
C H A P T E R 5
![]()
Creating Community Web Sites with Organic Groups
Many aspects of Drupal will be recognized as revolutionary in the years to come, but the revolution, still largely undeveloped, has to do with the power buried within the Roles and Permissions settings. Most web platforms offer two or three roles, some variant on User, Member, Administrator, then call it a day. The exception is Facebook, of course, with its brilliant interface and variations on Friend categories. Facebook turns its Users into Administrators and its Visitors into Contributors, and that's a redivision of duties that both Marx and Wall Street would applaud.
Drupal can do the same and more… and it's the “and more” that causes the problems. Hundreds of options has a lot in common with none. Yet it is here that group-building in Drupal offers the most power, and revolutionary power at that, so we'll return to this idea after working through the basics involved in deploying the Organics Groups module.
The steps involved in getting Organic Groups up and running are, well, basic. Create a content type called Group and use it to create as many groups as you want on your site. Then create other content types such as Blog, Events, and Aggregator to create the content that you post into your groups. Then add Members and assign them appropriate roles—e.g., Group Manager, Administrator. One of the quirks of Organic Groups is that it works its magic mostly within the database. To show the relationships between Members and content and groups on your web site requires the help of other modules, primarily Views, which was introduced in Chapter 3, and Panels, which will be introduced here. Views selects and orders information from the database, and Panels allows you to position it on a page. Blocks and Regions can do the same, but they're dependent on your theme. Panels breaks you loose from your theme, so you can select and arrange content in more powerful and flexible ways.
The exercise in this chapter involves building a web site for senior citizens. As anyone who has tried to teach a parent the basics of a computer knows, the instructions have to be clear, the opportunities to ask questions abundant, and patience remains a virtue. The same is true for building a community-based web site. The essence of that effort is that you are trying to engage others in your group. Drupal's peculiar mix of power, simplicity, and quirkiness can present a barrier to newcomers. So an interface designed for simplicity is key, as are site resources such as how-to guides and videos.
The good news is that one of the best aspects of Drupal 7 has to do with improvements to Drupal's interface. What used to require ten clicks now requires one or two, and developing a web site no longer feels like commuting to work on a pogo stick.
Installing and Configuring Organic Groups
You'll start with a clean install of Drupal 7 and download and enable new contributed modules as you move through the chapter. The ones you need at the outset are Organic Groups and Views modules. Each of these in turn requires a helper module—the Entity module for Organic Groups and CTools for Views—so we'll download those as well. To install the modules, we'll use Drupal 7's new automated install feature (admin/modules/install) and add the currently recommended versions of each module:
- Organic Groups (
drupal.org/project/og) - Entity (
drupal.org/project/entity) - Views (
drupal.org/project/views) - CTools (
drupal.org/project/ctools)
![]() NoteOrganic Groups for Drupal 7 was still in major development at the time of writing. This chapter will focus on the basic functionality that is likely to remain unchanged. The concluding section will touch on the functionality that is likely to evolve in future releases.
NoteOrganic Groups for Drupal 7 was still in major development at the time of writing. This chapter will focus on the basic functionality that is likely to remain unchanged. The concluding section will touch on the functionality that is likely to evolve in future releases.
The Organic Groups project consists of seven modules (see Figure 5–1)—we'll be using all but the Migrate module in this chapter, so it is probably easiest to enable them all here at the outset.
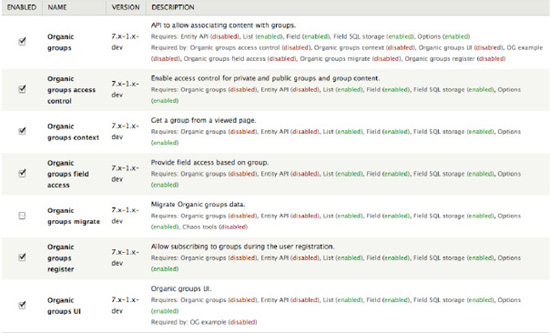
Figure 5-1. The suite of Organic Groups modules
![]() Note When you enable the OG access control module, you will be prompted to rebuild your permissions. Click yes so that the Drupal system can perform this update.
Note When you enable the OG access control module, you will be prompted to rebuild your permissions. Click yes so that the Drupal system can perform this update.
You also want to enable the OG Example module (see Figure 5–2). This is grouped in the Features section on the Modules page. In fact, you could enable the module through the Features UI (structure/features). But if you do it on the Modules page, we'll be prompted to enable the various helper modules that the example requires (see Figure 5–3).

Figure 5–2. OG Example module

Figure 5–3. Helper modules required by the OG Example module
Group Content Types
By default, a Standard Drupal installation includes two content types: Article and Basic page. When the OG Example module is enabled, two more content types are added, Group and Post (see Figure 5–4).
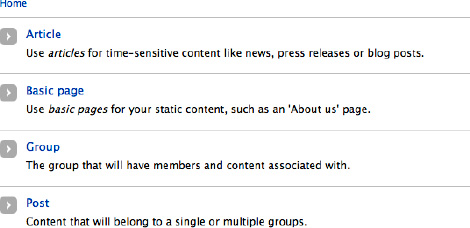
Figure 5–4. Two new content types, Group and Post, are added when the OG Example module is enabled.
We'll use the Group content type to create the groups for our site and the Post content type to create content that we'll post into our group. Let's open up the Group content type so that you can tweak some of its settings. Go to Structure ![]() Content types and select the Group content type (
Content types and select the Group content type (admin/structure/types/manage/group). Make the following changes:
- Change title field label to Group name.
- Description: “Create a new group.”
- Publishing options: Uncheck ‘Promoted to front page'
- Display settings: Uncheck this option.
- Comment settings: Closed.
The result should look close to Figure 5–5.
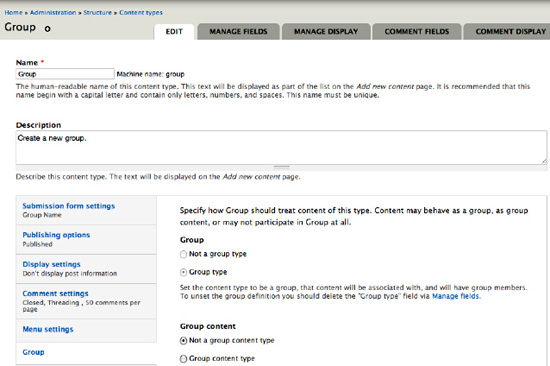
Figure 5–5. Group content type
Note the new vertical tab, Group, added to the form when the OG modules are enabled. This setting allows you to designate a content type as a group, group content, or neither. The nodes created with the Group content type should be groups, so the radio button is set to Group type. Save the modified form.
Next, open the Group content type again and this time, under the Manage Fields tab, change the body label from Body to Mission statement (see Figure 5–6). As any motivational speaker will tell you, defining a strong mission statement is the first step toward success in any endeavor. Even if you don't display the label for this field on our web site, knowing that this is what we're supposed to be doing here will help clarify our goals for each group added to the site. Click Edit and change the label from Body to Mission statement.

Figure 5–6. Modifying field label for the Group content type
Next, click the Manage Display tab to make one final adjustment. In order to allow visitors to the site to subscribe themselves to a group, you need to enable the Subscribe option. You do that by setting the format for the Group type to Group subscription (see Figure 5–7).
Then save the form.

Figure 5–7. The Manage Display tab. Subscriptions to groups are controlled by modifying the display of the group type field to be Group subscription. This places a Join link on every group page.
Creating Groups
Using the Group content type, we'll go ahead now and create some groups for the web site. Click Add content on the Shortcuts toolbar, which brings up the content types available on the site. Select Group (node/add/group). We'll add an iPad Users Group, fill in a Mission Statement, and save the form (see Figure 5–8).
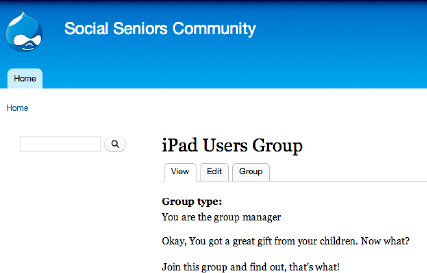
Figure 5–8. Homepage for iPad Users Group
A new tab, Group, has been added to group home pages, visible to users with appropriate permissions, as indicated by the message “You are the group manager.” Non-group members and administrators will see a link, “Request group membership.” The Group tab allows the group manager to add Members and modify roles and permissions. We'll deal with those options later.
But basically, there's not a lot of design going on here, which is why help is needed from the Views and Panels modules.
Using Views with Organic Modules
Four views are included with the OG modules (see Figure 5–9), and they'll get you started.
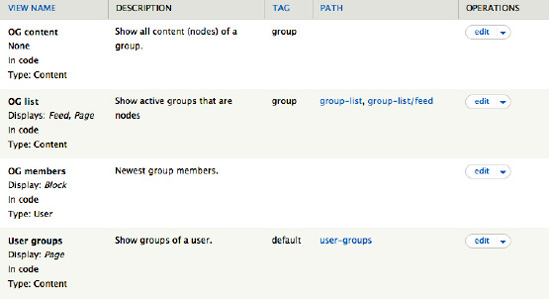
Figure 5–9. Four default views included with the OG modules
OG List will be used as the groups landing page, so open that one and make some adjustments. Out of the box, the page view has a path (group-list) but no menu (see Figure 5–10), and you want to access this page from the Main menu. So add a menu item to the Main menu.
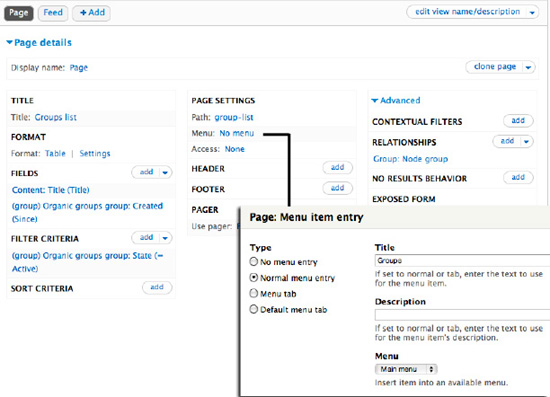
Click the menu link under the Page Settings and add a Menu item called Groups to the Main menu. Click and save the View. Now you have a Groups tab and a barebones Groups landing page (see Figure 5–11).
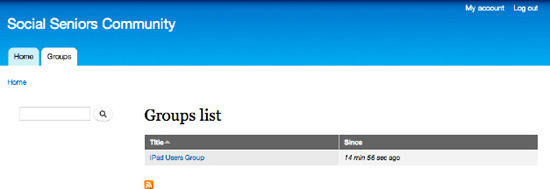
Figure 5–11. Groups landing page
The other views create blocks that show group members and group content, so you need to add some content and members to the group before those views can do anything.
Creating Group Content
In order to add some content to the groups, you need to create content types that can be used to create nodes that you post to the groups. You could simply use the Post content type that is included with the OG Example module. But instead, enable Drupal's own blog module (see Figure 5–12) by going to the Modules page (admin/modules).

Figure 5–12. Enabling the Blog module
Once enabled, open the Blog content type (admin/structure/types/manage/blog) and designate this content type as a group content type (see Figure 5–13). This means that when you create content with this content type, you'll have the option to post that content into any of the groups on the site.
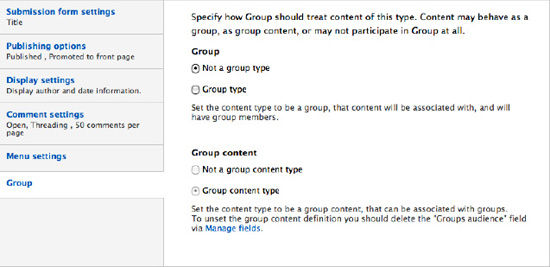
Figure 5–13. Designating Blog entries as Group content
For some reason I imagine that Golfers are more likely to blog than iPad Beginners, so I created a new group (vianode/add/group), the Tee-Birders Golfing Group, and created a blog entry (vianode/add/blog) to post into the group (see Figure 5–14).
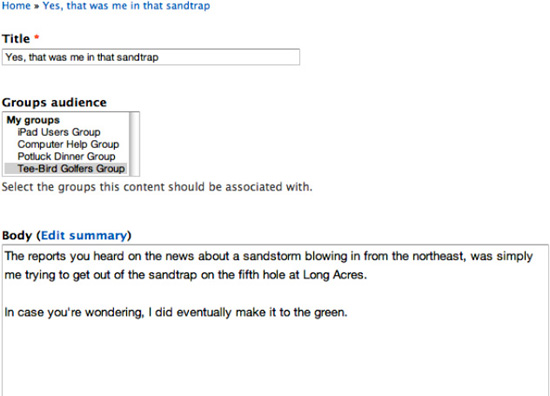
Figure 5–14. When a content type has been designated as Group content, a Group audience pull-down menu is added to the node creation form, allowing users to post the content in one or more groups.
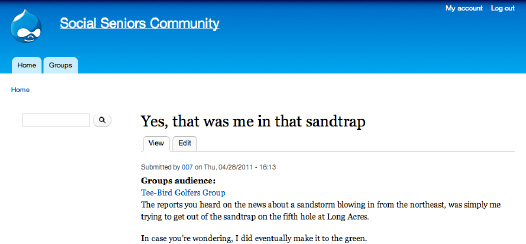
Figure 5–15. Blog post to the Tee-Birders Golfing Group
A group link is added to group content (see Figure 5–15). But both the group content and the group landing page (see Figure 5–16) still look a bit bare, so now you need to enable the Panels module to help with the layout.
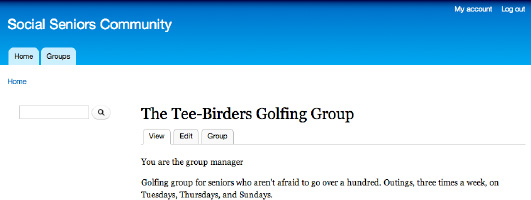
Figure 5–16. Homepage for Tee-Birders Golfing Group
Getting Started with Panels
You already enabled Panels and its helper modules when you enabled the OG Example module. Now you need to enable the Panel itself. Go to Structure ![]() Pages (
Pages (admin/structure/pages) and enable the Panel that controls the Node template (Figure 5–17).
Figure 5–17. Enabling the Panels example included in the OG modules
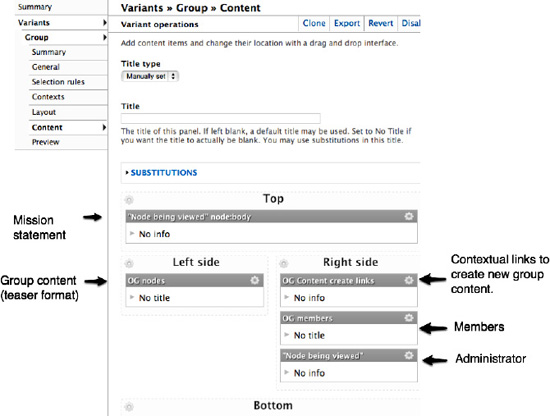
The enabled Panel immediately takes over the layout of your Group home page (see Figure 5–18). In addition to the Mission statement, the group home page is now showing three more group-related elements:
- Group content, displayed in teaser format
- Contextual links to add new content and post it into the current group
- A list of group members
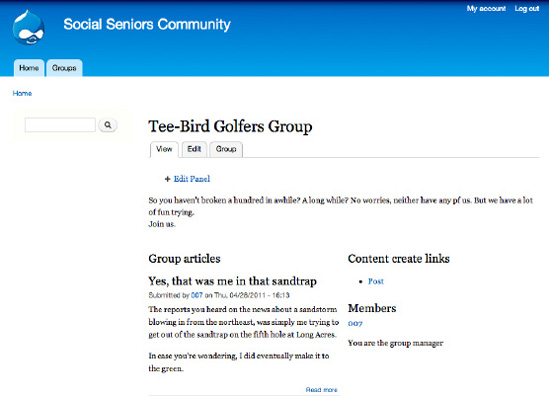
Figure 5–18. A group home page using the layout provided by Panels
If you click the Edit panel link, you're taken to the panel's administrative interface (see Figure 5–19). The vertical menu on the left provides links to different sections of the panels administrative interface.
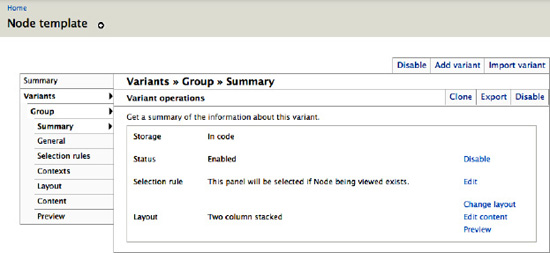
Figure 5–19. Summary of settings for OG Example panel
The key settings are Selection, which determines the conditions under which the panel becomes active, and Layout, which determines whether a 1, 2, or 3 column layout will be used, and what content will be displayed. The default settings for the OG Example panel include:
- Selection: The panel will become active for all Group nodes (see Figure 5–20).
- Layout: The 3-column layout is selected (see Figure 5–21).
- Content: (see Figure 5–22).

Figure 5–20. This shows the Selection settings. Panel will be used for all Group nodes.
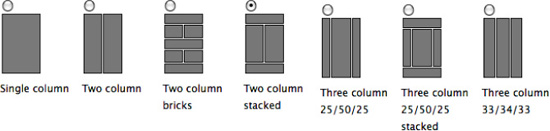
Figure 5–21. This shows the template layout. Two column stacked layout is selected.
A full discussion of Panels is beyond the scope of this chapter, but the head start provided by the OG Example panel serves as a useful introduction to this powerful module. More information, including videos and tutorials, is provided on the Panels 3 Documentation page (drupal.org/node/496278).
Members, Roles, and Permissions
For the most part, the functionality related to management of Group Members mirrors Drupal itself, except that the settings are available on a group-by-group basis. Once a new role is created (admin/config/group/roles, see Figure 5–23), then group-specific permissions can be set for that role (admin/config/group/permissions, see Figure 5–24).
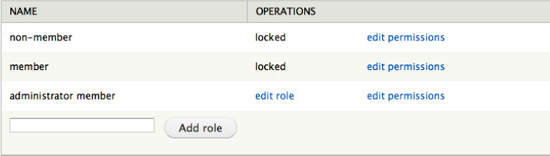
Figure 5–23. Group-related Roles
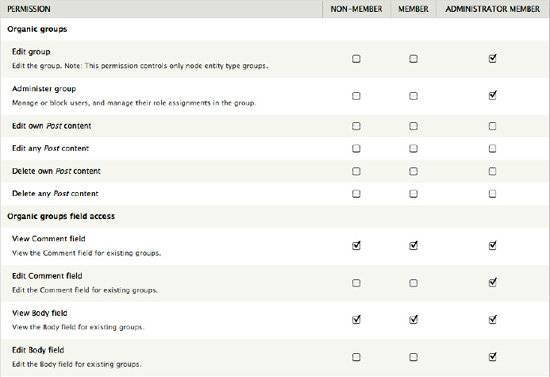
Figure 5–24. Group-related Permissions
Still in active development, Organic Groups for Drupal 7 will continue to evolve, so following the module's issue queue is strongly recommended (drupal.org/project/og).
Summary
In this chapter I've covered the basics of building group-based web sites in Drupal 7, deploying the Organic Groups module on the backend to create Groups and Groups Content, and to establish relationships among groups, content, and users. Then I showed how to enable the Views and Panels modules to organize and position content on your pages. User experience is key to building successful member-driven web sites, and I touched on some of the key issues involved, including Roles and Permissions.