
P A R T II
![]()
Site Building Foundations
Chapter 3 takes you on a journey of thorough understanding for the most important contributed project Drupal has: Views. Most if not all sites you build will rely on the Views module for the powerful ways it provides to list, filter, and sort content.
Chapter 4 introduces many other modules (bundles of functionality) available from the Drupal community that you may want to use and, more important, how to find and evaluate modules to meet your site-building needs.
Chapter 5 gives a tour of the Organic Groups suite of modules, which can give people the power to organize content and themselves on your site. This chapter includes an extended cameo by Panels, another powerhouse module for displaying content, especially in concert with Views.
Chapter 6 teaches security practices and provides ways to keep your site secure, from configuration to evaluating and even writing code.
Chapter 7 follows up on the security chapter with several approaches to keeping Drupal core and contributed modules up-to-date.
Chapter 8 continues the site build begun in the first chapter by configuring Fields, Views, and chosen contributed modules to showcase authors, present a table of contents, connect authors and resources to chapters, and allow visitors to participate. It gives a taste of how far you can go in Drupal without writing any code.
C H A P T E R 3
![]()
Building Dynamic Pages Using Views
Views changed my life. If you have built dynamic web sites for any period of time, you know that there are two main tasks that you perform over and over. You create content and store it in a database and then requests nuggets of that content to build stuff for your web pages. The latter requesting often requires complex formulas where the slightest typo will return you the wrong items or, more likely, nothing at all.
The Views module allows you to easily specify the criteria for displaying a subset of content, even combining multiple content types. It also allows you to massage the format in which the data is displayed. As new content is added to your web site, the resulting View is dynamically updated to reflect the new content. It helps you to do all of this—without asking you to write a single line of code; thank you, Earl! Views changed my life; and it’s about to change yours.
What Are Views?
The name Views comes from database terminology. A database view is a complex stored query that you use like a table in the database. When you request items from a database view, you get the things that you need in exactly the way you need them.
Drupal Views work in a similar manner but they let you use a graphical user interface to create the database query. When you create a Drupal View, the module writes the queries for you so you don’t have to know anything about database administration.
The Views module was envisioned/created and is maintained by Earl Miles (merlinofchaos on drupal.org). All downloadable versions, documentation, and the issue queue can be found on its project page at drupal.org/project/views.
This tool is essentially a smart query builder that, given enough configuration, can build the proper query, execute it, and display the results.
Among other things, Views can be used to generate reports, create summaries, and display collections of images and other content.
—Excerpted from drupal.org/project/views
Like Drupal itself, the Views module offers powerful functionality right out of the box. With only a few clicks, you can put a block on your home page that lists your site’s most recent content. A few more clicks and you can turn that block into a tabbed menu, so that the first tab shows your site’s most popular content, the second tab shows recent comments, and a third lists new members.
The Views Module provides the dynamo in a dynamic web site. It makes your work—in building the site and especially in maintaining it—easier and more powerful. One could easily write a book only about Views and not run out of interesting things to do.
For all these reasons, the essential thing to learn in this chapter is not what you can do with Views or how to do it, but how to do it in a way that makes it easier for you to maintain your site—and pass on that responsibility to the next person. In other words, it is the process, the tags, the descriptions, and the naming conventions that I want you to really learn. Once this is ingrained, you will be able to visualize and use Views to build almost anything.
Examples of Views Usage
The following are just a few examples of common usages of Views:
- The five most recent press releases
- Upcoming events
- All posts written by a specific person, like a blog
- A monthly archive of content
- List of content for administrative purposes (see Figure 3–1)
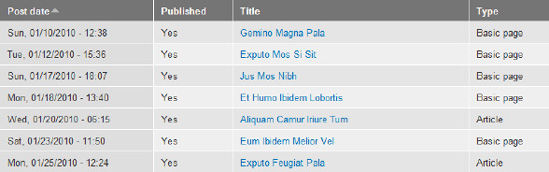
Figure 3–1. An example list of content for administrative purposes
You really can display any type of content and also bring in related content as well. If it’s in the database, you can use the Views module to display it.
The most common display types for Views are pages and blocks. With pages, you assign your output to a URL of its own, and with a block, your output can be placed in any region on any page in your site.
Download, Enable, and Configure Permissions for the Views Module(s)
To begin developing with Views, you need to download the module and enable it by following the standard procedure for downloading a module.
Download
In your web browser, go to drupal.org/project/views. When you scroll down to the Downloads section, you see a table titled “Recommend releases” shown in green. Click on the download link for the format that you want (tar.gz or zip) that accompanies the version of Drupal that you have installed, like 7.x-3.x.
Unpack the compressed files and put them in your contributed modules directory. For most developers, this is at sites/all/modules/contrib or simply sites/all/modules so that you can find all of the Views files in sites/all/modules/contrib/views or sites/all/modules/views. (Drush, covered in Chapter 2, can download and place the files for you.)
Enable
On your web site, make sure you are logged in as a user with permission to administer modules or as a user with the Administrator role (or user/1). Use the administrative menu at the top and click Modules (admin/modules).
Scroll down to the Views fieldset. You will see three modules: Views, Views exporter, and Views UI. Underneath the description of the Views module, you will notice that CTools is a required module for Views to work. If you already have the CTools module downloaded and enabled on your site, the text noting the dependency will say “enabled.” If you have CTools downloaded, but not enabled, the text will say “disabled.” And lastly, if you have not downloaded CTools, the text will say “missing.” Drupal will not allow you to enable a module if all dependencies are not present in your site files.
If you haven’t already done so, please download the CTools module from its project page at drupal.org/project/ctools. Unpack the compressed files and put the ctools folder in your contributed modules directory. For most developers, this is at /sites/all/modules so that you can find all of the CTools files in sites/all/modules/ctools.
![]() Note CTools (Chaos Tools Suite) is a module that provides helper code for other modules.
Note CTools (Chaos Tools Suite) is a module that provides helper code for other modules.
In your browser, go back to the Modules page (admin/modules) and click Refresh. Scroll down to the Views fieldset. The text noting the CTools dependency should say “disabled.” Since all required files are available, you may now enable Views. Check the checkboxes for Views and Views UI, then Save configuration (see Figure 3–2).
![]() Note We will be discussing the Views exporter module later in this chapter.
Note We will be discussing the Views exporter module later in this chapter.
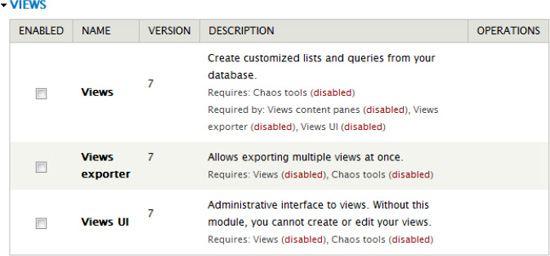
Figure 3–2. Modules list administration page. The needed modules have been downloaded but not yet enabled.
Drupal knows that the Views module needs another module enabled and prompts you.
You must enable the Chaos tools module to install Views UI.  Would you like to continue with

the above?

Please "Continue".
Configure Permissions
One of the features that Drupal offers is the ability to grant permissions to different roles, as covered in Chapters 1 and 8. Most modules have associated permissions that need to be granted to roles in order to interact with them. Users of your web site will either have the role of Anonymous User or Authenticated User and will possibly have additional roles assigned to them.
![]() Tip After enabling any module, it is best to configure the permissions right away. Waiting until the end of development often leads to an overwhelming permissions audit.
Tip After enabling any module, it is best to configure the permissions right away. Waiting until the end of development often leads to an overwhelming permissions audit.
Go to the Administrative menu at the top and click People. Once on this page, click the Permissions tab. Scroll down to the bottom and find the Views section. There are two permissions for the Views module, “Administer views” and “Access all views”.
![]() Note You may also use the Permissions link for Views on the module administration page. This will take you directly to the Views section on the permissions page.
Note You may also use the Permissions link for Views on the module administration page. This will take you directly to the Views section on the permissions page.
“Administer views” grants access to the Views administration pages allowing users the ability to create, edit and delete Views. Only give this permission to roles assigned to users that are appropriate and trained to use them properly. Most “Administer” permissions are only given to the Administrator role.
“Bypass views access control” is another permission that should be used sparingly. For a specific View, you can specify which roles can see the results. Selecting the “Access all views” permission for a role will override that setting. We recommend only granting this permission to roles assigned to users that are appropriate and are trained properly to use them properly, like your site administrator.
Confirm that neither checkbox is selected for Authenticated User and Anonymous User roles. Confirm that both checkboxes are selected for Administrator role. If you made any changes, click Save permissions.
![]() Tip During development, make sure you check your web pages as different users to confirm they are having the correct user experience as defined by the permission settings. Try having three different browsers open, each demonstrating a different Role, such as Administrator in Firefox, Authenticated user in Chrome, and Anonymous user in Internet Explorer. You need a different brand of browser for each role because your browser shares among its open windows/tabs the user account you are logged in with.
Tip During development, make sure you check your web pages as different users to confirm they are having the correct user experience as defined by the permission settings. Try having three different browsers open, each demonstrating a different Role, such as Administrator in Firefox, Authenticated user in Chrome, and Anonymous user in Internet Explorer. You need a different brand of browser for each role because your browser shares among its open windows/tabs the user account you are logged in with.
Congratulations! You have now successfully downloaded and configured permissions for the Views modules. You are now ready to administer Views.
The Views Administration Page
Using the Administration menu, click Structure and then on that page, click Views (admin/structure/views). This is the Views list page where all Views in your web site are listed.
Advanced Help Module
If you have not yet installed and enabled the Advanced Help module, you will see a status message at the top of the page (see Figure 3–3).
The Advanced Help module will provide some additional information explaining the options while you build your Views. You may choose to download it at drupal.org/project/advanced_help or click Hide this message.
Figure 3–3. Advanced Help status message
Action Links
Beneath the status message, you will see Add new view and Import. We will be discussing using those later in this chapter.
Change Which Available Views Are Listed
By default, all available Views display on this page. Although it may not be necessary now, if your site has a lot of views, sorting and filtering them makes this administration page much more manageable. You can sort the table of views by clicking the columns heading of View Name, Tag, and Path. Click once to sort first to last and again for the reverse.
You can also enable a set of additional filters by clicking the Settings tab, checking the box next to “Show filters on the list of views,” and clicking Save configuration.
Above the table you will see a Search box for finding a view by name and the drop-down filters shown in Table 3–1.
| Filter | |
| Tags | What extra classification (similar to metadata) has been added to this View to make it easier to find related Views? |
| Displays | Does this View display as a full page with its own URL, a feed, or as a block that can be placed on any page in your web site? |
| Types | Is the View display about content that is nodes, users, files, etc.? |
| Storage | Is the View stored in the database, in code only, or in the database overriding code (more on this later)? |
| Status | Is the View enabled or disabled? |
Any filter selection is automatically applied to the list but you can click “Reset” to return the list display to its default settings (see Figure 3–4).

Figure 3–4. Refine the list of available Views
Available Views
The Views module comes with several default Views that you may choose to enable and use in your site. Other modules in your site may also define Views that could appear in the listing. By the end of this chapter, you’ll be creating your own Views.
Elements of a View Listing
For each View listed, there is a lot of information provided. The following elements are mapped in Figure 3–5 and relate directly to how you can refine which Views are displayed in the list:

Figure 3–5. Elements of a View listing
- What is the name of the View?
- This is the human readable name of the View.
- You can hover over this label to see the machine name.
- What is the description?
- The description only appears in the administrative list. This is useful when looking at all the available Views and determining what each one does.
- Optional
- What are the tags?
- Tags are metadata for Views. They are additional information that helps you categorize your Views and find them easier on the list page. An example would be to tag all Views about company information including employees and departments as “internal.”
- What is the path?
- This is used only for display types of pages.
- If your View is set to display as a page, you are required to enter a path. This is the URL where you find the display of your View on your web site. Drupal only needs the part after your domain name. For example, if your View is to display at http://www.example.com/archive, you would only see archive shown here.
- Is it enabled or disabled?
- This is the ability to change that setting.
- When a module defines a View, it is often an optional feature that you may toggle on and off. Some modules will create a View with the initial state as disabled, allowing you to decide whether or not you want to you use it. If this is the case, you are provided with a link to enable it. Once enabled, you may then disable it if you choose not to use it.
- Also under this menu you will find clone and export (discussed later).
 Tip The word that is displayed is the action you want to take, not the current state. If Enable is displayed, it means that the View is disabled; you may click Enable to enable it.
 - What displays are used?
- When you create a View, you can select in what format you would like content to be displayed in. Do you want a page, a block, or something else? A single View may have several displays created. For example, a View of press releases may have a block that shows the title of the most recent five and a page that shows all teasers for press releases in a single month.
- What is the storage format? There are three possibilities for storage format.
- In code means that the code for the View is stored in a module file. Any module may define any number of Views.
- Database overriding code means that a module originally defined the View, but you have modified it and saved a copy in the database. It is the copy in the database that is currently being used on the site.
- In database means that you created the View using administrative interface and the code is stored only in the database.
- What type of View is it?
- This describes the type of content you want to display in your View. Options include content, user, comment, term, file, etc.
The Default Views
The main page for administering Views (admin/structure/views) displays a list of all Views available. Table 3–2 lists the Views that are defined by the Views module. Other contributed modules may define additional default Views. A default View is stored in code whereas when you create a View using the administrative interface, its definition is stored in the database. Because your web site may be set up differently, you probably have additional Views in your list.
Table 3–2. Views Defined By the Views Module
| View | Definition |
| Archive | Displays a list of months that link to content for that month. |
| Backlinks | Displays a list of nodes that link to the node, using the search backlinks table. |
| Front page | Emulates the default Drupal front page; you may set the default home page path to this view to make it your front page. |
| Glossary | A list of all content, by letter. |
| Recent comments | Contains a block and a page to list recent comments; the block will automatically link to the page, which displays the comment body as well as a link to the node. |
| Taxonomy term | A view to emulate Drupal core’s handling of taxonomy/term; it also emulates Views 1’s handling by having two possible feeds. |
| Tracker | Shows all new activity on system. |
Deconstructing a View
The Views module is a very powerful module with many configuration options. Looking at all of these options for the first time can be very intimidating. We will explain all of them but will highlight the ones that are the most important to know when you are getting started.
Let’s look at a default View and inspect all of its elements. On the Views administration page, locate the default View named Front page. Locate the operations column on the far right and click Enable. Now that you have enabled the View, the operations link has changed to Edit.
This small menu of option allows you to perform a series of different actions with the chosen View.
- Edit: You may edit this View and save your revised version. If this View was stored in code, you will be making an active copy of its definition and saving it in the database. You will always have the option to revert to that original version that is stored in code.
- Disable: If the View you are working with is stored in code and you no longer want to use it, you may disable it. If you disable it, the View’s displays are no longer visible on your web site. That means blocks or pages may disappear.
- Clone: As mentioned, you can edit and save a View that is stored in code. If you prefer to make a View that is similar to an existing View, you can clone it. This makes an exact copy of the View so that you may rename it and make as many changes as you would like. Rather saving over a View that is stored in the database or overriding a View in code, cloning allows you to create a brand new View that is identical to an existing one. You can then edit the new View without affecting the original.
- Export: If you are interested in the code that creates a View, you may export it. Clicking this will take you to a page where you may copy the code and place it in your module (more on this later).
![]() Tip If your new cloned View uses a page display, be careful to not use the same identical path as the original View.
Tip If your new cloned View uses a page display, be careful to not use the same identical path as the original View.
For the Front page View, click Edit, as shown in Figure 3–6.

Figure 3–6. An enabled View in the listing and its operations menu
Display Types
Clicking Edit brings you to the configuration page for a specific View. In this case, you should be looking at the Front page View. The first item to notice is the horizontal navigation for each display in the View. When you first edit a View, you are shown the first display available, indicated by its dark highlight (see Figure 3–7).
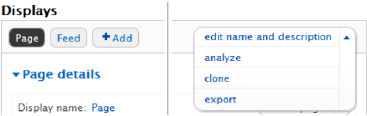
Figure 3–7. Displays with Page active (left) and the operations menu(right) of a View
This Front page View has two displays; Page and Feed. If you wanted to, you could use the +Add button to add a new display (more on this later).
On the right of the display bar is another menu of operations. Clone and Export have identical functionality to the same items on the Views list. In addition, you find the following:
- Edit name and description: This opens a dialog that allows you to edit the human-readable name for the view and the View description which you’ll use to describe the purpose of the View (see Figure 3–8)
You can also create or look up an existing View tag; these can be incredibly helpful. As you use Views more and more you will create dozens and dozens for every project. Using a tag will help you to organize and manage the Views in your project. While this is not required, I highly suggest you take advantage of it.
- Analyze: The Analyze button will look to see if you have any settings that are in conflict with each other or report any other relevant development information.
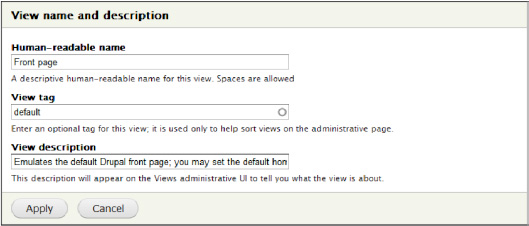
Figure 3–8. The Edit name and Description Dialog
Views Configuration Detail
Now we come to the heart of defining a View. Get comfortable, because you will spend a large portion of your development career creating, editing, tweaking, and massaging you Views using this interface (see Figure 3–9). While it might seem a little daunting at first, you will quickly learn your way around the interface. Each grouping of functionality, designated by the black headers, controls one aspect of your View. You’ll use these to set what content is to be displayed and how it will be displayed, as well as setting metadata and providing functional controls like a pager.
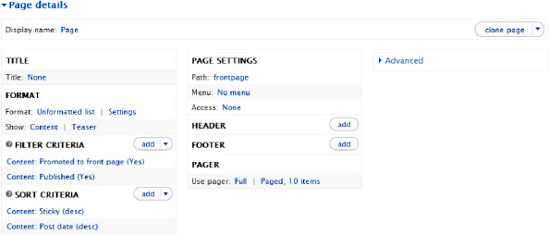
Figure 3–9. View details with the advanced section expanded
We will briefly discuss all the options for the Page display for the Frontpage View, then we’ll circle back around and give much more detail about the pivotal players in creating a View.
Display Name
The first item that you can edit is the display name. To edit, click the text “Page.” Clicking the current setting will open a modal dialog that allows you to edit the information for the specific display.
- Name: The same of the display of the View you are editing. When you create a new display, this name field is prefilled with the type of display you just created. It’s important that you edit this field to distinguish between several displays of the same type. For example, you could have a View that has a block that displays the five most recent posts and another block that displays five random posts. When you created each of these block displays, Views would pre-fill the name of the display as “block” for both of them. It’s a good idea to change the name to something more descriptive, like “Block: 5 recent” and “Block: 5 random.”
- Description: A human-readable description of the view display.
Title
The title appears in different places depending on the display type. If the display type is a page, the title will become the page title, both the H1 tag and in the metadata. If the display type is a block, the title will appear as the block title above the content output. Click the current title to open the modal dialog with the following settings, as shown in Figure 3–10:
- For menu: This drop-down controls whether the title you enter here is applied to only this display if you choose “This page (override),” or all displays if you choose “All displays (except overridden).”
- The text field for the Title.

Figure 3–10. Display title dialog, an example modal dialog
Format
What kind of HTML markup do you want the results of the View to use? Options include a list, table, grid, or unformatted, which wraps each result in a div tag. Other contributed modules can add additional ways to display the results.
- Settings: Allows you to add a custom CSS class to each row’s output container.
- Show: Do you want to display the content or teaser as a whole pre-formatted chunk or select specific fields to display?
- Based on your first choice, you will have options after the “|” symbol (pronounced as “pipe”) to specify the formatted chunk options or options for how the fields are grouped or arranged. If you choose fields, a whole new section labeled Fields will appear that lets you add and configure field specific settings.
Fields
This grouping is hidden if Content is selected as the Show option, but appears if you select to display your results as fields. Here you would select fields from a catalog of available options provided by Drupal.
Filter Criteria
So as not to display all possible content, limit the result set based on specified criteria. By default you’ll see that “Content: Published (Yes)” is set as a filter. This is a gift from the wise programmatic forefathers of development who have added this for you, as if to say, “May you never know the shame of creating a View that shows the world your unpublished content.” Know that if you seek to remove it, their eyes are upon you.
Sort Criteria
In what order should the results be shown? By default you’ll see that “Content: Post date (desc)” is set as a sort. This will put your content in reverse chronology (also known as blog order) where the most recent content is at the top.
Display Settings
These setting will vary to reflect the display type you are currently editing. In our example it will be a page.
- Path: This is the URL where this View will display its content. In this example, it’s
http://www.example.com/frontpage. - Menu: Create a menu item that will bring users to your View. You can also make tabs and other options.
- Access: Do you want to only allow users with certain permissions or roles to see the content? “None” means that there are no special restrictions.
Header
Is there any content you would like to display above the Views results?
Footer
Is there any content you would like to display below the Views results?
Pager
- Use pager: If you decide to display 10 results, yet your View produces 35 results, you can tell Drupal to automatically paginate it. After 10 results, there will be a pager to take you to the next page with another 10 results. This is a great solution if you have a lot of content that is making your page too long to be usable.
- More link (only appears for blocks and attachments): Creates a link to a page with more results. If you have a block that only displays five results and a page that displays all results, you can let Drupal create a link on the block to the page.
Contextual Filters
If you would like to create dynamic pages that use the URL to make decisions about what content is displayed, you can specify that here. This section used to be called Arguments.
Relationships
If there is content that you want to display that is related to the actual result but not a part of it, you may join to it and display it using a relationship.
If you are scratching your head at that description, I hear you. Relationships are a hard concept to grasp but once you do, you’ll find them rewarding, just like real relationships. We’ll cover this in detail later.
No Results Behavior
If there are no results, would you like to display any text to the user? This setting used to be called Empty text.
Exposed Forms
- Exposed form in block: If you have set filters to be exposed, would you like to render them in a separate block rather than with the View results? Filters and how to expose them will be discussed later in this chapter.
- Exposed form style: Allows more configurations for the exposed filters including labels.
Other
- Machine Name: This field lets you define a machine-friendly name, one without spaces or special characters.
- Comment: A block where you can enter notes or message about this View.
- Display Status: Just as you could enable or disable a whole View, you can enable or disable a display within a View.
- Use AJAX: Do you want paging, table sorting, and exposed filters to load content on the fly without a page refresh?
- Hide attachments in summary: Hide attachments when displaying a contextual filter summary.
- Use grouping: Do you want to allow Views to group results together based on a certain field? If you also specify a sort order, the results will be grouped first then sorted.
- Query settings:
- Disable SQL rewriting: Do you want to disable the fact that results are tested to make sure the user has permission to see them? This skips
node_accesschecks and any other implementation ofhook_query_alter().In most cases, it’s not recommended to change this setting. - Distinct: Do you want to ensure that there are no duplicate results? By selecting Distinct, if your View results had the same node several times, this setting would remove it.
An example of when you don’t want multiple instances of a node would be if you had a View that displayed all nodes with file attachments. Because this is a multi-value field, the node would show up for every attachment.
An example of when you want multiple instances of a node would be if your View grouped nodes by taxonomy terms and your nodes are tagged with several terms, you would want it to display in all appropriate groups.
- Use Slave Server: This is a performance option. This will make the query attempt to connect to a slave server if available.
- Disable SQL rewriting: Do you want to disable the fact that results are tested to make sure the user has permission to see them? This skips
- Caching: Do you want to cache the results of this View so they are delivered faster? Note that if content is updated, it won’t be immediately updated in the View. Cache would only be cleared at the interval you set here. For Views where the content is changing often, like a list of the most recent posts on a very active site, you might not want to cache your results. However, if your View displays content that doesn’t change that often, caching is a good idea. Even short intervals of caching can dramatically improve site performance.
- Link display: If you are using the More link, to which display would you like it to go to? For example, if your block uses the More link and you also have several Page displays in your View, to which page would you like the More link to go to?
- CSS class: Do you want to add a CSS class to the wrapper
divso you can apply styling? - Theme: This is not a setting, but rather information to help you create templates so you can customize the output of the View further. Click on it to see the template information available to you. Note that these templates need to be saved in code to be functional and are not used in this administrative interface.
Overriding: A Views Concept
Many settings can be overridden for a particular display. Before we go any further, it’s important to understand the concept of a settings override.
When you create a View for the first time, the settings you configure for the first display will get inherited by subsequent View displays. In other words, when you add additional displays, like Pages or Blocks, all the settings that they can have in common with the first display will be set the same. This makes developing related displays very efficient but you also have the option to override any of these settings for an individual display.
Understanding when a setting has been overridden is important to building consistent Views and there are clear visual cues for identifying overrides. When a setting on a view configuration has been overridden a broken link icon will be displayed to the left of the setting, as shown in Figure 3–11.

Figure 3–11. The broken link icon indicates this title has been overridden.
Understanding What Type of Content Will Be Output: Views Filters
No matter which display you are editing, there are three columns of configuration options. To understand the type of content that will be displayed, look at the Filters section in the first column. A filter reduces the content that will be displayed to match your criteria. The Frontpage View has two (2) filters.
Click Content: Promoted to front page, as shown in Figure 3–12.
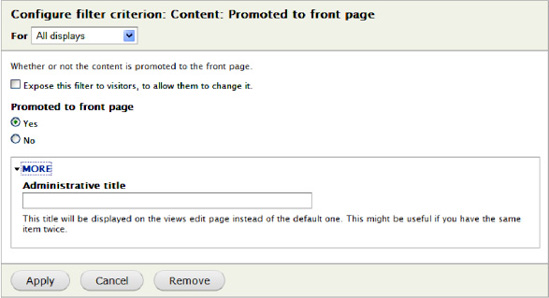
Figure 3–12. Configuring a filter
The title of this dialog tells you a lot: “Configure filter criterion: Content: Promoted to front page”.
- Configure filter criterion tells you that you are working with filters as opposed to another grouping of configurations, like fields or sort criteria.
- Content: Promoted to front page is the name of the filter. “Content” refers to the type of filter and “Promoted to front page” is the specific one.
- For All Displays drop-down tells you that this display uses the same setting as all other displays that have not been overridden.
You have the option to expose a filter. This will allow the web site visitor to determine the value of the filter. This will be discussed in more detail later.
This particular filter has two (2) values for you to choose from, either Yes or No. Think of this filter as asking you a question. Do you want to only show content that has been promoted to the front page? Yes or No? In this case, the answer is Yes.
Below, the configuration options are three (3) buttons:
- Apply: This will set the configuration with the option selected. Note that it doesn’t actually save the View.
- Cancel: This will exit you out of this configuration setting. Even if you changed something, it will not set those changes.
- Remove: If you no longer want this filter as part of your View, it will remove it completely.
All filter configurations are composed of the following parts:
- A descriptive title.
- Option to expose the filter and if set, those configurations.
- The actual settings.
- Buttons to set or cancel the filter configuration and remove the filter.
Looking at the three (3) columns again, click “Content: Published.” This configuration block is set up just like the previous one. It asks the question: Do you want to only show content that has been published? Yes or No?
![]() Tip It is extremely important that unless you have another intention, you include a filter for the published state. While managing your site’s content, you may choose to unpublish a node because you do not want your visitors to see it. In order to keep this content hidden, you must filter the View to only show published content. A published state filter is provided as a default filter for each new View you create. Remove it with extreme caution.
Tip It is extremely important that unless you have another intention, you include a filter for the published state. While managing your site’s content, you may choose to unpublish a node because you do not want your visitors to see it. In order to keep this content hidden, you must filter the View to only show published content. A published state filter is provided as a default filter for each new View you create. Remove it with extreme caution.
Click Cancel to exit out of this configuration dialog.
Advanced Filter Criteria Groups: Combining Sorts with Logical Operators
The Views module has the ability to build logical combinations of filters to achieve more complex groups of content. For example, you might want a block of all stories that
- have more than ten comments, or
- that received a comment in the past hour.
Having either of these conditions met keeps the content in a block very fresh. However, if you added both the Comment count filter and the Last comment time filter you would instead get a block with stories that had gotten ten comments and the one last within the last hour. That would be a very different group of items that what you wanted. Instead, you need to specify that items need to meet the first or the second criteria as opposed to both.
On the right of the Filter Criteria section, open the option list and select And/Or.
You will see the dialog “Page: Rearrange filter criteria,” as shown in Figure 3–13. You can set the standard For option to say whether this filter change will apply to just this display or all displays in the View. By default, all of the filters you have specified will be included in one filter logic group and the operator is set to And. This configuration will make the filters have the same effect as filters do by default, meaning all content must pass each filter to be included in the results for the view.
In the current example (Front page View), if you change the Operator to Or, you will get a list of content that is published OR promoted to the front page. This will include any unpublished content in your Views output, so use logical operators with caution.
Clicking “Create new filter group” will create another operator box; if you had many more filters, you could use the small arrow next to each filter to drag them into more logical groups, potentially creating combinations where the same filter is used in multiple filter groups.
![]() Tip Remember, each grouping in an Or logical group works autonomously from the other groups; for example, ((A and B) or (C and D)). You will need to add multiple Content: Published Yes filters to your Filter Criteria and one to each group so that each requires its content to be published.
Tip Remember, each grouping in an Or logical group works autonomously from the other groups; for example, ((A and B) or (C and D)). You will need to add multiple Content: Published Yes filters to your Filter Criteria and one to each group so that each requires its content to be published.
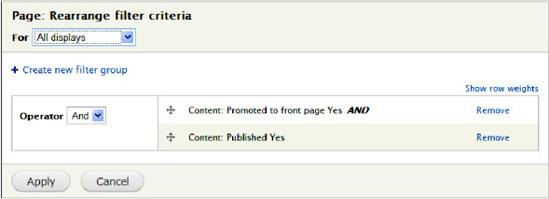
Figure 3–13. Configuring an And/Or filter group
![]() Tip You most likely noticed the More toggle at the bottom of each filter. If you open it, you’ll see a field called Administrative title. This allows you to give each filter a customized name. You’ll most likely only use this if you have multiple copies of the same filter as you might for use in logical groups.
Tip You most likely noticed the More toggle at the bottom of each filter. If you open it, you’ll see a field called Administrative title. This allows you to give each filter a customized name. You’ll most likely only use this if you have multiple copies of the same filter as you might for use in logical groups.
Understanding the Order in Which Content Will Be Output: Views Sort Criteria
To understand in what order content will be displayed, look at the Sort criteria section in the first column. Multiple sort criteria allow you to be very granular with this setting. The Front page Views has two (2) sort criteria.
Click Content: Sticky. This particular filter has two (2) values for you to choose from: Sort ascending or Sort descending. Think of this filter as asking you a question. Do you want content that is marked as sticky to rise to the top or sink to the bottom of your results? In this case, the answer is Sort descending. All content marked as sticky will be at the top of the page.
Looking at the three (3) columns again, click Content: Post date under Sort Criteria. This configuration block is set up just like the previous one. It asks the question: Do you want the most recent content displayed first or the oldest content displayed first? If you would like what is considered Blog Chronology where the most recently posted content is the top, you would chose Sort descending.
Because there are two (2) sort criteria, the first one is called and sorts the results. Where there are results with the same sort weight, the next sort criteria is called. You can have as many sort criteria as you want for a very granular result order.
In the current example, the results would first show all posts as sticky at the top. Then it would go through the sticky posts and sort them to make sure the most recent are at the top and also go through all posts not marked as sticky to sort those to make sure the most recent posts are listed first.
Click Cancel to exit out of this configuration dialog.
Understanding What Pieces of Content Will Be Output: Views Format Settings
You have already figured out what type of content will display and the order in which it will be displayed. But what will it look like? What pieces of the content will display? In the first column, the Format box allows you to configure several elements. The Front page View displays its results as content teasers with a container div. Under Settings, you can see that no extra CSS classes are set (see Figure 3–14).
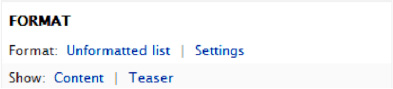
Figure 3–14. Format settings configuration box
When editing or creating a View, the first item you should look at is the Show setting. Yes, it’s the second one in the list, but has more of an impact on what the results will look like.
You may click the word link Content to change the Show setting. If you click the Teaser, you change the settings for the selected Show style.
Configuration Options for Format Settings
When you click the current value for Show setting, Content, you see all available options. The Views module provides two options: Fields and Content. Other contributed modules may provide additional options that would display here. Examples include displaying results as points on a map, a slide show, or as customizable HTML.
To see the settings for Content Show setting, click Teaser. The select box for View Mode is currently set as Teaser. This means the shortened version of the content displays with a linked title and a Read More link. If your theme uses a custom template for teasers, your Teaser may look different than described.
In addition to the Show setting, you may also configure the Format of the whole View, as described in Table 3–3.
Table 3–3. Configuration Options
| Option | Description |
| Grid | A Grid puts all of the content of a View into a box and you choose how many boxes you want in a row or a column. |
| HTML List | You have the option of either an ordered list (numerical) or an unordered list (bullets). |
| Jump Menu | If you put content titles in a jump menu, when you select that title, you will automatically be directed to that content. |
| Table | A table puts the resulting fields into a table that resembles a spreadsheet. You can allow the column headers to act as sort links. |
| Unformatted | A simple div with a customizable CSS class goes around each class. |
Creating a Basic View
Let’s dive right in and create the first View. For this example, it is assumed that you already have content in your web site. Near the top of the Views administration page (admin/structure/views), find the link that says Add new view and click it.
The Goal
You want to create a page that has teasers that lead to all articles authored by a specific person and a block that shows the five most recent titles for those articles, linked to the actual content. You also want a more link to take the user to the main page for all articles.
Systematic Approach
When I create a View, I follow the same pattern each time. I ask myself a series of questions that correspond to a different configuration box. This ensures that I get the results that I expect and that I don’t miss a step.
If I am creating a new View, the wizard has an initial window that allows me to answer some of these questions. The answers I type in will prepopulate some of the configuration boxes on the primary editing page.
If I already have a View and I am adding an additional Display to it, I follow all of the following steps:
- Create the display: Should this be a block or a page or something else?
- Name: When I look at the displays, what name should appear to help me understand which one I am editing? When I want to place a block somewhere in the site using other administrative interfaces, what name would make sense?
- Title: What should the title be? What should the web site users see as the title of this content?
- Filters: What type of content do I want to display?
- Fields or Show Content/Teaser: What parts of the content do I want to display?
- Format: Do I want the results to display as a table or a list?
- Sort: In what order should the results be?
- Contextual Filters/Relationships: Do I need to use parts of the URL in order to further customize the result set? Do I need to pull in related data? Contextual Filters and Relationships are discussed in a later section.
Set Up the Basics for Your Views
Thanks to the wizard, you can configure much of your Views on the Add new view screen. Let’s do that! Use the Administration menu and go to Structure ![]() Views (
Views (admin/structure/views) and click Add new view.
It is important to think about the Views you will need on your site and create a naming convention that will facilitate managing them. Consider including the site section or content type in your view name.
For this example, name your View “articles by {author name}.” Mine is named “articles by bob.” The machine name is automatically generated from the name you type.
Check the Description box to display the field where you can enter your Views description. The description should be something similar to “Show articles written by {author_name}.”
The next section of the wizard helps you articulate the type of content that you want to display. From start to finish, you want to show “Content” of type “Article” tagged with “___” sorted by “Newest first.”
You can see that Create a page was checked by default and that much of the information for the page is now filled in for you by using your title.
The Page title and Path have been prefilled using the {author_name} you used in the title. In this example, I’m choosing a fictitious Bob, so my page title becomes “Articles by Bob” and my path “articles-by-bob.”
The Display format settings also look good with the defaults: an unformatted list of teasers with links (allow users to add comments, etc.) without comments.
Items per page can be left at 10.
You could add a menu here or include an RSS feed, but let’s wait.
Check the Create a block box. You can accept the default settings for now but change the Block title to “Articles by Bob.”
If your settings look like those in Figure 3–15, you’re ready. Click “Continue & edit” to create you first view.
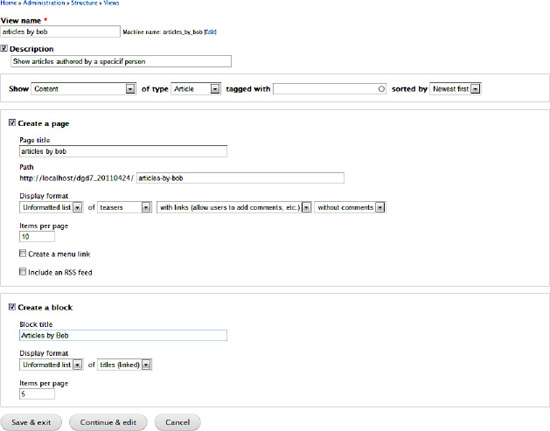
Figure 3–15. Add New View wizard
Other types of Views will be discussed later in this chapter. Click Continue & Edit.
![]() Tip While creating/editing, it’s important to periodically save your View. Also note that if you are creating/editing on a production site, when you save the View, it will be available to your users. To avoid this, read the “Exporting to Code” section later in this chapter.
Tip While creating/editing, it’s important to periodically save your View. Also note that if you are creating/editing on a production site, when you save the View, it will be available to your users. To avoid this, read the “Exporting to Code” section later in this chapter.
You are now looking at the main page for editing a View.
![]() Tip The URL is
Tip The URL is admin/structure/views/edit/articles_by_bob. To edit any View, you can find it in the listing on the Views administration page or just replace articles_by_bob with the machine name of the View you want to edit.
Define the Administrative Information
As mentioned, if your View has multiple displays, it can be difficult to decipher which one does what. Fortunately, Views allows you to set an administrative name for each display. It is important that you use a name that is meaningful so other developers can easily edit the View you created.
For this example, next to Display name, click the active link Page. When the dialog opens, change this to “Page: by {author_name}” where you replace {author_name} with the username you chose earlier. Remember, I chose “Bob.” You can repeat the same text for Description. Click Apply and the Save your View. You might need to scroll up to see the Save button.
Notice how the Page display buttons at the top now reflect the name you entered.
Define the Title
When you set a display for your View (either as a page or a block), you want a title to appear above the results so that the user knows what the content is about.
In the Title box, you can see Title: Articles by {author_name}. This title will be displayed with the View wherever titles are normally displayed: as the page title, block title, etc. If you want to change it, click the linked title and then click Apply.
Define What Type of Content You Want to Display
You are going to jump over a configuration box so that you can specify Filter Criteria. Unless you are creating a View for site administrators, you always want your first filter to be Content: Published. This will ensure that you don’t inadvertently display hidden content. This filter is added by default, but always check for it.
Now, you want to make sure you only display nodes authored by a specific person. Click Add in the Filters Criteria section. Select User from the Filter select box and select the User: Name filter from the list. Click “Add and Configure filter criteria.”
In the new dialog, select the operator to be “Is one of.” For the Usernames auto complete, just start typing a username of a person who has authored Articles on your site, like Bob. Apply.
![]() Note In the previous example, you selected and configured one filter at a time. When adding filters, you may select several filters from different filter groups. After you click Add, you will be guided to configure each one. Doing it this way can be a time-saver because there are significantly less clicks!
Note In the previous example, you selected and configured one filter at a time. When adding filters, you may select several filters from different filter groups. After you click Add, you will be guided to configure each one. Doing it this way can be a time-saver because there are significantly less clicks!
You have successfully set the filters! Now your result set will only display published article nodes authored by a certain person, as shown in Figure 3–16.
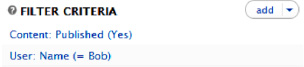
Figure 3–16. Filters selected for Articles by Author Name View
Define What Elements of the Content You Want to Display
Now you can go back to the Format configuration box. As you can see, this section has been prepopulated with your selections in the wizard. Show is set to Content | Teaser, which is both the type and the way you want your content to display. If you had chosen fields as the display format in the wizard, you would now need to start adding and configuring fields to a Fields configuration box.
Define Format Settings
You have already set the row settings to be Content | Teaser. Now you can confirm the HTML markup around each result. For results that are either Content | Teaser or Content | Full Content, I like to choose Unformatted as the style. This means each result will have a div around it, as opposed to being in a list or table. This is the default setting, but you may also specify a CSS class to go on that row div. This can be helpful when you are theming/styling your web pages. In the Format section, click Settings next to Unformatted list to enter in a CSS class.
Additionally, if you want several Views to look the same, you may add a CSS class to the entire View. This can be specified by clicking the active link None for CSS Class in the Other section in the third column under the Advanced header.
Define the Order in Which You Want Your Content to Display
Consistent with many listings of content, you want your View to display the results with the most recently posted article at the top and the older articles at the bottom.
You can see that Sort Criteria is set to Content: Post date (desc), which is exactly what you want, so again you move on.
Define the Number of Results
In the middle column, click the active link for Use Pager: Full. This is where you set what kind of pager style you want or if you only want to display a fixed amount of results. Click Cancel to exit the modal window.
Click “Paged, 10 items” to change the number of items to display. I think 10 will be too few so let’s have 15 items per page.
There are quite a few options to explore under Exposed Options. These are the settings for what to display to the user, including allowing the user to determine how many items to display per page.
Click Apply to save the change for number of items to display per page.
Add a Menu
Let’s add a menu for your page so it will appear in the site’s main navigation. Under Page settings, next to Menu, click No Menu to open the modal dialog. Choose Normal menu entry. Enter the title “Articles by {author_name}” for the title. Also select Main Menu in the Menu drop-down. Click Apply.
![]() Note We will discuss Menu Tabs in a later exercise.
Note We will discuss Menu Tabs in a later exercise.
Define Advanced Settings
In the Advanced Settings box, you are going to leave Use AJAX as “no” because this is the main content for the page. If you choose to change this setting to “yes,” the subsequent paged pages will not be indexed by search engines since the HTML is never printed in the source code, but rather created on the fly.
You won’t be using the Grouping or Query settings on this View, so you can skip those configurations in this step.
Views Caching can be very useful for sites with a lot of traffic. If you choose to do a time-based cache of either the query or the results, the data is not generated each time someone visits the page. This can save some processing resources on high-traffic sites, but it also means that the most up-to-date results only get displayed after the cache expiration. So, for highly dynamic or time-sensitive content, I don’t recommend setting up caching, but for content that doesn’t change that frequently, caching can be useful.
![]() Tip If you decide to use Views caching, during development, you may want to clear Views cache periodically to see the changes rather than waiting for the set expiration. To clear Views cache, click the tab at the top that says Tools and click the Clear Views’ Cache button at the top.
Tip If you decide to use Views caching, during development, you may want to clear Views cache periodically to see the changes rather than waiting for the set expiration. To clear Views cache, click the tab at the top that says Tools and click the Clear Views’ Cache button at the top.
Preview Your Work
The Views module allows you to preview the settings you just configured without leaving the Views interface. If you scroll down to just below all of the configuration boxes, you will notice the Auto Preview area. It demonstrates the display that you are currently editing; assuming the user you selected has authored some content, you should have a nice preview.
Dynamically Editing Your View
One of the nifty features in Views is the ability to edit your View results in the auto preview area. Once you have setup some display options so your view is displaying content, it can sometime be easier to make editing decisions that are based on the actual content.
For instance, now that I see my Title, “Articles by Bob” I just don’t like it. The “by Bob” simply has too much alliteration for me to take it seriously and I want to change it. I’m going to make that change right here in the preview area.
Above my title I’m going to click on the Gear icon. I’ll see a small menu appear with the item Edit Title, so I’ll click that item (see Figure 3–17).
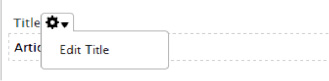
Figure 3–17. Preview area Edit menu
The same dialog opens that would appear if I clicked the link next to Title in the main settings area. I make my change and click Apply.
Wow, that was great. In fact, if you’d rather work by just tweaking what you see in the preview area, you can actually collapse the main setting area by click the “Page: By {author_name} details” name at the very top of the dialog, just below the display buttons. Don’t forget to save your view when you are done!
Admire Your View
At the start, you assigned a path to your page display. Go to that page in your browser. If you followed my suggestion, it should be something like http://example.com/articles-by-author_name. Also, if you created a normal menu item in the main menu for this page, you can go to any page and click the link in your navigation bar.
Congrats! But there is more….
Add More Features
As I mentioned in the goal of this exercise, you also want a block that shows the five most recent titles for those articles, linked to the actual nodes.
For each display, follow the steps outlined in the systematic approach. Although many of these settings won’t need to be changed, it is important to adhere to the process and check your work.
Create Another Display
You already created your block using the wizard; if you needed another, you could easily create it by editing your view and clicking the + Add button at the top left. You can also clone an existing display.
Since you have your block, click the Block button at the top left to see that display’s settings.
Define Administrative Information
For ease of usability while administering Views, update the Name in the Display name to be “Block: titles only” or something else meaningful.
Override the Format
For your block, you want to display only the content titles. This means you need to have it set to show fields, so that you can choose exactly what fields to show (with the title considered a field by Views for this purpose). Formerly, the Show setting was called Row Style.
Look at the Show line in Format box. It has a broken link next to it. This means that it is using your overridden format and you can see that it is set to Fields.
If you click Fields, you can see the scope for this configuration is set to “This block (override).” Click Cancel to exit out of this modal window.
Edit Fields
You need to confirm that you have the fields you want and that they are outputting the markup you need for both semantic quality and styling.
If you look in the Fields section, you can see that when you created the block in the wizard, it added Content : Title by default.
- Click Content : Title to open the field configuration dialog.
- Configure the options as described below (I am only noting the ones that need to be changed).
- Confirm that “Link this field to the original piece of content” is checked.
One thing you want to change is the HTML markup that is being output. Currently all the titles are simply being output in div tags but you want to indicate that they are headings to your readers and to search engines.
- Click on Style Settings to expand the setting box.
- Check the box “Wrap field in HTML” and more settings will appear. From the HTML element box, select H2.
- Check the “Create a CSS class” box and enter “title” in the field that appears.
You settings should now look like those in Figure 3–18.

Figure 3–18. Title field Style Settings
- Click Apply and scroll up to Save your View.
Add a More Link
It would be a nice touch to add a More link to your block display so a user won’t have to do a lot of paging to see all the items.
In the Pager Settings box, click the link “More Link: No.” The first thing you want to do is change the For setting so that your link only appears on this display. Set the drop-down to “This block (override).” Click the checkbox for Create More Link. Click Apply and check out your work in the Auto preview area.
Save the View.
You can test your More link in the preview area. Note that if you have less content than your block is set to display, a More link will not appear.
![]() Note The wildly astute in our audience might say, “How did my More link know to link to the Page view?” Since it’s the only page in this View, it’s likely to share the block’s criteria and so that’s where Views linked it. You might also then say, “That’s a lame answer because what happens if I have more than one page in my View?” Ah yes, if you have more than one Page, a new item will appear in the Block’s Options section called “Link display: [page name]”. Clicking the name will open a dialog where you can designate which page should be your destination for things like summary links, RSS feed links, More links, and so on.
Note The wildly astute in our audience might say, “How did my More link know to link to the Page view?” Since it’s the only page in this View, it’s likely to share the block’s criteria and so that’s where Views linked it. You might also then say, “That’s a lame answer because what happens if I have more than one page in my View?” Ah yes, if you have more than one Page, a new item will appear in the Block’s Options section called “Link display: [page name]”. Clicking the name will open a dialog where you can designate which page should be your destination for things like summary links, RSS feed links, More links, and so on.
Place the Block
Once you save your View, your block will appear in the list of disabled blocks on the Block Administration page. Enable the block as you would any other. For more information on placing blocks, please refer to Chapters 1 or 8.
Extend a View
There are other configurations you can make to the View you created to increase usability. Let’s start with the basic View you created showing articles by a specific author.
Handling the Use Case of Zero Results
Sometimes we create Views with the anticipation of content in the future. It is conceivable that, as a developer, we knew we needed to show all articles by {author_name} even though those articles hadn’t been written yet. If our View goes to the production site before the content is created, we need to account for that when users navigate to the page.
For the Page display, in the right column, click Add for No Results Behavior. Check Global: Text area and then Add and Configure.
For the administrative label, type “default”. Enter in your default no results text, something similar to “There are no articles available yet. Check back soon as we are updating content frequently.” Apply.
If you want to check to see this is working as expected, you can change one of your filters to something that you know will product zero results and look at the Auto Preview area.
Because you didn’t change the For setting, your message was applied to both the Page and the Block display—twice the work accomplished in one shot.
One Page, Multiple Displays to Highlight First Result
The page you previously created shows 15 teasers with a pager. This is a great way to show all the content. However, in another area of the site, you might want to highlight the most recent node.
Let’s make a page where you display the most recent article as a full node and the following 14 nodes in a table below it.
To accomplish this, follow these steps:
- Add a new page display.
- Update the Display name to “Page: Highlight”.
- Add a Path “highlights” under Page Settings where this View will display. Add a normal menu item in the Main Menu so you can easily find it.
- Under Format, change the Show setting to display full content; make sure you set “For” to “This page (override).”
- Override “Use pager” and set it to “Display a specified number of items” and set this to 1 for only this display
Tip When you went to add the page title, you saw the error message “Display ‘Page’ uses a path but the path is undefined.” Don’t worry; this is the first display you have created without using the wizard and you just need to set a path for the display before it lets you save it.
Look at the Auto Preview area to see if the results are as you expect.
Now, you need to add the table below that highlighted node.
- Add a new attachment display.
- Update the administrative name to “Attach: table to highlight”.
- Override the Show Style to use fields. You don’t need to make any other further configurations.
- Click Add in the Fields menu. In the Content group, select Content: Post Date, and Add. Change the Date Format to whatever you want it to be. Apply.
- Experiment with adding two other fields.
- Override the Format from Unformatted to Table.
The Table style option dialog is pretty fancy. You are probably hoping for guidance but just take a look and read the text. You’ll quickly see that it’s powerful but not hard or confusing. You can accept the defaults or make all kind of changes; it’s up to you.
- Override the number of items to display under Pager to display 14 with an offset of 1. This means that the first result will not display, but the subsequent 14 will. This is exactly what you want since you are going to use the full display for the first node.
- Override the More link in Pager to create a More link.
- In order to attach this table to the full node page display, click on the link in Attach to: Not defined in the Attachment Settings box. Select Page: Highlight and Apply. Click Before under Attachment position and change this to After. Apply.
- Save your View and go to Page: Highlights. You can now see your awesome table view below the Contents.
Using Tabs for Unique Displays
You can create a page that has several tabs so your users don’t have to leave the page to see a lot of content.
Let’s create a new View that has a primary page that shows all Article nodes, a tab for all Event nodes, and a tab for Blog nodes (see Table 3–4).
Table 3–4. Creating a New View Using Tabs for Unique Displays
Save your View and go to a page where you can see your main menu. Click on the Content link you created, as shown in Figure 3–19.
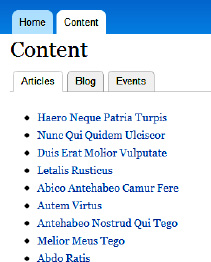
Figure 3–19. A View with tabs
Cloning and Making Administrative Tables Using Exposed Filters
There are often cases where you want a group of your administrators to be able to see content lists and be able to filter them to get an exact result set of their choice. The Views module provides this functionality with exposed filters. By exposing filters, you allow the user to set the conditions.
Let’s create a new View for administrators (see Table 3–5) that shows all content in table format, but is filterable and sortable, as shown in Figure 3–20.
Table 3–5. Creating a New View for Administrators
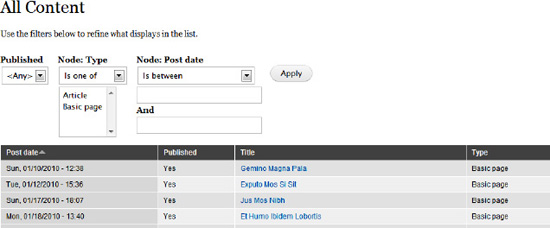
Figure 3–20. A View with exposed filters
Advanced Views Implementations
We have discussed how to create Views where we set criteria and even where the user sets criteria, but we can also create a View where a variable is passed in that will determine what the results are. Additionally, we are able to pull information that is related to the result to display alongside it.
In this section, we discuss the only configuration boxes left: Contextual Filters and Relationships.
Contextual Filters
Contextual filters are input that usually come from the URL, often called arguments. A typical use of an argument might be to reduce a View to a single node, a single user, or nodes with a given taxonomy term. It is like a filter, but rather than setting the value in a form, it is coming from the URL.
Similar to the View created earlier in this chapter, let’s create a View where each user with at least one blog node gets their own page and these pages are created dynamically so that you never need to explicitly filter on username (see Table 3–6). You’ll also create a menu and a block.
Table 3–6. Creating a View with Contextual Filters
| Create a new node View | |
| Add new Page display | |
| Title | Title = Blogs |
| Format | Show = Content | Teaser |
| Filters | Content: Published = Yes Content: Type = Blog |
| Sort Criteria | Content: Post Date = Sort Descending |
| Page Settings | Path = blog Menu = Normal Menu Entry –Title = Blog –Menu = Main Menu |
| Contextual filters | User: Name –When the filter value is NOT in the URL = Show “Display all results for the specified field” –Override Title = Blogs by %1 –Specify validation settings = Basic Validation, Display contents of “No results found” –More Section: –Case = Capitalize each word –Case in path = lowercase –Transform spaces to dashes in the URL = Yes |
| Add new Block display | |
| Override Contextual Filters | User: Name -Action to take if argument is not present = Display a summary -Sort order = Ascending |
![]() Tip The contributed module Pathauto (
Tip The contributed module Pathauto (drupal.org/project/pathauto) allows you to specify patterns for URL aliases so that they are automatically created. These aliases are user and SEO friendly. In this example, you should set Pathauto for blog node to use the pattern blog/[user]/[title] so that this page URL follows the Views you are creating.
Place your block on pages with a path of “blog/*” so that it is on all blog pages, both Views and nodes. Go to your main page and click the Blog link in your Main Menu.
Relationships
The Relationship configuration allows you to bring in content that is related to the content you are displaying, but not stored in the same area of the database. Once you create a relationship, you then need to associate it with either a field or contextual filter.
For this example, you want to display who created the node and who edited/revised the node for each node result. Use the View you created in the Contextual Filters example and make some modifications. You’ll pretend that instead of blog nodes, you have a View of wiki nodes (Table 3–7).
While you are building, look at the Live Preview area once you finish adding the new fields. Then look again after you associate the relationship with the username field.
Table 3–7. Creating a View of Wiki Nodes
| Update the Page display | |
| Format | Show = Fields |
| Fields | Content: Title –Link this field to its Content –Wrap field and label in HTML = H2 User: Name –Label = Created by –More: Administrative title = Created by User: Name –Label = Revised by –More: Administrative title = Revised by Content: Body –Remove the Label –Formatter = Trimmed, 300 |
| Relationships | Content Revision: User |
| Edit Fields | User: Name (the 2nd one you added with an administrative title of Revised by) –Relationship = revisions user |
| Format | Style = Grid –Number of columns = 3 |
| Pager Settings | User pager = Paged output, full pager –Items per page = 9 |
You just assigned a relationship to a field. Before the relationship, it printed the author of the node. After the relationship, it printed the author of who saved it last (the revision), as shown in Figure 3–21. The reason you needed to use a Relationship to accomplish this is because of where the data for the node, the node revision history, and the user are stored in the database. You needed to relate the information.
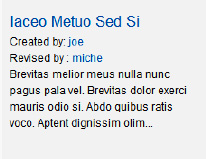
Figure 3–21. A View using a relationship to display the username of the person who edited the node most recently
![]() Tip Some contributed modules that you choose to install will require relationships in order to display the desired content. If you are having difficulty finding the filter or field in the available groups and know that is has to be there, it probably requires a relationship.
Tip Some contributed modules that you choose to install will require relationships in order to display the desired content. If you are having difficulty finding the filter or field in the available groups and know that is has to be there, it probably requires a relationship.
Other Modules
There are many modules that extend what you can accomplish with Views. Often, they will create Views for you to customize so most of the work is already done. This list is far from exhaustive, but some modules you should investigate include:
- Administration
- Views Bulk Operations (VBO) –
drupal.org/project/views_bulk_operations
- Views Bulk Operations (VBO) –
- Maps
- OpenLayers –
drupal.org/project/openlayers - Gmap –
drupal.org/project/gmap
- OpenLayers –
- Calendars
- Calendar –
drupal.org/project/calendar
- Calendar –
- Styles and Displays
- jCarousel –
drupal.org/project/jcarousel - Views Accordion – drupal.org/project/views_
accordion - Views Infinite Scroll – drupal.org/project/views_infinite_scroll
- jCarousel –
Remember, that all modules are a continual work-in-progress and it is up to the members of the community to help strengthen them by reporting issues and testing patches.
Exporting to Code
You must, you must!! And I’ll tell you why….
I mentioned during the exercises that it is important to save your Views periodically, but the catch was that it would display on your site even if you weren’t ready. I suppose it really isn’t that big of a catch for a new View since there is a configuration to change the Display Status in the Basic Settings box. But what if you are make changes to an existing View?
Additionally, if you are initially making your View in a development environment, how do you get your View to display on the production server? Do you have click 100 times to replicate it?
Of course not; you export your View to code!
Use your development environment to create, edit, and fine-tune your Views; export the final version; and copy the file to your production server. It is so easy and reduces human error from misclicking.
However, before you export the View, you need to create a module to keep the code. Based on what you learn in Chapter 22, create your module folder, .info, and .module files. Also, create a folder in your module named views. This is where you will put each export. In that folder, create an empty text file named articles_by_author.inc or whatever the name of your View is.
Open the .inc file that you just created and type the following code at the top:
<?php

//put export code here

$views[$view->name] = $view;
Go to the Views Administration page at /admin/structure/views and locate the View you want to export. Click Export in the Operations menu for that view on the right side of the View listing. This will take you to a page with lots of code. Copy all the code in the text area and paste it over the one middle line (//put export code here) in articles_by_author.inc.
For every View you want to export, you will need to create a file in your module’s views folder and paste in the export code just like you did for this one.
The next step is to add some code to your module that tells the Views module to look in your module’s views folder. In your module’s .module file, add the following code, replacing “dgd7glue” with the name of your module:
/**

 * Implements hook_views_api().

 */

function dgd7glue_views_api() {

  return array(

    'api' => '3.0',

  );

}


/**

 * Implements hook_views_default_views().

 */

function dgd7glue_views_default_views() {

  $path = './' . drupal_get_path('module', 'dgd7glue') .'/views/*.inc';

  $views = array();

  foreach (glob($path) as $views_filename) {

     require_once($views_filename);

  }

  return $views;

}
Enable your module like you would any other module at admin/modules.
Just to make sure the Views module knows you added a View into code, you want to clear Views cache. Go to the Views Tools tab at admin/structure/views/settings/advanced and click Clear Views’ Cache.
Go back to the Views listing page. Find the View you just exported. You will notice the words “Database overriding code” on the left. This means that Drupal knows you have this View in code, but it is using the version in the database. You want to use the code version you just added and delete the database version. Click Revert in the Operations menu for the View you just exported. It will confirm that you really want to. After you say, “Yes, I want to Revert my View!”, it will redirect you back to the listing page. Notice how the words next to your View are now “In code.”
Congratulations!
This greatest benefit of exporting Views into code is how easy you can make changes and transfer a View you created from one environment to another. Just don’t forget to clear Views’ cache.
Additional Resources
Because the Views module is popular, there are a lot of resources online and presentations at Drupal events. If you are looking for more help, check out these places:
- Drupal Documentation pages: These are updated by the community; although Views has matured over the years, the concepts and strategies have remained relative consistent.
drupal.org/documentation/modules/views - Views Issue Queue: Search through these issues to see if someone is discussing something similar. If you don’t find it, you can create a support ticket.
drupal.org/project/issues/views - Google: There are so many blog posts, tutorials, and videos on Views online.
google.com/search?q=drupal+views - Your local Drupal group: Every region has monthly meetups and this is a great place to ask questions. Find you local group and join!
groups.drupal.org/groups - Professional Training: There are many professional paid training sessions to take you to the next level. See Chapter 9 for more ways to get involved in Drupal and get help, but never hesitate to play and experiment on your own (just work locally and not on a live site).