
C H A P T E R 13
![]()
Putting a Site Online and Deploying New Features
If only you can see it, your Drupal site isn't quite as useful as it could be. If something happens to it, and you can't restore it, that's really bad. If you need to take the site offline for a week to add a complex new feature, that's not great either. This chapter covers putting your site online, backing it up, and then treads lightly into Drupal's new frontier of deploying major features.
Putting Your Site Online
Your web site deserves to be on the Internet. This section covers the steps to put a site online (or “take it live”) in general terms that apply no matter what software is available. We'll explain each step and we'll provide the command line steps that should work for any serious setup. If you deploy more than a couple times, you'll want to automate these steps. There is no Drupal community consensus yet on the best way to do this, but we'll include some tips and point to some resources for best-practice approaches.
Taking a site from your local computer or a development server to a live web server can be broken into five steps.
- Export the database.
- Transfer a copy of the site code, user files, and exported database to the server.
- On the server, import the site's database.
- Create or edit the site's settings.php on the server to use the database settings.
- Direct traffic for your domain name(s) to the site's web root on the server.
These steps can be followed with different tools on any platform, such as graphical database and SFTP programs. Likewise, any build tool, such as rake or ant, can perform steps 2 through 4.
![]() Tip When choosing a company to host your web site, look for one that will let you access your host server with SSH. See the online notes and resources for possible hosts at
Tip When choosing a company to host your web site, look for one that will let you access your host server with SSH. See the online notes and resources for possible hosts at dgd7.org/deploy.
We'll look at the specific command line steps for Linux, Mac OS X, or Cygwin now. These steps should work even for environments you have not been able to set up. On the server side, the commands are based on a typical Debian or Ubuntu setup; if you're setting up your own server, see wiki.debian.org/LaMp.
When you're dealing with more than one site, you will certainly want to script the process. Deployment scripts are usually specific to your hosting and development workflow and needs. (For an example, the evolving practice of the Drupal collective I am part of is documented at data.agaric.com/deploying-the-agaric-way.) Aegir, which makes heavy use of Drush, is a Drupal deployment solution (using Drupal to help deploy Drupal) that has a significant, longstanding, and growing community. It is a free software hosting system for automating common tasks associated with deploying and managing web sites. For information and downloads, see aegirproject.org.
![]() Tip See how Drush can enhance your deployment workflow in the “Using Remote Commands to Deploy Sites with Drush” section in Chapter 26.
Tip See how Drush can enhance your deployment workflow in the “Using Remote Commands to Deploy Sites with Drush” section in Chapter 26.
1. Export the Database
Thus far, this book has had you work with your site installed locally on your computer. To take your configuration online with any content you've added, you will want to first export the database.
![]() Caution This first step only applies the first time you take a site online. Exporting your development database and replacing an existing live database would, in most cases, be a mistake. If you aren't already backing up your live site (using tools mentioned in Chapter 2 or described later in this chapter), it would amount to a colossal mistake.
Caution This first step only applies the first time you take a site online. Exporting your development database and replacing an existing live database would, in most cases, be a mistake. If you aren't already backing up your live site (using tools mentioned in Chapter 2 or described later in this chapter), it would amount to a colossal mistake.
In the following commands, the key action is mysqldump. The other commands just refer to a place to put the database in the meantime.
The Drush command drush sql-dump can save you looking up the database connection information, when run from within the site root or with an alias.
# Change to your project's folder.

cd ~/code/dgd7

# If a database ("db") directory is not made already:

mkdir db

# Export the database, where dgd7 is the name of the database.

mysqldump -udgd7 -pdgd7 dgd7 > db/development.sql
The options used in the mysqldump command are the following:
-ufor database username, which can be followed immediately by the user (dgd7 here).-pfor database password, which is followed immediately by the password (dgd7).- The lone word (
dgd7) is the database name itself. You can get these values from your local site'ssettings.phpfile.
![]() Note Find out more about the
Note Find out more about the mysqldump command by typing man mysqldump on the command line in UNIX-like environments (Linux, Mac OS X, Cygwin). The command man is short for manual, as in a user's manual; you can use it to get more information on almost any command.
2. Transfer to Server
This is the step you don't need to be reminded about: moving the site's code, any user files associated with it, and the exported database from your development environment to a server that is online. The remote file copy program secure copy (scp) will work.
scp -r ~/code/dgd7 [email protected]:/var/www/
![]() Tip Don't forget to transfer the .
Tip Don't forget to transfer the .htaccess file; as a “hidden” file beginning with a dot, it's easily missed.
Set Files Directories Permissions
After moving the codebase and user files, you need to make sure the user files directories are writeable. The scp command created the directory dgd7 in/var/www while moving in your site code and dumped database, so after logging into your server, you can go to that directory to access them conveniently. (Note that it's assumed you are deploying to an Apache web server running as user www-data.)
ssh [email protected]

cd /var/www/dgd7

chown -R www-data:www-data web/sites/default/files

chown -R www-data:www-data private_files
The latter command only applies if you do a private files directory and should be done where you choose to create your private files directory (which should be outside of your web root).
3. Create a Database on the Server and Import Your Database
On your host server, log in to create a new database and load the transferred database dump into it.
![]() Note It's quite possible your host will provide a control panel for creating database users and databases.
Note It's quite possible your host will provide a control panel for creating database users and databases.
We name the database user and the database itself after the project name, which in this case is dgd7.
ssh [email protected]

mysqladmin -u root -p create dgd7

mysql -u root -p -e "GRANT ALL ON `dgd7`.* TO 'dgd7'@'localhost' IDENTIFIED BY

 'S3cUr3p4s5w0rD'"
You will be prompted for your MySQL root password after issuing each of the last two commands. It's better not to write this password inline, as that would put this important password in your server's shell command history. In this example, the third command gives the new database the password “S3cUr3p4s5w0rD”, which you will then use to import the database, to use along with the database user and database name.
If you followed the steps in the “Set Files Directories Permissions” section, you are already logged into the host server and in the directory /var/www/dgd7, so the database directory used in the section before that, db, is right there.
mysql -h localhost -u dgd7 -pS3cUr3p4s5w0rD dgd7 < db/development.sql
The mysql command used to import the database has the same parameters as mysqldump when exporting the database, with one addition:-h for host, the server on which the database lives. Typically, the database will be on the same server as everything else, so you can use localhost. Note that the angle bracket is turned around—think of it as accepting the database file into the command.
4. Set the Database Settings in settings.php
Your Drupal site is almost ready to go live. The code is in place on your production server, the user files were transferred along with it, the databases are loaded, and now it needs to know about the database.
You can manually edit settings.php to use these values or you can use Drupal to set it up for you (if the file permissions in settings.php are set to allow it) by going to the site in your browser, for instance:
http://example.com/install.php
To edit the file manually, the following commands will open it in vim; go to the correct line (around line 181), and enter insert mode:
vi sites/default/settings.php

:181

i
Make the relevant section (the $databases = array() line) look something like this:
$databases['default']['default'] = array(

  'driver' => 'mysql',

  'database' => 'dgd7',

  'username' => 'dgd7',

  'password' => 'S3cUr3p4s5w0rD',

  'host' => 'localhost',

  'prefix' => '',

);
![]() Tip Remember that the array you are defining is nested two deep (typically with the key ‘default’ for each)! It's not simply
Tip Remember that the array you are defining is nested two deep (typically with the key ‘default’ for each)! It's not simply $databases = array() as Drupal starts you off; it is a twice-nested array and you might as well start off like $databases['default']['default'] = array( ... ); The first default is for the default database rather than an additional one and the second default indicates that it is the main (master) database rather than a supporting (slave) database.
Every automation tool has to perform the steps described so far. We presume a functioning web serving environment, so this section on initial deployment is done with a final step: telling your web serving software the location of the document root of your web site. The preconditions we are not covering include a module capable of interpreting or running php (such as, for Apache, mod_fcgid or mod_php).
5. Point Incoming Traffic for Your Domain(s) to Your Site on the Server
This step is about pointing visitors looking for your domain to your site. This means configuring your web server software (most commonly Apache) to match the corresponding location and setup of Drupal from the previous steps. Before visitors can see your site at a public address (web domain), however, a few prerequisites need to be met.
- First, you need a domain name, which you can purchase through a domain name registrar (see
icann.org/en/registrars/accredited-list.htmlfor the full list of registrars). - Second, you need the Domain Name System (DNS) settings for your domain name to point to nameservers you control. Your nameservers may be provided through your registrar, your host, or a dedicated DNS service.
- Finally, the nameservers need to be telling your domain to point to your server's Internet Protocol (IP) address.
![]() Note After telling your domain to use new nameservers, it can take up to two days to resolve (start working). If you purchase hosting and domain names from the same company (not recommended), these steps may have already been done for you.
Note After telling your domain to use new nameservers, it can take up to two days to resolve (start working). If you purchase hosting and domain names from the same company (not recommended), these steps may have already been done for you.
Once all that is established, you can configure the web server software to send incoming requests for your domain name to the folder that contains your site's web root. In this example, that folder is /var/www/dgd7/web. (Drupal's code was placed in the sub-directory web in the directory dgd7 in Chapter 1.)
![]() Note As with most things you'll do in Drupal, there are multiple ways to serve a web site. Even if your host is using Apache, it may have a graphical user interface set up or command line tools to automate some or all of the upcoming tasks, so look for the easy solutions first!
Note As with most things you'll do in Drupal, there are multiple ways to serve a web site. Even if your host is using Apache, it may have a graphical user interface set up or command line tools to automate some or all of the upcoming tasks, so look for the easy solutions first!
Apache is the most-used web server; like Drupal, it's Free Software. A common way for Apache to direct visitors to your web site is with a virtual host configuration. These can be written as individual files, one for each web site, and added to /etc/apache2/sites-available (in a Debian installation). You can create a new file and begin editing it with the Vim editor (see Appendix I) with the command vi /etc/apache2/sites-available/dgd7 (where dgd7 can be any filename that lets you identify your site) and put something like the code in Listing 13–1 in it.
Listing 13–1. Example Apache Virtual Host Configuration File for definitivedrupal.org
<VirtualHost *:80>

     ServerAdmin [email protected]

     ServerName definitivedrupal.org

     ServerAlias www.definitivedrupal.org dgd7.org www.dgd7.org definitivedrupal.mayfirst.org

     DocumentRoot /var/www/dgd7/web

     <Directory />

        Options FollowSymlinks

        AllowOverride None

     </Directory>

     <Directory /var/www/dgd7/web>

        Options Indexes FollowSymLinks

        AllowOverride All

        Order allow, deny

        allow from all

     </Directory>

</VirtualHost>
A symlink to this file in Apache's sites-enabled directory can be created with the command sudo a2ensite dgd7 (where dgd7 is the name of the file you created in Apache's sites-available directory).
Apache must reload its virtualhost configuration files before they take effect. An error in one of these files can cause all web sites served by Apache to fail, so we highly recommend you test first (the first command here):
sudo /usr/sbin/apache2ctl -t

sudo /etc/init.d/apache2 reload
The second command reloads your configuration, and you should be able to see your web site at your domain name now! For more information about Apache virtualhosts, see apache.org/docs/current/vhosts.
Note the AllowOverride directive which permits Drupal's included .htaccess to give Apache instructions necessary for Drupal's proper operation.
![]() Note You may have noticed that one of the domains listed as a server alias in the example Apache Vhost file was
Note You may have noticed that one of the domains listed as a server alias in the example Apache Vhost file was definitivedrupal.mayfirst.org, not one that acts as a public domain for the site. This allows you to test all the configuration done in this section before anyone can access your site through its usual domain name or names. This is especially useful when replacing an existing site. This particular domain and subdomain is set up by our host, May First People Link, for each project, but you could set up your own, even directing a subdomain such as livetest.definitivedrupal.org at your server for this purpose.
Your web site is online! Now (or earlier!) comes backups, and soon comes deploying updates and newfeatures.
Before You Go Any Further, Back Up
“Another mortal mistake is not backing up your site.”
—Jeff Robbins(from a Lullabot podcast)
Karen Stevenson immediately added that everyone has committed this sin, and most have horror stories. Permit us to help you avoid this fate. If you do nothing in this section, at least set up the Backup and Migrate module (drupal.org/project/backup_migrate) described in Chapter 2. Again, if you don't get going with a server-based backup solution such as the one described below, set up the Backup and Migrate module on every of your Drupal sites. Configure it to take daily backups, uploading them to a place on your server and/or sending them to your mailbox.
![]() Tip Do not skip this section. If you do not yet have automated backups, before you go any further, back up your work—and then set up your work environment and servers so that backups are automated.
Tip Do not skip this section. If you do not yet have automated backups, before you go any further, back up your work—and then set up your work environment and servers so that backups are automated.
If you are building anything you want to see again, you need to back it up. If you don't believe this, ask any developer who's had a server malfunction, user or developer error, or an attack on a site that wasn't backed up. Heck, ask anyone who has lost their computer or had a hard drive die.
Continually backing up your work is an essential practice for any web developer. As introduced in Chapter 2 and elaborated upon in Chapter 14, whether you are downloading modules to construct a site, authoring a theme, or coding a module, you can have peace of mind and comfortable creative flow by using version control.
Even more important than your code, however, are the words, the pictures, the stories and facts that people using your site have crafted and placed there. This content is a sacred trust; the worst thing you can do to your users is lose all their data. And that is, in fact, very bad. Don't do it.
Back up the database and the files. If you have configured a private file directory, don't forget to back the private files up as well, wherever you have placed them. Do whatever you need to do to make sure all data and files are regularly backed up, locally and to a separate computer. A server malfunction, user or developer error, or an attack on your site can mean that failure to back up comes at a very high price.
![]() Note A database backup that extends Drush is DGB, for Drush Git Backup. It provides Drush commands for backing up a Drupal database such that each table of the database is a separate file. This approach is more suitable for adding database exports to version control (the Git part), as you can see changes in a table with the
Note A database backup that extends Drush is DGB, for Drush Git Backup. It provides Drush commands for backing up a Drupal database such that each table of the database is a separate file. This approach is more suitable for adding database exports to version control (the Git part), as you can see changes in a table with the gitdiff command (some tables are more useful to look at than others). It also improves on Drush's handling of cache_* tables, conveniently excluding data in these that doesn't need to be part of any backup. DGB is available on GitHub: github.com/scor/dgb.
See many more options for backing up a site at drupal.org/node/22281. Next, we present a proven approach with a handy tool, Backupninja.
BACKUPNINJA
Backupninja lets you drop simple config files in /etc/backup.d to coordinate system backups. It is a master of many arts, including incremental remote filesystem backup and MySQL backup. On systems using Debian's package management tools, you can install it by executing apt-get install backupninja.
![]() Note For Linux without Debian's package manager, you can get backupninja through its project page,
Note For Linux without Debian's package manager, you can get backupninja through its project page, https://labs.riseup.net/code/projects/show/backupninja.
Running man backupninja gives some basic information; most notably, it mentions a small program called ninjahelper. It has a simple user interface offering the following two basic functions when you start it for the first time:
- new to create a new backup action
- quit to leave ninjahelper
A basic setup involving a dump of your database, system configuration, and remote storage involves creating three actions:
- sys
- mysql
- rdiff (make sure to include all the relevant directories mentioned earlier)
The last option requires a user account on a remote machine with ssh access. The really helpful ninjahelper creates and copies an ssh public key, installs required packages, and leaves you with a working backup configuration.
Testing Backups
Your site is not backed up if you can't restore it. Find out where your backups are (if you used the backupninja setup previously mentioned, it will all be specified in your /etc/backup.d directory).
Decide also what sort of restoration you need. If it's good enough that you can manually restore everything within a couple hours to a day if something catastrophic happens, you just need to know where everything is. If you need to have very rapid restoration no matter what happens, you will need to have a backup server ready to go and script your restoration.
![]() Tip This is entirely unrelated to backups, but another scenario when a client or other site user will get upset about lost data is if they type a brilliant essay into the web site and something goes wrong (with the web site or their browser). Don't write anything of significance directly into a browser window, and tell others to avoid it. Edit your precious work in a text editor or word processor like MS Word or Open Office.org and copy and paste it into the form. Using a browser that tries hard to safeguard your data, such as Firefox or Chrome, can also make you much happier.
Tip This is entirely unrelated to backups, but another scenario when a client or other site user will get upset about lost data is if they type a brilliant essay into the web site and something goes wrong (with the web site or their browser). Don't write anything of significance directly into a browser window, and tell others to avoid it. Edit your precious work in a text editor or word processor like MS Word or Open Office.org and copy and paste it into the form. Using a browser that tries hard to safeguard your data, such as Firefox or Chrome, can also make you much happier.
Your web sites aren't the only thing you should be backing up, of course. As mentioned in the next chapter, include your coding area in your personal computer's overall backup. If you aren't backing up your personal computer, now is the time to start. After all, it's not just treasured personal notes, irreplaceable photographs, and potential blackmail material anymore; we're talking truly precious lines of Drupal code.
Staging and Deployment
By staging and deployment, we mean the process of putting all the work going into a web site (the development and the content) somewhere they can be seen together (a staging site), and then taking this to a live web site where it can be seen in all its glory by everyone (deployment).
The trick is doing this when people are using the live web site every day and multiple people may be contributing to development.
![]() Note Taking the security measures and bug fixes covered in Chapter 6 to a live site is a special case for deployment and by far the easiest case of what is described here; the most basic update code and running of
Note Taking the security measures and bug fixes covered in Chapter 6 to a live site is a special case for deployment and by far the easiest case of what is described here; the most basic update code and running of update.php (after testing on stage) will work to deploy these sorts of updates. This process is described next.
There is no definitive way to stage Drupal. There are many ways. The best way depends on the specific needs of the web site project. In our experience, the most common needs involve adding features to an already operating web site. The recommended approach for deployment of new functionality is to make a distinction between content and configuration, and capture the configuration in code where it is version-controlled and easily moved from one environment (such as your local computer) to another (such as stage or live). This approach is commonly called “everything in code.”
![]() Tip No one in Drupal—not even Greg Dunlap, author of the Deploy module (
Tip No one in Drupal—not even Greg Dunlap, author of the Deploy module (drupal.org/project/deploy)—considers deployment a completely solved problem in Drupal 7. He and others do think we'll be able to solve it in Drupal 8. The Deploy module is not covered here; it is especially well suited when you need to push content as well as configuration from a staging site. In particular, the Deploy module is essential for a frequent content publisher staging and previewing lots of content on a staging site, then pushing it all forward to the live site.
Approach
The approach in this section assumes:
- Competent Drupal developers
- Straightforward publishing workflow (significantly, no need to stage content)
In this case, we recommend an “everythingincode”approach to development by using theFeaturessuite of modules to automate major parts of it, keeping the live database the final authority, and making all development impacts on the database testable and re-playable.
In this approach, the database of the live site remains canonical, correct, and never has to be merged. Database changes required for configuration can be replayed in a testable fashion on the staging site before being re-played on live.
If you have a Drupal site you've been working on for a while, you do not need to go back and move all existing configuration in the Drupal site into code. Development will always build on a copy of your working, live database. It does mean that new features must use code to make any changes to the database.
Drupal has some pitfalls when it comes to updates, like all applications that rely heavily on a database. That's an architectural decision that has its pros and cons. Applying “everything in code” to an application that follows at its core an “everything through the web” philosophy has its challenges, but the Drupal community is rising to meet them, as you'll seesoon.
The Workflow
Given this approach, a model workflow would look like the following:
- Make a copy of the live database and work with it locally.
- Add functionality or change appearance through code (modules, themes, etc.). All changes made through pointing and clicking must be exported or otherwise reproduced in a form that is captured in code.
- Test a fresh copy of the live database against your code from step 2 and run
update.phpif you have written code to change the database. You can do this on a staging server for other people to see and assess. - On the live site, apply the exact code updates you just tested in step 3 and immediately run any needed database update.
![]() Tip To always know what site you're looking at, you can use the Environment Indicator module (
Tip To always know what site you're looking at, you can use the Environment Indicator module (drupal.org/project/environment_indicator).
All content changes and additions, everything done by users, and the user accounts themselves flow from the live site. All code changes (including everything typically done by a site-building administrator exported to code) flow from the development site or sites. The database and user files meet the code on a quality assurance (QA), test, or stage site for, well, quality assurance and testing, before they meet again on the live site. Figure 13–1 diagrams the flows.

Figure 13–1. Diagram of an “all configuration in code, all content changes on live” code and database/files flow
A key thing about this setup is that the local development environments can be multiplied many times (one for every developer working on the site) and the code and data flow and the workflow remain the same. This is made possible by the bare repository, a common repository that you and other developers can push code changes to and pull code changes from. The staging and live sites should only pull changes. This is discussed in the “Bring Code Changes from Development to Stage, then Live” section later in this chapter.
Can you still make configuration changes on live? Of course. What we present here is a recommended ideal, not the laws of physics. A hybrid approach where content types and views are built in development and imported to live, but many other changes and tweaks are made directly on live, is quite common. Simply be aware that live configuration changes will burn you sooner or later: something will go wrong on live and you will not know how or why. The more people involved in a site, the more likely this will be. The less acceptable it is to roll back to the previous night's snapshot backup, the more serious this problem can be. Meanwhile, the more you put all your configuration changes into code, the faster you will get at it; likewise, the more everyone uses this approach, the better the community tools will be. Some of these tools are covered in the upcoming “How to put “Everything in Code'” section.
Bringing Content from Production to Development (and Stage/QA)
The same commands from the “Putting Your Site Online” section can be used here. Dump and import the databases. Drush (drupal.org/project/drush) can do this even better; see Chapter 26. Don't forget to bring user files, which can be done with rsync.
Try to make this a one-command solution in your setup. To reduce unneeded strain on your live server, you may want to automate the nightly dump or simply get the copy from your most recent backup, rather than exporting the live database directly each time you sync production to development and stage. The important thing is to make it easy so that developers use it regularly. The database should always be considered to belong to live, and any changes you wish to keep must be captured in code.
![]() Note The Demonstration module (
Note The Demonstration module (drupal.org/project/demo) can help your workflow of testing your code changes by re-loading a database.
Bring Code Changes from Development to Stage, then Live
Your code changes don't have to be major—you could simply updated core or contributed code (as from Chapter 7). It just has to be done on a development site first. So, download updates or make your code changes on your web site on your local development environment. Then commit these changes to your local repository, push changes to a shared repository, and pull the changes to a staging or QA site for testing. When everything checks out there, the code changes can go live.
A key part of this scenario is that all the environments talk to one repository. This repository can be hosted by a service such as http://gitorious.org or http://github.com, or you can create it yourself and place it on your own server.
SETTING UP YOUR OWN CENTRAL REPOSITORY
With everything set up, the commands for adding and committing your changes to local version control and pushing to a shared repository are quite simple. Once you've done whatever you feel needs to be done to your code (much more on that in a following section) you can push it to your central repository, like so:
git add -A

git commit -m "Updated pathologic module to the latest security release."

git push
Note that git add -A captures every change you have made (added, edited, or removed files) and prepares them for committing. Use git status to see what you are proposing to commit (and git reset to undo an add before committing).
This pushes your code to the remote repository it's associated with. If it is associated with more than one repository, you may have to specify it in the push command (for instance, git push origin master).
Now the code is ready to be tested in a fresh environment. First, sync the database from the live site (manually, as in the “Putting Your Site Online” section, or using Drush), and likewise bring the user-created files from live by using the rsync command. Next, bring the code changes over to your test site (a clone and working copy of the repository). You can use something like the following commands:
ssh [email protected]

cd /var/www/dgd7

git pull
![]() Note As with every step in this chapter, you can see an example of helper scripts in the (evolving) practice of one Drupal shop at
Note As with every step in this chapter, you can see an example of helper scripts in the (evolving) practice of one Drupal shop at data.agaric.com/deploying-the-agaric-way.
Don't forget to go to update.php, as in http://test.example.com/update.php, if your code changes include any database updates that need to be run. (Updated core and contributed code, even for security releases, can require updating something in the database, so if you aren't completely sure, go to update.php on your site to check.)
When everything has been checked out, you can make the code change on production (continuing to use source control as a deployment tool or using rsync for the go-live) and run update.php, exactly as you did on the test site.
How to Put “Everything In Code”
The approach outlined in this chapter is to export or otherwise capture in code all changes that you wish to make to a site. It's work—though the tools and techniques mentioned here make it less work—but the benefits are substantial.
- Code can be versioned and there are well-established procedures for resolving conflicts between different versions of the code using version control tools. You can see who did what change and when.
- The quality assurance (QA) environment enables you to test exactly what will happen when you take changes to production.
- Separated configuration and content means that your updates don't overwrite user activity on the live site.
In short, you want to capture in code every single configuration thing you possibly can. There's a movement in Drupal to make configuration exportable, and they have successfully implemented this idea for the most important elements of modern Drupal configuration: content (node) types, fields, and views. Arguably, most menus, blocks, and taxonomy can be considered configuration and thus given over to the control of code rather than the user interface on a live site. The Chaos Tools project (drupal.org/project/ctools) brought us the clearly defined concept of exportables and tools to help other modules export their configuration. Much of this has been further automated by the Features project, which is the most convenient way for most people to get configuration into code, and so is covered next.
Features
The Features project (drupal.org/project/features) is not the only approach to putting site configuration in code. Even within a single Drupal shop, some teams may only use update hooks (covered next), and some may use the Features module. However, there is pretty universal agreement that making Drupal configuration exportable is a key part of a robust deployment solution, and Features is helping drive the automation of this.
Variations of the word “feature” are used to mean different things in the Features world, and the distinctions are important. This book follows the official definitions:
- Features: The Drupal module that allows for the capture of configuration into code.
- Feature: A module that contains a collection of Drupal parts that do something specific.
- feature: Something you want your web site to do.
- features: A set of things you want your web site to do.
“Yes, I'm sorry. It seemed like a good idea at the time.”
—Jeff Miccolis, Development Seed, on the terminology used by Features
To use these forms in a sentence: A Feature module (which is created by the Features module) will typically have a tightly related set of features. See Figure 13–2 for a typical workflow of how a feature becomes a Feature module and can be deployed to another site.
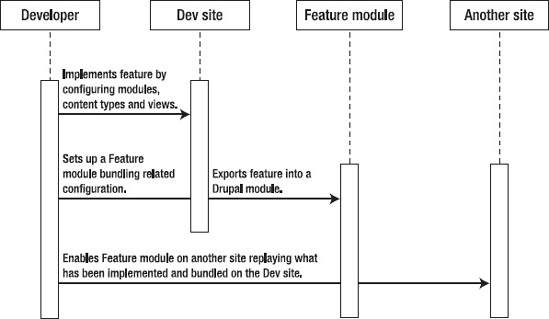
Figure 13–2. From feature to Feature module
Drupal developers working on a relatively simple site can choose to have just one Feature module for the whole site. The single sitewide update Feature evolves with the site. Separate custom Feature modules can be useful for multiple developers working on a complex site. The real ideal of Features, however, is a shareable Feature module that encapsulates useful functionality and configuration that can be deployed on multiple sites. See the Kit specification (drupal.org/project/kit) for best practices for making a shareable Feature.
![]() Tip Major new developments related to a given piece of functionality should be done in a dedicated custom module or, better yet, a module you contribute on
Tip Major new developments related to a given piece of functionality should be done in a dedicated custom module or, better yet, a module you contribute on drupal.org. Use of Features for content types and views and other elements specific to your site does not prevent you from handling the export and storage of selected of these elements with individual modules, when their use can be generalized. These additional modules you make can also use and require the Features, or not. In either case, they would be required by the sitewide Feature module to keep everything tied together.
Features and Drupal 7 core do fairly well at exporting content types, fields, permissions, input filters, menu items, image styles, and taxonomy vocabularies. And if necessary, it's possible to hook up almost anything else to CTools' exportables framework yourself. In this way, you can make additional or custom modules' database-stored configuration exportable. (For contributed modules, check their issue queue first for other's progress!) Additional modules add to Features export and restore capabilities. In particular, the Strongarm module (drupal.org/project/strongarm), which also requires CTools, can be used by modules (including the Features module) to export and override settings stored in the much used and abused variable table.
What all this gives you is the ability to configure your Drupal site as always through the administrative UI (creating content types, views that use these content types, image styles that fields in these content types use in different views and view modes, etc.) and then, using Features UI or Drush, export it all to code and into a Feature module.
![]() Tip The Features module allows you to automate and do through the graphical user interface what would be a lot of custom coding. You make your changes locally, and Features exports your changes into code in a special Feature module.
Tip The Features module allows you to automate and do through the graphical user interface what would be a lot of custom coding. You make your changes locally, and Features exports your changes into code in a special Feature module.
Telling a Feature to use what it has in code is called reverting a feature, which is confusing from the perspective of the workflow followed in this chapter because we're actually updating. Features calls this reverting because using a Feature module's saved configuration reverts to what is in code; it is only because you are not making any changes through the user interface on the live site that this always results in an update, and not what you would commonly think of as reverting.
Writing Update Hooks
This is the approach mentioned as an alternative to the Features approach, but really it's complementary. Export functionality is often still inconsistent and incomplete, but you can supplement exportables and Features-generated modules with your own custom code.
The essence of this approach is still the same: all changes are coded in a module. You write your own update code for every change you make. Each new change that affects the database goes in a hook_update_N() function, and the same change goes in hook_install() or hook_schema() to be kept in synch. See api.drupal.org/hook_update_N for the basics of update hooks.
![]() Tip We highly recommend even if you are doing everything with features to also write an update hook to trigger the feature with
Tip We highly recommend even if you are doing everything with features to also write an update hook to trigger the feature with features_revert().
Try to use APIs, rather than direct database calls, whenever possible in your update hooks. (Note, though, that for creating content programmatically, API functions such as node_save() don't always pull in everything properly; faking out a form array and submitting with drupal_form_submit() may prove necessary.)
![]() Note Anything that can be done in your module by submitting a form should also be doable with a line of code. Indeed, the
Note Anything that can be done in your module by submitting a form should also be doable with a line of code. Indeed, the submit function that handles your form should always use an API function to save the change. Unfortunately, Drupal core itself is not there yet, so you will sometimes have to resort to faking out a form and using drupal_form_submit() rather than a proper API function. For instance, node_save() currently fails to accept free-tagging taxonomy terms except when called in the context of drupal_form_submit().
Dependencies have to be really careful to do things in the right order. Keep in mind that update code runs for disabled modules, and in this case you must explicitly load any code you need for this module that is not in its .install file. First, check if a module is enabled with ifmodule_exists().
This chapter does not go into the details of using Feature modules nor writing update hooks. The latter is covered in the context of module development in Chapter 24. Look for updates and resources at dgd7.org/deploy; for examples using Features and update hooks to add features to a site, follow dgd7.org/anjali.
Creating, Editing, and Reviewing Content on Production
This chapter's approach entails that all content changes be made on a live site, with robust revision moderation as needed, using Drupal's capabilities as a CMS, and that you not try to deploy content changes from a staging site. (Instead of a place for content creation or configuration, the staging site in this workflow is the place where the live production site's database and the development sites' code are tested together.)
The approach discussed in this chapter takes staging content out of the equation. Do it on live. Use the staging site for confirming that bringing the literally codified development changes to a copy of the live database works as expected, then bring the code changes live and enable the feature/run update.php.
For “staging” content on live (creating or editing and reviewing before anything is made public), there are several options for main content that extend Drupal's content management capabilities. For instance, the Revision moderation module (drupal.org/project/revision_moderation) allows content to be edited without the edits going public until after they have been reviewed. (At the time of this writing, it was in the process of being ported to Drupal 7.)
Another module to protect live content from breaking is the Path redirect (drupal.org/project/path_redirect) module. Path redirect ensures that even if Pathauto module changes the path of a piece of content because, for instance, the title changed, the old path redirects to the new URL.
If your publishing needs mandate that content be staged on a separate site, we refer you again to the Deploy module (drupal.org/project/deploy). However it happens, if significant content is already or does get generated on a development or staging site, Deploy or possibly Feeds (drupal.org/project/feeds) or Migrate (drupal.org/project/migrate) may be called for.
Node export (drupal.org/project/node_export) could also work, and it can create code that can be run in update hooks by update.php to import the exported content. If doing this, the Pathologic module (drupal.org/project/pathologic) can be used to fix absolute paths in content.
Pages or Content Sections That Require Functionality
Pages and sections with a great deal of functionality can be created via hook_menu() and callback functions instead of as nodes. See api.drupal.org/hook_menu and Chapter 29.
![]() Tip If the PHP Filter module is enabled, try to disable it. PHP Filter module should not be used to provide functionality on node (content) pages. Avoiding that is a good idea from both code quality and deployment perspectives. For placing functionality, rather than content, on a page or part of a page, use Drupal's
Tip If the PHP Filter module is enabled, try to disable it. PHP Filter module should not be used to provide functionality on node (content) pages. Avoiding that is a good idea from both code quality and deployment perspectives. For placing functionality, rather than content, on a page or part of a page, use Drupal's hook_menu(), hook_block(), or hook_page_build().
You can make content to go with your functionality—you can have code create content—but this is problematic where content has to relate to each other (e.g., primary key issues). This is a priority for Drupal 8, and a lot of thought is being put into Universally Unique Identifiers (UUIDs).
Development Workflow Recap
There are many possible development workflows. It's important that you safeguard production data and incorporate testing, and that everyone you are working with understands and follows the same approach. A basic development workflow is to pull content and user data from a live site (if any), add features and fix bugs locally, push the changed code to a staging site for people to test it, and only after testing, push it to the live site.
- New functionality is added to an existing or new module. Database-related aspects of this functionality are exported using Features (and committed to a module) or more manually encoded into a module.
- Other developers can pull from the developers repository (or from a central repository), run
update.phpin a browser on the development environment, and have a working version of the site. - Fresh imports of the production database are taken regularly in the development process, but particular attention is paid to taking a fresh copy and doing quality assurance on stage with code updated and
update.phprun, but with no manual configuration changes, before updating the code and runningupdate.phpon live. - If necessary, create shared development environments for collaboration on database configuration (before these changes are exported to code) but keep stage for quality assurance.
![]() Tip Set up testing for your development (in part, an automated deploy to staging) with Jenkins Continuous Integration tool (
Tip Set up testing for your development (in part, an automated deploy to staging) with Jenkins Continuous Integration tool (jenkins-ci.org). See groups.drupal.org/node/47686 for a Drupal-oriented setup. (Note that Jenkins was called Hudson until 2011; it is the same software but was renamed to preserve its independence as a Free Software project.)
Summary
This is just one approach to deployment. The concept of “everything in code” is most comfortable to people who like making modules, but the Features project makes it a reasonable approach for people who prefer the site builder role.
![]() Note See reader comments and updated links to resources at
Note See reader comments and updated links to resources at dgd7.org/deploy. To see the principles of code-driven deployment put into practice, follow the Anjali project at dgd7.org/anjali.
We encourage you to consider deployment from the needs of your site and your team's workflow. You may find that a variation of the approach outlined here works best, or you may find a completely different alternative to be preferable. This is an area of a lot of movement and potential in Drupal, and the more people who get involved, the better it can be. See the Packaging & Deployment group at groups.drupal.org/build-systems-change-management to follow some of the conversations about developing better deployment tools and techniques in Drupal 7 and beyond.