
P A R T IV
![]()
Front-End Development
Chapters 15 and 16 take you on a thorough tour of using Drupal's theming system to transform how your site looks in ways that are both powerful and maintainable.
Chapter 17 introduces another key part of front-end development, enhancing site visitor experience with JavaScript, and in particular the powerful and relatively easy-to-use, even fun, jQuery library.
See also Appendix D, which covers designing for Drupal.
C H A P T E R 15
![]()
Theming
Drupal's theme layer, and the themes that use it, are responsible for the look and feel of a Drupal web site. Good themes consist of all the same elements that you would find on any reputable web site, including standards-compliant XHTML markup, CSS, and JavaScript. How it all comes together is what is so special and what makes Drupal themes so flexible and powerful.
Drupal themes can be as simple or as complex as you need them to be. Themes have the final say and ultimate control over almost every aspect of each page. Like Drupal itself, themes are flexible and powerful. Admittedly, taking full advantage of Drupal's theme layer means overcoming a rather steep learning curve, and without a general understanding of what's going on under the hood, it is easy to make mistakes early on.
In this chapter, you will learn about the basic aspects of Drupal's theme layer. You'll learn how to go about making customizations and changes in a sustainable way and best practices for common tasks. You will be well on your way to creating flexible and sustainable custom Drupal themes in no time! The next chapter will build on this one and will cover the more advanced intricacies of Drupal themes.
Some of the examples you'll find throughout this chapter and the next can be found in the DGD7 theme. It's available at https://github.com/jacine/dgd7 for download if you'd like to follow along.
The Core Themes Directory
When starting out, one of the first things people do is navigate to the core /themes directory and take a look at the files in the themes to get an idea of the general structure and contents. Unfortunately, many people make the mistake of starting out by directly customizing core themes. Do not make this mistake! They usually run into roadblocks and frustration shortly thereafter. Drupal has a large and diverse user base, and the main goal of a core Drupal theme is to cater to the masses.
Aesthetics aside, core themes have many requirements and different use cases to satisfy. A few themes support the Color module in order to make it easy for site administrators to change color schemes in the user interface. This is not a bad thing; however, it can easily become confusing and frustrating when trying to customize colorized themes because CSS is generated programmatically and stored outside of the theme directory. Core themes must also function if used as an administration theme and they must support bidirectional text; in general, they can't stray far from Drupal's default regions and settings.
It's not easy to please everyone, and Drupal core themes have the tough job of trying to do just that. As a result, core themes are nowhere near as flexible or as cutting edge as they could be. Most of the time, your goal and approach will be very different when creating custom themes. You'll be able to focus on coding your own front-end or back-end focused design, customize the markup, decide which CSS files to use (if any), and other exciting decisions.
Core Themes
Drupal core contains four themes. They are introduced in the following sections.
Bartik
Bartik is a new and welcome addition to Drupal 7. Drupal enables Bartik as the default user-facing theme upon installation. It is a clean and simple theme that supports the color module and makes excellent use of regions (see Figure 15–1). In addition to the default regions Drupal recommends, the Bartik theme has seven custom regions for laying out blocks in the footer and sub-footer.
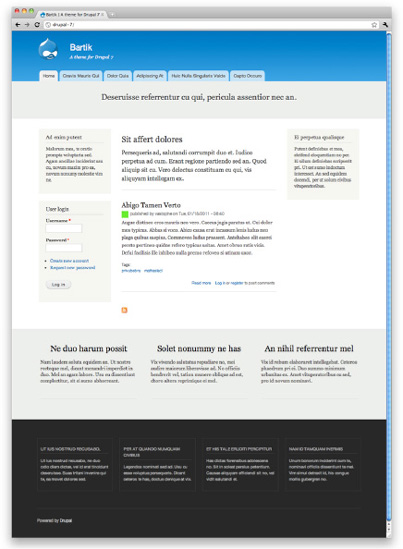
Figure 15–1. Bartik is a clean and simple theme.
Garland
Garland originally made its debut as a core theme in Drupal 5. It is a more complex theme with excellent color module support (see Figure 15–2). It contains fifteen color schemes and provides an option to toggle between a fixed or fluid layout.
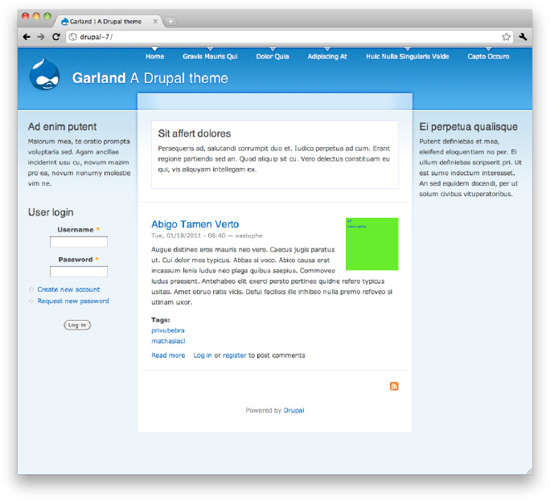
Figure 15–2. Garland is a more complex theme with excellent color module support.
Seven
Also new to Drupal 7, Seven is Drupal's default administrative theme. Born out of the Drupal 7 User Experience project (http://d7ux.org), Seven drove many of Drupal's user interface improvements. It contains very few regions, as its focus is on performing administrative tasks (see Figure 15–3).
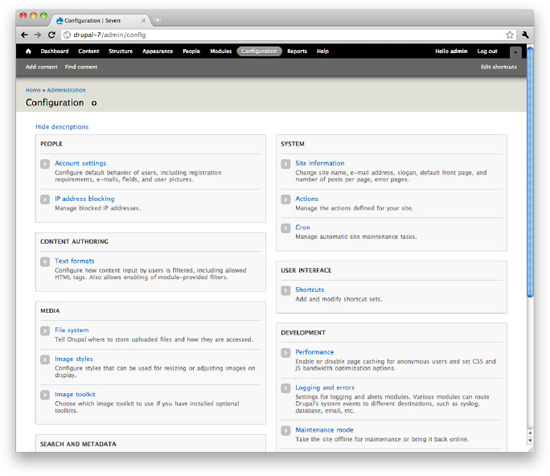
Figure 15–3. Seven is Drupal's default administrative theme.
Stark
Stark is a unique and literally minimal Drupal theme (see Figure 15–4). Its main purpose is to expose Drupal's default HTML markup and CSS. It does not provide any template files and barely provides any CSS at all, other than basic layout styles that place the default sidebar regions. Don't let its simplicity fool you; it is actually quite useful. Stark is the perfect theme for developers to code against when writing CSS for their modules. It can also assist theme developers when trying to troubleshoot issues where they're not positive if the problem is with their theme or another module.
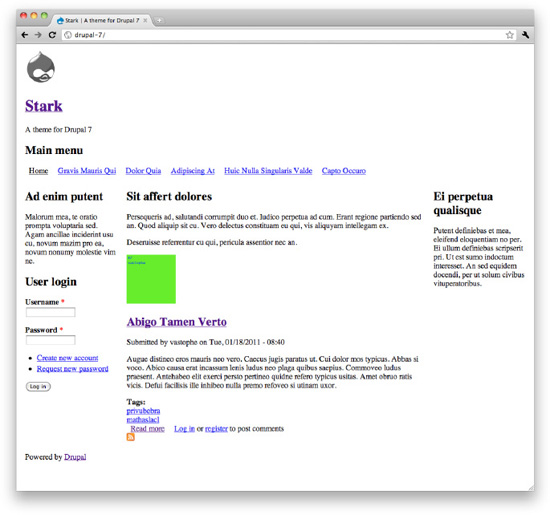
Figure 15–4. Stark is a unique and literally minimal Drupal theme.
Theme Engines
Drupal's theme directory also has an engines directory that contains a theme engine called PHPTemplate. Theme engines provide an easy way to separate themable output into template files as opposed to plain old PHP. The main benefit of using the PHPTemplate engine is that separating logic from presentation is simplified. Those who are unfamiliar with PHP can accomplish a great deal because they are able to work in template files that mainly contain markup and print variables.
While other theme engines such as Smarty, XTemplate, and PHPTal may be used, PHPTemplate is Drupal's default theme engine andis by far the most popular theme engine used by Drupal themes (and many popular contributed modules), so we will cover it in this chapter. It is also possible to write pure PHP Drupal themes. See the Chameleon theme for an example of a pure PHP theme at http://drupal.org/project/chameleon. For a full listing of available theme engines, visit http://drupal.org/project/theme+engines.
Theme Administration
Theme configuration tasks are located in the Appearance section of Drupal's administration. This is where you can control things like which themes you want to enable or disable, which settings you want to apply, which color scheme you want to use (if your theme supports the color module), and more.
Enabling and Setting a Default Theme
In a fresh installation of Drupal 7, the default theme (Bartik) appears at the top of the Appearance page, followed by other enabled and disabled themes (see Figure 15–5). What is a default theme? Simply enabling a theme is not enough with Drupal. Setting a theme as the default is what makes it the front-end theme (the theme your site visitors will see).
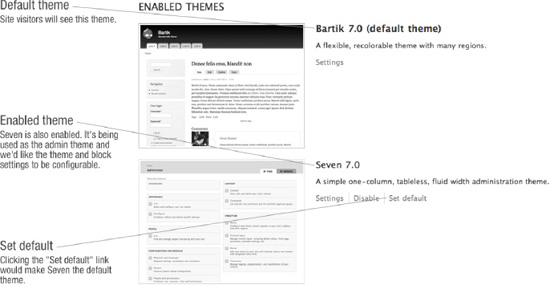
Figure 15–5. The Appearance page in a default installation showing enabled themes
Enabling a theme without setting it as the default is useful when you want your site to utilize multiple themes at once. This setting is typically more useful when used in conjunction with contributed modules. An example of this is the SwitchTheme (http://drupal.org/project/switchtheme) module, which allows users to change the site theme by selecting the name of a theme from a list that is populated with all enabled themes.
Administration Theme
In Drupal 7, the Seven theme is the default administration theme. The administrative theme is used when performing all administrative tasks, most of which happen under the /admin path. You can also choose to allow the administrative theme to be used when editing site content. Although some themes support Drupal's administrative interface better than others, any Drupal theme can be used as an administration theme if desired.
The administration theme's configuration settings are located below the theme listings on the admin/appearance page. To use the same theme in both the front and back end of your Drupal site, simply choose Default theme as the Administration theme.
Global Theme Settings
Drupal comes with some theme settings that can be configured in the administrative interface. This is where most of the site identity assets are defined, as well as a couple of other miscellaneous settings. AGlobal Settings page located at admin/appearance/settings contains these settings. When global settings are saved, the settings apply to all themes. Each theme also has its own Settings page accessible via a Settings link located next to each enabled theme on the admin/appearance page. When theme settings are applied on an individual theme's Settings page, they override the global settings. The following sections will detail what each of these are and where you'll encounter them in your themes.
Quite a few of these settings determine whether or not variables are populated and therefore printed in template files. The settings pictured in Figure 15–6 represent the defaults provided by Drupal. These can be overridden by themes by defining features in the theme's .info file, which is discussed further in the “Defining Theme Metadata” section. When specifying features in .info files, you'll need to make sure you include all the features you want to support, as having just one will override all of the defaults provided by Drupal. The following is a quick reference of these settings as they'd be entered in a .info file:
features[] = logo

features[] = name

features[] = slogan

features[] = favicon

features[] = main_menu

features[] = secondary_menu

features[] = node_user_picture

features[] = comment_user_picture

features[] = comment_user_verification

Figure 15–6. The Global Settings page
Logo
By default, Drupal will look for a file named logo.png in the root of the theme directory. There is also an option to specify a path to a different file to use for the logo, as well as the ability to upload a logo to use. When the Logo checkbox is checked, a variable called $logo is populated with the path to the logo, which will be available in page.tpl.php. If unchecked, the logo will not print.
Name and Slogan
The site name is defined during the installation process. Both the site name and slogan can be changed on the admin/config/system/site-information page. On the theme'sSettings page, you can toggle their visibility. Both are available in page.tpl.php as $site_name and $site_slogan.
Shortcut Icon
The shortcut icon, also known as the favicon, is the small Drupal icon that appears in the address bar, bookmarks, and tabs of most browsers. Like the logo, the shortcut icon's visibility can be toggled and a custom file can be used. The default file is misc/favicon.ico.
User Pictures in Posts and Comments
These settings control whether or not the variables $user_picture in node.tpl.php and $picture in comment.tpl.php are populated, and therefore whether or not the pictures are displayed when viewing nodes and comments.
User Verification Status in Comments
This option will display “(Not verified)” next to the user name for users that do not have a verified account. This text is defined in template_preprocess_username() and printed in theme_username() as $variables[‘extra']. See the “Preprocess and Process Functions” and “Theme Functions” sections to learn how to change this.
Main and Secondary Menus
When the checkboxes for the Main and Secondary menus are checked, $main_menu and $secondary_menu variables are populated in page.tpl.php with arrays containing the menu links for each menu. On the Menu Settings page, located at admin/structure/menu/settings, you can choose which menu is used for each. By default, the Main menu, which can be managed at admin/structure/menu/manage/main-menu, is used as the source that populates $main_menu. The default menu for the source of the Secondary menu is the User menu, which can be managed at admin/structure/menu/manage/user-menu.
These are simple one-level menus output using the theme_links() function (which will be covered later in this chapter) in page.tpl.php. This makes them hard to use when styling complex navigation designs. Because complex navigation is often required, many theme developers create regions for navigation and use blocks to output their menus instead of using these menus. We highly recommend the Menu Block module (http://drupal.org/project/menu_block), which allows you to do pretty much anything you'll ever need to do with menus very easily.
Custom Theme Settings
Custom theme settings are similar to the global theme settings and can be provided by themes and modules. An example of custom theme settings can be found in the Garland theme in the garland.info file. It creates a setting called garland_width that can be set to fixed or fluid. The Shortcut module also provides a setting to display the “Add or remove shortcut link” used in the Seven theme to provide the icon you see in the Overlay next to the title. To learn how to create custom theme settings for your theme, visit http://drupal.org/node/177868.
Installing a New Theme
Drupal scans its theme directories for available themes, so it's important that you place your themes in the right place for Drupal to recognize them. You might also be tempted to add themes to Drupal's /themes directory, but technically this is considered “hacking core” and should be avoided. After downloading and unpacking your theme, choose one of the following directories in which to place the theme. Using one of these directories will help ensure that any updates you make to Drupal itself will not result in accidentally overwriting your theme.
sites/all/themes: Use this directory when you want the theme to be available to all sites in your Drupal installation.sites/sitename/themes: Use this directory when you only want the theme available to a specific site in your multisite Drupal installation.
You may also use the theme installer to download and install contributed themes by clicking the Install new theme link at the top of the Appearance page. This will bring you to a form where you can enter the link to the project download's tarball location and click Install. The theme installer will automatically download your theme and place it in the sites/all/themes directory. Once completed, you can enable the theme as usual on the admin/admin/appearance page.
Defining Theme Metadata (.info Files)
.info files (pronounced “dot info files”) contain important metadata about your theme, such as the name of the theme, which version of Drupal it supports, as well as things like the stylesheets and regions the theme will contain. Writing a .info file is usually the first step you take when creating a Drupal theme.
The first part of the file name is the machine-readable name of the theme, which Drupal uses to store information about your theme in the database. Dashes and other special characters are not allowed. While underscores are allowed, it is considered a best practice to avoid using them when naming your .info file. Use themename.info instead of theme_name.info. This name will also be used to prefix function names when implementing theme function overrides. When overriding theme_menu_link(), for example, a function named themename_menu_link() is considered easier to read than theme_name_menu_link() when trying to determine the override being performed.
![]() Caution Your theme (machine) name must be unique. Do NOT to give your theme the same name as any existing modules as it will likely cause namespace issues and make it difficult to track down PHP errors.
Caution Your theme (machine) name must be unique. Do NOT to give your theme the same name as any existing modules as it will likely cause namespace issues and make it difficult to track down PHP errors.
Each theme requires some basic properties to be set in the theme's .info file. The name, core, and engine properties are the bare minimum requirements for all Drupal themes. The following sections contain a brief description of each available property followed by an example of the syntax.
![]() Tip To add comments to your .info file, add a semicolon to the beginning of each line, like so:
Tip To add comments to your .info file, add a semicolon to the beginning of each line, like so: ; This is a comment. Comments are good. Make frequent use of them.
Required Properties
Core: Drupal will only allow your theme to be enabled if the core setting is set to support the current major version of Drupal. Major versions are simply
6.x,7.xor8.x, and so on.core = 7.xName: The human-readable name of your theme. It doesn't need to match or resemble the machine-readable name, so feel free to be creative here.
name = Theme Name
Additional Properties
Base theme: Drupal allows themes to establish a relationship with each other. Creating a subtheme allows you to inherit the functionality and assets of the base theme (more on this in the next chapter). When creating a subtheme, you'll need to specify the base theme. It's important that the machine name of the base theme is used here.
base theme = themenameDescription: The basic features or purpose of the theme should be described here. The description will appear in the
admin/appearancepage and may contain HTML.description = The description of my themeEngine: Specifies the theme engine. PHPTemplate is the default and most common, so unless you want to change this, it doesn't have to be manually set. Other options include
smartyandthemefor a pure PHP theme (see Chameleon athttp://drupal.org/project/chameleonfor an example).engine = phptemplateFeatures: Setting features are a way of overriding Drupal's default global theme settings. The following is a list of the default theme settings provided by Drupal. These settings can be toggled on an off in the administrative interface on the Settings page of each theme. Specifying even one will disable Drupal's defaults and use yours.
features[] = logo

features[] = favicon

features[] = name

features[] = slogan

features[] = node_user_picture

features[] = comment_user_picture

features[] = comment_user_verification

features[] = main_menu

features[] = secondary_menu
PHP: Drupal 7 supports PHP version 5.2.5, and by default, so does your theme. This is something you will probably never need, but in case your theme has code that only works with a certain version PHP, you may specify it here.
php = 5.3Regions: Regions are sections of your page layout where content (blocks) are placed. Each entry is prefixed with
regionsand contains the system name of the region in brackets with the human readable name as the value. For example,regions[system_name] = Human readable name. The default regions are as follows:regions[page_top] = Page Top
regions[header] = Header
regions[highlighted] = Highlighted
regions[help] = Help
regions[content] = Content
regions[sidebar_first] = Sidebar First
regions[sidebar_second] = Sidebar Second
regions[footer] = Footer
regions[page_bottom] = Page BottomSettings: The setting property is reserved for custom setting implementations in themes. The Garland theme provides a theme setting for the type of layout (fixed or fluid), which the site administrator can choose. While we won't be covering custom theme settings, we highly recommend checking out the Omega (
http://drupal.org/project/omega) and Fusion (http://drupal.org/project/fusion) themes to get an idea of how theme settings can be used. For more information, visithttp://drupal.org/node/177868.settings[garland_width] = fluidScreenshot: Drupal will automatically look for a file named
screenshot.pngin the root of your theme directory, so this line is only required if you want to use an alternative path or file name for your theme's screenshot. The recommended dimensions for the screenshot image are 294 x 219 pixels.screenshot = screenshot.pngStylesheets: There are quite a few options for adding CSS files in Drupal 7. You'll want to add stylesheets via the theme's
.infofor CSS files you want to load on every page. I'll cover this in much more detail in the Managing CSS Files section in the next chapter.stylesheets[screen][] = path/to/screen-stylesheet.css
stylesheets[print][] = path/to/print-stylesheet.cssScripts: JavaScript files can be defined in
.infofiles using thescriptsproperty. Like stylesheets, you'll only want to load JavaScript files here that need to be loaded on each page.scripts[] = path/to/script.jsversion: Specifying the version is discouraged for both contributed themes and modules. This is because
drupal.orghas a packaging script that takes care of adding the version when releases are created. However, you may use this for custom themes, if desired.version = 7.x-1.1
Now let's see the basics in action by taking a look your DGD7 theme's .info file, as shown in Listing 15–1.
Listing 15–1. The Top Portion of the DGD7 Theme's .info File
name = DGD7 Theme
description = A theme written for The Definitive Guide to Drupal 7 book website.
core = 7.x
With the exception of the core property, all of the above can be seen in the user interface on the admin/appearance page, as shown in Figure 15–7. This is all you'll need to get started with your theme.
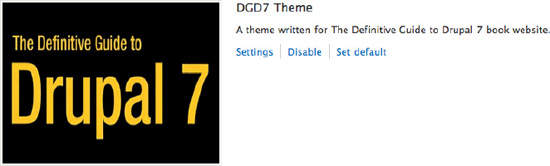
Figure 15–7. DGD7 theme as shown on the theme listing page admin/appearance.
CREATE YOUR FIRST THEME!
![]() Tip You will need to clear your site caches in order for changes in
Tip You will need to clear your site caches in order for changes in .info files to take effect! To clear the site caches, visit the Performance page at admin/config/development/performance.
Working with Regions
Most of the content found on Drupal pages is output inside a region. Typical regions include the header, footer, sidebars, and content (see Figure 15–8); these regions often play a large part in defining the high-level structure of your HTML markup. An option appears in the blocks interface at admin/structure/block for each region, allowing site administrators to control and position the blocks inside them.
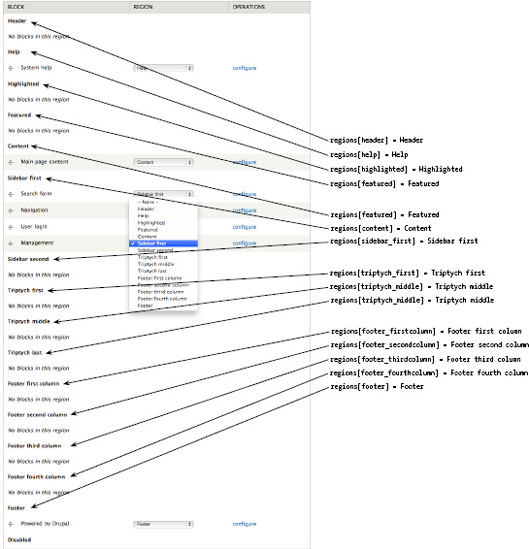
Figure 15–8. The Bartik theme's regions and block placement options on the Blocks administration page
Themes have full control over defining and determining the placement of printing and styling regions. An example of what this looks like in the Bartik theme is shown in Figure 15–9.
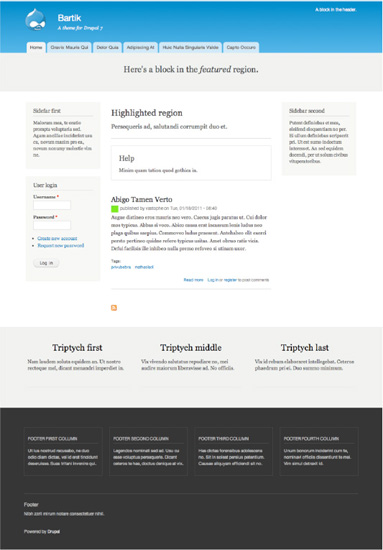
Figure 15–9. Bartik regions filled with custom blocks
In addition, themes may also use regions for less obvious purposes in combination with JavaScript or jQuery. Common use cases for regions include containing modal or hidden content to enhance the user interface or embedding blocks into node content.
Default Regions
Drupal core defines nine regions for themes to utilize programmatically by default. The code in Listing 15–2 duplicates the default core regions in .info file format. Like most theme layer implementations, the reason themes define regions is because they want to modify or add to the defaults. Until a theme defines its own regions, Drupal will use the defaults. This means that if the default regions are sufficient for your design, you will not need to define regions in your theme's .info file.
Listing 15–2. Drupal's Nine Predefined Theme Regions in Chronological Order
regions[page_top] = Page Top

regions[header] = Header

regions[highlighted] = Highlighted

regions[help] = Help

regions[content] = Content

regions[sidebar_first] = Sidebar First

regions[sidebar_second] = Sidebar Second

regions[footer] = Footer

regions[page_bottom] = Page Bottom
However, including this code in your theme's .info file to begin with is a good practice. Once you define a single region in your theme, it will override core defaults, so having the full list of defaults and commenting out regions that you have disabled (instead of deleting or omitting them entirely) is a good way to keep track of what you're doing with them. You will need some of these regions, namely the page_top, content, and page_bottom regions. These are required and must be printed in every Drupal theme to maintain a properly functioning site. An example of how one might organize regions in an .info file, taking defaults into account, is shown in Listing 15–3.
Listing 15–3. An Example of Region Implementation in a Theme's .info File
; CORE REGIONS - DISABLED

;regions[highlighted] = Highlighted

;regions[help] = Help

;regions[header] = Header

;regions[footer] = Footer


; CORE REGIONS - REQUIRED
regions[page_top] = Page Top

regions[content] = Content

regions[page_bottom] = Page Bottom


; CORE REGIONS

regions[sidebar_first] = Sidebar First

regions[sidebar_second] = Sidebar Second


; CUSTOM REGIONS

regions[my_custom_region] = My Custom Region
![]() Tip If you're curious where Drupal defines the default regions, take a look at the
Tip If you're curious where Drupal defines the default regions, take a look at the _system_rebuild_theme_data() function at http://api.drupal.org/_system_rebuild_theme_data.
As shown in Figure 15–10, the intended display of Drupal's default regions is a standard three-column layout. The gray regions are required and the rest are optional. Header, sidebar_first, sidebar_second, and footer are layout regions. The page_top and page_bottom are special regions; they are discussed in the “Hidden Regions” section of this chapter.
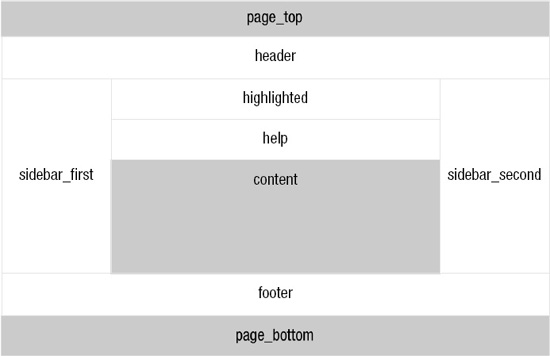
Figure 15–10. Drupal's default layout for regions
The highlighted region replaces the old Site Mission, which used to be a static variable containing the site's mission statement or a brief summary text that was output manually in page.tpl.php. The prior implementation was not ideal for a few reasons, but mainly because its display was limited to the front page. It was decided that using a custom block to display this information was a better option, so the highlighted region was created.
The Help region also used to be a page.tpl.php variable that printed error and status messages. The status messages are now displayed in a block called System help and the Help region was created to contain it. However, the System help block may easily be placed inside the Content region, weighted above the Main content block for the same effect.
The Content region is new to Drupal 7. It was introduced to contain the Main page content block, which is somewhat special because it can be moved from region to region but can't be disabled. Since the Block module is optional and the contents of the Main page content block are critical to operate a Drupal site, the contents of this block will always display via the $page[‘content’] variable in page.tpl.php.
As a result, some of the Block module's functionality doesn't work as you might expect. If you place the Main page content block in the disabled area or set block visibility settings to exclude it from a page, the Block module's UI will lead you to believe that it has been disabled. However, the content will still appear. You'll also notice changes in the markup, which may lead to undesired results, such as un-styled content, depending on how your CSS is written.
Hidden Regions
Notably missing from the options on the Blocks administration pagein Figure 15–8 are the page_top and page_bottom regions. Both are hidden regions, which Drupal intentionally excludes from the user interface so that site administrators can't interact with or control their content. The main purpose of hidden regions is to act as a placeholder where modules or themes can dynamically add markup to in a structured way. Themes may declare hidden regions within .info files by using the following syntax, with each region on a separate a line:
regions_hidden[] = the_region_name
Both the page_top and page_bottom regions are printed in html.tpl.php (see Listing 15–4) and should not be removed or rearranged. The page_top region, for example, is utilized by the Toolbar module to add the markup needed for the administrative toolbar shown at the top of each page when a user is logged in as a site administrator. The page_bottom region exists for modules to add any final closing markup, which specifically needs to be at the very bottom of the page. An example of this is the Google Analytics module, which adds markup to load JavaScript files that track the site visitor activity and needs to be loaded last. The page_bottom region replaces the $closure variable that was used in prior versions of Drupal.
Listing 15–4. The Contents of html.tpl.php, Highlighting the Placement of the page_top and page_bottom Regions
<!DOCTYPE html PUBLIC "-//W3C//DTD XHTML+RDFa 1.0//EN"

  "http://www.w3.org/MarkUp/DTD/xhtml-rdfa-1.dtd">

<html xmlns="http://www.w3.org/1999/xhtml" xml:lang="<?php print $language->language; ?>" version="XHTML+RDFa 1.0" dir="<?php print $language->dir; ?>"<?php print $rdf_namespaces; ?>>

<head profile="<?php print $grddl_profile; ?>">

  <?php print $head; ?>

  <title><?php print $head_title; ?></title>

  <?php print $styles; ?>

  <?php print $scripts; ?>

  </head>

<body class="<?php print $classes; ?>" <?php print $attributes;?>>

  <div id="skip-link">

    <a href="#main-content" class="element-invisible element-focusable"><?php print t('Skip to main content'), ?></a>

  </div>

  <?php print $page_top; ?>

  <?php print $page; ?>

  <?php print $page_bottom; ?>

</body>

</html>
![]() Tip Drupal uses
Tip Drupal uses hook_system_info_alter() to declare the page_top and page_bottom hidden regions. For more information, see http://api.drupal.org/api/function/system_system_info_alter/7.
Module-Specific Regions
The Dashboard module's Dashboard Main and Dashboard Sidebar regions are an example of regions created by a module. These regions are nontraditional in the sense that they can't be administered via the Blocks administration page, and the theme does not control defining or printing them. The Dashboard module defines them programmatically using hook_system_info_alter() and takes care of displaying them on the administrative Dashboard located at /admin. The Dashboard module allows you to drag and drop available blocks to those regions to create a dashboard for site administrators (see Figure 15–11).
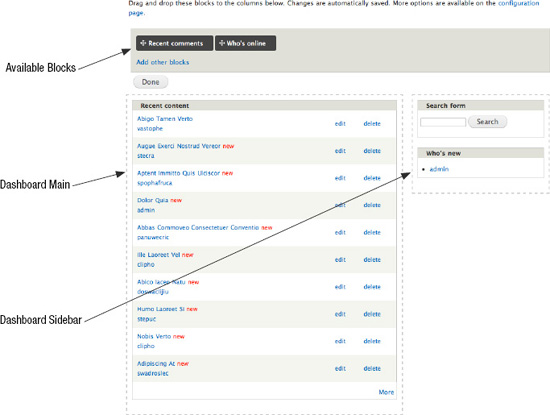
Figure 15–11. Administrative Dashboard in edit mode
Regions and Your Theme
Getting started with your theme regions requires taking a good look at design requirements as well as planning for the unexpected. There are many things to consider, including how site administrators will need to work with blocks and regions, what types of content you have, and how regions play a part in your general layout strategy. As discussed earlier, the default regions are a great starting point. We recommend that you begin defining the defaults in your theme's .info file and tweaking from there, as shown in Listing 15–5.
Listing 15–5. Drupal's Default Regions
regions[page_top] = Page Top

regions[header] = Header

regions[highlight] = Highlight

regions[help] = Help

regions[content] = Content

regions[sidebar_first] = Sidebar First

regions[sidebar_second] = Sidebar Second

regions[footer] = Footer

regions[page_bottom] = Page Bottom
![]() Tip In addition to defining regions in your theme's
Tip In addition to defining regions in your theme's .info file, you'll need to print it in the appropriate template file. The page_top and page_bottom regions print in the html.tpl.php template and the rest print in page.tpl.php. Printing regions and template files are discussed in more detail later in the chapter.
Using Regions vs. Hard-coding Variables in Template Files
When deciding whether or not to use regions in your theme, it's useful to consider the content that will be included in each section, how likely the position of the content is to change, and who needs to be able to change it. Blocks are flexible by nature and were designed to allow site administrators to easily move them around. This can cause problems if blocks are expected to be in a certain region and then moved or reordered.
When working on a site alone, or when only a few trusted individuals have control over the configuration of blocks, this is probably not something you need worry about. Alternatively, in cases where less trusted individuals have access and can potentially cause problems, taking extra measures to identify potential problem areas and doing what you can to prevent them is well worth it. For example, headers and footers are especially prone to this sort of problem. They usually have a tightly defined design and CSS to match. When blocks are moved around inside these regions, especially highly styled content such as the main menu navigation, things can go wrong quickly in the wrong hands. Sometimes defining an additional region, even if its purpose is to hold only one block, is a safer option compared with placing the block in the header region with other blocks. This will help ensure it is always printed in the right location and reduce the chance of user error. If site administrators do not need control over positioning, it may be best to print using a hardcoded variable in page.tpl.php, where it can't be affected by actions taken in the blocks interface.
As a general rule, consider using a region when content needs to be moved between regions or rearranged in the Blocks interface. When content doesn't need to be controlled via the Blocks interface, and it is risky for it to be there, consider hardcoding it in template files so it can't be affected by actions taken in the Blocks interface.
![]() Tip The main menu
Tip The main menu ($main_menu) and secondary menu ($secondary_menu), which are located in page.tpl.php, are examples of hardcoded variables.
Layout Strategies
The core defaults for sidebars (Sidebar First and Sidebar Second) were designed to handle multiple sidebar combinations with the help of body classes. Drupal is extremely flexible, and pages can be changed on a whim. Whether this will actually look good or not depends on how flexible and well coded the theme is. Since Drupal only prints regions that contain content, having a well planned and flexible layout is very important.
For example, let's say you have a two-column layout theme where the first column contains the main content and the Sidebar First region contains a single block. If you were to set the visibility of that block to only show on the home page, the entire Sidebar First region would only print on the home page and the inside pages would print just the main column. If your layout CSS only accounts for having both of those columns on each page, instead of including CSS for both a single column and the two-column, your layout will break. While regions are fairly easy to add or modify at any given time, oversimplifying the layout in the beginning of a project may come back to bite you in the form of extra CSS work. However many sidebars your theme will have, it's generally best to account for all possible sidebar combinations (one, two, or three columns) to avoid running into problems down the line. A great way to do this easily and sustainably is to use an established base theme.
There are also certain types of content that often work better in separate regions. For example, custom blocks containing advertisements and blocks that have significantly different design requirements are often easier to work with and write CSS for when they are abstracted. Figure 15–12 shows what adding a region for an ad banner and main navigation might look like.
It is also important to consider how the pages will be built and who will be working with them. If your site is going to be using regions and blocks to implement more complicated designs and you want to make it easy for site administrators to use, it may make sense to predefine multiple regions to lay out smaller sections of your pages. A good example of this is the Bartik theme, which contains seven additional regions to organize blocks in the footer, as shown in Figure 15–13. The same look could be achieved by defining two regions (Footer First and Footer Second) instead and style them using CSS to float the blocks in each to the left, but Bartik's implementation, shown in Listing 15–6 and illustrated in Figure 15–13, is arguably easier to understand for those who are not interested in the inner-workings of the code and just want to use the theme.
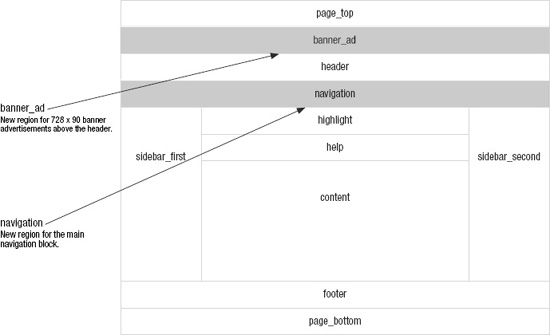
Figure 15–12. Example of custom advertisement banner and navigation regions
Listing 15–6. Excerpt from Bartik Theme's .info File Where Its Seven Custom Regions Are Defined
regions[triptych_first] = Triptych first

regions[triptych_middle] = Triptych middle

regions[triptych_last] = Triptych last

regions[footer_firstcolumn] = Footer first column

regions[footer_secondcolumn] = Footer second column

regions[footer_thirdcolumn] = Footer third column

regions[footer_fourthcolumn] = Footer fourth column
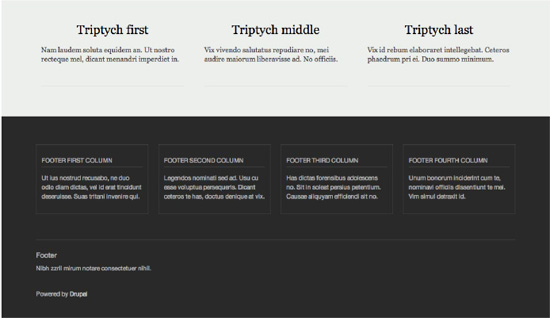
Figure 15–13. Populated footer regions in the Bartik theme
CREATING NEW REGIONS
Template Files
Drupal core, its modules, and contributed modules provide much of their output in the form of template files. Template files consist of HTML markup and PHP variables. This makes it fairly easy for those with little or no PHP experience to make changes to HTML code.
A simple example of a template file is user-picture.tpl.php (see Listing 15–7). This template is located in the modules/user directory and its purpose is solely to print a site user's picture as either an image or an image with a link (depending on whether or not the user viewing the photo has access to view user profiles). It wraps the picture in a <div class="user-picture">. This template file will be used anywhere the user_picture theme hook is called, such as the user profile page and author information for nodes and comment (where enabled).
Listing 15–7. Contents of user-picture.tpl.php File
<?php
// $Id: user-picture.tpl.php,v 1.5 2009/08/06 05:05:59 webchick Exp $
/**
* @file
* Default theme implementation to present a picture configured for the
* user's account.
*
* Available variables:
* - $user_picture: Image set by the user or the site's default. Will be linked
* depending on the viewer's permission to view the users profile page.
* - $account: Array of account information. Potentially unsafe. Be sure to
* check_plain() before use.
*
* @see template_preprocess_user_picture()
*/
?>
<?php if ($user_picture): ?>
<div class="user-picture">
<?php print $user_picture; ?>
</div>
<?php endif; ?>
A typical page on a Drupal site is essentially a big tree of nested template files and theme functions. As Figure 15–14 illustrates, this tree begins with larger templates such as html.tpl.php and page.tpl.php files and goes all the way down field.tpl.php, which is used to print fields.
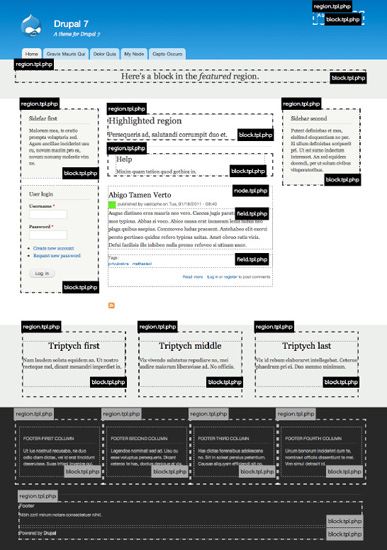
Figure 15–14. An example home page using the Bartik theme, which highlights the use of major template files and many custom regions
Common Core Templates
Drupal core contains over forty template files, but there are six major template files (described in Table 15–1) that are tasked with making up the majority of each page. These major template files are the ones you'll be working with most when writing Drupal themes and they will allow you do most of the heavy lifting in your theme.
Table 15–1. Common Core Template Files
| Name | Origin | Purpose |
html.tpl.php |
modules/system |
Prints the structure of the HTML document, including the contents of <head> tags, e.g. $scripts, and $styles, as well as opening and closing <body> tags with $page_top, $page and $page_bottom regions printed inside. Unless you need to change the DOCTYPE, there's probably no reason to override this file. |
page.tpl.php |
modules/system |
Prints the page level regions and other hard-coded variables such as $logo, $site_name, $tabs, $main_menu, etc. Full control of the site layout is possible by manipulating this file, and most themes provide their own version of it. |
region.tpl.php |
modules/system |
Prints the HTML markup for regions. |
block.tpl.php |
modules/block |
Prints the HTML markup for blocks. |
node.tpl.php |
modules/node |
Prints the HTML markup for nodes. |
comment.tpl.php |
modules/comment |
Prints the HTML markup for comments. |
field.tpl.php* |
modules/field/theme |
Prints the HTML markup for fields. There are many different types of fields, and since this file needs to cover every case, its implementation is very general. If having semantic markup is important to you, you'll probably end up with a few versions of this template. |
* field.tpl.php is used only when overridden by a theme. The one in modules/field/theme is only provided as a base for your work.
Overriding Template Files
The template files provided by Drupal core and contributed modules represent the default markup implementation chosen by the original author or team, but every last one of these template files¬—and the markup and variables printed inside of them—is customizable. When developing a theme, if you decide the default implementation is not going to suit your needs, you can simply choose to override it. Drupal's theme layer is designed to be extremely flexible and easy to manipulate in this way.
The beauty of theming Drupal sites is that you can easily make changes without having to modify templates where they originate. The process of overriding template files is extremely simple:
- Find the original template file by browsing through code or checking
http://api.drupal.org - Copy and paste it into your theme directory.
- Clear the site cache and reload!
After following these three steps, Drupal will begin using the theme's version of the file, and you are free to make whatever changes you wish. It's that simple.
![]() Tip A quick way to ensure that Drupal is using the template file you've just overridden in your theme is to add text to the top of the template file, like “Hello World.” If your text appears when you reload, you'll know you're working with the correct file.
Tip A quick way to ensure that Drupal is using the template file you've just overridden in your theme is to add text to the top of the template file, like “Hello World.” If your text appears when you reload, you'll know you're working with the correct file.
Global Template Variables
Template files usually contain a few more variables than they actually print. In some cases there are many more. This is a great thing for theme developers because it opens up many possibilities for manipulating the display of markup without the need for much PHP knowledge. Table 1-2 describes some of the helpful variables available in all templates (with the exception of the attribute variables; these are covered section the “HTML Attributes” section). Identifying available variables is covered in detail in the next chapter.
Table 15–2. Variables Available in All Templates
HTML Attributes
In Drupal 7, we began storing attributes in arrays. Part of the reason this was done is the RDF module. The RDF module utilizes these variables to tack on its data during the preprocess phase. Another reason was to allow theme developers more control over the classes printing out in their template files in preprocess functions.
Each of these variables, described in Table 15–3, has an array and string version. The array version, which contains the suffix _array in the variable name, is populated during various preprocess functions, such as template_preprocess() and template_preprocess_node() or template_preprocess_block(). Then, during the template_process() phase, new variables containing a flattened or string version of these arrays is created for use in templates. This process is illustrated in Figure 15–15. See the “Preprocess and Process Functions” section of this chapter for more details.
Table 15–3. Pluggable HTML Attributes
| Variable | Description |
$attributes |
Contains HTML attributes provided by modules (mainly RDF), except for the class attribute, which is handled separately (see below). $attributes, available as $attributes_array in preprocess, is usually reserved for the top-level HTML wrapper element, such as <body> or outermost <div> in other template files. |
$classes |
Contains HTML classes for templates. Usually reserved for the top-level HTML wrapper element, such as <body> or outermost <div> in other template files. |
$title_attributes |
Contains classes for the top-level heading, such as a node or block title, of the template file, which is usually an <h2> for node teaser or block content. |
$content_attributes |
Contains classes for the content wrapper <div>, or post body of templates. An example of how these variables are used can be found in the node.tpl.php file. |

Figure 15–15. Excerpt from node.tpl.php, which highlights how the pluggable HTML attributes are used
![]() Tip If you don't see these attributes in your source code, be sure to enable the RDF module.
Tip If you don't see these attributes in your source code, be sure to enable the RDF module.
All of the common core templates provide detailed documentation of the available variables. A quick look at the default block.tpl.php template file, located in the modules/block directory reveals that most of the contents of the file is actually documentation for the available variables. As shown in Listing 15–8, you can get a good idea of what you have to work with by just looking at the documentation and code.
Listing 15–8. Source Code for Default modules/block/block.tpl.php, Including Variable Documentation
<?php
/**
* @file
* Default theme implementation to display a block.
*
* Available variables:
* - $block->subject: Block title.
* - $content: Block content.
* - $block->module: Module that generated the block.
* - $block->delta: An ID for the block, unique within each module.
* - $block->region: The block region embedding the current block.
* - $classes: String of classes that can be used to style contextually through
* CSS. It can be manipulated through the variable $classes_array from
* preprocess functions. The default values can be one or more of the following:
* - block: The current template type, i.e., "theming hook".
* - block-[module]: The module generating the block. For example, the user module
* is responsible for handling the default user navigation block. In that case
* the class would be "block-user".
* - $title_prefix (array): An array containing additional output populated by
* modules, intended to be displayed in front of the main title tag that
* appears in the template.
* - $title_suffix (array): An array containing additional output populated by
* modules, intended to be displayed after the main title tag that appears in
* the template.
*
* Helper variables:
* - $classes_array: Array of html class attribute values. It is flattened
* into a string within the variable $classes.
* - $block_zebra: Outputs 'odd' and 'even' dependent on each block region.
* - $zebra: Same output as $block_zebra but independent of any block region.
* - $block_id: Counter dependent on each block region.
* - $id: Same output as $block_id but independent of any block region.
* - $is_front: Flags true when presented in the front page.
* - $logged_in: Flags true when the current user is a logged-in member.
* - $is_admin: Flags true when the current user is an administrator.
* - $block_html_id: A valid HTML ID and guaranteed unique.
*
* @see template_preprocess()
* @see template_preprocess_block()
* @see template_process()
*/
?>
<div id="<?php print $block_html_id; ?>" class="<?php print $classes; ?>"<?php print $attributes; ?>>
<?php print render($title_prefix); ?>
<?php if ($block->subject): ?>
<h2<?php print $title_attributes; ?>><?php print $block->subject ?></h2>
<?php endif;?>
<?php print render($title_suffix); ?>
<div class="content"<?php print $content_attributes; ?>>
<?php print $content ?>
</div>
</div>
At the top of the file there is a @file block, which briefly describes the purpose of the file. Underneath, there is a long list of variables, some of which are printed in the template file and some that are not. There are also @see references to applicable preprocess and process functions, which are discussed in more detail in the next chapter.
To get an up-close idea of what this template file produces, take a look at a block produced by the Bartik theme. Bartik does not include a block.tpl.php file; it uses Drupal's default, which is provided by the Block module. Create a custom block with the title “My Custom Block” and some dummy text as the body, and place it in the Sidebar First region of the Bartik theme.
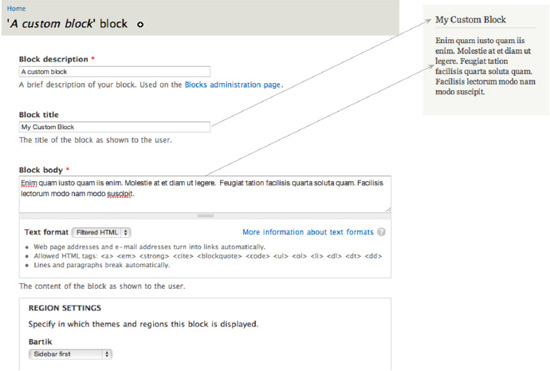
Figure 15–16. Screenshots of our rendered custom block as viewed using the Bartik theme and the configuration page for the block
Your custom block, shown in Figure 15–16 along with the block.tpl.php template file in Listing 15–9, produces the output displayed in Listing 15–9 for anonymous users. The block title is printed by <?php print $block->subject ?> and the body is printed by <?php print $content ?>. Drupal will only populate variables and display content that the user viewing it has access to.
Listing 15–9. HTML Output of a Custom Block Titled “My Custom Block” When Logged Out
<div id="block-block-1" class="block block-block">
<h2>My Custom Block</h2>
<div class="content">
<p>Enim quam iusto quam iis enim. Molestie at et diam ut legere. Feugiat tation facilisis
quarta soluta quam. Facilisis lectorum modo nam modo suscipit.</p>
</div>
</div>
Listing 15–10 shows the HTML for the same block as it is displayed to users logged in as administrators. You'll notice that the code is different. Administrators have access to contextual administrative links, added by the Contextual Links module. These links are printed via the <?php print render($title_prefix); ?> line. The Contextual Links module also adds a class to the wrapper <div> identifying it as a contextual-links-region. This behavior is not specific to the Block module or the block.tpl.php template file. The $title_prefix and $title_suffix variables were created to allow modules to inject content before and after titles in template files, which the Contextual links module takes advantage of.
Listing 15–10. HTML Output of a Custom Block Titled “My Custom Block” When Logged In as an Administrator, Highlighting the Output of $title_suffix
<div id="block-block-1" class="block block-block contextual-links-region">
<h2>My Custom Block</h2>
<div class="contextual-links-wrapper contextual-links-processed">
<a class="contextual-links-trigger" href="#">Configure</a>
<ul class="contextual-links">
<li class="block-configure first last"><a href="/admin/structure/block/manage/block/1/configure?destination=node">Configure block</a></li>
</ul>
</div>
<div class="content">
<p>Enim quam iusto quam iis enim. Molestie at et diam ut legere. Feugiat tation facilisis
quarta soluta quam. Facilisis lectorum modo nam modo suscipit.</p>
</div>
</div>
Theme Functions
The purpose of a theme function is the same as a template file in that its goal is to provide HTML markup in a way that makes it customizable by themes (and modules, too). There are many, many theme functions in Drupal core, from form elements to menu items to full administration page implementations. For a full list of theme functions available in Drupal 7, visit http://api.drupal.org/api/group/themeable/7.
How Theme Functions Are Created
Drupal core and modules usually define theme functions, but they can be defined by themes as well. hook_theme() implementations are where all the juicy information about most generic theme functions resides, including what parameters these functions accept. Theme hooks are covered in detail in the “Theme Hook Suggestions” section later in this chapter, but Listing 15–11 shows what a simple hook_theme() implementation looks like.
Listing 15–11. Example hook_theme() Implementation
<?php
/**
* Implements hook_theme().
*/
function mymodule_theme() {
return array(
'my_theme_hook' => array(
'variables' => array('parameter' => NULL),
),
);
}
?>
Implementations of hook_theme() let Drupal know about theme hooks. Once Drupal is aware, it will search for a theme function called theme_my_theme_hook() in this case, which might look like the code in Listing 15–12.
Listing 15–12. Example Theme Function Implementation
<?php
function theme_my_theme_hook($variables) {
$parameter = $variables['parameter'];
if (!empty($parameter)) {
return '<div class="my-theme-hook">' . $parameter . '</div>';
}
}
?>
Calling Theme Functions
Throughout this chapter we refer to theme functions as theme_this() and theme_that(). That's what the functions are named and usually referred to as. However, you should never call a theme function directly. Doing so will reverse the wonderful functionality that comes along with Drupal's theme layer, such as overrides, suggestions, etc. Always use the theme() function to generate theme output. It takes care of routing the request to the appropriate theme function. For more information on how this works, see http://api.drupal.org/api/function/theme/7.
Using theme_image(), Listings 15–13 and 15–14 illustrate the right and wrong way to call theme functions, respectively.
Listing 15–13. The Correct Way to Call a Theme Function.
<?php print theme('image', array('path' => 'path/to/image.png', 'alt' => 'Image description')); ?>
Listing 15–14. The Wrong Way to Call a Theme Function
<?php print theme_image(array('path' => 'path/to/image.png', 'alt' => 'Image description')); ?>
Overriding Theme Functions
Overriding theme functions is very similar to overriding template files. The main difference is that you are working with functions, and your overridden theme functions all reside in template.php. The steps involved in overriding a theme function are as follows:
- Find the original theme function by browsing through Drupal's source code or checking
http://api.drupal.org. - Copy and paste it into your
template.phpfile. - Change the beginning of the function name from
theme_toyourthemename_. - Save
template.php, clear the site cache, and reload!
![]() CautionIf creating
CautionIf creating template.php from scratch, remember to include <?php at the top of the file. Also note that a closing tag should not be added at the bottom of the file. Omitting the closing PHP tag prevents unwanted whitespace, which can cause “Cannot modify header information” or “Headers already sent” errors. For more information, visit http://drupal.org/node/1424.
LET'S OVERRIDE A THEME FUNCTION
![]() Tip In Step 3, you'll notice that the comment block has been changed to indicate what function was overridden and the changes that were made. Documenting your code is always a good idea, and explicitly listing the reasons why you've overridden a theme function can be a big time saver in the future. Theme functions change, and some aren't as small as a few lines. When upgrading major versions of Drupal, such as Drupal 7 to Drupal 8, such comments will make your life a lot easier.
Tip In Step 3, you'll notice that the comment block has been changed to indicate what function was overridden and the changes that were made. Documenting your code is always a good idea, and explicitly listing the reasons why you've overridden a theme function can be a big time saver in the future. Theme functions change, and some aren't as small as a few lines. When upgrading major versions of Drupal, such as Drupal 7 to Drupal 8, such comments will make your life a lot easier.
Theme Hooks and Theme Hook Suggestions
Theme functions and templates are defined by theme hooks. By making use of theme hook suggestions, you have a lot more flexibility to override theme functions or templates in certain situations. This section covers both ways to greatly increase the power and maneuverability of your custom theme.
What Is a Theme Hook?
In Drupal, theme hooks refer to template files and functions that have been specifically registered via hook_theme(). This may sound scary or over-technical to non-PHP developers, but honestly it's not. You've already learned about template files and theme functions, so technically you already have a pretty good grasp on theme hooks.
Whether a template file or function is implemented in core is decided on a case-by-case basis, and the criteria for making this decision is usually a balance between how likely it is to be reused by other modules, how often it is expected to change, and whether or not it makes sense for performance reasons. Template files are slightly slower than theme functions so they are not always desirable. Smaller bits of markup for things like form input elements are more efficiently implemented as theme functions, whereas larger chunks like nodes and blocks are better as a template file.
- Both theme functions and template files exist as a way for Drupal and its modules to create output consisting of markup and variables in a way that you, the themer, can override and make it your own. They are both entirely YOUR domain, and you get the last word as to how they should look.
- Both share the same exact theme hook. For example, a template file called
node.tpl.phpand a function calledtheme_node()share the same node theme hook. The difference is in the implementation, as both cannot be used at the same time. - Both can take advantage of preprocess functions, which allow you to intercept and alter variables before rendering. Using the node hook as an example, this would look like
template_preprocess_node();in your theme it would beyourtheme_preprocess_node().
Theme Hook Suggestions
The default implementation of template files and theme functions offer a very generic set of markup that is sufficient, but not ideal in all cases. When doing a standard override, such as copying block.tpl.php into a theme, the changes made will apply site-wide whenever a block is rendered. At times this the desired result, but you'll often want to make changes to a specific block, a set of blocks provided by a specific module, or even a group of blocks in a specific region.
Theme hook suggestions allow you to implement targeted overrides in your theme for both template files and theme functions with naming patterns. The options and naming patterns vary depending on what type of object you are working with. During the preprocess stage, before each template is rendered, a variable called $theme_hook_suggestions is created and populated with alternative hook suggestions.
Suggestions and Template Files
All of the common template files listed in Table 15–1 can be overridden to allow for more targeted customization by simply changing the name of the template file. When working with blocks, for example, Drupal suggests the options in Listing 15–15 during template_preprocess_block().
Listing 15–15. Excerpt from template_preprocess_block() where template suggestions for block template files are defined
<?php
$variables['theme_hook_suggestions'][] = 'block__' . $variables['block']->region;
$variables['theme_hook_suggestions'][] = 'block__' . $variables['block']->module;
$variables['theme_hook_suggestions'][] = 'block__' . $variables['block']->module . '__' .
$variables['block']->delta;
?>
Drupal automatically converts the underscores to dashes and searches for these templates in your theme when determining which one to use. This code translates to the suggestions shown in Table 15–4.
Table 15–4. Template Suggestions for Blocks
| Suggestion | Template File Equivalent | Description |
block |
block.tpl.php |
Default block implementation. |
block__REGION |
block--REGION.tpl.php |
REGION is replaced with the theme region name, and the template targets blocks in that region. |
block__MODULE |
block--MODULE.tpl.php |
MODULE is replaced with the name of the module that created the block. For example, a template file that targets custom blocks would be block--block.tpl.php and a block created by the menu module would be targeted by using block--menu.tpl.php. |
block__MODULE__DELTA |
block--MODULE--DELTA.tpl.php |
The DELTA value, which used to be a number in previous versions, is the system name of the block as defined by the module. For example, to target the System module's Navigation block, you would use block--system--navigation.tpl.php. In this example, “system” is the module and “navigation” is the delta. |
Page-Level Suggestions
Because of their special nature as the highest-level template files in Drupal, both html.tpl.php and page.tpl.php are given special attention when it comes to generating their suggestions. A function called theme_get_suggestions() is used to automatically generate suggestions using arguments based on the context of the current page. This means that if you wanted to, you could literally have a different version of these template files for every page on your site. Of course, this is something you should never even think about doing, but in certain cases, like a very different home page or landing page, having a different page.tpl.php makes perfect sense.
As mentioned, the theme hook suggestions for these files are generated with the help of arguments. Arguments in Drupal are the elements or pieces of system path of a page. For example, when viewing the URL http://yoursite.com/node/1, the first argument is “node” and the second argument is “1.” Understanding arguments in Drupal is one of the key things that will help you understand Drupal. They are extremely useful in determining context and can allow you to perform more advanced manipulations in your theme.
Figure 15–17 illustrates how you can use theme hook suggestions and arguments to make separate page.tpl.php and html.tpl.php templates for just about any page on your site.
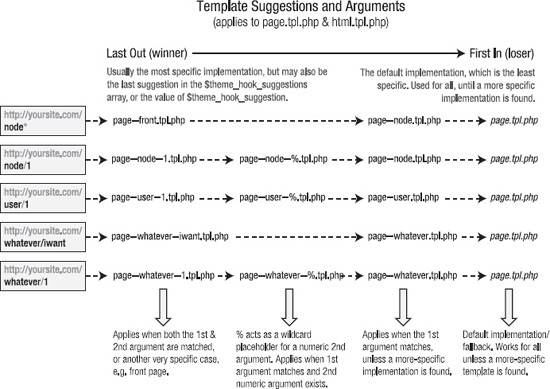
Figure 15–17. Suggestions for page.tpl.php on different types of pages
* Drupal's front page is set to “node” by default under Admin ![]() Configuration
Configuration ![]() Site Information. This page is not a typical node. It is a custom page provided by the node module's node_page_default() function. It lists posts that have been marked as “Promote to front page.” The “front” suggestion is specific to the front page (or home page), regardless of what type of page it is. Should you change your front page to a different path, additional suggestions will become available to you.
Site Information. This page is not a typical node. It is a custom page provided by the node module's node_page_default() function. It lists posts that have been marked as “Promote to front page.” The “front” suggestion is specific to the front page (or home page), regardless of what type of page it is. Should you change your front page to a different path, additional suggestions will become available to you.
![]() Caution Figure 15–17 lists examples of named paths that you'll likely encounter when using contributed modules such as views and panels. These become system paths and can be used as template suggestions. However, attempting to create a template file using a path that was created using a custom alias (or the Pathauto module) such as
Caution Figure 15–17 lists examples of named paths that you'll likely encounter when using contributed modules such as views and panels. These become system paths and can be used as template suggestions. However, attempting to create a template file using a path that was created using a custom alias (or the Pathauto module) such as about/team for a node/1 will not work. The same applies to taxonomy, terms, and user profiles. The real system path is always required when working with templates.
Some observations of $theme_hook_suggestions include:
- Underscores are used instead of dashes.
- File extensions are not present because these hooks can be implemented as theme functions or template files. At this stage in the process, it doesn't matter whether a template or a theme function will be used. When it's time to render the content,
theme()will determine which should be used and make the necessary adjustments. - Each suggestion begins with a
hook__(double-underscore) prefix. In the example shown in Listing 15–15, that hook is block. This allows Drupal to fall back on the generic theme hook, which in this case is block, and useblock.tpl.phpwhen a more specific template, likeblock--module.tpl.php, doesn't exist.
The order in which these suggestions appear in the $theme_hook_suggestions variable determines which hook/template file will be used in FILO (first in, last out) order. When it comes time to render the template, the last suggestion will be used, with one exception. A variable called $theme_hook_suggestion (note that it is singular, not plural) is also available. If it's set by a module or theme, it will take precedence over anything defined in $theme_hook_suggestions.
![]() Tip Use the
Tip Use the dpm() function (provided with the Devel module) inside the generic template file you are working with to find out what options are available. <?php dpm($theme_hook_suggestions); ?> will show the options that are available for the page you are working on.
Suggestions and Theme Functions
As explained in the “Suggestions and Template Files” section, alternate $theme_hook_suggestions are usually defined in the preprocess function for that hook. This works well because template files usually serve a specific purpose, like printing a specific entity such as a node or block. Theme functions, however, are much more diverse and end up being used within many different types of output, such as form elements, fields, and render elements. Module developers may also use theme functions to create one-off, custom content. This makes the prospect of implementing a theme function override of a widely used function such as theme_links() much less attractive, as it could potentially break styling in unexpected places all over your site.
Luckily, theme hook suggestions also exist for many theme functions, and Drupal core has implemented suggestions for some of the popular theme functions, like theme_links(). Using theme hook suggestions with theme functions simply means that you can choose to override a theme function in a specific context as opposed to overriding the base theme function, which would have a site-wide effect.
As mentioned, theme_links() is a good example of where to use theme hook suggestions when overriding theme functions. This theme function is used in many, many places, such as the main navigation, node, comment, and contextual links. Note that to implement the functions named in the “Theme function equivalent” column in Table 15–5, you need to replace THEME with the name of your theme in template.php.
Table 15–5. Some Example Template Suggestions for theme_links()
| Suggestion | Theme Function Equivalent | Description |
links |
THEME_links() |
Default implementation, which is used for all implementations unless a more specific implementation like those below is specified. |
links__node |
THEME_links__node() |
Targeted implementation of theme_links() that only applies to links lists inside of nodes. |
links__comment |
THEME_links__comment() |
Targeted implementation of theme_links() that only applies to links lists inside of comments. |
links__contextual |
THEME_links__contextual() |
Targeted implementation of theme_links() that only applies to links generated for contextual links. |
links__contextual__node |
THEME_links__contextual__node() |
Targeted implementation of theme_links() that only applies to contextual links inside of nodes. |
You'll notice in Drupal's default page.tpl.php file, located in the modules/system directory, that both the main and secondary menus are printed using suggestions. You might also notice that theme functions called theme_links__system_main_menu() and theme_links__system_secondary_menu() do not exist, and that's okay. In this case, the base hook, or the fallback, theme_links() will be used unless a more targeted theme function is created (see Listing 15–16).
Listing 15–16. Excerpt from modules/system/page.tpl.php
<?php if ($main_menu || $secondary_menu): ?>

      <div id="navigation"><div class="section">

        <?php print theme('links__system_main_menu', array('links' => $main_menu,

'attributes' => array('id' => 'main-menu', 'class' => array('links', 'inline',

'clearfix')), 'heading' => t('Main menu'))); ?>

        <?php print theme('links__system_secondary_menu', array('links' =>

$secondary_menu, 'attributes' => array('id' => 'secondary-menu', 'class' =>

array('links', 'inline', 'clearfix')), 'heading' => t('Secondary menu'))); ?>

      </div></div><!-- /.section, /#navigation -->

    <?php endif; ?>
In this situation, the theme hook suggestions are hardcoded into the function arguments. When theme() processes this, it will check to see if an implementation of theme_links__system_main_menu() exists first. If the function is found, it will be used to render the content. If not, the original (or fallback) theme_links() will be used instead. theme() handles this automatically and can determine the base hook from the use of the double underscore that appears directly after it.
![]() CautionIt's important to note that theme hook suggestions are NOT the same as theme hooks. Given what you've learned about theme hook suggestions, it's natural to think that preprocess and process functions can be written for the specific suggestion. Theme hooks, which are the default implementation and suggestion, are specifically registered in an implementation of
CautionIt's important to note that theme hook suggestions are NOT the same as theme hooks. Given what you've learned about theme hook suggestions, it's natural to think that preprocess and process functions can be written for the specific suggestion. Theme hooks, which are the default implementation and suggestion, are specifically registered in an implementation of hook_theme(). This means that you may create a preprocess function called THEME_preprocess_page() but you may not use THEME_preprocess_page__front().
Summary
This chapter has covered the basics of Drupal themes, including how to:
- Define
.infofiles and work with regions. - Override and create targeted template files and theme functions.
- Make sense out of theme hooks and suggestions.
Armed with this knowledge, it's time to move onto some more advanced theme topics in the next chapter.