
A P P E N D I X G
![]()
Installing Drupal on Ubuntu
Developing your sites in a Linux environment means that the norm for all the tools you use will be that they are open source free software, like Drupal itself. More important to you, perhaps, the server, programming language, and database that Drupal relies upon are easier to set up and keep running on Linux.
I highly recommend that you develop web sites within a Linux environment for one additional reason: your Drupal sites are likely to be hosted on a server running on Linux. While all varieties of GNU-Linux are heartily endorsed, if you're running any version other than the popular Ubuntu, I will assume you already know what you are doing. This appendix will focus on setting up Drupal in Ubuntu.
![]() Tip If you aren't running Linux and don't want to switch your main operating system yet for the sake of developing on or simply running local web sites, you can run Linux in a virtual machine.
Tip If you aren't running Linux and don't want to switch your main operating system yet for the sake of developing on or simply running local web sites, you can run Linux in a virtual machine.
The most important quality to have going into setting up your development environment is patience. It takes some time up front to get things working, but it will save you lots of time down the road.
Running Ubuntu on Windows or Mac OS X
To use Linux on a computer that is running another operating system—when you have a Mac OS X or Windows personal computer—you can run Linux very effectively in a virtual machine (VM). VMs have become quite good in recent years.
Download the VM of your choice. The open source VirtualBox is free for Windows or Mac (see virtualbox.org). The proprietary VMWare (including VMWare Fusion for running Linux on Mac OS X) is pretty affordable.
Also download the disk image for a current Ubuntu version (go to ubuntu.com/download and choose Download and install).
Once both the VM software and the Ubuntu disk image have downloaded to your computer, follow the instructions for your VM for installing an operating system. The most important thing is telling the VM where your disk image is on your computer (and it needs to stay at this location). Accepting the defaults for other configuration will work.
![]() Note If using VirtualBox, instead of downloading the Ubuntu disk image, you can get Ubuntu set up for Drupal development already on a VirtualBox appliance:
Note If using VirtualBox, instead of downloading the Ubuntu disk image, you can get Ubuntu set up for Drupal development already on a VirtualBox appliance: drupal.org/project/quickstart. Quickstart gives you an environment similar to Drubuntu, described in the following section, but it is not compatible with Drubuntu—you have to pick one or the other.
Customizing Ubuntu for Drupal Development with Drubuntu
Drubuntusets up a Drupal development environment for a single developer, with the LAMP stack (Linux, Apache, MySQL, PHP), Eclipse integrated development environment, Firefox developer tools, Git, Drush, and more. Drubuntu also includes its own Drush scripts for adding and removing your local sites.
![]() Tip The area of Ubuntu-based environments set up for Drupal development is rapidly improving. See
Tip The area of Ubuntu-based environments set up for Drupal development is rapidly improving. See dgd7.org/ubuntu for the latest recommendations.
Get the current instructions for installing Drubuntu from its project page at drupal.org/project/drubuntu. It has a way to bootstrap its own installation without even downloading first, by grabbing the drubuntu-bootstrap.sh shell script out of the repository directly. You can of course download Drubuntu from its project page (./drubuntu/drubuntu-bootstrap.sh) and run it, also.
Enter your password and type y for yes as requested (it will often say you may need to enter your password when you won't) and be patient while it installs a hefty development environment, including many things you will use every day.
Creating a Root MySQL Password
One thing Drubuntu does not set up for you that you can do to make your development environment a more convenient place to work is setting a MySQL root password.
mysqladmin -u root password YourPassword
Then add thatpassword to a MySQL configuration file, so you never have to enter it. Open or create the file with a text editor such as Vim.
vi ~/.my.cnf
Give it these contents:
[client]

user=root

pass=YourPassword
Installing Drupal
Drubuntu's great value is in installing LAMP, Git, Drush, and other tools for you. You don't have to use its special tools (such as the drubuntu-site-add Drush command), and in fact you will not do so here. Someone is sure to put together the ultimate start a new site Drush command, and most developers have their own shell scripts—but these often tie into repositories or server practices that are not generalized. You can check out examples of helper shell scripts for many things, including setting up a new site like Listing G-1 shows with one command, at dgd7.org/sh.
When everything related to a project is in one place, it is easy to put in version control together (see Chapter 2). Therefore, I recommend you create a folder to be a project folder and put Drupal in a subfolder of that (for instance, called drupal or web). Having a project folder above the web root allows you to keep materials together with the project that should not be in the public web root (which is what the directory where Drupal's index.php is). It is good practice to create a directory for the project (in this case, dgd7) and put Drupal core into the web root (dgd7/web) in a sub-directory that I'll refer to as the Drupal root directory.
After placing a copy of Drupal core there, go to your Drupal root directory and create a copy of the sites/default/default.settings.php file, renaming it to sites/default/settings.php while making the copy, and change the permissions of the files directories to make them writable.
Listing G-1. Non-Drush command line steps to download Drupal and prepare it for running the web installer. Change drupal-7.1 to the current stable release of Drupal; for instance, drupal-7.4.
wget http://ftp.drupal.org/files/projects/drupal-7.1.tar.gz

tar -xzf drupal-7.1.tar.gz

mkdir -p ~/code/dgd7

mv drupal-7.1 ~/dgd7/web

cd ~/code/dgd7/web

cp sites/default/default.settings.php sites/default/settings.php

chmod -R o+w sites/default
![]() Tip Those first five steps can be done even more quickly with Drush:
Tip Those first five steps can be done even more quickly with Drush: cd ~/code; mkdir dgd7; cd dgd7; drush dl drupal --drupal-project-rename=web; cd web.
Drubuntu sets up Apache to automatically serve up any directory placed in the ~/workspace directory as a web site. That is, if you create a directory ~/workspace/dgd7 and put an index.html file in there, you can go to dgd7.localhost in your browser and you will see that index.html file as a web page. Because Drupal is running out of a subdirectory of its project directory, put the full project directory in your own ~/code directory and create a symlink targeting the project's web root from the workspace directory, like so:
ln -s /home/ben/code/dgd7/web /home/ben/workspace/dgd7
When creating test sites that are not going to become projects (or if not following this approach of having a project repository that includes the web root as a subdirectory) you can create projects directly in Drubuntu's workspace directory and skip the symlink step.
Creating the Database
Drupal stores information in a database. All the information about your site is stored in this database, neatly divided up into different tables based on the type of information, such as posts, comments, and users. Creating a MySQL (see Listing G-2) or MariaDB database for your new Drupal web site to use is fast and easy using the command line, but you can also use an application or a web application such as phpMyAdmin. If using phpMyAdmin, you can quickly create a database and a user at the same time by going to Privileges ![]() Add a new User, and under “Database for User” select “Create database with same name and grant all privileges”.
Add a new User, and under “Database for User” select “Create database with same name and grant all privileges”.
Listing G-2. Command line instructions to create a database in MySQL. If you haven't created a .my.cnf file as described in “Creating a Root MySQL Password,” the first line will have to be mysql -u root -p password.
$ mysql

mysql> CREATE DATABASE database;

mysql> GRANT ALL PRIVILEGES ON database.* TO "username"@"localhost" IDENTIFIED BY "password";

mysql> FLUSH PRIVILEGES;

mysql> EXIT;
Fill in your own values for the parts in italics. For the database name, you can keep it simple and call it dgd7, and to keep it really easy call your database user dgd7, too. Hostname in this case will be localhost, and because security is not an issue on your own computer go ahead and make the password dgd7, too.
![]() Tip See
Tip See dgd7.org/sh for shell scripts to automate the creation of the database and everything else I just covered. When installing one site it doesn't matter much, but when you do a lot, the time adds up, and it helps to get in the habit of creating new test sites.
Drupal's Automatic Installer
Now load up your Drupal root directory in your browser. The exact address will be different depending on your local hosting environment. Usually it's localhost/drupal or similar. You'll automatically be redirected to the install.php and Drupal's automatic installer.
On the first page you choose the installation profile you want to use; unless you have downloaded a contributed one from Drupal.org or created one of your own, you likely want to use the Standard profile, as Minimal is really minimal. Click through the Choose language page, unless you want to first download a non-English translation, to get to the Set up database page. Here, you probably want to leave “Database type” as the default “MySQL, MariaDB, or equivalent” and enter under Database name, user, and password the values you provided in creating the database. Submit the form and Drupal will install itself! When it is done, you will be able fill in some basic site details along with creating a username and e-mail address with credentials suitable for the administrative user account (see Figure G-1).
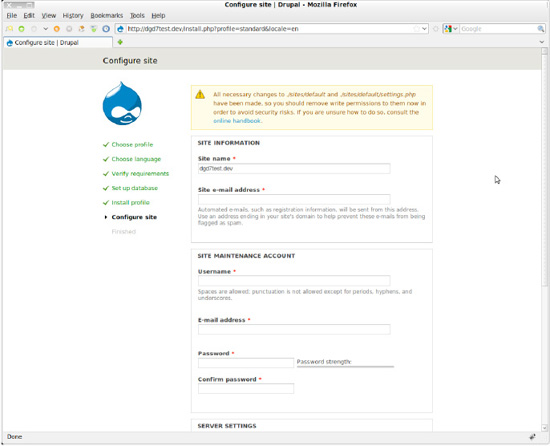
Figure G-1. Drupal's site configuration page for site name and the first, privileged user, after installing a site
Congratulations! You now have an empty Drupal site. There is no content yet, and Drupal 7 is nice enough to tell you that there is no front page content. Front page content means (sensibly) content that is marked as “promoted to front page.” Head to Chapter 1 to build out a new site.
![]() Note For more information and, in particular, a better description and new recommendations based on reader feedback, visit
Note For more information and, in particular, a better description and new recommendations based on reader feedback, visit dgd7.org/ubuntu.