
A P P E N D I X I
![]()
Setting Up a Drupal Environment with the Acquia Dev Desktop
The Dev Desktop app from Acquia has many virtues. Download the installer (see Figure I-1) and within 10 minutes you will have the server, database, and your first Drupal site up and running. Access to phpMyAdmin is a click away. Create as many fresh installations as you want. Clone a site by dumping the database and importing the sql file into a new installation. Elegant, easy, and powerful.
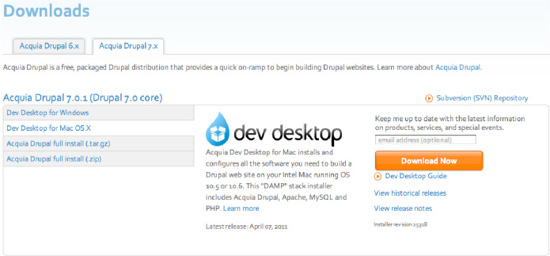
Figure I-1. Drupal stack installer from Acquia
![]() Note The Dev Desktop is available for both Mac and Windows. I've only used the Mac version, and have found it to be a thing of beauty. The Drupal 6 version for Windows was said to be a bit quirky, though those issues may have been addressed in the Drupal 7 version.
Note The Dev Desktop is available for both Mac and Windows. I've only used the Mac version, and have found it to be a thing of beauty. The Drupal 6 version for Windows was said to be a bit quirky, though those issues may have been addressed in the Drupal 7 version.
Installation
Download the Dev Desktop as a disk image file from Acquia's web site (acquia.com/downloads).
Click the file to expand the disk image and open the installer.
Double-click the icon to launch the installation process.
The installer will walk you through a series of screens for the file locations, port settings, and default site settings (see Figure I-2). The default settings are what you want. The Drupal site settings are used for the first site you create, but you can modify the settings for any subsites or imported sites that you create.

Figure I-2. Default settings for the Dev Desktop installation
![]() Note You can set up multiple copies of the Dev Desktop (on your hard drive, a portable hard drive, Dropbox, etc). Simply repeat the installation process and modify the settings accordingly. For the port settings, increment the default settings (8082, 8083, etc.).
Note You can set up multiple copies of the Dev Desktop (on your hard drive, a portable hard drive, Dropbox, etc). Simply repeat the installation process and modify the settings accordingly. For the port settings, increment the default settings (8082, 8083, etc.).
When the installation process has completed, the installer requests permission to create your first web site. Click yes. This will launch the Dev Desktop's Control Panel (see Figure I-3) and open a new browser window showing the Welcome screen of your new web site (see Figure I-4). Log in using the Username and Password you provided during the setup.
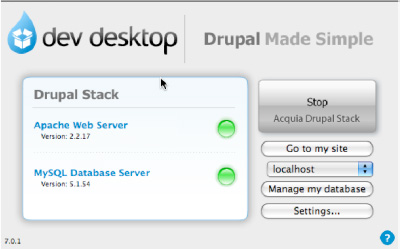
Figure I-3. Dev Desktop's Control Panel
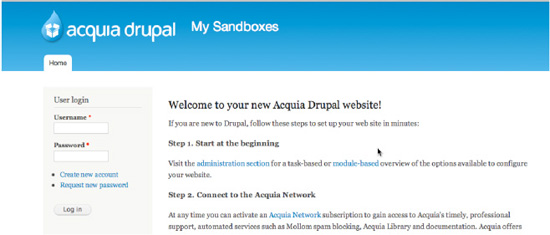
Figure I-4. Login screen for stack installer's first web site
Taking It Further
The real power of the Dev Desktop has to do with how easy it is to create more sites. You have two options:
- Create subsites off your main installation—or multisites, to use Drupal terminology. A subsite creates a new database but uses the files and modules of your original installation.
- Create a new, stand-alone Drupal 7 installation. This is ideal for use with installation profiles.
The first is quick, the second is powerful. Win, win.
It all happens from the Dev Desktop's Control Panel, which will become your best friend from here on out. From here you can open phpMyAdmin, navigate to any of the sites that you've created, or create new sites (see Figure I-5).
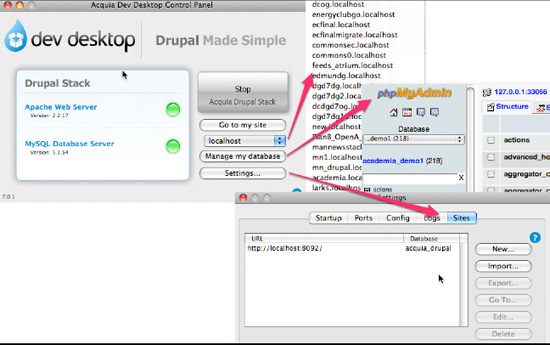
Figure I-5. Control Panel links
Creating a Subsite
To create a subsite of your current installation, start from your Control Panel and go to Settings ![]() Sites
Sites ![]() New. This opens up the form shown in Figure I-6. Fill in a site name. The database and subserver fill in automatically, and the other settings draw on the defaults that you provided during the installation process. Click OK. In a minute or so the new site is created. Click the Go To button to open the site in a new browser window.
New. This opens up the form shown in Figure I-6. Fill in a site name. The database and subserver fill in automatically, and the other settings draw on the defaults that you provided during the installation process. Click OK. In a minute or so the new site is created. Click the Go To button to open the site in a new browser window.
More information on multisites is available from Drupal's online documentation (drupal.org/node/53705).
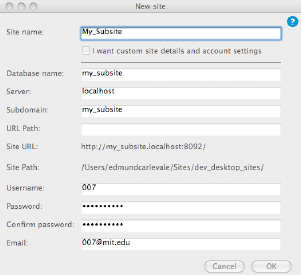
Figure I-6. Creating a subsite
![]() Note With the Drupal 6 version of the Dev Desktop, some contributed modules were moved from their default location (
Note With the Drupal 6 version of the Dev Desktop, some contributed modules were moved from their default location (/sites/all/modules) to a folder within the core modules folder (modules/acquia), thus complicating module updates. For the Drupal 7 version, some contributed modules are placed within the Profiles folder (see Figure I-7), but the new Automatic Update functionality handles updates efficiently and unobtrusively behind the scenes.
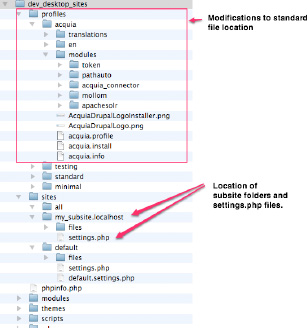
Figure I-7. Directory structure for the Dev Desktop's main Drupal installation and associated subsites
Importing Sites
The Import option is ideal for using with installation profiles. Simply download the install file and unzip it to a convenient folder, keeping it outside of the folder that stores the Dev Desktop's main Drupal installation. Then, navigate to Settings ![]() Sites
Sites ![]() Import (see Figure I-8).
Import (see Figure I-8).
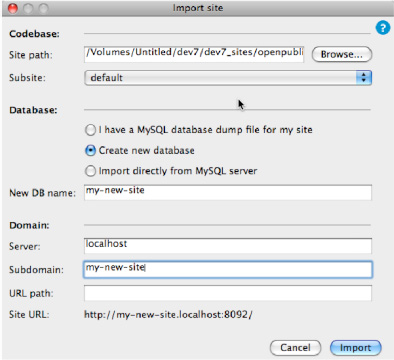
Figure I-8. Importing a new Drupal installation
For more information on installation profiles, see Chapter 38. Head to Chapter 1 to build out a new site.
![]() Note For updates and discussion on running Drupal with Acquia's Dev Desktop, see
Note For updates and discussion on running Drupal with Acquia's Dev Desktop, see dgd7.org/stack. And of course, for corrections and new material related to this book as a whole, check out dgd7.org/updates.