
The three R's, Reading, wRiting and aRithmetic, are considered the basis of the skills children learn in schools. When you think about it, these same concepts apply to software as well. The foundations of any programs—whether web applications, batch jobs, or anything else—are the input of data, the processing of it in some way, and the output of data.
This concept is no more obvious than when you use Spring Batch. Each step consists of an ItemReader, an ItemProcessor, and an ItemWriter. Reading in any system isn't always straight forward, however. There are a number of different formats in which input can be provided; flat files, XML, and databases are just some of the potential input sources.
Spring Batch provides standard ways to handle most forms of input without the need to write code as well as the ability to develop your own readers for formats that are not supported, like reading a web service. This chapter will walk through the different features ItemReaders provide within the Spring Batch framework.
Up to this chapter we have vaguly discussed the concept of an ItemReader but we have not looked at the interface that Spring Batch uses to define input operations. The org.springframework.batch.item.ItemReader<T> interface defines a single method, read that is used to provide input for a step. Listing 7-1 shows the ItemReader interface.
Example 7.1. org.springframework.batch.item.ItemReader<T>
package org.springframework.batch.item;

public interface ItemReader<T> {

    T read() throws Exception, UnexpectedInputException, ParseException,
                    NonTransientResourceException;
}
The ItemReader interface shown in Listing 7-1 is a strategy interface. Spring Batch provides a numer of implementations based on the type of input to be processed. Flat files, databases, JMS resources and other sources of input all have implementations provided by Spring Batch. You can also implement your own ItemReader by implementing the ItemReader or any one of its subinterfaces.
The read method of the ItemReader interface returns a single item to be processed by your step as it is called by Spring Batch. This item is what your step will count as it maintains how many items within a chunk has been processed. The item will be passed to any configured ItemProcessor before being sent as part of a chunk to the ItemWriter.
The best way to understand how to use the ItemReader interface is to put it to use. In the next section you will begin to look at the many ItemReader implementations provided by Spring Batch by working with the FlatFileItemReader.
When I think of file IO in Java, I can't help but cringe. The API for IO is marginally better than the API for handling dates in this language, and you all know how good that is. Luckily, the guys at Spring Batch have addressed most of this by providing a number of declarative readers that allow you to declare the format of what you're going to read and they handle the rest. In this section, you'll be looking at the declarative readers that Spring Batch provides and how to configure them for file-based IO.
When I talk about flat files in the case of batch processes, I'm talking about any file that has one or more records. Each record can take up one or more lines. The difference between a flat file and an XML file is that the data within the file is non-descriptive. In other words, there is no meta information within the file itself to define the format or meaning of the data. In contrast, in XML, you use tags to give the data meaning.
Before you get into actually configuring an ItemReader for a flat file, let's take a look at the pieces of reading a file in Spring Batch. The authors of the framework did a good job in creating an API that makes sense and can be easily related to concepts that most of us already know.
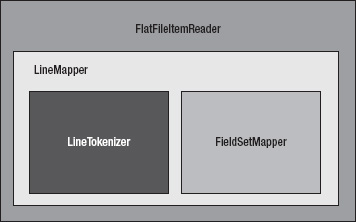
Figure 7-1 shows the components of the FlatFileItemReader. The org.springframework.batch.item.file.FlatFileItemReader consists of two main components: a Spring Resource that represents the file to be read and an implementation of the org.springfamework.batch.item.file.LineMapper interface. The LineMapper serves a similar function as the RowMapper does in Spring JDBC. When using a RowMapper in Spring JDBC, a ResultSet representing a collection of fields is provided for you map to objects.
The FlatFileItemReader allows you to configure a number of attributes about the file you're reading. Table 7-1 shows the options that you are likely to use and explains their meanings.
Table 7.1. FlatFileItemReader Configuration Options
Option | Type | Default | Description |
|---|---|---|---|
Comments | String [] | null | This array of strings indicates what prefixes will be considered line comments and skipped during file parsing. |
Encoding | String | ISO-8859-1 | The character encoding for the file. |
lineMapper | LineMapper | null (required) | This class will take each line of a file as a String and convert it into a domain object (item) to be processed. |
int | 0 | When running a job, the FlatFileItemReader can be configured to skip lines at the beginning of the file before parsing. This number indicates how many. | |
RecordSeparatorPolicy | DefaultRecordSeparatorPolicy | Used to determine the end of each record. By default, an end of line character indicates the end of a record; however, this can be used to determine how to handle things like quoted strings across lines. | |
Resource | Resource | null (required) | The resource to be read. |
LineCallbackHandler | null | Callback interface called with the line skipped. Every line skipped will be passed to this callback. | |
Strict | boolean | false | An Exception will be thrown if the resource is not found in strict mode. |
With Spring Batch's LineMapper interface, a String is provided, representing a single record from a file. With the raw String from the file, there is a two-step process for getting it to the domain object you will later work with. These two steps are handled by the LineTokenizer and FieldSetMapper.
A LineTokenizer implementation parses the line into a
org.springframework.batch.item.file.FieldSet. The provided String represents the entire line from the file. In order to be able to map the individual fields of each record to your domain object, you need to parse the line into a collection of fields. The FieldSet in Spring Batch represents that collection of fields for a single row.The FieldSetMapper implementation maps the FieldSet to a domain object. With the line divided into individual fields, you can now map each input field to the field of your domain object just like a RowMapper would map a ResultSet row to the domain object.
Sounds simple doesn't it? It really is. The intricacies come from how to parse the line and when you look at objects that are built out of multiple records from your file. Let's take a look at reading files with fixed-width records first.
When dealing with legacy mainframe systems, it is common to have to work with fixed-width files due to the way COBOL and other technologies declare their storage. Because of this, you need to be able to handle fixed with files as well.
You can use a customer file as your fixed-width file. Consisting of a customer's name and address, Table 7-2 outlines the format of your customer file.
Table 7.2. Customer File Format
Field | Length | Description |
|---|---|---|
First Name | 10 | Your customer's first name. |
Middle Initial | 1 | The customer's middle initial. |
Last Name | 10 | The last name of the customer. |
Address Number | 6 | The street number piece of the customer's address. |
Street | 20 | The name of the street where the customer lives. |
City | 10 | The city the customer is from. |
State | 2 | The two letter state abbreviation. |
Zip Code | 5 | The customer's postal code. |
Defining the format for a fixed with file is important. A delimited file describes its fields with its delimiters. XML or other structured files are self-describing given the metadata the tags provide. Database data has the metadata from the database describing it. However, fixed-width files are different. They provide zero metadata to describe their format. If you look at Listing 7-1, you can see an example of what the previous description looks like as your input file.
Example 7.1. customer.txt, the Fixed-Width File
Michael   TMinella   123   4th Street          Chicago  IL60606
Warren    QGates     11    Wall Street         New York NY10005
Ann       BDarrow    350   Fifth Avenue        New York NY10118
Terrence  HDonnelly  4059  Mt. Lee Drive       HollywoodCA90068
To demonstrate how each of these readers work, you will create a single-step job that reads in a file and writes it right back out. For this job, copyJob, you will create a copyJob.xml file with the following beans:
customerFile: The input file.
outputFile: The file you will copy the input file to.
customerReader: The FlatFileItemReader.
outputWriter: The FlatFileItemWriter.
copyStep: The step definition for your job.
copyJob: The job definition.
Your customerFile and outputFile beans will be nothing more than Spring's org.springframework.core.io.FileSystemResource beans. Each of the file-related beans has the scope step because they can't be bound until the step begins (unlike normal Spring beans, which are instantiated and wired upon the application's startup)[18]. The customerReader is an instance of the FlatFileItemReader. As covered previously, the FlatFileItemReader consists of two pieces, a resource to read in (in this case, the customerFile) and a way to map each line of the file (a LineMapper implementation).
Note
The "step" scope is a new bean scope provided by Spring Batch. This scope allows bean properties to be set when the step is excuted instead of on application startup (as is the default in Spring).
For the LineMapper implementation, you are going to use Spring Batch's org.springframework.batch.item.file.DefaultLineMapper. This LineMapper implementation is intended for the two-step process of mapping lines to domain objects you talked about previously: parsing the line into a FieldSet and then mapping the fields of the FieldSet to a domain object, the Customer object in your case.
To support the two step mapping process, the DefaultLineMapper takes two dependencies: a LineTokenizer implementation which will parse the String that is read in from your file into a FieldSet and a FieldSetMapper implementation to map the fields in your FieldSet to the fields in your domain object. Listing 7-2 shows the customerFile and customerReader bean definitions.
Example 7.2. customerFile and customerReader in copyJob.xml
<?xml version="1.0" encoding="UTF-8"?>
<beans:beans xmlns="http://www.springframework.org/schema/batch"
    xmlns:beans="http://www.springframework.org/schema/beans"
    xmlns:util="http://www.springframework.org/schema/beans"
    xmlns:xsi="http://www.w3.org/2001/XMLSchema-instance"
    xsi:schemaLocation="http://www.springframework.org/schema/beans
        http://www.springframework.org/schema/beans/spring-beans-3.0.xsd
        http://www.springframework.org/schema/util
        http://www.springframework.org/schema/util/spring-util.xsd
        http://www.springframework.org/schema/batch
        http://www.springframework.org/schema/batch/spring-batch-2.1.xsd">

  <beans:import resyource="../launch-context.xml"/>

  <beans:bean id="customerFile"
    class="org.springframework.core.io.FileSystemResyource" scope="step">
    <beans:constructor-arg value="#{jobParameters[customerFile]}"/>
  </beans:bean>

  <beans:bean id="customerReader"
    class="org.springframework.batch.item.file.FlatFileItemReader">
    <beans:property name="resyource" ref="customerFile" />
    <beans:property name="lineMapper">
      <beans:bean
        class="org.springframework.batch.item.file.mapping.
DefaultLineMapper">
        <beans:property name="lineTokenizer">
          <beans:bean
            class="org.springframework.batch.item.file.transform.
FixedLengthTokenizer">
            <beans:property name="names"
              value="firstName,middleInitial,lastName,addressNumber,street,
city,state,zip"/>
            <beans:property name="columns"
              value="1-10,11,12-21,22-27,28-47,48-56,57-58,59-63"/>
          </beans:bean>
        </beans:property>
        <beans:property name="fieldSetMapper">
          <beans:bean
class="org.springframework.batch.item.file.mapping.
BeanWrapperFieldSetMapper">
<beans:property name="prototypeBeanName" value="customer"/>
</beans:bean>
</beans:property>
</beans:bean>
</beans:property>
</beans:bean>
<beans:bean id="customer" class="com.apress.springbatch.chapter7.Customer"
scope="prototype"/>
...Listing 7-2 begins with the customerFile, which is a reference to the file that will be read in by the customerReader. Note that the actual name of the customer file will be passed in as a job parameter at runtime.
From there you have your customerReader. The reader, as noted previously, consists of two pieces: the file to be read in and a LineMapper instance. When you look at the LineMapper interface, as shown in Listing 7-3, you can see that it's nearly identical to Spring's RowMapper.
Example 7.3. The LineMapper Interface
package org.springframework.batch.item.file;

import org.springframework.batch.item.file.mapping.FieldSetMapper;
import org.springframework.batch.item.file.transform.LineTokenizer;

public interface LineMapper<T> {

        T mapLine(String line, int lineNumber) throws Exception;
}
For each line in your file, Spring Batch will call the mapLine method of the LineMapper implementation configured. In your case, that method will do two things; first, it will use the org.springframework.batch.item.file.transform.FixedLengthTokenizer to divide the string up into a FieldSet based upon the columns you configured. Then it will pass the FieldSet to the org.springframework.batch.item.file.mapping.BeanWrapperFieldSetMapper, which will use the names of each field to map the fields to the bean you requested (Customer in this case).
When working with fixed-width files, you use the FixedLengthTokenizer to parse your records into FieldSets. This implementation of the LineTokenizer interface takes three parameters:
columns (required): The column number ranges that define each field.
names (optional): A name to associate with each of the ranges specified in the list of columns.
strict (optional): A Boolean telling the reader if an exception should be thrown if a line of an invalid length is passed in (fixed-width files are expected to have all records be the same length).
With the LineTokenizer configured, you have a way to parse your line into a FieldSet. Now you need to map the FieldSet into the fields of your domain object. In this case, you are going to use the BeanWrapperFieldSetMapper. This implementation of the FieldSetMapper interface uses the bean spec to map fields in the FieldSet to fields in the domain object by name (the Customer object will have a getFirstName() and a setFirstName(String name), etc). The only thing you need to supply for the BeanWrapperFieldSetMapper is a reference to the bean it will be using, in your case it is the reference to the customer bean.
Note
The FixedLengthTokenizer doesn't trim any leading or trailing characters (spaces, zeros, etc) within each field. To do this, you'll have to implement your own LineTokenizer or you can trim in your own FieldSetMapper.
To put your reader to use, you need to configure your step and job. You will also need to configure a writer so that you can see that everything works. You will be covering writers in depth in the next chapter so you can keep the writer for this example simple. Listing 7-4 shows how to configure a simple writer to output the domain objects to a file.
Example 7.4. A Simple Writer
...
<beans:bean id="outputFile"
  class="org.springframework.core.io.FileSystemResyource" scope="step">
  <beans:constructor-arg value="#{jobParameters[outputFile]}"/>
</beans:bean>

<beans:bean id="outputWriter"
  class="org.springframework.batch.item.file.FlatFileItemWriter">
  <beans:property name="resource" ref="outputFile" />
  <beans:property name="lineAggregator">
    <beans:bean class="org.springframework.batch.item.file.transform.
FormatterLineAggregator">
      <beans:property name="fieldExtractor">
        <beans:bean class="org.springframework.batch.item.file.transform.
BeanWrapperFieldExtractor">
          <beans:property name="names" value="firstName,middleInitial,
lastName,addressNumber,street,city,state,zip" />
        </beans:bean>
      </beans:property>
      <beans:property name="format" value=" %s %s. %s, %s %s, %s %s %s" />
    </beans:bean>
  </beans:property>
</beans:bean>
...
Looking at the output file resource and the writer in Listing 7-4, you can see a pattern between the readers and writers. The writer has two dependencies: the file resource to write to and a lineAggregator. The lineAggregator is used to take an object and convert it to the string that will be written to the file.
Your job configuration is very simple. As shown in Listing 7-5, a simple step that consists of the reader and writer with a commit count of 10 records is all you need. Your job uses that single step.
Example 7.5. The copyFileStep and copyFileJob
...
  <step id="copyFileStep">
    <tasklet>
      <chunk reader="customerFileReader" writer="outputWriter"
        commit-interval="10"/>
    </tasklet>
  </step>

  <job id="copyJob">
    <step id="step1" parent="copyFileStep"/>
  </job>
</beans:beans>
The interesting piece of all of this is the small amount of code required to read and write this file. In this example, the only code you need to write is the domain object itself (Customer). Once you build your application, you can execute it with the command shown in Listing 7-6.
Example 7.6. Executing the copyJob
java -jar copyJob.jar jobs/copyJob.xml copyJob customerFile=/input/customer.txt outputFile=/output/output.txt
The output of the job is the same contents of the input file formatted according to the format string of the writer, as shown in Listing 7-7.
Example 7.7. Results of the copyJob
Michael T. Minella, 123 4th Street, Chicago IL 60606
Warren Q. Gates, 11 Wall Street, New York NY 10005
Ann B. Darrow, 350 Fifth Avenue, New York NY 10118
Terrence H. Donnelly, 4059 Mt. Lee Drive, Hollywood CA 90068
Fixed-width files are a form of input provided for batch processes in many enterprises. As you can see, parsing the file into objects via FlatFileItemReader and FixedLengthTokenizer makes this process easy. In the next section you will look at a file format that provides a small amount of metadata to tell us how the file is to be parsed.
Delimited files are files that provide a small amount of metadata within the file to tell us what the format of the file is. In this case, a character acts as a divider between each field in your record. This metadata provides us with the ability to not have to know what defines each individual field. Instead, the file dictates to use what each field consists of by dividing each record with a delimiter.
As with fixed-width records, the process is the same to read a delimited record. The record will first be tokenized by the LineTokenizer into a FieldSet. From there, the FieldSet will be mapped into your domain object by the FieldSetMapper. With the process being the same, all you need to do is update the LineTokenizer implementation you use to parse your file based upon a delimiter instead of premapped columns. Let's start by looking at an updated customerFile that is delimited instead of fixed-width. Listing 7-8 shows your new input file.
Example 7.8. A Delimited customerFile
Michael,T,Minella,123,4th Street,Chicago,IL,60606
Warren,Q,Gates,11,Wall Street,New York,NY,10005
Ann,B,Darrow,350,Fifth Avenue,New York,NY,10118
Terrence,H,Donnelly,4059,Mt. Lee Drive,Hollywood,CA,90068
You'll notice right away that there are two changes between the new file and the old one. First, you are using commas to delimit the fields. Second, you have trimmed all of the fields. Typically when using delimited files, each field is not padded to a fixed-width like they are in fixed-width files. Because of that, the record length can vary, unlike the fixed-width record length.
As mentioned, the only configuration update you need to make to use the new file format is how each record is parsed. For fixed-width records, you used the FixedLengthTokenizer to parse each line. For the new delimited records, you will use the org.springframework.batch.item.file.transform.DelimitedLineTokenizer to parse the records into a FieldSet. Listing 7-9 shows the configuration of the reader updated with the DelimitedLineTokenizer.
Example 7.9. customerFileReader with the DelimitedLineTokenizer
...
<beans:bean id="customerFile"
  class="org.springframework.core.io.FileSystemResyource" scope="step">
  <beans:constructor-arg value="#{jobParameters[customerFile]}"/>
</beans:bean>

<beans:bean id="customerFileReader"
  class="org.springframework.batch.item.file.FlatFileItemReader">
  <beans:property name="resyource" ref="customerFile" />
  <beans:property name="lineMapper">
    <beans:bean
      class="org.springframework.batch.item.file.mapping.DefaultLineMapper">
      <beans:property name="lineTokenizer">
              <beans:bean
class="org.springframework.batch.item.file.transform.DelimitedLineTokenizer">
                <beans:property name="names"
value="firstName,middleInitial,lastName,addressNumber,street,city,state,zip"/>
                <beans:property name="delimiter" value=","/>
              </beans:bean>
      </beans:property>
      <beans:property name="fieldSetMapper">
        <beans:bean class="org.springframework.batch.item.file.mapping.
BeanWrapperFieldSetMapper">
          <beans:property name="prototypeBeanName" value="customer"/>
        </beans:bean>
      </beans:property>
    </beans:bean>
  </beans:property>
</beans:bean>
<beans:bean id="customer" class="com.apress.springbatch.chapter7.Customer" scope="prototype"/> ...
The DelimitedLineTokenizer allows for two options that you'll find very useful. The first is the ability to configure the delimiter. A comma is the default value; however, any single character can be used. The second option is the ability to configure what value will be used as a quote character. When this option is used, that value will be used instead of " as the character to indicate quotes. This character will also be able to escape itself. Listing 7-10 shows an example of how a string is parsed when you use # character as quote character.
Example 7.10. Parsing a Delimited File with the Quote Character Configured
Michael,T,Minella,#123,4th Street#,Chicago,IL,60606 Is parsed as Michael T Minella 123,4th Street Chicago IL 60606
Although that's all that is required to process delimited files, it's not the only option you have. The current example maps address numbers and streets to two different fields. However, what if you wanted to map them together into a single field as represented in the domain object in Listing 7-11?
Example 7.11. Customer with a Single Street Address Field
package com.apress.springbatch.chapter7;
public class Customer {
private String firstName;
private String middleInitial;
private String lastName;
private String addressNumber;
private String street;
private String city;
private String state;
private String zip;
// Getters & setters go here
...
}With the new object format, you will need to update how the FieldSet is mapped to the domain object. To do this, you will create your own implementation of the org.springframework.batch.item.file.mapping.FieldSetMapper interface. The FieldSetMapper interface, as shown in Listing 7-12, consists of a single method, mapFieldSet, that allows you to map the FieldSet as it is returned from the LineTokenizer to the domain object fields.
Example 7.12. The FieldSetMapper Interface
package org.springframework.batch.item.file.mapping;
import org.springframework.batch.item.file.transform.FieldSet;
import org.springframework.validation.BindException;
public interface FieldSetMapper<T> {
T mapFieldSet(FieldSet fieldSet) throws BindException;
}To create your own mapper, you will implement the FieldSetMapper interface with the type defined as Customer. From there, as shown in Listing 7-13, you can map each field from the FieldSet to the domain object, concatenating the addressNumber and street fields into a single address field per your requirements.
Example 7.13. Mapping Fields from the FieldSet to the Customer Object
package com.apress.springbatch.chapter7;
import org.springframework.batch.item.file.mapping.FieldSetMapper;
import org.springframework.batch.item.file.transform.FieldSet;
import org.springframework.validation.BindException;
public class CustomerFieldSetMapper implements FieldSetMapper<Customer> {
public Customer mapFieldSet(FieldSet fieldSet) throws BindException {
Customer customer = new Customer();
customer.setAddress(fieldSet.readString("addressNumber") +
" " + fieldSet.readString("street"));
customer.setCity(fieldSet.readString("city"));
customer.setFirstName(fieldSet.readString("firstName"));
customer.setLastName(fieldSet.readString("lastName"));
customer.setMiddleInitial(fieldSet.readString("middleInitial"));
customer.setState(fieldSet.readString("state"));
customer.setZip(fieldSet.readString("zip"));
return customer;
}
}The FieldSet methods are very similar to the ResultSet methods of the JDBC realm. Spring provides a method for each of the primitive data types, String (trimmed or untrimmed), BigDecimal, and java.util.Date. Each of these different methods has two different varieties. The first takes an integer as the parameter where the integer represents the index of the field to be retrieved in the record. The other version, shown in Listing 7-14, takes the name of the field. Although this approach requires you to name the fields in the job configuration, it's a more maintainable model in the long run. Listing 7-14 shows the FieldSet interface.
Example 7.14. FieldSet Interface
package org.springframework.batch.item.file.transform;
import java.math.BigDecimal;
import java.sql.ResultSet;
import java.util.Date;
import java.util.Properties;
public interface FieldSet {
String[] getNames();
boolean hasNames();
String[] getValues();
String readString(int index);
String readString(String name);
String readRawString(int index);
String readRawString(String name);
boolean readBoolean(int index);
boolean readBoolean(String name);
boolean readBoolean(int index, String trueValue);
boolean readBoolean(String name, String trueValue);
char readChar(int index);
char readChar(String name);
byte readByte(int index);
byte readByte(String name);
short readShort(int index);
short readShort(String name);
int readInt(int index);
int readInt(String name);
int readInt(int index, int defaultValue);
int readInt(String name, int defaultValue);
long readLong(int index);
long readLong(String name);
long readLong(int index, long defaultValue);
long readLong(String name, long defaultValue);
float readFloat(int index);
float readFloat(String name);
double readDouble(int index);
double readDouble(String name);
BigDecimal readBigDecimal(int index);
BigDecimal readBigDecimal(String name);
BigDecimal readBigDecimal(int index, BigDecimal defaultValue);
BigDecimal readBigDecimal(String name, BigDecimal defaultValue);
Date readDate(int index);
Date readDate(String name);
Date readDate(int index, Date defaultValue);
Date readDate(String name, Date defaultValue);
Date readDate(int index, String pattern);
Date readDate(String name, String pattern);
Date readDate(int index, String pattern, Date defaultValue);Date readDate(String name, String pattern, Date defaultValue);
int getFieldCount();
Properties getProperties();
}Note
Unlike the JDBC ResultSet, which begins indexing columns at 1, the index used by Spring Batch's FieldSet is zero-based.
To put the CustomerFieldSetMapper to use, you need to update the configuration to use it. Replace the BeanWrapperFieldSetMapper reference with your own bean reference, as shown in Listing 7-15.
Example 7.15. customerFileReader Configured with the CustomerFieldSetMapper
...
<beans:bean id="customerFile"
class="org.springframework.core.io.FileSystemResource" scope="step">
<beans:constructor-arg value="#{jobParameters[customerFile]}"/>
</beans:bean>
<beans:bean id="customerFileReader"
class="org.springframework.batch.item.file.FlatFileItemReader">
<beans:property name="resource" ref="customerFile" />
<beans:property name="lineMapper">
<beans:bean
class="org.springframework.batch.item.file.mapping.DefaultLineMapper">
<beans:property name="lineTokenizer">
<beans:bean class="org.springframework.batch.item.file.transform.
DelimitedLineTokenizer">
<beans:property name="names"
value="firstName,middleInitial,lastName,addressNumber,street,
city,state,zip"/>
<beans:property name="delimiter" value=","/>
</beans:bean>
</beans:property>
<beans:property name="fieldSetMapper">
<beans:bean
class="com.apress.springbatch.chapter7.CustomerFieldSetMapper"/>
</beans:property>
</beans:bean>
</beans:property>
</beans:bean>
...Note that with your new CustomerFieldSetMapper, you don't need to configure the reference to the Customer bean. Since you handle the instantiation yourselves, this is no longer needed.
Parsing files with the standard Spring Batch parsers, as you have shown, requires nothing more than a few lines of XML. However, not all files consist of Unicode characters laid out in a format that is easy for Java to understand. When dealing with legacy systems, it's common to come across data storage techniques that require custom parsing. In the next section, you will look at how to implement your own LineTokenizer to be able to handle custom file formats.
In the previous section you looked at how to address the ability to tweak the mapping of fields in your file to the fields of your domain object by creating a custom FieldSetMapper implementation. However, that is not the only option. Instead, you can create your own LineTokenizer implementation. This will allow you to parse each record however you need.
Like the FieldSetMapper interface, the org.springframework.batch.item.file.transform.LineTokenizer interface has a single method: tokenize. Listing 7-16 shows the LineTokenizer interface.
Example 7.16. LineTokenizer interface
package org.springframework.batch.item.file.transform;
public interface LineTokenizer {
FieldSet tokenize(String line);
}For this approach you will use the same delimited input file you used previously; however, since the domain object has the address number and the street combined into a single field, you will combine those two tokens into a single field in the FieldSet. Listing 7-17 shows the CustomerFileLineTokenizer.
Example 7.17. CustomerFileLineTokenizer
package com.apress.springbatch.chapter7;
import java.util.ArrayList;
import java.util.List;
import org.springframework.batch.item.file.transform.DefaultFieldSetFactory;
import org.springframework.batch.item.file.transform.FieldSet;
import org.springframework.batch.item.file.transform.FieldSetFactory;
import org.springframework.batch.item.file.transform.LineTokenizer;
public class CustomerFileLineTokenizer implements LineTokenizer {
private String delimiter;
private String names;
private FieldSetFactory fieldSetFactory = new DefaultFieldSetFactory();
public FieldSet tokenize(String record) {
String[] fields = record.split(delimiter);
List<String> parsedFields = new ArrayList<String>();for (int i = 0; i < fields.length; i++) {
if (i == 4) {
parsedFields.set(i - 1,
parsedFields.get(i - 1) + " " + fields[i]);
} else {
parsedFields.add(fields[i]);
}
}
FieldSet fieldSet =
fieldSetFactory.create(parsedFields.toArray(new String [0]),
names.split(","));
return fieldSet;
}
public void setDelimiter(String delimiter) {
this.delimiter = delimiter;
}
public void setNames(String names) {
this.names = names;
}
}The tokenize method of the CustomerFileLineTokenizer takes each record and splits it based upon the delimiter that was configured with Spring. You loop through the fields, combining the third and fourth fields together so that they are a single field. You then create a FieldSet using the DefaultFieldSetFactory, passing it the one required parameter (an array of values to be your fields) and one optional parameter (an array of names for the fields). This LineTokenizer names your fields so that you can use the BeanWrapperFieldSetMapper to do your FieldSet to domain object mapping without any additional code.
Configuring the CustomerFileLineTokenizer is identical to the configuration for the DelimitedLineTokenizer with only the class name to change. Listing 7-18 shows the updated configuration.
Example 7.18. Configuring the CustomerFileLineTokenizer
...
<beans:bean id="customerFile"
class="org.springframework.core.io.FileSystemResyource" scope="step">
<beans:constructor-arg value="#{jobParameters[customerFile]}"/>
</beans:bean>
<beans:bean id="customerFileReader"
class="org.springframework.batch.item.file.FlatFileItemReader">
<beans:property name="resource" ref="customerFile" />
<beans:property name="lineMapper">
<beans:bean
class="org.springframework.batch.item.file.mapping.DefaultLineMapper">
<beans:property name="lineTokenizer">
<beans:bean class="com.apress.springbatch.chapter7.CustomerFileLineTokenizer">
<beans:property name="names"
value="firstName,middleInitial,lastName,address,city,state,zip"/>
<beans:property name="delimiter" value=","/>
</beans:bean>
</beans:property>
<beans:property name="fieldSetMapper">
<beans:bean class="org.springframework.batch.item.file.mapping.
BeanWrapperFieldSetMapper">
<beans:property name="prototypeBeanName" value="customer"/>
</beans:bean>
</beans:property>
</beans:bean>
</beans:property>
</beans:bean>
<beans:bean id="customer" class="com.apress.springbatch.chapter7.Customer"
  scope="prototype"/>
...
The sky's the limit with what you can do with your own LineTokenizer and FieldSetMapper. Other uses for custom LineTokenizers could include:
Parsing legacy file encodings like EBCDIC.
Parsing third party file formats like Microsoft's Excel Worksheets.
Handling special type conversion requirements.
However, not all files are as simple as the customer one you have been working with. What if your file contains multiple record formats? The next section will discuss how Spring Batch can choose the appropriate LineTokenizer to parse each record it comes across.
Up to this point you have been looking at a customer file that contains a collection of customer records. Each record in the file has the exact same format. However, what if you received a file that had customer information as well as transaction information? Yes, you could implement a single custom LineTokenizer. However there are two issues with this approach.
Complexity: If you have a file that has three, four, five, or more line formats—each with a large number of fields—this single class can get out of hand quickly.
Separation of concerns: The LineTokenizer is intended to parse a record. That's it. It should not need to determine what the record type is prior to the parsing.
With this in mind, Spring Batch provides another LineMapper implementation: the org.springframework.batch.item.file.mapping.PatternMatchingCompositeLineMapper. The previous examples used the DefaultLineMapper, which provided the ability to use a single LineTokenizer and a single FileSetMapper. With the PatternMatchingCompositeLineMapper, you will be able to define a Map of LineTokenizers and a corresponding Map of FieldSetMappers. The key for each map will be a pattern that the LineMapper will use to identify which LineTokenizer to use to parse each record.
Let's start this example by looking at the updated input file. In this case, you still have the same customer records. However, interspersed between each customer record is a random number of transaction records. To help identify each record, you have added a prefix to each record. Listing 7-19 shows the updated input file.
Example 7.19. The Updated customerInputFile
CUST,Warren,Q,Darrow,8272 4th Street,New York,IL,76091
TRANS,1165965,2011-01-22 00:13:29,51.43
CUST,Ann,V,Gates,9247 Infinite Loop Drive,Hollywood,NE,37612
CUST,Erica,I,Jobs,8875 Farnam Street,Aurora,IL,36314
TRANS,8116369,2011-01-21 20:40:52,-14.83
TRANS,8116369,2011-01-21 15:50:17,-45.45
TRANS,8116369,2011-01-21 16:52:46,-74.6
TRANS,8116369,2011-01-22 13:51:05,48.55
TRANS,8116369,2011-01-21 16:51:59,98.53
In the file shown in Listing 7-19, you have two comma-delimited formats. The first consists of the standard customer format you have been working to up to now with the concatenated address number and street. These records are indicated with the prefix CUST. The other records are transaction records; each of these records, prefixed with the TRANS, prefix, are also comma-delimited, with the following three fields:
Account number: The customer's account number.
Date : The date the transaction occurred. The transactions may or may not be in date order.
Amount: The amount in dollars for the transaction. Negative values symbolize debits and positive amounts symbolize credits.
Listing 7-20 shows the code for the Transaction domain object.
Example 7.20. Transaction Domain Object Code
package com.apress.springbatch.chapter7;

import java.text.DateFormat;
import java.text.SimpleDateFormat;
import java.util.Date;

public class Transaction {

    private String accountNumber;
    private Date transactionDate;
    private Double amount;

    private DateFormat formatter = new SimpleDateFormat("MM/dd/yyyy");

    public String getAccountNumber() {
        return accountNumber;
    }
    public void setAccountNumber(String accountNumber) {
        this.accountNumber = accountNumber;
    }
    public Date getTransactionDate() {
        return transactionDate;
    }
    public void setTransactionDate(Date transactionDate) {
        this.transactionDate = transactionDate;
    }
    public Double getAmount() {
        return amount;
    }
    public void setAmount(Double amount) {
        this.amount = amount;
    }
    public String getDateString() {
        return formatter.format(transactionDate);
    }

}
With the record formats identified, you can look at the reader. Listing 7-21 shows the configuration for the updated customerFileReader. As mentioned, using the PatternMatchingCompositeLineMapper, you map two instances of the DelimitedLineTokenizer, each with the correct record format configured. You'll notice that you have an additional field named prefix for each of the LineTokenizers. This is to address the string at the beginning of each record (CUST and TRANS). Spring Batch will parse the prefix and name it prefix in your FieldSet; however, since you don't have a prefix field in either of your domain objects, it will be ignored in the mapping.
Example 7.21. Configuring the customerFileReader with Multiple Record Formats
...
<beans:bean id="customerFile"
  class="org.springframework.core.io.FileSystemResyource" scope="step">
  <beans:constructor-arg value="#{jobParameters[customerFile]}"/>
</beans:bean>

<beans:bean id="customerFileReader"
  class="org.springframework.batch.item.file.FlatFileItemReader">
  <beans:property name="resyource" ref="customerFile" />
  <beans:property name="lineMapper">
    <beans:bean class="org.springframework.batch.item.file.mapping.
PatternMatchingCompositeLineMapper">
      <beans:property name="tokenizers">
        <beans:map>
          <beans:entry key="CUST*" value-ref="customerLineTokenizer"/>
          <beans:entry key="TRANS*" value-ref="transactionLineTokenizer"/>
        </beans:map>
      </beans:property>
      <beans:property name="fieldSetMappers">
        <beans:map>
          <beans:entry key="CUST*" value-ref="customerFieldSetMapper"/>
          <beans:entry key="TRANS*" value-ref="transactionFieldSetMapper"/>
        </beans:map>
      </beans:property>
    </beans:bean>
  </beans:property>
</beans:bean>

<beans:bean id="customerLineTokenizer"
  class="org.springframework.batch.item.file.transform.
DelimitedLineTokenizer">
  <beans:property name="names"
    value="prefix,firstName,middleInitial,lastName,address,city,state,zip"/>
  <beans:property name="delimiter" value=","/>
</beans:bean>

<beans:bean id="transactionLineTokenizer"
  class="org.springframework.batch.item.file.transform.
DelimitedLineTokenizer">
  <beans:property name="names"
    value="prefix,accountNumber,transactionDate,amount"/>
  <beans:property name="delimiter" value=","/>
</beans:bean>

<beans:bean id="customerFieldSetMapper"
  class="org.springframework.batch.item.file.mapping.
BeanWrapperFieldSetMapper">
  <beans:property name="prototypeBeanName" value="customer"/>
  <beans:property name="strict" value="false"/>
</beans:bean> <beans:bean id="transactionFieldSetMapper" class="com.apress.springbatch.chapter7.TransactionFieldSetMapper"/> <beans:bean id="customer" class="com.apress.springbatch.chapter7.Customer" scope="prototype"/> ...
The configuration of the customerFileReader is beginning to get a bit verbose. Let's walk through what will actually happen when this reader is executed. If you look at Figure 7-2, you can follow the flow of how the customerFileReader will process each line.
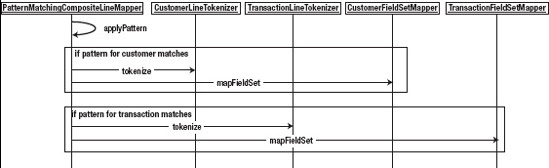
As Figure 7-2 shows, the PatternMatchingCompositeLineMapper will look at each record of the file and apply your pattern to it. If the record begins with CUST,* (where * is zero or more characters), it will pass the record to the customerLineTokenizer for parsing. Once the record is parsed into a FieldSet, it will be passed to the customerFieldSetMapper to be mapped to the domain object. However, if the record begins with TRANS,*, it will be passed to the transactionLineTokenizer for parsing with the resulting FieldSet being passed to the custom transactionFieldSetMapper.
But why do you need a custom FieldSetMapper? It's necessary for custom type conversion. By default, the BeanWrapperFieldSetMapper doesn't do any special type conversion. The Transaction domain object consists of an accountNumber field, which is a String; however, the other two fields, transactionDate and amount, are a java.util.Date and a Double, respectively. Because of this, you will need to create a custom FieldSetMapper to do the required type conversions. Listing 7-22 shows the TransactionFieldSetMapper.
Example 7.22. TransactionFieldSetMapper
package com.apress.springbatch.chapter7;
import org.springframework.batch.item.file.mapping.FieldSetMapper;
import org.springframework.batch.item.file.transform.FieldSet;
import org.springframework.validation.BindException;
public class TransactionFieldSetMapper implements FieldSetMapper<Transaction> {
public Transaction mapFieldSet(FieldSet fieldSet) throws BindException {
Transaction trans = new Transaction();trans.setAccountNumber(fieldSet.readString("accountNumber"));
trans.setAmount(fieldSet.readDouble("amount"));
trans.setTransactionDate(fieldSet.readDate("transactionDate",
"yyyy-MM-dd HH:mm:ss"));
return trans;
}
}As you can see, the FieldSet interface, like the ResultSet interface of the JDBC world, provides custom methods for each data type. In the case of the Transaction domain object, you use the readDouble method to have the String in your file converted into a Java.lang.Double and you use the readDate method to parse the string contained in your file into a Java.util.Date. For the date conversion, you specify not only the field's name but also the format of the date to be parsed.
Unfortunately, with two different item types now being processed by the step at the same time, you won't be able to use the same ItemWriter you have been up to now. I would love to be able to tell you that Spring Batch has the equivalent delegator for the writer side as it does with the reader side and the PatternMatchingCompositeLineMapper. Unfortunately, it doesn't. Instead, you will need to create a custom ItemWriter that will delegate to the appropriate writer based upon the type of item to be printed. Chapter 9 covers the details of this writer implementation. However, to be able to see the results of the job, Listing 7-23 shows the implementation of the LineAggregator interface that will delegate the items accordingly.
Example 7.23. CustomerLineAggregator
package com.apress.springbatch.chapter7;
import org.springframework.batch.item.file.transform.LineAggregator;
public class CustomerLineAggregator implements LineAggregator<Object> {
private LineAggregator<Customer> customerLineAggregator;
private LineAggregator<Transaction> transactionLineAggregator;
public String aggregate(Object record) {
if(record instanceof Customer) {
return customerLineAggregator.aggregate((Customer) record);
} else {
return transactionLineAggregator.aggregate((Transaction) record);
}
}
public void setCustomerLineAggregator(
LineAggregator<Customer> customerLineAggregator) {
this.customerLineAggregator = customerLineAggregator;
}
public void setTransactionLineAggregator(
LineAggregator<Transaction> transactionLineAggregator) {
this.transactionLineAggregator = transactionLineAggregator;} }
The LineAggregator implementation in Listing 7-23 is quite simple. It takes an item, determines its type, and passes the item to the appropriate LineAggregator implementation based upon the type. The configuration for the previous LineAggregator is shown in Listing 7-24.
Example 7.24. outputWriter Configuration
...
<beans:bean id="outputFile"
class="org.springframework.core.io.FileSystemResource" scope="step">
<beans:constructor-arg value="#{jobParameters[outputFile]}"/>
</beans:bean>
<beans:bean id="outputWriter"
class="org.springframework.batch.item.file.FlatFileItemWriter">
<beans:property name="resource" ref="outputFile" />
<beans:property name="lineAggregator">
<beans:bean
class="com.apress.springbatch.chapter7.CustomerLineAggregator">
<beans:property name="customerLineAggregator"
ref="customerLineAggregator" />
<beans:property name="transactionLineAggregator"
ref="transactionLineAggregator" />
</beans:bean>
</beans:property>
</beans:bean>
<beans:bean id="customerLineAggregator"
class="org.springframework.batch.item.file.transform.
FormatterLineAggregator">
<beans:property name="fieldExtractor">
<beans:bean class="org.springframework.batch.item.file.transform.
BeanWrapperFieldExtractor">
<beans:property name="names" value="firstName,middleInitial,lastName,
address,city,state,zip" />
</beans:bean>
</beans:property>
<beans:property name="format" value="%s %s. %s, %s, %s %s %s" />
</beans:bean>
<beans:bean id="transactionLineAggregator" class="org.springframework.batch.
item.file.transform.FormatterLineAggregator">
<beans:property name="fieldExtractor">
<beans:bean class="org.springframework.batch.item.file.transform.
BeanWrapperFieldExtractor">
<beans:property name="names" value="accountNumber,amount,dateString" />
</beans:bean>
</beans:property>
<beans:property name="format" value="%s had a transaction of %.2f on %s" /></beans:bean> ...
As you can see from Listing 7-24, configuring each of the two LineAggregators to which the CustomerLineAggregator delegates are based upon the same configuration that you used previously. The only difference is you have a delegation step in front of them.
When you execute the job, you're able to read in the two different record formats, parse them into their respective domain objects, and print them out into two, different record formats. A sample of the results of this job is shown in Listing 7-25.
Example 7.25. Results of Running the copyJob Job with Multiple Record Formats
Warren Q. Darrow, 8272 4th Street, New York IL 76091 1165965 had a transaction of 51.43 on 01/22/2011 Ann V. Gates, 9247 Infinite Loop Drive, Hollywood NE 37612 Erica I. Jobs, 8875 Farnam Street, Aurora IL 36314 8116369 had a transaction of −14.83 on 01/21/2011 8116369 had a transaction of −45.45 on 01/21/2011 8116369 had a transaction of −74.60 on 01/21/2011 8116369 had a transaction of 48.55 on 01/22/2011 8116369 had a transaction of 98.53 on 01/21/2011
The ability to process multiple records from a single file is a common requirement in batch processing. However, this example assumes that there was no real relationship between the different records. What if there is? The next section will look at how to read multiline records into a single item.
In the last example, you looked at the processing of two different record formats into two different, unrelated items. However, if you take a closer look at the file format you were using, you can see that the records you were reading were actually related (as shown in the output of the job). While not related by a field in the file, the transaction records are the transaction records for the customer record above it. Instead of processing each record independently, doesn't it make more sense to have a Customer object that has a collection of Transaction objects on it?
To make this work, you will need to perform a small bit of trickery. The examples provided with Spring Batch use a footer record to identify the true end of a record. Although convenient, many files seen in batch do not have that trailer record. With your file format, you run into the issue of not knowing when a record is complete without reading the next row. To get around this, you can implement your own ItemReader that adds a bit of logic around the customerFileReader you configured in the previous section. Figure 7-3 shows the flow of logic you will use within your custom ItemReader.
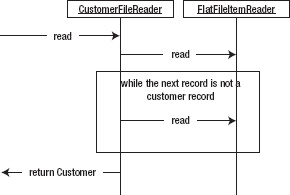
As Figure 7-3 shows, your read method will begin by determining if a Customer object has already been read. If it hasn't, it will attempt to read one from the FlatFileItemReader. Assuming you read a record (you won't have read one once you reach the end of the file), you will initialize the transaction List on the Customer object. While the next record you read is a Transaction, you will add it to the Customer object. Listing 7-26 shows the implementation of the CustomerFileReader.
Example 7.26. CustomerFileReader
package com.apress.springbatch.chapter7;
import Java.util.ArrayList;
import org.springframework.batch.item.ExecutionContext;
import org.springframework.batch.item.ItemStreamException;
import org.springframework.batch.item.ItemStreamReader;
import org.springframework.batch.item.ParseException;
import org.springframework.batch.item.UnexpectedInputException;
public class CustomerFileReader implements ItemStreamReader<Object> {
private Object curItem = null;
private ItemStreamReader<Object> delegate;
public Object read() throws Exception {
if(curItem == null) {
curItem = (Customer) delegate.read();
}
Customer item = (Customer) curItem;
curItem = null;
if(item != null) {
item.setTransactions(new ArrayList<Transaction>());
while(peek() instanceof Transaction) {item.getTransactions().add((Transaction) curItem);
curItem = null;
}
}
return item;
}
public Object peek() throws Exception, UnexpectedInputException,
ParseException {
if (curItem == null) {
curItem = delegate.read();
}
return curItem;
}
public void setDelegate(ItemStreamReader<Object> delegate) {
this.delegate = delegate;
}
public void close() throws ItemStreamException {
delegate.close();
}
public void open(ExecutionContext arg0) throws ItemStreamException {
delegate.open(arg0);
}
public void update(ExecutionContext arg0) throws ItemStreamException {
delegate.update(arg0);
}
}The CustomerFileReader has two key methods that you should look at. The first is the read() method. This method is responsible for implementing the logic involved in reading and assembling a single Customer item including its child transaction records. It does so by reading in a customer record from the file you are reading. It then reads the related transaction records until the next record is the next customer record. Once the next customer record is found, the current customer is considered complete and returned by your ItemReader. This type of logic is called control break logic.
The other method of consequence is the peak method. This method is used to read ahead while still working on the current Customer. It caches the current record. If the record has been read but not processed, it will return the same record again. If the record has been processed (indicated to this method by setting curItem to null), it will read in the next record[19].
You should notice that your custom ItemReader does not implement the ItemReader interface. Instead, it implements on of its subinterfaces, the ItemStreamReader interface. The reason for this is that when using one of the Spring Batch ItemReader implementations, they handle the opening and closing of the resource being read as well as maintaining the ExecutionContext as records are being read. However, if you implement your own, you need to manage that yourself. Since you are just wrapping a Spring Batch ItemReader (the FlatFileItemReader), you can use it to maintain those resources.
To configure the CustomerFileReader, the only dependency you have is the delegate. The delegate in this case is the reader that will do the actual reading and parsing work for you. Listing 7-27 shows the configuration for the CustomerFileReader.
Example 7.27. CustomerFileReader Configuration
...
<beans:bean id="customerFile"
class="org.springframework.core.io.FileSystemResyource" scope="step">
<beans:constructor-arg value="#{jobParameters[customerFile]}"/>
</beans:bean>
<beans:bean id="customerFileReader" class="com.apress.springbatch.chapter7.CustomerFileReader">
<beans:property name="delegate" ref="trueCustomerFileReader"/>
</beans:bean>
<beans:bean id="trueCustomerFileReader"
class="org.springframework.batch.item.file.FlatFileItemReader">
<beans:property name="resource" ref="customerFile" />
<beans:property name="lineMapper">
<beans:bean class="org.springframework.batch.item.file.mapping.
PatternMatchingCompositeLineMapper">
<beans:property name="tokenizers">
<beans:map>
<beans:entry key="CUST*" value-ref="customerLineTokenizer"/>
<beans:entry key="TRANS*" value-ref="transactionLineTokenizer"/>
</beans:map>
</beans:property>
<beans:property name="fieldSetMappers">
<beans:map>
<beans:entry key="CUST*" value-ref="customerFieldSetMapper"/>
<beans:entry key="TRANS*" value-ref="transactionFieldSetMapper"/>
</beans:map>
</beans:property>
</beans:bean>
</beans:property>
</beans:bean>
<beans:bean id="customerLineTokenizer"
class="org.springframework.batch.item.file.transform.
DelimitedLineTokenizer">
<beans:property name="names" value="prefix,firstName,middleInitial,
lastName,address,city,state,zip"/>
<beans:property name="delimiter" value=","/>
</beans:bean>
<beans:bean id="transactionLineTokenizer"
class="org.springframework.batch.item.file.transform.DelimitedLineTokenizer">
<beans:property name="names"
value="prefix,accountNumber,transactionDate,amount"/>
<beans:property name="delimiter" value=","/>
</beans:bean>
<beans:bean id="customerFieldSetMapper"
class="org.springframework.batch.item.file.mapping.
BeanWrapperFieldSetMapper">
<beans:property name="prototypeBeanName" value="customer"/>
</beans:bean>

<beans:bean id="transactionFieldSetMapper"
  class="com.apress.springbatch.chapter7.TransactionFieldSetMapper"/>

<beans:bean id="customer" class="com.apress.springbatch.chapter7.Customer"
  scope="prototype"/>
...
The configuration in Listing 7-27 should look familiar. It's essentially the exact same as the configuration you used for multiple record formats (see Listing 7-19). The only addition, as highlighted in bold, is the configuration of your new CustomerFileReader with its reference to the old ItemReader and renaming the old ItemReader.
With the updated object model, the previous method for writing to your output file won't work for this example. Because of this, I chose to use Spring Batch's PassThroughLineAggregator to write the output for this example. It calls the item's toString() method and writes the output to the output file. Listing 7-28 shows the updated ItemWriter configuration.
Example 7.28. Updated outputWriter Configuration
...
<beans:bean id="outputFile"
class="org.springframework.core.io.FileSystemResyource" scope="step">
<beans:constructor-arg value="#{jobParameters[outputFile]}"/>
</beans:bean>
<beans:bean id="outputWriter"
class="org.springframework.batch.item.file.FlatFileItemWriter">
<beans:property name="resource" ref="outputFile" />
<beans:property name="lineAggregator">
<beans:bean class="org.springframework.batch.item.file.transform.
PassThroughLineAggregator"/>
</beans:property>
</beans:bean>
...For each Customer object, it will print how many transactions the user has. This will provide enough detail for you to verify that your reading worked correctly. With the PassThroughLineAggregator configured as it is, you only need to override the Customer's toString() method to format the output. Listing 7-29 shows the updated method.
Example 7.29. Customer's toString() Method
...
@Override
public String toString() {
StringBuilder output = new StringBuilder();
output.append(firstName);
output.append(" ");
output.append(middleInitial);
output.append(". ");
output.append(lastName);
if(transactions != null&& transactions.size() > 0) {
output.append(" has ");
output.append(transactions.size());
output.append(" transactions.");
} else {
output.append(" has no transactions.");
}
return output.toString();
}
...With a run of the job, you can see each of your customers and the number of transaction records you read in. It's important to note that when reading records in this way, the customer record and all the subsequent transaction records are considered a single item. The reason for this is that Spring Batch considers an item to be any object that is returned by the ItemReader. In this case, the Customer object is the object returned by the ItemReader so it is the item used for things like commit counts, etc. Each Customer object will be processed once by any configured ItemProcessor you add and once by any configured ItemWriter. The output from the job configured with the new ItemReaders can be seen in Listing 7-30.
Example 7.30. Output from Multiline Job
Warren Q. Darrow has 1 transactions. Ann V. Gates has no transactions. Erica I. Jobs has 5 transactions.
Multiline records are a common element in batch processing. Although they are a bit more complex than basic record processing, as you can see from this example, there is still only a minimal amount of actual code that needs to be written to handle these robust situations.
The last piece of the flat file puzzle is to look at input situations where you read in from multiple files. This is a common requirement in the batch world and it's covered in the next section.
The examples up to this point have been based around a customer file with transactions for each customer. Many companies have multiple departments or locations that sell things. Take, for example, a restaurant chain with restaurants nationwide. Each location may contribute a file with the same format to be processed. If you were to process each one with a separate writer like you have been up to now, there would be a number of issues from performance to maintainability. So how does Spring Batch provide for the ability to read in multiple files with the same format?
Using a similar pattern to the one you just used in the multiline record example, Spring Batch provides an ItemReader called the MultiResourceItemReader. This reader wraps another ItemReader like the CustomerFileItemReader did; however, instead of defining the resource to be read as part of the child ItemReader, a pattern that defines all of the files to be read is defined as a dependency of the MultiResourceItemReader. Let's take a look.
You can use the same file format as you did in your multi-record example (as shown in Listing 7-19), which will allow you to use the same ItemReader configuration you created in the multiline example as well. However, if you have five of these files with the filenames customerFile1.txt, customerFile2.txt, customerFile3.txt, customerFile4.txt, and customerFile5.txt, you need to make two small updates. The first is to the configuration. You need to tweak your configuration to use the MultiResyourceItemReader with the correct resource pattern. You will also remove the reference to the input resource (<beans:property name="resource" ref="customerFile" />) from the FlatFileItemReader that you have used up to this point. Listing 7-31 shows the updated configuration.
Example 7.31. Configuration to Process Multiple Customer Files
...<beans:bean id="customerFileReader"class="org.springframework.batch.item.file.MultiResourceItemReader"><beans:property name="resources" value="file:/Users/mminella/temp/customerFile*.csv"/><beans:property name="delegate" ref="fullCustomerFileReader"/></beans:bean><beans:bean id="fullCustomerFileReader"class="com.apress.springbatch.chapter7.CustomerFileReader"> <beans:property name="delegate" ref="trueCustomerFileReader"/> </beans:bean> <beans:bean id="trueCustomerFileReader" class="org.springframework.batch.item.file.FlatFileItemReader"> <beans:property name="lineMapper"> <beans:bean class="org.springframework.batch.item.file.mapping. PatternMatchingCompositeLineMapper"> <beans:property name="tokenizers"> <beans:map> <beans:entry key="CUST*" value-ref="customerLineTokenizer"/> <beans:entry key="TRANS*" value-ref="transactionLineTokenizer"/> </beans:map> </beans:property> <beans:property name="fieldSetMappers"> <beans:map> <beans:entry key="CUST*" value-ref="customerFieldSetMapper"/> <beans:entry key="TRANS*" value-ref="transactionFieldSetMapper"/> </beans:map> </beans:property> </beans:bean> </beans:property>
</beans:bean>
<beans:bean id="customerLineTokenizer"
class="org.springframework.batch.item.file.transform.
DelimitedLineTokenizer">
<beans:property name="names" value="prefix,firstName,middleInitial,
lastName,address,city,state,zip"/>
<beans:property name="delimiter" value=","/>
</beans:bean>
<beans:bean id="transactionLineTokenizer"
class="org.springframework.batch.item.file.transform.
DelimitedLineTokenizer">
<beans:property name="names"
value="prefix,accountNumber,transactionDate,amount"/>
<beans:property name="delimiter" value=","/>
</beans:bean>
<beans:bean id="customerFieldSetMapper"
class="org.springframework.batch.item.file.mapping.
BeanWrapperFieldSetMapper">
<beans:property name="prototypeBeanName" value="customer"/>
<beans:property name="strict" value="false"/>
</beans:bean>
<beans:bean id="transactionFieldSetMapper"
class="com.apress.springbatch.chapter7.TransactionFieldSetMapper"/>
<beans:bean id="customer" class="com.apress.springbatch.chapter7.Customer"
scope="prototype"/>
...The other change you need to make is to the CustomerFileReader code. Previously, you were able to use the ItemStreamReader interface as what you implemented and the delegate's type. However, that won't be specific enough this time around. Instead, you are going to need to use one of the ItemStreamResource's sub interfaces. The ResourceAwareItemReaderItemStream interface is for any ItemReader that reads its input from resources. The reason you will want to make the two changes is that you will need to be able to inject multiple Resources into the ItemReader.
By implementing org.springframework.batch.item.file.ResourceAwareItemStreamItemReader, you will be required to add one additional method: setResource. Like the open, close and update methods of the ItemStreamReader interface, you will just be calling the setResource method on the delegate in your implementation. The other change you need to make is to have your delegate be of the type ResourceAwareItemStreamItemReader. Since you are using the FlatFileItemReader as your delegate, you won't need to use a different ItemReader as the delegate. The updated code is listed in Listing 7-32.
Example 7.32. CustomerFileReader
package com.apress.springbatch.chapter7; import java.util.ArrayList; import org.springframework.batch.item.ExecutionContext; import org.springframework.batch.item.ItemStreamException; import org.springframework.batch.item.ParseException; import org.springframework.batch.item.UnexpectedInputException; import org.springframework.batch.item.file.ResourceAwareItemReaderItemStream; import org.springframework.core.io.Resource;public class CustomerFileReader implementsResourceAwareItemReaderItemStream<Object> {private Object curItem = null;private ResourceAwareItemReaderItemStream<Object> delegate;public Object read() throws Exception { if (curItem == null) { curItem = (Customer) delegate.read(); } Customer item = (Customer) curItem; curItem = null; if (item != null) { item.setTransactions(new ArrayList<Transaction>()); while (peek() instanceof Transaction) { item.getTransactions().add((Transaction) curItem); curItem = null; } } return item; } public Object peek() throws Exception, UnexpectedInputException, ParseException { if (curItem == null) { curItem = delegate.read(); } return curItem; } public void setDelegate( ResourceAwareItemReaderItemStream<Object> delegate) { this.delegate = delegate;
}
public void close() throws ItemStreamException {
delegate.close();
}
public void open(ExecutionContext arg0) throws ItemStreamException {
delegate.open(arg0);
}
public void update(ExecutionContext arg0) throws ItemStreamException {
delegate.update(arg0);
}
public void setResource(Resyource arg0) {
delegate.setResource(arg0);
}

}
The sole difference from a processing standpoint between what is shown in Listing 7-33 and what you originally wrote in Listing 7-26 is the ability to inject a Resource. This allows Spring Batch to create each of the files as needed and inject them into the ItemReader instead of the ItemReader itself being responsible for file management.
When you run this example, Spring Batch will iterate through all of the resources that match your provided pattern and execute your reader for each file. The output for this job is nothing more than a larger version of the output from the multiline record example.
Example 7.33. Output from Multiline Job
Warren Q. Darrow has 1 transactions. Ann V. Gates has no transactions. Erica I. Jobs has 5 transactions. Joseph Z. Williams has 2 transactions. Estelle Y. Laflamme has 3 transactions. Robert X. Wilson has 1 transactions. Clement A. Blair has 1 transactions. Chana B. Meyer has 1 transactions. Kay C. Quinonez has 1 transactions. Kristen D. Seibert has 1 transactions. Lee E. Troupe has 1 transactions. Edgar F. Christian has 1 transactions.
It is important to note that when dealing with multiple files like this, Spring Batch provides no added safety around things like restart. So in this example, if your job started with files customerFile1.csv, customerFile2.csv, and customerFile3.csv and it were to fail after processing customerFile2.csv, and you added a customerFile4.csv before it was restated, customerFile4.csv would be processed as part of this run even though it didn't exist when the job was first executed. To safeguard against this, it's a common practice to have a directory for each batch run. All files that are to be processed for the run go into the appropriate directory and are processed. Any new files go into a new directory so that they have no impact on the currently running execution.
I have covered many scenarios involving flat files—from fixed-width records, delimited records, multiline records, and even input from multiple files. However, flat files are not the only type of files that you are likely to see. You have spent a large amount of this book (and will still spend a large amount more) looking at XML, yet you haven't even looked at how Spring Batch processes it. Let's see what Spring Batch can do for you when you're faced with XML files.
When I began talking about file-based processing at the beginning of this chapter, I talked about how different file formats have differing amounts of metadata that describe the format of the file. I said that fixed-width records have the least amount of metadata, requiring the most information about the record format to be known in advance. XML is at the other end of the spectrum. XML uses tags to describe the data in the file, providing a full description of the data it contains.
Two XML parsers are commonly used: DOM and SAX. The DOM parser loads the entire file into memory in a tree structure for navigation of the nodes. This approach is not useful for batch processing due to the performance implications. This leaves you with the SAX parser. SAX is an event-based parser that fires events when certain elements are found.
In Spring Batch, you use a StAX parser. Although this is an event-based parser similar to SAX, it has the advantage of allowing for the ability to parse sections of your document independently. This relates directly with the item oriented reading you do. A SAX parser would parse the entire file in a single run; the StAX parser allows you to read each section of a file that represents an item to be processed at a time.
Before you look at how to parse XML with Spring Batch, let's look at a sample input file. To see how the XML parsing works with Spring Batch, you will be working with the same input: your customer file. However, instead of the data in the format of a flat file, you will structure it via XML. Listing 7-34 shows a sample of the input.
Example 7.34. Customer XML File Sample
<customers>
<customer>
<firstName>Laura</firstName>
<middleInitial>O</middleInitial>
<lastName>Minella</lastName>
<address>2039 Wall Street</address>
<city>Omaha</city>
<state>IL</state>
<zip>35446</zip>
<transaction>
<account>829433</account>
<transactionDate>2010-10-14 05:49:58</transactionDate>
<amount>26.08</amount>
</transaction>
</customer>
<customer>
<firstName>Michael</firstName>
<middleInitial>T</middleInitial>
<lastName>Buffett</lastName>
<address>8192 Wall Street</address>
<city>Omaha</city>
<state>NE</state>
<zip>25372</zip><transaction>
<account>8179238</account>
<transactionDate>2010-10-27 05:56:59</transactionDate>
<amount>-91.76</amount>
</transaction>
<transaction>
<account>8179238</account>
<transactionDate>2010-10-06 21:51:05</transactionDate>
<amount>-25.99</amount>
</transaction>
</customer>
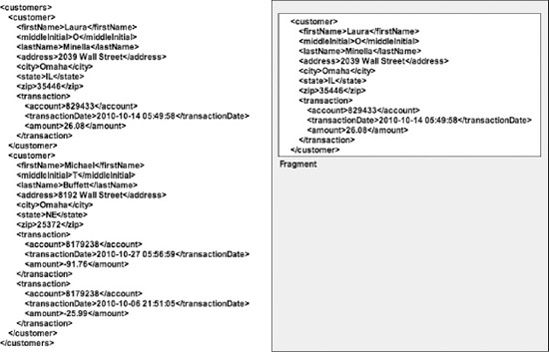
</customers>The customer file is structured as a collection of customer sections. Each of these contains a collection of transaction sections. Spring Batch parses lines in flat files into FieldSets. When working with XML, Spring Batch parses XML fragments that you define into your domain objects. What is a fragment? As Figure 7-4 shows, an XML fragment is a block of XML from open to close tag. Each time the specified fragment exists in your file, it will be considered a single record and converted into an item to be processed.
In the customer input file, you have the same data at the customer level. You also have a collection of transaction elements within each customer, representing the list of transactions you put together in the multiline example previously.
To parse your XML input file, you will use the org.springframework.batch.item.xml.StaxEventItemReader that Spring Batch provides. To use it, you define a fragment root element name, which identifies the root element of each fragment considered an item in your XML. In your case, this will be the customer tag. It also takes a resource, which will be the same your customerFile bean as it has been previously. Finally, it takes an org.springframework.oxm.Unmarshaller implementation. This will be used to convert the XML to your domain object. Listing 7-35 shows the configuration of your customerFileReader using the StaxEventItemReader implementation.
Example 7.35. customerFileReader Configured with the StaxEventItemReader
...
<beans:bean id="customerFile"
class="org.springframework.core.io.FileSystemResource" scope="step">
<beans:constructor-arg value="#{jobParameters[customerFile]}"/>
</beans:bean>
<beans:bean id="customerFileReader"
class="org.springframework.batch.item.xml.StaxEventItemReader">
<beans:property name="fragmentRootElementName" value="customer" />
<beans:property name="resource" ref="customerFile" />
<beans:property name="unmarshaller" ref="customerMarshaller" />
</beans:bean>
...Spring Batch is not picky about the XML binding technology you choose to use. Spring provides Unmarshaller implementations that use Castor, JAXB, JiBX, XMLBeans, and XStream in their oxm package. For this example, you will use the XStream binding framework.
For your customerMarshaller configuration, you will use the org.springframework.oxm.xstream.XStreamMarshaller implementation provided by Spring. To parse your customer file, there are three things you will need to configure on the XStreamMarshaller instance.
Aliases: This is a map of tag names to fully qualified class names that tells the unmarshaller what each tag maps to.
implicitCollection: This is a map of fields to fully qualified classes that indicate what fields on the class specified are collections consisting of another type.
Converters: Although XStream is pretty smart and can figure out how to convert most of your XML file from the Strings it sees in the file to the required data type in your objects, you need to help it out on the transaction date. For XStream to be able to parse the transaction date, you will need to provide a DateConverter instance configured with the correct date format.
Listing 7-36 shows how to configure your XStreamMarshaller with these dependencies.
Example 7.36. customerMarshaller Configuration
...
<beans:bean id="customerMarshaller"
  class="org.springframework.oxm.xstream.XStreamMarshaller">
  <beans:property name="aliases">
    <beans:map>
<beans:entry key="customer"
value="com.apress.springbatch.chapter7.Customer" />
<beans:entry key="transaction"
value="com.apress.springbatch.chapter7.Transaction" />
<beans:entry key="account" value="java.lang.String"/>
<beans:entry key="zip" value="java.lang.String"/>
</beans:map>
</beans:property>
<beans:property name="implicitCollection">
<beans:map>
<beans:entry key="transactions"
value="com.apress.springbatch.chapter7.Customer"/>
</beans:map>
</beans:property>
<beans:property name="converters">
<beans:list>
<beans:ref local="dateConverter"/>
</beans:list>
</beans:property>
</beans:bean>
<beans:bean id="dateConverter"
class="com.thoughtworks.xstream.converters.basic.DateConverter">
<beans:constructor-arg value="yyyy-MM-dd HH:mm:ss"/>
<beans:constructor-arg value="yyyy-MM-dd HH:mm:ss"/>
</beans:bean>
...As you can see in Listing 7-36, you configure the aliases to tell your parser what each tag maps to. Note that you don't need to map every tag since the parser can figure out most of the Strings. However, in the case of the zip code and account number, you need to let XStream know that those are not any type of number field. You also let your parser know what each of the two root tags map to: transaction maps to the Transaction class and customer maps to the Customer class. The implicitCollection dependency identifies that the field transactions on the Customer object is a collection. Finally, you provide a list of converters for XStream to use when it finds types that it can't parse by default. In your case, you provide the com.thoughtworks.xstream.converters.basic.DateConverter with the correct format for the dates found in your file.
That's all you need to parse XML into items in Spring Batch! By running this job, you will get the same output as you did from the multiline record job.
Over the course of this section, you have covered a wide array of input formats. Fixed length files, delimited files, and various record configurations as well as XML are all available to be handled via Spring Batch with no or very limited coding, as you have seen. However, not all input will come from a file. Relational databases will provide a large amount of the input for your batch processes. The next section will cover the facilities that Spring Batch provides for database input.
Databases serve as a great source of input for batch processes for a number of reasons. They provide transactionality built in, they are typically more performant, and they scale better than flat files. They also provide better recovery features out of the box than most other input formats. When you consider all of the above and the fact that most enterprise data is stored in relational databases to begin with, your batch processes will need to be able to handle input from databases. In this section, you will look at some of the facilities that Spring Batch provide out of the box to handle reading input data from a database including JDBC, Hibernate, and JPA.
In the Java world, database connectivity begins with JDBC. We all go through the pain of writing the JDBC connection code when we learn it, then quickly forget those lines when we realize that most frameworks handle things like connections for us. One of the Spring framework's strengths is encapsulating the pain points of things like JDBC in ways that allow developers to concentrate only on the business-specific details.
In this tradition, the developers of the Spring Batch framework have extended the Spring framework's JDBC functionality with the features that are needed in the batch world. But what are those features and how has Spring Batch addressed them?
When working with batch processes, the need to process large amounts of data is common. If you have a query that returns millions of records, you probably don't want all of that data loaded into memory at once. However, if you use Spring's JdbcTemplate, that is exactly what you would get. The JdbcTemplate loops through the entire ResultSet, mapping every row to the required domain object in memory.
Instead, Spring Batch provides two different methods for loading records one at a time as they are processed: a cursor and paging. A cursor is actually the default functionality of the JDBC ResultSet. When a ResultSet is opened, every time the next() method is called a record from the database is returned. This allows records to be streamed from the database on demand, which is the behavior that you need for a cursor.
Paging, on the other hand, takes a bit more work. The concept of paging is that you retrieve records from the database in chunks called pages. As you read through each page, a new page is read from the database. Figure 7-5 shows the difference between the two approaches.

As you can see in Figure 7-5, the first read in the cursor returns a single record and advances the record you point at to the next record, streaming a single record at a time, whereas in the pagination approach, you receive 10 records from the database at a time. You will look at both approaches (cursor implementations as well as paging) for each of the database technologies you will look at. Let's start with straight JDBC.
For this example, you'll be using a Customer table. Using the same fields you have been working with up to now, you will create a database table to hold the data. Figure 7-6 shows the database model for the new Customer table.
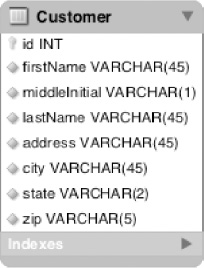
To implement a JDBC reader (either cursor-based or page-based), you will need to do two things: configure the reader to execute the query that is required and create a RowMapper implementation just like the Spring JdbcTemplate requires to map your ResultSet to your domain object. Since the RowMapper implementation will be the same for each approach, you can start there.
A RowMapper is exactly what it sounds like. It takes a row from a ResultSet and maps the fields to a domain object. In your case, you will be mapping the fields of the Customer table to the Customer domain object. Listing 7-37 shows the CustomerRowMapper you'll use for your JDBC implementations.
Example 7.37. CustomerRowMapper
package com.apress.springbatch.chapter7;

import java.sql.ResultSet;
import java.sql.SQLException;

import org.springframework.jdbc.core.RowMapper;

public class CustomerRowMapper implements RowMapper {

    public Customer mapRow(ResultSet resultSet, int rowNumber) throws
        SQLException {
        Customer customer = new Customer();

        customer.setId(resultSet.getLong("id"));
        customer.setAddress(resultSet.getString("address"));
        customer.setCity(resultSet.getString("city"));
        customer.setFirstName(resultSet.getString("firstName"));
        customer.setLastName(resultSet.getString("lastName"));
        customer.setMiddleInitial(resultSet.getString("middleInitial"));
        customer.setState(resultSet.getString("state"));
        customer.setZip(resultSet.getString("zip"));

        return customer;
    }
}
With the ability to map your query results to a domain object, you need to be able to execute a query by opening a cursor to return results on demand. To do that, you will use Spring Batch's org.springframework.batch.item.database.JdbcCursorItemReader. This ItemReader opens a cursor (by creating a ResultSet) and have a row mapped to a domain object each time the read method is called by Spring Batch. To configure the JdbcCursorItemReader, you provide a minimum of three dependencies: a datasource, the query you want to run, and your RowMapper implementation. Listing 7-38 shows the configuration for your customerItemReader.
Example 7.38. JDBC Cursor-Based customerItemReader
...
<beans:bean id="customerItemReader"
  class="org.springframework.batch.item.database.JdbcCursorItemReader">
  <beans:property name="dataSource" ref="dataSource"/>
  <beans:property name="sql" value="select * from customer"/>
  <beans:property name="rowMapper" ref="customerRowMapper"/>
</beans:bean>

<beans:bean id="customerRowMapper"
  class="com.apress.springbatch.chapter7.CustomerRowMapper"/>
...
I should point out that while the rest of the configurations for the job do not need to be changed (the same ItemWriter will work fine), you will need to update the reference to the customerFileReader in the copyFileStep to reference your new customerItemReader instead.
For this example, you will ignore the Transaction data that you have been working with in previous examples. Because of that, you will need to update your Customer's toString to print out valid output. Instead of printing the number of transactions each customer had, you will print out a formatted address for each customer. Listing 7-39 shows the updated toString method you can use.
Example 7.39. Customer.toString
...
    @Override
    public String toString() {
        StringBuilder output = new StringBuilder();

        output.append(firstName + " " +
                      middleInitial + ". " +
                      lastName + "
");
        output.append(address + "
");
        output.append(city + ", " + state + "
");
        output.append(zip);

        return output.toString();
    }
...
With the configuration you have now, each time Spring Batch calls the read() method on the JdbcCursorItemReader, the database will return a single row to be mapped to your domain object and processed.
To run your job, you use the same command you have been using: Java –jar copyJob.jar jobs/copyJob.xml copyJob outputFile=/output/jdbcOutput.txt. This command will execute your job generating the same type of output you have in your previous examples.
Although this example is nice, it lacks one key ingredient. The SQL is hardcoded. I can think of very few instances where SQL requires no parameters. Using the JdbcCursorItemReader, you use the same functionality to set parameters in your SQL as you would using the JdbcTemplate and a PreparedStatement. To do this, you need to write an org.springframework.jdbc.core.PreparedStatementSetter implementation. A PreparedStatementSetter is similar to a RowMapper; however, instead of mapping a ResultSet row to a domain object, you are mapping parameters to your SQL statement. If you wanted to get all of the customers in a given city, your configuration would look like Listing 7-40.
Example 7.40. Processing Only Customers by a Given City
<beans:bean id="customerItemReader"
  class="org.springframework.batch.item.database.JdbcCursorItemReader">
  <beans:property name="dataSource" ref="dataSource"/>
  <beans:property name="sql" value="select * from customer where city = ?"/>
  <beans:property name="rowMapper" ref="customerRowMapper"/>
  <beans:property name="preparedStatementSetter" ref="citySetter"/>
</beans:bean>
<beans:bean id="citySetter"
  class="com.apress.springbatch.chapter7.CitySetter" scope="step">
  <beans:property name="city" value="#{jobParameters[city]}"/>
</beans:bean>

<beans:bean id="customerRowMapper"
  class="com.apress.springbatch.chapter7.CustomerRowMapper"/>
Notice that in the SQL, there is a ? where your parameter will go. This is nothing more than a standard PreparedStatement. Spring Batch will use your CitySetter to set the value of the city to be processed. This is the same processing paradigm as the JdbcTemplate in Spring Core uses. Listing 7-41 shows your CitySetter implementation.
Example 7.41. CitySetter
package com.apress.springbatch.chapter7;

import java.sql.PreparedStatement;
import java.sql.SQLException;

import org.springframework.jdbc.core.PreparedStatementSetter;

public class CitySetter implements PreparedStatementSetter {

    private String city;

    public void setValues(PreparedStatement ps) throws SQLException {
        ps.setString(1, city);
    }

    public void setCity(String city) {
        this.city = city;
    }
}
This job is executed using virtually the same command as the previous example. he only difference is the addition of the city parameter: java –jar copyJob.jar jobs/copyJob.xml copyJob outputFile=/output/jdbcOutput.txt city="Carol Stream".
With the ability to not only stream items from the database but also inject parameters into your queries, this approach is useful in the real world. There are good and bad things about this approach. It can be a good thing to stream records in certain cases; however, when processing a million rows, the individual network overhead for each request can add up, which leads you to the other option, paging.
When working with a paginated approach, Spring Batch returns the result set in chunks called pages. Each page is a predefined number of records to be returned by the database. It is important to note that when working with pages, the items your job will process will still be processed individually. There is no difference in the processing of the records. What differs is the way they are retrieved from the database. Instead of retrieving records one at a time, paging will essentially cache a page until they are needed to be processed. In this section, you'll update your configuration to return a page of 10 records in a page.
In order for paging to work, you need to be able to query based on a page size and page number (the number of records to return and which page you are currently processing). For example, if your total number of records is 10,000 and your page size is 100 records, you need to be able to specify that you are requesting the 20th page of 100 records (or records 2,000 through 2100). To do this, you provide an implementation of the org.springframework.batch.item.database.PagingQueryProvider interface to the JdbcPagingItemReader. The PagingQueryProvider interface provides all of the functionality required to navigate a paged ResultSet.
Unfortunately, each database offers its own paging implementation. Because of this, you have the following two options:
Configure a database-specific implementation of the PagingQueryProvider. As of this writing, Spring Batch provides implementations for DB2, Derby, H2, HSql, MySql, Oracle, Postgres, SqlServer, and Sybase.
Configure your reader to use the
org.springframework.batch.item.database.support.SqlPagingQueryProviderFactoryBean. This factory detects what database implementation to use.
Although the easier route is definitely the SqlPagingQueryProviderFactoryBean, it is important to note that each of the different databases implement paging in a different way. Because of this, you may want to use database specific options when tuning your jobs. Given that the analysis of each database type is out of the scope for this book, you will use the SqlPagingQueryProviderFactoryBean for your example.
To configure the JdbcPagingItemReader, you have four dependencies: a datasource, the PagingQueryProvider implementation, your RowMapper implementation, and the size of your page. You also have the opportunity to configure your SQL statement's parameters to be injected by Spring. Listing 7-42 shows the configuration for the JdbcPagingItemReader.
Example 7.42. JdbcPagingItemReader Configuration
...
<beans:bean id="customerItemReader"
  class="org.springframework.batch.item.database.JdbcPagingItemReader"
  scope="step">
  <beans:property name="dataSource" ref="dataSource"/>
  <beans:property name="queryProvider">
    <beans:bean class="org.springframework.batch.item.database.support.
SqlPagingQueryProviderFactoryBean">
      <beans:property name="selectClause" value="select *"/>
      <beans:property name="fromClause" value="from Customer"/>
      <beans:property name="whereClause" value="where city = :city"/>
      <beans:property name="sortKey" value="lastName"/>
      <beans:property name="dataSource" ref="dataSource"/>
    </beans:bean>
  </beans:property>
  <beans:property name="parameterValues">
    <beans:map>
      <beans:entry key="city" value="#{jobParameters[city]}"/>
    </beans:map>
  </beans:property>
  <beans:property name="pageSize" value="10"/>
  <beans:property name="rowMapper" ref="customerRowMapper"/>
</beans:bean> <beans:bean id="customerRowMapper" class="com.apress.springbatch.chapter7.CustomerRowMapper"/>
As you can see, to configure your JdbcPagingItemReader, you provide it a datasource, PagingQueryProvider, the parameters to be injected into your SQL, the size of each page, and the RowMapper implementation that will be used to map your results.
Within the PagingQueryProvider's configuration, you provide five pieces of information. The first three are the different pieces of your SQL statement: the select clause, the from clause, and the where clause of your statement. The next property you set is the sort key. It is important to sort your results when paging since instead of a single query being executed and the results being streamed, a paged approach will typically execute a query for each page. In order for the record order to be guaranteed across query executions, an order by is recommended and is applied to the generated SQL statement for any fields that are listed in the sortKey. Finally, you have a dataSource reference. You may wonder why you need to configure it in both the SqlPagingQueryProviderFactoryBean and the JdbcPagingItemReader. The SqlPagingQueryProviderFactoryBean uses the dataSource to determine what type of database it's working with. From there, it provides the appropriate implementation of the PagingQueryProvider to be used for your reader.
The use of parameters in a paging context is different than it is in the previous cursor example. Instead of creating a single SQL statement with question marks as parameter placeholders, you build your SQL statement in pieces. Within the whereClause string, you have the option of using either the standard question mark placeholders or you can use the named parameters as I did in the customerItemReader in Listing 7-42. From there, you can inject the values to be set as a map in your configuration. In this case, the city entry in the parameterValues map maps to the named parameter city in your whereClause string. If you wanted to use question marks instead of names, you would use the number of the question mark as the key for each parameter. With all of the pieces in place, Spring Batch will construct the appropriate query for each page each time it is required.
As you can see, straight JDBC interaction with a database for reading the items to be processed is actually quite simple. With not much more than a few lines of XML, you can have a performant ItemReader in place that allows you to input data to your job. However, JDBC isn't the only way to access database records. Object Relational Mapping (ORM) technologies like Hibernate and MyBatis have become popular choices for data access given their well-executed solution for mapping relational database tables to objects. You will take a look at how to use Hibernate for data access next.
Hibernate is the leading ORM technology in Java today. Written by Gaven King back in 2001, Hibernate provides the ability to map the object oriented model you use in your applications to a relational database. Hibernate uses XML files or annotations to configure mappings of objects to database tables; it also provides a framework for querying the database by object. This provides the ability to write queries based on the object structure with little or no knowledge of the underlying database structure. In this section, you will look at how to use Hibernate as your method of reading items from a database.
Using Hibernate in batch processing is not as straightforward as it is for web applications. For web applications, the typical scenario is to use the session in view pattern. In this pattern, the session is opened as a request comes into the server, all processing is done using the same session, and then the session is closed as the view is returned to the client. Although this works well for web applications that typically have small independent interactions, batch processing is different.
For batch processing, if you use Hibernate naively, you would use the normal stateful session implementation, read from it as you process your items, and write to it as you complete your processing closing the session once the step is complete. However, as mentioned, the standard session within Hibernate is stateful. If you are reading a million items, processing them, then writing those same million items, the Hibernate session will cache the items as they are read and an OutOfMemoryException will occur.
Another issue with using Hibernate as a persistence framework for batch processing is that Hibernate incurs larger overhead than straight JDBC does. When processing millions of records, every millisecond can make a big difference[20].
I'm not trying to persuade you from against using Hibernate for your batch processing. In environments where you have the Hibernate objects mapped previously for another system, it can be a great way to get things up and running. Also, Hibernate does solve the fundamental issue of mapping objects to database tables in a very robust way. It's up to you and your requirements to determine if Hibernate or any ORM tool is right for your job.
To use Hibernate with a cursor, you will need to configure the sessionFactory, your Customer mapping, the HibernateCursorItemReader, and add the Hibernate dependencies to your pom.xml file. Let's start with updating your pom.xml file.
Using Hibernate in your job will require three additional dependencies to be added to your POM. Listing 7-43 shows the addition of the hibernate-core, hibernate-entity manager, and the hibernate-annotations to pom.xml.
Example 7.43. Hibernate Dependencies in POM
...
<dependency>
  <groupId>org.hibernate</groupId>
  <artifactId>hibernate-core</artifactId>
  <version>3.3.0.SP1</version>
</dependency>
<dependency>
  <groupId>org.hibernate</groupId>
  <artifactId>hibernate-entitymanager</artifactId>
  <optional>true</optional>
  <version>3.3.2.GA</version>
</dependency>
<dependency>
  <groupId>org.hibernate</groupId>
  <artifactId>hibernate-annotations</artifactId>
  <optional>true</optional>
  <version>3.4.0.GA</version>
</dependency>
<dependency>
  <groupId>org.springframework</groupId>
  <artifactId>spring-orm</artifactId>
  <version>${spring.framework.version}</version>
</dependency> ...
With the Hibernate framework added to your project, you can map your Customer object to the Customer table in the database. To keep things simple, you will use Hibernate's annotations to configure the mapping. Listing 7-44 shows the updated Customer object mapped to the Customer table.
Example 7.44. Customer Object Mapped to the Customer Table via Hibernate Annotations
package com.apress.springbatch.chapter7;

import java.util.List;

import javax.persistence.Entity;
import javax.persistence.Id;
import javax.persistence.Table;

@Entity
@Table(name="customer")
public class Customer {
    @Id private long id;
    private String firstName;
    private String middleInitial;
    private String lastName;
    private String address;
    private String city;
    private String state;
    private String zip;
    @Transient
    List<Transaction> transactions;

    // Accessors go here
    ...

    @Override
    public String toString() {
        StringBuilder output = new StringBuilder();

        output.append(firstName + " " +
                      middleInitial + ". " +
                      lastName + "
");
        output.append(address + "
");
        output.append(city + ", " + state + "
");
        output.append(zip);

        return output.toString();
    }
}
The Customer class's mapping consists of identifying the object as an Entity using the JPA annotation @Entity, specifying the table the entity maps to using the @Tab le annotation, and finally identifying the ID for the table with the @Id tag. All other attributes on the Customer will be mapped automatically by Hibernate since you have named the columns in the database the same as the attributes in your object. For simplicity, you will mark the Transaction attribute as @Transient so that Hibernate ignores it.
Once you have Hibernate as part of your project and map your classes, you can configure Hibernate. To configure Hibernate, you will need to configure a SessionFactory, update your transaction manager, and create a hibernate.cfg.xml to tell Hibernate where to find the domain objects. Let's look at the updates to the launch-context.xml file first. Here you will add the session factory as well as change the transaction manager to use Spring's HibernateTransactionManager. Listing 7-45 shows the updates to the launch-context.xml.
Example 7.45. Launch-config.xml Updates
...
<bean id="sessionFactory"
  class="org.springframework.orm.hibernate3.LocalSessionFactoryBean">
  <property name="dataSyource" ref="dataSyource" />
  <property name="configLocation">
    <value>classpath:hibernate.cfg.xml</value>
  </property>
  <property  name="configurationClass">
    <value>org.hibernate.cfg.AnnotationConfiguration</value>
  </property>
  <property name="hibernateProperties">
    <props>
      <prop key="hibernate.show_sql">true</prop>
      <prop key="hibernate.format_sql">true</prop>
    </props>
  </property>
</bean>

<bean id="transactionManager"
  class="org.springframework.orm.hibernate3.HibernateTransactionManager"
  lazy-init="true">
  <property name="sessionFactory" ref="sessionFactory" />
</bean>
...
The SessionFactory you are using requires three things: a dataSource to provide a database connection to the Hibernate Session it creates, the location of the Hibernate configuration file (which is in the root of your class path in this case), and, since you are using Hibernate's annotations to map your domain objects, the org.hibernate.cfg.AnnotationConfiguration class for Hibernate to be able to read the mappings. The only other dependency you provide for the SessionFactory is configuring Hibernate to log and format the SQL it generates via the hibernateProperties.
The other change you made to the launch-context.xml file is to change the transactionManager implementation you are using. You will be using Spring's org.springframework.orm.hibernate.HibernateTransactionManager instead of the org.springframework.jdbc.datasource.DataSourceTransactionManager you have been using up to this point.
To configure Hibernate itself, you need to provide a hibernate.cfg.xml file in the root of your classpath. To do this, you create a new file in <myprojectname>/src/main/resources called hibernate.cfg.xml. Listing 7-46 shows that its sole use in your example is to list your domain classes for Hibernate.
Example 7.46. hibernate.cfg.xml
<!DOCTYPE hibernate-configuration PUBLIC
"-//Hibernate/Hibernate Configuration DTD 3.0//EN"
"http://hibernate.sourceforge.net/hibernate-configuration-3.0.dtd">

<hibernate-configuration>
  <session-factory>
    <mapping class="com.apress.springbatch.chapter7.Customer"/>
  </session-factory>
</hibernate-configuration>
Last but not least, you need to actually configure the org.springframework.batch.item.database.HibernateCusorItemReader. Probably the simplest piece of the puzzle, this ItemReader implementation requires only two dependencies: a Hibernate SessionFactory and the HQL string to be executed. Listing 7-47 shows the configuration of the HibernateCusorItemReader with those two dependencies included as well as injecting query parameters the same way you did in the JdbcPagingItemReader earlier in this chapter.
Example 7.47. Configuring the HibernateCursorItemReader
...
<beans:bean id="customerItemReader"
  class="org.springframework.batch.item.database.HibernateCursorItemReader"
  scope="step">
  <beans:property name="sessionFactory" ref="sessionFactory"/>
  <beans:property name="queryString"
    value="from Customer where city = :city"/>
  <beans:property name="parameterValues">
    <beans:map>
      <beans:entry key="city" value="#{jobParameters[city]}"/>
    </beans:map>
  </beans:property>
</beans:bean>
...
In this example, you used an HQL query as your method of querying the database. There are two other ways to specify the query to execute. Table 7-3 covers all three options.
Table 7.3. Hibernate Query Options
Option | Type | Description |
|---|---|---|
queryName | String | This references a named Hibernate query as configured in your Hibernate configurations. |
queryString | String | This is an HQL query specified in your Spring configuration. |
queryProvider | HibernateQueryProvider | This provides the ability to programmatically build your Hibernate Query. |
That's all that is required to implement the Hibernate equivalent to JdbcCursorItemReader. Executing this job will output the same output as your previous job.
Hibernate, like JDBC, supports both cursor database access as well as paged database access. The only change required is to specify the HibernatePagingItemReader instead of the HibernateCursorItemReader in your copyJob.xml file and specify a page size for your ItemReader. Listing 7-48 shows the updated ItemReader using paged database access with Hibernate.
Example 7.48. Paging Database Access with Hibernate
...
<beans:bean id="customerItemReader"
  class="org.springframework.batch.item.database.HibernatePagingItemReader"
  scope="step">
  <beans:property name="sessionFactory" ref="sessionFactory"/>
  <beans:property name="queryString"
    value="from Customer where city = :city"/>
  <beans:property name="parameterValues">
    <beans:map>
      <beans:entry key="city" value="#{jobParameters[city]}"/>
    </beans:map>
  </beans:property>
  <beans:property name="pageSize" value="10"/>
</beans:bean>
...
Using Hibernate can speed up development of batch processing in situations where the mapping already exists as well as simplify the mapping of relational data to domain objects. However, Hibernate is not the only kid on the ORM block. The Java Persistence API (or JPA for short) is the native Java implementation of ORM persistence. You'll look at that next.
Over the past few years, the majority of innovation in the Java world has been in the open source space. Spring, Hibernate, the various JVM languages like Clojure, Scala, and JRuby that have come onto the scene. All of these have been products of the open source movement. As those products have shown their usefulness, Sun (now Oracle) has integrated similar approaches into the native Java API. JPA is one such example. In this case, Gavin King (the original author of Hibernate) was one of the driving forces in the development of JSR 220. In this section, you will look at how to use the JPA as your method of database access for your batch processes.
Although, as you will see, JPA has a number of similarities to Hibernate, it is not a drop-in replacement. One of the notable features missing from the JPA capabilities that Hibernate supports is the ability to use a cursor for database access. JPA supports paging but not cursor driven access. In this example, you will use JPA to provide paged database access similar to the Hibernate paged example you used previously.
To configure JPA, you will need to create the JPA version of the hibernate.cfg.xml, the persistence.xml as well as update launch-context.xml and copyJob.xml. It is important to note that since you used the JPA annotations in your Hibernate example, there will be no need to change your Customer object itself. Let's get started by creating the persistence.xml file.
The persistence.xml file must reside in the META-INF folder of your built jar file per the Java spec. To get it there, you will create your file in the <project_root>/src/main/resources/META-INF directory. Maven will take care of getting this directory in the correct spot of your jar file when you build it later. The contents of your persistence.xml file are about as simple as you can get. The only thing you need it for is to define your persistence unit (a customer object) and associate it with the correct class (your Customer class). Listing 7-49 shows the persistence.xml file you will use.
Example 7.49. persistence.xml
<persistence xmlns="http://java.sun.com/xml/ns/persistence"
  xmlns:xsi="http://www.w3.org/2001/XMLSchema-instance"
  xsi:schemaLocation="http://java.sun.com/xml/ns/persistence
    http://java.sun.com/xml/ns/persistence/persistence_1_0.xsd"
  version="1.0">

  <persistence-unit name="customer" transaction-type="RESOURCE_LOCAL">
    <class>com.apress.springbatch.chapter7.Customer</class>
  </persistence-unit>
</persistence>
With the persistence.xml file configured, you can update your launch-context.xml to use Spring's org.springframework.orm.jpa.JpaTransactionManager and its EntityManager, and to update the jobRepository. The configuration for your JpaTransactionManager and EntityManager should look very familiar. They are almost identical to the Hibernate configurations for the HibernateTransactionManager and SessionFactory, respectively. The small tweak you need to make to your jobRepository implementation is that you need to define the transaction isolation level to create ISOLATION_DEFAULT. Listing 7-50 shows launch-context.xml configured to use JPA for persistence.
Example 7.50. launch-context.xml
<?xml version="1.0" encoding="UTF-8"?>
<beans xmlns="http://www.springframework.org/schema/beans"
  xmlns:p="http://www.springframework.org/schema/p"
xmlns:xsi="http://www.w3.org/2001/XMLSchema-instance"
  xsi:schemaLocation="http://www.springframework.org/schema/beans
    http://www.springframework.org/schema/beans/spring-beans-3.0.xsd">

  <bean id="jobOperator"
    class="org.springframework.batch.core.launch.support.SimpleJobOperator"
    p:jobLauncher-ref="jobLauncher" p:jobExplorer-ref="jobExplorer"
    p:jobRepository-ref="jobRepository" p:jobRegistry-ref="jobRegistry" />

  <bean
    id="jobExplorer"class="org.springframework.batch.core.explore.support.
JobExplorerFactoryBean" p:dataSource-ref="dataSource" />

  <bean
    id="jobRegistry"class="org.springframework.batch.core.configuration.
support.MapJobRegistry" />

  <bean class="org.springframework.batch.core.configuration.support.
JobRegistryBeanPostProcessor">
    <property name="jobRegistry" ref="jobRegistry"/>
  </bean>

  <bean id="jobLauncher"
    class="org.springframework.batch.core.launch.support.SimpleJobLauncher">
    <property name="jobRepository" ref="jobRepository" />
  </bean>

  <bean id="dataSource" class="org.apache.commons.dbcp.BasicDataSource">
    <property name="driverClassName" value="${batch.jdbc.driver}" />
    <property name="url" value="${batch.jdbc.url}" />
    <property name="username" value="${batch.jdbc.user}" />
    <property name="password" value="${batch.jdbc.password}" />
  </bean>

  <bean id="transactionManager" class="org.springframework.orm.jpa.JpaTransactionManager">
    <property name="entityManagerFactory" ref="entityManagerFactory" />
  </bean>

  <bean id="entityManagerFactory"
    class="org.springframework.orm.jpa.LocalContainerEntityManagerFactoryBean">
    <property name="dataSource" ref="dataSource" />
    <property name="persistenceUnitName" value="customer" />
    <property name="jpaVendorAdapter">
      <bean class="org.springframework.orm.jpa.vendor.HibernateJpaVendorAdapter">
        <property name="showSql" value="false" />
      </bean>
    </property>
    <property name="jpaDialect">
      <bean class="org.springframework.orm.jpa.vendor.HibernateJpaDialect" />
    </property>
  </bean>
<bean id="jobRepository"
class="org.springframework.batch.core.repository.support.
JobRepositoryFactoryBean">
<property name="isolationLevelForCreate" value="ISOLATION_DEFAULT" />
<property name="dataSource" ref="dataSource" />
<property name="transactionManager" ref="transactionManager" />
</bean>
<bean id="placeholderProperties"
class="org.springframework.beans.factory.config.
PropertyPlaceholderConfigurer">
<property name="location" value="classpath:batch.properties" />
<property name="systemPropertiesModeName"
value="SYSTEM_PROPERTIES_MODE_OVERRIDE" />
<property name="ignoreUnresolvablePlaceholders" value="true" />
<property name="order" value="1" />
</bean>
</beans>The transactionManager relationship to the entityManagerFactoryBean is the same as Hibernate's relationship between the HibernateTransactionManager and the SessionFactory. For the EntityManager configuration, you specify a datasource like you did in Hibernate; however, since the JPA spec defines where to look for the persistence.xml file (in the META-INF directory), you don't need to configure that. You do need to tell your EntityManager the persistence unit name and configure the vendor implementation. Since Hibernate implements the JPA spec, you will use it for this example.
The last piece of the JPA puzzle is to configure your ItemReader. As mentioned, JPA does not support cursor database access but it does support paging database access. The ItemReader will be the org.springframework.batch.item.database.JpaPagingItemReader which uses three dependencies: the entityManager you configured in the launch-context.xml, a query to execute, and in your case, your query has a parameter, so you will inject the value of the parameter as well. Listing 7-51 shows the customerItemReader configured for JPA database access.
Example 7.51. customerItemReader with JPA
...
<beans:bean id="customerItemReader"
  class="org.springframework.batch.item.database.JpaPagingItemReader"
  scope="step">
  <beans:property name="entityManagerFactory" ref="entityManagerFactory" />
  <beans:property name="queryString"
    value="select c from Customer c where c.city = :city" />
  <beans:property name="parameterValues">
    <beans:map>
      <beans:entry key="city" value="#{jobParameters[city]}"/>
    </beans:map>
  </beans:property>
</beans:bean>
...
Executing the job as it currently is configured will output a file containing all of the customers' names and addresses within the city specified at the command line. There's another way to specify queries in JPA: the Query object. To use JPA's Query API, you need to implement the org.springframework.batch.item.database.orm.JpaQueryProvider interface. The interface, which consists of a createQuery() method and a setEntityManager(EntityManager em) method is used by the JpaPagingItemReader to obtain the required Query to be executed. To make things easier, Spring batch provides an abstract base class for you to extend, the org.springframework.batch.item.database.orm.AbstractJpaQueryProvider. Listing 7-52 shows what the implementation to return the same query (as configured in Listing 7-51) looks like.
Example 7.52. CustomerByCityQueryProvider
package com.apress.springbatch.chapter7;

import javax.persistence.EntityManager;
import javax.persistence.Query;

import org.springframework.batch.item.database.orm.AbstractJpaQueryProvider;
import org.springframework.util.Assert;

public class CustomerByCityQueryProvider extends AbstractJpaQueryProvider {

    private String cityName;

    public Query createQuery() {
        EntityManager manager = getEntityManager();

        Query query =
            manager.createQuery("select c from Customer " +
                                "c where c.city = :city");
        query.setParameter("city", cityName);

        return query;
    }

    public void afterPropertiesSet() throws Exception {
        Assert.notNull(cityName);
    }

    public void setCityName(String cityName) {
        this.cityName = cityName;
    }
}
For the CustomerByCityQueryProvider, you use the AbstractJpaQueryProvider base class to handle obtaining an EntityManager for you. From there, you create the JPA query, populate any parameters in the query and return it to Spring Batch for execution. To configure your ItemReader to use the CustomerByCityQueryProvider instead of the query string you provided previously, you simply swap the queryString parameter with the queryProvider parameter, as shown in Listing 7-53.
Example 7.53. Using the JpaQueryProvider
...
<beans:bean id="customerItemReader"
class="org.springframework.batch.item.database.JpaPagingItemReader"
  scope="step">
  <beans:property name="entityManagerFactory" ref="entityManagerFactory" />
  <beans:property name="queryProvider">
    <beans:bean
      class="com.apress.springbatch.chapter7.CustomerByCityQueryProvider">
      <beans:property name="cityName" value="#{jobParameters[city]}"/>
    </beans:bean>
  </beans:property>
</beans:bean>
...
Using JPA can limit an application's dependencies on third party libraries while still providing many of the benefits of ORM libraries like Hibernate.
Up to this point you have covered file and database input sources and the variety of ways you can obtain your input data from them. However, a common scenario concerns existing Java services that provide the data you need. In the next section, you will cover how to obtain data from your existing Java services.
Many companies have Java applications (web or otherwise) currently in production. These applications have gone through strenuous amounts of analysis, development, testing, and bug fixing. The code that comprises these applications is battle tested and proven to work.
So why can't you use that code in your batch processes? Let's use the example that your batch process requires you to read in customer objects. However, instead of a Customer object mapping to a single table or file like it has been up to now, your customer data is spread across multiple tables in multiple databases. Also, you never physically delete customers; instead you flag them as being deleted. A service to retrieve the customer objects already exists in your web-based application. How do you use that in your batch process? In this section you will look at how to call existing Spring services to provide data for your ItemReader.
Back in Chapter 4, you learned about a few adapters that Spring Batch provides for tasklets to be able to do different things, specifically the org.springframework.batch.core.step.tasklet.CallableTaskletAdapter, org.springframework.batch.core.step.tasklet.MethodInvokingTaskletAdapter and the org.springframework.batch.core.step.tasklet.SystemCommandTasklet. All three of these were used to wrap some other element in a way that Spring Batch could interact with it. To use an existing service within Spring Batch, the same pattern is used.
In this case, you will be using the org.springframework.batch.item.adapter.ItemReaderAdapter. This class takes two dependencies when it is configured: a reference to the service to call and the name of the method to call. You need to keep the following two things in mind when using the ItemReaderAdapter:
The object returned from each call is the object that will be returned by the ItemReader. If your service returns a single Customer, then that single
Customerobject will be the object passed onto the ItemProcessor and finally the ItemWriter. If a collection ofCustomerobjects is returned by the service, it will be passed as a single item to the ItemProcessor and ItemWriter and it will be your responsibility to iterate over the collection.Once the input is exhausted, the service method must return a null. This indicates to Spring Batch that the input is exhausted for this step.
For this example, you will use a service hardcoded to return a Customer object for each call until the list is exhausted. Once the List is exhausted, null will be returned for every call after. The CustomerService in Listing 7-54 generates a random list of Customer objects for your use.
Example 7.54. CustomerService
package com.apress.springbatch.chapter7;

import Java.util.ArrayList;
import Java.util.List;
import Java.util.Random;

public class CustomerService {

    private List<Customer> customers;
    private int curIndex;

    private String [] firstNames = {"Michael", "Warren", "Ann", "Terrence",
                                    "Erica", "Laura", "Steve", "Larry"};
    private String middleInitial = "ABCDEFGHIJKLMNOPQRSTUVWXYZ";
    private String [] lastNames = {"Gates", "Darrow", "Donnelly", "Jobs",
                                   "Buffett", "Ellison", "Obama"};
    private String [] streets = {"4th Street", "Wall Street", "Fifth Avenue",
                                 "Mt. Lee Drive", "Jeopardy Lane",
                                 "Infinite Loop Drive", "Farnam Street",
                                 "Isabella Ave", "S. Greenwood Ave"};
    private String [] cities = {"Chicago", "New York", "Hollywood", "Aurora",
                                "Omaha", "Atherton"};
    private String [] states = {"IL", "NY", "CA", "NE"};

    private Random generator = new Random();

    public CustomerService() {
        curIndex = 0;

        customers = new ArrayList<Customer>();

        for(int i = 0; i < 100; i++) {
            customers.add(buildCustomer());
        }
    }

    private Customer buildCustomer() {
        Customer customer = new Customer();

        customer.setFirstName(
            firstNames[generator.nextInt(firstNames.length - 1)]);
        customer.setMiddleInitial(
            String.valueOf(middleInitial.charAt(
generator.nextInt(middleInitial.length() - 1))));
customer.setLastName(
lastNames[generator.nextInt(lastNames.length - 1)]);
customer.setAddress(generator.nextInt(9999) + " " +
streets[generator.nextInt(streets.length - 1)]);
customer.setCity(cities[generator.nextInt(cities.length - 1)]);
customer.setState(states[generator.nextInt(states.length - 1)]);
customer.setZip(String.valueOf(generator.nextInt(99999)));
return customer;
}
public Customer getCustomer() {
Customer cust = null;
if(curIndex < customers.size()) {
cust = customers.get(curIndex);
curIndex++;
}
return cust;
}
}Finally, to use the service you have developed in Listing 7-54, using the ItemReaderAdapter, you configure your customerItemReader to call the getCustomer method for each item. Listing 7-55 shows the configuration for this.
Example 7.55. Configuring the ItemReaderAdapter to Call the CustomerService
...
<beans:bean id="customerItemReader"
  class="org.springframework.batch.item.adapter.ItemReaderAdapter">
  <beans:property name="targetObject" ref="customerService"/>
  <beans:property name="targetMethod" value="getCustomer"/>
</beans:bean>

<beans:bean id="customerService"
  class="com.apress.springbatch.chapter7.CustomerService"/>
...
That's all that is required to use one of your existing services as the source of data for your batch job. Using existing services can allow you to reuse code that is tested and proven instead of running the risk of introducing new bugs by rewriting existing processes.
Spring Batch provides a wide array of ItemReader implementations, many of which you have covered up to now. However, there is now way the developers of the framework can plan for every possible scenario. Because of this, they provide the facilities for you to create your own ItemReader implementations. The next section will look at how to implement your own custom ItemReader.
Spring Batch provides readers for just about every type of input Java applications normally face, however if you are using a form of input that Spring Batch provides an ItemReader, you will need to create one yourself. Implementing the ItemReader interface's read() method is the easy part. However, what happens when you need to be able to restart your reader? How do you maintain state across executions? This section will look at how to implement an ItemReader that can handle state across executions.
As mentioned, implementing Spring Batch's ItemReader interface is actually quite simple. In fact, with a small tweak, you can convert the CustomerService you used in the previous section to an ItemReader. All you need to do is implement the interface and rename the method getCustomer() to read(). Listing 7-56 shows the updated code.
Example 7.56. CustomerItemReader
package com.apress.springbatch.chapter7;

import java.util.ArrayList;
import java.util.List;
import java.util.Random;

import org.springframework.batch.item.ItemReader;

public class CustomerItemReader implements ItemReader<Customer> {

    private List<Customer> customers;
    private int curIndex;

    private String [] firstNames = {"Michael", "Warren", "Ann", "Terrence",
                                    "Erica", "Laura", "Steve", "Larry"};
    private String middleInitial = "ABCDEFGHIJKLMNOPQRSTUVWXYZ";
    private String [] lastNames = {"Gates", "Darrow", "Donnelly", "Jobs",
                                   "Buffett", "Ellison", "Obama"};
    private String [] streets = {"4th Street", "Wall Street", "Fifth Avenue",
                                 "Mt. Lee Drive", "Jeopardy Lane",
                                 "Infinite Loop Drive", "Farnam Street",
                                 "Isabella Ave", "S. Greenwood Ave"};
    private String [] cities = {"Chicago", "New York", "Hollywood", "Aurora",
                                "Omaha", "Atherton"};
    private String [] states = {"IL", "NY", "CA", "NE"};

    private Random generator = new Random();

    public CustomerItemReader () {
        curIndex = 0;

        customers = new ArrayList<Customer>();

        for(int i = 0; i < 100; i++) {
            customers.add(buildCustomer());
        }
    }
private Customer buildCustomer() {
Customer customer = new Customer();
customer.setFirstName(
firstNames[generator.nextInt(firstNames.length - 1)]);
customer.setMiddleInitial(
String.valueOf(middleInitial.charAt(
generator.nextInt(middleInitial.length() - 1))));
customer.setLastName(
lastNames[generator.nextInt(lastNames.length - 1)]);
customer.setAddress(generator.nextInt(9999) + " " +
streets[generator.nextInt(streets.length - 1)]);
customer.setCity(cities[generator.nextInt(cities.length - 1)]);
customer.setState(states[generator.nextInt(states.length - 1)]);
customer.setZip(String.valueOf(generator.nextInt(99999)));
return customer;
}
public Customer read() {
Customer cust = null;
if(curIndex < customers.size()) {
cust = customers.get(curIndex);
curIndex++;
}
return cust;
}
}Even if you ignore the fact that your CustomerItemReader builds a new list with each run, the CustomerItemReader as it is written in Listing 7-56 will restart at the beginning of your list each time the job is executed. Although this will be the behavior you want in many cases, it will not always be the case. Instead, if there is an error after processing half a million records out of a million, you will want to start over again in that same chunk.
To provide the ability for Spring Batch to maintain the state of your reader in the jobRepository and restart your reader where you left off, you need to implement an additional interface, the ItemStream interface. Shown in Listing 7-57, the ItemStream interface consists of three methods: open, update, and close.
Example 7.57. The ItemStream Interface
package org.springframework.batch.item;

public interface ItemStream {

  void open(ExecutionContext executionContext) throws ItemStreamException;
  void update(ExecutionContext executionContext) throws ItemStreamException;
  void close() throws ItemStreamException;
}
Each of the three methods of the ItemStream interface are called by Spring Batch during the execution of a step. open is called to initialize any required state within your ItemReader. This includes the opening of any files or database connections as well as when restarting a job. The open method could be used to reload the number of records that had been processed so they could be skipped during the second execution. update is used by Spring Batch as processing occurs to update that state. Keeping track of how many records or chunks have been processed is a use for the update method. Finally, the close method is used to close any required resources (close files, etc).
You will notice that the open and update provide access to the ExecutionContext that you did not have a handle on in your ItemReader implementation. This is because Spring Batch will use the open method to reset the state of the reader when a job is restarted. It will also use the update method to learn the current state of the reader (which record you are currently on) as each item is processed. Finally, the close method is used to clean up any resources used in the ItemStream.
Now you may be wondering how you can use the ItemStream interface for your ItemReader if it doesn't have the read method. Short answer: you don't. Instead you'll use a utility interface, org.springframework.batch.item.ItemStreamReader, that extends both the ItemStream and the ItemReader interfaces. This will allow you to implement the ItemReader functionality as well as maintain the state of your reader via Spring Batch. Listing 7-58 shows your CustomerItemReader updated to implement the ItemStreamReader interface.
Example 7.58. CustomerItemReader Implementing the ItemStreamReader Interface
package com.apress.springbatch.chapter7;

import java.util.ArrayList;
import java.util.List;
import java.util.Random;

import org.springframework.batch.item.ExecutionContext;
import org.springframework.batch.item.ItemStreamException;
import org.springframework.batch.item.ItemStreamReader;

public class CustomerItemReader implements ItemStreamReader<Customer> {

    private List<Customer> customers;
    private int curIndex;
    private String INDEX_KEY = "current.index.customers";

    private String [] firstNames = {"Michael", "Warren", "Ann", "Terrence",
                                    "Erica", "Laura", "Steve", "Larry"};
    private String middleInitial = "ABCDEFGHIJKLMNOPQRSTUVWXYZ";
    private String [] lastNames = {"Gates", "Darrow", "Donnelly", "Jobs",
                                   "Buffett", "Ellison", "Obama"};
    private String [] streets = {"4th Street", "Wall Street", "Fifth Avenue",
                                 "Mt. Lee Drive", "Jeopardy Lane",
                                 "Infinite Loop Drive", "Farnam Street",
                                 "Isabella Ave", "S. Greenwood Ave"};
    private String [] cities = {"Chicago", "New York", "Hollywood", "Aurora",
                                "Omaha", "Atherton"};
    private String [] states = {"IL", "NY", "CA", "NE"};
private Random generator = new Random();
public CustomerItemReader() {
customers = new ArrayList<Customer>();
for(int i = 0; i < 100; i++) {
customers.add(buildCustomer());
}
}
private Customer buildCustomer() {
Customer customer = new Customer();
customer.setFirstName(
firstNames[generator.nextInt(firstNames.length - 1)]);
customer.setMiddleInitial(
String.valueOf(middleInitial.charAt(
generator.nextInt(middleInitial.length() - 1))));
customer.setLastName(
lastNames[generator.nextInt(lastNames.length - 1)]);
customer.setAddress(generator.nextInt(9999) + " " +
streets[generator.nextInt(streets.length - 1)]);
customer.setCity(cities[generator.nextInt(cities.length - 1)]);
customer.setState(states[generator.nextInt(states.length - 1)]);
customer.setZip(String.valueOf(generator.nextInt(99999)));
return customer;
}
public Customer read() {
Customer cust = null;
if(curIndex == 50) {
throw new RuntimeException("This will end your execution");
}
if(curIndex < customers.size()) {
cust = customers.get(curIndex);
curIndex++;
}
return cust;
}
public void close() throws ItemStreamException {
}
public void open(ExecutionContext executionContext) throws ItemStreamException {
if(executionContext.containsKey(INDEX_KEY)) {
int index = executionContext.getInt(INDEX_KEY);
if(index == 50) {curIndex = 51;} else {curIndex = index;}} else {curIndex = 0;}}public void update(ExecutionContext executionContext) throws ItemStreamException {executionContext.putInt(INDEX_KEY, curIndex);}}
The bold sections of Listing 7-58 show the updates to the CustomerItemReader. First, the class was changed to implement the ItemStreamReader interface. Then the close, open and update methods were added. In the update method, you add a key value pair to the executionContext that indicates the current record being processed. The open method will check to see if that value has been set. If it has been set, that means that this is the restart of your job. In the run method, to force the job to end, you added code to throw a RuntimeException after the 50th customer. In the open method, if the index being restored is 50, you'll know it was due to your previous code so you will just skip that record. Otherwise, you'll try again.
The other piece you need to do is configure your new ItemReader implementation. In this case, your ItemReader has no dependencies so all you will need to do is define the bean with the correct name (so it is referred to in your existing copyJob). Listing 7-59 shows the configuration of the CustomerItemReader.
Example 7.59. CustomerItemReader Configuration
...
<beans:bean id="customerItemReader"
  class="com.apress.springbatch.chapter7.CustomerItemReader"/>
...
That really is it. Now if you execute your job, after you process 50 records, your CustomerItemReader will throw an Exception causing your job to fail. However, if you look in the BATCH_STEP_EXECUTION_CONTEXT table of your jobRepository, you will be happy to see what is listed in Listing 7-60.
Example 7.60. The Step Execution Context
mysql> select * from BATCH_STEP_EXECUTION_CONTEXT where STEP_EXECUTION_ID = 8495;
+-------------------+-------------------------------------------------------------
-----+------------------------+
| STEP_EXECUTION_ID | SHORT_CONTEXT                                                                             | SERIALIZED_CONTEXT |
+-------------------+-------------------------------------------------------------
-----+------------------------+
|              8495 | {"map":{"entry":[{"string":"FlatFileItemWriter.current.count","long":2655},{"string":"FlatFi
leItemWriter.written","long":50},{"string":"current.index.customers","int":50}]}} | NULL
|
Although a bit hard to read, you'll notice that Spring Batch has saved your commit count in the jobRepository. Because of this and your logic to skip the 50th customer the second time around, you can re-execute your job knowing that Spring Batch will start back where it left off and your writer will skip the item that caused the error.
Files, databases, services and even your own custom ItemReaders—Spring Batch provides you with a wide array of input options of which you have truly only scratched the surface here. Unfortunately, not all of the data you work with in the real world is as pristine as the data you have been working with here. However, not all errors are ones that need to stop processing. In the next section you will look at some of the ways that Spring Batch allows you to deal with input errors.
Things can go wrong in any part of a Spring Batch application—on startup, when reading input, processing input, or writing output. In this section, you will look at ways to handle different errors that can occur during batch processing.
When there is an error reading a record from your input, you have a couple different options. First, an Exception can be thrown that causes processing to stop. Depending on how many records need to be processed and the impact of not processing this single record, this may be a drastic resolution. Instead, Spring Batch provides the ability to skip a record when a specified Exception is thrown. This section will look at how to use this technique to skip records based upon specific Exceptions.
There are two pieces involved in choosing when a record is skipped. The first is under what conditions to skip the record, specifically what exceptions you will ignore. When any error occurs during the reading process, Spring Batch throws an exception. In order to determine what to skip, you need to identify what exceptions to skip.
The second part of skipping input records is how many records you will allow the step to skip before considering the step execution failed. If you skip one or two records out of a million, not a big deal; however, skipping half a million out of a million is probably wrong. It's your responsibility to determine the threshold.
To actually skip records, all you need to do is tweak your configuration to specify the exceptions you want to skip and how many times it's okay to do so. Say you want to skip the first 10 records that throw any org.springframework.batch.item.ParseException. Listing 7-61 shows the configuration for this scenario.
Example 7.61. Configuring to Skip 10 ParseExceptions
<step id="copyFileStep">
  <tasklet>
    <chunk reader="customerItemReader" writer="outputWriter"
      commit-interval="10" skip-limit="10">
      <skippable-exception-classes>
        <include class="org.springframework.batch.item.ParseException"/>
      </skippable-exception-classes>
    </chunk>
  </tasklet>
</step>
In this scenario, you have a single exception that you want to be able to skip. However, sometimes this can be a rather exhaustive list. The configuration in Listing 7-61 allows the skipping of a specific exception, but it might be easier to configure the ones you don't want to skip instead of the ones you do. To do this, you use a combination of the include tag like Listing 7-61 did and the exclude tag. Listing 7-62 shows how to configure the opposite of your previous example (skipping all exceptions except for the ParseException).
Example 7.62. Configuring to Skip All Exceptions Except the ParseException
<step id="copyFileStep">
  <tasklet>
    <chunk reader="customerItemReader" writer="outputWriter"
      commit-interval="10" skip-limit="10">
      <skippable-exception-classes>
        <include class="java.lang.Exception"/>
        <exclude class="org.springframework.batch.item.ParseException"/>
      </skippable-exception-classes>
    </chunk>
  </tasklet>
</step>
The configuration in Listing 7-62 specifies that any Exception that extends java.lang.Exception except for org.springframework.batch.item.ParseException will be skipped up to 10 times.
There is a third way to specify what Exceptions to skip and how many times to skip them. Spring Batch provides an interface called org.springframework.batch.core.step.skip.SkipPolicy. This interface, with its single method shouldSkip, takes the Exception that was thrown and the number of times records have been skipped. From there, any implementation can determine what Exceptions they should skip and how many times. Listing 7-63 shows a SkipPolicy implementation that will not allow a java.io.FileNotFoundException to be skipped but 10 ParseExceptions to be skipped.
Example 7.63. FileVerificationSkipper
package com.apress.springbatch.chapter7;

import java.io.FileNotFoundException;

import org.springframework.batch.core.step.skip.SkipLimitExceededException;
import org.springframework.batch.core.step.skip.SkipPolicy;
import org.springframework.batch.item.ParseException;

public class FileVerificationSkipper implements SkipPolicy {

    public boolean shouldSkip(Throwable exception, int skipCount)
        throws SkipLimitExceededException {

        if(exception instanceof FileNotFoundException) {
            return false;
        } else if(exception instanceof ParseException && skipCount <= 10) {
            return true;
        } else {
            return false;
        }
} }
Skipping records is a common practice in batch processing. It allows what is typically a much larger process than a single record to continue with minimal impact. Once you can skip a record that has an error, you may want to do something additional like log it for future evaluation. The next section discusses an approach for just that.
While skipping problematic records is a useful tool, by itself it can raise an issue. In some scenarios, the ability to skip a record is okay. Say you are mining data and come across something you can't resolve; it's probably okay to skip it. However, when you get into situations where money is involved, say when processing transactions, just skipping a record probably will not be a robust enough solution. In cases like these, it is helpful to be able to log the record that was the cause of the error. In this section, you will look at using an ItemListener to record records that were invalid.
The ItemReadListener interface consists of three methods: beforeRead, afterRead, and onReadError. For the case of logging invalid records as they are read in, you can use the ItemListenerSupport class and override the onReadError to log what happened. It's important to point out that Spring Batch does a good job building its Exceptions for file parsing to inform you of what happened and why. On the database side, things are a little less in the framework's hands as most of the actual database work is done by other frameworks (Spring itself, Hibernate, etc). It is important that as you develop your own processing (custom ItemReaders, RowMappers, etc) that you include enough detail for you to diagnose the issue from the Exception itself.
In this example, you will read data in from the Customer file from the beginning of the chapter. When an Exception is thrown during input, you will log the record that caused the exception and the exception itself. To do this, the CustomerItemListener will take the exception thrown and if it is a FlatFileParseException, you will have access to the record that caused the issue and information on what went wrong. Listing 7-64 shows the CustomerItemListener.
Example 7.64. CustomerItemListener
package com.apress.springbatch.chapter7;
import org.apache.log4j.Logger;
import org.springframework.batch.core.listener.ItemListenerSupport;
import org.springframework.batch.item.file.FlatFileParseException;
public class CustomerItemListener extends
ItemListenerSupport<Customer, Customer> {
private Logger logger = Logger.getLogger(CustomerItemListener.class);
@Override
public void onReadError(Exception e) {
if(e instanceof FlatFileParseException) {
FlatFileParseException ffpe = (FlatFileParseException) e;
StringBuilder errorMessage = new StringBuilder();
errorMessage.append("An error occured while processing the " +
ffpe.getLineNumber() +" line of the file. Below was the faulty " +
"input.
");
errorMessage.append(ffpe.getInput() + "
");
logger.error(errorMessage.toString(), ffpe);
} else {
logger.error("An error has occured", e);
}
}
}Configuring your listener requires you to update the step reading the file. In your case, you have only one step in your copyJob. Listing 7-65 shows the configuration for this listener.
Example 7.65. Configuring the CustomerItemListener
...
<beans:bean id="customerItemLogger"
    class="com.apress.springbatch.chapter7.CustomerItemListener"/>

<job id="copyJob">
    <step id="copyFileStep">
        <tasklet>
            <chunk reader="customerFileReader" writer="outputWriter"
                commit-interval="10" skip-limit="100">
                <skippable-exception-classes>
                    <include class="java.lang.Exception"/>
                </skippable-exception-classes>
            </chunk>
            <listeners>
                <listener ref="customerItemLogger"/>
            </listeners>
        </tasklet>
    </step>
</job>
...
If you use the fixed length record job as an example and execute it with a file that contains an input record longer than 63 characters, an exception will be thrown. However, since you have configured your job to skip all exceptions that extend Exception, the exception will not affect your job's results, yet your customerItemLogger will be called and log the item as required. When you execute this job, you see two things. The first is a FlatFileParseException for each record that is invalid. The second are your log messages. Listing 7-66 shows an example of the log messages your job generates on error.
Example 7.66. Output of the CustomerItemLogger
2011-05-03 23:49:22,148 ERROR main [com.apress.springbatch.chapter7.CustomerItemListener] -
<An error occured while processing the 1 line of the file.  Below was the faulty input.
Michael   TMinella   123   4th Street          Chicago  IL60606ABCDE
>
Using nothing more that log4j, you can get the input that failed to parse from the FlatFileParseException and log it to your log file. However, this by itself does not accomplish your goal of logging the error record to a file and continuing on. In this scenario, your job will log the record that caused the issue and fail. In the last section, you will look at how to handle having no input when your jobs run.
A SQL query that returns no rows is not an uncommon occurrence. Empty files exist in many situations. But do they make sense for your batch process? In this section, you will look at how Spring Batch handles reading input sources that have no data.
When a reader attempts to read from an input source and a null is returned the first time, by default this is treated like any other time a reader receives a null; it considers the step complete. While this approach may work in the majority of the scenarios, you may need to know when a given query returns zero rows or a file is empty.
If you want to cause your step to fail or take any other action (send an e-mail, etc) when no input has been read, you use a StepListener. In Chapter 4, you used a StepListener to log the beginning and end of your step. In this case, you can use the StepListener's @AfterStep method to see how many records were read and react accordingly. Listing 7-67 shows how you would mark a step failed if no records were read.
Example 7.67. EmptyInputStepFailer
package com.apress.springbatch.chapter7;

import org.springframework.batch.core.ExitStatus;
import org.springframework.batch.core.StepExecution;
import org.springframework.batch.core.annotation.AfterStep;

public class EmptyInputStepFailer {

    @AfterStep
    public ExitStatus afterStep(StepExecution execution) {
        if(execution.getReadCount() > 0) {
            return execution.getExitStatus();
        } else {
            return ExitStatus.FAILED;
        }
    }
}
To configure your listener, you configure it like you would any other StepListener. Listing 7-68 covers the configuration in this instance.
Example 7.68. Configuring the EmptyInputStepFailer
...
<beans:bean id="emptyFileFailer"
  class="com.apress.springbatch.chapter7.EmptyInputStepFailer"/>

<step id="copyFileStep">
<tasklet>
    <chunk reader="customerItemReader" writer="outputWriter"
      commit-interval="10"/>
    <listeners>
      <listener ref="emptyFileFailer"/>
    </listeners>
  </tasklet>
</step>
...
By running a job with this step configured, instead of your job ending with the status COMPLETED if no input was found, the job will fail, allowing you to obtain the expected input and rerun the job.
Reading and writing take up the vast majority of a batch process and as such, is one of the most important pieces of the Spring Batch framework. In this chapter, you took a thorough (but not exhaustive) look at the ItemReader options within the framework. Now that you can read in an item, you need to be able to do something with it. ItemProcessors, which make things happen, are covered in the next chapter.
[19] It is important to note that there is an ItemReader subiterface called the org.springframework.batch.item.PeekableItemReader<T>. Since the CustomerFileReader not firmly meet the contract defined by that interface here we do not implement it.
[20] A one millisecond increase per item over the course of a million items can add over 15 minutes of processing time to a single step.