
It's amazing what computers can do. The numbers they can crunch. The images they can process. Yet it doesn't mean a thing unless the computer can communicate what it has done via its output. ItemWriters are the output facility for Spring Batch. And when you need a format to output the results of the Spring Batch process, Spring Batch delivers. In this chapter, you look at the different types of ItemWriters provided by Spring Batch as well as how to develop ItemWriters for situations that are more specific to your needs. Topics discussed include the following:
Introduction to ItemWriters: Similar to the ItemReaders at the other end of step execution, ItemWriters have their own special nuances. This chapter talks about how ItemWriters work from a high level.
File-based ItemWriters: File-based output is the easiest method to set up and is one of the most common forms used in batch processing. Because of this, you begin your exploration of ItemWriters by looking at writing to flat files as well as XML files.
Database ItemWriters: The relational database is king in the enterprise when it comes to data storage. However, databases create their own unique challenges when you're working with high volumes of data. You look at how Spring Batch handles these challenges with its unique architecture.
Alternative output destination ItemWriters: Files and databases aren't the only media to which enterprise software outputs. Systems send e-mails, write to JMS endpoints, and save data via other systems. This section looks at some of the less common but still very useful output methods that Spring Batch supports.
Multipart ItemWriters: Unlike reading, where data typically comes from a single source, it's common to send output to multiple sources. Spring Batch provides ways to write to multiple systems as well as structure a single ItemWriter as a collaborative effort of multiple ItemWriters. This section looks at ItemWriters tasked with working with either multiple resources or multiple output formats.
Statement writers: This chapter finishes the development of the statement job by implementing the required writers for each step.
To start with ItemWriters, let's look at how they work and how they fit into a step.
The ItemWriter is the output mechanism used in Spring Batch. When Spring Batch first came out, ItemWriters were essentially the same as ItemReaders. They wrote each item out as it was processed. However, with Spring Batch 2 and the introduction of chunk-based processing, the role of the ItemWriter changed. Writing out each item as it's processed no longer makes sense.
With chunked-based processing, an ItemWriter doesn't write a single item: it writes a chunk of items. Because of this, the org.springframework.batch.item.ItemWriter interface is slightly different than the ItemReader interface. Listing 9-1 shows that the ItemWriter's write method takes a list of items, whereas the ItemReader interface you looked at in Chapter 7 returns only a single item from the read method.
Example 9.1. ItemWriter
package org.springframework.batch.item;
import java.util.List;
public interface ItemWriter<T> {
void write(List<? extends T> items) throws Exception;
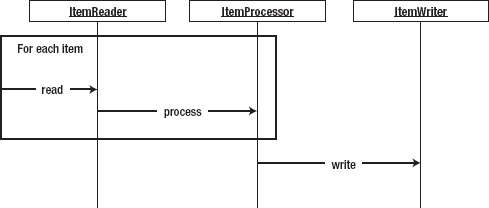
}To illustrate the flow of how an ItemWriter fits into the step, Figure 9-1 shows a sequence diagram that walks through the processing within a step. The step reads each item individually via the ItemReader and passes it to the ItemProcessor for processing. This interaction continues until the number of items in a chunk has been processed. With the processing of a chunk complete, the items are passed into the ItemWriter to be written accordingly.
Since chunk-based processing was introduced, the number of calls to an ItemWriter is much less than it was. However, you need to handle things a bit differently. Take for example working with nontransactional resources like files. If a write to a file fails, there is no way to roll back what was already written. Because of that, if you write a custom writer, you should buffer the output and flush all at once to the file to prevent an item from being half written, leaving the file in an inconsistent state.
Spring Batch provides a number of writers to handle the vast majority of output scenarios. Let's start with writers at the same place you started with readers: FlatFileItemWriter.
Large amounts of data are moved via files in enterprise batch processing. There is a reason for this: files are simple and reliable. Backups are easy. So is recovery if you need to start over. This section looks at how to generate flat files in a variety of formats including formatted records (fixed width or other) and delimited files as well as how Spring Batch handles the issue of file creation.
org.springframework.batch.item.file.FlatFileItemWriter is the ItemWriter implementation provided to generate text file output. Similar to FlatFileItemReader in many respects, this class addresses the issues with file-based output in Java with a clean, consistent interface for you to use. Figure 9-2 shows how the FlatFileItemWriter is constructed.
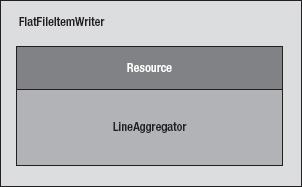
FlatFileItemWriter, as shown in Figure 9-2 consists of a resource to write to and a LineAggregator implementation. The org.springframework.batch.item.file.transform.LineAggregator interface replaces the LineMapper of the FlatFileItemReader discussed in Chapter 7. Here, instead of parsing a String into an object as the LineMapper is responsible for doing, the LineAggregator is responsible for the generating of an output String based on an object.
In many of the previous examples, you used PassThroughLineAggregator to generate the output files. This particular implementation of the LineAggregator interface just calls the item's toString() method to generate the output. But there are other implementations that you look at in the coming sections.
FlatFileItemWriter has a number of interesting configuration options, which are reviewed in Table 9-1.
Table 9.1. FlatFileItemWriter Cconfiguration Options
Option | Type | Default | Description |
|---|---|---|---|
|
| UTF-8 | Character encoding for the file. |
|
|
| Executed after the last item of a file has been written. |
|
|
| Executed before the first item of a file has been written. |
|
|
| Used to convert an individual item to a |
|
| System's | Generated file's newline character. |
|
|
| File or stream to be written to. |
|
|
| Determines if the state of the writer should be stored in the |
|
|
| If |
|
|
| If |
|
|
| If |
|
|
| If |
Unlike the LineMapper of FlatFileItemReader, the LineAggregator doesn't have any hard dependencies. However, a related interface to be aware of is org.springframework.batch.item.file.transform.FieldExtractor. This interface is used in most of the provided LineAggregator implementations as a way to access the required fields from a given item. Spring Batch provides two implementations of the FieldExtractor interface: org.springframework.batch.item.file.transform.BeanWrapperFieldExtractor, which uses the getters on the class to access the properties per the JavaBean spec, and org.springframework.batch.item.file.transform.PassThroughFieldExtractor, which returns the item (useful for items that are just a String, for example).
You look at a few of the LineAggregator implementations over the rest of this section. Let's begin with using FlatFileItemWriter with FormatterLineAggregator to create formatted files.
When you looked at text files from the input side, you had three different types: fixed width, delimited, and XML. From the output side of things, you still have delimited and XML, but fixed width isn't just fixed width. In this case, it's really a formatted record. This section looks at how to construct batch output as a formatted text file.
Why the difference between a fixed-width input file and a formatted output file? Well, technically there is no difference. They're both files that contain a fixed format record of some kind. However, typically input files have records that contain nothing but data and are defined via columns, whereas output files can be either fixed width or more robust (as you see later in this chapter with the statement job).
This example generates a list of customers and where they live. To begin, let's look at the input you're working with. Listing 9-2 shows an example of the customer.csv file.
Example 9.2. customer.csv
Richard,N,Darrow,5570 Isabella Ave,St. Louis,IL,58540
Warren,L,Darrow,4686 Mt. Lee Drive,St. Louis,NY,94935
Barack,G,Donnelly,7844 S. Greenwood Ave,Houston,CA,38635
Ann,Z,Benes,2447 S. Greenwood Ave,Las Vegas,NY,55366
Erica,Z,Gates,3141 Farnam Street,Omaha,CA,57640
Warren,M,Williams,6670 S. Greenwood Ave,Hollywood,FL,37288
Harry,T,Darrow,3273 Isabella Ave,Houston,FL,97261
Steve,O,Darrow,8407 Infinite Loop Drive,Las Vegas,WA,90520
As Listing 9-2 shows, you're working with a file similar to the customer files you've been using up to this point in the book. However, the output for this job will be slightly different. In this case, you want to output a full sentence for each customer: "Richard Darrow lives at 5570 Isabella Ave in St. Louis, IL." Listing 9-3 shows an example of what the output file looks like.
Example 9.3. Formatted Customer Output
Richard N Darrow lives at 5570 Isabella Ave in St. Louis, IL.
Warren L Darrow lives at 4686 Mt. Lee Drive in St. Louis, NY.
Barack G Donnelly lives at 7844 S. Greenwood Ave in Houston, CA.
Ann Z Benes lives at 2447 S. Greenwood Ave in Las Vegas, NY.
Laura 9S Minella lives at 8177 4th Street in Dallas, FL.
Erica Z Gates lives at 3141 Farnam Street in Omaha, CA.
Warren M Williams lives at 6670 S. Greenwood Ave in Hollywood, FL.
Harry T Darrow lives at 3273 Isabella Ave in Houston, FL.
Steve O Darrow lives at 8407 Infinite Loop Drive in Las Vegas, WA.
Erica Z Minella lives at 513 S. Greenwood Ave in Miami, IL.
How do you do this? For this example, you'll use a single step job that reads in the input file and writes it to the output file; you don't need an ItemProcessor. Because the only code you need to write is that for the Customer class, you can start there; see Listing 9-4.
Example 9.4. Customer.java
package com.apress.springbatch.chapter9;

import java.io.Serializable;

public class Customer implements Serializable {
    private static final long serialVersionUID = 1L;

    private long id;
    private String firstName;
    private String middleInitial;
    private String lastName;
    private String address;
    private String city;
    private String state;
    private String zip;

    // Accessors go here
    ...
}
As you can see in Listing 9-4, the fields of the Customer object map to the fields in the customer.csv file.[24] With the item coded, you can begin configuring the job.[25] The input side should be familiar from Chapter 7. Listing 9-5 shows the configuration of the input file as a resource (the value is passed in via a job parameter), the FlatFileItemReader configuration, and the required reference to the Customer object.
Example 9.5. Configuring the Format Job's Input
...
<beans:bean id="customerFile"
  class="org.springframework.core.io.FileSystemResource" scope="step">
  <beans:constructor-arg value="#{jobParameters[customerFile]}"/>
</beans:bean>

<beans:bean id="customerFileReader"
  class="org.springframework.batch.item.file.FlatFileItemReader">
  <beans:property name="resource" ref="customerFile"/>
  <beans:property name="lineMapper">
    <beans:bean
      class="org.springframework.batch.item.file.mapping.DefaultLineMapper">
      <beans:property name="lineTokenizer">
        <beans:bean
          class="org.springframework.batch.item.file.transform.
DelimitedLineTokenizer">
          <beans:property name="names"
            value="firstName,middleInitial,lastName,address,city,state,zip"/>
          <beans:property name="delimiter" value=","/>
        </beans:bean>
      </beans:property>
      <beans:property name="fieldSetMapper">
        <beans:bean class="org.springframework.batch.item.file.mapping.
BeanWrapperFieldSetMapper">
          <beans:property name="prototypeBeanName" value="customer"/>
        </beans:bean>
      </beans:property>
    </beans:bean>
  </beans:property>
</beans:bean>

<beans:bean id="customer" class="com.apress.springbatch.chapter9.Customer"
  scope="prototype"/>
...
There shouldn't be a lot of surprises in the configuration in Listing 9-4. You begin by configuring customerFile as a resource for the ItemReader to read from. Next is customerFileReader, which consists of a FlatFileItemReader. customerFileReader references customerFile as well as a LineMapper implementation to convert each record of the file into a Customer object. Because you're processing a basic CSV file, you're able to use DelimitedLineTokenizer to parse each record and BeanWrapperFieldSetMapper to take the resulting FieldSet and populate a customer instance. The final piece of the input configuration is a reference to the Customer object that the ItemReader uses to create new Customer objects.
For the output side of things, you need to configure the output file, FlatFileItemWriter, and a LineAggregator. This example uses the org.springframework.batch.itemfile.transform.FormatterLineAggregator provided by Spring Batch. Listing 9-6 shows the configuration for the job's output.
Example 9.6. Output Configuration for Format Job
...
<beans:bean id="outputFile"
  class="org.springframework.core.io.FileSystemResource" scope="step">
  <beans:constructor-arg value="#{jobParameters[outputFile]}"/>
</beans:bean>

<beans:bean id="flatFileOutputWriter"
  class="org.springframework.batch.item.file.FlatFileItemWriter">
  <beans:property name="resource" ref="outputFile"/>
  <beans:property name="lineAggregator" ref="formattedLineAggregator"/>
</beans:bean>

<beans:bean id="formattedLineAggregator"
  class="org.springframework.batch.item.file.transform.
FormatterLineAggregator">
  <beans:property name="fieldExtractor">
    <beans:bean class="org.springframework.batch.item.file.transform.
BeanWrapperFieldExtractor">
      <beans:property name="names"
        value="firstName,lastName,address,city,state,zip"/>
    </beans:bean>
  </beans:property>
  <beans:property name="format" value="%s %s lives at %s %s in %s, %s."/>
</beans:bean>
...
As Listing 9-6 shows, the configuration for the output side of this step is actually smaller than the input. You begin by configuring of the output file; again, the name of the file is passed in as a job parameter. Next you have the configuration of the FlatFileItemWriter. flatFileOutputWriter takes two dependencies: a resource (the file to write to) and the LineAggregator implementation. The last piece of the output puzzle is the LineAggregator implementation: FormatterLineAggregator in this case. It takes two dependencies: a FieldExtractor implementation and a format.
The org.springframework.batch.item.file.transform.FieldExtractor interface is intended to abstract the process of taking the fields of an object tree and convert them into an Object array. With the objects to be written into an array, the FormatterLineAggregator uses Java's String.format() method in conjunction with the string provided in the format dependency to generate the formatted String to be written to the file. In this case, BeanWrapperFieldExtractor uses the getters for each of the properties defined and returns the results, in order, in an Object array to be formatted according to the format string. In the case of Listing 9-6, you're extracting the firstName, lastName, address, city, state, and zip from each item. It's important to note that there is no key/value pairing during the formatting process. If you want a bean property to appear twice in the formatted String, you need to include it twice, in order, in the names list.
With all of the input and output configured, all you need to do to complete the job is configure the step and job. Listing 9-7 shows the complete configuration of formatJob including the previous input and output.
Example 9.7. formatJob.xml
<?xml version="1.0" encoding="UTF-8"?>
<beans:beans xmlns="http://www.springframework.org/schema/batch"
  xmlns:beans="http://www.springframework.org/schema/beans"
  xmlns:xsi="http://www.w3.org/2001/XMLSchema-instance"
  xsi:schemaLocation="http://www.springframework.org/schema/beans
    http://www.springframework.org/schema/beans/spring-beans-3.0.xsd
    http://www.springframework.org/schema/batch
    http://www.springframework.org/schema/batch/spring-batch-2.1.xsd">

  <beans:import resource="../launch-context.xml"/>

  <beans:bean id="customerFile"
    class="org.springframework.core.io.FileSystemResource" scope="step">
    <beans:constructor-arg value="#{jobParameters[customerFile]}"/>
  </beans:bean>

  <beans:bean id="customerFileReader"
    class="org.springframework.batch.item.file.FlatFileItemReader">
    <beans:property name="resource" ref="customerFile"/>
    <beans:property name="lineMapper">
      <beans:bean
       class="org.springframework.batch.item.file.mapping.DefaultLineMapper">
        <beans:property name="lineTokenizer">
          <beans:bean class="org.springframework.batch.item.file.transform.
DelimitedLineTokenizer">
            <beans:property name="names"
            value="firstName,middleInitial,lastName,address,city,state,zip"/>
            <beans:property name="delimiter" value=","/>
          </beans:bean>
        </beans:property>
        <beans:property name="fieldSetMapper">
          <beans:bean class="org.springframework.batch.item.file.mapping.
BeanWrapperFieldSetMapper">
            <beans:property name="prototypeBeanName" value="customer"/>
          </beans:bean>
        </beans:property>
      </beans:bean>
    </beans:property>
  </beans:bean>

  <beans:bean id="customer" class="com.apress.springbatch.chapter9.Customer"
    scope="prototype"/>

  <beans:bean id="outputFile"
    class="org.springframework.core.io.FileSystemResource" scope="step">
    <beans:constructor-arg value="#{jobParameters[outputFile]}"/>
  </beans:bean>

  <beans:bean id="flatFileOutputWriter"
class="org.springframework.batch.item.file.FlatFileItemWriter">
<beans:property name="resource" ref="outputFile"/>
<beans:property name="lineAggregator" ref="formattedLineAggregator"/>
</beans:bean>
<beans:bean id="formattedLineAggregator"
class="org.springframework.batch.item.file.transform.
FormatterLineAggregator">
<beans:property name="fieldExtractor">
<beans:bean class="org.springframework.batch.item.file.transform.
BeanWrapperFieldExtractor">
<beans:property name="names"
value="firstName,lastName,address,city,state,zip"/>
</beans:bean>
</beans:property>
<beans:property name="format" value="%s %s lives at %s %s in %s, %s."/>
</beans:bean>
<step id="formatStep">
<tasklet>
<chunk reader="customerFileReader" writer="flatFileOutputWriter"
commit-interval="10"/>
</tasklet>
</step>
<job id="formatJob">
<step id="step1" parent="formatStep"/>
</job>
</beans:beans>After you build the project using Maven's mvn clean install command, you can execute the example using CommandLineJobRunner with the command shown in Listing 9-8.
Example 9.8. How to Execute formatJob from the Command Line
java -jar itemWriters-0.0.1-SNAPSHOT.jar jobs/formatJob.xml formatJob
customerFile=/input/customer.csv outputFile=/output/formattedCustomers.txt
When you run the job with the input specified in Listing 9-2, the result is a new file, formattedCustomers.txt, with the contents listed in Listing 9-9.
Example 9.9. formattedCustomers.txt
Richard Darrow lives at 5570 Isabella Ave St. Louis in IL, 58540.
Warren Darrow lives at 4686 Mt. Lee Drive St. Louis in NY, 94935.
Barack Donnelly lives at 7844 S. Greenwood Ave Houston in CA, 38635.
Ann Benes lives at 2447 S. Greenwood Ave Las Vegas in NY, 55366.
Erica Gates lives at 3141 Farnam Street Omaha in CA, 57640.
Warren Williams lives at 6670 S. Greenwood Ave Hollywood in FL, 37288.
Harry Darrow lives at 3273 Isabella Ave Houston in FL, 97261.
Steve Darrow lives at 8407 Infinite Loop Drive Las Vegas in WA, 90520.
This method of formatting output can be used for a number of different requirements. Whether it's formatting items into human-readable output as you did here, or formatting them into a fixed-width file as you used for input in Chapter 7, all that needs to change is the format String you configure for the LineAggregator.
The other main type of flat file you see on a regular basis is the delimited file. customer.csv is a comma-delimited file, for example. The next section looks at how to output files that contain delimited output.
Unlike the formatted files you looked at in the previous section, delimited files don't have a single predefined format. Instead, a delimited file consists of a list of values separated by a predefined separator character. This section looks at how to use Spring Batch to generate a delimited file.
To see how generating a delimited file works, you use the same input for this job. For the output, you refactor the ItemWriter to generate the new, delimited output. In this case, you change the order of the fields and change the delimiter from a comma (,) to a semicolon (;). Listing 9-10 shows some sample output with the updated formatJob.
Example 9.10. Output for Delimited formatJob
58540;IL;St. Louis;5570 Isabella Ave;Darrow;Richard
94935;NY;St. Louis;4686 Mt. Lee Drive;Darrow;Warren
38635;CA;Houston;7844 S. Greenwood Ave;Donnelly;Barack
55366;NY;Las Vegas;2447 S. Greenwood Ave;Benes;Ann
57640;CA;Omaha;3141 Farnam Street;Gates;Erica
37288;FL;Hollywood;6670 S. Greenwood Ave;Williams;Warren
97261;FL;Houston;3273 Isabella Ave;Darrow;Harry
90520;WA;Las Vegas;8407 Infinite Loop Drive;Darrow;Steve
To generate the output in Listing 9-10, all you need to do is update the configuration of the LineAggregator. Instead of using FormatterLineAggregator, you use Spring Batch's org.springframework.batch.item.file.transform.DelimitedLineAggregator implementation. Using the same BeanWrapperFieldExtractor to extract an Object array, the DelimitedLineAggregator concatenates the elements of the array with the configured delimiter between each element. Listing 9-11 shows the updated configuration for the ItemWriter.
Example 9.11. flatFileOutputWriter Configuration
...
<beans:bean id="flatFileOutputWriter"
  class="org.springframework.batch.item.file.FlatFileItemWriter">
  <beans:property name="resource" ref="outputFile"/>
  <beans:property name="lineAggregator" ref="delimitedLineAggregator"/>
</beans:bean>

<beans:bean id="delimitedLineAggregator"
  class="org.springframework.batch.item.file.transform.
DelimitedLineAggregator">
  <beans:property name="fieldExtractor">
    <beans:bean class="org.springframework.batch.item.file.transform.
BeanWrapperFieldExtractor">
<beanand operty name="names"
value="zip,state,city,address,lastName,firstName"/>
</beans:bean>
</beans:property>
<beans:property name="delimiter" value=";"/>
</beans:bean>
...By changing the configuration of the FormatterLineAggregator to use Spring Batch's DelimitedLineAggregator, the only other change you have to make is removing the format dependency and including the definition of a delimiter character. After building the project with the same mvn clean install you used previously, you can run the job with the command in Listing 9-12.
Example 9.12. Running formatJob to Generate Delimited Output
java -jar itemWriters-0.0.1-SNAPSHOT.jar jobs/formatJob.xml formatJob
customerFile=/input/customer.csv outputFile=/output/delimitedCustomers.txt
The results of the formatJob with the updated configuration are shown in Listing 9-13.
Example 9.13. formatJob results for delimited file writing
58540;IL;St. Louis;5570 Isabella Ave;Darrow;Richard
94935;NY;St. Louis;4686 Mt. Lee Drive;Darrow;Warren
38635;CA;Houston;7844 S. Greenwood Ave;Donnelly;Barack
55366;NY;Las Vegas;2447 S. Greenwood Ave;Benes;Ann
57640;CA;Omaha;3141 Farnam Street;Gates;Erica
37288;FL;Hollywood;6670 S. Greenwood Ave;Williams;Warren
97261;FL;Houston;3273 Isabella Ave;Darrow;Harry
90520;WA;Las Vegas;8407 Infinite Loop Drive;Darrow;Steve
It's easy to create flat files with Spring Batch. With zero lines of code outside of the domain object, you can read in a file and convert its format to either a formatted file or a delimited file. Both of the examples for flat-file processing have assumed that the file is a new file to be created each time. The next section looks at some of the more advanced options Spring Batch provides for handling what file to write to.
Unlike reading from an input file where the file must exist or it's considered an error condition, an output file may or may not exist, and that may or may not be ok. Spring Batch provides the ability to configure how to handle each of these scenarios based on your needs. This section looks at how to configure FlatFileItemWriter to handle multiple file creation scenarios.
In Table 9-1, there were two options for FlatFileItemWriter that pertain to file creation: shouldDeleteIfEmpty and shouldDeleteIfExists. shouldDeleteIfEmpty actually deals with what to do when a step is complete. It's set to false by default. If a step executes, no items were written (a header and footer may have been, but no item records were written), and shouldDeleteIfEmpty is set to true, the file is deleted on the completion of the step. By default, the file is created and left empty. You can look at this behavior with the formatJob you ran in the previous section. By updating the configuration of flatFileOutputWriter to set shouldDeleteIfEmpty to true as shown in Listing 9-14, you can process an empty file and see that no output file is left behind.
Example 9.14. Configuring formatJob to Delete the Output File if No Items Are Written
...
<beans:bean id="flatFileOutputWriter"
  class="org.springframework.batch.item.file.FlatFileItemWriter">
  <beans:property name="resource" ref="outputFile"/>
  <beans:property name="lineAggregator" ref="delimitedLineAggregator"/>
  <beans:property name="shouldDeleteIfEmpty" value="true"/>
</beans:bean>
...
If you execute formatJob with the updated file and pass it an empty customer.csv file as input, no output is left behind. It's important to note that the file is still created, opened, and closed. In fact, if the step is configured to write a header and/or footer in the file, that is written as well. However, if the number of items written to the file is zero, the file is deleted at the end of the step.
The next configuration parameter related to file creation/deletion is the shouldDeleteIfExists flag. This flag, set to true by default, deletes a file that has the same name as the output file the step intends to write to. For example, if you're going to run a job that writes to a file /output/jobRun.txt, and that file already exists when the job starts, Spring Batch deletes the file and creates a new one. If this file exists and the flag is set to false, an org.springframework.batch.item.ItemStreamException is thrown when the step attempts to create the new file. Listing 9-15 shows formatJob's flatFileOutputWriter configured to not delete the output file if it exists.
Example 9.15. Configuring formatJob to Not Delete the Output File if It Already Exists
...
<beans:bean id="flatFileOutputWriter"
  class="org.springframework.batch.item.file.FlatFileItemWriter">
  <beans:property name="resource" ref="outputFile"/>
  <beans:property name="lineAggregator" ref="delimitedLineAggregator"/>
  <beans:property name="shouldDeleteIfExists" value="false"/>
</beans:bean>
...
By running the job as it's configured in Listing 9-15, you receive the previously mentioned ItemStreamException as shown in Listing 9-16.
Example 9.16. Results of a Job that Writes to an Existing File that Shouldn't Be There
2011-03-06 12:32:51,006 DEBUG main
[org.springframework.batch.core.scope.StepScope] - <Creating object in
scope=step, name=scopedTarget.outputFile>
2011-03-06 12:32:51,065 ERROR main
[org.springframework.batch.core.step.AbstractStep] - <Encountered an error
executing the step>
org.springframework.batch.item.ItemStreamException: File already exists:
[/output/overwriteThisFile.txt]
      at org.springframework.batch.item.util.FileUtils.setUpOutputFile(FileUtils.java:62)
        at
org.springframework.batch.item.file.FlatFileItemWriter$OutputState.initialize
BufferedWriter(FlatFileItemWriter.java:497)
        at
org.springframework.batch.item.file.FlatFileItemWriter$OutputState.access$000
(FlatFileItemWriter.java:354)
        at
org.springframework.batch.item.file.FlatFileItemWriter.doOpen(FlatFileItemWri
ter.java:291)
        at
org.springframework.batch.item.file.FlatFileItemWriter.open(FlatFileItemWrite
r.java:281)
        at
org.springframework.batch.item.support.CompositeItemStream.open(CompositeItem
Stream.java:98)
        at
org.springframework.batch.core.step.tasklet.TaskletStep.open(TaskletStep.java
:288)
      at org.springframework.batch.core.step.AbstractStep.execute(AbstractStep.java:193)
        at
org.springframework.batch.core.job.SimpleStepHandler.handleStep(SimpleStepHan
dler.java:135)
        at
org.springframework.batch.core.job.flow.JobFlowExecutor.executeStep(JobFlowEx
ecutor.java:61)
The use of this parameter is a good idea in an environment where you want to preserve the output of each run. This prevents an accidental overwrite of your old file.
The final option related to file creation is the appendAllowed parameter. When this flag (which defaults to false) is set to true, Spring Batch automatically sets the shouldDeleteIfExists flag to false, creates a new file if one doesn't exist, and appends the data if it does. This option can be useful if you have an output file that you need to write to from multiple steps. Listing 9-17 shows formatJob configured to append data if the file exists.
Example 9.17. Appending Data if the Output File Exists
...
<beans:bean id="flatFileOutputWriter"
  class="org.springframework.batch.item.file.FlatFileItemWriter">
  <beans:property name="resource" ref="outputFile"/>
  <beans:property name="lineAggregator" ref="delimitedLineAggregator"/>
  <beans:property name="appendAllowed" value="true"/>
</beans:bean>
...
With this configuration, you can run the job multiple times using the same output file (with different input files), and Spring Batch appends the output of the current job to the end of the existing output file.
As you can see, there are a number of options available to handle flat file-based output, from being able to format your records any way you want to generating delimited files and even providing options for how Spring Batch handles files that already exist. However, flat files aren't the only type of file output. XML is the other type of file output that Spring Batch provides for, and you look at it next.
When you looked at reading XML back in Chapter 7, you explored how Spring Batch views XML documents in fragments. Each of these fragments is the XML representation of a single item to be processed. On the ItemWriter side, the same concept exists. Spring Batch generates an XML fragment for each of the items the ItemWriter receives and writes the fragment to the file. This section looks at how Spring Batch handles XML as an output medium.
To handle writing XML using Spring Batch, you use org.springframework.batch.item.xml.StaxEventItemWriter. Just like the ItemReader, the Streaming API for XML (StAX) implementation allows Spring Batch to write fragments of XML as each chunk is processed. Just like FlatFileItemWriter, StaxEventItemWriter generates the XML a chunk at a time and writes it to the file after the local transaction has been committed; this prevents rollback issues if there is an error writing to the file.
The configuration of the StaxEventItemReader consists of a resource (file to read from), a root element name (the root tag for each fragment), and an unmarshaller to be able to convert the XML input into an object. The configuration for StaxEventItemWriter is almost identical, with a resource to write to, a root element name (the root tag for each fragment you generate), and a marshaller to convert each item into an XML fragment.
StaxEventItemWriter has a collection of configurable attributes that are covered in Table 9-2.
Table 9.2. Attributes Available in StaxEventItemWriter
Option | Type | Default | Description |
|---|---|---|---|
|
| UTF-8 | Character encoding for the file. |
|
|
| Executed after the last item of a file has been written. |
|
|
| Executed before the first item of a file has been written. |
|
|
| Used to convert an individual item to an XML fragment for output. |
|
| By default, the file is replaced if the output file already exists. If this is set to | |
|
|
| File or stream to be written to. |
|
| This key/value pairing is appended to the root tag of each fragment with the keys as the attribute names and value as their values. | |
|
| Defines the root XML tag the XML document. | |
|
|
| Determines if Spring Batch keeps track of the state of the ItemWriter (number of items written, and so on). |
|
|
| If |
|
|
| Version of XML the file is written in. |
To look at how StaxEventItemWriter works, let's update formatJob to output the customer output in XML. Using the same input from the previous examples, Listing 9-18 shows the new output you create when you update the job.
Example 9.18. customer.xml
<?xml version="1.0" encoding="UTF-8"?>
<customers>
  <customer>
    <id>0</id>
    <firstName>Richard</firstName>
    <middleInitial>N</middleInitial>
    <lastName>Darrow</lastName>
    <address>5570 Isabella Ave</address>
    <city>St. Louis</city>
    <state>IL</state>
    <zip>58540</zip>
  </customer>
    ...
</customers>
In order to generate the output shown in Listing 9-18, you reuse the formatJob configuration but replace flatFileOutputWriter with a new xmlOutputWriter that uses the StaxEventItemWriter ItemWriter implementation. To configure the new ItemWriter, you provide three dependencies as shown in Listing 9-19: a resource to write to, a reference to an org.springframework.oxm.Marshaller implementation, and a root tag name (customer in this case).
Example 9.19. Configuration for formatJob with StaxEventItemWriter
<?xml version="1.0" encoding="UTF-8"?>
<beans:beans xmlns="http://www.springframework.org/schema/batch"
  xmlns:beans="http://www.springframework.org/schema/beans"
  xmlns:util="http://www.springframework.org/schema/beans"
  xmlns:xsi="http://www.w3.org/2001/XMLSchema-instance"
  xsi:schemaLocation="http://www.springframework.org/schema/beans
    http://www.springframework.org/schema/beans/spring-beans-3.0.xsd
    http://www.springframework.org/schema/util
    http://www.springframework.org/schema/util/spring-util.xsd
    http://www.springframework.org/schema/batch
    http://www.springframework.org/schema/batch/spring-batch-2.1.xsd">

  <beans:import resource="../launch-context.xml"/>

  <beans:bean id="customerFile"
    class="org.springframework.core.io.FileSystemResource" scope="step">
    <beans:constructor-arg value="#{jobParameters[customerFile]}"/>
  </beans:bean>

  <beans:bean id="customerFileReader"
    class="org.springframework.batch.item.file.FlatFileItemReader">
    <beans:property name="resource" ref="customerFile"/>
    <beans:property name="lineMapper">
      <beans:bean
       class="org.springframework.batch.item.file.mapping.DefaultLineMapper">
        <beans:property name="lineTokenizer">
          <beans:bean class="org.springframework.batch.item.file.transform.
DelimitedLineTokenizer">
            <beans:property name="names"
            value="firstName,middleInitial,lastName,address,city,state,zip"/>
            <beans:property name="delimiter" value=","/>
          </beans:bean>
        </beans:property>
        <beans:property name="fieldSetMapper">
          <beans:bean class="org.springframework.batch.item.file.mapping.
BeanWrapperFieldSetMapper">
            <beans:property name="prototypeBeanName" value="customer"/>
          </beans:bean>
        </beans:property>
      </beans:bean>
    </beans:property>
  </beans:bean>

  <beans:bean id="customer" class="com.apress.springbatch.chapter9.Customer"
    scope="prototype"/>

  <beans:bean id="outputFile"
    class="org.springframework.core.io.FileSystemResource" scope="step">
    <beans:constructor-arg value="#{jobParameters[outputFile]}"/>
</beans:bean>
<beans:bean id="xmlOutputWriter"
class="org.springframework.batch.item.xml.StaxEventItemWriter">
<beans:property name="resource" ref="outputFile" />
<beans:property name="marshaller" ref="customerMarshaller" />
<beans:property name="rootTagName" value="customers" />
</beans:bean>
<beans:bean id="customerMarshaller"
class="org.springframework.oxm.xstream.XStreamMarshaller">
<beans:property name="aliases">
<util:map>
<beans:entry key="customer"
value="com.apress.springbatch.chapter9.Customer" />
</util:map>
</beans:property>
</beans:bean>
<step id="formatStep">
<tasklet>
<chunk reader="customerFileReader" writer="xmlOutputWriter"
commit-interval="10"/>
</tasklet>
</step>
<job id="formatJob">
<step id="step1" parent="formatStep"/>
</job>
</beans:beans>Of the 69 lines of XML that it took to configure the original formatJob as shown in Listing 9-7, the formatJob in Listing 9-19 has changed only 14 lines (shortening the file overall by one line). The changes begin with the definition of a new ItemWriter, xmlOutputWriter. This bean is a reference to the StaxEventItemWriter the section has been talking about and defines three dependencies: the resource to write to, the Marshaller implementation, and the root tag name for each XML fragment the Marshaller will generate.
Just below xmlOutputWriter is customerMarshaller. This bean is used to generate an XML fragment for each item the job processes. Using Spring's org.springframework.oxm.xtream.XStreamMarshaller class, the only further configuration you're required to provide is a Map of aliases to use for each type the Marshaller comes across. By default, the Marshaller uses the attribute's name as the tag name, but you provide an alias for the Customer class because the XStreamMarshaller uses the fully qualified name for the class by default as the root tag of each fragment (com.apress.springbatch.chatper8.Customer instead of just customer).
In order for the job to be able to compile and run, you need to make one more update. The POM file needs a new dependency to handle the XML processing, a reference to Spring's Object/XML Mapping (OXM) library. Listing 9-20 shows the update to the POM that is required.
Example 9.20. Spring's OXM Library Maven Dependency
...
<dependency>
  <groupId>org.springframework.ws</groupId>
  <artifactId>spring-oxm</artifactId>
  <version>1.5.9</version>
</dependency>
...
Note
Although Spring Batch considers itself compatible with Spring 3, and you're using Spring 3 for all examples in this book, this is one area where it isn't compatible and depends on an older version of OXM.
With the POM updated and the job configured, you're ready to build and run formatJob to generate XML as the output. After running a mvn clean install from the command line, you can use the command listed in Listing 9-21 to execute the job.
Example 9.21. Executing formatJob to Generate XML
java -jar itemWriters-0.0.1-SNAPSHOT.jar jobs/formatJob.xml formatJob
customerFile=/input/customer.csv outputFile=/output/xmlCustomer.xml
When you look at the results of the XML, notice that it was obviously generated by a library in that there is no formatting applied. But by running it through XML Tidy, you can see clearly that the output is what you expected. Listing 9-22 shows a sample of the generated output XML.
Example 9.22. formatJob XML Results
<?xml version="1.0" encoding="UTF-8"?>
<customers>
<customer>
<id>0</id>
<firstName>Richard</firstName>
<middleInitial>N</middleInitial>
<lastName>Darrow</lastName>
<address>5570 Isabella Ave</address>
<city>St. Louis</city>
<state>IL</state>
<zip>58540</zip>
</customer>
    ...
</customers>
With not much more than a couple lines of XML, you can easily generate XML output with the full power of any Spring-supported XML marshaller.
The ability to process XML as both input and output is important in today's enterprise environment, as isthe ability to process flat files. However, although files play a large part in batch processing, they aren't as prevalent in other processing in today's enterprise. Instead, the relational database has taken over. As such, the batch process must be able to not only read from a database (as you saw in Chapter 7) but write to it as well. The next section looks at the more common ways to handle writing to a database using Spring Batch.
Writing to a database offers a different set of constraints than file-based output. First, databases are transactional resources, unlike files. Because of this, you can include the physical write as part of the transaction instead of segmenting it as file-based processing does. Also, there are many different options for how to access a database. JDBC, Java Persistence API (JPA), and Hibernate all offer unique yet compelling models for handling writing to a database. This section looks at how to use JDBC, Hibernate, and JPA to write the output of a batch process to a database.
The first way you can write to the database is the way most people learn how to access a database with Spring in general, via JDBC. Spring Batch's JdbcBatchItemWriter uses the JdbcTemplate and its batch SQL execution capabilities to execute all of the SQL for a single chunk at once. This section looks at how to use JdbcBatchItemWriter to write a step's output to a database.
org.springframework.batch.item.database.JdbcBatchItemWriter isn't much more than a thin wrapper around Spring's org.springframework.jdbc.support.JdbcTemplate, using the JdbcTemplate.batchUpdate or JdbcTemplate.execute method depending on if named parameters are used in the SQL to execute mass database insert/updates. The important thing to note about this is that Spring uses PreparedStatement's batch-update capabilities to execute all the SQL statements for a single chunk at once instead of using multiple calls. This greatly improves performance while still allowing all the executions to execute within the current transaction.
To see how the JdbcBatchItemWriter works, again you work with the same input you used with the file-based writers, but you use it to populate a customer database table instead of writing a file. Figure 9-3 shows the design of the table into which you're inserting the customer information.
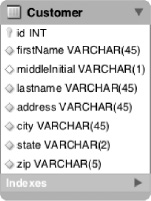
As you can see in Figure 9-3, the columns of the Customer table match up virtually one-to-one with the elements in the customer.csv file. The only difference is the id field, which you let the database populate for you. In order to insert the values into the table, you need to build the SQL in either of two ways: using question marks (?) as placeholders for the values or using named parameters (:name, for example) as placeholders. Each of these two options requires a slightly different approach in populating the values. You start with the question mark as shown in the sample SQL statement in Listing 9-23.
Example 9.23. Prepared Statement for Inserting into the Customer Table
insert into customer (firstName, middleInitial, lastName, address, city,
state, zip) values (?, ?, ?, ?, ?, ?, ?)
As you can see, there is nothing unusual about the prepared statement. However, providing the SQL statement is only one of the configuration options for JdbcBatchItemWriter. Table 9-3 lists all the configuration options.
Table 9.3. JdbcBatchItemWriter Configuration Options
To use JdbcBatchItemWriter in formatJob, you replace xmlOutputWriter with a new jdbcBatchWriter bean. Because you begin with a standard PreparedStatement syntax for the query (using question marks), you need to provide it with a dataSource, the SQL to be executed, and an implementation of the org.springframework.batch.item.database.ItemPreparedStatementSetter interface. Yes, you're correct if you realized that you're going to have to write some code to make this one work.
ItemPreparedStatementSetter is a simple interface used to abstract the extraction of values from each item and set them on the PreparedStatement. It contains a single method, as shown in Listing 9-24.
Example 9.24. ItemPreparedStatementSetter Interface
package org.springframework.batch.item.database;

import java.sql.PreparedStatement;
import java.sql.SQLException;

import org.springframework.jdbc.core.RowMapper;

public interface ItemPreparedStatementSetter<T> {
    void setValues(T item, PreparedStatement ps) throws SQLException;
}
To implement the ItemPreparedStatementSetter interface, you create your own CustomerItemPreparedStatementSetter. This class implements the single setValues method that is required by the ItemPreparedStatementSetter interface by using the normal PreparedStatement API to populate each value of the PreparedStatement with the appropriate value from the item. Listing 9-25 shows the code for CustomerItemPreparedStatementSetter.
Example 9.25. CustomerItemPreparedStatementSetter.java
package com.apress.springbatch.chapter9;

import java.sql.PreparedStatement;
import java.sql.SQLException;

import org.springframework.batch.item.database.ItemPreparedStatementSetter;

public class CustomerItemPreparedStatementSetter implements
        ItemPreparedStatementSetter<Customer> {

    public void setValues(Customer customer, PreparedStatement ps)
            throws SQLException {

        ps.setString(1, customer.getFirstName());
        ps.setString(2, customer.getMiddleInitial());
        ps.setString(3, customer.getLastName());
        ps.setString(4, customer.getAddress());
        ps.setString(5, customer.getCity());
        ps.setString(6, customer.getState());
        ps.setString(7, customer.getZip());
    }
}
As Listing 9-25 shows, there is no magic involved in setting the values for each PreparedStatement. With this code, you can update formatJob's configuration to write its output to the database. Listing 9-26 shows the configuration for the new ItemWriter.
Example 9.26. jdbcBatchWriter's Configuration
...
<beans:bean id="jdbcBatchWriter"
  class="org.springframework.batch.item.database.JdbcBatchItemWriter">
  <beans:property name="dataSource" ref="dataSource"/>
  <beans:property name="sql" value="insert into customer (firstName,
middleInitial, lastName, address, city, state, zip) values (?, ?, ?, ?, ?, ?,
?)"/>
  <beans:property name="itemPreparedStatementSetter"
    ref="preparedStatementSetter"/>
</beans:bean>

<beans:bean id="preparedStatementSetter"
class="com.apress.springbatch.chapter9.CustomerItemPreparedStatementSetter"/>
...
As you can see in Listing 9-26, the new jdbcBatchItemWriter references the dataSource bean from the launch-context.xml file (the customer table is in the same schema as the Spring Batch tables you use for the JobRepository). The SQL value is the same as the SQL statement you previously defined in Listing 9-23. The last dependency you provide is the reference to the CustomerItemPreparedStatementSetter.
The final piece of the puzzle to configure the new ItemWriter is to update the configuration for the step to reference the new ItemWriter. To do this, all you need to do is update formatStep's configuration to reference the jdbcBatchWriter bean in place of its current reference to the xmlOutputWriter from the previous section. Listing 9-27 shows the full listing of formatJob.xml configured to write to the database.
Example 9.27. formatJob.xml Configured for JDBC Database Writing
<?xml version="1.0" encoding="UTF-8"?>
<beans:beans xmlns="http://www.springframework.org/schema/batch"
  xmlns:beans="http://www.springframework.org/schema/beans"
  xmlns:util="http://www.springframework.org/schema/beans"
  xmlns:xsi="http://www.w3.org/2001/XMLSchema-instance"
  xsi:schemaLocation="http://www.springframework.org/schema/beans
    http://www.springframework.org/schema/beans/spring-beans-3.0.xsd
    http://www.springframework.org/schema/util
    http://www.springframework.org/schema/util/spring-util.xsd
    http://www.springframework.org/schema/batch
    http://www.springframework.org/schema/batch/spring-batch-2.1.xsd">

  <beans:import resource="../launch-context.xml"/>

  <beans:bean id="customerFile"
    class="org.springframework.core.io.FileSystemResource" scope="step">
    <beans:constructor-arg value="#{jobParameters[customerFile]}"/>
  </beans:bean>

  <beans:bean id="customerFileReader"
    class="org.springframework.batch.item.file.FlatFileItemReader">
    <beans:property name="resource" ref="customerFile"/>
    <beans:property name="lineMapper">
      <beans:bean
       class="org.springframework.batch.item.file.mapping.DefaultLineMapper">
        <beans:property name="lineTokenizer">
          <beans:bean class="org.springframework.batch.item.file.transform.
DelimitedLineTokenizer">
            <beans:property name="names"
            value="firstName,middleInitial,lastName,address,city,state,zip"/>
            <beans:property name="delimiter" value=","/>
          </beans:bean>
        </beans:property>
        <beans:property name="fieldSetMapper">
          <beans:bean class="org.springframework.batch.item.file.mapping.
BeanWrapperFieldSetMapper">
            <beans:property name="prototypeBeanName" value="customer"/>
          </beans:bean>
        </beans:property>
      </beans:bean>
    </beans:property>
  </beans:bean>

  <beans:bean id="customer" class="com.apress.springbatch.chapter9.Customer"
    scope="prototype"/>

  <beans:bean id="jdbcBatchWriter"
class="org.springframework.batch.item.database.JdbcBatchItemWriter">
<beans:property name="dataSource" ref="dataSource"/>
<beans:property name="sql" value="insert into customer (firstName,
middleInitial, lastName, address, city, state, zip) values (?, ?, ?, ?, ?, ?,
?)"/>
<beans:property name="itemPreparedStatementSetter"
ref="preparedStatementSetter"/>
</beans:bean>
<beans:bean id="preparedStatementSetter"
class="com.apress.springbatch.chapter9.
CustomerItemPreparedStatementSetter"/>
<step id="formatStep">
<tasklet>
<chunk reader="customerFileReader" writer="jdbcBatchWriter"
commit-interval="10"/>
</tasklet>
</step>
<job id="formatJob">
<step id="step1" parent="formatStep"/>
</job>
</beans:beans>Because you already have the JDBC drivers configured in the POM and the dataSource configured for the JobRepository, all you need to do is execute an mvn clean install and execute the command in Listing 9-28 to see the results of the updated formatJob.
Example 9.28. Command to Execute formatJob
java -jar itemWriters-0.0.1-SNAPSHOT.jar jobs/formatJob.xml formatJob
customerFile=/input/customer.csv
The output of this job isn't in a file this time but in the database. You can confirm the execution in two ways. The first is by going to the database to validate the input. Listing 9-29 shows the results of the job in the database.
Example 9.29. Job Results with jdbcBatchWriter
mysql> select * from customer;
+------+-----------+---------------+----------+--------------------------+---
--------+-------+-------+
| id   | firstName | middleInitial | lastName | address                  |
city      | state | zip   |
+------+-----------+---------------+----------+--------------------------+---
--------+-------+-------+
| 1607 | Richard   | N             | Darrow   | 5570 Isabella Ave        |
St. Louis | IL    | 58540 |
| 1608 | Warren    | L             | Darrow   | 4686 Mt. Lee Drive       |
St. Louis | NY    | 94935 |
| 1609 | Barack    | G             | Donnelly | 7844 S. Greenwood Ave    |
Houston   | CA    | 38635 |
| 1610 | Ann       | Z             | Benes    | 2447 S. Greenwood Ave    |
Las Vegas | NY    | 55366 |
| 1612 | Erica     | Z             | Gates    | 3141 Farnam Street       |
Omaha     | CA    | 57640 |
| 1613 | Warren    | M             | Williams | 6670 S. Greenwood Ave    |
Hollywood | FL    | 37288 |
| 1614 | Harry     | T             | Darrow   | 3273 Isabella Ave        |
Houston   | FL    | 97261 |
| 1615 | Steve     | O             | Darrow   | 8407 Infinite Loop Drive |
Las Vegas | WA    | 90520 |
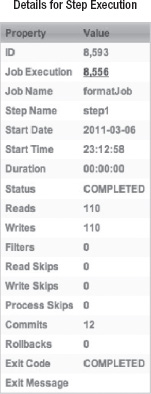
The other way to check the output of the job is to look at the results via the Spring Batch Admin application. Figure 9-4 shows Spring Batch Admin's display of the results.
The PreparedStatement notation is useful given most Java developers' familiarity with it. However, the named parameter approach provided by Spring's JdbcTemplate is a much safer way to go and is the preferred way to populate parameters in most Spring environments. With that in mind, you can put this feature to use by making two small updates to the configuration:
Update the configuration to remove the
ItemPreparedStatementSetterimplementation you wrote and replace it with an implementation of theItemSqlParameterSourceProviderinterface.Update the SQL to use named parameters instead of question marks for parameters.
The org.springframework.batch.item.database.ItemSqlParameterSourceProvider interface is slightly different from the ItemPreparedStatementSetter interface in that it doesn't set the parameters on the statement to be executed. Instead, an implementation of the ItemSqlParameterSourceProvider's responsibility is to extract the parameter values from an item and return them as an org.springframework.jdbc.core.namedparam.SqlParameterSource object.
The nice thing about this approach is that not only is it the safer approach (no concerns about needing to keep the SQL in the XML file in synch with the code of the ItemPreparedStatementSetter implementation) but Spring Batch provides implementations of this interface that allow you to use convention over code to extract the values from the items. In this example, you use Spring Batch's BeanPropertyItemSqlParameterSourceProvider (try saying that three times fast) to extract the values from the items to be populated in the SQL. Listing 9-30 shows the updated jdbcBatchWriter configuration for this change.
Example 9.30. jdbcBatchWriter using BeanPropertyItemSqlParameterSourceProvider
...
<beans:bean id="jdbcBatchWriter"
  class="org.springframework.batch.item.database.JdbcBatchItemWriter">
  <beans:property name="dataSource" ref="dataSource"/>
  <beans:property name="sql" value="insert into customer (firstName, middleInitial, lastName, address, city, state, zip) values (:firstName, :middleInitial, :lastName, :address, :city, :state, :zip)"/>
  <beans:property name="itemSqlParameterSourceProvider">
    <beans:bean
      class="org.springframework.batch.item.database.
BeanPropertyItemSqlParameterSourceProvider"/>
  </beans:property>
</beans:bean>
...
You can quickly note in Listing 9-30 that there is no reference to the ItemPreparedStatementSetter implementation. By using this configuration, you don't need any custom code. Yet the results are the same.
Although JDBC is known for its speed compared to other persistence framework that lie on top of it, other frameworks are popular in the enterprise. Next you look at how to use the most popular of those to do database writing: Hibernate.
When you have most of your database tables and applications already mapped with Hibernate, reusing all that is a logical choice to start. You saw how Hibernate works as a competent reader in Chapter 7. This section looks at how you can use HibernateItemWriter to write the changes to a database.
Like JdbcBatchItemWriter, org.springframework.batch.item.database.HibernateItemWriter serves as a thin wrapper to Spring's org.springframework.orm.hibernate3.HibernateTemplate. When a chunk completes, the list of items is passed to HibernateItemWriter where HibernateTemplate's saveOrUpdate method is called for each item. When all the items have been saved or updated, HibernateItemWriter makes a single call to HibernateTemplate's flush method, executing all the changes at once. This provides a batching functionality similar to JdbcBatchItemWriter's implementation without dealing directly with the SQL.
Configuring HibernateItemWriter is simple. All but the configuration of the actual ItemWriter should be familiar, because it's the same as the configuration and coding you did for the Hibernate-supported ItemReaders. To modify formatJob to use Hibernate, you need to update the following:
The pompom: The POM needs to incorporate the Hibernate dependencies.
Customer.java: You use annotations to configure the mapping for theCustomerobject, so you need to add those to theCustomerclass.SessionFactory: You need to configure both theSessionFactoryand a newTransactionManagerto support Hibernate.HibernateItemWriter: You can configure the new ItemWriter usingHibernateItemWriter.
Let's start with the POM updates. For Hibernate to work with Spring Batch, you need to include the Hibernate dependencies as well as Spring's ORM-supporting dependencies. Listing 9-31 shows the additions you need to make to the POM.
Example 9.31. Pom Additions for Supporting Hibernate
...
<dependency>
  <groupId>org.hibernate</groupId>
  <artifactId>hibernate-core</artifactId>
  <version>3.3.0.SP1</version>
</dependency>
<dependency>
  <groupId>org.hibernate</groupId>
  <artifactId>hibernate-entitymanager</artifactId>
  <optional>true</optional>
  <version>3.3.2.GA</version>
</dependency>
<dependency>
  <groupId>org.hibernate</groupId>
  <artifactId>hibernate-annotations</artifactId>
  <optional>true</optional>
  <version>3.4.0.GA</version>
</dependency>
<dependency>
  <groupId>org.springframework</groupId>
  <artifactId>spring-orm</artifactId>
  <version>${spring.framework.version}</version>
</dependency>
<dependency>
  <groupId>org.springframework</groupId>
  <artifactId>spring-context-support</artifactId>
  <version>${spring.framework.version}</version>
</dependency>
...
Now you can begin updating formatJob. Let's begin with the only code you need to write: the annotations you add to the Customer class to map it to the database. Listing 9-32 shows the Customer class updated.
Example 9.32. Customer.java Mapped to the Customer Table
package com.apress.springbatch.chapter9;

import java.io.Serializable;

import javax.persistence.Entity;
import javax.persistence.GeneratedValue;
import javax.persistence.GenerationType;
import javax.persistence.Id;
import javax.persistence.Table;

@Entity
@Table(name="customer")
public class Customer implements Serializable {
    private static final long serialVersionUID = 1L;

    @Id
    @GeneratedValue(strategy = GenerationType.IDENTITY)
    private long id;
    private String firstName;
    private String middleInitial;
    private String lastName;
    private String address;
    private String city;
    private String state;
    private String zip;

    // Accessors go here
    ....
}
The annotations you use here are the same as the ones you used in the ItemReader example in Chapter 7. The mapping for the Customer class is pretty straightforward because the column names of the Customer table match those of the Customer class. The other thing to notice is that you aren't using any Hibernate-specific annotations. All the annotations used here are JPA-supported annotations, which allows you to switch from Hibernate to any JPA-supported implementation if you choose with no code changes required.
Next, you can move on to configuring the SessionFactory. Again, the configuration here is the same that you used in Chapter 7 for Hibernate's ItemReader implementations. You configure the SessionFactory and the Hibernate-supported transaction manager both in the launch-context.xml file. In addition, you add a hibernate.cfg.xml file to the root of the resources directory. Listing 9-33 shows the configuration updates you need to make to the launch-context.xml file.
Example 9.33. Launch-context.xml Configured for Hibernate Support
...
<bean id="sessionFactory"
  class="org.springframework.orm.hibernate3.LocalSessionFactoryBean">
  <property name="dataSource" ref="dataSource" />
  <property name="configLocation">
    <value>classpath:hibernate.cfg.xml</value>
  </property>
  <property  name="configurationClass">
    <value>org.hibernate.cfg.AnnotationConfiguration</value>
  </property>
  <property name="hibernateProperties">
    <props>
      <prop key="hibernate.show_sql">true</prop>
      <prop key="hibernate.format_sql">true</prop>
    </props>
  </property>
</bean>

<bean id="transactionManager"
  class="org.springframework.orm.hibernate3.HibernateTransactionManager"
  lazy-init="true">
  <property name="sessionFactory" ref="sessionFactory" />
</bean>
...
Again, this configuration should be familiar because it matches what you used in Chapter 7. You begin the configuration with the SessionFactory. It relies on a dataSource (you recycle the same one you've been using up to now); the location of the configuration, which in the case is a hibernate.cfg.xml file in the root of the classpath; and a configurationClass to identify that you're using Hibernate's annotation support to handle the mapping. Finally, you want to see the SQL that is being executed, so you add the properties to tell Hibernate to log and format all SQL it generates.
The second part of the configuration in Listing 9-33 is the configuration of Hibernate's transaction manager. It's important to note that you want to remove the one you've used up to now (and that's included in launch-context.xml) when you use Hibernate's transaction manager. This allows Spring Batch and the Hibernate code to use the same transaction manager.
The second part of the SessionFactory configuration is the addition of a hibernate.cfg.xml file into the <PROJECT_HOME>/src/main/resources directory. Listing 9-34 shows the contents of this file.
Example 9.34. hibernate.cfg.xml
<!DOCTYPE hibernate-configuration PUBLIC
  "-//Hibernate/Hibernate Configuration DTD 3.0//EN"
  "http://hibernate.sourceforge.net/hibernate-configuration-3.0.dtd">

<hibernate-configuration>
  <session-factory>
    <mapping class="com.apress.springbatch.chapter9.Customer"/>
  </session-factory>
</hibernate-configuration>
The very simple hibernate.cfg.xml file shown in Listing 9-34 serves only to tell Hibernate where to look for classes that are annotated as entities.
Finally you can configure HibernateItemWriter. It's probably the easiest ItemWriter to configure given that other components and the Hibernate framework do all the work. HibernateItemWriter requires a single dependency and has one optional dependency. The required dependency is a reference to the SessionFactory you configured previously in Listing 9-31. The optional dependency (which you aren't using in this case) is a reference to a HibernateOperations implementation via the property hibernateTemplate.[26] Listing 9-35 show the configuration of the job complete with the new HibernateItemWriter configuration.
Example 9.35. formatJob.xml Using Hibernate
<?xml version="1.0" encoding="UTF-8"?>
<beans:beans xmlns="http://www.springframework.org/schema/batch"
  xmlns:beans="http://www.springframework.org/schema/beans"
  xmlns:util="http://www.springframework.org/schema/beans"
  xmlns:xsi="http://www.w3.org/2001/XMLSchema-instance"
  xsi:schemaLocation="http://www.springframework.org/schema/beans
    http://www.springframework.org/schema/beans/spring-beans-3.0.xsd
    http://www.springframework.org/schema/util
    http://www.springframework.org/schema/util/spring-util.xsd
    http://www.springframework.org/schema/batch
    http://www.springframework.org/schema/batch/spring-batch-2.1.xsd">

  <beans:import resource="../launch-context.xml"/>

  <beans:bean id="customerFile"
    class="org.springframework.core.io.FileSystemResource" scope="step">
    <beans:constructor-arg value="#{jobParameters[customerFile]}"/>
  </beans:bean>

  <beans:bean id="customerFileReader"
    class="org.springframework.batch.item.file.FlatFileItemReader">
    <beans:property name="resource" ref="customerFile"/>
    <beans:property name="lineMapper">
      <beans:bean
       class="org.springframework.batch.item.file.mapping.DefaultLineMapper">
        <beans:property name="lineTokenizer">
          <beans:bean class="org.springframework.batch.item.file.transform.
DelimitedLineTokenizer">
            <beans:property name="names"
            value="firstName,middleInitial,lastName,address,city,state,zip"/>
            <beans:property name="delimiter" value=","/>
          </beans:bean>
        </beans:property>
        <beans:property name="fieldSetMapper">
          <beans:bean class="org.springframework.batch.item.file.mapping.
BeanWrapperFieldSetMapper">
<beans:property name="prototypeBeanName" value="customer"/>
</beans:bean>
</beans:property>
</beans:bean>
</beans:property>
</beans:bean>
<beans:bean id="customer" class="com.apress.springbatch.chapter9.Customer"
scope="prototype"/>
<beans:bean id="hibernateBatchWriter"
class="org.springframework.batch.item.database.HibernateItemWriter">
<beans:property name="sessionFactory" ref="sessionFactory"/>
</beans:bean>
<step id="formatStep">
<tasklet>
<chunk reader="customerFileReader" writer="hibernateBatchWriter"
commit-interval="10"/>
</tasklet>
</step>
<job id="formatJob">
<step id="step1" parent="formatStep"/>
</job>
</beans:beans>The configuration for this job changes only with the configuration of hibernateBatchWriter and its reference in the formatStep. As you saw previously, HibernateItemWriter requires only a reference to a SessionFactory, which is provided via the configuration in launch-context.xml. Executing this job returns the same results as the JdbcBatchItemWriter example previously.
When other frameworks do all of the heavy lifting, the Spring Batch configuration is quite simple, as this Hibernate example shows. Hibernate's official spec cousin, JPA, is the other database access framework you can use to do database writing.
The Java Persistence API (JPA) provides very similar functionality and requires almost the exact same configuration as its Hibernate cousin. It, like Hibernate, does the heavy lifting in the case of writing to the database, so the Spring Batch piece of the puzzle is very small. This section looks at how to configure JPA to perform database writing.
When you look at the org.springframework.batch.item.writer.JpaItemWriter, it serves as a thin wrapper around JPA's javax.persistence.EntityManager. When a chunk completes, the list of items within the chunk is passed to JpaItemWriter. The writer loops over the items in the list, calling the EntityManager's merge method on each item before calling flush after all the items have been saved.
To see JpaItemWriter in action, you use the same customer input as earlier and insert it into the same Customer table. To hook JPA into the job, you need to do the following four things:
Add a
persistence.xmlfile. Thepersistence.xmlfile in JPA is used to configure theEntityManager. For you to be able to use JPA, you need to add one to the project.Configure
EntityManagerFactoryand the JPA Transaction Manager.EntityManagerFactoryis the source of anEntityManagerfor the job. It along with a JPA-supported transaction manager is required.Map the
Customerclass. You use annotations to configure the mapping of theCustomerclass to the Customer table.Configure the
JpaItemWriter. The last step is to configure the new ItemWriter to save the items read in the job.
Let's start with the persistence.xml file, which is shown in Listing 9-36. This file needs to live in the <PROJECT_HOME>/src/main/resources/META-INF/ directory with the name persistence.xml per the JPA specification.
Example 9.36. persistence.xml
<persistence xmlns="http://java.sun.com/xml/ns/persistence"
  xmlns:xsi="http://www.w3.org/2001/XMLSchema-instance"
  xsi:schemaLocation="http://java.sun.com/xml/ns/persistence
    http://java.sun.com/xml/ns/persistence/persistence_1_.xsd"
    version="1.0">

  <persistence-unit name="customer" transaction-type="RESOURCE_LOCAL">
    <class>com.apress.springbatch.chapter9.Customer</class>
  </persistence-unit>
</persistence>
The persistence.xml file required for this example is about as simple as you can create. The persistence unit is named customer with the application controlling the transactions. You have a single class mapped with annotations, the Customer class. To get started with JPA, that is really all you need for a persistence.xml file.
Next you can update the launch-context.xml file with an EntityManagerFactory and Spring's JpaTransactionManager. Listing 9-37 shows the additions you need to make to a base launch-context.xml file to incorporate the JPA components.
Example 9.37. Launch-context.xml Updates for JPA
...
<bean id="entityManagerFactory"
  class="org.springframework.orm.jpa.LocalContainerEntityManagerFactoryBean">
  <property name="dataSource" ref="dataSource" />
  <property name="persistenceUnitName" value="customer" />
  <property name="jpaVendorAdapter">
    <bean
      class="org.springframework.orm.jpa.vendor.HibernateJpaVendorAdapter">
      <property name="showSql" value="true" />
    </bean>
  </property>
  <property name="jpaDialect">
    <bean class="org.springframework.orm.jpa.vendor.HibernateJpaDialect" />
  </property>
</bean>
<bean id="transactionManager" class="org.springframework.orm.jpa.JpaTransactionManager"> <property name="entityManagerFactory" ref="entityManagerFactory" /> </bean> ...
You begin looking at the configuration for launch-context.xml with the EntityManagerFactory. Configuring Spring's org.springframework.orm.jpa.LocalContainerEntityManagerFactoryBean requires four dependencies:
A datasource: The
EntityManageruses this to connect to the database.A persistence unit name: This defines the group of persistable classes for the
EntityManager.jpaVendorAdapter: JPA is just a specification like JDBC or JavaServer Faces (JSF). Someone needs to implement the specification in order for you to use it. In this example, you're using Hibernate's implementation of JPA.jpaDialect: This gives you a vendor-dependent way of handling things that JPA doesn't provide for (accessing the underlying database connection, for example).
Next, you configure Spring's org.springframework.orm.jpa.JpaTransactionManager with its single dependency, the EntityManagerFactory you just configured.
The next piece of the JPA puzzle is mapping the Customer object to the Customer table. You use annotations for this as you have in the past. The nice thing about the way you mapped the Customer class previously is that you used all JPA annotations for the Hibernate example. This allows you to reuse the Customer object unchanged for JPA. Listing 9-38 shows the Customer class mapped using the JPA annotations.
Example 9.38. Customer.java Mapped with JPA Annotations
package com.apress.springbatch.chapter9;

import java.io.Serializable;

import javax.persistence.Entity;
import javax.persistence.GeneratedValue;
import javax.persistence.GenerationType;
import javax.persistence.Id;
import javax.persistence.Table;

@Entity
@Table(name="customer")
public class Customer implements Serializable {
    private static final long serialVersionUID = 1L;

    @Id
    @GeneratedValue(strategy = GenerationType.IDENTITY)
    private long id;
    private String firstName;
    private String middleInitial;
    private String lastName;
private String address;
private String city;
private String state;
private String zip;
// Accessors go here
...
}The code in Listing 9-38 is the same that is in Listing 9-32. By avoiding the Hibernate annotations in the previous example, you're able to see how switching persistence frameworks requires no code changes.
The final aspect of configuring the job to use JPA is to configure JpaItemWriter. It requires only a single dependency—a reference to EntityManagerFactory—so that it can obtain an EntityManager to work with. Listing 9-39 shows the configuration for the new ItemWriter and the job updated to use it.
Example 9.39. formatJob Configured to Use JpaItemWriter
...
<beans:bean id="jpaBatchWriter"
  class="org.springframework.batch.item.database.JpaItemWriter">
  <beans:property name="entityManagerFactory" ref="entityManagerFactory"/>
</beans:bean>

<step id="formatFileStep">
  <tasklet>
    <chunk reader="customerFileReader" writer="jpaBatchWriter"
      commit-interval="10"/>
  </tasklet>
</step>

<job id="formatJob">
  <step id="step1" parent="formatFileStep"/>
</job>
...
You can now build the job with a quick mvn clean install. To execute the job, use the command in Listing 9-40, which returns the results you've seen in the other database examples.
Example 9.40. Command to Execute formatJob with JPA Configured
java -jar itemWriters-0.0.1-SNAPSHOT.jar jobs/formatJob.xml formatJob
customerFile=/input/customer.csv
The relational database rules in the modern enterprise, for better or worse. As you can see, writing job results to a database is easy with Spring Batch. But files and databases aren't the only forms of output that are available both from Spring Batch or needed in an enterprise. The next section looks at other examples of the wide range of output options Spring Batch provides.
Files and databases aren't the only ways you can communicate the end result of an item being processed. Enterprises use a number of other means to store an item after it has been processed. In Chapter 7, you looked at Spring Batch's ability to call an existing Spring service to obtain data. It should come as no surprise then that the framework offers similar functionality on the writing end. Spring Batch also exposes Spring's powerful JMS interactions with a JmsItemWriter. Finally, if you have a requirement to send e-mails from a batch process, Spring Batch can handle that too. This section looks at how to call existing Spring services, write to a JMS destination, and send e-mail using provided Spring Batch ItemWriters.
In most enterprises that use Spring, there are a number of existing services already written and battle-tested in production. There is no reason they can't be reused in your batch processes. In Chapter 7, you looked at how to use them as sources of input for the jobs. This section looks at how the ItemWriterAdapter allows you to use existing Spring services as ItemWriters as well.
org.springframework.batch.item.adapter.ItemWriterAdapter is nothing more than a thin wrapper around the service you configure. As with any other ItemWriter, the write method receives a list of items to be written. ItemWriterAdapter loops through the list calling the service method configured for each item in the list. It's important to note that the method being called by ItemWriterAdapter can only accept the item type being processed. For example, if the step is processing Car objects, the method being called must take a single argument of type Car.
To configure an ItemWriterAdapter, two dependencies are required:
Note
The method being called by ItemWriterAdapter must take a single argument of the type that is being processed by the current step.
Let's look at an example of ItemWriterAdapter in action. Listing 9-41 shows the code for a service that logs Customer items to System.out.
Example 9.41. CustomerServiceImpl.java
package com.apress.springbatch.chapter9;

public class CustomerServiceImpl {

public void logCustomer(Customer cust) {
        System.out.println("I just saved " + cust);
    }
}
As you can see in Listing 9-41, CustomerServiceImpl is short, sweet, and to the point. But it serves the purpose for the example. To put this service to work in formatJob, you can configure it to be the target of a new ItemWriterAdapter. Using the same input configuration you've used in the other jobs this chapter, Listing 9-42 shows the configuration for the ItemWriter using the CustomerServiceImpl's logCustomer method and job referencing it.
Example 9.42. ItemWriterAdapter Configuration
...
<beans:bean id="customerService"
  class="com.apress.springbatch.chapter9.CustomerServiceImpl"/>

<beans:bean id="itemWriterAdapter"
  class="org.springframework.batch.item.adapter.ItemWriterAdapter">
  <beans:property name="targetObject" ref="customerService"/>
  <beans:property name="targetMethod" value="logCustomer"/>
</beans:bean>

<step id="formatFileStep">
  <tasklet>
    <chunk reader="customerFileReader" writer="itemWriterAdapter"
      commit-interval="10"/>
  </tasklet>
</step>

<job id="formatJob">
  <step id="step1" parent="formatFileStep"/>
</job>
...
Listing 9-42 starts with the configuration of customerService. The ItemWriter is next as the itemWriterAdapter. The two dependencies it uses are a reference to customerService and the name of the logCustomer method. Finally, you reference the itemWriterAdapter in the step to be used by the job.
To execute this job, you build it, like all jobs, with a mvn clean install from the command line. With the job built, you can execute it by executing the jar file as you've done in the past. A sample of the output of this job is shown in Listing 9-43.
Example 9.43. ItemWriterAdapter Output
2011-03-09 22:43:56,526 DEBUG main
[org.springframework.batch.repeat.support.RepeatTemplate] - <Repeat operation
about to start at count=10>
2011-03-09 22:43:56,526 DEBUG main
[org.springframework.batch.repeat.support.RepeatTemplate] - <Repeat is
complete according to policy and result value.>
I just saved Richard N. Darrow
5570 Isabella Ave
St. Louis, IL
58540
I just saved Warren L. Darrow
4686 Mt. Lee Drive
St. Louis, NY
94935
As you would expect, calling an existing service with the item you've processed in your step is made easy with Spring Batch. However, what if your service doesn't take the same object you're processing? If you want to be able to extract values out of your item and pass them to your service, Spring Batch has you covered. PropertyExtractingDelegatingItemWriter (yes, that really is its name) is next.
The use case for ItemWriterAdapter is pretty simple. Take the item being processed, and pass it to an existing Spring service. However, software is rarely that straightforward. Because of that, Spring Batch has provided a mechanism to extract values from an item and pass them to a service as parameters. This section looks at PropertyExtractingDelegatingItemWriter and how to use it with an existing service.
Although it has a long name, org.springframework.batch.item.adapter.PropertyExtractingDelegatingItemWriter is a lot like the ItemWriterAdapter. Just like ItemWriterAdapter, it calls a specified method on a referenced Spring service. The difference is that instead of blindly passing the item being processed by the step, PropertyExtractingDelegatingItemWriter passes only the attributes of the item that are requested. For example, if you have an item of type Product that contains fields for a database id, name, price, and SKU number, you're required to pass the entire Product object to the service method as with ItemWriterAdapter. But with PropertyExtractingDelegatingItemWriter, you can specify that you only want the database id and price to be passed as parameters to the service.
To look at this as an example, you can use the same customer input that you're familiar with by this point. You add a method to the CustomerService Impl that allows you to log the address of the Customer item being processed and use PropertyExtractingDelegatingItemWriter to call the new method. Let's start by looking at the updated CustomerServiceImpl (see Listing 9-44).
Example 9.44. CustomerServiceImpl with logAddress()
package com.apress.springbatch.chapter9;

public class CustomerServiceImpl {

    public void logCustomer(Customer cust) {
        System.out.println("I just saved " + cust);
    }

    public void logAddress(String address,
                           String city,
                           String state,
                           String zip) {
        System.out.println("I just saved the address:
" + address + "
" +
                           city + ", " + state + "
" + zip);
    }
}
As you can see in Listing 9-44, the logAddress method doesn't take the Customer item. Instead it takes values that you have within it. To use this method, you use PropertyExtractingDelegatingItemWriter to extract the address fields (address, city, state, and zip) from each Customer item and call the service with the values it receives. To configure this ItemWriter, you pass in an ordered list of properties to extract from the item along with the target object and method to be called. The list you pass in in the same order as the parameters required for the property; Spring does support dot notation (address.city, for example) as well as index properties (e-mail[5]). Just like the ItemWriterAdapter, this ItemWriter implementation also exposes an arguments property that isn't used because the arguments are extracted by the writer dynamically. Listing 9-45 shows the job updated to call the logAddress method instead of handling the entire Customer item.
Example 9.45. formatJob Configured to Call the logAddress Method on CustomerServiceImpl
...
<beans:bean id="parameterizedItemWriterAdapter"
  class="org.springframework.batch.item.adapter.
PropertyExtractingDelegatingItemWriter">
  <beans:property name="targetObject" ref="customerService"/>
  <beans:property name="targetMethod" value="logAddress"/>
  <beans:property name="fieldsUsedAsTargetMethodArguments"
    value="address,city,state,zip"/>
</beans:bean>

<step id="formatFileStep">
  <tasklet>
    <chunk reader="customerFileReader"
      writer="parameterizedItemWriterAdapter" commit-interval="10"/>
  </tasklet>
</step>

<job id="formatJob">
  <step id="step1" parent="formatFileStep"/>
</job>
...
When you run the job, the output of it consists of a sentence written to System.out with a formatted address. Listing 9-46 shows a sample of the output you can expect.
Example 9.46. Output of formatJob Using PropertyExtractingDelegatingItemWriter
2011-03-10 22:14:46,744 DEBUG main
[org.springframework.batch.repeat.support.RepeatTemplate] - <Repeat operation
about to start at count=9>
2011-03-10 22:14:46,744 DEBUG main
[org.springframework.batch.repeat.support.RepeatTemplate] - <Repeat operation
about to start at count=10>
2011-03-10 22:14:46,745 DEBUG main
[org.springframework.batch.repeat.support.RepeatTemplate] - <Repeat is
complete according to policy and result value.>
I just saved the address:
5570 Isabella Ave
St. Louis, IL
58540
I just saved the address:
4686 Mt. Lee Drive
St. Louis, NY
94935
Spring Batch provides the ability to reuse just about any existing Spring service you've created as an ItemWriter, with good reason. The code your enterprise has is battle tested in production, and reusing it is less likely to introduce new bugs and also speeds up development time. The next section looks at using JMS resources as the destination of items processed within a step.
Java Messaging Service (JMS) is a message-oriented method of communicating between two or more endpoints. By using either point-to-point communication (a JMS queue) or a publish-subscribe model (JMS topic), Java applications can communicate with any other technology that can interface with the messaging implementation. This section looks at how you can put messages on a JMS queue using Spring Batch's JmsItemWriter.
Spring has made great progress in simplifying a number of common Java concepts. JDBC and integration with the various ORM frameworks come to mind as examples. But Spring's work in simplifying interfacing with JMS resources is just as impressive. In order to work with JMS, you need to use a JMS broker. This example uses Apache's ActiveMQ.
Apache ActiveMQ is one of the most popular and powerful open source JMS implementations available. It has the ability to interface with a number of different languages (Java, C, C++, C#, Ruby, and so on), provides a full JMS 1.1 implementation, and yet still is one of the easier message brokers to work with.
Before you can work with ActiveMQ, you need to add its dependencies and Spring's JMS dependencies to the POM so that it's available. This example works with ActiveMQ version 5.4.2, which is the most current version as of this writing. Listing 9-47 shows the dependencies you need to add to the POM.
Example 9.47. Dependencies for ActiveMQ and Spring JMS
...
<dependency>
  <groupId>org.apache.activemq</groupId>
  <artifactId>activemq-core</artifactId>
  <version>5.4.2</version>
  <exclusions>
    <exclusion>
      <groupId>org.apache.activemq</groupId>
      <artifactId>activeio-core</artifactId>
    </exclusion>
  </exclusions>
</dependency>
<dependency>
  <groupId>org.springframework</groupId>
  <artifactId>spring-jms</artifactId>
  <version>${spring.framework.version}</version>
</dependency>
...
Now you can begin to put ActiveMQ to work. Before you get into the code, however, let's look at the processing for this job because it's slightly different than before.
In previous examples in this chapter, you have had a single step that read in the customer.csv file and wrote it out using the appropriate ItemWriter for the example. For this example, however, that won't be enough. If you read in the items and write them to the JMS queue, you won't know that everything got onto the queue correctly because you can't see what is in the queue. Instead, as Figure 9-5 shows, you use two steps for this job. The first one reads the customer.csv file and writes it to the ActiveMQ queue. The second step reads from the queue and writes the records out to an XML file.

It's important to note that you don't want to do this in an actual production environment because a message isn't pulled off the queue until all of them have been put on it. This could lead to running out of room in your queue depending on how it's configured and the resources available. However, for this example and given the small number of customers you're processing, this approach demonstrates the point.
To begin using org.springframework.batch.item.jms.JmsItemWriter, you need to configure a couple of JMS-related beans in launch-context.xml. Luckily, Spring makes this very easy.[27] You need to configure three beans:
Let's start by looking at the queue. Although ActiveMQ offers a number of options for configuring a queue, it makes things simple to get up and running by allowing you to configure a JMS queue via Spring. You will configure the queue to be dynamically created on startup and serve as the destination.
With the queue itself configured, you can configure the connection factory to access it. Just like the queue itself, ActiveMQ exposes a class that allows you to configure the connection factory via Spring. To do that, all you need to do is define a URL in which the connection factory can find the broker. In this case, you're telling it to look at the local JVM.
Finally you can create JmsTemplate. This is Spring's way of exposing JMS functionality in a way that's easy to use and understand. To put it to use here, you need to provide three dependencies: a reference to the connection factory, a reference to the queue, and a timeout value for how long the reader will wait when listening for messages. Listing 9-48 shows the configuration of the JMS resources in launch-context.xml.
Example 9.48. JMS Resource Configuration in launch-context.xml
...
<bean id="destination" class="org.apache.activemq.command.ActiveMQQueue">
  <constructor-arg value="customerQueue"/>
</bean>

<bean id="jmsConnectionFactory"
  class="org.apache.activemq.ActiveMQConnectionFactory">
  <property name="brokerURL" value="vm://localhost"/>
</bean>

<bean id="jmsTemplate" class="org.springframework.jms.core.JmsTemplate">
  <property name="connectionFactory" ref="jmsConnectionFactory"/>
  <property name="defaultDestination" ref="destination"/>
  <property name="receiveTimeout" value="5000"/>
</bean>
...
Now you can configure the job. You use the same reader you've used up to this point in the chapter for the first step and the same writer you used in the XML example earlier in the chapter for the writer in the second step. Their configuration can be found in Listing 9-49.
Example 9.49. Input and Output of jmsFormatJob
<beans:bean id="customerFile"
  class="org.springframework.core.io.FileSystemResource" scope="step">
  <beans:constructor-arg value="#{jobParameters[customerFile]}"/>
</beans:bean>

<beans:bean id="customerFileReader"
  class="org.springframework.batch.item.file.FlatFileItemReader">
  <beans:property name="resource" ref="customerFile"/>
  <beans:property name="lineMapper">
    <beans:bean
      class="org.springframework.batch.item.file.mapping.DefaultLineMapper">
      <beans:property name="lineTokenizer">
        <beans:bean class="org.springframework.batch.item.file.transform.
DelimitedLineTokenizer">
          <beans:property name="names"
            value="firstName,middleInitial,lastName,address,city,state,zip"/>
          <beans:property name="delimiter" value=","/>
        </beans:bean>
      </beans:property>
      <beans:property name="fieldSetMapper">
        <beans:bean class="org.springframework.batch.item.file.mapping.
BeanWrapperFieldSetMapper">
          <beans:property name="prototypeBeanName" value="customer"/>
        </beans:bean>
      </beans:property>
    </beans:bean>
  </beans:property>
</beans:bean>
<beans:bean id="customer" class="com.apress.springbatch.chapter9.Customer"
scope="prototype"/>
<beans:bean id="outputFile"
class="org.springframework.core.io.FileSystemResource" scope="step">
<beans:constructor-arg value="#{jobParameters[outputFile]}"/>
</beans:bean>
<beans:bean id="xmlOutputWriter"
class="org.springframework.batch.item.xml.StaxEventItemWriter">
<beans:property name="resource" ref="outputFile" />
<beans:property name="marshaller" ref="customerMarshaller" />
<beans:property name="rootTagName" value="customers" />
</beans:bean>
<beans:bean id="customerMarshaller"
class="org.springframework.oxm.xstream.XStreamMarshaller">
<beans:property name="aliases">
<util:map>
<beans:entry key="customer"
value="com.apress.springbatch.chapter9.Customer" />
</util:map>
</beans:property>
</beans:bean>
...JmsReader and JmsWriter are configured the same way. Both of them are basic Spring beans with a reference to the JmsTemplate configured in Listing 9-48. In Listing 9-50, you see the configuration of JmsItemReader, JmsItemWriter, and the job to put all the readers/writers to work.
Example 9.50. JmsItemReader and JmsItemWriter and the Job that Uses Them
...
<beans:bean id="jmsReader"
  class="org.springframework.batch.item.jms.JmsItemReader">
  <beans:property name="jmsTemplate" ref="jmsTemplate"/>
</beans:bean>

<beans:bean id="jmsWriter"
  class="org.springframework.batch.item.jms.JmsItemWriter">
  <beans:property name="jmsTemplate" ref="jmsTemplate"/>
</beans:bean>

<step id="formatFileInputStep">
  <tasklet>
    <chunk reader="customerFileReader" writer="jmsWriter"
      commit-interval="10"/>
  </tasklet>
</step>

<step id="formatFileOutputStep">
  <tasklet>
<chunk reader="jmsReader" writer="xmlOutputWriter" commit-interval="10"/> </tasklet> </step> <job id="formatJob"> <step id="step1" parent="formatFileInputStep" next="step2"/> <step id="step2" parent="formatFileOutputStep"/> </job> ...
That's all it takes! With all the resources configured, building and running this job is no different than any of the others you've executed. However, when you run this job, notice that nothing obvious is outputted from step 1 to tell you that anything happened besides looking into the JobRepository or browsing the queue before the second step executes. When you look at the XML generated in step 2, you can see that the messages have successfully been passed through the queue as expected. Listing 9-51 shows a sample of the XML generated by this job.
Example 9.51. Sample Output from the JMS Version of formatJob
<?xml version="1.0" encoding="UTF-8"?>
<customers>
<customer>
<id>0</id>
<firstName>Richard</firstName>
<middleInitial>N</middleInitial>
<lastName>Darrow</lastName>
<address>5570 Isabella Ave</address>
<city>St. Louis</city>
<state>IL</state>
<zip>58540</zip>
</customer>
<customer>
<id>0</id>
<firstName>Warren</firstName>
<middleInitial>L</middleInitial>
<lastName>Darrow</lastName>
<address>4686 Mt. Lee Drive</address>
<city>St. Louis</city>
<state>NY</state>
<zip>94935</zip>
</customer>
    ...
</customers>
By using Spring's JmsTemplate, Spring Batch exposes the full power of Spring's JMS processing capabilities to the batch processes with minimal effort. The next section looks at a writer you may not have thought about: it lets you send e-mail from batch processes.
The ability to send an e-mail may sound very useful. Heck, when a job completes, it might be handy to receive an e-mail that things ended nicely. However, that isn't what this ItemWriter is for. It's an ItemWriter, which means it's called once for each item processed in the step where it's used. If you want to run your own spam operation, this is the ItemWriter for you! This section looks at how to use Spring Batch's SimpleMailMessageItemWriter to send e-mails from jobs.
Although you probably won't be using this ItemWriter to write a spam-processing program, you can use it for other things as well. Let's say the customer file you've been processing up to this point is really a customer import file; after you import all the new customers, you want to send a welcome e-mail to each one. Using the org.springframework.batch.item.mail.SimpleMailMessageItemWriter is a perfect way to do that.
For this example, you have a two-step process as you did in the JMS example. The first step imports the customer.csv file into the customer database table. The second step reads all the customers that have been imported and sends them the welcome e-mail. Figure 9-6 shows the flow for this job.

Before you begin coding, let's look at SimpleMailMessageItemWriter. Like all other ItemWriters, it implements the ItemWriter interface by executing a single write method that takes a list of objects. However, unlike the ItemWriters you've looked at up to this point, SimpleMailMessageItemWriter doesn't take just any item. Sending an e-mail requires more information than the text of the e-mail. It needs a subject, a to address, and a from address. Because of this, SimpleMailMessageItemWriter requires that the list of objects it takes contain objects that extend Spring's SimpleMailMessage. By doing this, SimpleMailMessageItemWriter has all the information it needs to build the e-mail message.
But does that mean any item you read in must extend SimpleMailMessage? That seems like a poor job of decoupling e-mail functionality from business logic—which is why you don't have to do that. If you remember, Chapter 8 talked about how ItemProcessors don't need to return an object of the same type they receive. For example, you can receive a Car object but return an object of type House. In this case, you create an ItemProcessor that takes in the Customer object and returns the required SimpleMailMessage.
To make this work, you reuse the same input file format with a single field appended to the end: the customer's e-mail address. Listing 9-52 shows an example of the input file you're processing.
Example 9.52. customerWithEmail.csv
Ann,A,Smith,2501 Mt. Lee Drive,Miami,NE,62935,[email protected]
Laura,B,Jobs,9542 Isabella Ave,Aurora,FL,62344,[email protected]
Harry,J,Williams,1909 4th Street,Seatle,TX,48548,[email protected]
Larry,Y,Minella,7839 S. Greenwood Ave,Miami,IL,65371,[email protected]
Richard,Q,Jobs,9732 4th Street,Chicago,NV,31320,[email protected]
Ann,P,Darrow,4195 Jeopardy Lane,Aurora,CA,24482,[email protected]
Larry,V,Williams,3075 Wall Street,St. Louis,NY,34205,[email protected]
Michael,H,Gates,3219 S. Greenwood Ave,Boston,FL,24692,[email protected]
Harry,H,Johnson,7520 Infinite Loop Drive,Hollywood,MA,83983,[email protected]
Harry,N,Ellison,6959 4th Street,Hollywood,MO,70398,[email protected]
To handle the need for an e-mail address per customer, you need to add an e-mail field to the Customer object as well. Listing 9-53 shows the updated Customer class.
Example 9.53. Customer.java Updated with an E-mail Field
package com.apress.springbatch.chapter9;

import java.io.Serializable;

import javax.persistence.Entity;
import javax.persistence.GeneratedValue;
import javax.persistence.GenerationType;
import javax.persistence.Id;
import javax.persistence.Table;

@Entity
@Table(name="customer")
public class Customer implements Serializable {
    private static final long serialVersionUID = 1L;

    @Id
    @GeneratedValue(strategy = GenerationType.IDENTITY)
    private long id;
    private String firstName;
    private String middleInitial;
    private String lastName;
    private String address;
    private String city;
    private String state;
    private String zip;
    private String email;

    // Accessors go here
    ...
}
Because the job is storing the customer information in the database, let's take a quick look at how that interaction works. To start, Figure 9-7 has the data model for the Customer table you use in this example.
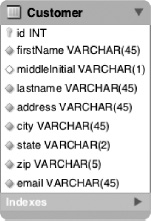
To write to the database, you use JdbcBatchItemWriter as you did earlier in this chapter. If you remember, JdbcBatchItemWriter depends on three things: a datasource, a prepared statement, and an implementation of the ItemPreparedStatementSetter interface to populate the prepared statement with values from the Customer item. Listing 9-54 has the code for CustomerItemPreparedStatementSetter.
Example 9.54. CustomerItemPreparedStatementSetter.java
package com.apress.springbatch.chapter9;

import java.sql.PreparedStatement;
import java.sql.SQLException;

import org.springframework.batch.item.database.ItemPreparedStatementSetter;

public class CustomerItemPreparedStatementSetter implements
        ItemPreparedStatementSetter<Customer> {

    public void setValues(Customer customer, PreparedStatement ps)
            throws SQLException {

        ps.setString(1, customer.getFirstName());
        ps.setString(2, customer.getMiddleInitial());
        ps.setString(3, customer.getLastName());
        ps.setString(4, customer.getAddress());
        ps.setString(5, customer.getCity());
        ps.setString(6, customer.getState());
        ps.setString(7, customer.getZip());
        ps.setString(8, customer.getEmail());

    }
}
On the flip side, after you've imported the Customer items into the database, you need to read them out again in the second step. For this step, you use the JdbcCursorItemReader discussed back in Chapter 7. Like JdbcBatchItemWriter, JdbcCursorItemReader also depends on a datasource. However, this ItemReader only needs an SQL statement instead of a prepared statement, and it needs a RowMapper implementation to map the returned ResultSet into items you can process. The CustomerRowMapper implementation is shown in Listing 9-55.
Example 9.55. CustomerRowMapper.java
package com.apress.springbatch.chapter9;

import java.sql.ResultSet;
import java.sql.SQLException;

import org.springframework.jdbc.core.RowMapper;

public class CustomerRowMapper implements RowMapper<Customer> {
@Override
public Customer mapRow(ResultSet rs, int arg1) throws SQLException {
Customer customer = new Customer();
customer.setAddress(rs.getString("address"));
customer.setCity(rs.getString("city"));
customer.setEmail(rs.getString("email"));
customer.setFirstName(rs.getString("firstName"));
customer.setId(rs.getLong("id"));
customer.setLastName(rs.getString("lastName"));
customer.setMiddleInitial(rs.getString("middleInitial"));
customer.setState(rs.getString("state"));
customer.setZip(rs.getString("zip"));
return customer;
}
}Now that the Customer class can handle e-mails, you need to do one other piece of coding for the job before you wire it up. As mentioned previously, this job needs an ItemProcessor to convert the Customer objects into the required SimpleMailMessages. Listing 9-56 shows the simple converter you use for this.
Example 9.56. CustomerEmailConverter.java
package com.apress.springbatch.chapter9;

import org.springframework.batch.item.ItemProcessor;
import org.springframework.mail.SimpleMailMessage;

public class CustomerEmailConverter implements
    ItemProcessor<Customer, SimpleMailMessage> {

    private static final String EMAIL_TEMPLATE =
        "Welcome %s,
You were imported into the system using Spring Batch!";

    @Override
    public SimpleMailMessage process(Customer customer) throws Exception {
        SimpleMailMessage mail = new SimpleMailMessage();

        mail.setFrom("[email protected]");
        mail.setTo(customer.getEmail());
        mail.setSubject("Welcome!");
        mail.setText(String.format(EMAIL_TEMPLATE,
            new Object[] {customer.getFirstName(), customer.getLastName()}));

        return mail;
    }
}
That's all the code you need to write! However, to get it to compile, you need to update the POM file to include the Java mail dependencies. Listing 9-57 shows the additions required to build the updated project.
Example 9.57. Java Mail Dependency
...
<dependency>
    <groupId>javax.mail</groupId>
    <artifactId>mail</artifactId>
    <version>1.4</version>
</dependency>
...
To wire all this up, start by configuring Spring to be able to send e-mails in the first place. Using Spring's org.springframework.mail.javamail.JavaMailSenderImpl lets you configure where the SMTP server is and the appropriate values for it. Listing 9-58 shows the configuration that goes in launch-context.xml for this bean.
Example 9.58. Configuring JavaMailSenderImpl
...
<bean id="javaMailSender"
  class="org.springframework.mail.javamail.JavaMailSenderImpl">
  <property name="host" value="smtp.gmail.com"/>
  <property name="port" value="587"/>
  <property name="username" value="someusername"/>
  <property name="password" value="somepassword"/>
  <property name="javaMailProperties">
    <props>
      <prop key="mail.smtp.auth">true</prop>
      <prop key="mail.smtp.starttls.enable">true</prop>
    </props>
  </property>
</bean>
...
To be able to test the e-mail sending capabilities, you use Google's Gmail SMTP functionality as the mail server. Listing 9-58 shows the configuration required. All you need to do is replace the username and password with your Gmail username and password.[28]
Next, you can move on to configuring the job to process the new customers. To configure the input for the first step, you configure a resource to read from that is passed from the command line, and a FlatFileItemReader that reads in the customerWithEmail.csv file. The writer for step 1 consists of the previously mentioned JdbcBatchItemWriter using the dataSource, a provided preparedStatement, and the CustomerItemPreparedStatementSetter coded in Listing 9-54. Listing 9-59 shows how you wire that up for the first step in the job.
Example 9.59. ItemReader and ItemWriter for Step 1
...
<beans:bean id="customerFile"
  class="org.springframework.core.io.FileSystemResource" scope="step">
  <beans:constructor-arg value="#{jobParameters[customerFile]}"/>
</beans:bean>

<beans:bean id="customerFileReader"
  class="org.springframework.batch.item.file.FlatFileItemReader">
  <beans:property name="resource" ref="customerFile"/>
  <beans:property name="lineMapper">
  <beans:bean
    class="org.springframework.batch.item.file.mapping.DefaultLineMapper">
    <beans:property name="lineTokenizer">
      <beans:bean class="org.springframework.batch.item.file.transform.
DelimitedLineTokenizer">
        <beans:property name="names"
          value="firstName,middleInitial,lastName,address,city,state,zip,
email"/>
        <beans:property name="delimiter" value=","/>
      </beans:bean>
    </beans:property>
    <beans:property name="fieldSetMapper">
        <beans:bean class="org.springframework.batch.item.file.mapping.
BeanWrapperFieldSetMapper">
          <beans:property name="prototypeBeanName" value="customer"/>
        </beans:bean>
      </beans:property>
    </beans:bean>
  </beans:property>
</beans:bean>

<beans:bean id="customer" class="com.apress.springbatch.chapter9.Customer"
  scope="prototype"/>

<beans:bean id="jdbcBatchWriter"
  class="org.springframework.batch.item.database.JdbcBatchItemWriter">
  <beans:property name="dataSource" ref="dataSource"/>
  <beans:property name="sql" value="insert into customer (firstName, middleInitial, lastName, address, city, state, zip, email) values (?, ?, ?, ?, ?, ?, ?, ?)"/>
  <beans:property name="itemPreparedStatementSetter"
    ref="preparedStatementSetter"/>
</beans:bean>

<beans:bean id="preparedStatementSetter"
  class="com.apress.springbatch.chapter9.
CustomerItemPreparedStatementSetter"/>
...
None of the configuration in Listing 9-59 should be new, because you've seen it previously. The new parts come when you configure step 2. For step 2, you're using a JdbcCursorItemReader with the CustomerRowMapper you coded in Listing 9-55, along with the CustomerEmailConverter from Listing 9-56 as the ItemProcessor, and finally SimpleMailMessageItemWriter as the ItemWriter. Listing 9-60 shows the configuration of the beans required for step 2 along with the job configuration.
Example 9.60. Step2 and the Job Configuration
...
<beans:bean id="customerItemReader"
  class="org.springframework.batch.item.database.JdbcCursorItemReader">
  <beans:property name="dataSource" ref="dataSource"/>
  <beans:property name="sql" value="select * from customer"/>
  <beans:property name="rowMapper" ref="customerRowMapper"/>
</beans:bean>

<beans:bean id="customerRowMapper"
  class="com.apress.springbatch.chapter9.CustomerRowMapper"/>

<beans:bean id="simpleEmailWriter"
  class="org.springframework.batch.item.mail.SimpleMailMessageItemWriter">
  <beans:property name="mailSender" ref="javaMailSender"/>
</beans:bean>

<beans:bean id="emailConverter"
  class="com.apress.springbatch.chapter9.CustomerEmailConverter"/>

<step id="importFileStep">
  <tasklet>
    <chunk reader="customerFileReader" writer="jdbcBatchWriter"
      commit-interval="10"/>
  </tasklet>
</step>

<step id="emailCustomersStep">
  <tasklet>
    <chunk reader="customerItemReader" processor="emailConverter"
      writer="simpleEmailWriter" commit-interval="10"/>
  </tasklet>
</step>

<job id="formatJob">
  <step id="step1" parent="importFileStep" next="step2"/>
  <step id="step2" parent="emailCustomersStep"/>
</job>
...
That's all there is to it! You can build this job with mvn clean install from the command line and run it with the command listed in Listing 9-61 to process the input file and send out the e-mails.
Example 9.61. Executing the E-mail Job
java -jar itemWriters-0.0.1-SNAPSHOT.jar jobs/emailFormatJob.xml formatJob
customerFile=/input/customerWithEmail.csv
When the job is complete, you can check your e-mail inbox as shown in Figure 9-8 to see that the customers have successfully received their e-mails.
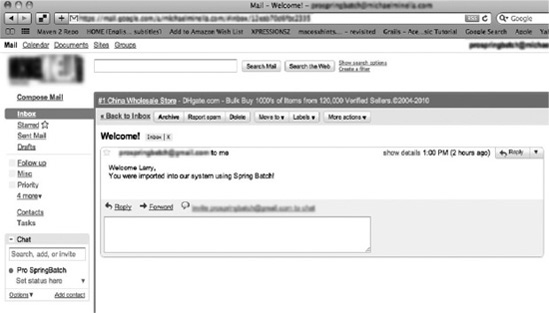
Spring Batch provides a full collection of ItemWriters to handle the vast majority of output handling that you need to be able to do. The next section looks at how you can use the individual features of each of these ItemWriters together to address more complex output scenarios, such as writing to multiple places based on a number of scenarios.
As part of your new system, you have the requirement to extract customer data into two different formats. You need an XML file for the Sale's department's customer relationship management (CRM) application. You also need a CSV for the billing department's database import system. The issue is, you expect to extract one million customers.
Using the tools discussed up to this point, you would be stuck looping through the one million items twice (once for a step that outputs the XML file and once for the step that outputs the CSV file) or creating a custom ItemWriter implementation to write to each file as an item is processed. Neither option is what you're looking for. The first will take too long, tying up resources; and the other requires you to code and test something that the framework should already provide. Fortunately for you, it does. This section looks at how you can use the various composite ItemWriters available in Spring Batch to address more complex output scenarios.
Chapter 7 looked at Spring Batch's ability to read from multiple files with the same format in a single step. Spring Batch provides a similar feature on the ItemWriter side as well. This section looks at how to generate multiple resources based on the number of items written to a file.
Spring Batch offers the ability to create a new resource after a given number of records has been processed. Say you want to extract all the customer records and write them to XML files with only 10 customers per file. To do that, you use MultiResourceItemWriter.
MultiResourceItemWriter dynamically creates output resources based on the number of records it has processed. It passes each item it processes to a delegate writer so that the actual writing piece is handled there. All MultiResourceItemWriter is responsible for is maintaining the current count and creating new resources as items are processed. Figure 9-9 shows the flow of a step using org.springframework.batch.item.file.MultiResourceItemWriter.
When the write method on MultiResourceItemWriter is called, it verifies that the current resource has been created and is open (if not, it creates and opens a new file) and passes the items to the delegate ItemWriter. Once the items have been written, it checks to see if the number of items written to the file has reached the configured threshold for a new resource. If it has, the current file is closed.
It's important to note that when MultiResourceItemWriter is processing, it doesn't create a new resource mid-chunk. It waits for the end of the chunk before creating a new resource. For example, if the writer is configured to roll the file after 15 items have been processed but the chunk size is configured to 20, MultiResourceItemWriter writes the 20 items in the chunk before creating a new resource.
MultiResourceItemWriter has five available dependencies you can configure. Table 9-4 shows each one and how they're used.
Table 9.4. MultiResourceItemWriter Configuration Options
Option | Type | Default | Description |
|---|---|---|---|
|
|
| The delegate ItemWriter that the |
|
|
| The number of items to write to each resource. |
|
|
| A prototype of the resources to be created by |
|
|
| Optionally, |
|
|
| If |
To see how this works, you extract customers from the database and create XML files containing 10 customers each. To make this work, you don't need to develop any new code (you created the XML). All you need to do is wire everything up. Let's start working with this example by looking at the configuration for the job.
Listing 9-62 shows the configuration for the ItemReader in this example. In this case, it's a simple JdbcCursorItemReader configured to select all customers. From there, you pass the customers you receive from the database to the ItemWriter you configure next.
Example 9.62. The multiResource formatJob's ItemReader
...
<beans:bean id="customerItemReader"
  class="org.springframework.batch.item.database.JdbcCursorItemReader">
  <beans:property name="dataSource" ref="dataSource"/>
  <beans:property name="sql" value="select * from customer"/>
  <beans:property name="rowMapper" ref="customerRowMapper"/>
</beans:bean>

<beans:bean id="customerRowMapper"
  class="com.apress.springbatch.chapter9.CustomerRowMapper"/>
...
The configuration for this ItemWriter is in layers. First you configure the StaxEventItemWriter that you use for the XML generation. With that configured you layer MultiResourceItemWriter on top to generate multiple resources the StaxEventItemWriter writes to. Listing 9-63 shows the configuration of the output half of the job as well as the step and job configuration.
Example 9.63. ItemWriters and Step and Job Configuration
...
<beans:bean id="outputFile"
  class="org.springframework.core.io.FileSystemResource" scope="step">
  <beans:constructor-arg value="#{jobParameters[outputFile]}"/>
</beans:bean>

<beans:bean id="xmlOutputWriter"
class="org.springframework.batch.item.xml.StaxEventItemWriter">
<beans:property name="marshaller" ref="customerMarshaller" />
<beans:property name="rootTagName" value="customers" />
</beans:bean>
<beans:bean id="customerMarshaller"
class="org.springframework.oxm.xstream.XStreamMarshaller">
<beans:property name="aliases">
<util:map>
<beans:entry key="customer"
value="com.apress.springbatch.chapter9.Customer" />
</util:map>
</beans:property>
</beans:bean>
<beans:bean id="multiResourceItemWriter"
class="org.springframework.batch.item.file.MultiResourceItemWriter">
<beans:property name="resource" ref="outputFile"/>
<beans:property name="delegate" ref="xmlOutputWriter"/>
<beans:property name="itemCountLimitPerResource" value="10"/>
</beans:bean>
<step id="formatFileStep">
<tasklet>
<chunk reader="customerItemReader" writer="multiResourceItemWriter"
commit-interval="10"/>
</tasklet>
</step>
<job id="formatJob">
<step id="step1" parent="formatFileStep"/>
</job>
...As you saw earlier, the configuration of the output for this job begins with the outputFile configuration. Although the file is generated by MultiResourceItemWriter, MultiResourceItemWriter uses this as a template for each new file (file location and file name specifically). In the case, the outputFile bean in Listing 9-63 serves as the template for the output file definition. With the file name configured, you can configure xmlOutputWriter and customerMarshaller to generate the XML as required. Although similar, it's important to note that xmlOutputWriter doesn't have a direct reference to the output file. Instead, multiResourceItemWriter provides it when needed.
For this example, multiResourceItemWriter uses three dependencies: the resource you configured previously, the xmlOutputWriter that does the actual work of writing to the files it creates, and the number of customers that the ItemWriter writes per file (itemCountLimitPerResource)—10 in this case. The last piece for this job is configuring the step and job to put them to use. The configuration for the job itself is straightforward, as Listing 9-63 shows. To use this job, you use the command listed in Listing 9-64.
Example 9.64. Command Used to Execute the multiResource Job
java -jar itemWriters-0.0.1-SNAPSHOT.jar jobs/multiResourceFormatJob.xml
formatJob outputFile=/output/custOutputs
When you look at the output of this job, you find in the /output directory one file for every 10 customers currently loaded in the database. However, Spring Batch did something interesting. First, note that you didn't pass in a file extension on the outputFile parameter you passed into the job. This was for a reason. If you look at the directory listing shown in Listing 9-65, you see that MultiResourceItemWriter added a .X to each file, where X is the number of the file that was created.
Example 9.65. File Names Created by the Job
michael-minellas-macbook-pro:temp mminella$ ls /output/
custOutputs.1custOutputs.2custOutputs.4custOutputs.6custOutputs.8
custOutputs.10  custOutputs.3custOutputs.5custOutputs.7custOutputs.9
Although it makes sense that you need to distinguish each file name from another, this may or may not be a workable solution for how to name the files (they don't exactly open nicely with your favorite editor by default). Because of that, Spring Batch lets you to configure the suffix for each file created. You do that by implementing the org.springframework.batch.item.file.ResourceSuffixCreator interface and adding that as a dependency to the multiResourceItemWriter bean. When the MultiResourceItemWriter is creating a new file, it uses ResourceSuffixCreator to generate a suffix that it tacks onto the end of the new file's name. Listing 9-66 shows the suffix creator for the example.
Example 9.66. CustomerOutputFileSuffixCreator
package com.apress.springbatch.chapter9;

import org.springframework.batch.item.file.ResourceSuffixCreator;

public class CustomerOutputFileSuffixCreator implements ResourceSuffixCreator {

    @Override
    public String getSuffix(int arg0) {
        return arg0 + ".xml";
    }
}
In Listing 9-66, you implement the ResourceSuffixCreator's only method, getSuffix, and return a suffix of the number provided and an .xml extension. The number provided is the number file that is being created. If you were to re-create the same extension as the default, you would return a dot plus the number provided.
To use CustomerOutputFileSuffixCreator, you configure it as a bean and add it as a dependency to the multiResourceItemWriter bean using the property resourceSuffixCreator. Listing 9-67 shows the added configuration.
Example 9.67. Configuring CustomerOutputFileSuffixCreator
...
<beans:bean id="customerSuffixCreator"
  class="com.apress.springbatch.chapter9.CustomerOutputFileSuffixCreator"/>

<beans:bean id="multiResourceItemWriter"
  class="org.springframework.batch.item.file.MultiResourceItemWriter">
  <beans:property name="resource" ref="outputFile"/>
<beans:property name="delegate" ref="xmlOutputWriter"/>
  <beans:property name="itemCountLimitPerResource" value="10"/>
  <beans:property name="resourceSuffixCreator" ref="customerSuffixCreator"/>
</beans:bean>
...
By running the job again with the additional configuration provided in Listing 9-67, you get a slightly different result, as shown in Listing 9-68.
Example 9.68. Results Using ResourceSuffixCreator
michael-minellas-macbook-pro:output mminella$ ls /output/
custOutputs1.xml      custOutputs2.xml    custOutputs4.xml    custOutputs6.xml
custOutputs8.xml
custOutputs10.xml    custOutputs3.xml    custOutputs5.xml    custOutputs7.xml
custOutputs9.xml
You surely agree that the file names in Listing 9-68 are more like what you would expect when generating XML files.
When creating files, whether a single file for a step/job or multiple files as you saw in the previous example, it's common to need to be able to generate a header or footer on the file. You can use a header to define the format of a flat file (what fields exist in a file or in what order) or include a separate, non-item-related section in an XML file. A footer may include the number of records processed in the file or totals to use as integrity checks after a file has been processed. This section looks at how to generate header and footer records using Spring Batch's callbacks available for them.
When opening or closing a file, Spring Batch provides the ability to add either a header or footer (whichever is appropriate) to your file. Adding a header or footer to a file means different things based on whether it's a flat file or an XML file. For a flat file, adding a header means adding one or more records to the top or bottom of the file. For an XML file, you may want to add an XML segment at either the top or bottom of the file. Because the generation of plain text for a flat file is different from generating an XML segment for an XML file, Spring Batch offers two different interfaces to implement and make this happen. Let's begin by looking at the XML callback interface, org.springframework.batch.item.xml.StaxWriterCallback.
The StaxWriterCallback interface consists of a single write method that is used to add XML to the current XML document. Spring Batch executes a configured callback once at either the header or footer of the file (based on the configuration). To see how this works, in this example you write a StaxWriterCallback implementation that adds an XML fragment containing the name of the person who wrote the job (me). Listing 9-69 shows the code for the implementation.
Example 9.69. CustomerXmlHeaderCallback
package com.apress.springbatch.chapter9;

import java.io.IOException;

import javax.xml.stream.XMLEventFactory;
import javax.xml.stream.XMLEventWriter;
import javax.xml.stream.XMLStreamException;

import org.springframework.batch.item.xml.StaxWriterCallback;

public class CustomerXmlHeaderCallback implements StaxWriterCallback {

    @Override
    public void write(XMLEventWriter writer) throws IOException {
        XMLEventFactory factory = XMLEventFactory.newInstance();

        try {
            writer.add(factory.createStartElement("", "", "identification"));
            writer.add(factory.createStartElement("", "", "author"));
            writer.add(factory.createAttribute("name", "Michael Minella"));
            writer.add(factory.createEndElement("", "", "author"));
            writer.add(factory.createEndElement("", "", "identification"));
        } catch (XMLStreamException xmlse) {
            System.err.println("An error occured: " + xmlse.getMessage());
            xmlse.printStackTrace(System.err);
        }
    }
}
Listing 9-69 shows CustomerXmlHeaderCallback. In the callback, you add two tags to the XML file: an identification section and a single author section. The author section contains a single attribute called name with the value Michael Minella. To create a tag, you use the javax.xml.stream.XMLEventFactory's createStartElement and createEndElement methods. Each of these methods takes three parameters: a prefix, a namespace, and the name of the tag. Because you aren't using a prefix or namespace, you pass in empty strings for those. To put this implementation to use, you need to configure StaxEventItemWriter to call the callback as the headerCallback. Listing 9-70 shows the configuration for this example.
Example 9.70. XML Configuration for CustomerXmlHeaderCallback
...
<beans:bean id="xmlOutputWriter"
  class="org.springframework.batch.item.xml.StaxEventItemWriter">
  <beans:property name="marshaller" ref="customerMarshaller" />
  <beans:property name="rootTagName" value="customers" />
  <beans:property name="headerCallback" ref="customerHeaderCallback"/>
</beans:bean>

<beans:bean id="customerHeaderCallback"
  class="com.apress.springbatch.chapter9.CustomerXmlHeaderCallback"/>
...
When you execute the multiresource job from the previous example using the header configuration in Listing 9-70, each of the output files begins with the XML fragment as shown in Listing 9-71.
Example 9.71. XML Header
<?xml version="1.0" encoding="UTF-8"?>
<customers>
<identification>
<author name="Michael Minella"/>
</identification>
<customer>
    ...
As you can see, adding an XML fragment at either the start or end of an XML file is quite easy. Implement the StaxWriterCallback interface and configure the ItemWriter to call it as either the header or the footer, and you're done!
Next you can look at adding headers and footers to a flat file. Unlike the XML header and footer generation that use the same interface for either, writing a header in a flat file requires the implementation of a different interface than that of a footer. For the header, you implement the org.springframework.batch.item.file.FlatFileHeaderCallback interface; and for the footer, you implement the org.springframework.batch.item.file.FlatFileFooterCallback interface. Both consist of a single method: writeHeader and writeFooter, respectively. Let's look at how to write a footer that writes the number of records you've processed in the current file.
For this example, you use the MultiResourceItemWriter to write files with 10 formatted records in each record plus a single footer record that states how many records were written in each file. To be able to keep count of the number of items you've written into a file, you need to decorate the writers with the appropriate functionality. Figure 9-10 shows the layering of the ItemWriters required for the example.
As Figure 9-10 shows, the writer that does the heavy lifting in this example is a regular FlatFileItemWriter. But you decorate that ItemWriter with your own implementation that keeps track of the number of items that have been written and implement the FlatFileFooterCallback interface. Finally you use MultiResourceItemWriter to create the resources as needed.
Because the only code you need to write for this example is the CustomerWriterWithFooter class, you can start there. This class implements two interfaces: FlatFileFooterCallback as well as org.springframework.batch.item.file.ResourceAwareItemWriterItemStream. You implement FlatFileFooterCallback so you can use the data compiled while you write the items to write the footer. The ResourceAwareItemWriterItemStream interface is implemented so MultiResourceItemWriter can inject the resource into the ItemWriter as they're created. If you didn't use this interface, you would be required to inject a single resource at startup, which is not what you require. For all practical purposes, the methods required by the ResourceAwareItemWriterItemStream interface are just passthroughs to the FlatFileItemWriter it wraps. Listing 9-72 shows the implementation of the CustomerWriterWithFooter class.
Example 9.72. CustomerWriterWithFooter
package com.apress.springbatch.chapter9;

import java.io.IOException;
import java.io.Writer;
import java.util.List;

import org.springframework.batch.item.ExecutionContext;
import org.springframework.batch.item.ItemStreamException;
import org.springframework.batch.item.file.FlatFileFooterCallback;
import org.springframework.batch.item.file.ResourceAwareItemWriterItemStream;
import org.springframework.core.io.Resource;

public class CustomerWriterWithFooter implements
    ResourceAwareItemWriterItemStream<Customer>, FlatFileFooterCallback {

    private ResourceAwareItemWriterItemStream<Customer> delegate;
    private int itemsProcessedSoFar = 0;

    @Override
    public void writeFooter(Writer writer) throws IOException {
        writer.write("At the end of this file, you have written " +
                     itemsProcessedSoFar + " items");
    }

    @Override
    public void write(List<? extends Customer> items) throws Exception {
        itemsProcessedSoFar += items.size();

        delegate.write(items);
    }

    public void setDelegate(
        ResourceAwareItemWriterItemStream<Customer> delegate) {
        this.delegate = delegate;
    }

    @Override
    public void close() throws ItemStreamException {
        delegate.close();
    }

    @Override
    public void open(ExecutionContext executionContext)
        throws ItemStreamException {
        if(executionContext.containsKey("records.processed")) {
            itemsProcessedSoFar = Integer.parseInt(executionContext
                                       .get("records.processed").toString());
        }
delegate.open(executionContext);
}
@Override
public void update(ExecutionContext executionContext)
throws ItemStreamException {
executionContext.put("records.processed", itemsProcessedSoFar);
delegate.update(executionContext);
}
@Override
public void setResource(Resource arg0) {
itemsProcessedSoFar = 0;
delegate.setResource(arg0);
}
}As you can see in Listing 9-72 when a resource is set on the ItemWriter, the counter (itemsProcessedSoFar) is set to 0. As items are written via the write method, the counter is incremented accordingly. When the writeFooter method is called, the counter is used in the footer output to list the number of records that are in the file that is being closed.
There are three other methods to take note of in this implementation: open, update, and close. The open and update methods end up being more than just passthroughs to make this ItemWriter restartable. Because the ItemWriter has its own state (the number of records that have been processed in the current file), you want to save that in the ExecutionContext in case the job fails. The update method is used to save that value during processing. The open method is used to reset where you left off in the event the job is restarted. The close method serves as only a passthrough to the delegate so that it can close the file as required.
To configure the various ItemWriters required for this example, Listing 9-73 shows the required XML. You begin with the input, reading the customer records out of the Customer table. From there, you configure the three ItemWriter implementations. The first is FlatFileItemWriter and its required LineAggregator. From there, you configure customerWriter, which is the implementation of the ItemWriter (ResourceAwareItemReaderItemStream is a sub-interface of the ItemReader interface) in Listing 9-72. Finally, you have the multiResourceItemWriter you've used previously. Listing 9-73 finishes with the configuration of the step and job.
Example 9.73. customerFooterFormatJob.xml
<?xml version="1.0" encoding="UTF-8"?>
<beans:beans xmlns="http://www.springframework.org/schema/batch"
  xmlns:beans="http://www.springframework.org/schema/beans"
  xmlns:util="http://www.springframework.org/schema/beans"
  xmlns:xsi="http://www.w3.org/2001/XMLSchema-instance"
  xsi:schemaLocation="http://www.springframework.org/schema/beans
    http://www.springframework.org/schema/beans/spring-beans-3.0.xsd
    http://www.springframework.org/schema/util
    http://www.springframework.org/schema/util/spring-util.xsd
    http://www.springframework.org/schema/batch
    http://www.springframework.org/schema/batch/spring-batch-2.1.xsd">

  <beans:import resource="../launch-context.xml"/>
<beans:bean id="customerItemReader"
class="org.springframework.batch.item.database.JdbcCursorItemReader">
<beans:property name="dataSource" ref="dataSource"/>
<beans:property name="sql" value="select * from customer"/>
<beans:property name="rowMapper" ref="customerRowMapper"/>
</beans:bean>
<beans:bean id="customerRowMapper"
class="com.apress.springbatch.chapter9.CustomerRowMapper"/>
<beans:bean id="outputFile"
class="org.springframework.core.io.FileSystemResource" scope="step">
<beans:constructor-arg value="#{jobParameters[outputFile]}"/>
</beans:bean>
<beans:bean id="flatFileOutputWriter"
class="org.springframework.batch.item.file.FlatFileItemWriter">
<beans:property name="lineAggregator" ref="formattedLineAggregator"/>
<beans:property name="appendAllowed" value="true"/>
<beans:property name="footerCallback" ref="customerWriter"/>
</beans:bean>
<beans:bean id="formattedLineAggregator"
class="org.springframework.batch.item.file.transform.
FormatterLineAggregator">
<beans:property name="fieldExtractor">
<beans:bean class="org.springframework.batch.item.file.transform.
BeanWrapperFieldExtractor">
<beans:property name="names"
value="firstName,lastName,address,city,state,zip"/>
</beans:bean>
</beans:property>
<beans:property name="format" value="%s %s lives at %s %s in %s, %s."/>
</beans:bean>
<beans:bean id="customerWriter"
class="com.apress.springbatch.chapter9.CustomerWriterWithFooter">
<beans:property name="delegate" ref="flatFileOutputWriter"/>
</beans:bean>
<beans:bean id="multiResourceItemWriter"
class="org.springframework.batch.item.file.MultiResourceItemWriter">
<beans:property name="resource" ref="outputFile"/>
<beans:property name="delegate" ref="customerWriter"/>
<beans:property name="itemCountLimitPerResource" value="10"/>
</beans:bean>
<step id="formatFileStep">
<tasklet>
<chunk reader="customerItemReader" writer="multiResourceItemWriter"
commit-interval="10"/>
</tasklet></step>
<job id="formatJob">
<step id="step1" parent="formatFileStep"/>
</job>
</beans:beans>Writing to multiple files based on the number of records per file is made easy using MultiResourceItemWriter. Spring's ability to add a header and/or footer record is also managed in a simple and practical way using the appropriate interfaces and configuration. The next section looks at how to write the same item to multiple writers with the addition of no code.
Although it may not seem like it, the examples you've reviewed in this chapter up to this point have been simple. A step writes to a single output location. That location may be a database, a file, an e-mail, and so on, but they each have written to one endpoint. However, it's not always that simple. An enterprise may need to write to a database that a web application uses as well as a data warehouse. While items are being processed, various business metrics may need to be recorded. Spring Batch allows you to write to multiple places as you process each item of a step. This section looks at how the CompositeItemWriter lets a step write items to multiple ItemWriters.
Like most things in Spring Batch, the ability to call multiple ItemWriters for each item you process is quite easy. Before you get into the code, however, let's look at the flow of writing to multiple ItemWriters with the same item. Figure 9-11 shows a sequence diagram of the process.
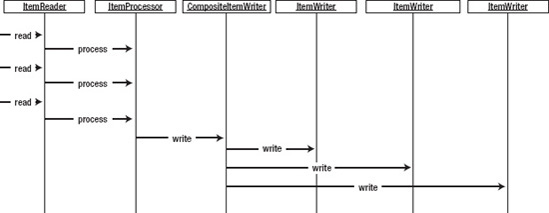
As Figure 9-11 shows, reading in occurs one at a time, as does processing. However, the diagram also shows that writing occurs in chunks as you would expect, calling each ItemWriter with the items in the current chunk in the order they're configured.
To look at how this feature works, you create a job that reads in the customerWithEmail.csv file from earlier in the chapter. let's start with the input. Listing 9-74 shows the configuration to read in the customerWithEmail.csv file.
Example 9.74. Reading in the customerWithEmail.csv File
...
<beans:bean id="customerFile"
  class="org.springframework.core.io.FileSystemResource" scope="step">
  <beans:constructor-arg value="#{jobParameters[customerFile]}"/>
</beans:bean>

<beans:bean id="customerFileReader"
  class="org.springframework.batch.item.file.FlatFileItemReader">
  <beans:property name="resource" ref="customerFile"/>
  <beans:property name="lineMapper">
    <beans:bean
      class="org.springframework.batch.item.file.mapping.DefaultLineMapper">
      <beans:property name="lineTokenizer">
        <beans:bean class="org.springframework.batch.item.file.transform.
DelimitedLineTokenizer">
          <beans:property name="names"
            value="firstName,middleInitial,lastName,address,city,state,zip,
email"/>
          <beans:property name="delimiter" value=","/>
        </beans:bean>
      </beans:property>
      <beans:property name="fieldSetMapper">
        <beans:bean class="org.springframework.batch.item.file.mapping.
BeanWrapperFieldSetMapper">
          <beans:property name="prototypeBeanName" value="customer"/>
        </beans:bean>
      </beans:property>
    </beans:bean>
  </beans:property>
</beans:bean>

<beans:bean id="customer" class="com.apress.springbatch.chapter9.Customer"
  scope="prototype"/>
...
Nothing in Listing 9-74 should be unfamiliar. You're using the same input file you used in the previous examples in this chapter. The configuration consists of the file reference (Resource), the configuration of the FlatFileItemReader using DelimitedLineTokenizer and BeanWrapperFieldSetMapper to read the file, and a reference to the Customer bean to create them as required.
On the output side, you need to create three ItemWriters: the XML writer and its dependencies, the JDBC writer and its dependencies, and the CompositeItemWriter that wraps both of the other writers. Listing 9-75 shows the configuration for the output of this step as well as the configuration for the step and job.
Example 9.75. Output, Step, and Job Configuration
...
<beans:bean id="outputFile"
  class="org.springframework.core.io.FileSystemResource" scope="step">
<beans:constructor-arg value="#{jobParameters[outputFile]}"/>
</beans:bean>

<beans:bean id="xmlOutputWriter"
  class="org.springframework.batch.item.xml.StaxEventItemWriter">
  <beans:property name="resource" ref="outputFile" />
  <beans:property name="marshaller" ref="customerMarshaller" />
  <beans:property name="rootTagName" value="customers" />
</beans:bean>

<beans:bean id="customerMarshaller"
  class="org.springframework.oxm.xstream.XStreamMarshaller">
  <beans:property name="aliases">
    <util:map>
      <beans:entry key="customer"
        value="com.apress.springbatch.chapter9.Customer" />
    </util:map>
  </beans:property>
</beans:bean>

<beans:bean id="jdbcBatchWriter"
  class="org.springframework.batch.item.database.JdbcBatchItemWriter">
  <beans:property name="dataSource" ref="dataSource"/>
  <beans:property name="sql" value="insert into customer (firstName, middleInitial, lastName, address, city, state, zip, email) values (?, ?, ?, ?, ?, ?, ?, ?)"/>
  <beans:property name="itemPreparedStatementSetter"
    ref="preparedStatementSetter"/>
</beans:bean>

<beans:bean id="preparedStatementSetter"
  class="com.apress.springbatch.chapter9.
CustomerItemPreparedStatementSetter"/>

<beans:bean id="customerCompositeWriter"
  class="org.springframework.batch.item.support.CompositeItemWriter">
  <beans:property name="delegates">
    <util:list>
      <util:ref bean="xmlOutputWriter"/>
      <util:ref bean="jdbcBatchWriter"/>
    </util:list>
  </beans:property>
</beans:bean>

<step id="formatFileStep">
  <tasklet>
    <chunk reader="customerFileReader" writer="customerCompositeWriter"
      commit-interval="10"/>
  </tasklet>
</step>

<job id="formatJob">
  <step id="step1" parent="formatFileStep"/>
</job> ...
The configuration for the ItemWriters is about what you would expect. You begin the configuration with the configuration of the output file (outputFile). From there, the XML writer you're using (xmlOutputWriter) is configured as in the example earlier on in the chapter. The JDBC ItemWriter is next, with the prepared statement configured and an ItemPreparedStatementSetter configured to set the values onto the PreparedStatement. Finally you get to the CompositeItemWriter definition (customerCompositeWriter). For customerCompositeWriter, you configure a list of ItemWriters for the wrapper to call. It's important to note that the ItemWriters is called in the order they're configured with all of the items in a chunk. So if there are 10 items in a chunk, the first ItemWriter is called with all 10 items followed by the next ItemWriter and so on. It's important to note that although the execution of the writing is serial (one writer at a time), all of the writes across all of the ItemWriters occur in the same transaction. Because of that, if an item fails to be written at any point in the chunk, the entire chunk is rolled back.
When you run this job as configured via the command java -jar itemWriters-0.0.1-SNAPSHOT.jar jobs/formatJob.xml formatJob customerFile=/input/customerWithEmail.csv outputFile=/output/xmlCustomer.xml, you can see that the output consists of all the records being written to both the database and an XML file. You would think that if the file had 100 customers in it, Spring Batch would consider this to be 200 writes. But if you look at what Spring Batch recorded in the JobRepository, it says that 100 writes were executed, as shown in Figure 9-12.
The reasoning is that Spring Batch is counting the number of items that were written. It doesn't care how many places you write the item to. If the job fails, the restart point depends on how many items you read and processed, not how many you wrote to each location (because those are rolled back anyway).
The CompositeItemWriter makes writing all the items to multiple locations easy. But sometimes you want to write some things to one place and some things to another place. The last ItemWriter you look at in this chapter is ClassifierCompositeItemWriter, which handles just that.
In Chapter 7, you looked at the scenario where you had a single file that contained multiple record types. Handling the ability to map different types of lines to different parsers and mappers so that each would end up in the correct object was no trivial task. But on the writing side, Spring Batch has made life a bit easier. This section looks at how ClassifierCompositeItemWriter allows you to choose where to write items based on a predetermined criteria.
org.springframework.batch.item.support.ClassifierCompositeItemWriter is used to look at items of different types, determine what ItemWriter they should be written to, and forward them accordingly. This functionality is based on two things: ClassifierCompositeItemWriter and an implementation of the org.springframework.batch.classify.Classifier interface. Let's start by looking at the Classifier interface.
The Classifier interface, shown in Listing 9-76, consists of a single method, classify. In the case of what ClassifierCompositeItemWriter uses a Classifier implementation for, the classify method accepts an item as input and returns the ItemWriter to write the item to. In essence, the Classifier implementation serves as a context, with the ItemWriters as strategy implementations.
Example 9.76. The Classifier Interface
package org.springframework.batch.classify;
public interface Classifier<C, T> {
T classify(C classifiable);
}ClassifierCompositeItemWriter takes a single dependency, an implementation of the Classifier interface. From there it gets the ItemWriter required for each item as it's processed.
Unlike the regular CompositeItemWriter, which writes all items to all ItemWriters, ClassifierCompositeItemWriter ends up with a different number of items written to each ItemWriter. Let's look at an example where you write all customers who live in a state that starts with the letters A through M to a flat file and items with a state name starting with the letters N through Z to the database.
As you've probably gathered, the Classifier implementation is the key to making CompositeItemWriter work, so that is where you start. To implement this Classifier as Listing 9-77 shows, you take a Customer object as the sole parameter to the classify method. From there, you use a regular expression to determine whether it should be written to a flat file or the database and return the ItemWriter as required.
Example 9.77. CustomerClassifier
package com.apress.springbatch.chapter9; import org.springframework.batch.classify.Classifier;
import org.springframework.batch.item.ItemWriter;
public class CustomerClassifier implements
Classifier<Customer, ItemWriter<Customer>> {
private ItemWriter<Customer> fileItemWriter;
private ItemWriter<Customer> jdbcItemWriter;
@Override
public ItemWriter<Customer> classify(Customer customer) {
if(customer.getState().matches("^[A-M].*")) {
return fileItemWriter;
} else {
return jdbcItemWriter;
}
}
public void setFileItemWriter(ItemWriter<Customer> fileItemWriter) {
this.fileItemWriter = fileItemWriter;
}
public void setJdbcItemWriter(ItemWriter<Customer> jdbcItemWriter) {
this.jdbcItemWriter = jdbcItemWriter;
}
}With the CustomerClassifier coded, you can configure the job and ItemWriters. You reuse the same input and individual ItemWriters you used in the CompositeItemWriter example in the previous section, leaving only ClassifierCompositeItemWriter to configure. The configuration for ClassifierCompositeItemWriter and CustomerClassifier is shown in Listing 9-78.
Example 9.78. Configuration of the ClassifierCompositeItemWriter and Dependencies
...
<beans:bean id="customerClassifier"
class="com.apress.springbatch.chapter9.CustomerClassifier">
<beans:property name="fileItemWriter" ref="xmlOutputWriter"/>
<beans:property name="jdbcItemWriter" ref="jdbcBatchWriter"/>
</beans:bean>
<beans:bean id="classifierWriter" class="org.springframework.batch.item.
support.ClassifierCompositeItemWriter">
<beans:property name="classifier" ref="customerClassifier"/>
</beans:bean>
<step id="formatFileStep">
<tasklet>
<chunk reader="customerFileReader" writer="classifierWriter"
commit-interval="10"/>
</tasklet>
</step><job id="classifierFormatJob"> <step id="step1" parent="formatFileStep"/> </job> ...
When you build and run classifierFormatJob via the statement java -jar itemWriters-0.0.1-SNAPSHOT.jar jobs/formatJob.xml formatJob customerFile=/input/customerWithEmail.csv outputFile=/output/xmlCustomer.xml, you're met with a bit of a surprise. It doesn't work. Instead of the normal output of Spring telling you the job completed as expected, you're met with an exception, as shown in Listing 9-79.
Example 9.79. Results of classifierFormatJob
2011-03-15 22:46:53,647 DEBUG main [org.springframework.batch.core.step.tasklet.TaskletStep]
- <Applying contribution: [StepContribution: read=10, written=0, filtered=0, readSkips=0, writeSkips=0, processSkips=0, exitStatus=EXECUTING]>
2011-03-15 22:46:53,647 DEBUG main
[org.springframework.batch.core.step.tasklet.TaskletStep] - <Rollback for
RuntimeException: java.lang.IllegalArgumentException: StaxResult contains
neither XMLStreamWriter nor XMLEventConsumer>
2011-03-15 22:46:53,648 DEBUG main
[org.springframework.batch.repeat.support.RepeatTemplate] - <Handling
exception: java.lang.IllegalArgumentException, caused by:
java.lang.IllegalArgumentException: StaxResult contains neither
XMLStreamWriter nor XMLEventConsumer>
2011-03-15 22:46:53,648 DEBUG main
[org.springframework.batch.repeat.support.RepeatTemplate] - <Handling fatal
exception explicitly (rethrowing first of 1):
java.lang.IllegalArgumentException: StaxResult contains neither
XMLStreamWriter nor XMLEventConsumer>
2011-03-15 22:46:53,649 ERROR main
[org.springframework.batch.core.step.AbstractStep] - <Encountered an error
executing the step>
java.lang.IllegalArgumentException: StaxResult contains neither
XMLStreamWriter nor XMLEventConsumer
at
org.springframework.oxm.AbstractMarshaller.marshalStaxResult(AbstractMarshall
er.java:217)
at org.springframework.oxm.AbstractMarshaller.marshal(AbstractMarshaller.java:91)
at org.springframework.batch.item.xml.StaxEventItemWriter.write(StaxEventItemWri
ter.java:573)
at
org.springframework.batch.item.support.ClassifierCompositeItemWriter.write(Cl
assifierCompositeItemWriter.java:65)
at
org.springframework.batch.core.step.item.SimpleChunkProcessor.writeItems(Simp
leChunkProcessor.java:171)
at org.springframework.batch.core.step.itemWhat went wrong? All you really did was swap out the CompositeItemWriter you used in the previous section with the new ClassifierCompositeItemWriter. The issue centers around the ItemStream interface.
The ItemStream interface serves as the contract to be able to periodically store and restore state. Consisting of three methods, open, update, and close, the ItemStream interface is implemented by any stateful ItemReader or ItemWriter. In cases, for example, where a file is involved in the input or output, the open method opens the required file, and the close method closes the required file. The update method records the current state (number of records written, and so on) as each chunk is completed.
The reason for the difference between CompositeItemWriter and ClassifierCompositeItemWriter is that CompositeItemWriter implements the org.springframework.batch.item.ItemStream interface. In CompositeItemWriter, the open method loops through the delegate ItemWriters and calls the open method on each of them as required. The close and update methods work the same way. However, ClassifierCompositeItemWriter doesn't implement the ItemStream method. Because of this, the XML file is never opened or XMLEventFactory (or the underlying XML writing) created, throwing the exception shown in Listing 9-79.
How do you fix this error? Spring Batch provides the ability to register ItemStreams to be handled in a step manually. If an ItemReader or ItemWriter implements ItemStream, the methods are handled for you. If they don't (as in the case of ClassifierCompositeItemWriter), you're required to register the ItemReader or ItemWriter as a stream to be able to work with it if it maintains state. Listing 9-80 shows the updated configuration for the job, registering the xmlOutputWriter as an ItemStream.[29]
Example 9.80. Updated Configuration Registering the Appropriate ItemStream for Processing
...
<step id="formatFileStep">
<tasklet>
<chunk reader="customerFileReader" writer="classifierWriter"
commit-interval="10">
<streams>
<stream ref="xmlOutputWriter"/>
</streams>
</chunk>
</tasklet>
</step>
<job id="formatJob">
<step id="step1" parent="formatFileStep"/>
</job>
...If you rebuild and rerun the job with the updated configuration, you see that all the records are processed as expected.
Spring Batch's ItemWriters provide a wide range of output options. From writing to a simple flat file to choosing which items get written to which ItemWriters on the fly, there aren't many scenarios that aren't covered by the components Spring Batch provides out of the box.
This chapter has covered the majority of the ItemWriters available in Spring Batch. You also looked at how to use the ItemWriters provided by the framework to complete the sample application. In the next chapter, you look at how to use the scalability features of the framework to allow the jobs to scale and perform as required.
[24] The Customer object has an id attribute that you use later; it has no data in the file.
[25] As with all the previous examples in this book, batch.properties for the project is the same as it was using MySQL in Chapter 2. Also, unless otherwise specified, launch-context.xml is the same as well.
[26] This option is rarely used. Typically it's used for testing purposes only.
[27] Entire books have been devoted to the subject of JMS, not to mention volumes on the topic of Spring integrating with JMS. This book keeps things simple to emphasize the integration of Spring Batch and JMS. For more information on Spring and JMS, check out Pro Spring Integration (Apress, 2011).
[28] Unlike most SMTP servers used by enterprises, the Gmail server you're using for this example ignores the from attribute of the e-mail when it's sent and replaces it with the name of the account from which you logged in.
[29] You only need to register the xmlOutputWriter as a stream. JdbcBatchItemWriter doesn't implement the ItemStream interface because it doesn't maintain any state.