The Java world is full of open source frameworks. Each has its own learning curve, but when you pick up most new frameworks, you at least understand the domain. For example, when you learned Struts or Spring MVC, you had probably developed a web-based application before. With that previous experience, converting your custom request-handling to the way a given framework handles it is really just a matter of learning a new syntax.
However, learning a framework where the domain is completely new is a bit harder. You run across jargon like job, step, and item processor as if it made sense in the context you're coming from. The fact is, it probably doesn't. So, I chose this chapter to serve as batch processing 101. The chapter covers the following topics:
The architecture of batch: This section begins to dig a bit deeper into what makes up a batch process and defines terms that you'll see throughout the rest of the book.
Project setup: I learn by doing. This book is assembled in a way that shows you examples of how the Spring Batch framework functions, explains why it works the way it does, and gives you the opportunity to code along. This section covers the basic setup for a Maven-based Spring Batch project.
Hello, World! The first law of thermodynamics talks about conserving energy. The first law of motion deals with how objects at rest tend to stay at rest unless acted upon by an outside force. Unfortunately, the first law of computer science seems to be that whatever new technology you learn, you must write a "Hello, World!" program using said technology. Here you obey the law.
Running a job: How to execute your first job may not be immediately apparent, so I'll walk you through how jobs are executed as well as how to pass in basic parameters.
The job results: You finish by seeing how jobs complete. This section covers what the statuses are and how they impact what Spring Batch does.
With all of that in mind, what is a job, anyway?
The last chapter spent some time talking about the three layers of the Spring Batch framework: the application layer, the core layer, and the infrastructure layer. The application layer represents the code you develop, which for the most part interfaces with the core layer. The core layer consists of the actual components that make up the batch domain. Finally, the infrastructure layer includes item readers and writers as well as the required classes and interfaces to address things like restartability.
This section goes deeper into the architecture of Spring Batch and defines some of the concepts referred to in the last chapter. You then learn about some of the scalability options that are key to batch processing and what makes Spring Batch so powerful. Finally, the chapter discusses outline administration options as well as where to find answers to your questions about Spring Batch in the documentation. You start with at the architecture of batch processes, looking at the components of the core layer.
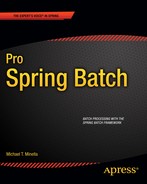
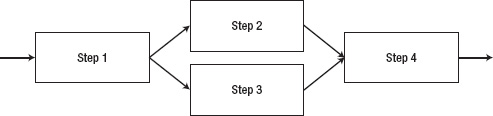
Figure 2-1 shows the essence of a job. Configured via XML, a batch job is a collection of steps in a specific order to be executed as part of a predefined process. Let's take for example the nightly processing of a user's bank account. Step 1 could be to load in a file of transactions received from another system. Step 2 would all credits to the account. Finally, step 3 would apply all debits to the account. The job represents the overall process of applying transactions to the user's account.
When you look deeper, at an individual step, you see a self-contained unit of work that is the main building block of a job. Each step has up to three parts: an ItemReader, an ItemProcessor, and an ItemWriter. Notice that the names for each of these elements (ItemReader, ItemProcessor, and ItemWriter) are singular. That's by intent. Each of these pieces of code is executed on each record to be processed. A reader reads in a single record and passes it to the item processor for processing before it's sent to the item writer to be persisted in some way.
I stated a step has up to three parts. A step isn't required to have an ItemProcessor.. It's ok to have a step that consists of just an ItemReader and an ItemWriter (common in data-migration jobs) or just a tasklet (the equivalent of an ItemProcessor when you don't have any data to read or write). Table 2-1 walks through the interfaces that Spring Batch provides to represent these concepts.
Table 2.1. The Interfaces that Make Up a Batch Job
Interface | Description |
|---|---|
| The object representing the job, as configured in the job's XML file. Also provides the ability to execute the job. |
Like the job, represents the step as configured in the XML as well as provides the ability to execute a step. | |
A strategy interface that provides the ability to input items. | |
A facility to apply business logic to an individual item as provided. | |
| A strategy interface that provides the ability to output a list of items. |
One of the advantages of the way Spring has structured a job is that it decouples each step into its own independent processor. Each step is responsible for obtaining its own data, applying the required business logic to it, and then writing the data to the appropriate location. This decoupling provides a number of features:
Flexibility: The ability to alter the order of processing with nothing more than an XML change is something many frameworks talk about yet very few deliver. Spring Batch is one that does deliver. Thinking about the earlier bank account example., If you wanted to apply the debits before the credits, the only change required would be to reorder the steps in the job XML (Chapter 4 shows an example). You can also skip a step, execute a step conditionally based on the results of a previous step, or even run multiple steps in parallel by doing nothing more than tweaking the XML.
Maintainability: With the code for each step decoupled from the steps before and after it, steps are easy to unit-test, debug, and update with virtually no impact on other steps. Decoupled steps also make it possible to reuse steps in multiple jobs. As you'll see in upcoming chapters, steps are nothing more than Spring beans and can be reused just like any other bean in Spring.
Scalability: Decoupling steps in a job provides a number of options to scale your jobs. You can execute steps in parallel. You can divide the work within a step across threads and execute the code of a single step in parallel (you see a bit more about this later in the chapter). Any of these abilities lets you meet the scalability needs of your business with minimum direct impact on your code.
Reliability: By decoupling each step and each piece within a step, you can structure jobs such that they can be restarted at a given point in the process. If a job fails after processing 50,000 records out of 10 million in step 3 out of 7, you can restart it right where it left off.
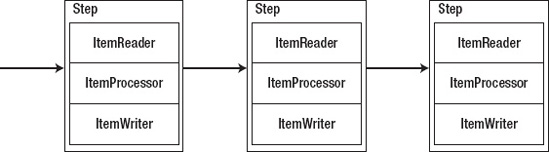
Let's look at what happens with the components and their relationships when a job is run. Notice in Figure 2-2 that the piece most of the components share is JobRepository. This is a datastore (in memory or a database) that is used to persist information about the job and step executions. A JobExecution or StepExecution is information about a single run of the job or step. You see more detail about what is in the executions and the repository later in this chapter and in Chapter 5.
Running a job begins with the JobLauncher. The JobLauncher verifies whether the job has been run before by checking the JobRepository, validates the parameters being passed into the job, and, finally, executes the job.
The processing of a job and a step are very similar. A job goes through the list of steps it has been configured to run, executing each one. As a chunk of items completes, Spring Batch updates the JobExecution or StepExecution in the repository with the results of the execution. A step goes through a list of items as read in by the ItemReader. As the step processes each chunk of items, the StepExecution in the repository is updated with where it is in the step. Things like current commit count, start and end times, and other information are stored in the repository. When a job or step is complete, the related execution is updated in the repository with the final status.
One of the things that changed in Spring Batch from version 1 to 2 was the addition of chunked processing. In version 1, records were read in, processed, and written out one at a time. The issue with this is that it doesn't take advantage of the ability to batch-write that Java's file and database I/O provides (buffered writing and batch updates). In version 2 and beyond of Spring Batch, the framework has been updated. Reading and processing is still a singular operation; there is no reason to load a large amount of data into memory if it can't be processed. But now, the write only occurs once a commit count interval occurs. This allows for more performant writing of records as well as a more capable rollback mechanism.
A simple batch process's architecture consists of a single-threaded process that executes a job's steps in order from start to finish. However, Spring Batch provides a number of parallelization options that you should be aware of as you move forward. (Chapter 11 covers these options in detail.) There are four different ways to parallelize your work: dividing work via multithreaded steps, parallel execution of full steps, remote chunking, and partitioning.
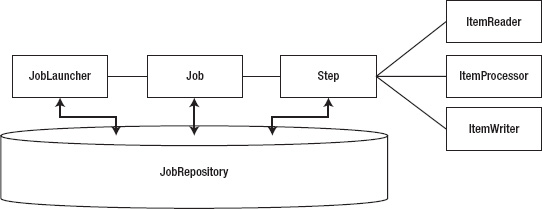
The first approach to achieving parallelization is the division of work via multithreaded steps. In Spring Batch, a job is configured to process work in blocks called chunks, with a commit after each block. Normally, each chunk is processed in series. If you have 10,000 records, and the commit count is set at 50 records, your job will process records 1 to 50 and then commit, process 51 to 100 and commit, and so on, until all 10,000 records have been processed. Spring Batch allows you to execute chunks of work in parallel to improve performance. With three threads, you can increase your throughput threefold, as shown in Figure 2-3.[3]
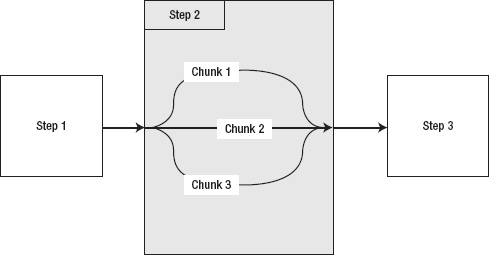
The next approach you have available for parallelization is the ability to execute steps in parallel, as shown in Figure 2-4. Let's say you have two steps, each of which loads an input file into your database; but there is no relationship between the steps. Does it make sense to have to wait until one file has been loaded before the next one is loaded? Of course not, which is why this is a classic example of when to use the ability to process steps in parallel.
The last two approaches to parallelization allow you to spread processing across multiple JVMs. In all cases previously, the processing was performed in a single JVM, which can seriously hinder the scalability options. When you can scale any part of your process horizontally across multiple JVMs, the ability to keep up with large demands increases.
The first remote-processing option is remote chunking. In this approach, input is performed using a standard ItemReader in a master node; the input is then sent via a form of durable communication (JMS for example) to a remote slave ItemProcessor that is configured as a message driven POJO. When the processing is complete, the slave sends the updated item back to the master for writing. Because this approach reads the data at the master, processes it at the slave, and then sends it back, it's important to note that it can be very network intensive. This approach is good for scenarios where the cost of I/O is small compared to the actual processing.
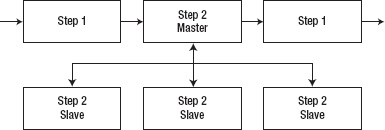
The final method for parallelization within Spring Batch is partitioning, shown in Figure 2-5. Again, you use a master/slave configuration; but this time you don't need a durable method of communication, and the master serves only as a controller for a collection of slave steps. In this case, each of your slave steps is self-contained and configured the same as if it was locally deployed. The only difference is that the slave steps receive their work from the master node instead of the job itself. When all the slaves have completed their work, the master step is considered complete. This configuration doesn't require durable communication with guaranteed delivery because the JobRepository guarantees that no work is duplicated and all work is completed—unlike the remote-chunking approach, in which the JobRepository has no knowledge of the state of the distributed work.
Any enterprise system must be able to start and stop processes, monitor their current state, and even view results. With web applications, this is easy: in the web application, you see the results of each action you request, and tools like Google Analytics provide various metrics on how your application is being used and is performing.
However, in the batch world, you may have a single Java process running on a server for eight hours with no output other than log files and the database the process is working on. This is hardly a manageable situation. For this reason, Spring has developed a web application called Spring Batch Admin that lets you start and stop jobs and also provides details about each job execution.
One of the strengths of Spring Batch is that real developers wrote it who have experience developing batch processes in various enterprises. From this experience comes not only a comprehensive framework but also a wealth of documentation to boot. The Spring Batch web site contains one of the best collections of documentation for an open source project I've ever worked with. Along with the formal documentation, the JavaDoc is also useful for API specifics. Finally, Spring Batch provides 19 different sample jobs for you to reference as you develop your own batch applications (see Table 2-2).
Table 2.2. Sample Batch Jobs
Up to this point, you've looked at why you'd use Spring Batch and examined the components of the framework. However, looking at diagrams and learning new lingo will only take you so far. At some point, you need to dig into the code: so, grab an editor, and let's start digging.
In this section, you build your first batch job. You walk through the setup of a Spring Batch project, including obtaining the required files from Spring. You then configure a job and code the "Hello, World!" version of Spring Batch. Finally, you learn how to launch a batch job from the command line.
Before you begin writing batch processes, you need to obtain the Spring Batch framework. There are three options for doing this: using the SpringSource Tool Suite (STS), downloading the zip distribution, or using Maven and Git.
SpringSource (the maintainers of the Spring Framework and all of its derivatives) has put together an Eclipse distribution with a collection of plug-ins designed specifically for Spring development. Features include wizards for creating Spring projects, XML files and beans, the ability to deploy applications remotely, and OSGi management. You can download this from the SpringSource web site.
The Spring Batch framework is also available via download from the SpringSource web site as a zip file with two options: all dependencies or no dependencies (as indicated by -no-dependencies in the file name). Given that the project is set up for Maven use (although a build.xml file is included for those who use Ant), the no-dependencies option is a better bet to download.
The zip file contains two directories: dist and samples. dist contains the release jar files: two for core, two for infrastructure, and two for test (a source and compiled for each). In the samples directory, you find a samples project (spring-batch-samples) that contains all the sample batch jobs you saw earlier in this chapter, a project shell (spring-batch-simple-cli) that can be used to as a starting point for any Spring Batch project, and a Maven parent project for the two. This template project is the easiest way for you to get started with Spring Batch and will be the way you build our projects going forward.
The final way to obtain the code for Spring Batch is to obtain it from the source code repository SpringSource uses, Github. The Git version control system is a distributed version control system that allows you to work with a full copy of the repository locally..
Example 2.1. Checking Out the Project from Github
$ git clone git://github.com/SpringSource/spring-batch.git
This command exports the source code for the Spring Batch project including a shell for a project, sample applications and all of the Spring Batch framework's source code. The command in Listing 2-1 will obtain the entire Spring Batch Git repository. In order to get a particular version execute the command in Listing 2-2 from within your checked out repository.
In order to use Maven for your builds, you need to tweak your local Maven installation slightly. The Project Object Model (POM) files that are provided as part of the downloaded distributions for Spring projects don't have the Spring Maven repositories configured in them. Because of that, you should add them to your settings.xml file. Listing 2-3 shows the added configuration you need.
Example 2.3. Getting the Repository DDL from SVN
<pluginRepositories>
    <pluginRepository>
        <id>com.springsource.repository.bundles.release</id>
        <name>SpringSource Enterprise Bundle Repository</name>
        <url>http://repository.springsource.com/maven/bundles/release</url>
    </pluginRepository>
</pluginRepositories>
With the project shell created and Maven configured, you can test the configuration by running a quick mvn clean install. With a successful build, you can move on to your first batch job.
The laws of computer science are clear. Any time you learn a new technology, you must create a "Hello, World!" program using said technology, so let's get started. Don't feel like you need to understand all the moving parts of this example. Future chapters go into each piece in greater detail.
Before you get too far into the new code, you should do some clean up of files and references to them that are not needed. These files, while being provided for examples, are not kept in a typical Spring Batch project. To start, we can delete all of the java source code and tests. These are located in the src/main/java and src/test/java directories. Once those are removed we can remove the module-context.xml file. This is a sample job configuration that you will not need in your project. Finally, since you removed a few java files that were referenced in the project's configuration, that needs to be updated as well. In the file src/main/resources/launch-context.xml you will want to remove the import at the top for the module-context.xml as well as the dataSourceInitializer bean at the bottom of the file. The dataSourceIntializer will be looked at further in Chapter 12.
As discussed earlier, a job is configured in XML. To create your "Hello, World!" job, create a new directory in src/main/resources called jobs; in the new directory, create an XML file called helloWorld.xml, as shown in Listing 2-4.
Example 2.4. The "Hello, World!" Job
<?xml version="1.0" encoding="UTF-8"?>
<beans:beans xmlns ="http://www.springframework.org/schema/batch"
       xmlns:beans="http://www.springframework.org/schema/beans"
xmlns:xsi="http://www.w3.org/2001/XMLSchema-instance"
xsi:schemaLocation="http://www.springframework.org/schema/beans
http://www.springframework.org/schema/beans/spring-beans-3.0.xsd
http://www.springframework.org/schema/batch
http://www.springframework.org/schema/batch/spring-batch-2.1.xsd">
<beans:import resource="../launch-context.xml"/>
<beans:bean id="helloWorld"
class="com.apress.springbatch.chapter2.HelloWorld"/>
<step id="helloWorldStep">
<tasklet ref="helloWorld"/>
</step>
<job id="helloWorldJob">
<step id="step1" parent="helloWorldStep"/>
</job>
</beans:beans>If that looks kind of familiar, it should. It's the high-level breakdown discussed previously, only in XML form.
Note
Although most of Spring has added annotation equivalents to the XML configuration options, Spring Batch doesn't. As part of the 2.0 release, Spring did add a namespace to assist with managing the XML.
If you walk through this, there are four main pieces: the import of launch-context.xml, the bean declaration, the step definition, and the job definition. Launch-context.xml is a file that is included in your shell project that contains a number of infrastructure pieces configured for your jobs. Things like the datasource, the JobLauncher, and other elements universal to all the jobs in the project are found here. Chapter 3 covers this file in more detail. For now, the default settings work.
The bean declaration should look like any other Spring bean, for a good reason: it's just like any other Spring bean. The HelloWorld bean is a tasklet that does the work in this job. A tasklet is a special type of step that is used to perform a function without a reader or writer. Typically, a tasklet is used for a single function, say performing some initialization, calling a stored procedure, or sending an e-mail to alert you that the job has finished. Chapter 4 goes into semantic specifics about tasklets along with the other step types.
The next piece is the step. Jobs are made up of one or more steps, as noted earlier. In the HelloWorld job, you start with a single step that executes your tasklet. Spring Batch provides an easy way to configure a step using the batch XSD. You create a tasklet using the tasklet tag and reference the tasklet you defined previously. You then wrap that in a step tag with just an id. This defines a reusable step that you can reference in your job as many times as you need.
Finally, you define your job. The job is really nothing more than an ordered list of steps to be executed. In this case, you have only one step. If you're wondering if the step tag in the job definition is the same type of tag that you used in the job definition, it is. You can declare the steps inline if you want. However, in this example I created a step outside of the job and made it the parent of the step within the job.[4] I did this for two reasons: to keep the XML cleaner and to allow for easy extraction of steps into other XML files if needed. You'll see in future chapters that the XML for steps can get quite verbose; the approach shown here helps to keep the job readable.
Your job is configured, but you have a class in that configuration that doesn't exist: the HelloWorld tasklet. Create the tasklet in the src/main/java/com/apress/springbatch/chapter2 directory. As you can guess, the code is pretty simple; see Listing 2-5.
Example 2.5. HelloWorld Tasklet
package com.apress.springbatch.chapter2;

import org.springframework.batch.core.StepContribution;
import org.springframework.batch.core.scope.context.ChunkContext;
import org.springframework.batch.core.step.tasklet.Tasklet;
import org.springframework.batch.repeat.RepeatStatus;

public class HelloWorld implements Tasklet {

     private static final String HELLO_WORLD = "Hello, world!";

     public RepeatStatus execute( StepContribution arg0, ChunkContext arg1 ) throws Exception
{
          System.out.println( HELLO_WORLD );
          return RepeatStatus.FINISHED;
     }
}
To create the HelloWorld tasklet, you implement the Tasklet interface's single method: execute. StepContribution and ChunkContext represent the context of the step (commit count, skip count, and so on) in which this tasklet is being executed. Future chapters get into those in more detail.
That's really it. Let's try building and running the job. To compile it, run mvn clean compile from the root of the project. When the build is successful, run the job. Spring Batch comes with its own job runner called CommandLineJobRunner. As you can guess, it's intended to be run from ... a command line! In this book, you will execute your jobs from your project's target directory so that you won't need to go through setting up the classpath. The CommandLineJobRunner takes two or more parameters: the path to the XML file that contains the job configuration, the name of the job to be executed, and a list of job parameters. In the case of HelloWorldJob, you only need to pass the first two parameters. To execute the job, run the command shown in Listing 2-6.
Example 2.6. Execute the HelloWorld Job
java -jar hello-world-0.0.1-SNAPSHOT.jar jobs/helloWorld.xml helloWorldJob
After you've run the job, notice that in traditional Spring style, there is quite a bit of output for a simple "Hello, World!" But if you look closely (around line 33 of the output), there it is:
2010-12-01 23:15:42,442 DEBUG
org.springframework.batch.core.launch.support.CommandLineJobRunner.main()
[org.springframework.batch.core.scope.context.StepContextRepeatCallback] - <Chunk execution
starting: queue size=0>

Hello, world!

2010-12-01 23:15:42,443 DEBUG
org.springframework.batch.core.launch.support.CommandLineJobRunner.main()
[org.springframework.batch.core.step.tasklet.TaskletStep] - <Applying contribution:
[StepContribution: read=0, written=0, filtered=0, readSkips=0, writeSkips=0, processSkips=0, exitStatus=EXECUTING]>
Congratulations! You just ran your first Spring Batch job. So, what actually happened? As discussed earlier in the chapter, when Spring Batch runs a job, the job runner (in this case, the CommandLineJobRunner) loads the application context and configuration of the job to be run (as specified by the first two parameters passed in). From there, the job runner passes the JobInstance to a JobLauncher that executes the job. In this case, the job's single step is executed, and the JobRepository is updated accordingly.
Wait. JobRepository? That wasn't specified in your XML. Where did all that information go? It went into the job repository, as it should. The problem is that Spring Batch is configured to use HSQLDB by default, so all that metadata, although stored in memory during the execution of the job, is now gone. Let's fix that by switching to MySQL instead so you can do a better job managing the metadata and look at what happens when you run your job. In this section, you look at how to configure your JobRepository to use MySQL, and you explore what Spring Batch logs to the database with a run of HelloWorldJob.
To change where Spring Batch stores the data, you need to do three things: update the batch.properties file, update your pom, and create the batch schema in your database.[5] Let's start by modifying the batch.properties file found in your project's /src/main/resources directory. The properties should be pretty straightforward. Listing 2-7 shows what I have in mine.
Example 2.7. batch.properties File
batch.jdbc.driver=com.mysql.jdbc.Driver
batch.jdbc.url=jdbc:mysql://localhost:3306/spring_batch_test
# use this one for a separate server process so you can inspect the results
# (or add it to system properties with -D to override at run time).
batch.jdbc.user=root
batch.jdbc.password=p@ssw0rd
batch.schema=spring_batch_test
#batch.schema.script=schema-mysql.sql
Note that I commented out the batch.schema.script line. When you run your job, the dataSourceIntializer executes the script specified. This is helpful when you're working in development, but if you want to persist the data, it's a bit less useful.
With the properties file now pointing to your local instance of MySQL, you need to update your POM file so that you include the MySQL driver in your classpath. To do that, find the HSQLDB dependency, and update it as shown in Listing 2-8.
Example 2.8. Maven MySQL Dependency
<dependency>
    <groupId>mysql</groupId>
    <artifactId>mysql-connector-java</artifactId>
    <version>5.1.3</version>
</dependency>
In this dependency, 5.1.3 is the version of MySQL running locally.
With your database connection configured, Spring Batch needs you to create the schema. Using MySQL, you can create the schema as shown in Listing 2-9.
Example 2.9. Creating the Database Schema
mysql> create database spring_batch_test;
Query OK, 1 row affected (0.00 sec)
mysql> use spring_batch_test;
Database changed
mysql> source ~/spring_batch/src/main/resources/org/springframework/batch/core/schema-mysql.sql
That's it. Let's run the job again (be sure to do a mvn clean compile first, to copy your updated batch.properties file to the target). Using the same command as earlier, you should see the same output. The difference is that this time, Spring Batch left something behind. Let's look at the database.
Spring Batch uses the database to maintain state both during a single execution and from execution to execution. Information is recorded about the job instance, the parameters passed in, the results of the execution, and the results of each step. Here are the six tables in the job repository; the following sections describe their relationships:[6]
Let's start with the BATCH_JOB_INSTANCE table. As you saw earlier, a job instance is created when the job is created. It's like calling a new on a job. However, a job instance is really the combination of the job instance itself and the job parameters (as stored in the BATCH_JOB_PARAMS table). This combination can only be executed once to success. Let me say that again: a job can only be run once with the same parameters. I won't pull out the soapbox on why I don't like this feature, but I will say that it's common to pass in the date and time of the run as job parameters to get around this. After running your HelloWorld job, the BATCH_JOB_INSTANCE table looks like what is shown in Table 2-3.
Table 2.3. BATCH_JOB_INSTANCE Table
Field | Description | Value |
|---|---|---|
JOB_INSTANCE_ID | Primary key of the table | 1 |
VERSION | The version[a] for the record | 0 |
JOB_NAME | The name of the job executed | helloWorldJob |
JOB_KEY | A hash of the job name and parameters used to uniquely identify a job instance | d41d8cd98f00b204e980098ecf8427e |
[a] To learn more about the versions and entities in domain-driven design, read Domain Driven Design by Eric Evans (Addison-Wesley, 2003). | ||
It should come as no surprise that the BATCH_JOB_PARAMS table contains all the parameters passed to the job. As mentioned in the previous section, the parameters are part of what Spring Batch uses to identify the run of a job. In this case, the BATCH_JOB_PARAMS table is empty because you didn't pass any parameters to your job. However, the fields in the BATCH_JOB_PARAMS table are shown in Table 2-4.
Table 2.4. BATCH_JOB_PARAMS Table
Field | Description |
|---|---|
JOB_INSTANCE_ID | Foreign key to the BATCH_JOB_INSTANCE table |
TYPE_CD | The type of value being stored (string, date, long, or double) |
KEY_NAME | The parameter key (job parameters are passed in as key/value pairs) |
STRING_VAL | The value, if the type of parameter was a string |
DATE_VAL | Date parameters |
LONG_VAL | Long parameters |
DOUBLE_VAL | Double or float parameters |
After a job instance is created, it's executed. The state of the job execution is maintained in—you guessed it—the BATCH_JOB_EXECUTION table. Start time, end time, and results of the last execution are stored here. I know what you're thinking: if a job with the same parameters can be run only once, what's the point of the BATCH_JOB_EXECUTION table? The combination of job and parameters can only be run once to success. If a job runs and fails (assuming it's configured to be able to be rerun), it can be run again as many times as needed to get it to succeed. This is a common occurrence in the batch world when dealing with data that's out of your control. As the job processes data, it can find bad data that causes the process to throw an error. Someone fixes the data and restarts the job.
The BATCH_STEP_EXECUTION table serves the same purpose as the BATCH_JOB_EXECUTION table. Start time, end time, number of commits, and other parameters related to the state of the step are maintained in BATCH_STEP_EXECUTION.
After the execution of the HelloWorld job, you have a single record in the BATCH_JOB_EXECUTION table. Notice in Table 2-5 that the times are all the same: it's because System.out.println(HELLO_WORLD); doesn't take long.
Table 2.5. BATCH_JOB_EXECUTION Table
Field | Description | Value |
|---|---|---|
JOB_EXECUTION_ID | Primary key of the table | 1 |
VERSION | The version of the record | 2 |
JOB_INSTANCE_ID | Foreign key to the BATCH_JOB_INSTANCE table | 1 |
CREATE_TIME | The time the job execution was created | 2010-10-25 18:08:30 |
START_TIME | The start time for the job execution | 2010-10-25 18:08:30 |
END_TIME | The end time for the execution, regardless of success | 2010-10-25 18:08:30 |
STATUS | The status as returned to the job | COMPLETED |
EXIT_CODE | The exit code as returned to the job | COMPLETED |
EXIT_MESSAGE | Any exit message that was returned to the job | |
LAST_UPDATED | The last time this record was updated | 2010-10-25 18:08:30 |
Your BATCH_STEP_EXECUTION table also contains only one record because your job had only one step. Table 2-6 outlines the columns and values that the table has after your execution.
Table 2.6. BATCH_STEP_EXECUTION Table
• Field | • Description | • Value |
|---|---|---|
STEP_EXECUTION_ID | Primary key for the table | 1 |
VERSION | The version of the record | 2 |
STEP_NAME | The name of the step as it's configured in the job's XML | step1 |
JOB_EXECUTION_ID | Foreign key back to the BATCH_JOB_EXECUTION table | 1 |
START_TIME | The time the step was started | 2010-10-25 18:08:30 |
END_TIME | The time the step completed, regardless of result | 2010-10-25 18:08:30 |
STATUS | The current status of the step | COMPLETED |
COMMIT_COUNT | The commit count the step is currently on | 1 |
READ_COUNT | The read count the step is currently on | 0 |
FILTER_COUNT | The number of items that have been filtered | 0 |
WRITE_COUNT | The number of items that have been written | 0 |
READ_SKIP_COUNT | The number of items that have been skipped being read | 0 |
WRITE_SKIP_COUNT | The number of items that have been skipped being written | 0 |
PROCESS_SKIP_COUNT | The number of items that haven't gone through the ItemProcessor (straight from ItemReader to ItemWriter) | 0 |
ROLLBACK_COUNT | The total number of rollbacks during the execution, including each rollback for a given item skip or retry | 0 |
EXIT_CODE | The exit code that was returned a the step completed | COMPLETE |
EXIT_MESSAGE | Any message returned by the step | |
LAST_UPDATED | The last time the record was updated | 2010-10-25 18:08:30 |
That leaves the two context tables, BATCH_JOB_EXECUTION_CONTEXT and BATCH_STEP_EXECUTION_CONTEXT. These tables are the persisted versions of the ExecutionContext related to either the job or the step. The ExecutionContext is the Spring Batch similar to the servlet context or session in a web application in that it's a global place to store information. It's essentially a map of key/value pairs that are scoped to either the job or the step. The job or step execution context is used to pass information around within the given scope; for jobs, it's used to pass information from step to step, and for steps, it's used to pass information across the processing of multiple records.
The tables BATCH_JOB_EXECUTION_CONTEXT and BATCH_STEP_EXECUTION_CONTEXT are the serialized version of these maps. In this case, they both contain the same data, with only the foreign key (which is the primary key of the table) being different (BATCH_STEP_EXECUTION_CONTEXT refers to the BATCH_STEP_EXECUTION table, and BATCH_JOB_EXECUTION_CONTEXT refers to the BATCH_JOB_EXECUTION table). Table 2-7 shows what the tables contain.
Table 2.7. BATCH_JOB_EXECUTION_CONTEXT and BATCH_STEP_EXECUTION_CONTEXT Tables
Field | Description | Value |
|---|---|---|
JOB_EXECUTION_ID / STEP_EXECUTION_ID | Foreign key to the BATCH_JOB_EXECUTION / BATCH_STEP_EXECUTION table | 1 |
SHORT_CONTEXT | A string representation of the context | {"map":""} |
SERIALIZED_CONTEXT | The serialized execution context for future use on retries, and so on | NULL |
In this chapter, you got your feet wet with Spring Batch. You walked through the batch domain covering what a job and step are and how they interact through the job repository. You learned about the different features of the framework, including the ability to map batch concepts in XML, robust parallelization options, the formal documentation (including a list of the available sample jobs), and the administration application Spring Batch Admin.
From there, you wrote the Spring Batch version of "Hello, World!". You learned the different methods of obtaining the Spring Batch framework, including checking it out from Git, using the SpringSource Tool Suite, and downloading the zip distribution. When you had your project set up, you created your job in XML, coded a tasklet, and executed your job. Finally, you explored the job repository that Spring Batch uses to maintain information about the jobs it runs.
I want to point out that you've barely taken a peek into what Spring Batch can do. The next chapter walks through the design of a sample application that you'll build later in this book and outlines how Spring Batch addresses issues that you'd have to deal with yourself without it.
[3] This is a theoretical throughput increase. Many factors can prevent the ability of a process to achieve linear parallelization like this.
[5] I'm going to assume you already have MySQL installed. If you don't, go to www.mysql.com to download it and get installation instructions.
[6] Those using MySQL and some other databases may see three additional "tables": batch_job_execution_seq, batch_job_seq, and batch_step_execution_seq. These are used to maintain a database sequence and aren't discussed here.