
When you look into writing a batch process, the ability to execute processes without a UI in a stand-alone manner isn't that hard. When you dig into Spring Batch, the execution of a job amounts to nothing more than using an implementation of Spring's TaskExecutor to run a separate task. You don't need Spring Batch to do that.
Where things get interesting, however, is when things go wrong. If your batch job is running and an error occurs, how do you recover? How does your job know where it was in processing when the error occurred, and what should happen when the job is restarted? State management is an important part of processing large volumes of data. This is one of the key features that Spring Batch brings to the table. Spring Batch, as discussed previously in this book, maintains the state of a job as it executes in a job repository. It then uses this information when a job is restarted or an item is retried to determine how to continue. The power of this feature can't be overstated.
Another aspect of batch processing in which the job repository is helpful is monitoring. The ability to see how far a job is in its processing as well as trend elements such as how long operations take or how many items were retried due to errors is vital in the enterprise environment. The fact that Spring Batch does the number gathering for you makes this type of trending much easier.
This chapter covers job repositories in detail. It goes over ways to configure a job repository for most environments by using either a database or an in-memory repository. You also look briefly at performance impacts on the configuration of the job repository. After you have the job repository configured, you learn how to put the job information stored by the job repository to use using the JobExplorer and the JobOperator.
In order for Spring Batch to be able to maintain state, the job repository needs to be available. Spring offers two options by default: an in-memory repository and a persisted repository in a database. This section looks at how to configure each of those options as well as the performance impacts of both options. Let's start with more simpler option, the in-memory job repository.
The opening paragraphs of this chapter laid out a list of benefits for the job repository, such as the ability to maintain state from execution to execution and trend run statistics from run to run. However, you'll almost never use an in-memory repository for those reasons. That's because when the process ends, all of that data is lost. So, why would you use an in-memory repository at all?
The answer is that sometimes you don't need to persist the data. For example, in development, it's common to run jobs with an in-memory repository so that you don't have to worry about maintaining the job schema in a database. This also allows you to execute the same job multiple times with the same parameters, which is a must-have in development. You might also run a job using the in-memory repository for performance reasons. There is a cost to maintaining job state in a database that may not be needed. Say, for instance, that you're using Spring Batch to do a data migration, moving data from one database table to another; the destination table is empty to start, and you have a small amount of data to migrate. In a case like this, the overhead of setting up a Spring Batch schema and using it may not make sense. Situations that don't need Spring Batch to manage restarts and so on can use the in-memory option.
The JobRepository you've been using so far is configured in the launch-context.xml file. In the previous examples, you've configured the job repository using MySQL. To configure your job to use an in-memory repository, you use the org.springframework.batch.core.repository.support.MapJobRepositoryFactoryBean, as shown in Listing 5-1. Notice that a transaction manager is still required. This is because the data the JobRepository stores is still dependent on transaction semantics (rollback, and so on), and business logic may depend on transactional stores as well. The transaction manager configured in the listing, org.springframework.batch.support.transaction.ResourcelessTransactionManager, actually doesn't do anything with transactions; it's a dummy transaction manager that provides a dummy transaction.
Example 5.1. Configuring an In-Memory Job Repository
<?xml version="1.0" encoding="UTF-8"?>
<beans:beans xmlns="http://www.springframework.org/schema/batch"
    xmlns:beans="http://www.springframework.org/schema/beans"
    xmlns:xsi="http://www.w3.org/2001/XMLSchema-instance"
    xsi:schemaLocation="http://www.springframework.org/schema/beans
        http://www.springframework.org/schema/beans/spring-beans-3.0.xsd
        http://www.springframework.org/schema/batch
        http://www.springframework.org/schema/batch/spring-batch-2.1.xsd">
    <beans:bean id="transactionManager"
class="org.springframework.batch.support.transaction.
ResourcelessTransactionManager"/>

    <beans:bean id="jobRepository"
class="org.springframework.batch.core.repository.support.
MapJobRepositoryFactoryBean" p:transactionManager-ref="transactionManager" />
...
If you take the HelloWorld example from Chapter 2 and configure it to use the in-memory elements of Listing 5-1, you see that you can run the job over and over without Spring Batch throwing an exception for running the same job with the same parameters multiple times.
You should keep in mind a couple of limitations when using an in-memory job repository. First, as already stated, because the storage of data is in memory, once a JVM is restarted the data is lost. Second, because synchronization occurs in the memory space of a particular JVM, there is no guarantee that a given job won't be executed with the same given parameters by executing the same job in two JVMs. Finally, if your job is using any of the multithreading options (multithreaded step, parallel flows, and so on) provided by Spring Batch, this option won't work.
That's it for the in-memory option. By making a small configuration tweak, you can prevent yourself from having to deal with setting up a database to run your batch jobs. However, given the limitations of this approach and the features that a persistent job repository provides, most of the time you'll use a database to back your job repository. With that in mind, let's look at configuring the job repository in a database.
Using a Database Repository is the predominant way to configure a job repository. It allows you to utilize all the benefits of a persistent store with little impact on your job's overall performance. Later, this chapter looks at some hard numbers to illustrate the cost of using a database.
For now, however, let's start by looking at the MySQL configuration you've been using in the examples. You can see the configuration in Listing 5-2. In this case, you begin with the datasource. This example uses the org.apache.commons.dbcp.BasicDataSource provided by Apache Commons, but any datasource you want to use is ok. Listing 5-2 sets the values of the various properties (driver class, database URL, username, and password) via properties in the batch.properties file. This allows you to configure those properties specific to the environment you're working in (your production environment has different values than your test environment, which has different values than your local development).
Example 5.2. Job Repository Configuration in launch-context.xml Using a Database
<beans:bean id="dataSource" class="org.apache.commons.dbcp.BasicDataSource">
    <beans:property name="driverClassName" value="${batch.jdbc.driver}" />
    <beans:property name="url" value="${batch.jdbc.url}" />
    <beans:property name="username" value="${batch.jdbc.user}" />
    <beans:property name="password" value="${batch.jdbc.password}" />
</beans:bean>

<beans:bean id="transactionManager"
    class="org.springframework.jdbc.datasource.DataSourceTransactionManager"
    lazy-init="true">
    <beans:property name="dataSource" ref="dataSource" />
</beans:bean>

<job-repository id="jobRepository" data-source="dataSource"
    transaction-manager="transactionManager"/>
The next thing you configure is the transaction manager. Again, you keep it simple here by using the basic DataSourceTransactionManager provided by Spring, but any transaction manager will do. DataSourceTransactionManager has a single dependency: an actual datasource that you've configured. The last aspect of the transaction manager is that it's configured to be lazily initialized[15] which is optional per the Spring documentation but because Spring Batch's shell project has it configured this way, there is no reason to change it.
Finally you come to the job repository factory. The first thing to call out about this configuration is that you don't use the regular bean tag. Instead, Spring Batch provides a tag specific for configuring the job repository. In order to configure the job repository this way, you need to add references to the Spring Batch XSD to launch-context.xml as you did in Listing 5-1, because it isn't included by default. With the job-repository tag, the only attribute that is required is id. By default, Spring autowires the data-source and transaction-manager attributes of JobRepositoryFactoryBean with beans named dataSource and transactionManager, respectively.
In either configuration, using the bean tag or the job-repository tag, you reference the second of two job repository factories provided with Spring Batch. The first is org.springframework.batch.core.repository.support.MapJobRepositoryFactoryBean, which you use for an in-memory job repository. The second is org.springframework.batch.core.repository.support.JobRepositoryFactoryBean. The JobRepositoryFactoryBean that this configuration demonstrates uses a database as the method for maintaining state in the job repository. To access the underlying database, you need to satisfy its two dependencies: a datasource and a transaction manager, both of which are configured in Listing 5-2.
Spring does a good job of allowing you to be flexible with your configurations. One of the things Spring Batch allows you to change up is the table prefix. By default, every table is prefixed with BATCH_, but this may not be what you or your enterprise want. With that in mind, the developers of Spring Batch let you configure the table prefix for the tables in the job repository. To do that, you use the table-prefix attribute of the job-repository tag as shown in Listing 5-3. With the configuration updated as it is in the example, Spring Batch expects the tables to be named SAMPLE_JOB_EXECUTION, and so on.
Example 5.3. Changing the Table Prefix
<job-repository id="jobRepository" data-source="dataSource"
    transaction-manager="transactionManager" table-prefix="SAMPLE_"/>
Note
Spring Batch only lets you configure the table prefix. You can't change the complete name of the tables or column names.
The other aspect of the database schema that Spring Batch allows you to configure is the maximum length of the varchar data type. By default, the schema scripts in Spring Batch set the length of the larger varchar columns to 2500 (EXIT_MESSAGE columns in the execution tables and the SHORT_CONTEXT columns in the execution context tables). If you're using a character set that uses more than a byte for a character, or modify the schema, you can use this to allow Spring Batch to store larger values. Listing 5-4 shows the job repository being configured for 3000 as the maximum.
Example 5.4. Configuring the Maximum varchar Length
<job-repository id="jobRepository" data-source="dataSource"
    transaction-manager="transactionManager" max-varchar-length="3000"/>
It's important to note that the max-varchar-length configuration in Listing 5-4 doesn't actually change the database. Instead, it truncates any messages that are too long to fit in the EXIT_MESSAGE column. The last and probably most important piece of configuring the job repository is how transactions are configured, which you look at next.
The use of the job repository is based on transactions. The repository is updated when each chunk of processing completes, which triggers the end of a transaction. You've seen that there are two ways to configure the job repository, one with the regular Spring bean tag and one using the Spring Batch namespace's job-repository tag. How transactions are configured depends on which of these options you choose.
When you use the job-repository tag from the Spring Batch namespace, Spring Batch uses Spring's AOP features to wrap the repository with a transaction. The only thing to configure when using this approach is the transaction isolation level for the createJobExecution method of the job repository interface. The intent of this configuration is to prevent multiple executions of a JobInstance at the same time. To address this issue, Spring Batch sets the transaction's isolation level at its most aggressive value, SERIALIZABLE, by default. However, your environment may not require a level this aggressive, so Spring Batch lets you configure the transaction level for the createJobExecution method with the isolation-level-for-create attribute of the job-repository tag. Listing 5-5 shows how to lower the isolation level when using the job-repository tag.
Example 5.5. Setting the Create Transaction Level
<job-repository id="jobRepository" transaction-manager="transactionManager"
    data-source="dataSource" isolation-level-for-create="READ_COMMITTED"/>
If you configure your job repository using the Spring bean tag as you did with the in-memory option, the framework doesn't handle any of the transactions for you. In this case, you need to configure transactional advice by hand, as shown in Listing 5-6. Here you use Spring's AOP namespace to configure the transaction advice and apply it to all the methods in the job repository interface.
Example 5.6. Configuring Job Repository Transactions by Hand
<beans:bean id="dataSource" class="org.apache.commons.dbcp.BasicDataSource">
    <beans:property name="driverClassName" value="${batch.jdbc.driver}" />
    <beans:property name="url" value="${batch.jdbc.url}" />
    <beans:property name="username" value="${batch.jdbc.user}" />
    <beans:property name="password" value="${batch.jdbc.password}" />
</beans:bean>

<beans:bean id="transactionManager"
   class="org.springframework.jdbc.datasource.DataSourceTransactionManager"/>

<aop:config>
    <aop:advisor
pointcut="execution(*org.springframework.batch.core.repository..*Repository+.*(..))"/>
    <advice-ref="txAdvice" />
</aop:config>

<tx:advice id="txAdvice" transaction-manager="transactionManager">
    <tx:attributes>
        <tx:method name="*" />
    </tx:attributes>
</tx:advice>
<beans:bean id="jobRepository" class="org.springframework.batch.core.repository.support.JobRepositoryFactoryBean" p:transactionManager-ref="transactionManager" p:dataSource-ref="dataSource" />
The job repository is the central piece of the safety net that Spring Batch provides for your processing. However, it's much more than just a tool for the Spring Batch framework's own use. You have as much access to the data as the framework does, along with the ability to manipulate that data. This next section shows you how how.
Although Spring Batch accesses the job repository tables through a collection of DAOs, they expose a much more practical API for the use of the framework and for you to use. This section you look at the two ways Spring Batch exposes the data in the job repository. First you look at the JobExplorer, an item you configured last chapter, how to configure it and read data from the repository using it. From there you move onto the JobOperator. You look at how to configure the operator as well as use it to manipulate the data contained in the job repository. Let's start with the JobExplorer.
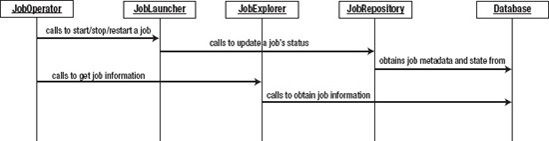
The org.springframework.batch.core.explore. JobExplorer interface is the starting point for all access to historical and active data in the job repository. Figure 5-1 shows that although most of the framework accesses the information stored about job execution through the JobRepository, the JobExplorer accesses it directly from the database itself.
The underlying purpose of the JobExplorer is to provide read-only access to the data in the job repository. The interface provides seven methods you can use to obtain information about job instances and executions. Table 5-1 lists the available methods and their use.
Table 5.1. Methods of the JobExplorer
Method | Description |
|---|---|
| Returns all JobExecutions without an end time. |
| Returns the JobExecution identified by the supplied id and |
| Returns a list of all JobExecutions related to the JobInstance supplied. |
| Returns the JobInstance identified by the supplied id or |
| Returns a range of JobInstances starting with the index specified (the |
| Returns all unique job names from the job repository in alphabetical order. |
| Returns the specified StepExecution based on the id of the StepExecution and the id of its parent JobExecution. |
As you can see, the entire job repository is available from the methods exposed by the JobExplorer interface. However, before you can put the JobExplorer to use, you need to configure it. Listing 5-7 shows how to configure the JobExplorer in the launch-context.xml file.
Example 5.7. JobExplorer Configuration
<beans:bean id="jobExplorer"
class="org.springframework.batch.core.explore.support.JobExplorerFactoryBean"
p:dataSource-ref="dataSource" />
The JobExplorer is configured just like any other Spring bean with a single dependency—a datasource—so it can be injected into any of your other elements. Note that unlike most of the other Spring Batch components you've configured that have a dependency of the JobRepository, this one depends on a datasource. The reason is that, as mentioned earlier, the JobExplorer doesn't obtain its information from the JobRepository. Instead, it goes directly to the database for its information.
To see how the JobExplorer works, you can inject it into the HelloWorld tasklet from the previous examples. From there, you can see what you can use the JobExplorer for. In Listing 5-8, you configure the HelloWorld tasklet with the JobExplorer injected.
Example 5.8. Configuration of the HelloWorld tasklet and JobExplorer
<?xml version="1.0" encoding="UTF-8"?>
<beans xmlns:batch="http://www.springframework.org/schema/batch"
    xmlns="http://www.springframework.org/schema/beans"
    xmlns:xsi="http://www.w3.org/2001/XMLSchema-instance"
    xsi:schemaLocation="http://www.springframework.org/schema/beans
        http://www.springframework.org/schema/beans/spring-beans-3.0.xsd
        http://www.springframework.org/schema/batch
        http://www.springframework.org/schema/batch/spring-batch-2.1.xsd">

    <import resource="../launch-context.xml"/>

    <bean id="helloWorld"
        class="com.apress.springbatch.chapter5.HelloWorld">
        <property name="explorer" ref="jobExplorer"/>
    </bean>

    <batch:step id="helloWorldStep">
        <batch:tasklet ref="helloWorld"/>
    </batch:step>

    <batch:job id="helloWorldJob">
        <batch:step id="step1" parent="helloWorldStep"/>
    </batch:job>
</beans>
With the JobExplorer configured, there are a number of things you can do with it. Within the Spring Batch framework, you can use the JobExplorer in the RunIdIncrementer you looked at in Chapter 4 to look up the previous run.id parameter value. Another place it's used is in the Spring Batch Admin web application to determine whether a job is currently running before launching a new instance. In the example, you use it to determine whether this is the first time you've run this JobInstance. If it is, you print the message "Hello, Michael!" where Michael is a value passed in. If it isn't the first time you've run the job, you update the message to "Welcome back Michael!" Listing 5-9 has the updated code for this tasklet.
Example 5.9. Updated HelloWorld Tasklet
package com.apress.springbatch.chapter5;

import java.util.List;

import org.springframework.batch.core.JobInstance;
import org.springframework.batch.core.StepContribution;
import org.springframework.batch.core.explore.JobExplorer;
import org.springframework.batch.core.scope.context.ChunkContext;
import org.springframework.batch.core.step.tasklet.Tasklet;
import org.springframework.batch.repeat.RepeatStatus;

public class HelloWorld implements Tasklet {

private static final String HELLO = "Hello, %s!";
    private static final String WELCOME = "And then we have %s!";
    private static final String JOB_NAME = "helloWorldJob";

    private JobExplorer explorer;

    public RepeatStatus execute(StepContribution stepContribution,
                                ChunkContext chunkContext) throws Exception {
        List<JobInstance>instances =
            explorer.getJobInstances(JOB_NAME, 0, Integer.MAX_VALUE);

        String name = (String) chunkContext.getStepContext()
                                           .getJobParameters()
                                           .get("name");

        if (instances != null && instances.size() > 1) {
            System.out.println(String.format(WELCOME, name));
        } else {
            System.out.println(String.format(HELLO, name));
        }

        return RepeatStatus.FINISHED;
    }

    public void setExplorer(JobExplorer explorer) {
        this.explorer = explorer;
    }
}
The code in Listing 5-9 begins by obtaining all the JobInstances for helloWorldJob. Once it has the list, it determines whether the job has been run before. If it has, you use the "Welcome back" message. If this is the first time the job is being run, you use the "Hello" message.
With the code and configuration in place, run the job twice so you can see both halves of the if statement execute. Listing 5-10 shows the important output for each job.
Example 5.10. HelloWorld Job Output from Both Runs
Run 1 executed with the command java -jar metadata-0.0.1-SNAPSHOT.jar name=Michael2010-12-17 22:42:50,613 DEBUG org.springframework.batch.core.launch.support.CommandLineJobRunner.main() [org.springframework.batch.core.scope.context.StepContextRepeatCallback] - <Chunk execution starting: queue size=0>Hello, Michael!2010-12-17 22:42:50,619 DEBUG org.springframework.batch.core.launch.support.CommandLineJobRunner.main() [org.springframework.batch.core.step.tasklet.TaskletStep] - <Applying contribution: [StepContribution: read=0, written=0, filtered=0, readSkips=0, writeSkips=0, processSkips=0, exitStatus=EXECUTING]>Run 2 executed with the command java -jar metadata-0.0.1-SNAPSHOT.jar name=John2010-12-17 22:44:49,960 DEBUG org.springframework.batch.core.launch.support.CommandLineJobRunner.main() [org.springframework.batch.core.scope.context.StepContextRepeatCallback] - <Chunk execution starting: queue size=0>And then we have John!2010-12-17 22:44:49,965 DEBUG org.springframework.batch.core.launch.support.CommandLineJobRunner.main() [org.springframework.batch.core.step.tasklet.TaskletStep] - <Applying contribution: [StepContribution: read=0, written=0, filtered=0, readSkips=0, writeSkips=0, processSkips=0, exitStatus=EXECUTING]>
This section looked at how to access data in the job repository via the JobExplorer. You use APIs like the JobExplorer to access the data to use it in a safe way. Although it isn't considered good practice to manipulate the job repository directly, that doesn't mean the data it maintains is hands-off. In fact, you can control what happens in your jobs programmatically by manipulating the job repository. You do this using the JobOperator.
The JobOperator is very similar to the JobExplorer when you look at the method names. However, whereas the JobExplorer provides a read-only look into the data in the job repository, the JobOperator exposes only as much as required to take action on it. The org.springframework.batch.core.launch. JobOperator interface lets you execute basic administrative tasks programmatically in a job.
The JobOperator's interface consists of 11 methods, which are outlined in Table 5-2.
Table 5.2. Methods Available on the JobOperator
Method | Description |
|---|---|
| Returns an ordered list of JobExecution |
| Returns the |
| Returns all job names available to be executed via the |
| Returns the job parameters used for the requested JobExecution in a human-readable string. |
| Returns the |
| Provides a summary (status, start and end times, and so on) of the each StepExecution related to the JobExecution specified. |
| Returns a summary of the JobExecution specified (status, start and end times, and so on). |
| Restarts a JobExecution in the |
| Starts a new JobInstance of the job specified with the parameters passed. |
| Performs the programmatic equivalent of running a job with the |
| Sends a stop signal to the JobExecution identified. It's important to note that this doesn't mean the job has stopped, only that the request to stop has been made. |
Up to now this book has been using a basic java command line command to launch Spring Batch's CommandLineJobRunner to run jobs. To see the JobOperator in action, you create a JMX JobRunner that allows you to execute a job via a JMX console. To get started, you have to write a main method that keeps the Spring application running without actually doing anything. Listing 5-11 shows how you do that.
Example 5.11. Bootstrapping a Spring Application
package com.apress.springbatch.chapter5;

import org.springframework.context.ApplicationContext;
import org.springframework.context.support.ClassPathXmlApplicationContext;

public class Batch {

    @SuppressWarnings("unused")
    public static void main(String[] args) {
        try {
            ApplicationContext context =
                new ClassPathXmlApplicationContext("launch-context.xml");

            Object lock = new Object();

            synchronized (lock) {
                lock.wait();
            }
        } catch (Exception e) {
            e.printStackTrace();
        }
    }
}
When you have the code written to launch your Spring application and keep it running, you can write JMXJobRunner. To do this, all you do is write a POJO that starts a job based on the job name passed in. As you can see in Listing 5-12, the code to accomplish this isn't much more than a wrapper around a JobOperator instance.
Example 5.12. JMXJobRunner
package com.apress.springbatch.chapter5;

import org.springframework.batch.core.JobParametersInvalidException;
import org.springframework.batch.core.launch.JobInstanceAlreadyExistsException;
import org.springframework.batch.core.launch.JobOperator;
import org.springframework.batch.core.launch.NoSuchJobException;
public class JMXJobRunner {

    private JobOperator operator;

    public void runJob(String name) throws NoSuchJobException,
                                           JobInstanceAlreadyExistsException,
                                           JobParametersInvalidException {
        operator.start(name, null);
    }
    public void setOperator(JobOperator operator) {
        this.operator = operator;
    }
}
In Listing 5-12, you use the JobOperator.start method to launch a job with the name provided and no parameters; the job is configured within the previously loaded ApplicationContext. With the JMXJobRunner and Batch classes written, the only thing left is to wire them up with Spring. All of the configuration for these elements is in launch-context.xml, as shown in Listing 5-13.
Example 5.13. launch-context.xml
<?xml version="1.0" encoding="UTF-8"?>
<beans:beans xmlns:beans="http://www.springframework.org/schema/beans"
    xmlns="http://www.springframework.org/schema/batch"
    xmlns:p="http://www.springframework.org/schema/p"
    xmlns:xsi="http://www.w3.org/2001/XMLSchema-instance"
    xsi:schemaLocation="http://www.springframework.org/schema/beans
        http://www.springframework.org/schema/beans/spring-beans-3.0.xsd
        http://www.springframework.org/schema/batch
        http://www.springframework.org/schema/batch/spring-batch-2.1.xsd">

    <beans:bean id="jobOperator"
      class="org.springframework.batch.core.launch.support.SimpleJobOperator"
      p:jobLauncher-ref="jobLauncher" p:jobExplorer-ref="jobExplorer"
      p:jobRepository-ref="jobRepository" p:jobRegistry-ref="jobRegistry" />

    <beans:bean id="jobExplorer"
class="org.springframework.batch.core.explore.support.JobExplorerFactoryBean"
        p:dataSource-ref="dataSource" />

    <beans:bean id="taskExecutor"
        class="org.springframework.core.task.SimpleAsyncTaskExecutor" />

    <beans:bean id="jobLauncher"
     class="org.springframework.batch.core.launch.support.SimpleJobLauncher">
        <beans:property name="jobRepository" ref="jobRepository" />
        <beans:property name="taskExecutor" ref="taskExecutor" />
    </beans:bean>

    <job-repository id="jobRepository"
        data-source="dataSource" transaction-manager="transactionManager" />
<beans:bean id="jobRegistry"
class="org.springframework.batch.core.configuration.support.MapJobRegistry" />
<beans:bean
class="org.springframework.batch.core.configuration.support.AutomaticJobRegistrar">
<beans:property name="applicationContextFactories">
<beans:bean
class="org.springframework.batch.core.configuration.support.
ClasspathXmlApplicationContextsFactoryBean">
<beans:property name="resources"
value="classpath*:/jobs/helloWorld.xml" />
</beans:bean>
</beans:property>
<beans:property name="jobLoader">
<beans:bean
class="org.springframework.batch.core.configuration.support.DefaultJobLoader">
<beans:property name="jobRegistry" ref="jobRegistry" />
</beans:bean>
</beans:property>
</beans:bean>
<beans:bean id="jobRunner"
class="com.apress.springbatch.chapter5.JMXJobRunnerImpl"
p:operator-ref="jobOperator" />
<beans:bean id="exporter"
class="org.springframework.jmx.export.MBeanExporter"
lazy-init="false">
<beans:property name="beans">
<map>
<entry key="bean:name=myJobRunner" value-ref="jobRunner" />
</map>
</beans:property>
<beans:property name="assembler" ref="assembler" />
</beans:bean>
<beans:bean id="assembler"
class="org.springframework.jmx.export.assembler.
InterfaceBasedMBeanInfoAssembler">
<beans:property name="managedInterfaces">
<list>
<value>com.apress.springbatch.chapter5.JMXJobRunner
</value>
</list>
</beans:property>
</beans:bean>
<beans:bean id="registry"
class="org.springframework.remoting.rmi.RmiRegistryFactoryBean">
<beans:property name="port" value="1099" />
</beans:bean><beans:bean id="dataSource"
class="org.apache.commons.dbcp.BasicDataSource">
<beans:property name="driverClassName"
value="${batch.jdbc.driver}" />
<beans:property name="url" value="${batch.jdbc.url}" />
<beans:property name="username" value="${batch.jdbc.user}" />
<beans:property name="password" value="${batch.jdbc.password}" />
</beans:bean>
<beans:bean id="transactionManager"
class="org.springframework.jdbc.datasource.DataSourceTransactionManager"
lazy-init="true">
<beans:property name="dataSource" ref="dataSource" />
</beans:bean>
<beans:bean id="placeholderProperties"
class="org.springframework.beans.factory.config.
PropertyPlaceholderConfigurer">
<beans:property name="location" value="classpath:batch.properties" />
<beans:property name="systemPropertiesModeName"
value="SYSTEM_PROPERTIES_MODE_OVERRIDE" />
<beans:property name="ignoreUnresolvablePlaceholders"
value="true" />
<beans:property name="order" value="1" />
</beans:bean>
</beans:beans>This launch-context.xml file has a lot going on, so let's take it from the top. In order for the JMXJobLauncher to be able to start a job, you need a reference to a JobOperator. The first bean in this file is that configuration. SimpleJobOperator is the only implementation of the JobOperator interface provided by the Spring Batch framework. You configure it to have access to the JobExplorer, JobLauncher, JobRepository, and JobRegistry. Given what the JobOperator can do, these dependencies are all needed.
The JobExplorer is next, to provide read-only access to the JobRepository for many of the objects in this configuration. After the JobExplorer is a TaskExecutor configuration along with the JobLauncher used by the JobOperator. The JobLauncher does the work of starting the job and is managed by the JobOperator for your environment. You configure the JobRepository next; as discussed, this is used by Spring Batch to maintain the state of your jobs.
The JobRegistry is the next bean configured. Spring Batch provides the ability to register a collection of jobs in a JobRegistry to be executed on demand. The JobRegistry contains all the jobs that are eligible to be run in this JVM. In the case of this configuration, you're using Spring Batch's MapJobRegistry, which is a Map of jobs available to be run. In order to populate the JobRegistry on startup, you configure an instance of AutomaticJobRegistrar. This class, as configured in Listing 5-13, reads all the jobs configured in the /jobs/helloWorldJob.xml file and loads them into the JobRegistry for future use.
The final piece from a Spring Batch perspective in this launch-context.xml file is the configuration of JMXJobLauncher itself. The rest of the configuration found in this file consists of the datasource, transaction manager, properties loader, and required elements to expose JMXJobLauncher as an MBean.
With all of the configuration and coding complete, you can now run the main class, Batch, and look at the beans exposed via JMX with the JConsole application provided by the JDK. To launch the Batch program, you need to make one last tweak, however. When you create a shell project by using Spring Batch's simple-cli-archetype, the cli stands for command line interface. The Project Object Model (POM) in this project is preconfigured to create a jar file, with CommandLineJobRunner defined as the main class by default. For this example, you update the POM to use the Batch class from Listing 5-11 as the main method for your jar. Listing 5-14 shows the snippet that needs to be updated.
Example 5.14. Maven Jar Plug-in Configured to Run Batch
<plugin>
    <groupId>org.apache.maven.plugins</groupId>
    <artifactId>maven-jar-plugin</artifactId>
    <configuration>
        <archive>
            <index>false</index>
            <manifest>
                <mainClass>com.apress.springbatch.chapter5.Batch</mainClass>
                <addClasspath>true</addClasspath>
                <classpathPrefix>lib/</classpathPrefix>
            </manifest>
            <manifestFile>
                ${project.build.outputDirectory}/META-INF/MANIFEST.MF
            </manifestFile>
        </archive>
    </configuration>
</plugin>
With the POM updated, you can use the same command you have in the past to launch the program: java –jar metadata-0.0.1-SNAPSHOT.jar.
Notice that when you run the program, the output is quite different. This time, no job runs. Instead, you see Spring bootstrap and register the job helloWorldJob from the helloWorld.xml file, as shown in Listing 5-16.
Example 5.15. The registration of the helloWorld job.
2010-12-16 21:17:41,390 DEBUG com.apress.springbatch.chapter5.Batch.main()
[org.springframework.batch.core.configuration.support.DefaultJobLoader] - <Registering job:
helloWorldJob1 from context: file:/Users/mminella/Documents/SpringBatch/Chapter5/batch-
test/target/classes/jobs/helloWorld.xml>
With the Batch process running, you view the beans exposed via JMX using Java's JConsole. JConsole is a free Java monitoring and management tool provided with the JDK. It allows you to monitor the JVM in a number of ways, including CPU utilization and memory allocation, and it lets you perform management tasks including interacting with JMX beans. When you launch JConsole, you're presented with a screen that asks you which Java process you would like to connect to, as shown in Figure 5-2.
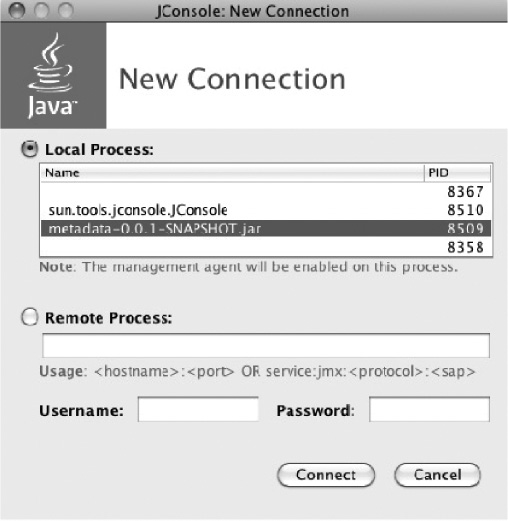
In this case, select the local process (you can use JConsole to administer remote Java processes as well) with the name org.codehaus.classworlds.Launcher "exec:java". This is the Java process you launched with the maven command in Listing 5-15. Clicking connect allows JConsole to connect to the JVM.
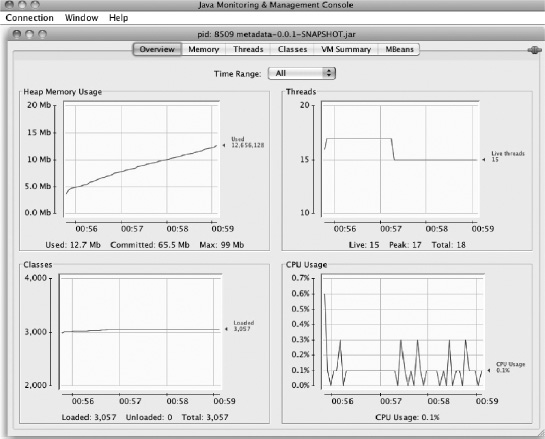
After you connect, JConsole shows you a screen like the one in Figure 5-3. At the top are six tabs: Overview, Memory, Threads, Classes, VM Summary, and MBeans. Below the tabs, JConsole lets you select the time range for which to display the overview data. Finally, there are four quadrants of data: the amount of JVM heap memory usage, the number of threads being used, the number of classes currently loaded by the JVM, and the CPU usage during the time selected. The tab you're interested in is MBeans.
When you select the MBeans tab, you're presented with a tree navigation on the left and a main panel in the rest of the window. In Listing 5-13 you configured the bean to be in the namespace bean and have the name myJobRunner. Sure enough, Figure 5-4 shows the bean namespace in the tree navigation with a bean myJobRunner available.
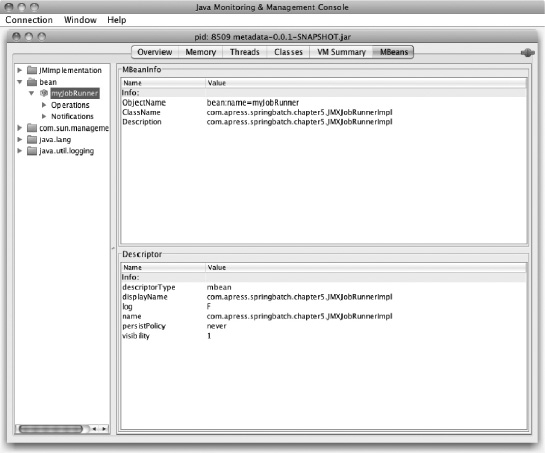
For any bean exposed, there are up to three sections: attributes that allow you to modify public attributes (which you don't have in this case); Operations, which lets you execute public methods; and Notifications, to show you any JMX notifications (messages sent from the bean to anyone listening via JMX). To run your batch job, go to Operations, as shown in Figure 5-5. There you see the only public method on JMXJobRunner: runJob. It's void and takes a single parameter. To invoke the job, all you need to do is enter the job name in the box and click Runjob.
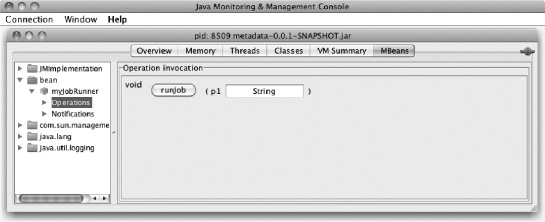
When you click the Runjob button, you see in the console in which you're currently running your Java process that the job runs, giving you the output you expect with helloWorldJob.
2010-12-17 17:06:09,444 DEBUG RMI TCP Connection(1)-192.168.1.119
[org.springframework.batch.core.scope.context.StepContextRepeatCallback] - <Chunk execution
starting: queue size=0>

Hello, World!

2010-12-17 17:06:09,450 DEBUG RMI TCP Connection(1)-192.168.1.119
[org.springframework.batch.core.step.tasklet.TaskletStep] - <Applying contribution:
[StepContribution: read=0, written=0, filtered=0, readSkips=0, writeSkips=0, processSkips=0,
exitStatus=EXECUTING]>
In this example, you wrote a job runner that you were able to expose via JMX. Other uses would be to develop a step listener that stops the job based on a given condition. In Chapter 6, you expand this example to accept parameters and use the JobOperator to stop and restart jobs programmatically.
Spring Batch's ability to manage metadata about a job as well as maintain the state of the job as it runs for error handling is one of the primary reasons, if not the primary reason, to use Spring Batch for enterprise batch processing. Not only does it provide the ability for robust error handling, but it also allows processes to make decisions about what to do based on what has happened elsewhere in the job. In the next chapter, you put this metadata to further use as well as the JobOperator as you take a deep look at how to start, stop, and restart jobs in a variety of environments.
[15] By default, Spring instantiates all singleton beans on startup. Because you don't know what will happen, there is no reason to go through the work of creating a transaction manager if it won't be used.