C H A P T E R 8
Marking Up Text
We are going to switch track from the big structural document elements to something much finer grained: the text-level elements (text elements, for brevity). When you add these elements to your text, you add structure and meaning. This will become evident as you work through the examples in this chapter.
The HTML5 specification makes it clear that you should only use elements for their semantic value. However, to make life easier, the specification also makes it clear that the traditional styling associated with these elements is part of the semantic meaning for some elements. This is a bit of a fudge, but a helpful one that maintains compatibility with older HTML versions.
Some of these elements have very specific meanings. For example, the cite element is used only to cite the title of another work, such as a book or film. However, many other elements are more ambiguous and, despite the intention of the HTML5 standard, essentially related to presentation.
My advice is to take a pragmatic approach. First, use a task-specific element if there is one available. Second, consider avoiding those elements that were formerly presentational only and that have had semantic meaning applied in retrospect—such as the b element—and manage presentation using CSS. Finally, irrespective of which elements you choose to use, use them consistently throughout your HTML. Table 8-1 provides the summary for this chapter.

Creating Hyperlinks
Hyperlinks are a critical feature in HTML, and provide the basis by which users can navigate through content, both within the same document and across pages. You create hyperlinks using the a element, which is summarized in Table 8-2.
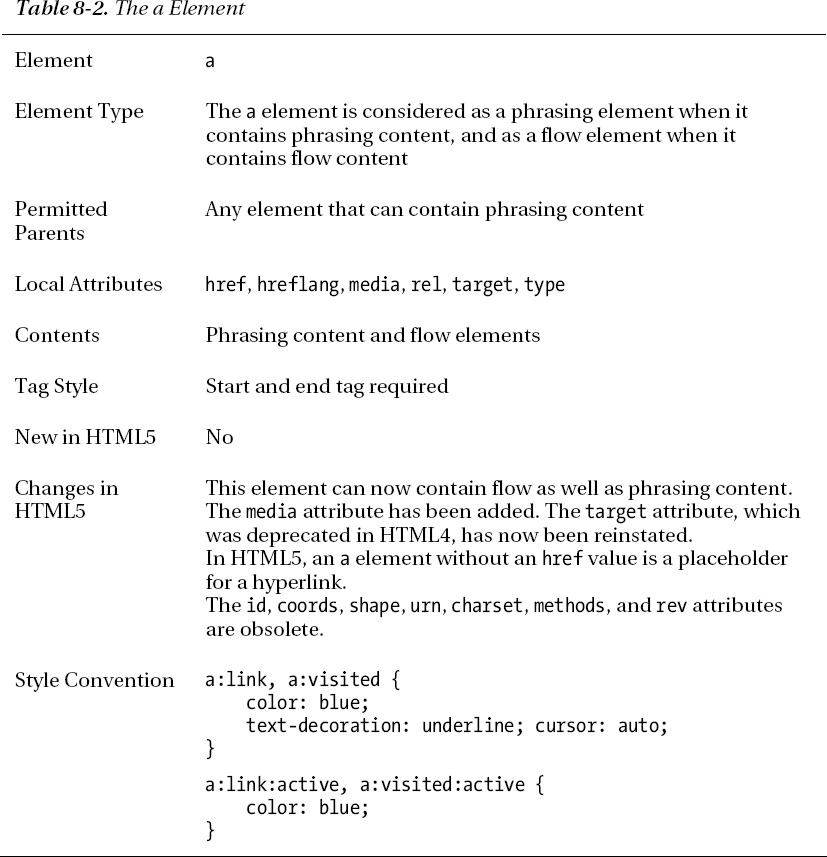
The a element defines six local attributes, described in Table 8-3. The most important of these attributes is href, as you'll see later in this section.

Creating External Hyperlinks
You can create hyperlinks to other HTML documents by setting the href attribute to a URL that starts with http://. When the user clicks the hyperlink, the browser will load the specified page. Listing 8-1 shows the a element being used to link to external content.
Listing 8-1. Using the a Element to Link to an External Resource
<!DOCTYPE HTML>

<html>

    <head>

        <title>Example</title>

        <base href="http://titan/listings/"/>

        <meta name="author" content="Adam Freeman"/>

        <meta name="description" content="A simple example"/>

        <link rel="shortcut icon" href="favicon.ico" type="image/x-icon" />

    </head>

    <body>

        I like <a href="http://en.wikipedia.org/wiki/Apples">apples</a> and

        <a href="http://en.wikipedia.org/wiki/Orange_(fruit)">oranges</a>.

    </body>

</html>
In this example, I have created two a elements that link to Wikipedia articles. Clicking either link will cause the appropriate article to be loaded and displayed to the user. You can see the default style convention for hyperlinks in Figure 8-1.
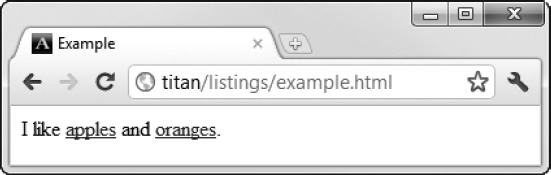
Figure 8-1. The default appearance of hyperlinks
Not all URLs have to refer to other web pages. Although the http protocol is the most widely used form of URL, browsers also support other protocols such as https and ftp. If you want to reference an e-mail address, you can use the mailto protocol; for example, mailto:[email protected].
![]() Tip You can use the
Tip You can use the a element to create image-based hyperlinks (where the user clicks an image, rather than text, to follow a hyperlink). This requires the use of the img element. You can find the details of the img element and a demonstration of an image-based hyperlink in Chapter 15.
Creating Relative URLs
If the value of the href attribute doesn't start with a recognized protocol, such as http://s, then the browser treats the hyperlink as a relative reference. By default, this means that the browser assumes that a target resource is available in the same location as the current document. Listing 8-2 gives an example of a relative URL.
Listing 8-2. Using a Relative URL in a Hyperlink
<!DOCTYPE HTML>

<html>

    <head>

        <title>Example</title>

        <base href="http://titan/listings/"/>

        <meta name="author" content="Adam Freeman"/>

        <meta name="description" content="A simple example"/>

        <link rel="shortcut icon" href="favicon.ico" type="image/x-icon" />

    </head>

    <body>

        I like <a href="http://en.wikipedia.org/wiki/Apples">apples</a> and

        <a href="http://en.wikipedia.org/wiki/Orange_(fruit)">oranges</a>.

        You can see other fruits I like <a href="fruitlist.html">here</a>.

    </body>

</html>
In this example, I have set the value of the href attribute to fruitlist.html. When the user clicks the link, the browser uses the URL of the current document to determine how to load the linked page. As an example, if the current document had been loaded from http://www.mydomain.com/docs/example.html, then the browser would load the target page from http://www.mydomain.com/doc.fruitlist.html.
![]() Tip You can override this default behavior and provide an alternative base URL through the
Tip You can override this default behavior and provide an alternative base URL through the base element, which I described in Chapter 7.
Creating Internal Hyperlinks
You can create hyperlinks that bring another element into view in the browser window. You do this using the CSS-style ID selector, #<id>, as shown in Listing 8-3.
Listing 8-3. Creating an Internal Hyperlink
<!DOCTYPE HTML>

<html>

    <head>

        <title>Example</title>

        <meta name="author" content="Adam Freeman"/>

        <meta name="description" content="A simple example"/>

        <link rel="shortcut icon" href="favicon.ico" type="image/x-icon" />

    </head>

    <body>

        I like <a href="http://en.wikipedia.org/wiki/Apples">apples</a> and

        <a href="http://en.wikipedia.org/wiki/Orange_(fruit)">oranges</a>.

        You can see other fruits I like <a href="#fruits">here</a>.


        <p id="fruits">

            I also like bananas, mangoes, cherries, apricots, plums, peaches and grapes.

        </p>

    </body>

</html>
I have created a hyperlink with the href value of #fruits. When the user clicks the link, the browser will look for an element in the document whose id attribute has a value of fruits. If the element isn't already visible on the screen, the browser will scroll the document so that it is.
![]() Tip If the browser can't find an element with the desired
Tip If the browser can't find an element with the desired id attribute value, it will search again, looking for a name attribute that matches the target.
Targeting a Browsing Context
The target attribute lets you tell the browser where you want the linked resource to be displayed. By default, the browser uses the window, tab, or frame in which the current document is displayed, meaning that the new document replaces the existing one. However, you do have other choices. Table 8-4 describes the supported values for the target attribute.
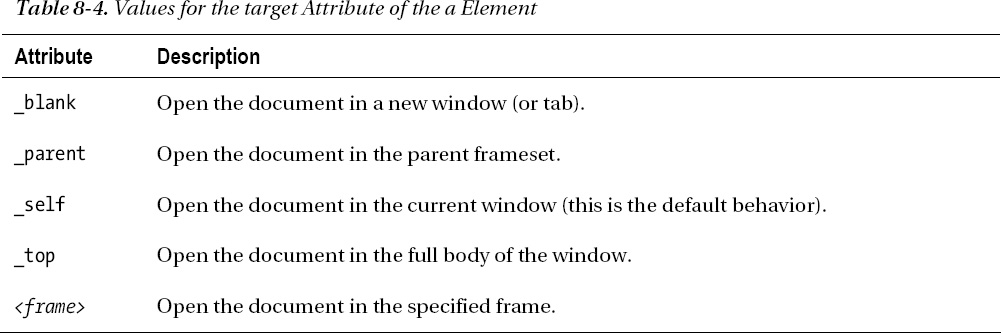
Each of these values represents a browsing context. The _blank and _self values are self-evident; the others relate to the use of frames, which I explain in Chapter 15.
Annotating Content with the Basic Text Elements
The first set of text elements that you will look at have been around in HTML for a while. Some of these elements represented text formatting in the past, but as HTML has evolved, the separation of presentation from broader semantics has meant that they now have more generalized significance.
Denoting Keywords and Product Names
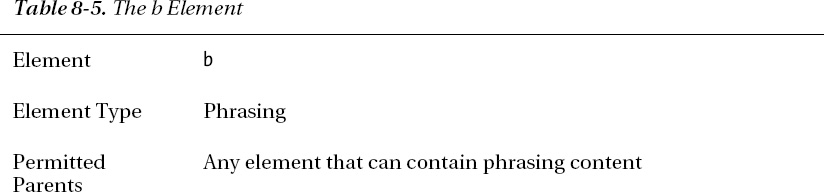
The b element is used to offset a span of text without indicating any extra emphasis or importance. The examples given in the HTML5 specification are keywords in a document abstract and product names in a review. Table 8-5 describes the b element.
The b element is very simple: content contained between the start and end tags is offset from the surrounding content. You would usually do this by showing the content in bold, but you can use CSS to change the style applied to b elements. Listing 8-4 shows the b element in use.
Listing 8-4. Using the b Element
<!DOCTYPE HTML>

<html>

    <head>

        <title>Example</title>

        <base href="http://titan/listings/"/>

        <meta name="author" content="Adam Freeman"/>

        <meta name="description" content="A simple example"/>

        <link rel="stylesheet" type="text/css" href="styles.css"/>

        <link rel="shortcut icon" href="favicon.ico" type="image/x-icon" />

    </head>

    <body>

        I like <b>apples</b> and <b>oranges</b>.

    </body>

</html>
You can see the default style convention for the b element in Figure 8-2.

Figure 8-2. Using the b element
Adding Emphasis
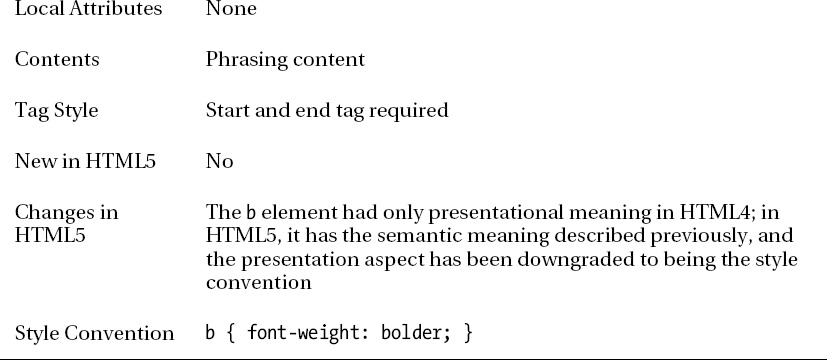
The em element represents a span of text with emphatic stress. You use this to give a kind of context to the reader about the meaning of a sentence or paragraph. I'll show you what this means following Table 8-6, which describes the em element.
Listing 8-5. Using the em Element
<!DOCTYPE HTML>

<html>

    <head>

        <title>Example</title>

        <base href="http://titan/listings/"/>

        <meta name="author" content="Adam Freeman"/>

        <meta name="description" content="A simple example"/>

        <link rel="stylesheet" type="text/css" href="styles.css"/>

        <link rel="shortcut icon" href="favicon.ico" type="image/x-icon" />

    </head>

    <body>

        <em>I</em> like <b>apples</b> and <b>oranges</b>.

    </body>

</html>
The styling convention for this element is to use italics, as shown in Figure 8-3.

Figure 8-3. Using the em element
In this example, I have placed the emphasis on I, at the start of the sentence. When thinking about the em element, it helps to read the sentence aloud and consider a question that the sentence might be an answer to. For example, imagine that I asked, “Who likes apples and oranges?” Your answer would be, “I like apples and oranges.” (When you read this aloud and put emphasis on I, you are making it clear that you are the person who likes these fruits.)
But if I asked, “You like apples and what else?” you might answer, “I like apples and oranges.” In this case, the weight of your emphasis would be on the last word, emphasizing that oranges are the other fruit you like. You would represent this variation as follows in HTML:
I like apples and <em>oranges</em>.
Denoting Foreign or Technical Terms
The i element denotes a span of text that has a different nature from the surrounding content. This is a fairly loose definition, but common examples include words from other languages, a technical or scientific term, and even a person's thoughts (as opposed to speech). Table 8-7 describes the i element.

Listing 8-6 shows the i element in use.
Listing 8-6. Using the i Element
<!DOCTYPE HTML>

<html>

    <head>

        <title>Example</title>

        <base href="http://titan/listings/"/>

        <meta name="author" content="Adam Freeman"/>

        <meta name="description" content="A simple example"/>

        <link rel="stylesheet" type="text/css" href="styles.css"/>

        <link rel="shortcut icon" href="favicon.ico" type="image/x-icon" />

    </head>

    <body>

        <em>I</em> like <b>apples</b> and <b>oranges</b>.

        My favorite kind of orange is the mandarin, properly known

        as <i>citrus reticulata</i>.

    </body>

</html>
You can see the effect of the i element in Figure 8-4. Notice that the style convention for the i element is the same as for the em element. This is a great example of how the meaning of an element differs from its appearance.
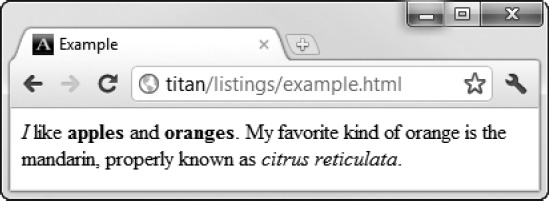
Figure 8-4. Using the i element
Showing Inaccuracies or Corrections
You use the s element to denote a span of text that is no longer correct or accurate. The style convention is to display the text with a line drawn through it. Table 8-8 describes the s element.
Listing 8-7 shows the s element in use.
Listing 8-7. Using the s Element
<!DOCTYPE HTML>

<html>

    <head>

        <title>Example</title>

        <base href="http://titan/listings/"/>

        <meta name="author" content="Adam Freeman"/>

        <meta name="description" content="A simple example"/>

        <link rel="stylesheet" type="text/css" href="styles.css"/>

        <link rel="shortcut icon" href="favicon.ico" type="image/x-icon" />

    </head>

    <body>

        <em>I</em> like <b>apples</b> and <b>oranges</b>.

        My favorite kind of orange is the mandarin, properly known

        as <i>citrus reticulata</i>.

        Oranges at my local store cost <s>$1 each</s> $2 for 3.

    </body>

</html>
You can see the default style convention of the s element in Figure 8-5.
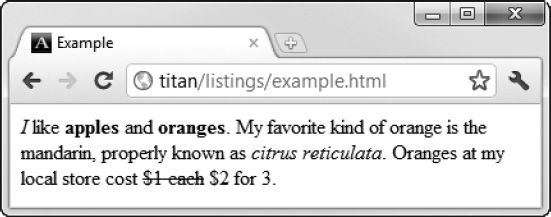
Figure 8-5. Using the s element
Denoting Important Text
The strong element denotes a span of text that is important. Table 8-9 describes this element.
Listing 8-8 shows the strong element in use.
Listing 8-8. Using the strong Element
<!DOCTYPE HTML>

<html>

    <head>

        <title>Example</title>

        <base href="http://titan/listings/"/>
<meta name="author" content="Adam Freeman"/>
<meta name="description" content="A simple example"/>
<link rel="stylesheet" type="text/css" href="styles.css"/>
<link rel="shortcut icon" href="favicon.ico" type="image/x-icon" />
</head>
<body>
I like apples and oranges.
<strong>Warning:</strong> Eating too many oranges can give you heart burn.
</body>
</html>
I have removed some of the text from the earlier examples to make the listing easier to read. You can see the default style convention of the strong element in Figure 8-6. The strong element has the same style convention as the b element. However, it is important to pick the right element when marking up your content; notice that the b element doesn't assign any importance to the text it encompasses.
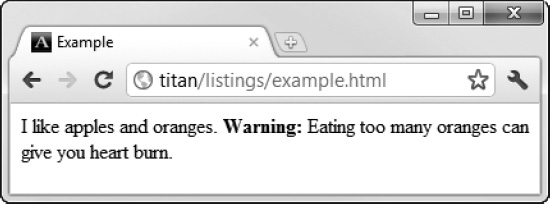
Figure 8-6. Using the strong element
Underlining Text
The u element offsets a span of text from the surrounding content without implying any increased importance or emphasis. This is a vague description because the u element previously had a presentational impact only (to underline text) and no real semantic significance. In effect, this is still a presentational element and the effect it has is to underline text (although you could potentially change this behavior using CSS, I don't recommend repurposing elements in this way; look at using the span element instead). Table 8-10 summarizes the u element.
The style convention for the u element is similar to that for the a element, which means that users will often mistake underlined text as being a hyperlink. To prevent this confusion, avoid the u element when possible. Listing 8-9 shows the u element in use.
Listing 8-9. Using the u Element
<!DOCTYPE HTML>

<html>

    <head>

        <title>Example</title>

        <base href="http://titan/listings/"/>

        <meta name="author" content="Adam Freeman"/>

        <meta name="description" content="A simple example"/>

        <link rel="stylesheet" type="text/css" href="styles.css"/>

        <link rel="shortcut icon" href="favicon.ico" type="image/x-icon" />

    </head>

    <body>

        I like apples and oranges.

        <strong>Warning:</strong> Eating <u>too many</u> oranges can give you heart burn.

    </body>

</html>
You can see how the browser displays this element using the default style convention in Figure 8-7.
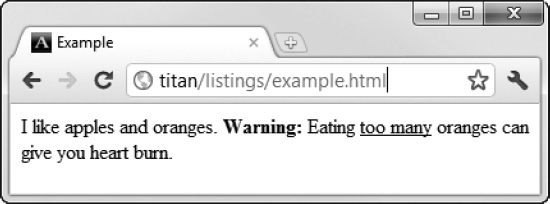
Figure 8-7. Using the u element
Adding Fine Print
The small element denotes fine print and is often used for disclaimers and clarifications. Table 8-11 summarizes the small element.
Listing 8-10 shows the small element in use.
Listing 8-10. Using the small Element
<!DOCTYPE HTML>

<html>

    <head>

        <title>Example</title>

        <meta name="author" content="Adam Freeman"/>

        <meta name="description" content="A simple example"/>

        <link rel="shortcut icon" href="favicon.ico" type="image/x-icon" />

    </head>

    <body>

        Oranges at my local store are $1 each <small>(plus tax)</small>

    </body>

</html>
You can see how the browser applies the default style convention in Figure 8-8.

Figure 8-8. Using the small element
Adding Superscript and Subscript
You use the sub and sup elements to denote subscripts and superscripts, respectively. Superscripts are required in some languages and both superscripts and subscripts are used in simple mathematical expressions. Table 8-12 summarizes these elements.
Listing 8-11 shows the sub and sup elements in use.
Listing 8-11. Using the sub and sup Elements
<!DOCTYPE HTML>

<html>

    <head>

        <title>Example</title>
<meta name="author" content="Adam Freeman"/>
<meta name="description" content="A simple example"/>
<link rel="shortcut icon" href="favicon.ico" type="image/x-icon" />
</head>
<body>
The point x<sub>10</sub> is the 10<sup>th</sup> point.
</body>
</html>
You can see how the browser applies the default style convention in Figure 8-9.
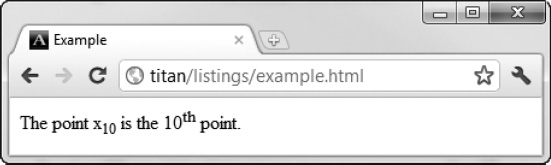
Figure 8-9. Using the sub and sup elements
Creating Breaks
There are two elements that you can use to deal with line breaks in content: the br and wbr elements.
Forcing a Line Break
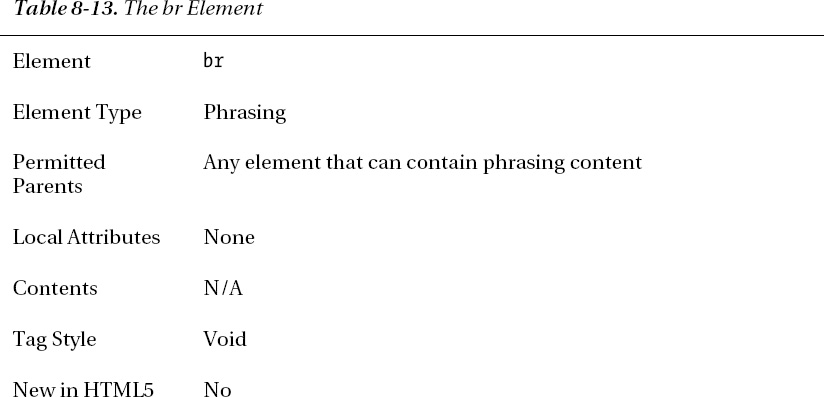
The br element introduces a line break. The style convention is to move subsequent content onto a new line. Table 8-13 summarizes the br element.

Listing 8-12 shows the br element in use.
![]() Note The
Note The br element may be used only when line breaks are part of the content, as in Listing 8-12. You must not use the br element to create paragraphs or other groupings of content; there are other elements for that task, which I describe in Chapters 9 and 10.
Listing 8-12. Using the br Element
<!DOCTYPE HTML>

<html>

    <head>

        <title>Example</title>

        <meta name="author" content="Adam Freeman"/>

        <meta name="description" content="A simple example"/>

        <link rel="shortcut icon" href="favicon.ico" type="image/x-icon" />

    </head>

    <body>

        I WANDERED lonely as a cloud<br/>

        That floats on high o'er vales and hills,<br/>

        When all at once I saw a crowd,<br>

        A host, of golden daffodils;

    </body>

</html>
You can see how the use of the br element causes the browser to display the content in Figure 8-10.
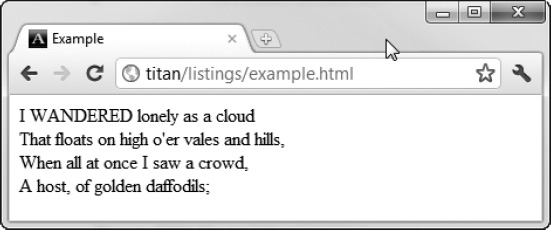
Figure 8-10. Using the br element
Indicating an Opportunity for a Safe Line Break
The wbr element is new to HTML5 and indicates where the browser could reasonably insert a line break to wrap content that is larger than the current browser window. It is the browser that makes the decision as to whether or not a line break is actually used. The wbr element is simply a guide to suitable places to break content. Table 8-14 summarizes the wbr element.

Listing 8-13 shows the use of the wbr element to help the browser display a long word.
Listing 8-13. Using the wbr Element
<!DOCTYPE HTML>

<html>

    <head>

        <title>Example</title>

        <meta name="author" content="Adam Freeman"/>

        <meta name="description" content="A simple example"/>

        <link rel="shortcut icon" href="favicon.ico" type="image/x-icon" />

    </head>

    <body>

        This is a very long word: Super<wbr>califragilistic<wbr>expialidocious.

        We can help the browser display long words with the <code>wbr</code> element.

    </body>

</html>
To understand the value of the wbr element, you have to see how the browser operates with and without the use of the element. Figure 8-11 shows how the browser deals with content when the wbr element isn't present.

Figure 8-11. Wrapping content without the wbr element
Without the wbr element, the browser encounters the long word and treats it as a single unit. This means that you end up with a large amount of wasted space at the end of the first line of text. If you add the wbr element, as in Listing 8-13, then you give the browser more options, as Figure 8-12 shows.

Figure 8-12. Wrapping content with the wbr element
With the wbr element, the browser is able to treat the very long word as a series of smaller segments, and can wrap the content more elegantly. When you use the wbr element, you are telling the browser where breaking a word would be most appropriate.
Representing Inputs and Outputs
There are four elements that betray the geeky origins of HTML. You use these elements to represent inputs and outputs of a computer. Table 8-15 summarizes these elements. None of these elements define local attributes and none of them are new or changed in HTML5.

Listing 8-14 shows these four elements used in a document.
Listing 8-14. Using the code, var, samp, and kbd Elements
<!DOCTYPE HTML>

<html>

    <head>

        <title>Example</title>

        <meta name="author" content="Adam Freeman"/>

        <meta name="description" content="A simple example"/>

        <link rel="shortcut icon" href="favicon.ico" type="image/x-icon" />

    </head>

    <body>

        <p>

        <code>var fruits = ["apples", "oranges", "mangoes", "cherries"];<br>

            document.writeln("I like " + fruits.length + " fruits");</code>

        </p>

        <p>The variable in this example is <var>fruits</var></p>

        <p>The output from the code is: <samp>I like 4 fruits</samp></p>

        <p>When prompted for my favorite fruit, I typed: <kbd>cherries</kbd>

    </body>

</html>
You can see the default style conventions for these elements in Figure 8-13. Notice that three of these elements have the same style convention. I have used the p element to add some structure to the content (I describe the p element in Chapter 9).
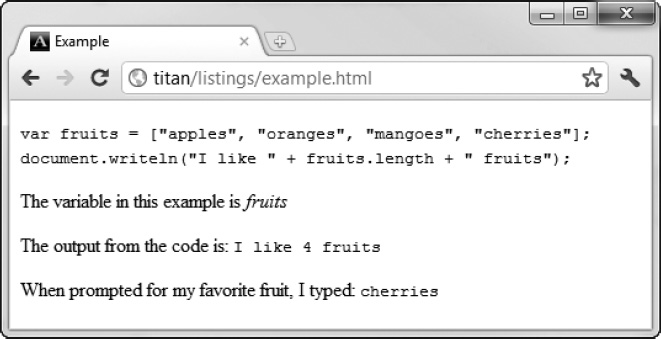
Figure 8-13. Using the code, var, samp, and kbd elements
Creating Citations, Quotations, Definitions, and Abbreviations
The next four elements that you will look at allow you to denote citations, quotations, definitions, and abbreviations. These are widely used in scientific and academic documents.
Denoting Abbreviations
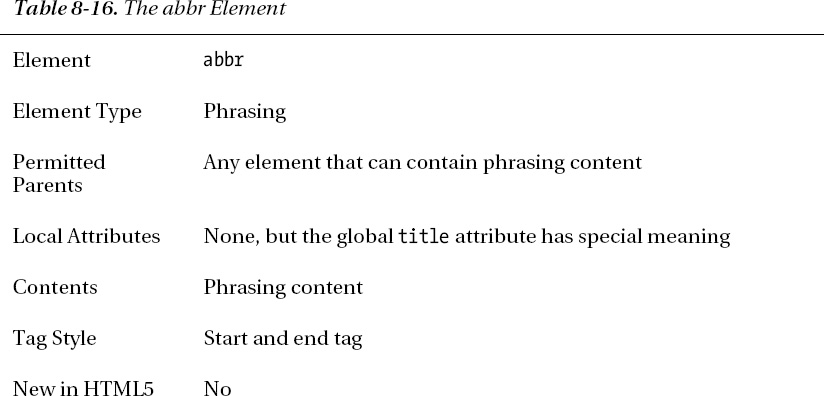
The abbr element allows you to denote an abbreviation. When using this element, you use the title attribute to provide the expanded text that the abbreviation represents. Table 8-16 summarizes this element.

Listing 8-15 shows the abbr element in use.
Listing 8-15. Using the abbr Element
<!DOCTYPE HTML>
<html>
<head>
<title>Example</title>
<meta name="author" content="Adam Freeman"/>
<meta name="description" content="A simple example"/>
<link rel="shortcut icon" href="favicon.ico" type="image/x-icon" />
</head>
<body>
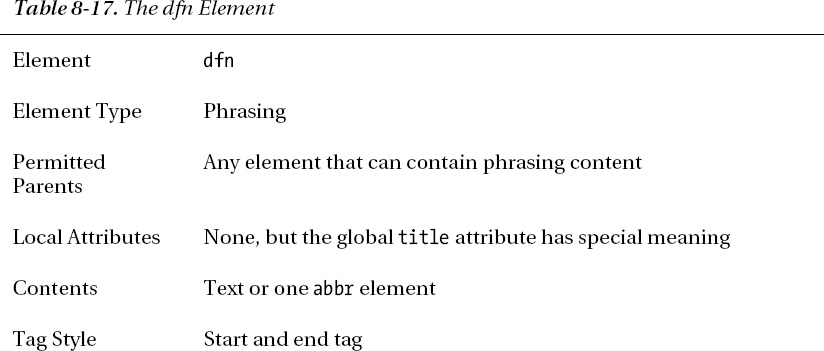
I like apples and oranges.
The <abbr title="Florida Department of Citrus">FDOC</abbr> regulates the Florida
citrus industry.
</body>
</html>
There is no style convention for the abbr element, so content contained in this element is not offset in any way.
Defining Terms
The dfn element denotes the defining instance of a term. This is the instance that explains the meaning or significance of a word or phrase. Table 8-17 summarizes this element.

There are some rules about how to use the dfn element. If the dfn element has a title attribute, then the value of the title attribute must be the term that is being defined. You can see an example of a dfn element being used this way in Listing 8-16.
Listing 8-16. Using the dfn Element
<!DOCTYPE HTML>

<html>

    <head>

        <title>Example</title>

        <meta name="author" content="Adam Freeman"/>

        <meta name="description" content="A simple example"/>

        <link rel="shortcut icon" href="favicon.ico" type="image/x-icon" />

    </head>

    <body>

        I like apples and oranges.

        The <abbr title="Florida Department of Citrus">FDOC</abbr> regulates the Florida

        citrus industry.


        <p>

            The <dfn title="apple">apple</dfn> is the pomaceous fruit of the apple tree,

            species Malus domestica in the rose family.

        </p>

    </body>

</html>
If the dfn element contains an abbr element, then the abbreviation is the term that is being defined. If there is no title attribute and the contents of the element are text, then the text represents the term being defined. There is no style convention associated with this element, so the content of this element is not offset in any way.
Quoting Content from Another Source
The q element denotes content quoted from another source. Table 8-18 summarizes the q element.


The definition of the term apple in the previous section comes from Wikipedia, and should be properly attributed. The cite attribute is used to specify the URL of the source document, as shown in Listing 8-17.
Listing 8-17. Using the q Element
<!DOCTYPE HTML>

<html>

    <head>

        <title>Example</title>

        <meta name="author" content="Adam Freeman"/>

        <meta name="description" content="A simple example"/>

        <link rel="shortcut icon" href="favicon.ico" type="image/x-icon" />

    </head>

    <body>

        I like apples and oranges.

        The <abbr title="Florida Department of Citrus">FDOC</abbr> regulates the Florida

        citrus industry.

        <p>

            <q cite="http://en.wikipedia.org/wiki/Apple">The

            <dfn title="apple">apple</dfn> is the pomaceous fruit of the apple tree,

            species Malus domestica in the rose family.</q>

        </p>

    </body>

</html>
Here, the style convention for the q element uses the CSS :before and :after pseudo-element selectors to surround the quoted text with quotation marks, as shown in Figure 8-14. You can learn about pseudo-element selectors in Chapters 17 and 18.
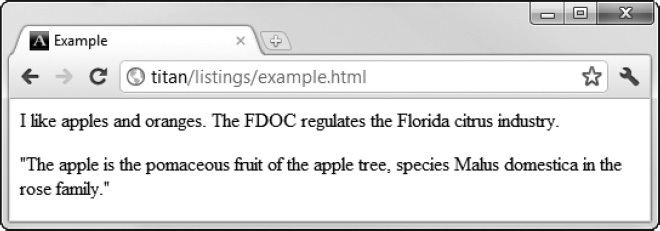
Figure 8-14. Using the q element
Citing the Title of Another Work
The cite element denotes the title of a cited work, such a book, article, film, or poem. Table 8-19 summarizes the cite element.

Listing 8-18 shows the use of the cite element.
Listing 8-18. Using the cite Element
<!DOCTYPE HTML>

<html>

    <head>
<title>Example</title>
<meta name="author" content="Adam Freeman"/>
<meta name="description" content="A simple example"/>
<link rel="shortcut icon" href="favicon.ico" type="image/x-icon" />
</head>
<body>
I like apples and oranges.
The <abbr title="Florida Department of Citrus">FDOC</abbr> regulates the Florida
citrus industry.
<p>
<q cite="http://en.wikipedia.org/wiki/Apple">The
<dfn title="apple">apple</dfn> is the pomaceous fruit of the apple tree,
species Malus domestica in the rose family.</q>
</p>
My favorite book on fruit is <cite>Fruit: Edible, Inedible, Incredible</cite>
by Stuppy & Kesseler
</body>
</html>
You can see the application of the default style convention in Figure 8-15.
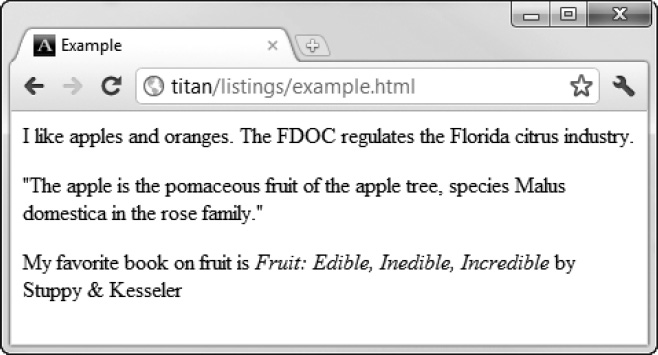
Figure 8-15. Using the cite element
Working with the Language Elements
There are five HTML elements, four of which are new in HTML5, that provide support for working with non-Western languages. The following sections describe these elements.
The ruby, rt, and rp Elements
Ruby characters are notations placed above or to the right of characters in logographic languages (such as Chinese or Japanese), and that aid the reader in correctly pronouncing characters. The ruby element denotes a span of text that contains a ruby. Table 8-20 summarizes this element.

You use the ruby element in conjunction with the rt and rp elements, which are also new in HTML5. The rt element marks the ruby notation, and the rp element denotes parentheses around an annotation that can be displayed by browsers that don't support ruby annotations.
I don't speak any logographic languages, which means that I don't have a basis on which to create an example using logograms. The best that I can do in this section is to use English text to demonstrate how ruby annotations are displayed by the browser. Listing 8-19 contains such an annotation.
Listing 8-19. Using the ruby, rt, and rp Elements
<!DOCTYPE HTML>

<html>

    <head>

        <title>Example</title>

        <meta name="author" content="Adam Freeman"/>

        <meta name="description" content="A simple example"/>

        <link rel="shortcut icon" href="favicon.ico" type="image/x-icon" />

    </head>

    <body>

        I like apples and oranges.

        The <abbr title="Florida Department of Citrus">FDOC</abbr> regulates the Florida

        citrus industry.

        <p>

            <q cite="http://en.wikipedia.org/wiki/Apple">The

            <dfn title="apple">apple</dfn> is the pomaceous fruit of the apple tree,

            species Malus domestica in the rose family.</q>

        </p>

        <p>
Oranges are often made
into<ruby> OJ <rp>(</rp><rt>Orange Juice</rt><rp>)</rp></ruby>
</p>
</body>
</html>
When the document is displayed in a browser that supports ruby annotations, the rp elements and their contents are ignored, and the contents of the rt element is displayed as an annotation, as shown in Figure 8-16.
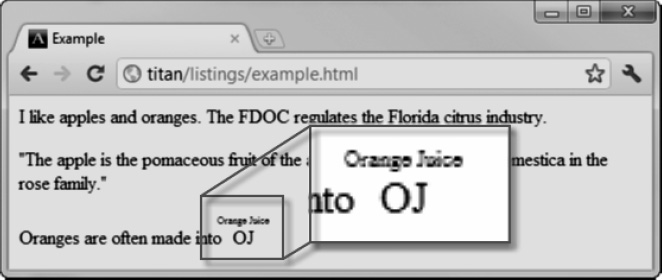
Figure 8-16. Using the ruby, rt, and rp elements
If you display the document in a browser that doesn't support ruby annotations, then the contents of the rp and rt elements are displayed. As I write this chapter, Firefox doesn't support ruby annotations; you can see how it would display the content in Figure 8-17.
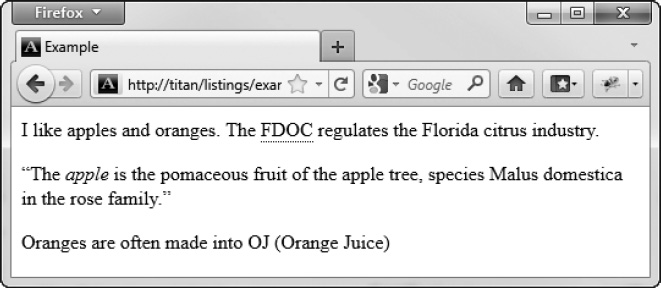
Figure 8-17. Rubies in a browser that doesn't support annotations
The bdo Element
The bdo element specifies an explicit text direction for its content, overriding the automatic directionality that would usually be applied. Table 8-21 summarizes the bdo element.

You must use the bdo element with the dir attribute, which has the allowed values of rtl (for right-to-left layout) and ltr (for left-to-right layout). Listing 8-20 shows the bdo element in use.
Listing 8-20. Using the bdo Element
<!DOCTYPE HTML>

<html>

    <head>

        <title>Example</title>

        <meta name="author" content="Adam Freeman"/>

        <meta name="description" content="A simple example"/>

        <link rel="shortcut icon" href="favicon.ico" type="image/x-icon" />

    </head>

    <body>

        I like apples and oranges.

        The <abbr title="Florida Department of Citrus">FDOC</abbr> regulates the Florida

        citrus industry.

        <p>

            This is left-to-right: <bdo dir="ltr">I like oranges</bdo>

        </p>

        <p>

            This is right-to-left: <bdo dir="rtl">I like oranges</bdo>

        </p>

    </body>

</html>
You can see how the browser displays the content of this element in Figure 8-18.
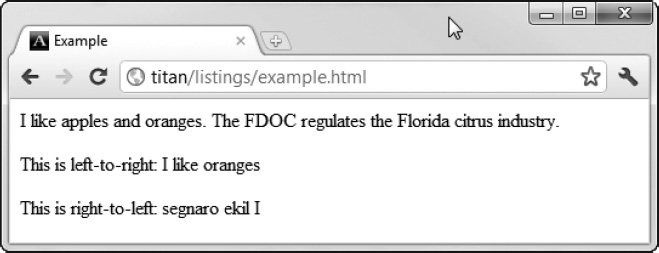
Figure 8-18. Using the bdo element
The bdi Element
The bdi element denotes a span of text that is isolated from other content for the purposes of text directionality. Table 8-22 summarizes this element.
You use this element when displaying content for which there is no directionality information available. When this happens, the browser determines the directionality automatically, and that can upset the formatting of the page. Listing 8-21 gives a simple example of the problem.
Listing 8-21. Dealing with Text Without the bdi Element
<!DOCTYPE HTML>

<html>

    <head>

        <title>Example</title>

        <meta name="author" content="Adam Freeman"/>

        <meta name="description" content="A simple example"/>

        <meta charset="utf-8"/>
<link rel="shortcut icon" href="favicon.ico" type="image/x-icon" />
</head>
<body>
I like apples and oranges.
Here are some users and the fruit they purchased this week:
<p>Adam: 3 applies and 2 oranges</p>
<p> : 2 apples</p>
<p>Joe: 6 apples</p>
</body>
</html>
When you display this document, the Arabic name causes the text directionality algorithm in the browser to display the number 2 before the name, and not after it, as shown in Figure 8-19.
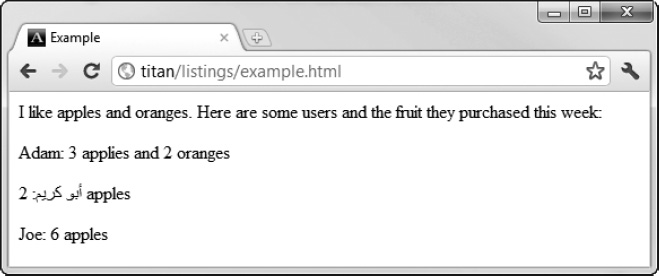
Figure 8-19. The effect of the bidirectional text algorithm when mixing formats
You can address this problem using the bdi element, as shown in Listing 8-22.
Listing 8-22. Using the bdi Element
<!DOCTYPE HTML>
<html>
<head>
<title>Example</title>
<meta name="author" content="Adam Freeman"/>
<meta name="description" content="A simple example"/>
<meta charset="utf-8"/> <link rel="shortcut icon" href="favicon.ico" type="image/x-icon" />
</head>
<body>
I like apples and oranges.
Here are some users and the fruit they purchased this week:
<p><bdi>Adam</bdi>: 3 applies and 2 oranges</p>
<p><bdi></bdi> : 2 apples</p>
<p><bdi>Joe</bdi>: 6 apples</p>
</body>
</html>
You can see the corrective effect of this element in Figure 8-20.

Figure 8-20. Using the bdi element
Wrapping Up: The Other Text Elements
There are four other elements that don't fit neatly into one of the other groups. I describe them in the following sections.
Denoting a Generic Span of Content
The span element has no meaning in its own right. You would use it to apply one of the global attributes to a region of content. Table 8-23 summarizes the span element.

Listing 8-23 shows the span element used with the class attribute, so that I can target content with a CSS style.
Listing 8-23. Using the span Element
<!DOCTYPE HTML>

<html>

    <head>

        <title>Example</title>

        <meta name="author" content="Adam Freeman"/>

        <meta name="description" content="A simple example"/>

        <link rel="shortcut icon" href="favicon.ico" type="image/x-icon" />

        <style>

           .fruit {

                border: thin solid black;

                padding: 1px;

            }

        </style>

    </head>

    <body>

        I like <span class="fruit">apples</span> and <span class="fruit">oranges</span>.

    </body>

</html>
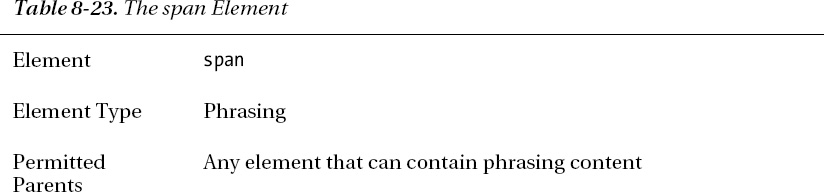
You can see the application of the style in Figure 8-21.
Figure 8-21. Using the span element to target styles
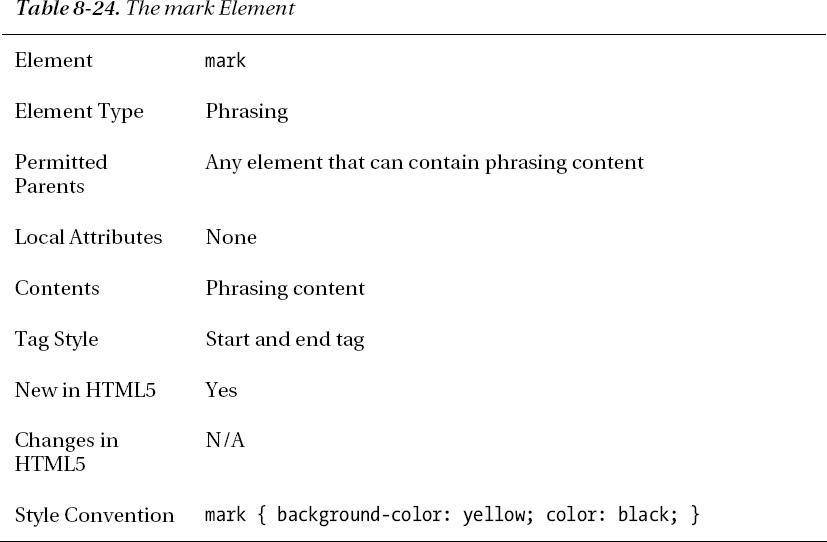
Highlighting Text
The mark element is new to HTML5 and represents a span of text that is highlighted due to its relevance in another context. Table 8-24 summarizes the mark element.
Listing 8-24 demonstrates the mark element.
Listing 8-24. Using the mark Element
<!DOCTYPE HTML>

<html>

    <head>

        <title>Example</title>

        <meta name="author" content="Adam Freeman"/>

        <meta name="description" content="A simple example"/>

        <link rel="shortcut icon" href="favicon.ico" type="image/x-icon" />

    </head>

    <body>


        Homophones are words which are pronounced the same, but have different spellings

        and meanings. For example:

        <p>

            I would like a <mark>pair</mark> of <mark>pears</mark>

        </p>

    </body>

</html>
You can see the style convention in Figure 8-22.
Figure 8-22. Using the mark element
Denoting Added or Removed Content
You can denote text that has been added or removed from the document using the ins and del elements. The ins element denotes inserted content and is summarized in Table 8-25.
You denote text that has been removed from the document using the del element, which is summarized in Table 8-26.

The ins and del elements defined the same local attributes. The cite attribute specifies a URL to a document that explains why the text was added or removed, and the datetime attribute specifies when the modification was made. You can see the ins and del elements in use in Listing 8-25.
Listing 8-25. Using the del and ins Elements
<!DOCTYPE HTML>

<html>

    <head>

        <title>Example</title>

        <meta name="author" content="Adam Freeman"/>

        <meta name="description" content="A simple example"/>

        <link rel="shortcut icon" href="favicon.ico" type="image/x-icon" />

    </head>

    <body>


        Homophones are words which are pronounced the same, but have different spellings

        and meanings. For example:

        <p>

            I would like a <mark>pair</mark> of <mark>pears</mark>

        </p>

        <p>

            <del>I can <mark>sea</mark> the <mark>see</mark></del>
<ins>I can <mark>see</mark> the <mark>sea</mark></ins>
</p>
</body>
</html>
The default style convention is shown in Figure 8-23.
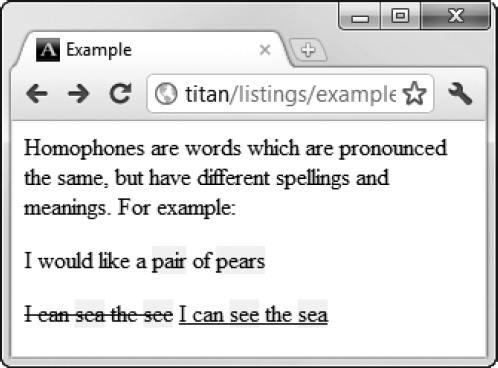
Figure 8-23. Using the ins and del elements
Denoting Times and Dates
You use the time element to represent a time of day or a date. Table 8-27 summarizes the time element.


If the Boolean pubdate attribute is present, then the time element is assumed to be the publication date of the entire HTML document or the nearest article element (I describe the article element in Chapter 10). The datetime attribute specifies the date or time in a format specified by RFC3339, which you can find at http://tools.ietf.org/html/rfc3339. Using the datetime attribute means you can specify a date in a human-readable form within the element and still ensure that a computer can unambiguously parse the date or time. Listing 8-26 shows the time element in use.
Listing 8-26. Using the time Element
<!DOCTYPE HTML>

<html>

    <head>

        <title>Example</title>

        <meta name="author" content="Adam Freeman"/>

        <meta name="description" content="A simple example"/>

        <link rel="shortcut icon" href="favicon.ico" type="image/x-icon" />

    </head>

    <body>

        I still remember the best apple I ever tasted.

        I bought it at <time datetime="15:00">3 o'clock</time>

        on <time datetime="1984-12-7">December 7th</time>.

    </body>

</html>
Summary
In this chapter, I have taken you on a tour of the text elements—those elements that you use to give structure and meaning to your content. These elements range from the basic to the complex, and you can see the tension between the desire to divorce meaning from presentation in HTML5 and the desire to preserve compatibility with HTML4.
Make sure you select text elements based on their meaning, and not the default style convention with which they are associated. You can apply the CSS style to your content in ways that you did not expect, and users will get odd results if you don't mark up your content correctly and consistently.