C H A P T E R 10
Creating Sections
In this chapter, I show you the elements you use to denote sections in your content—in effect, how to separate your content so that each topic or concept is isolated from the others. Many of the elements in this chapter are new, and they form a significant foundation in the effort to separate the meaning of elements from their presentation. Unfortunately, this means these elements are hard to demonstrate, because they have little or no visual impact on the content. To this end, I added some CSS styles to many of the examples in this chapter to emphasize the structure and changes these elements bring.
I don't explain the meaning of the CSS styles in this chapter. Chapter 4 contains a reminder of the key features of CSS, and the individual CSS properties are described from Chapter 16 onwards. Table 10-1 provides the summary for this chapter.

Adding Basic Headings
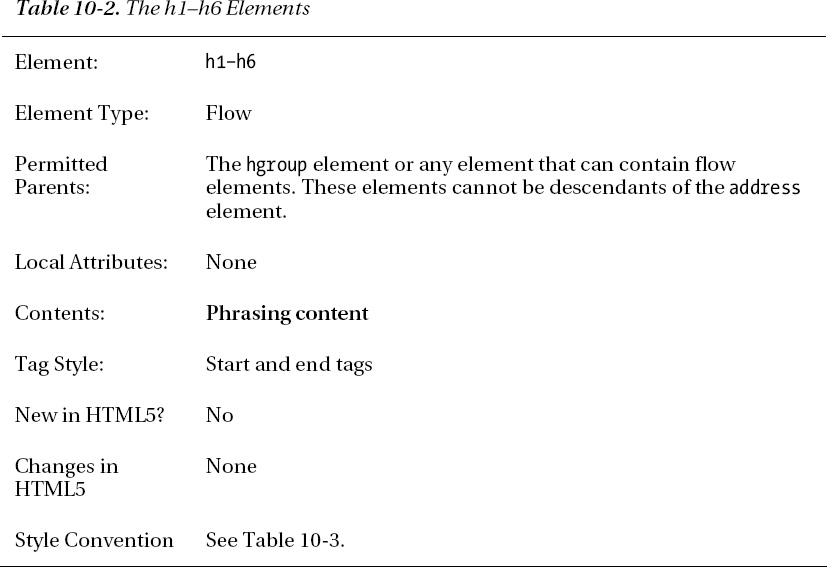
The h1 element represents a heading. HTML defines a hierarchy of heading elements, with h1 being the highest ranked. The other heading elements are h2, h3, through to h6. Table 10-2 summarizes the h1–h6 elements.
Headings of the same rank are typically used to break up content so that each topic is in its own section. Headings of descending rank are typically used to represent different aspects of the same topic. An additional benefit of these elements is that they create a document outline, where the user can get a sense of the overall nature and structure of the document simply by looking at the headings and more rapidly navigate to an area of interest by following the heading hierarchy. Listing 10-1 shows the h1–h3 elements in use.
Listing 10-1. Using the h1–h3 Elements
<!DOCTYPE HTML>

<html>

    <head>

        <title>Example</title>

        <meta name="author" content="Adam Freeman"/>

        <meta name="description" content="A simple example"/>

        <link rel="shortcut icon" href="favicon.ico" type="image/x-icon" />

    </head>

    <body>

            <h1>Fruits I like</h1>

            I like apples and oranges.

            <h2>Additional fruits</h2>

            I also like bananas, mangoes, cherries, apricots, plums, peaches and grapes.

            <h3>More information</h3>

            You can see other fruits I like <a href="fruitlist.html">here</a>.


            <h1>Activities I like</h1>

            <p>I like to swim, cycle and run. I am in training for my first triathlon,

            but it is hard work.</p>

            <h2>Kinds of Triathlon</h2>

            There are different kinds of triathlon - sprint, Olympic and so on.

            <h3>The kind of triathlon I am aiming for</h3>

            I am aiming for Olympic, which consists of the following:

            <ol>

                <li>1.5km swim</li>

                <li>40km cycle</li>

                <li>10km run</li>

            </ol>

    </body>

</html>
I showed only the h1, h2, and h3 headings in the listing because it is rare to have content that warrants any additional depth. The exceptions tend to be very technical and precise content, such as contracts and specifications. Most content requires two or three levels of heading at most. As an example, I use three levels of heading in my Apress books. Although the Apress template defines five levels of heading, the copy editors become uncomfortable if I use the fourth and fifth levels.
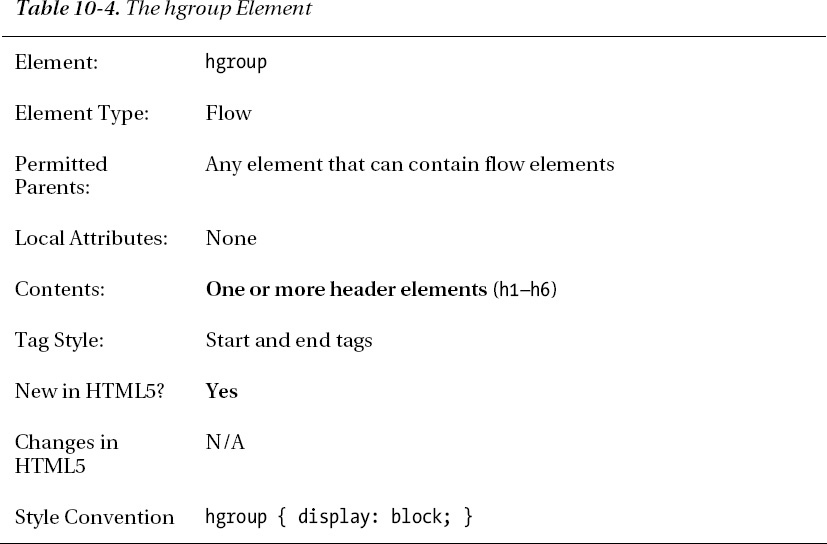
You can see how the browser displays the h1, h2, and h3 elements in the listing in Figure 10-1.
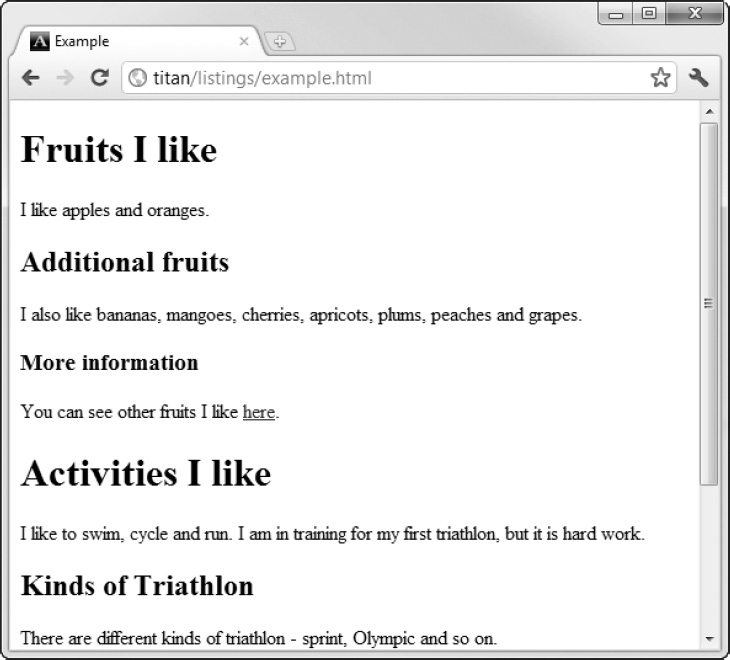
Figure 10-1. Displaying the h1, h2, and h3 elements using the default style conventions
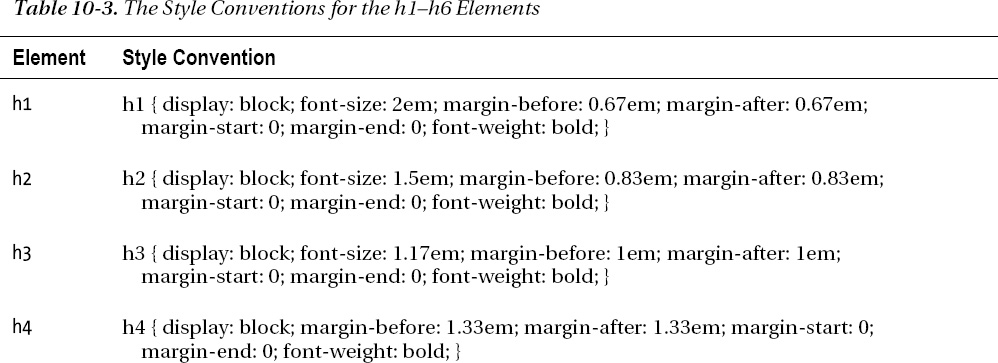
As you can see in the figure, each level of header has a different style convention. Table 10-3 shows the style convention for each header element.

You don't have to respect the h1–h6 element hierarchy, but you run the risk of confusing the user if you deviate from it. Hierarchical headings are so prevalent that users have a fixed expectation of how they work.
Hiding Subheadings
The hgroup element allows you to treat multiple header elements as a single item without affecting the outline of your HTML document. Table 10-4 summarizes the hgroup element.
The most common problem that the hgroup solves is subtitles. Imagine that I want to create a section in my document with the title “Fruits I Like” with the subtitle “How I Learned to Love Citrus”. I could use the h1 and h2 elements, as shown in Listing 10-2.
Listing 10-2. Using the h1 and h2 Elements to Create a Title with a Subtitle
<!DOCTYPE HTML>

<html>

    <head>

        <title>Example</title>

        <meta name="author" content="Adam Freeman"/>

        <meta name="description" content="A simple example"/>

        <link rel="shortcut icon" href="favicon.ico" type="image/x-icon" />

    </head>

    <body>

            <h1>Fruits I Like</h1>

            <h2>How I Learned to Love Citrus</h2>

            I like apples and oranges.

            <h2>Additional fruits</h2>

            I also like bananas, mangoes, cherries, apricots, plums, peaches and grapes.

            <h3>More information</h3>

            You can see other fruits I like <a href="fruitlist.html">here</a>.


            <h1>Activities I Like</h1>

            <p>I like to swim, cycle and run. I am in training for my first triathlon,

            but it is hard work.</p>

            <h2>Kinds of Triathlon</h2>

            There are different kinds of triathlon - sprint, Olympic and so on.

            <h3>The kind of triathlon I am aiming for</h3>

            I am aiming for Olympic, which consists of the following:

            <ol>

                <li>1.5km swim</li>

                <li>40km cycle</li>

                <li>10km run</li>

            </ol>

    </body>

</html>
The problem here is that you haven't been able to differentiate between the h2 element that is the subtitle and the h2 element that is a lower-level heading. If you wrote a script that went through your document to build an outline based on the h1–h6 elements, you would get a distorted result, like this:
Fruits I Like

    How I Learned to Love Citrus

    Additional fruits

        More information

Activities I Like

    Kinds of Triathlon

        The kind of triathlon I am aiming for
This gives the appearance that How I Learned to Love Citrus is a section header, not a subtitle. You can address this problem using the hgroup element, as shown in Listing 10-3.
Listing 10-3. Using the hgroup Element
<!DOCTYPE HTML>

<html>

    <head>

        <title>Example</title>

        <meta name="author" content="Adam Freeman"/>

        <meta name="description" content="A simple example"/>

        <link rel="shortcut icon" href="favicon.ico" type="image/x-icon" />

        <style>

            h1, h2, h3 { background: grey; color: white; }


            hgroup > h1 { margin-bottom: 0px;}


            hgroup > h2 { background: grey; color: white; font-size: 1em;

                          margin-top: 0px; }

        </style>

    </head>

    <body>

           <hgroup>

                <h1>Fruits I Like</h1>

                <h2>How I Learned to Love Citrus</h2>

            </hgroup>

            I like apples and oranges.

            <h2>Additional fruits</h2>

            I also like bananas, mangoes, cherries, apricots, plums, peaches and grapes.

            <h3>More information</h3>

            You can see other fruits I like <a href="fruitlist.html">here</a>.


            <h1>Activities I like</h1>

            <p>I like to swim, cycle and run. I am in training for my first triathlon,

            but it is hard work.</p>

            <h2>Kinds of Triathlon</h2>

            There are different kinds of triathlon - sprint, Olympic and so on.

            <h3>The kind of triathlon I am aiming for</h3>

            I am aiming for Olympic, which consists of the following:

            <ol>

                <li>1.5km swim</li>

                <li>40km cycle</li>

                <li>10km run</li>

            </ol>

    </body>

</html>
The position in the h1–h6 hierarchy of an hgroup element is determined by the first heading element child within the hgroup. For example, the hgroup in the listing is equivalent to an h1 element because that is the first child. Only the first h1–h6 element is included in the outline of a document, which gives you an outline like this:
Fruits I Like

    Additional fruits

        More information

Activities I Like

    Kinds of Triathlon

        The kind of triathlon I am aiming for
There is no longer confusion about the subtitle h2 element—the hgroup element tells you to ignore it. The second issue you have to deal with is making the subtitle visually distinctive from regular h2 elements. You can see that I applied some simple styles in the listing, the effect of which can be seen in Figure 10-2. You can learn how the CSS selectors in the listing work in Chapter 17.
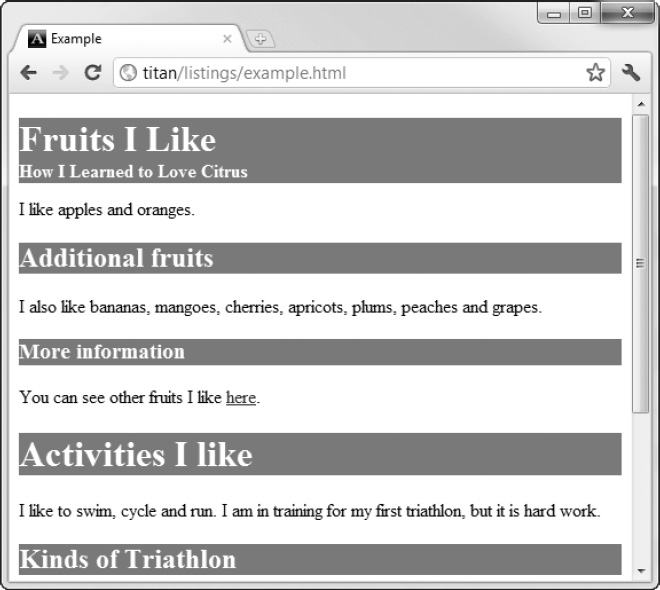
Figure 10-2. Making the relationship between elements in an hgroup visually explicit
I don't suggest that you adopt such a stark style, but you can see that you can make the relationship between elements in an hgroup element visually explicit by applying styles that eliminate some of the margins of the heading elements and bringing the elements together with a common background color.
Creating Sections
The section element is new to HTML5 and, as its name suggests, denotes a section of a document. When you use heading elements, you create implied sections, but this element lets you make them explicit and also allows you to divorce the sections of your document from the h1–h6 elements. There are no hard-and-fast rules about when to use the section element, but as a rule of thumb, the section element should be used to contain content that would be listed in a document's outline or table of contents. Section elements usually contain of one or more paragraphs of content and a heading, although the heading is optional. Table 10-5 summarizes the section element.

Listing 10-4 shows the section element in use.
Listing 10-4. Using the section Element
<!DOCTYPE HTML>

<html>

    <head>

        <title>Example</title>

        <meta name="author" content="Adam Freeman"/>

        <meta name="description" content="A simple example"/>

        <link rel="shortcut icon" href="favicon.ico" type="image/x-icon" />

        <style>

            h1, h2, h3 { background: grey; color: white; }

            hgroup > h1 { margin-bottom: 0px; }

            hgroup > h2 { background: grey; color: white; font-size: 1em;

                         margin-top: 0px;}

        </style>

    </head>

    <body>

        <section>

            <hgroup>

                <h1>Fruits I Like</h1>

                <h2>How I Learned to Love Citrus</h2>

            </hgroup>

            I like apples and oranges.

            <section>

                <h1>Additional fruits</h1>

                I also like bananas, mangoes, cherries, apricots, plums,

                peaches and grapes.

                <section>

                    <h1>More information</h1>

                    You can see other fruits I like <a href="fruitlist.html">here</a>.

                </section>

            </section>

        </section>


        <h1>Activities I like</h1>

        <p>I like to swim, cycle and run. I am in training for my first triathlon,

                    but it is hard work.</p>

        <h2>Kinds of Triathlon</h2>

        There are different kinds of triathlon - sprint, Olympic and so on.

        <h3>The kind of triathlon I am aiming for</h3>

        I am aiming for Olympic, which consists of the following:

        <ol>

            <li>1.5km swim</li>

            <li>40km cycle</li>

            <li>10km run</li>

        </ol>

    </body>

</html>
I have defined three section elements in this listing, one of which is nested within the other. Notice that the heading element in each is an h1. When using the section element, the browser is responsible for figuring out the hierarchy of heading elements, freeing you from having to determine and maintain the appropriate sequence of h1–h6 elements—at least in principle. The actual browser implementations differ slightly. Google Chrome, Internet Explorer 9 (IE9), and Firefox are able to derive the implied hierarchy and work out the relative rankings for each h1 element, as shown in Figure 10-3.
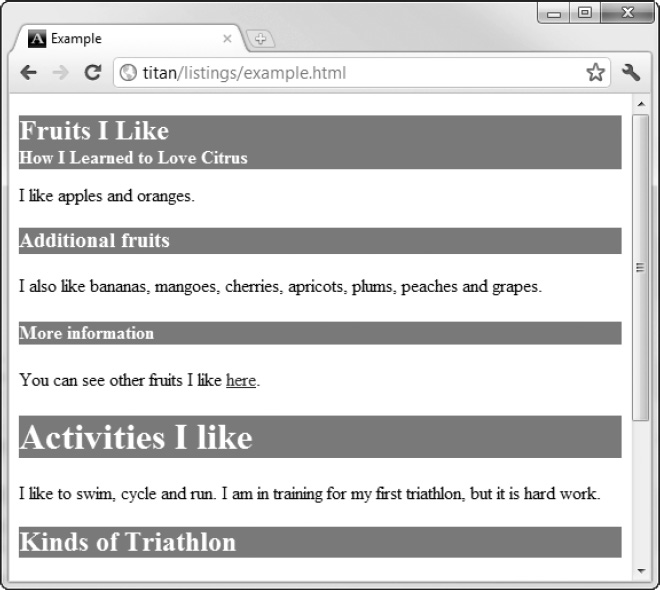
Figure 10-3. Using the section element with nested h1 elements in Chrome
This is good, but if you are observant, you noticed that the font used to display the h1 element whose content is Fruits I Like is smaller than the font used for the other h1 element at the same level—the Activities I like element. This is because some browsers (including Chrome and Firefox) apply a different style to h1 (and h2–h6) elements when they appear within section, article, aside, and nav elements. (The last three are described later in this chapter.) This new style is the same as the style convention for the h2 element. IE9 doesn't apply a special style, as shown in Figure 10-4. This is the correct behavior.
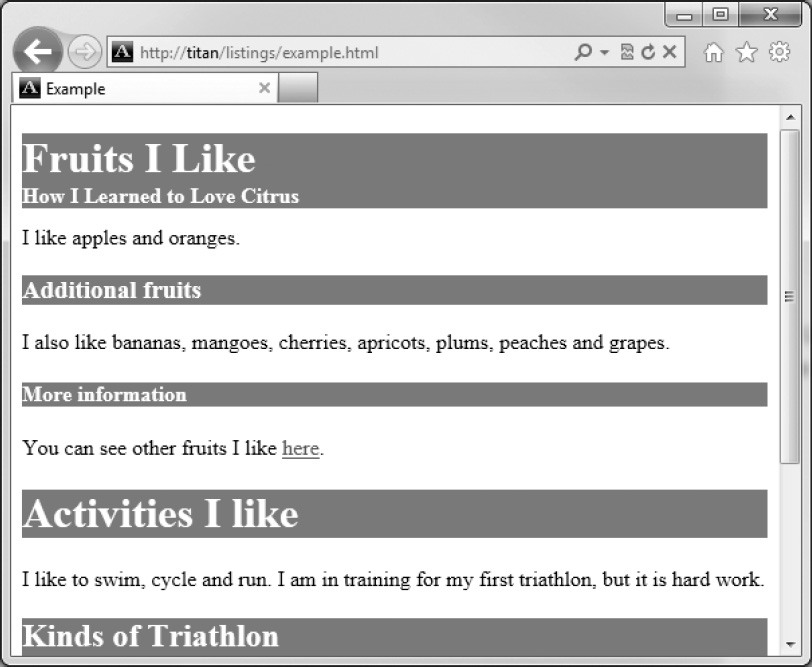
Figure 10-4. Using the section element with h1 elements in Internet Explorer
Further, not all browsers properly support creating an implied hierarchy of nested heading elements of the same type. You can see how Opera deals with these elements in Figure 10-5. Safari deals these elements in the same way—by ignoring the hierarchy implementations created by the section elements.
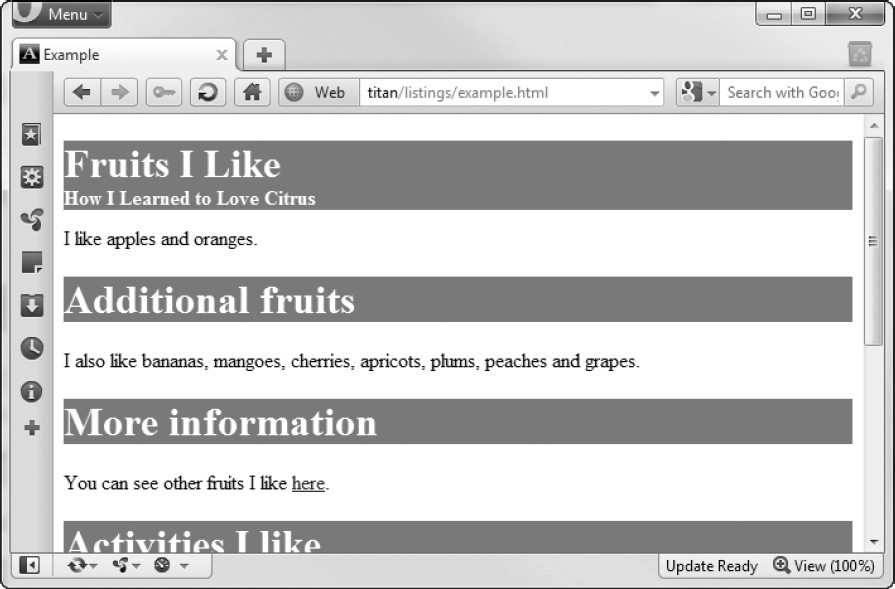
Figure 10-5. Using the section element with h1 elements in Opera
You can overcome the special style that Chrome and Firefox apply by creating your own styles, which take precedence over the styles defined by the browser (as I explained in Chapter 4). Internet Explorer does what you would expect. But you can't do much about Opera and Safari—and until the browser implementations become more consistent, this handy feature should be used with caution.
Adding Headers and Footers
The header element denotes the header of a section. It can contain any content that you wish to denote as being the header, including a masthead or logo. In terms of other elements, a header element typically contains one h1–h6 element or an hgroup element, and it can also contain navigation elements for the section. See the nav element (discussed in the upcoming “Adding Navigation Blocks” section) for details of navigation. Table 10-6 summarizes the header element.
The footer element is the complement to header and represents the footer for a section. A footer usually contains summary information about a section and can include details of the author, rights information, links to associated content, and logos and disclaimers. Table 10-7 summarizes the footer element.

You can see the header and footer elements in Listing 10-5.
Listing 10-5. Using the header and footer Elements
<!DOCTYPE HTML>
<html>
<head>
<title>Example</title>
<meta name="author" content="Adam Freeman"/>
<meta name="description" content="A simple example"/>
<link rel="shortcut icon" href="favicon.ico" type="image/x-icon" />
<style>
h1, h2, h3 { background: grey; color: white; }
hgroup > h1 { margin-bottom: 0; margin-top: 0}
hgroup > h2 { background: grey; color: white; font-size: 1em;
margin-top: 0px; margin-bottom: 2px}
body > header *, footer > * { background:transparent; color:black;}
body > section, body > section > section,
body > section > section > section {margin-left: 10px;}
body > header, body > footer {
border: medium solid black; padding-left: 5px; margin: 10px 0 10px 0;
}
</style>
</head>
<body>
<header>
<hgroup>
<h1>Things I like</h1>
<h2>by Adam Freeman</h2>
</hgroup>
</header>
<section>
<header>
<hgroup>
<h1>Fruits I Like</h1>
<h2>How I Learned to Love Citrus</h2>
</hgroup>
</header>
I like apples and oranges.
<section>
<h1>Additional fruits</h1>
I also like bananas, mangoes, cherries, apricots, plums,
peaches and grapes.
<section>
<h1>More information</h1>
You can see other fruits I like <a href="fruitlist.html">here</a>.
</section>
</section>
</section>
<section>
<header>
<h1>Activities I like</h1>
</header>
<section>
<p>I like to swim, cycle and run. I am in training for my first
triathlon, but it is hard work.</p>
<h1>Kinds of Triathlon</h1>
There are different kinds of triathlon - sprint, Olympic and so on.
<section>
<h1>The kind of triathlon I am aiming for</h1>
I am aiming for Olympic, which consists of the following:
<ol>
<li>1.5km swim</li>
<li>40km cycle</li>
<li>10km run</li>
</ol>
</section>
</section>
</section>
<footer id="mainFooter">
©2011, Adam Freeman. <a href="http://apress.com">Visit Apress</a>
</footer>
</body>
</html>
I defined three header elements in this example. When a header is a child of the body element, it is assumed to be the header for the entire document (but be careful—this is not the same as the head element, which I described in Chapter 7). When the header element is part of a section (either implied or explicitly defined using the section element), it is the header for that section. I added some styles to the document to make it easier to see the hierarchical relationship between the various sections and headings. You can see this in Figure 10-6.
Notice the relative sizes of the fonts. This is presumably why Google Chrome and Firefox redefine the h1–h6 elements when they are in a section element. It is to differentiate between the top-level h1 header and those that are nested in sections. This doesn't excuse the gratuitous redefinition of styles, but it does put it in context.
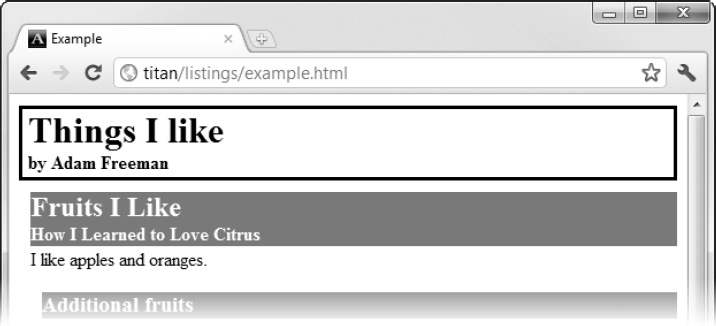
Figure 10-6. Using the header element
You can see the effect of the footer in Figure 10-7.

Figure 10-7. Adding a footer element
Adding Navigation Blocks
The nav element denotes a section of the document that contains links to other pages or to other parts of the same page. Obviously, not all hyperlinks have to be in a nav element. The purpose of this element is to identify the major navigation sections of a document. Table 10-8 describes the nav element.

Listing 10-6 shows the use of the nav element.
Listing 10-6. Using the nav Element
<!DOCTYPE HTML>
<html>
<head>
<title>Example</title>
<meta name="author" content="Adam Freeman"/>
<meta name="description" content="A simple example"/>
<link rel="shortcut icon" href="favicon.ico" type="image/x-icon" />
<style>
h1, h2, h3 { background: grey; color: white; }
hgroup > h1 { margin-bottom: 0; margin-top: 0}
hgroup > h2 { background: grey; color: white; font-size: 1em;
margin-top: 0px; margin-bottom: 2px}
body > header *, body > footer * { background:transparent; color:black;}
body > section, body > section > section,
body > section > section > section {margin-left: 10px;}
body > header, body > footer {
border: medium solid black; padding-left: 5px; margin: 10px 0 10px 0;
}
body > nav { text-align: center; padding: 2px; border : dashed thin black;}
body > nav > a {padding: 2px; color: black}
</style>
</head>
<body>
<header>
<hgroup>
<h1>Things I like</h1>
<h2>by Adam Freeman</h2>
</hgroup>
<nav>
<h1>Contents</h1>
<ul>
<li><a href="#fruitsilike">Fruits I Like</a></li>
<ul>
<li><a href="#morefruit">Additional Fruits</a></li>
</ul>
<li><a href="#activitiesilike">Activities I Like</a></li>
<ul>
<li><a href="#tritypes">Kinds of Triathlon</a></li>
<li><a href="#mytri">The kind of triathlon I am
aiming for</a></li>
</ul>
</ul>
</nav>
</header>
<section>
<header>
<hgroup>
<h1 id="fruitsilike">Fruits I Like</h1>
<h2>How I Learned to Love Citrus</h2>
</hgroup>
</header>
I like apples and oranges.
<section>
<h1 id="morefruit">Additional fruits</h1>
I also like bananas, mangoes, cherries, apricots, plums,
peaches and grapes.
<section>
<h1>More information</h1>
You can see other fruits I like <a href="fruitlist.html">here</a>.
</section>
</section>
</section>
<section>
<header>
<h1 id="activitiesilike">Activities I like</h1>
</header>
<section>
<p>I like to swim, cycle and run. I am in training for my first
triathlon, but it is hard work.</p>
<h1 id="tritypes">Kinds of Triathlon</h1>
There are different kinds of triathlon - sprint, Olympic and so on.
<section>
<h1 id="mytri">The kind of triathlon I am aiming for</h1>
I am aiming for Olympic, which consists of the following:
<ol>
<li>1.5km swim</li>
<li>40km cycle</li>
<li>10km run</li>
</ol>
</section>
</section>
</section>
<nav>
More Information:
<a href="http://fruit.org">Learn More About Fruit</a>
<a href="http://triathlon.org">Learn More About Triathlons</a>
</nav>
<footer id="mainFooter">
©2011, Adam Freeman. <a href="http://apress.com">Visit Apress</a>
</footer>
</body>
</html>
I added a couple of nav elements to the document to give a sense of the flexibility of this element. The first nav element provides the user with navigation within the document. I used ul, li, and a elements to create a hierarchical set of relative hyperlinks. You can see how this is displayed by the browser in Figure 10-8.
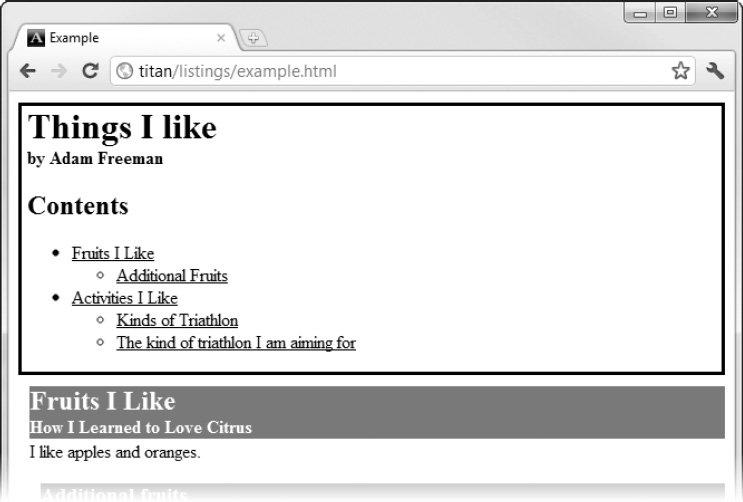
Figure 10-8. Using a nav element to create a content navigation section
I placed this nav element inside the main header element for the document. This is not compulsory, but I like to do this to indicate that this is the main nav element. Notice that I mixed the h1 element in with the other content. The nav element can contain any flow content, not just hyperlinks. I added the second nav element to the end of the document, providing the user with some links to get more information. You can see how the browser renders this in Figure 10-9.
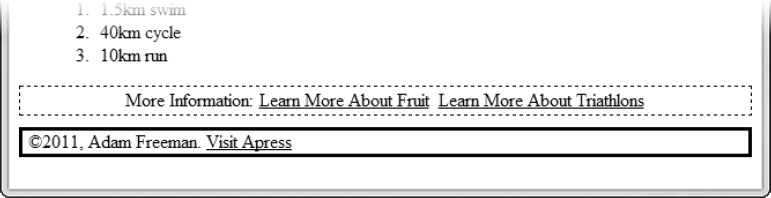
Figure 10-9. Using a nav element to provide external navigation
In both instances of the nav element, I added styles to the style element in the document to make the additions visually distinctive. The style conventions for the nav element don't explicitly denote the nav element's content.
Working with Articles
The article element represents a self-contained piece of content in an HTML document that could, in principle, be distributed or used independently from the rest of the page (such as through an RSS feed). That's not to say you have to distribute it independently, just that independence is the guidance for when to use this element. Good examples include a new article and a blog entry. Table 10-9 summarizes the article element.
Listing 10-7 shows the article element in use.
Listing 10-7. Using the article Element
<!DOCTYPE HTML>
<html>
<head>
<title>Example</title>
<meta name="author" content="Adam Freeman"/>
<meta name="description" content="A simple example"/>
<link rel="shortcut icon" href="favicon.ico" type="image/x-icon" />
<style>
h1, h2, h3, article > footer { background: grey; color: white; }
hgroup > h1 { margin-bottom: 0; margin-top: 0}
hgroup > h2 { background: grey; color: white; font-size: 1em;
margin-top: 0px; margin-bottom: 2px}
body > header *, body > footer * { background:transparent; color:black;}
article {border: thin black solid; padding: 10px; margin-bottom: 5px}
article > footer {padding:5px; margin: 5px; text-align: center}
article > footer > nav > a {color: white}
body > article > section,
body > article > section > section {margin-left: 10px;}
body > header, body > footer {
border: medium solid black; padding-left: 5px; margin: 10px 0 10px 0;
}
body > nav { text-align: center; padding: 2px; border : dashed thin black;}
body > nav > a {padding: 2px; color: black}
</style>
</head>
<body>
<header>
<hgroup>
<h1>Things I like</h1>
<h2>by Adam Freeman</h2>
</hgroup>
<nav>
<h1>Contents</h1>
<ul>
<li><a href="#fruitsilike">Fruits I Like</a></li>
<li><a href="#activitiesilike">Activities I Like</a></li>
</ul>
</nav>
</header>
<article>
<header>
<hgroup>
<h1 id="fruitsilike">Fruits I Like</h1>
<h2>How I Learned to Love Citrus</h2>
</hgroup>
</header>
I like apples and oranges.
<section>
<h1 id="morefruit">Additional fruits</h1>
I also like bananas, mangoes, cherries, apricots, plums,
peaches and grapes.
<section>
<h1>More information</h1>
You can see other fruits I like <a href="fruitlist.html">here</a>
</section>
</section>
<footer>
<nav>
More Information:
<a href="http://fruit.org">Learn More About Fruit</a>
</nav>
</footer>
</article>
<article>
<header>
<hgroup>
<h1 id="activitiesilike">Activities I like</h1>
<h2>It hurts, but I keep doing it</h2>
</hgroup>
</header>
<section>
<p>I like to swim, cycle and run. I am in training for my first
triathlon, but it is hard work.</p>
<h1 id="tritypes">Kinds of Triathlon</h1>
There are different kinds of triathlon - sprint, Olympic and so on.
<section>
<h1 id="mytri">The kind of triathlon I am aiming for</h1>
I am aiming for Olympic, which consists of the following:
<ol>
<li>1.5km swim</li>
<li>40km cycle</li>
<li>10km run</li>
</ol>
</section>
</section>
<footer>
<nav>
More Information:
<a href="http://triathlon.org">Learn More About Triathlons</a>
</nav>
</footer>
</article>
<footer id="mainFooter">
©2011, Adam Freeman. <a href="http://apress.com">Visit Apress</a>
</footer>
</body>
</html>
In this example, I restructured my document to be more consistent with the general style of a blog, although perhaps it's not the most interesting blog available. The main part of the document is broken down into three parts. The first is the header, which transcends individual entries and provides an anchor point for the rest of document. The second part is the footer, which balances the header and provides the user with some basic information that applies to the rest of the content. The new addition is the third part: the article elements. In this example, each article describes a kind of thing I like. This meets the independence test because each description of a thing I like is self-contained and can be distributed on its own while still making some kind of sense. Once again, I added some styles to highlight the section effect of the element, which you can see in Figure 10-10.
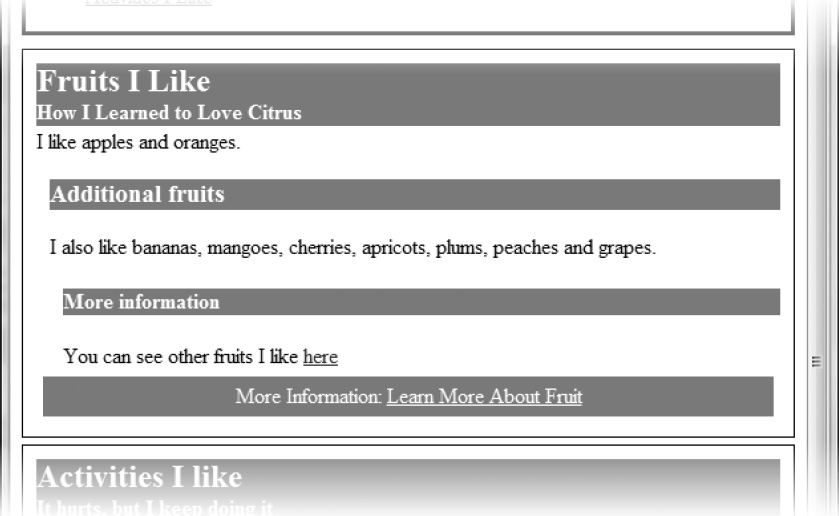
Figure 10-10. Applying the article element
The article element can be applied as flexibly as the other new semantic elements. For example, you could nest article elements to indicate the original article and then each update or comment that you received. As with some of the other elements, the value of article is contextual—that which adds meaningful structure in one kind of content may not add value in another. Judgment (and consistency) is required.
Creating Sidebars
The aside element denotes content that is only tangentially related to the surrounding element. This is similar to a sidebar in a book or magazine. The content has something to do with the rest of the page, article, or section, but it isn't part of the main flow. It could be some additional background, a set of links to related articles, and so on. Table 10-10 summarizes the aside element.

Listing 10-8 shows the aside element in use. I added an aside to one of the articles and added styles to give it the appearance of a simple magazine-style sidebar.
Listing 10-8. Adding and Styling the asideEeement
<!DOCTYPE HTML>
<html>
<head>
<title>Example</title>
<meta name="author" content="Adam Freeman"/>
<meta name="description" content="A simple example"/>
<link rel="shortcut icon" href="favicon.ico" type="image/x-icon" />
<style>
h1, h2, h3, article > footer { background: grey; color: white; }
hgroup > h1 { margin-bottom: 0; margin-top: 0}
hgroup > h2 { background: grey; color: white; font-size: 1em;
margin-top: 0px; margin-bottom: 2px}
body > header *, body > footer * { background:transparent; color:black;}
article {border: thin black solid; padding: 10px; margin-bottom: 5px}
article > footer {padding:5px; margin: 5px; text-align: center}
article > footer > nav > a {color: white}
body > article > section,
body > article > section > section {margin-left: 10px;}
body > header, body > footer {
border: medium solid black; padding-left: 5px; margin: 10px 0 10px 0;
}
body > nav { text-align: center; padding: 2px; border : dashed thin black;}
body > nav > a {padding: 2px; color: black}
aside { width:40%; background:white; float:right; border: thick solid black;
margin-left: 5px;}
aside > section { padding: 5px;}
aside > h1 {background: white; color: black; text-align:center}
</style>
</head>
<body>
<header>
<hgroup>
<h1>Things I like</h1>
<h2>by Adam Freeman</h2>
</hgroup>
<nav>
<h1>Contents</h1>
<ul>
<li><a href="#fruitsilike">Fruits I Like</a></li>
<li><a href="#activitiesilike">Activities I Like</a></li>
</ul>
</nav>
</header>
<article>
<header>
<hgroup>
<h1 id="fruitsilike">Fruits I Like</h1>
<h2>How I Learned to Love Citrus</h2>
</hgroup>
</header>
<aside>
<h1>Why Fruit is Healthy</h1>
<section>
Here are three reasons why everyone should eat more fruit:
<ol>
<li>Fruit contains lots of vitamins</li>
<li>Fruit is a source of fibre</li>
<li>Fruit contains few calories</li>
</ol>
</section>
</aside>
I like apples and oranges.
<section>
<h1 id="morefruit">Additional fruits</h1>
I also like bananas, mangoes, cherries, apricots, plums,
peaches and grapes.
<section>
<h1>More information</h1>
You can see other fruits I like <a href="fruitlist.html">here</a>
</section>
</section>
<footer>
<nav>
More Information:
<a href="http://fruit.org">Learn More About Fruit</a>
</nav>
</footer>
</article>
<article>
<header>
<hgroup>
<h1 id="activitiesilike">Activities I like</h1>
<h2>It hurts, but I keep doing it</h2>
</hgroup>
</header>
<section>
<p>I like to swim, cycle and run. I am in training for my first
triathlon, but it is hard work.</p>
<h1 id="tritypes">Kinds of Triathlon</h1>
There are different kinds of triathlon - sprint, Olympic and so on.
<section>
<h1 id="mytri">The kind of triathlon I am aiming for</h1>
I am aiming for Olympic, which consists of the following:
<ol>
<li>1.5km swim</li>
<li>40km cycle</li>
<li>10km run</li>
</ol>
</section>
</section>
<footer>
<nav>
More Information:
<a href="http://triathlon.org">Learn More About Triathlons</a>
</nav>
</footer>
</article>
<footer id="mainFooter">
©2011, Adam Freeman. <a href="http://apress.com">Visit Apress</a>
</footer>
</body>
</html>
You can see the effect of the aside element and the additional styles in Figure 10-11. I added some filler text to the document shown in the figure to make the flow of content more apparent.

Figure 10-11. Applying and styling the aside element
Providing Contact Information
The address element is used to denote contact information for a document or article element. Table 10-11 summarizes the address element.

When the address element is a descendant of an article element, it is assumed to provide contact information for that article. Otherwise, when an address element is a child of a body element (and there is no article element between the body and address elements), the address is assumed to provide contact information for the entire document.
The address element must not be used to denote addresses that are not contact information for a document or article. For example, you can't use this element to denote addresses of customers or users in the content of a document. Listing 10-9 shows the address element in use.
Listing 10-9. Using the address Element
...

<body>

    <header>

        <hgroup>

            <h1>Things I like</h1>

            <h2>by Adam Freeman</h2>

        </hgroup>

        <address>

            Questions and comments? <a href="mailto:[email protected]">Email me</a>

        </address>

        <nav>

            <h1>Contents</h1>

            <ul>

                <li><a href="#fruitsilike">Fruits I Like</a></li>

                <li><a href="#activitiesilike">Activities I Like</a></li>

            </ul>

        </nav>

    </header>


    <article>

        <header>

            <hgroup>

...
I added the address element to the header for the document. In this case, I provided an email address for users/readers to contact me. You can see the addition in Figure 10-12.
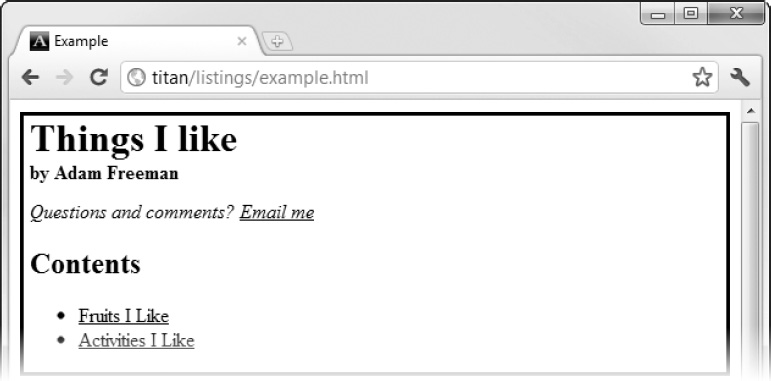
Figure 10-12. Adding an address element
Creating a Details Section
The details element creates a section of the document that the user can expand to get further details about a topic. Table 10-12 summarizes the details element.
The details element usually contains a summary element, which creates a label or title for the details section. Table 10-13 describes the summary element.
You can see both the details and summary elements used in Listing 10-10.
Listing 10-10. Using the summary and details Elements
<!DOCTYPE HTML>

<html>

    <head>

        <title>Example</title>

        <meta name="author" content="Adam Freeman"/>

        <meta name="description" content="A simple example"/>

        <link rel="shortcut icon" href="favicon.ico" type="image/x-icon" />

        <style>

            h1, h2, h3, article > footer { background: grey; color: white; }

            hgroup > h1 { margin-bottom: 0; margin-top: 0}

            hgroup > h2 { background: grey; color: white; font-size: 1em;

                        margin-top: 0px; margin-bottom: 2px}

            body > header  *, body > footer * { background:transparent; color:black;}

            body > article > section,

            body > article > section > section {margin-left: 10px;}

            body > header {

                border: medium solid black; padding-left: 5px; margin: 10px 0 10px 0;

            }

            article {border: thin black solid; padding: 10px; margin-bottom: 5px}

            details {border: solid thin black; padding: 5px}

            details > summary { font-weight: bold}

        </style>

    </head>

    <body>

        <header>

            <hgroup>

                <h1>Things I like</h1>

                <h2>by Adam Freeman</h2>

            </hgroup>

        </header>

        <article>

            <header>

                <hgroup>

                    <h1 id="activitiesilike">Activities I like</h1>

                    <h2>It hurts, but I keep doing it</h2>

                </hgroup>

            </header>

            <section>

                <p>I like to swim, cycle and run. I am in training for my first

                triathlon, but it is hard work.</p>

                <details>

                    <summary>Kinds of Triathlon</summary>

                    There are different kinds of triathlon - sprint, Olympic and so on.

                    I am aiming for Olympic, which consists of the following:

                    <ol>

                        <li>1.5km swim</li>

                        <li>40km cycle</li>

                        <li>10km run</li>

                    </ol>

                </details>

            </section>

        </article>

    </body>

</html>
You can see how the browser displays these elements in Figure 10-13. Not all browsers support the details element properly. IE9 has difficulties, for example.
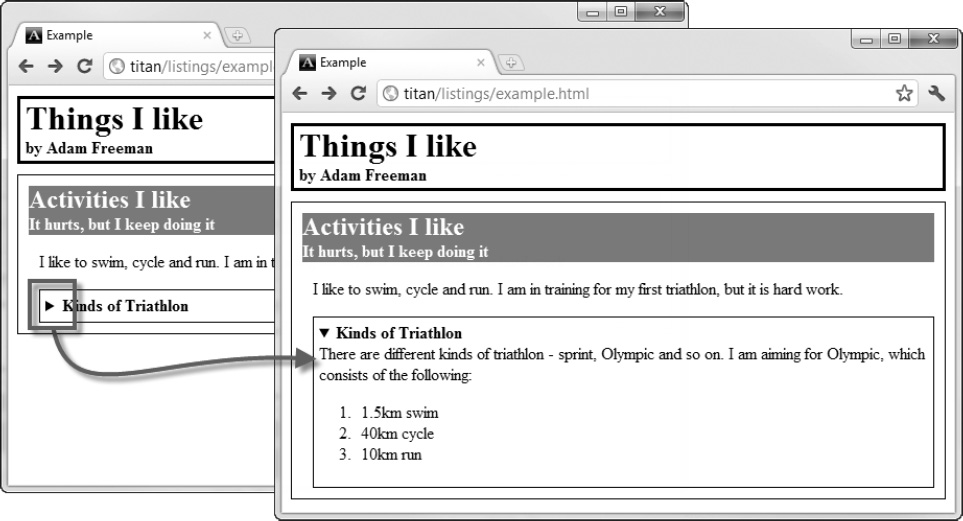
Figure 10-13. Using the details and summary attributes
As you can see from the figure, the browser provides an interface control which, when activated, opens and displays the contents of the details element. When the details element is closed, only the contents of the summary element are visible. To have the details element open when the page is first displayed, apply the open attribute.
Summary
In this chapter, I introduced you to the elements that you use to create sections in your documents and to isolate unrelated content. Most of these elements are new to HTML5. Although you are not compelled to use them to create compliant HTML5 documents, these new elements are one of the major enhancements in the effort to bring semantics to HTML.