
Chapter 32
Managing and Accessing Local Databases
SQLite is a very popular embedded database, as it combines a clean SQL interface with a very small memory footprint and decent speed. Moreover, it is public domain, so everyone can use it. Many firms (e.g., Adobe, Apple, Google, Sun, and Symbian) and open source projects (e.g., Mozilla, PHP, and Python) ship products with SQLite.
For Android, SQLite is “baked into” the Android runtime, so every Android application can create SQLite databases. Since SQLite uses a SQL interface, it is fairly straightforward to use for people with experience in other SQL-based databases. However, its native API is written in C, and while Java libraries such as JDBC are available for it, JDBC might be too much overhead for a memory-limited device like a phone, anyway. Hence, Android programmers have a different API to learn. The good news is that it is not very difficult.
This chapter will cover the basics of SQLite use in the context of working on Android. It by no means is a thorough coverage of SQLite as a whole. If you want to learn more about SQLite and how to use it in environments other than Android, a fine book is The Definitive Guide to SQLite, Second Edition, by Grant Allen (your present author) and Michael Owens (Apress, 2010). This also covers other complementary topics such as security of SQLite databases and more.
Much of the sample code shown in this chapter comes from the Database/Constants application. This application presents a list of physical constants, with names and values culled from Android's SensorManager, as shown in Figure 32–1.
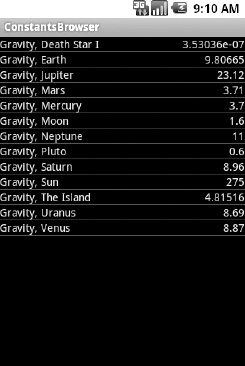
Figure 32–1. The Constants sample application, as initially launched
You can pop up a menu to add a new constant, which brings up a dialog box in which to fill in the name and value of the constant, as shown in Figure 32–2.
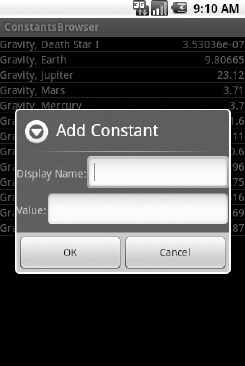
Figure 32–2. The Constants sample application's Add Constant dialog box
The constant is then added to the list. A long-tap on an existing constant will bring up a context menu with a Delete option, which, after confirmation, will delete the constant.
And, of course, all of this is stored in a SQLite database.
A Quick SQLite Primer
SQLite, as the name suggests, uses a dialect of SQL for data manipulation queries (SELECT, INSERT, et al.), and data definition (CREATE TABLE, et al.). SQLite has a few places where it deviates from the SQL-92 and SQL-99 standards, which is no different from most relational databases. The good news is that SQLite is so space-efficient that the Android runtime can include all of SQLite, not some arbitrary subset to trim it down to size.
The biggest difference between SQLite and other relational databases is the data typing. While you can specify the data types for columns in a CREATE TABLE statement, and SQLite will use those as a hint, that is as far as it goes. You can put whatever data you want in whatever column you want. Put a string in an INTEGER column? Sure, no problem! Vice versa? That works, too! SQLite refers to this as manifest typing, as described in the documentation:
In manifest typing, the datatype is a property of the value itself, not of the column in which the value is stored. SQLite thus allows the user to store any value of any datatype into any column regardless of the declared type of that column.
Start at the Beginning
No databases are automatically supplied to you by Android. If you want to use SQLite, you will need to create your own database, and then populate it with your own tables, indexes, and data.
To create and open a database, your best option is to craft a subclass of SQLiteOpenHelper. This class wraps up the logic to create and upgrade a database, per your specifications, as needed by your application. Your subclass of SQLiteOpenHelper will need three methods:
- The constructor, chaining upward to the
SQLiteOpenHelperconstructor. This takes theContext(e.g., anActivity), the name of the database, an optional cursor factory (typically, just passnull), and an integer representing the version of the database schema you are using. onCreate(), which passes you aSQLiteDatabaseobject that you populate with tables and initial data, as appropriate.onUpgrade(), which passes you aSQLiteDatabaseobject and the old and new version numbers, so you can figure out how best to convert the database from the old schema to the new one. If you don't care for the existing data or database, the simplest, albeit least friendly, approach is to drop the old tables and create new ones. A better approach would be to use the appropriateCREATEorALTER TABLEstatements to upgrade your schema (though be sure to check out the conditions on usingALTER TABLE, discussed later in this chapter).
For example, here is a DatabaseHelper class from Database/Constants that, in onCreate(), creates a table and adds a number of rows, and in onUpgrade() cheats by dropping the existing table and executing onCreate():
packagecom.commonsware.android.constants;


importandroid.content.ContentValues;

importandroid.content.Context;

importandroid.database.Cursor;

importandroid.database.SQLException;

importandroid.database.sqlite.SQLiteOpenHelper;

importandroid.database.sqlite.SQLiteDatabase;

importandroid.hardware.SensorManager;


public class DatabaseHelper extends SQLiteOpenHelper {

  private static final String DATABASE_NAME="db";

  static final String TITLE="title";

  static final String VALUE="value";


  public DatabaseHelper(Context context) {

    super(context, DATABASE_NAME, null, 1);

  }


  @Override

  public void onCreate(SQLiteDatabasedb) {

    db.execSQL("create table constants (_id integer primary key autoincrement, title

text, value real);");


    ContentValues cv=new ContentValues();


    cv.put(TITLE, "Gravity, Death Star I");

    cv.put(VALUE, SensorManager.GRAVITY_DEATH_STAR_I);

    db.insert("constants", TITLE, cv);


    cv.put(TITLE, "Gravity, Earth");

    cv.put(VALUE, SensorManager.GRAVITY_EARTH);

    db.insert("constants", TITLE, cv);


    cv.put(TITLE, "Gravity, Jupiter");

    cv.put(VALUE, SensorManager.GRAVITY_JUPITER);

    db.insert("constants", TITLE, cv);


    cv.put(TITLE, "Gravity, Mars");

    cv.put(VALUE, SensorManager.GRAVITY_MARS);

    db.insert("constants", TITLE, cv);
    cv.put(TITLE, "Gravity, Mercury");

    cv.put(VALUE, SensorManager.GRAVITY_MERCURY);

    db.insert("constants", TITLE, cv);


    cv.put(TITLE, "Gravity, Moon");

    cv.put(VALUE, SensorManager.GRAVITY_MOON);

    db.insert("constants", TITLE, cv);


    cv.put(TITLE, "Gravity, Neptune");

    cv.put(VALUE, SensorManager.GRAVITY_NEPTUNE);

    db.insert("constants", TITLE, cv);


    cv.put(TITLE, "Gravity, Pluto");

    cv.put(VALUE, SensorManager.GRAVITY_PLUTO);

    db.insert("constants", TITLE, cv);


    cv.put(TITLE, "Gravity, Saturn");

    cv.put(VALUE, SensorManager.GRAVITY_SATURN);

    db.insert("constants", TITLE, cv);


    cv.put(TITLE, "Gravity, Sun");

    cv.put(VALUE, SensorManager.GRAVITY_SUN);

    db.insert("constants", TITLE, cv);


    cv.put(TITLE, "Gravity, The Island");

    cv.put(VALUE, SensorManager.GRAVITY_THE_ISLAND);

    db.insert("constants", TITLE, cv);


    cv.put(TITLE, "Gravity, Uranus");

    cv.put(VALUE, SensorManager.GRAVITY_URANUS);

    db.insert("constants", TITLE, cv);


    cv.put(TITLE, "Gravity, Venus");

    cv.put(VALUE, SensorManager.GRAVITY_VENUS);

    db.insert("constants", TITLE, cv);

  }


  @Override

  public void onUpgrade(SQLiteDatabasedb, intoldVersion, intnewVersion) {

    android.util.Log.w("Constants", "Upgrading database, which will destroy all

old data");

    db.execSQL("drop table if exists constants");

    onCreate(db);

  }

}
We will take a closer look at what onCreate() is doing—in terms of execSQL() and insert() calls—later in this chapter.
To use your SQLiteOpenHelper subclass, create and hold onto an instance of it. Then, when you need a SQLiteDatabase object to do queries or data modifications, ask your SQLiteOpenHelper to getReadableDatabase() or getWriteableDatabase(), depending on whether or not you will be changing its contents. For example, our ConstantsBrowser activity opens the database in onCreate() as part of doing a query:
constantsCursor=db

                  .getReadableDatabase()

                  .rawQuery("select _id, title, value "+

                           "from constants order by title",

                           null);
When you are done with the database (e.g., your activity is being closed), simply call close() on your SQLiteOpenHelper to release your connection.
For onUpgrade() to work properly, your version numbers for your database schema must increase as you move forward. A typical pattern is to start with 1 and work your way up from there.
There are two other methods you can elect to override in your SQLiteOpenHelper, if you feel the need:
onOpen(): You can override this to get control when somebody opens this database. Usually, this is not required.onDowngrade(): Introduced in Android 3.0, this method will be called if the code requests a schema that is older than what is in the database presently. This is the converse ofonUpgrade(). If your version numbers differ, one of these two methods will be invoked. Since normally you are moving forward with updates, you can usually skiponDowngrade().
Setting the Table
For creating your tables and indexes, you will need to call execSQL() on your SQLiteDatabase, providing the Data Definition Language (DDL) statement you wish to apply against the database. Barring a database error, this method returns nothing.
So, for example, you can call execSQL() to create the constants table, as shown in the DatabaseHelperonCreate() method:
db.execSQL("create table constants (_id integer primary key autoincrement, title text, value real);");
This will create a table, named constants, with a primary key column named _id that is an autoincremented integer (i.e., SQLite will assign the value for you when you insert rows), plus two data columns: title (text) and value (a float, or real in SQLite terms). SQLite will automatically create an index for you on your primary key column. You could add other indexes here via some CREATE INDEX statements.
Most likely, you will create tables and indexes when you first create the database, or possibly when the database needs upgrading to accommodate a new release of your application. The exception may be if you decide to package a preconfigured SQLite database with your application—an option we'll explore later in this chapter. If you do not change your table schemas, you might never drop your tables or indexes, but if you do, just use execSQL() to invoke DROP INDEX and DROP TABLE statements as needed.
Makin' Data
Given that you have a database and one or more tables, you probably want to put some data in them. You have two major approaches for doing this:
- Use
execSQL(), just as you did for creating the tables. TheexecSQL()method works for any SQL that does not return results, so it can handleINSERT,UPDATE,DELETE, and so forth just fine. - Use the
insert(),update(), anddelete()methods on theSQLiteDatabaseobject, which eliminates much of the SQL syntax required to do basic operations.
For example, here we insert() a new row into our constants table:
private void processAdd(DialogWrapper wrapper) {

  ContentValues values=new ContentValues(2);


  values.put(DatabaseHelper.TITLE, wrapper.getTitle());

  values.put(DatabaseHelper.VALUE, wrapper.getValue());


  db.getWritableDatabase().insert("constants", DatabaseHelper.TITLE, values);

  constantsCursor.requery();

}
These methods make use of ContentValues objects, which implement a Map-esque interface, albeit one that has additional methods for working with SQLite types. For example, in addition to get() to retrieve a value by its key, you have getAsInteger(), getAsString(), and so forth.
The insert() method takes the name of the table, the name of one column as the “null column hack,” and a ContentValues with the initial values you want put into this row. The null column hack is for the case where the ContentValues instance is empty—the column named as the null column hack will be explicitly assigned the value NULL in the SQL INSERT statement generated by insert(). This is required due to a quirk in SQLite's support for the SQL INSERT statement.
The update() method takes the name of the table, a ContentValues representing the columns and replacement values to use, an optional WHERE clause, and an optional list of parameters to fill into the WHERE clause, to replace any embedded question marks (?). Since update() replaces only columns with fixed values, versus ones computed based on other information, you may need to use execSQL() to accomplish some ends. The WHERE clause and parameter list work akin to the positional SQL parameters you may be used to from other SQL APIs.
The delete() method works akin to update(), taking the name of the table, the optional WHERE clause, and the corresponding parameters to fill into the WHERE clause. For example, here we delete() a row from our constants table, given its _ID:
private void processDelete(long rowId) {

  String[] args={String.valueOf(rowId)};
  db.getWritableDatabase().delete("constants", "_ID=?", args);

  constantsCursor.requery();

}
What Goes Around, Comes Around
As with INSERT, UPDATE, and DELETE, you have two main options for retrieving data from a SQLite database using SELECT:
- Use
rawQuery()to invoke aSELECTstatement directly - Use
query()to build up a query from its component parts
Confounding matters further is the SQLiteQueryBuilder class and the issue of cursors and cursor factories. Let's take all of this one piece at a time.
Raw Queries
The simplest solution, at least in terms of the API, is rawQuery(). Simply call it with your SQL SELECT statement. The SELECT statement can include positional parameters; the array of these forms your second parameter to rawQuery(). This parameter is null if your query contains no positional parameters. So, we wind up with this:
constantsCursor=db

                  .getReadableDatabase()

                  .rawQuery("SELECT _ID, title, value "+

                           "FROM constants ORDER BY title",

                           null);
The return value is a Cursor, which is the common structure most database APIs use in handling sets of results from database queries. Your Cursor contains methods for iterating over results (discussed shortly, in the “Using Cursors” section).
If your queries are pretty much “baked into” your application, this is a very straightforward way to use them. However, it gets complicated if parts of the query are dynamic, beyond what positional parameters can really handle. For example, if the set of columns you need to retrieve is not known at compile time, puttering around concatenating column names into a comma-delimited list can be annoying...which is where query() comes in.
Regular Queries
The query() method takes the discrete pieces of a SELECT statement and builds the query from them. The pieces, in the order they appear as parameters to query(), are as follows: The name of the table to query against
- The list of columns to retrieve
- The
WHEREclause, optionally including positional parameters - The list of values to substitute in for those positional parameters
- The
GROUP BYclause, if any - The
HAVINGclause, if any - The
ORDER BYclause, if any
These can be null when they are not needed (except the table name, of course):
String[] columns={"ID", "inventory"};

String[] parms={"snicklefritz"};

Cursor result=db.query("widgets", columns, "name=?",

                       parms, null, null, null);
The one large drawback of the query() method is right there in the first bullet point: only one table can be queried, and joining tables either implicitly or explicitly is beyond the method's scope.
Using Cursors
No matter how you execute the query, you get a Cursor back. This is the Android/SQLite edition of the database cursor, a concept used in many database systems. With the cursor, you can do the following:
- Find out how many rows are in the result set via
getCount()(though be warned, counting rows this way implicitly retrieves all of the data in the result set) - Iterate over the rows via
moveToFirst(),moveToNext(), andisAfterLast() - Find out the names of the columns via
getColumnNames(), convert those into column numbers viagetColumnIndex(), and get values for the current row for a given column via methods likegetString(),getInt(), and so on - Re-execute the query that created the cursor via
requery() - Release the cursor's resources via
close()
For example, here we iterate over a widgets table entries:
Cursor result=

  db.rawQuery("select id, name, inventory from widgets", null);


while (!result.moveToNext()) {

  int id=result.getInt(0);

  String name=result.getString(1);

  int inventory=result.getInt(2);


// do something useful with these

}
result.close();
You can also wrap a Cursor in a SimpleCursorAdapter or other implementation, and then hand the resulting adapter to a ListView or other selection widget. Note, though, that if you are going to use CursorAdapter or its subclasses (such as SimpleCursorAdapter), the result set of your query must contain an integer column named _ID that is unique for the result set. This “id” value is then supplied to methods such as onListItemClick(), to identify which item the user clicked on in the AdapterView.
For example, after retrieving the sorted list of constants, we pop those into the ListView for the ConstantsBrowser activity in just a few lines of code:
ListAdapter adapter=new SimpleCursorAdapter(this,

                     R.layout.row, constantsCursor,

                     new String[] {DatabaseHelper.TITLE,

                                   DatabaseHelper.VALUE},

                     new int[] {R.id.title, R.id.value});
Custom CursorAdapters
You may recall from an earlier chapter that you can override getView() in ArrayAdapter to provide more custom control over how rows are displayed. However, CursorAdapter and its subclasses have a default implementation of getView(), which inspects the supplied View to recycle. If it is null, getView() calls newView() and then bindView(). If it is not null, getView() just calls bindView(). If you are extending CursorAdapter—used for displaying results of a database or content provider query—you should override newView() and bindView() instead of getView().
All this does is remove your if() test you would have had in getView() and puts each branch of that test in an independent method, akin to the following:
public View newView(Context context, Cursor cursor,

                   ViewGroup parent) {

  LayoutInflaterinflater=getLayoutInflater();

  View row=inflater.inflate(R.layout.row, null);

  ViewWrapper wrapper=new ViewWrapper(row);


  row.setTag(wrapper);


  return(row);

}

public void bindView(View row, Context context, Cursor cursor) {

  ViewWrapper wrapper=(ViewWrapper)row.getTag();

  // actual logic to populate row from Cursor goes here

}
Making Your Own Cursors
There may be circumstances in which you want to use your own Cursor subclass, rather than the stock implementation provided by Android. In those cases, you can use queryWithFactory() and rawQueryWithFactory(), which take a SQLiteDatabase.CursorFactory instance as a parameter. The factory, as you might expect, is responsible for creating new cursors via its newCursor() implementation.
Finding and implementing a valid use for this facility is left as an exercise for you. Suffice it to say that you should not need to create your own cursor classes much, if at all, in ordinary Android development.
SQLite and Android Versions
The underlying SQLite library included with Android has evolved as new versions of both continue to be released. The initial release of Android shipped with SQLite 3.5.9. Android 2.2 Froyo updated the SQLite library to 3.6.22. This was a relatively minor upgrade, dealing with bug fixes and the like. Android 3.0 Honeycomb again upgraded the SQLite library to 3.7.4, and this is still the version in use with Android 4.0 Ice Cream Sandwich. While you can treat this upgrade as just another point release fixing bugs and providing incremental improvements, the 3.7 release of SQLite includes a quite radical set of enhanced features around concurrency, logging, and locking.
You might never need to worry about these changes, particularly as your application is likely to be the only one concurrently accessing your SQLite database. There are however a few subtleties introduced.
First, the major internal version number of the SQLite database format was incremented for new databases created with SQLite version 3.7 and later, and older databases could be upgraded to this new format. If you plan on packaging your own SQLite database as part of your application (rather than creating it via onCreate()), you should consider which older devices and versions of Android you will support, and ensure you use the older SQLite database format. It can still be read and manipulated by SQLite 3.7.4 without any form of upgrade.
Second, some new features of SQLite are obviously only made available in later versions. This will mainly affect some of the more advanced queries you execute using rawQuery(), such as using SQL standard foreign key creation commands.
Flash: Sounds Faster Than It Is
Your database will be stored on flash memory, normally the onboard flash for the device. Reading data off of flash is relatively quick. While the memory is not especially fast, there is no seek time to move hard drive heads around, as you find with magnetic media, so performing a query against a SQLite database tends to be speedy.
Writing data to flash is another matter entirely. Sometimes, this may happen fairly quickly, on the order of a couple of milliseconds. Sometimes, though, it may take hundreds of milliseconds, even for writing small amounts of data. Moreover, flash tends to get slower the fuller it is, so the speed your users will see varies even more.
The net result is that you should seriously consider doing all database write operations off the main application thread, such as via an AsyncTask, as is described in Chapter 20. That way, the database write operations will not slow down your UI.
There are also situations in which writing to flash-based storage can be a risky move. When battery power is low, believing that writing to flash will complete before the battery is drained can be a bit too trusting on your part as a developer. Similarly, relying on the ability to write to flash during power-cycling of the device is not a good move. In these situations, you can add an Intent receiver to your application to watch out for ACTION_BATTERY_CHANGED broadcasts, and then examine the data provided to see what's happening to the battery, its current charge level, and so on.
Note that the emulator behaves differently, because it is typically using a file on your hard drive for storing data, rather than flash. While the emulator tends to be much slower than hardware for CPU and GPU operations, the emulator will tend to be much faster for writing data to flash. Hence, just because you are not seeing any UI slowdowns due to database I/O in the emulator, do not assume that will be the same when your code is running on a real Android device.
Ship Ahoy!
Many applications are shipped with an existing database in place, to support all manner of uses from a handy reference list, through to a complete offline cache. You can incorporate a database you've created elsewhere in your project for packaging with your compiled application.
First, include your SQLite database file in the assets/ folder of your project. To use your bundled database in your code, you can pass its location and file name to the openDatabase() method. Calling openDatabase() can take as its first parameter the full path and file name. In practice, this full path and file name is constructed by concatenating the following:
- The path used to refer to all database assets,
/data/data/your.application.package/databases/ - Then your desired database file name; e.g.,
your-db-name
Data, Data, Everywhere
If you are used to developing for other databases, you are also probably used to having tools to inspect and manipulate the contents of the database, beyond merely the database's API. With Android's emulator, you have two main options for this.
First, the emulator is supposed to bundle in the sqlite3 console program and make it available from the adb shell command. Once you are in the emulator's shell, just execute sqlite3, providing it the path to your database file. Your database file can be found at the following location:
/data/data/your.app.package/databases/your-db-name
Here, your.app.package is the Java package for your application (e.g., com.commonsware.android) and your-db-name is the name of your database, as supplied to createDatabase().
The sqlite3 program works, and if you are used to poking around your tables using a console interface, you are welcome to use it. If you prefer something a little friendlier, you can always copy the SQLite database from the device onto your development machine, and then use a SQLite-aware client program to putter around. Note, though, that you are working off a copy of the database; if you want your changes to go back to the device, you will need to transfer the database back over.
To copy the database from the device, you can use the adb pull command (or the equivalent in your IDE, or the File Manager in the Dalvik Debug Monitor Service), which takes the path to the on-device database and the local destination as parameters. To store a modified database on the device, use adb push, which takes the local path to the database and the on-device destination as parameters.
One of the most-accessible SQLite clients is the SQLite Manager extension for Firefox, shown in Figure 32–3, as it works across all platforms.
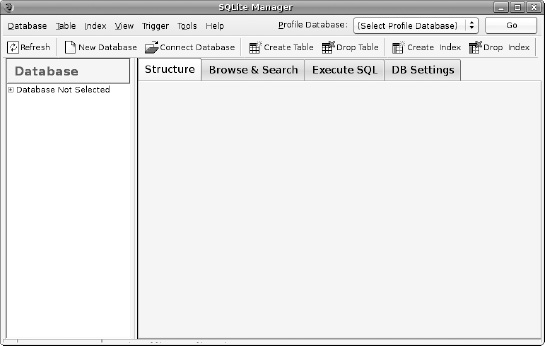
Figure 32–3. SQLite Manager Firefox extension
You can find other client tools on the SQLite web site.