
Chapter 37
Alerting Users via Notifications
Pop-up messages, tray icons and their associated “bubble” messages, bouncing dock icons…you are no doubt used to programs trying to get your attention, sometimes for good reason. Your phone also probably chirps at you for more than just incoming calls: low battery, alarm clocks, appointment notifications, incoming text and e-mail messages, and so on.
Not surprisingly, Android has a whole framework for dealing with these sorts of things, collectively called notifications, as described in this chapter.
Notification Configuration
A service, running in the background, needs a way to let users know something of interest has occurred, such as when e-mail has been received. Moreover, the service may need some way to steer users to an activity where they can act upon the event, such as reading a received message. For this, Android supplies status bar icons, flashing lights, and other indicators collectively known as notifications.
Your current phone may already have such icons, to indicate battery life, signal strength, whether Bluetooth is enabled, and the like. With Android, applications can add their own status bar icons, with an eye toward having them appear only when needed (e.g., a message has arrived).
In Android, you can raise notifications via theNotificationManager, which is a system service. To use it, you need to get the service object via getSystemService(NOTIFICATION_SERVICE) from your activity. The NotificationManager gives you three methods: one to raise a Notification (notify()) and two to get rid of an existing Notification (cancel() and cancelAll()).
The notify() method takes a Notification, which is a data structure that spells out what form your pestering should take. The capabilities of this object are described in the following sections.
Hardware Notifications
You can flash LEDs on the device by setting lights to true, also specifying the color (as an #ARGB value in ledARGB) and what pattern the light should blink in (by providing off/on durations in milliseconds for the light via ledOnMS and ledOffMS). Note, however, that Android devices will apply best efforts to meet your color request, meaning that different devices may give you different colors, or perhaps no control over color at all. For example, the Motorola CLIQ has only a white LED, so you can ask for any color you want, and you will get white. Note that you will need to OR (|) the Notification.FLAG_SHOW_LIGHTS value into the public flags field on the Notification object for flashing of the LED to work.
You can play a sound, using aUri to a piece of content held, perhaps, by a ContentManager (sound). Think of this as a ringtone for your application.
You can vibrate the device, controlled via a long[], indicating the on/off patterns (in milliseconds) for the vibration (vibrate). You might do this by default, or you might make it an option the user can choose when circumstances require a more subtle notification than a ringtone. To use this, though, you will need to request the VIBRATE permission (permissions are discussed in Chapter 38).
All of these options, by default, happen once (e.g., one LED flash or one playback of the sound). If you want to have them persist until the Notification is canceled, you will need to set the flags public field in your Notification to include FLAG_INSISTENT.
Instead of manually specifying the hardware options, you can also use the defaults field in the Notification, setting it to DEFAULT_LIGHTS, DEFAULT_SOUND, DEFAULT_VIBRATE, or DEFAULT_ALL, which will use platform defaults for all hardware options.
Icons
While the flashing lights, sounds, and vibrations are aimed at getting somebody to look at the device, icons are designed to take them the next step and tell them what’s so important.
To set up an icon for a Notification, you need to set two public fields: icon, where you provide the identifier of a Drawable resource representing the icon, and contentIntent, where you supply a PendingIntent to be raised when the icon is clicked. A PendingIntent is a wrapper around a regular Intent that allows the Intent to be invoked later, by another process, to start an activity or whatever. Typically, a Notification will trigger an activity, in which case you would create the PendingIntent via the static getActivity() method and give it an Intent that identifies one of your activities. That being said, you could have the Notification send a broadcast Intent instead, by using a getBroadcast() version of a PendingIntent. Android 4.0 has expanded the variety of send() methods available with PendingIntent, providing for most imaginable circumstance.
You can also supply a text blurb to appear when the icon is put on the status bar (tickerText).
If you want all three, the simpler approach is to call setLatestEventInfo(), which wraps all three of those in a single call.
You can also set a value in the number public field of your Notification. This will cause the number you supply to be drawn over the top of the icon in one corner. This is used, for example, to show the number of unread e-mail messages, so that you don’t need to have a bunch of different icons, one for each possible number of unread messages. By default, the number field will be ignored and not used.
Note that thesize of the icons used with a Notification changed with Android 2.3. Before that version, 25-pixel square was the desired size. Now, per-density icons in a more rectangular shape are preferred:
- 24-pixel square (inside a 24-pixel wide by 38-pixel high bounding box) for high-density and extra-high density screens
- 16-pixel square (inside a 16×25-pixel bounding box) for medium-density screens
- 12-pixel square (inside a 12×19-pixel bounding box) for low-density screens
Applications following these rules will want to use specific resource sets for the new icons:
res/drawable-xhdpi-v9/: For extra-high-density Android 2.3 and later editionsres/drawable-hdpi-v9/: For high-density Android 2.3 and later editionsres/drawable-mdpi-v9/: For medium-density Android 2.3 and later editionsres/drawable-ldpi-v9/: For low-density Android 2.3 and later editionsres/drawable/: For the icon to use on Android 2.2 and earlier
More details on guidelines for all icons, including status bar icons, can be found in the Android developer documentation.
Notifications in Action
Let’s now take a peek at the Notifications/Notify1 sample project, in particular the NotifyDemo class:
packagecom.commonsware.android.notify;


importandroid.app.Activity;

importandroid.app.Notification;

importandroid.app.NotificationManager;

importandroid.app.PendingIntent;

importandroid.content.Intent;

importandroid.os.Bundle;

importandroid.view.View;


public class NotifyDemo extends Activity {

  private static final int NOTIFY_ME_ID=1337;

  privateint count=0;

  private NotificationManager mgr=null;


  @Override

  public void onCreate(Bundle savedInstanceState) {

    super.onCreate(savedInstanceState);

    setContentView(R.layout.main);


    mgr=(NotificationManager)getSystemService(NOTIFICATION_SERVICE);

  }


  public void notifyMe(View v) {

    Notification note=new Notification(R.drawable.stat_notify_chat,

                                       "Status message!",

                                        System.currentTimeMillis());

    PendingIntenti=PendingIntent.getActivity(this, 0,

                          newIntent(this, NotifyMessage.class),

                                          0);


    note.setLatestEventInfo(this, "Notification Title",

                           "This is the notification message", i);

    note.number=++count;

    note.vibrate=new long[] {500L, 200L, 200L, 500L};

    note.flags|=Notification.FLAG_AUTO_CANCEL;


    mgr.notify(NOTIFY_ME_ID, note);

  }


  public void clearNotification(View v) {

    mgr.cancel(NOTIFY_ME_ID);

  }

}
As shown in Figure 37–1, this activity sports two large buttons, one to kick off a notification after a 5-second delay and one to cancel that notification (if it is active).
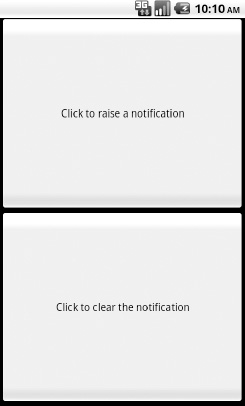
Figure 37–1. The NotifyDemo activity main view
Creating the notification, in notifyMe(), is accomplished in seven steps:
- Create a
Notificationobject with our icon, a message to flash on the status bar as the notification is raised, and the time associated with this event. - Create a
PendingIntentthat will trigger the display of another activity (NotifyMessage). - Use
setLatestEventInfo()to specify that, when the notification is clicked, we are to display a certain title and message, and if that is clicked, we launch thePendingIntent. - Update the number associated with the notification.
- Specify a vibration pattern: 500ms on, 200ms off, 200ms on, 500ms off.
- Include
FLAG_AUTO_CANCELin theNotificationobject’sflagsfield. - Tell the
NotificationManager(obtained inonCreate()) to display the notification.
Hence, if we click the top button, our icon will appear in the status bar, along with a brief display of our status message, as shown in Figure 37–2.
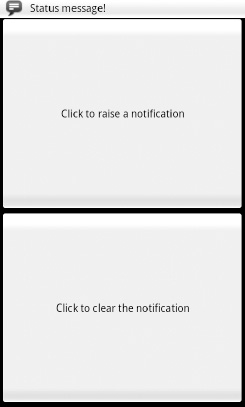
Figure 37–2. Our notification as it appears on the status bar, with our status message
After the status message goes away, the icon will have our number (initially 1) superimposed on its lower-right corner, as shown in Figure 37–3. You might use this to signify the number of unread messages, for example.
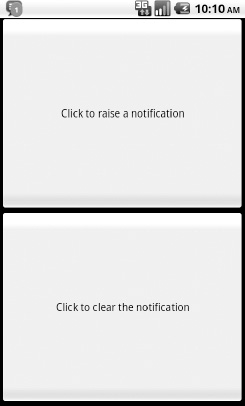
Figure 37–3. Our notification with the superimposed number
If you drag down the icon, a drawer will appear beneath the status bar. Drag that drawer all the way to the bottom of the screen to show the outstanding notifications, including our own, as shown in Figure 37–4.
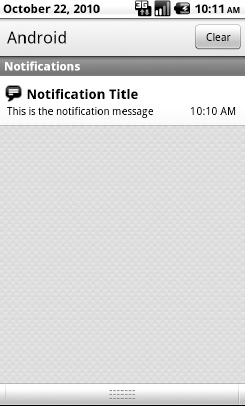
Figure 37–4. The notifications drawer, fully expanded, with our notification
If you click the notification entry in the drawer, you’ll be taken to a trivial activity displaying a message. In a real application, this activity would do something useful based upon the event that occurred (e.g., take users to the newly arrived mail messages).
Clicking the cancel button, clicking the Clear button in the drawer, or clicking the notification entry in the drawer will remove the icon from the status bar. The latter occurs because we included FLAG_AUTO_CANCEL in the Notification, indicating that a tap on the drawer entry should cancel the Notification itself. Users of Android 4.0 will also have the option of“swipe to clear,” where they can simply swipe individual notifications to either side of the screen to dismiss or action them. This aids in situations where a user has multiple notifications active, and wants to return to the remaining notifications after dealing with a particular one.
Staying in the Foreground
Notifications have another use: keeping select services around.
Services do not live forever. Android may terminate your application’s process to free up memory in an emergency situation, or just because it seems to have been hanging around memory too long. Ideally, you design your services to deal with the fact that they may not run indefinitely.
However, some services will be missed by the user if they mysteriously vanish. For example, the default music player application that ships with Android uses a service for the actual music playback. That way, users can listen to music while continuing to use their phone for other purposes. The service stops only when the user presses the stop button in the music player activity. If that service were to shut down unexpectedly, the user would wonder what is wrong.
Services like this can declare themselves as being part of the foreground. This will cause their priority to rise and make them less likely to be bumped out of memory. The trade-off is that the service has to maintain a Notification, so the user knows that this service is claiming part of the foreground. And, ideally, that Notification should provide an easy path back to some activity where the user can stop the service.
To do this, in onCreate() of your service (or wherever else in the service’s life it would make sense), call startForeground(). This takes a Notification and a locally unique integer, just like the notify() method on NotificationManager. It causes the Notification to appear and moves the service into foreground priority. Later on, you can call stopForeground() to return to normal priority.
Note that this method was added with Android 2.0 (API level 5). There was an earlier method, setForeground(), that performed a similar function in earlier versions of Android.
FakePlayer, Redux
The previous chapter, covering service patterns, presented a fake music player, implemented with an Activity (FakePlayer) and a Service (PlayerService). The PlayerService is actually what plays the music, so the music can play even while the FakePlayer activity is not open.
However, Android may not consider PlayerService to be part of the user experience, since services normally interact very little directly with users. This means Android may run PlayerService in a way that caps CPU usage (not necessarily bad) and might elect to shut down the service if it thinks it has been running too long (probably bad).
The answer is to use startForeground() and stopForeground(). We can call startForeground() when we start the music playing in our play() method:
private void play(String playlist, booleanuseShuffle) {

  if (!isPlaying) {

    Log.w(getClass().getName(), "Got to play()!");

    isPlaying=true;


    Notification note=new Notification(R.drawable.stat_notify_chat,

                                       "Can you hear the music?",

                                        System.currentTimeMillis());

    Intent i=new Intent(this, FakePlayer.class);


    i.setFlags(Intent.FLAG_ACTIVITY_CLEAR_TOP|

              Intent.FLAG_ACTIVITY_SINGLE_TOP);


    PendingIntent pi=PendingIntent.getActivity(this, 0,

                                              i, 0);


    note.setLatestEventInfo(this, "Fake Player",

                           "Now Playing: "Ummmm, Nothing"",

pi);

    note.flags|=Notification.FLAG_NO_CLEAR;


    startForeground(1337, note);

  }

}
The plus side is that our service will have more CPU availability if needed and will be far less likely to be killed by Android. Users will see an icon in the status bar. If they slide down the notification drawer and tap our Notification’s entry, they will be taken back to FakePlayer—the existing instance, if there is one, or a fresh instance otherwise, courtesy of our Intent flags (Intent.FLAG_ACTIVITY_CLEAR_TOP| Intent.FLAG_ACTIVITY_SINGLE_TOP). For a music player, this UI pattern makes it easy for users to quickly go back to stop the music when needed.
Stopping the music, via our stop() method, will call stopForeground():
private void stop() {

  if (isPlaying) {

    Log.w(getClass().getName(), "Got to stop()!");

    isPlaying=false;

    stopForeground(true);

  }

}
The true value passed to stopForeground() tells Android to remove the Notification, which would be the typical approach for this pattern.
Notifications in Ice Cream Sandwich and Honeycomb
The Honeycomb UI introduced in Android 3.0, and its successor in Android 4.0, Ice Cream Sandwich, support notifications, just like all previous versions of Android. However, the user experience is a bit different, owing to the tablet metaphor and its additional screen space.
Figure 37–5 shows the unmodified Notifications/Notify1 project, as seen in a tablet-sized emulator.

Figure 37–5. Notify1 as seen on an Android 3.0 tablet-sized emulator
Other than the newer style of the status bar, and the extra-huge buttons, this is no different from what you would see on a pre-Honeycomb phone.
If we click the top button, our Notification appears, this time in the lower-right corner, with the icon and ticker text, as shown in Figure 37–6.
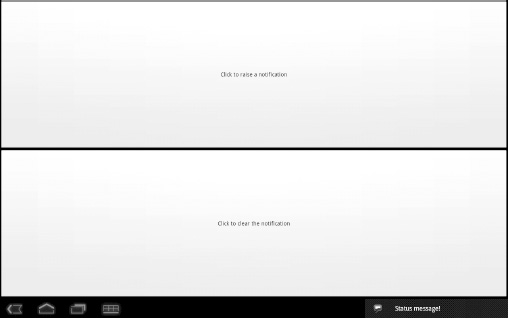
Figure 37–6. Notify1 with a notification added
Note that if the user taps the ticker, it triggers our PendingIntent, just as if they had tapped the notification drawer entry on a phone.
When the ticker is removed, our icon remains...without the number, as shown in Figure 37–7.
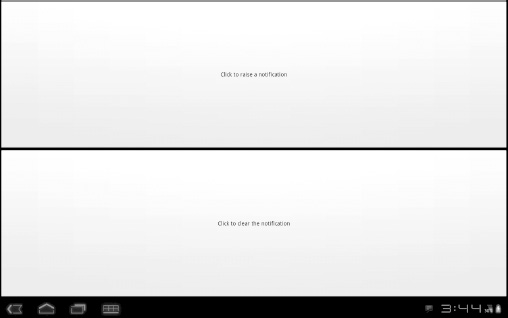
Figure 37–7. Notify1 with a numberless notification icon
If the user taps that icon, a notification drawer–style pop-up appears nearby, as shown in Figure 37–8.
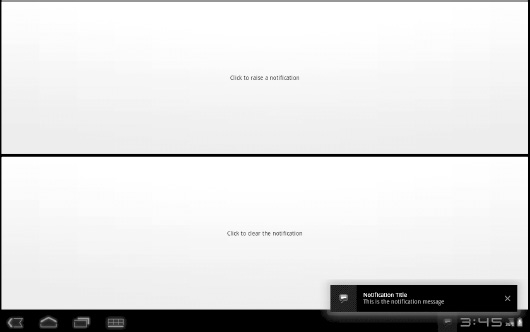
Figure 37–8. Notify1 with the notification content appearing
Tapping the icon or the text triggers the PendingIntent, while tapping the × on the right cancels this Notification.