
Specifying Per Vertex Color
In the last example, we set a global default color for all vertices we drew via glColor4f(). Sometimes we want to have more granular control (for example, we want to set a color per vertex). OpenGL ES offers us this functionality, and it's really easy to use. All we have to do is add RGBA float components to each vertex and tell OpenGL ES where it can find the color for each vertex, similar to how we told it where it can find the position for each vertex. Let's start by adding the colors to each vertex.
int VERTEX_SIZE = (2 + 4) * 4;

ByteBuffer byteBuffer = ByteBuffer.allocateDirect(3 * VERTEX_SIZE);

byteBuffer.order(ByteOrder.nativeOrder());

FloatBuffer vertices = byteBuffer.asFloatBuffer();

vertices.put( new float[] {   0.0f,   0.0f, 1, 0, 0, 1,

                            319.0f,   0.0f, 0, 1, 0, 1,

                            160.0f, 479.0f, 0, 0, 1, 1});

vertices.flip();
We first have to allocate a ByteBuffer for our three vertices. How big should that ByteBuffer be? We have two coordinates and four (RGBA) color components per vertex, so that's six floats in total. Each float value takes up 4 bytes, so a single vertex uses 24 bytes. We store this information in VERTEX_SIZE. When we call ByteBuffer.allocateDirect(), we just multiply VERTEX_SIZE by the number of vertices we want to store in the ByteBuffer. The rest is fairly self-explanatory. We get a FloatBuffer view to our ByteBuffer and put() the vertices into the ByteBuffer. Each row of the float array holds the x- and y-coordinates and the R, G, B, and A components of a vertex, in that order.
If we want to render this, we have to tell OpenGL ES that our vertices not only have a position, but they also have a color attribute. We start off, as before, by calling glEnableClientState().
Now that OpenGL ES knows that it can expect position and color information for each vertex, we have to tell it where it can find that information:
vertices.position(0);
gl.glVertexPointer(2, GL10.GL_FLOAT, VERTEX_SIZE, vertices);
vertices.position(2);
gl.glColorPointer(4, GL10.GL_FLOAT, VERTEX_SIZE, vertices);
We start of by setting the position of our FloatBuffer, which holds our vertices to 0. The position thus points to the x-coordinate of our first vertex in the buffer. Next, we call glVertexPointer(). The only difference from the previous example is that we now also specify the vertex size (remember, it's given in bytes). OpenGL ES will then start reading in vertex positions from the position in the buffer from which we told it to start. For the second vertex position, it will add VERTEX_SIZE bytes to the first position's address, and so on.
Next, we set the position of the buffer to the R component of the first vertex and call glColorPointer(), which tells OpenGL ES where it can find the colors of our vertices. The first argument is the number of components per color. This is always four, as OpenGL ES demands an R, G, B, and A component per vertex from us. The second parameter specifies the type of each component. As with the vertex coordinates, we use GL10.GL_FLOAT again to indicate that each color component is a float in the range between 0 and 1. The third parameter is the stride between vertex colors. It's of course the same as the stride between vertex positions. The final parameter is our vertices buffer again.
Since we called vertices.position(2) before the glColorPointer() call, OpenGL ES knows that the first vertex color can be found starting from the third float in the buffer. If we wouldn't have set the position of the buffer to 2, OpenGL ES would have started reading in the colors from position 0. That would have been bad, as that's where the x-coordinate of our first vertex is. Figure 7–8 shows from where OpenGL ES will read our vertex attributes, and how it jumps from one vertex to the next for each attribute.
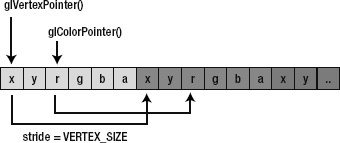
Figure 7–8. Our vertices FloatBuffer, start addresses for OpenGL ES from which to read position/color, and stride used to jump to the next position/color
To draw our triangle, we again call glDrawElements(), which tells OpenGL ES to draw a triangle using the first three vertices of our FloatBuffer.
gl.glDrawElements(GL10.GL_TRIANGLES, 0, 3);
Since we enabled the GL10.GL_VERTEX_ARRAY and GL10.GL_COLOR_ARRAY, OpenGL ES knows that it should use the attributes specified by glVertexPointer() and glColorPointer(). It will ignore the default color, as we provide our own per-vertex colors.
NOTE: The way we just specified our vertices' positions and colors is called interleaving. This means that we pack the attributes of a vertex in one continuous memory block. There's another way we could have achieved this: non-interleaved vertex arrays. We could have used two FloatBuffers, one for the positions and one for the colors. However, interleaving performs much better due to memory locality, so we won't discuss non-interleaved vertex arrays here.
Putting it all together into a new GLGame and Screen implementation should be a breeze. Listing 7–6 shows an excerpt from the file ColoredTriangleTest.java. We left out the boilerplate code.
Listing 7–6.Excerpt from ColoredTriangleTest.java; Interleaving Position and Color Attributes
class ColoredTriangleScreen extends Screen {
final int VERTEX_SIZE = (2 + 4) * 4;
GLGraphics glGraphics;
FloatBuffer vertices;
public ColoredTriangleScreen(Game game) {
super(game);
glGraphics = ((GLGame) game).getGLGraphics();
ByteBuffer byteBuffer = ByteBuffer.allocateDirect(3 * VERTEX_SIZE);
byteBuffer.order(ByteOrder.nativeOrder());
vertices = byteBuffer.asFloatBuffer();
vertices.put( new float[] { 0.0f, 0.0f, 1, 0, 0, 1,
319.0f, 0.0f, 0, 1, 0, 1,
160.0f, 479.0f, 0, 0, 1, 1});
vertices.flip();
}
@Override
public void present(float deltaTime) {
GL10 gl = glGraphics.getGL();
gl.glViewport(0, 0, glGraphics.getWidth(), glGraphics.getHeight());
gl.glClear(GL10.GL_COLOR_BUFFER_BIT);
gl.glMatrixMode(GL10.GL_PROJECTION);
gl.glLoadIdentity();
gl.glOrthof(0, 320, 0, 480, 1, -1);
gl.glEnableClientState(GL10.GL_VERTEX_ARRAY);

gl.glEnableClientState(GL10.GL_COLOR_ARRAY);
vertices.position(0);

gl.glVertexPointer(2, GL10.GL_FLOAT, VERTEX_SIZE, vertices);

vertices.position(2);

gl.glColorPointer(4, GL10.GL_FLOAT, VERTEX_SIZE, vertices);
        gl.glDrawArrays(GL10.GL_TRIANGLES, 0, 3);

    }
Cool—that still looks pretty straightforward. Compared to the previous example, we simply added the four color components to each vertex in our FloatBuffer and enabled the GL10.GL_COLOR_ARRAY. The best thing about it is that any additional vertex attributes we add in the following examples will work the same way. We just tell OpenGL ES not to use the default value for that specific attribute; instead, we tell it to look up the attributes in our FloatBuffer, starting at a specific position and moving from vertex to vertex by VERTEX_SIZE bytes.
Now, we could also turn off the GL10.GL_COLOR_ARRAY so that OpenGL ES uses the default vertex color again, which we can specify via glColor4f() as we did previously. For this we can call
gl.glDisableClientState(GL10.GL_COLOR_ARRAY);
OpenGL ES will just turn off the feature to read the colors from our FloatBuffer. If we already set a color pointer via glColorPointer(), OpenGL ES will remember the pointer even though we just told OpenGL ES to not use it.
To round this example out, let's have a look at the output of the preceding program. Figure 7–9 shows a screenshot.

Figure 7–9. Per-vertex colored triangle
Whoa, this is pretty neat! We didn't make any assumptions about how OpenGL ES will use the three colors we specified (red for the bottom-left vertex, green for the bottom-right vertex, and blue for the top vertex). It turns out that it will interpolate the colors between the vertices for us. With this, we can easily create nice gradients.; however, colors alone will not make us happy for very long. We want to draw images with OpenGL ES. And that's where so-called texture mapping comes into play.