
A Camera in 2D
Up until now, you haven't had the concept of a camera in your code; you've only had the definition of your view frustum via glOrthof(), like this:
gl.glMatrixMode(GL10.GL_PROJECTION);

gl.glLoadIdentity();

gl.glOrthof(0, FRUSTUM_WIDTH, 0, FRUSTUM_HEIGHT, 1, -1);
From Chapter 6, you know that the first two parameters define the x-coordinates of the left and right edges of your frustum in the world, the next two parameters define the y-coordinates of the bottom and top edges of the frustum, and the last two parameters define the near and far clipping planes. Figure 8–19 shows that frustum again.
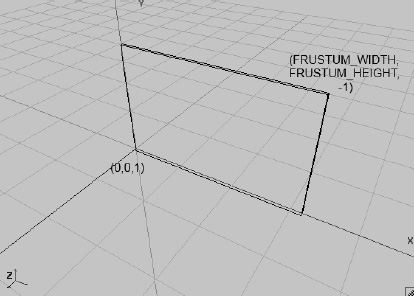
Figure 8–19. The view frustum for your 2D world, again
So you only see the region (0,0,1) to (FRUSTUM_WIDTH, FRUSTUM_HEIGHT,–1) of your world. Wouldn't it be nice if you could move the frustum, say, to the left? Of course that would be nice, and it is also dead simple:
gl.glOrthof(x, x + FRUSTUM_WIDTH, 0, FRUSTUM_HEIGHT, 1, -1);
In this case, x is just some offset that you define. You can, of course, also move on the x- and y-axes:
gl.glOrthof(x, x + FRUSTUM_WIDTH, y, y +FRUSTUM_HEIGHT, 1, -1);
Figure 8–20 shows what that means.
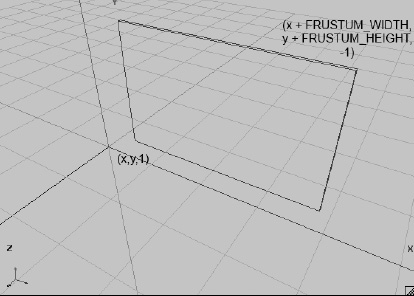
Figure 8–20. Moving the frustum around
Simply specify the bottom-left corner of your view frustum in the world space. This is already sufficient to implement a freely-movable 2D camera. But you can do better. What about not specifying the bottom-left corner of the view frustum with x and y, but instead specifying the center of the view frustum? This way you can easily center your view frustum on an object at a specific location—say, the cannonball from the preceding example:
gl.glOrthof(x – FRUSTUM_WIDTH / 2, x + FRUSTUM_WIDTH / 2, y – FRUSTUM_HEIGHT / 2, y +FRUSTUM_HEIGHT / 2, 1, -1);
Figure 8–21 shows what this looks like.
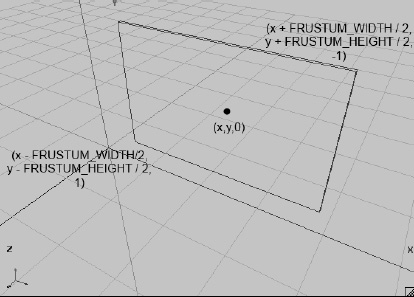
Figure 8–21. Specifying the view frustum in terms of its center
That's still not all you can do with glOrthof(). What about zooming? Let's think about this. You know that, via glViewportf(), you can tell OpenGL ES what portion of your screen you wish to render the contents of your view frustum. OpenGL ES will automatically stretch and scale the output to align with the viewport. Now, if you make the width and height of your view frustum smaller, you will simply show a smaller region of your world on the screen—that's zooming in. If you make the frustum bigger, you can show more of your world—that's zooming out. You can therefore introduce a zoom factor and multiply it by your frustum's width and height to zoom in an out. A factor of 1 will show you the world, as in Figure 8–21, using the normal frustum width and height. A factor smaller than 1 will zoom in on the center of your view frustum, while a factor bigger than 1 will zoom out, showing you more of your world (for example, setting the zoom factor to 2 will show twice as much of your world). Here's how you can use glOrthof() to do that:
gl.glOrthof(x – FRUSTUM_WIDTH / 2 * zoom, x + FRUSTUM_WIDTH / 2 * zoom, y –

FRUSTUM_HEIGHT / 2 * zoom, y +FRUSTUM_HEIGHT / 2 * zoom, 1, -1);
Dead simple! You can now create a camera class that has a position at which it is looking (the center of the view frustum), a standard frustum width and height, and a zoom factor that makes the frustum smaller or bigger, thereby showing either less of your world (zooming in) or more of your world (zooming out). Figure 8–22 shows a view frustum with a zoom factor of 0.5 (the inner gray box), and one with a zoom factor of 1 (the outer, transparent box).
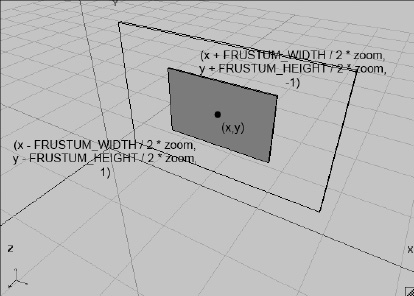
Figure 8–22. Zooming, by manipulating the frustum size
To make your life complete, you should add one more thing. Imagine that you touch the screen and want to figure out which point in your 2D world you touched. You already did this a couple of times in your iteratively improving cannon examples. With a view frustum configuration that does not factor in the camera's position and zoom, as seen in Figure 8–19, you had the following equations (see the update() method of your cannon examples):
worldX = (touchX / Graphics.getWidth()) × FRUSTUM_WIDTH;

worldY = (1 – touchY / Graphics.getHeight()) × FRUSTUM_HEIGHT;
First, normalize the touch x- and y-coordinates to the range 0 to 1 by dividing by the screen's width and height, and then scale them so that they are expressed in terms of your world space by multiplying them with the frustum's width and height. All you need to do is factor in the position of the view frustum, as well as the zoom factor. Here's how you do that:
worldX = (touchX / Graphics.getWidth()) × FRUSTUM_WIDTH + x – FRUSTUM_WIDTH / 2;

worldY = (1 – touchY / Graphics.getHeight()) × FRUSTUM_HEIGHT + y – FRUSTUM_HEIGHT / 2;
Here, x and y are your camera's position in world space.
The Camera2D Class
Let's put all this together into a single class. You want it to store the camera's position, the standard frustum width and height, and the zoom factor. You also want a convenient method that sets the viewport (always use the whole screen) and projection matrix correctly. Additionally, you want a method that can translate touch coordinates to world coordinates. Listing 8–15 shows your new Camera2D class.
Listing 8–15. Camera2D.java, Your Shiny New Camera Class for 2D Rendering
package com.badlogic.androidgames.framework.gl;


import javax.microedition.khronos.opengles.GL10;


import com.badlogic.androidgames.framework.impl.GLGraphics;

import com.badlogic.androidgames.framework.math.Vector2;


public class Camera2D {

    public final Vector2 position;

    public float zoom;

    public final float frustumWidth;

    public final float frustumHeight;

    final GLGraphics glGraphics;
As discussed, you store the camera's position, frustum width and height, and zoom factor as members. The position and zoom factor are public, so you can easily manipulate them. You also need a reference to GLGraphics so that you can get the up-to-date width and height of the screen in pixels for transforming touch coordinates to world coordinates.
    public Camera2D(GLGraphics glGraphics, float frustumWidth, float frustumHeight) {

        this.glGraphics = glGraphics;

        this.frustumWidth = frustumWidth;

        this.frustumHeight = frustumHeight;

        this.position = new Vector2(frustumWidth / 2, frustumHeight / 2);

        this.zoom = 1.0f;

    }
In the constructor, take a GLGraphics instance, and the frustum's width and height at the zoom factor 1, as parameters. You store them and initialize the position of the camera to look at the center of the box bounded by (0,0,1) and (frustumWidth, frustumHeight,–1), as shown in Figure 8–19. The initial zoom factor is set to 1.
    public void setViewportAndMatrices() {

        GL10 gl = glGraphics.getGL();

        gl.glViewport(0, 0, glGraphics.getWidth(), glGraphics.getHeight());

        gl.glMatrixMode(GL10.GL_PROJECTION);

        gl.glLoadIdentity();

        gl.glOrthof(position.x - frustumWidth * zoom / 2,

                    position.x + frustumWidth * zoom/ 2,

                    position.y - frustumHeight * zoom / 2,

                    position.y + frustumHeight * zoom/ 2,

                    1, -1);

        gl.glMatrixMode(GL10.GL_MODELVIEW);

        gl.glLoadIdentity();

    }
The setViewportAndMatrices() method sets the viewport to span the whole screen, and sets the projection matrix in accordance with your camera's parameters, as discussed previously. At the end of the method, tell OpenGL ES that all further matrix operations are targeting the model view matrix and load an identity matrix. Call this method each frame so that you can start from a clean slate. No more direct OpenGL ES calls to set up your viewport and projection matrix.
    public void touchToWorld(Vector2 touch) {

        touch.x = (touch.x / (float) glGraphics.getWidth()) * frustumWidth * zoom;

        touch.y = (1 - touch.y / (float) glGraphics.getHeight()) * frustumHeight * zoom;

        touch.add(position).sub(frustumWidth * zoom / 2, frustumHeight * zoom / 2);

    }

}
The touchToWorld() method takes a Vector2 instance containing touch coordinates and transforms the vector to world space. This is the same as was just discussed; the only difference is that you can use your fancy Vector2 class.
An Example
Use the Camera2D class in your cannon example. Copy the CollisionTest file and rename it Camera2DTest. Rename the GLGame class inside the file Camera2DTest, and rename the CollisionScreen class Camera2DScreen. There are a few little changes you have to make to use your new Camera2D class.
The first thing you do is add a new member to the Camera2DScreen class:
Camera2D camera;
You initialize this member in the constructor, as follows:
camera = new Camera2D(glGraphics, WORLD_WIDTH, WORLD_HEIGHT);
Pass in your GLGraphics instance and the world's width and height, which you previously used as the frustum's width and height in your call to glOrthof(). All you need to do now is replace your direct OpenGL ES calls in the present() method, which looked like this:
gl.glViewport(0, 0, glGraphics.getWidth(), glGraphics.getHeight());

gl.glClear(GL10.GL_COLOR_BUFFER_BIT);

gl.glMatrixMode(GL10.GL_PROJECTION);

gl.glLoadIdentity();

gl.glOrthof(0, WORLD_WIDTH, 0, WORLD_HEIGHT, 1, -1);

gl.glMatrixMode(GL10.GL_MODELVIEW);
You replace them with this:
gl.glClear(GL10.GL_COLOR_BUFFER_BIT);

camera.setViewportAndMatrices();
You still have to clear the framebuffer, of course, but all the other direct OpenGL ES calls are nicely hidden inside the Camera2D.setViewportAndMatrices() method. If you run that code, you'll see that nothing has changed. Everything works like before—all you did was make things a little nicer and more flexible.
You can also simplify the update() method of the test. Since you added the Camera2D.touchToWorld() method to the camera class, you might as well use it. You can replace this snippet from the update method:
touchPos.x = (event.x / (float) glGraphics.getWidth())* WORLD_WIDTH;

touchPos.y = (1 - event.y / (float) glGraphics.getHeight()) * WORLD_HEIGHT;
with this:
camera.touchToWorld(touchPos.set(event.x, event.y));
Neat—now everything is nicely encapsulated. But it would be very boring if you didn't use the features of your camera class to their full extent. Here's the plan: you want to have the camera look at the world in the “normal” way as long as the cannonball does not fly. That's easy; you're already doing that. You can determine whether the cannonball flies or not by checking whether the y-coordinate of its position is less than or equal to zero. Since you always apply gravity to the cannonball, it will fall even if you don't shoot it, so that's a cheap way to check matters.
Your new addition will come into effect when the cannonball is flying (when the y-coordinate is greater than zero). You want the camera to follow the cannonball. You can achieve this by simply setting the camera's position to the cannonball's position. That will always keep the cannonball in the center of the screen. You also want to try out your zooming functionality. Therefore, you can increase the zoom factor depending on the y-coordinate of the cannonball: the further away from zero, the higher the zoom factor. If the cannonball has a higher y-coordinate, this will make the camera zoom out. Here's what you need to add at the end of the update() method in your test's screen:
if(ball.position.y > 0) {

    camera.position.set(ball.position);

    camera.zoom = 1 + ball.position.y / WORLD_HEIGHT;

} else {

    camera.position.set(WORLD_WIDTH / 2, WORLD_HEIGHT / 2);

    camera.zoom = 1;

}
As long as the y-coordinate of your ball is greater than zero, the camera will follow it and zoom out. Just add a value to the standard zoom factor of 1. That value is just the relation between the ball's y-position and the world's height. If the ball's y-coordinate is at WORLD_HEIGHT, the zoom factor will be 2, so you'll see more of your world. The way this is done can be really arbitrary; you can come up with any formula that you want here—there's nothing magical about it. In case the ball's position is less than or equal to zero, you show the world normally, as you did in the previous examples.