
Performance Improvements With C/C++
Now that you know how to combine Java and C/C++ code, you may think that C/C++ is always preferred over Java to achieve best performance. This is not true, and native code is not the answer to all your performance problems. Actually, you may sometimes experience a performance degradation when calling native code. While this may sound surprising, it really shouldn't as switching from Java space to native space is not without any cost. The Dalvik JIT compiler will also produce native code, which may be equivalent to or possibly even better than your own native code.
Let's consider the Fibonacci.computeIterativelyFaster() method from Chapter 1 and its C implementation, as shown in Listing 2–16.
Listing 2–16. Iterative C Implementation of Fibonacci Series
    uint64_t computeIterativelyFaster (unsigned int n)

    {

        if (n > 1) {

            uint64_t a, b = 1;

            n--;

            a = n & 1;

            n /= 2;

            while (n-- > 0) {

                a += b;
                b += a;

            }

            return b;

        }

        return n;

    }

}
As you can see, the C implementation is very similar to the Java implementation, except for the use of unsigned types. You can also observe the Dalvikbytecode shown in Listing 2–17 looks similar to the ARM native code shown in Listing 2–18, generated with the NDK's objdump tool. Among other things, the objdump NDK tool allows you to disassemble a binary file (object file, library, or executable) and display the assembler mnemonics. This tool is very much like dexdump, which basically performs the same operations but on .dex files (for example, an application's classes.dex file).
NOTE: Use objdump's –d option to disassemble a file, for example, objdump –d libfibonacci.so. Execute objdump without any option or parameter to see the list of all supported options. The NDK comes with different versions of objdump: one for the ARM ABIs and one for the x86 ABI.
Listing 2–17. Dalvik Bytecode of Fibonacci.iterativeFaster
0008e8:             |[0008e8] com.apress.proandroid.Fibonacci.iterativeFaster:(I)J

0008f8: 1215        |0000: const/4 v5, #int 1 // #1

0008fa: 3758 1600   |0001: if-le v8, v5, 0017 // +0016

0008fe: 1602 0100   |0003: const-wide/16 v2, #int 1 // #1

000902: d808 08ff   |0005: add-int/lit8 v8, v8, #int -1 // #ff

000906: dd05 0801   |0007: and-int/lit8 v5, v8, #int 1 // #01

00090a: 8150        |0009: int-to-long v0, v5

00090c: db08 0802   |000a: div-int/lit8 v8, v8, #int 2 // #02

000910: 0184        |000c: move v4, v8

000912: d808 04ff   |000d: add-int/lit8 v8, v4, #int -1 // #ff

000916: 3c04 0400   |000f: if-gtz v4, 0013 // +0004

00091a: 0425        |0011: move-wide v5, v2

00091c: 1005        |0012: return-wide v5

00091e: bb20        |0013: add-long/2addr v0, v2

000920: bb02        |0014: add-long/2addr v2, v0

000922: 0184        |0015: move v4, v8

000924: 28f7        |0016: goto 000d // -0009

000926: 8185        |0017: int-to-long v5, v8

000928: 28fa        |0018: goto 0012 // -0006
Listing 2–18. ARM Assembly Code of C Implementation of iterativeFaster
00000410 <iterativeFaster>:

 410:   e3500001    cmp    r0, #1   ; 0x1

 414:   e92d0030    push   {r4, r5}

 418:   91a02000    movls  r2, r0

 41c:   93a03000    movls  r3, #0   ; 0x0

 420:   9a00000e    bls    460 <iterativeFaster+0x50>

 424:   e2400001    sub    r0, r0, #1   ; 0x1

 428:   e1b010a0    lsrs   r1, r0, #1

 42c:   03a02001    moveq  r2, #1   ; 0x1
 430:   03a03000    moveq  r3, #0   ; 0x0

 434:   0a000009    beq    460 <iterativeFaster+0x50>

 438:   e3a02001    mov    r2, #1   ; 0x1

 43c:   e3a03000    mov    r3, #0   ; 0x0

 440:   e0024000    and    r4, r2, r0

 444:   e3a05000    mov    r5, #0   ; 0x0

 448:   e0944002    adds   r4, r4, r2

 44c:   e0a55003    adc    r5, r5, r3

 450:   e0922004    adds   r2, r2, r4

 454:   e0a33005    adc    r3, r3, r5

 458:   e2511001    subs   r1, r1, #1   ; 0x1

 45c:   1afffff9    bne    448 <iterativeFaster+0x38>

 460:   e1a01003    mov    r1, r3

 464:   e1a00002    mov    r0, r2

 468:   e8bd0030    pop    {r4, r5}

 46c:   e12fff1e    bx     lr
NOTE: Refer to http://infocenter.arm.com for a complete documentation of the ARM instruction set.
The assembly code is what is going to be executed by the CPU. Since the Dalvikbytecode looks a lot like the assembly code (even though the assembly code is more compact), one could infer that the native code the Dalvik Just-In-Time compiler will generate should be pretty close to the native code shown in Listing 2–18. Also, if the bytecode were significantly different from the assembly code, the Dalvik JIT compiler may still generate native code very similar to the assembly code the NDK generated.
Now, to be able to compare these methods, we need to run some tests. Actual performance evaluation needs empirical evidence, and we are going to test and compare four items:
- Java implementation without JIT compiler
- Java implementation with JIT compiler
- Native implementation (debug)
- Native implementation (release)
The test skeleton (found in Fibonacci.java) is shown in Listing 2–19, and results are shown in Figure 2-1 and Figure 2-2.
Listing 2–19. Test Skeleton
    static {

        System.loadLibrary(“fibonacci_release”); // we use two libraries

        System.loadLibrary(“fibonacci_debug”);

    }


    private static final int ITERATIONS = 1000000;


    private static long testFibonacci (int n)

    {

        long time = System.currentTimeMillis();
        for (int i = 0; i < ITERATIONS; i++) {

            // call iterativeFaster(n), iterativeFasterNativeRelease(n) or interativeFasterNativeDebug(n)

            callFibonacciFunctionHere(n);

        }

        time = System.currentTimeMillis() - time;

        Log.i(“testFibonacci”, String.valueOf(n) + “ >> Total time: ” + time + “ milliseconds”);

    }


    private static void testFibonacci ()

    {

        for (int i = 0; i < 92; i++) {

            testFibonacci(i);

        }

    }


    private static native long iterativeFasterNativeRelease (int n);


    private static native long iterativeFasterNativeDebug (int n);
Figure 2–1 shows the duration of the test in milliseconds for each of the four implementations listed above. Figure 2–2 shows the relative performance of the four implementations with the baseline being the Java implementation with JIT compiler enabled.
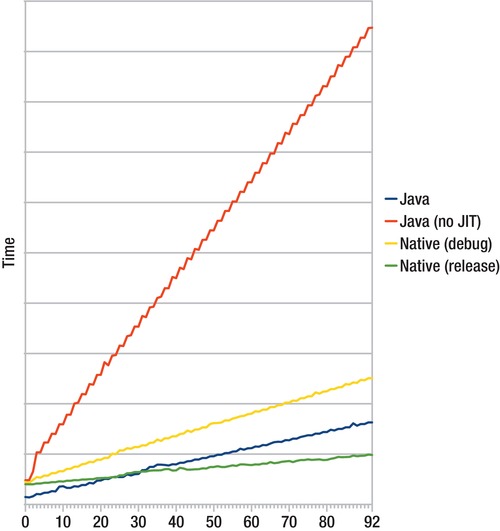
Figure 2–1. The performance of different implementations of iterativeFaster()
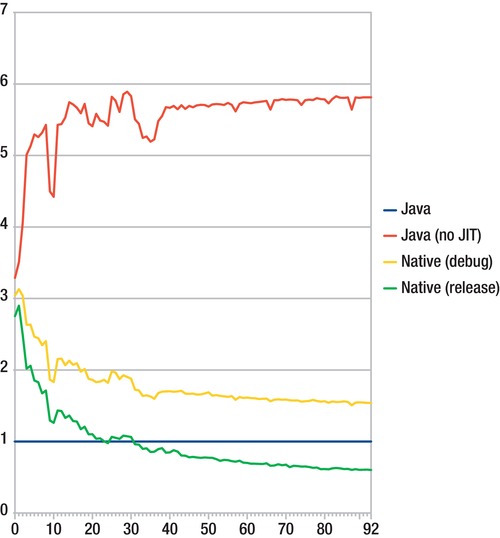
Figure 2–2. The performance of different implementations of iterativeFaster() relative to a JIT-enabled Java implementation
We can draw a few conclusions:
- The Dalvik JIT compiler can increase performance significantly. (The JIT-enabled version is 3 to 6 times faster than JIT-disabled version.)
- The native implementation is not always faster than the JIT-enabled Java version.
- The more time spent in the native space, the more diluted the Java/native transition cost is.
Google's own tests showed the Dalvik JIT compiler could improve performance by a factor of 5 with CPU-intensive code, and our own results here confirm that. The performance gain will depend on the code though, so you should not always assume such a ratio. This is important to measure if you still target older devices running a JIT-less version of Android (Android 2.1 or earlier). In some cases, using native code is the only option to provide an acceptable user experience on older devices.
More About JNI
The JNI glue layer we used was extremely simple as all it did was to call another C function. Unfortunately, it won't be as easy all the time as things get more complicated when non-primitive types are used and when the native code needs to access fields or methods from the Java object or class. On the plus side, everything you do in the JNI glue layer will be quite mechanical.
Strings
Working with strings in both Java and C/C++ can often lead to performance problems. Java's String uses 16-bit Unicode characters (UTF-16) while many C/C++ functions simply use char* to refer to strings (that is, strings in C/C++ are most of the time ASCII or UTF-8). Nostalgic developers may even use the EBCDIC encoding for obfuscation purposes. That being said, Java strings have to be converted to C/C++ strings before they can be used. A simple example is shown in Listing 2–20.
Listing 2–20. Java Native Method Using String and JNI Glue Layer
// Java (in Myclass.java)

public class MyClass {

    public static native void doSomethingWithString (String s);

}


// JNI glue layer (in C file)

void JNICALL

Java_com_apress_proandroid_MyClass_doSomethingWithString

  (JNIEnv *env, jclass clazz, jstring s)

{

    const char* str = (*env)->GetStringUTFChars(env, s, NULL);

    if (str != NULL) {

        // do something with str string here


        // remember to release the string to avoid memory leaks galore

        (*env)->ReleaseStringUTFChars(env, s, str);

    }

}
The JNI offers multiple methods to work with strings, and they all pretty much work the same way:
- The Java String must be converted to a C/C++ string.
- C/C++ string must be released.
Table 2–6 shows the various string get/release methods the JNI provides, together with a short description.
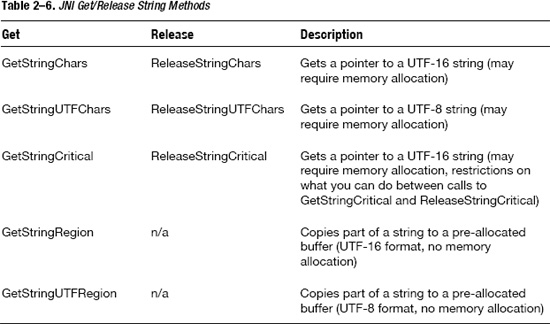
Since memory allocations are never free, you should favor the GetStringRegion and GetStringUTFRegion in your code whenever possible. By doing so, you:
- Avoid possible memory allocations.
- Copy only the part of the String you need in a pre-allocated buffer (possibly in the stack).
- Avoid having to release the string, and avoid forgetting about releasing the string.
NOTE: Refer to the online JNI documentation and the NDK's jni.h header file for more information about other String functions.
Accessing Fields or Methods
You can access fields and methods from Java objects or classes from within the JNI glue layer, however it is not as simple as accessing a field or calling a function of a C++ object or class. Fields and methods of Java objects or classes are accessed by id. To access a field or call a method, you need to:
- Get the id of this field or method.
- Use a JNI function to set/get the field or call the method.
An example is shown in Listing 2–21.
Listing 2–21. Modifying a Field and Calling a Method From the JNI Glue Layer
// Java (in MyClass.java)


public class MyClass {

    static {

        System.loadLibrary(“mylib”);

    }


    public static int someInteger = 0;


    public static native void sayHelloToJNI();


    public static void helloFromJNI() {

        Log.i(“MyClass”, “Greetings! someInteger=” + someInteger);

    }

}


// JNI glue layer (in C file)


void JNICALL

Java_com_apress_proandroid_MyClass_sayHelloToJNI

  (JNIEnv *env, jclass clazz)

{

    // we get the ids for the someInteger field and helloFromJNI method

    jfieldID someIntegerId = (*env)->GetStaticFieldID(env, clazz, “someInteger”, “I”);

    jfieldID helloFromJNIId = (*env)->GetStaticMethodID(env, clazz, “helloFromJNI”, “()V”);


    // we increment someInteger

    jint value = (*env)->GetStaticIntField(env, clazz, someIntegerId);

    (*env)->SetStaticIntField(env, clazz, value + 1);


    // we call helloFromJNI

    (*env)->CallStaticVoidMethod(env, clazz, helloFromJNIId);

}
For performance reasons, you don't want to retrieve the field or method ids every single time you need to access a field or call a method. The field and method ids are set when the class is loaded by the virtual machine and are valid only as long as the class is still loaded. If the class is unloaded by the virtual machine and reloaded again, the new ids may be different from the old ones. That being said, an efficient approach is to retrieve the ids when the class is loaded, that is, in the static initialization block, as shown in Listing 2–22.
Listing 2–22. Retrieving Field/Method Ids Only Once
// Java (in MyClass.java)


public class MyClass {

    static {

        System.loadLibrary(“mylib”);

        getIds(); // we get the ids only once when the class is loaded

    }


    public static int someInteger = 0;
    public static native void sayHelloToJNI();


    public static void helloFromJNI() {

        Log.i(“MyClass”, “Greetings! someInteger=” + someInteger);

    }


    private static native void getIds();

}


// JNI glue layer (in C file)


static jfieldID someIntegerId;

static jfieldID helloFromJNIId;


void JNICALL

Java_com_apress_proandroid_MyClass_sayHelloToJNI

  (JNIEnv *env, jclass clazz)

{

    // we do not need to get the ids here anymore


    // we increment someInteger

    jint value = (*env)->GetStaticIntField(env, clazz, someIntegerId);

    (*env)->SetStaticIntField(env, clazz, value + 1);


    // we call helloFromJNI

    (*env)->CallStaticVoidMethod(env, clazz, helloFromJNIId);

}


void JNICALL

Java_com_apress_proandroid_MyClass_getIds

  (JNIEnv *env, jclass clazz)

{

    // we get the ids for the someInteger field and helloFromJNI method

    someIntegerId = (*env)->GetStaticFieldID(env, clazz, “someInteger”, “I”);

    helloFromJNIId = (*env)->GetStaticMethodID(env, clazz, “helloFromJNI”, “()V”);

}
The JNI defines tons of functions you can use to access fields and call methods. For example, accessing an integer field and accessing a Boolean field are two operations that are done with two different functions. Similarly, different functions are defined to call a static method and a non-static method.
NOTE: Refer to the online JNI documentation and the NDK's jni.h header file for a complete list of functions you can use.
Android defines its own set of functions and data structures to access the most common classes used in native code. For example, the APIs defined in android/bitmap.h (introduced in NDK release 4b) allow access to the pixel buffers of bitmap objects:
- AndroidBitmap_getInfo
- AndroidBitmap_lockPixels
- AndroidBitmap_unlockPixels
NDK revision 5 introduced many new APIs application developers can use from native code to access parts of the Android Java framework, without relying on JNI idiosyncrasies (JNIEnv, jclass, jobject, for example).