
![]()
Once users are authenticated to APEX applications, they will be able to run any page and see all components, unless there are restrictions put in place. Most often, these restrictions will be implemented using authorization schemes or conditions. Authorization schemes are APEX components that act like roles. They are associated with an APEX component on one side and then map to a user or group of users on the other, thus allowing a developer to secure their applications using a standard, structured approach.
This chapter will cover APEX authorization schemes, both what they are and how they should be implemented. It will review the core features of authorization schemes and discuss which ones are most optimal for a secure application. It will then discuss where to store user-to-role mappings and summarize the benefits and drawbacks of each approach. It will also cover different use cases of authorization schemes and how to protect against authorization inconsistencies. It will conclude with a brief review of the built-in Access Control feature.
Authorization Schemes
As just mentioned, an authorization scheme in APEX is a component that returns either a TRUE or a FALSE when evaluated. Authorization schemes can be associated with almost every single component in APEX, from the application itself to a specific column in a report. They differ from authentication schemes in that they determine which components of an application a user can access or execute, whereas an authentication scheme determines whether a user’s credentials are valid.
When an authorization scheme is created, APEX will automatically create a second authorization scheme that will be the opposite of the one just created. For example, if an authorization scheme for admin users was created, a second scheme called {Not Admin Users} would also be created. This second scheme can be associated with any APEX component and will evaluate to TRUE when the result of the original authorization scheme is FALSE, or vice versa. No additional option needs to be selected for the second, opposite authorization scheme to be created.
Authorization schemes are shared components and can be referenced from almost any other component. Despite their power and utility, authorization schemes are one of the simplest components in APEX, containing only four editable attributes, as shown in Figure 9-1.

Figure 9-1 . The attributes of an authorization scheme
While the name of the authorization scheme may seem cosmetic, several APIs make reference to it. For example, the APEX_UTIL.PUBLIC_CHECK_AUTHORIZATION API takes in a single parameter: the name of an authorization scheme. Thus, the name of an authorization scheme should not be altered once it is created, especially if APIs that make reference to it are being used. Unfortunately, there is no way to enforce this in APEX because the name field is always editable.
A number of different methods can be used when determining the result of an authorization scheme. Regardless of the authorization scheme’s type, the end result is still a Boolean. The following are the possible authentication schemes:
- Exists SQL Query
- Item in Expression 1 is NULL
- Item in Expression 1 is NOT NULL
- NOT Exists SQL Query
- PL/SQL Function Returning Boolean
- Value of Item in Expression 1 Does NOT Equal Expression 2
- Value of Item in Expression 1 Equals Expression 2
- Value of Preference in Expression 1 Does NOT Equal Expression 2
- Value of Preference in Expression 1 Equals Expression 2
Most types are self-explanatory as to what they do and should be familiar to experienced APEX developers because conditions utilize similar constructs. Depending on the type selected, additional attributes may be required.
The last attribute of an authorization scheme is the evaluation point. There are two possible settings for this attribute: once per page view and once per session. The former will evaluate the authorization scheme each and every page view, whereas the latter will evaluate the authorization scheme only once per session.
While setting the value of this attribute to “once per page view” will certainly introduce a small amount of additional overhead, it does provide the most secure implementation of authorization schemes because a user’s association with a scheme can immediately be revoked on the very next page view. Setting this attribute to “once per session” is much more efficient because all authorization schemes will be evaluated only when the user logs in, and the results are used throughout the duration of their session.
Authorization schemes are one of the few shared components that work with subscriptions. A subscription in APEX allows any number of components to “subscribe” to a master copy. A developer can then either publish the master to all subscribers or refresh the subscription on a per-component basis. This allows for better centralized control of components because if an update is required, only the master needs to be updated and then republished versus editing many individual components. In addition to authorization schemes, you’ll find that authentication schemes, lists of values, shortcuts, and templates work with subscriptions.
While the intended purpose of conditions in APEX is to facilitate business rules, sometimes they need to be used for security. A typical example of this is when a condition is used to determine whether the user is authenticated. While this practice should be avoided if possible, there is no inherent risk in applying it.
Implementing Authorization Schemes
Implementing an authorization scheme is typically as simple as associating it with the corresponding APEX components that need to be secured. Once done, those components will render only when the associated authorization scheme returns a TRUE. While that sounds simple enough, properly adding authorization schemes to your application is one of the most critical parts of developing a secure application and should be planned carefully from the beginning of the design phase.
Role Location
The first decision that needs to be made is where the mapping of users to roles will be stored. In some organizations, these mappings are done via LDAP groups. If this is the case, then an authorization scheme can easily check a user’s membership in an LDAP group by calling the APEX_LDAP.IS_MEMBER API. If the user is in fact a member of the associated group, then the authorization scheme will return a TRUE, and any component associated with it will be available to the user.
In many organizations, it is nearly impossible to gain access to the LDAP server so that user-to-group mappings can efficiently be managed. Rather than fight the political battle to gain these rights to the LDAP server, many choose to manage user-to-group mappings locally via a set of database tables. In this case, it is still possible to use LDAP for an authentication scheme, ensuring that user management is still done at the LDAP server, not in APEX. As long as the authentication scheme is associated with a centrally managed user repository, there is little risk to this hybrid approach.
Table-Based Roles
Storing roles in a local set of tables is relatively simple to implement and manage. A basic solution can be achieved with only two tables: one for the role definition and one for the user-to-role mappings. Like any development project, building a locally managed role management infrastructure is something that should be properly designed and developed, not something that is thrown together in a couple of hours. For example, when securing pages, it makes much more sense to have a single authorization scheme that is aware of the page and its associated users versus one authorization scheme per page.
The tables that manage the roles and role mappings should be stored in a separate schema from any schema that is mapped to an APEX workspace. This is done for security purposes because a simple read-only view accessible to any parse-as schema can be built and referenced in any APEX application to determine whether a user has any role.
A simple APEX application can also be built for the specific purpose of managing the role and role mappings. This application would need access to a set of APIs that securely allow the management of role and mappings. Care should be taken to ensure that any activity in this application is audited.
Gatekeeper Authorization Scheme
The most important component to associate an authorization scheme with is the application itself. If this is not done, then any user who can authenticate will be able to run your application. Consider an organization with 1,000 employees. Each of those employee’s credentials will be stored in an LDAP server that will be associated with all applications via an authentication scheme. If a developer wanted to build an application for a specific subset of the employees, having an authentication scheme is simply not enough because any of the 1,000 employees will be able to log in.
Thus, a “gatekeeper” authorization schemeshould be created and associated with the application. A gatekeeper scheme is slightly different from other authorization schemes in that its goal is to determine whether the current user has at least one valid role or group in the associated application. How it does this all depends on where the user-to-role mappings are stored. If they are in LDAP, then the APEX_LDAP.MEMBER_OF or MEMBER_OF2 API can be called to determine whether the user has at least one valid group. If roles are stored in a table, then a simple EXISTS query can be run to ensure that the user has at least one valid role.
To associate an authorization scheme with the application, edit the application’s shared components. Next, click Security Attributes, and in the Authorization region, select an authorization scheme, as shown in Figure 9-2.

Figure 9-2 . Associating an authorization scheme with an application
Page-Level Authorization Schemes
Ensuring that sensitive pages have an authorization scheme associated with them is another important step to take when building your applications. Every page—aside from the global pages—can and should have an associated authorization scheme. To associate an authorization scheme with a page, edit the page properties, and then in the Security region, select an authorization scheme, as shown in Figure 9-3.

Figure 9-3 . Associating an authorization scheme with a page
While this approach would be effective for a small number of pages, it would get quite tedious when the application has 20 or more pages. Fortunately, there is an updatable report that allows some page attributes—including authorization scheme—to be updated in batch. This report is buried within the Application Utilities section of the Application Builder. To access it, navigate to the application home page. From there, click the Utilities icon. Next, select Cross Page Utilities from the Page Specific Utilities region, which can be found in the lower-right side of the page. Lastly, select Grid Edit of All Pages. The resulting updatable report will list the first 15 pages of your application, as shown in Figure 9-4.

Figure 9-4 . Editing multiple page attributes at once
One thing to note when using this report is that changes must be saved before clicking the next or previous set of records icon. APEX 4.2 will display a reminder if there are unsaved changed, but previous versions of APEX will not.
Using a security tool such as Enkitec’s eSERT can help when it comes to keeping track of which page is mapped to which authorization scheme. One of eSERT’s attributes inspects every page and produces a report based on which pages are mapped to an authorization scheme and which are not, as illustrated in Figure 9-5.
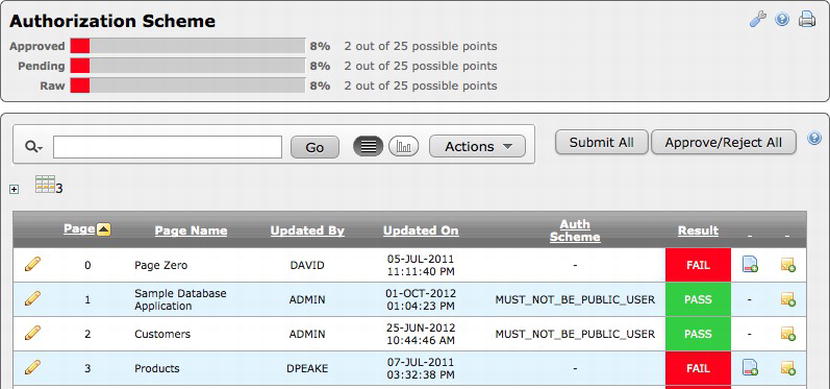
Figure 9-5 . The page authorization scheme report from eSERT
From this report, it is clear to the developer which pages have authorization schemes and which do not. Additionally, a developer can click the edit link and immediately edit the corresponding page, allowing them to quickly remedy any issue.
Authorization Inconsistencies
Associating authorization schemes with other APEX components—items, regions, buttons, charts, and so on—is relatively straightforward. Simply edit the component in question, navigate to the Security region, select the corresponding authorization scheme, and then save your changes.
At some point, it can become overwhelming to mentally keep track of which authorization scheme is associated with which APEX component. Fortunately, there is a report that does just that. Simply edit the authorization scheme in question, and then select the Utilization tab, as shown in Figure 9-6. This report will detail all the components in APEX that are associated with either all authorization schemes or a specific one, based on the value selected.

Figure 9-6 . An authorization scheme utilization report
As your applications grow in size and complexity, the chance that they will contain at least one authorization inconsistency will increase. An authorization inconsistency is when a developer has associated an authorization scheme with a button or tab but neglected to associate the same scheme with the target page. This would allow the user to access the page by simply editing the URL. Authorization inconsistencies can also be defined as insecure Ajax callbacks or unsecured processes associated with secured buttons.
There is no report built in to APEX that details these authorization inconsistencies. Fortunately, there is a section in Enkitec eSERT that does this. The Authorization Inconsistencies category covers a wide range of issues, as shown in Figure 9-7.

Figure 9-7 . The Authorization Inconsistencies report in Enkitec eSERT
Even experienced APEX developers are not immune from authorization inconsistencies because they are extremely simple to overlook. Thus, care should be taken to ensure that all pages are properly secured not only with any authorization scheme but with the proper one.
APEX Access Control
APEX actually does contain a built-in role management feature called Access Control. When installed in your application, this feature creates three roles—administrator, edit, and view—each mapped to an authorization scheme. Users can then be mapped to a role via an administration page. The corresponding authorization schemes are then mapped to different APEX components.
Access Control is installed into an application by creating a new page of type “access control.” Once installed, Access Control will create a management page in your application, as shown in Figure 9-8. This page will facilitate the user-to-role mappings, as well as configure the Access Control application mode.

Figure 9-8 . The main Access Control management page
Additionally, three authorization schemes will also be created in your application—one for each role. These authorization schemes are quite sophisticated and don’t simply look at the role that they represent. First, they will check the application mode. The mode that is set will depend on what result will be returned. The three roles included with Access Control are hierarchical in nature, in that the higher-level roles inherit the privileges of the lower-level roles. Thus, anything that users mapped to the read role can do, users mapped to the edit and administration roles can do, too.
On the database side, Access Control will create two tables in your parse-as schema: APEX_ACCESS_CONTROL and APEX_ACCESS_SETUP. The former is where the user-to-role mappings are stored, and the latter is where the application mode is stored. These tables will be created only if they do not already exist because Access Control stores information for all applications in the same table.
While it may seem convenient to use the Access Control feature, there are a number of reasons it is less than optimal. First, only three roles are available when using Access Control. If a fourth role is required, then additional coding will be required to construct the corresponding authorization scheme. Second, the functionality of the three available roles is quite specific. In some applications, they should suffice. But many applications require roles outside of the three available in Access Control.
Since Access Control is embedded within an application, it is not possible to have a single place where roles for all applications can be managed. Each application would end up having its own role management facility. This presents the problem of a distributed role management system without any central oversight or auditing. In such an environment, any user who has access to the Access Control administration pages would be able to grant access to any other user and not be held accountable.
Because of its numerous shortcomings and drawbacks, it is best to avoid APEX’s Access Control feature in most cases. The amount of effort that would need to be done to remedy its issues is about the same as the amount of effort required to develop a custom solution that overcomes these drawbacks.
Summary
Authorization schemes are a powerful tool when it comes to controlling who gets to see what in an application. However, like most facets of application development, they need to be considered early on in the design phase and not implemented hastily right before an application goes live. It matters little where the roles are defined—an LDAP server or a local table. What does matter is that the assignment and management of roles is centralized and audited so that all activity can be recalled, if necessary.
While APEX does provide an Access Control tool, it falls short of what many organizations need. With just a small amount of effort, a custom solution that meets all your organizational requirements can quickly be implemented.