
![]()
Consider this: when you enable export to CSV on an APEX report, you’re allowing any user to export all rows of any report with a single click. Think about that for a second. Enabling this feature may make users’ lives extremely convenient and solve a lot of their problems. But the security implications of enabling it are massive and definitely outweigh any convenience that it brings.
This chapter will start by discussing options in APEX that can be configured to control some aspects of the report exports that APEX provides. It will also introduce a more secure method for allowing users to export report data to a CSV file. While this method is not a core component of APEX, it is very unobtrusive and requires only a couple of additional components be added to an application for it to work. It is also flexible enough that it can be configured for a specific application’s security and auditing needs.
Although the feature which allows APEX to export reports is quite powerful, it is also quite rudimentary in nature. The ability to export cannot be conditionally enabled based on a security role or other business rule; it is either on for everyone or off for everyone. APEX will log a page view event upon export and record the date, time, username, and page (and if from an interactive report, the report ID) that the event occurred on, but it does not provide any additional information as to which report was downloaded. Thus, in the case of multiple standard reports on the same page, it remains unclear which one was exported in the logs.
Despite these drawbacks, you can configure some features of the export to make them more secure. For example, you can set a limit on how many records can be exported for any report, whether interactive or standard. In addition, columns can be displayed in the browser but excluded in an export.
These basic features may be more than enough for your needs and security requirements. However, if they fall short of your requirements, there is another option: you can build a custom export to CSV routine from scratch. While this approach requires some additional components and custom code, it is very lean and can be implemented once and used everywhere within an application.
Maximum Row Count
Every report in APEX has a parameter called Maximum Row Count. This parameter will control the maximum number of rows presented in a report in APEX, regardless of the size of the underlying data set. You can find the Maximum Row Count parameter on the Report Attributes page for both standard and interactive reports. Figure 10-1 illustrates its location in standard reports, whereas Figure 10-2 illustrates its location in interactive reports.

Figure 10-1 . The Maximum Row Count parameter on the standard report attributes screen

Figure 10-2 . The Maximum Row Count parameter on the interactive report attributes screen
In standard reports, this parameter defaults to 500, even when left blank. Often developers will set this value to something unnecessarily high, such as 999,999. This is not recommended for two major reasons: first, performance will be negatively impacted, and second, if users can view all the records, they can also export all records to CSV.
In interactive reports, this value is set considerably higher by default: 10,000 or even higher for larger data sets. Not altering this value for interactive reports is much more dire than in standard reports because instead of a default setting of just 500, thousands of records can be exported.
Therefore, you should set the Maximum Row Count parameter as low as possible based on your business requirements. Use item-based filters or an interactive report to allow users to slice and dice the data to find what they are looking for. If your data set contains 1,000 or more records, there is no user who will want to paginate through all of those records 15 at a time. Thus, the use of smart filters will help them get to the records they need to see quickly and securely.
Column Restrictions: Standard Reports
Another method used to protect sensitive data is to restrict which columns can be exported. This comes in handy when you need a user to search by account number and display that column on the screen but do not want that user to be able to export all account numbers; you may want the user to be able to export just the name and address, for example. While it’s obvious how to configure restrictions for standard reports, it takes a bit more work for interactive reports.
To restrict a column from being exported in a standard report, simply edit the column’s attributes and set the Include in Export parameter to No, as shown in Figure 10-3. This approach will still allow the column to be displayed in the report normally. It will restrict the column only when exporting to CSV.

Figure 10-3 . Disabling a column from being exported in a standard report
Column Restrictions: Interactive Reports
Unfortunately, there is no such declarative option for interactive reports. Despite this limitation, you can achieve the same functionality using a simple condition at the column level. As illustrated in Figure 10-4, simply set the condition to Request is NOT Contained within Expression 1, and then set Expression 1 to the following: CSV:HTMLD:XLS:PDF:RTF.

Figure 10-4 . Setting the condition of a column to prevent it from being exported
The string entered in Expression 1 ensures that the column will not be included in any native APEX export, regardless of the format selected by the user. This list can obviously be changed to allow the column to be included in the PDF but not the other formats, for example.
Custom Export to CSV
Although there are a few declarative ways to control and restrict the ability to export report data in APEX, they often do not provide a comprehensive enough solution for more secure or sophisticated requirements. The built-in export function offers an “all-or-nothing” approach. Either it is enabled and all users can export all of the records or it is disabled and no one can export anything.
Restricting Records with ROWNUM
Since there is no facility within APEX to augment this procedure, you need to do it in the SQL that constructs an APEX report. By wrapping the SQL with a WHERE clause that selectively limits the number of records returned based on a business rule, you can effectively limit the number of records returned when the report is run.
To implement this technique, you need to create an application item called G_MAX_ROWS. This item will be populated with the maximum number of records a user is allowed to export. When creating this item, be sure to set the Session State Protection parameter to Restricted – May not be set from browser. Failure to do so will allow a savvy user to set this item by simply passing a value through the URL.
The value for G_MAX_ROWS can be determined by a function call, a SQL query, or even a fixed amount. This item can even be set differently for each user-page combination. Regardless of how it is set, it should be set in an application computation that fires before each page is rendered.
When APEX calls the built-in export routine, it does so by passing a specific value to the request parameter of the URL. For a standard report, APEX will pass FLOW_EXCEL_OUTPUT_RXXX_en to the request parameter, where XXX refers to the corresponding region ID. For an interactive report, APEX will pass in CSV, HTMLD, XLS, PDF, or RTF, depending on what type of report was exported. Thus, if any of these values are passed to the request parameter, you can assume that a report is being exported by the built-in APEX export function and instrument the SQL to take that into consideration.
![]() Caution When using interactive reports, this technique will not work when selecting e-mail as a download format or when using e-mail subscriptions. Both options should be disabled in the interactive report to ensure that data is not exported using that method.
Caution When using interactive reports, this technique will not work when selecting e-mail as a download format or when using e-mail subscriptions. Both options should be disabled in the interactive report to ensure that data is not exported using that method.
For example, a simple SQL statement like the one in Listing 10-1 can be augmented to restrict the maximum number of records in a standard report, as shown in Listing 10-2, or in an interactive report, as shown in Listing 10-3.
Listing 10-1. A Simple SQL Statement
SELECT
  ename,
  empno,
  sal
FROM
  emp
Listing 10-2. The Same SQL Statement Wrapped to Restrict the Maximum Number of Records Returned for a Standard Report
SELECT
  ename,
  empno,
  sal
FROM
  (
  SELECT
    ename,
    empno,
    sal
  FROM
    emp
  )
WHERE
  rownum <= CASE
  WHEN :REQUEST LIKE 'FLOW_EXCEL_OUTPUT%' THEN
    TO_NUMBER(:G_MAX_ROWS)
  ELSE rownum END
Listing 10-3. The Same SQL Statement Wrapped to Restrict the Maximum Number of Records Returned for a Standard Report
SELECT
  ename,
  empno,
  sal
FROM
  (
  SELECT
    ename,
    empno,
    sal
  FROM
    emp
  )
WHERE
  rownum <= CASE
  WHEN :REQUEST IN ('CSV','HTMLD','XLS','PDF','RTF') THEN
    TO_NUMBER(:G_MAX_ROWS)
  ELSE rownum END
While this technique is a bit intrusive, in that you have to add an additional WHERE clause to your SQL, it is effective and does not require any additional components, save for an application item and its associated computation.
Restricting Records with PL/SQL
If modifying the SQL to restrict the number of rows returned is not sufficient, then the only alternative is to build your own custom export routines by hand. While this sounds a bit daunting at first, the code and mechanism required here are not sophisticated and are very repeatable and nonintrusive to your applications.
![]() Note The core code for this approach can be traced back to one of my blog posts from April 2006 (http://spendolini.blogspot.com/2006/04/custom-export-to-csv.html). Using the techniques described in that blog post and expanding upon them, you can create a custom export routine that offers as much auditing and control as you need.
Note The core code for this approach can be traced back to one of my blog posts from April 2006 (http://spendolini.blogspot.com/2006/04/custom-export-to-csv.html). Using the techniques described in that blog post and expanding upon them, you can create a custom export routine that offers as much auditing and control as you need.
Since there is no way to modify the core APEX components, the solution will have to sit just outside the APEX framework. The solution should be both reusable and as minimally intrusive as possible, thus making it almost seamless to enable whenever and wherever needed. The core of the solution will reside in a PL/SQL package. The actual generation of the export files, as well as all security and audit routines, will occur there. The rest of the solution will be based on built-in APEX components. It is important to note that despite this being a custom solution, it relies on 100 percent supported functionality of APEX and the Oracle Database.
The following example uses the standard Oracle EMP table. Both EMP and DEPT should be installed by default in an APEX workspace (as long as the option to install demonstration applications is enabled). Create a new application, and make sure that it has a page 1. On this page, simply create two reports, one classic and the other interactive. The SQL for these reports is quite simple, as illustrated in Listing 10-4.
Listing 10-4. SQL Statement Used for Both Types of Reports
SELECT * FROM EMP
Step 1: Disable Built-in Export Controls
The first step to implementing a custom download procedure is to disable the built-in export or download controls. Since custom controls will be added later, there is no longer a need to display the built-on ones. Depending on the type of report, the steps will vary. For Standard standard Reportsreports, edit the report attributes and simply set the Enable CSV Output option in the Report Export region to No, as illustrated in Figure 10-5.

Figure 10-5 . Disabling the export function in a standard report
![]() Note When using classic reports, disabling the Report Export function is not enough. A clever, malicious user can easily get the region ID of a classic report and pass that through the URL, thus triggering the built-in export mechanism, even if it is disabled. The only way to truly protect against this type of attack is to ensure that each column in a classic report has its Include in Export option set to No. Failure to properly secure each column in a classic report puts the data in that column at risk.
Note When using classic reports, disabling the Report Export function is not enough. A clever, malicious user can easily get the region ID of a classic report and pass that through the URL, thus triggering the built-in export mechanism, even if it is disabled. The only way to truly protect against this type of attack is to ensure that each column in a classic report has its Include in Export option set to No. Failure to properly secure each column in a classic report puts the data in that column at risk.
For interactive reports, this is a two-step process. First, edit the report attributes. Next, uncheck the Download option in the Search Bar region of a report’s attributes, as illustrated in Figure 10-6.
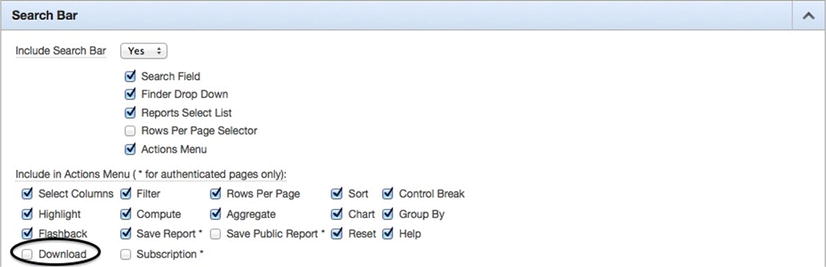
Figure 10-6 . Disabling the export function for an interactive report
Unchecking the Download option simply removes that option from the interactive report menu. It does not prevent a user from using the URL to download the contents of the interactive report. Thus, all Download Formats options also need to be unchecked, as per Figure 10-7. Failure to uncheck all these options will allow a malicious user to use the URL to harvest information from any interactive report.

Figure 10-7 . Be sure to also uncheck all Download Formats options in an interactive report
Step 2: Create a Shortcut
Once the built-in export mechanism is disabled and columns are restricted, the next step is to create a shortcut. Shortcuts in APEX are shared components that can be assigned a value by a developer. When used throughout the application, the shortcut will simply render as the value to which it is set. They are quite useful if you need to reuse the same snippet or code in multiple places.
The shortcut used in this solution will call an APEX URL that is generic enough that it can be referenced from any report on any page using built-in APEX substitution strings. Thus, only a single shortcut for any number or reports is required for this solution. Creating a single shortcut also provides the ability for the URL references to be changed in a single place and impact the entire application, should it be necessary to do so.
To create a shortcut, navigate to the shared components of your application. Create a new shortcut from scratch, name it DOWNLOAD, and set its type to HTML Text. Next, enter the code from Listing 10-5 into the Shortcut region and create the shortcut.
Listing 10-5. The DOWNLOAD Shortcut URL
<a href="f?p=&APP_ID.:&APP_PAGE_ID.:&APP_SESSION.
:EXPORT::: G_REGION_ID:#REGION_ID#">Download</a>
When the shortcut renders on the page, the built-in substitution strings &APP_ID., &APP_PAGE_ID., and &APP_PAGE_SESSION. will resolve to their actual values. Thus, this snippet will reflect the current application, page, and session ID associated with a specific user. When referred to in a region header or footer, #REGION_ID# will be replaced with the corresponding region’s internal ID. This will help to get a “handle” on the region and determine which export link was clicked if there is more than one region on a page. The value of region ID will be passed to an application item called G_REGION_ID, which will also be passed to the PL/SQL package.
The value EXPORT will be passed to the request parameter of the URL. An application process will be added later and conditionally set to call the PL/SQL export routine if the request value is set to EXPORT.
Figure 10-8 shows the shortcut page.
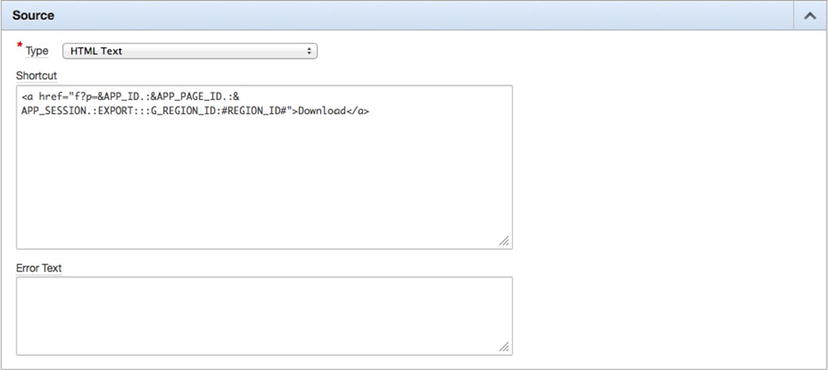
Figure 10-8 . The type and source of the DOWNLOAD shortcut
Once the shortcut is created, it will have to be added to any region that will call the custom export procedure. Simply edit any report (standard or interactive), and paste the shortcut name enclosed in double quotes into the Region Footer area, as illustrated in Figure 10-9.

Figure 10-9 . Associating the shortcut with a region footer
When users run the page, the Download link will look identical to the built-in Export to CSV link that they are accustomed to seeing. Keeping the link title consistent will alleviate the need for additional user training.
Step 3: Associate a Static ID
One more slight modification needs to be made to the region before it will work with the custom export procedure: a static ID must be associated with it. All APEX regions have an associated region ID that can be determined by inspecting the #REGION_ID# built-in item from within a region. APEX region IDs are surrogate keys and will consequentially be changed when moving the application from one instance to another. Therefore, they do not make good references if you want to look for a specific region from a PL/SQL package.
The static ID is a place to supply a natural primary key for a region so that if it is programmatically referred to in the PL/SQL package in one instance, it will still retain that same ID in any other instance. The static ID in APEX can be set to any value at all. Unfortunately, APEX does not check to see whether it is unique within a page, so extra attention needs to be paid when creating static IDs to ensure that they are unique on a page.
Oftentimes, the static ID will already be set for use in jQuery or JavaScript. That will not interfere with the purposes of the custom export routine. As long as it’s defined to some value and is unique within an APEX page, there should be no conflicts.
To set the static ID of any region, simply edit the region and enter a value for Static ID, as illustrated in Figure 10-10.

Figure 10-10 . Setting the static ID of a region
A consistent naming convention may combine the page number that the region resides on with the title or a portion of the title of the region. For this example, the static ID of the classic report will be set to p1EmpClassic, and the static ID of the interactive report will be set to p1EmpInteractive.
Step 4: Set an Application Item
To capture the region ID of the corresponding region that was clicked, an application item is needed. The value of this item can easily be inspected within a PL/SQL package to determine which export procedure to execute. The Session State Protection attribute for this item must be set to Unrestricted. Typically, the best practice is to set application items to at least some variant of Checksum Required, as illustrated in Figure 10-11. However, in this case, it is safe to leave this application item set to Unrestricted, because additional security checks will be implemented within the PL/SQL package. Since this application item will be unrestricted, it should never be referred to by using &G_REGION_ID.within a static region of APEX.

Figure 10-11 . Creating the application item to store the region ID
Alternatively, a hidden item on Page 0 can be used in lieu of an application item. Technically, there is little difference between the two. Page 0 items, of course, require that page 0 and at least one region be created, whereas application items have no such requirement.
Any APEX item must be associated with a region, so you may want to create a placeholder HTML region on page 0 and associate P0_REGION_ID with that region. This region should not have a condition on it so that P0_REGION_ID is available on all pages of the application.
Step 5: Create an Application Process
The final APEX component needed is an application process. This process should be a PL/SQL anonymous block set to fire On Load: Before Header and be given a sequence of 0 so that it executes before anything else. Figure 10-12 provides an example of the settings for the application process.

Figure 10-12 . Application process settings used to call the custom export package
Next, enter the code in Listing 10-6 for the source or process text of the application process.
Listing 10-6. The Source for the Custom Export Application Process
custom_export.export_data
  (
  p_app_id                   => v('APP_ID'),
  p_app_page_id              => v('APP_PAGE_ID'),
  p_app_session              => v('APP_SESSION'),
  p_app_user                 => v('APP_USER'),
  p_region_id                => :G_REGION_ID
  );
The process will evaluate and determine the application ID, page, session, and user by calling the v function and passing in the corresponding parameter. It will use G_REGION_ID as the final parameter, thus identifying which link in which report was clicked.
Finally, the process should be conditional and set to fire only on Request = Expression 1, and Expression 1 should be set to EXPORT, as illustrated in Figure 10-13. This will limit the process to fire only when the custom link is clicked rather than before every page view.
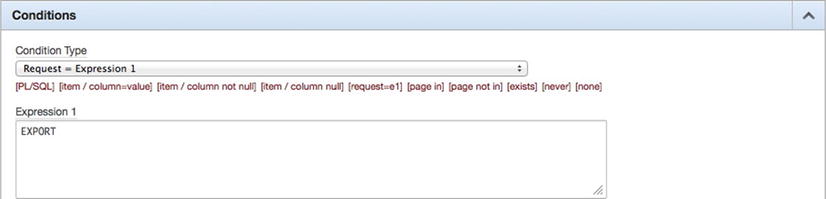
Figure 10-13 . Setting the condition of the application process
Step 6: Create the PL/SQL Package
Now that all of the APEX components are configured, the PL/SQL package that will facilitate the actual export routine needs to be created. The complete listing for this package as well as the supporting database objects can be found in the source code download for this book. (Snippets of the package are referred to in this chapter for illustrative purposes only.)
This package also assumes that the EMP and DEPT tables installed in the schema. If these tables are not installed, then the contents of the procedures p1_emp_classic and p1_emp_interactive can be modified to refer to tables that are present.
Once the database objects and package from the source code are installed, the custom export routine is ready to go. Clicking the custom export link in either the classic or interactive report region can test the custom export procedure, as depicted in Figure 10-14.

Figure 10-14 . The download link that will call the custom export routine
When the Download link is clicked, APEX will redirect to the same page, but this time, it will pass the value EXPORT to the request parameter. This, in turn, will trigger the application process that calls custom_export.export_data. Let’s step through what happens inside custom_export.export_data, one chunk at a time.
The very first thing that happens is that a check is performed to determine whether the click came from a classic or interactive report, and then the details of that event get logged, as outlined in Listing 10-7. Since the APEX views for these are different, this determination needs to be made right away. Once this determination is made, then the download event is logged to the export_audit table. Slightly different parameters are required based on the type of report used. These values will be used by triggers on the table to ensure that the correct data for the report is logged.
Listing 10-7. Code to Determine and Log What Type of Report Was Downloaded
-- Determine if the report is Classic or Interactive
SELECT COUNT(*) INTO l_count FROM apex_application_page_ir
  WHERE region_id = l_region_id;
-- Log the download
IF l_count = 1 THEN
  INSERT INTO export_audit (region_id, report_type)
    VALUES (p_region_id, 'Interactive'),
ELSE
  INSERT INTO export_audit (region_id) VALUES (p_region_id);
END IF;
Once the type of report is determined and the download event is logged, the next task is to determine the static ID based on the region ID that was passed to G_REGION_ID. The value of the static ID will be used to determine which download procedure to run. This needs to be transformed in this manner because the region ID of any APEX region is a surrogate key and will change when exported from one instance to another. Listing 10-8 illustrates the loop used to capture the static ID.
Listing 10-8. Fetching the Static ID Based on the Region ID
 -- Fetch the Static ID
FOR x IN (SELECT static_id FROM apex_application_page_regions
  WHERE region_id = l_region_id)
LOOP
  l_static_id := x.static_id;
END LOOP;
If the static ID is found, the process will continue, as outlined in Listing 10-9. However, if it is not found, then the process will fail and produce a basic error message, indicating to the user that no corresponding static ID exists for the region. More sophisticated error handling could be added here, but to keep things simple, the error message will simply be printed on the page.
Listing 10-9. Error Handling for When the Static ID Is Not Found
IF l_static_id IS NOT NULL THEN
  ...
ELSE
  -- Static ID not found
    htp.p('There is no Static ID defined for this region.'
      || '<br /><a href="f?p=' || p_app_id || ':'
      || p_app_page_id || ':' || p_app_session
      || '">Back to Report</a>'),
    mime_footer;
END IF;
Assuming that a static ID was found, two security checks will be made, which are outlined in Listing 10-10. The first will determine whether the user can run the page that the report is on. The second will check to see whether the user can run the actual report. It does this by calling the built-in APEX APIs to check the authorization scheme for the page and region.
This step is required because the URL is being used to pass the region ID to an unprotected application or page item. Thus, it would be very easy for malicious users to look up or even brute-force attack with a range of other region IDs and pass them to the procedure, thus allowing them to see data from reports that they do not have access to. Adding these additional security checks will prevent such an attack from occurring and allow only authorized users to run the custom export procedure.
Listing 10-10. Authorization Checks for Both the Page and Region
-- Determine if the user can run the page that the region is located on
FOR x IN
  (
  SELECT
    pr.authorization_scheme region_auth,
    p.authorization_scheme page_auth
  FROM
    apex_application_page_regions pr,
    apex_application_pages p
  WHERE
    pr.page_id = p.page_id
    AND p.application_id = pr.application_id
    AND pr.region_id = TO_NUMBER(l_region_id)
    AND p.application_id = p_app_id)
  )
LOOP
  l_page_auth := x.page_auth;
  l_region_auth := x.region_auth;
END LOOP;
-- Check to see that the user has access to the page
IF l_page_auth IS NOT NULL THEN
  l_page_auth_res := APEX_UTIL.PUBLIC_CHECK_AUTHORIZATION(l_page_auth);
ELSE
  l_page_auth_res := TRUE;
END IF;
-- Check to see that the user has access to the region
IF l_region_auth IS NOT NULL THEN
  l_region_auth_res := APEX_UTIL.PUBLIC_CHECK_AUTHORIZATION(l_region_auth);
ELSE
  l_region_auth_res := TRUE;
END IF;
If either of the checks failed (meaning that an APEX authorization scheme would prevent this user from viewing either this page or this specific region), then the procedure will display an error message and not continue, as illustrated in Listing 10-11. For additional security, this event could be logged and an administrator notified because ending up here would almost always be the result of a malicious attempt to view the export.
Listing 10-11. Error Message Displayed When the User Is Not Authorized to View the Page or Region
-- If the user can't see either the region of page,
-- then do not allow the download to start
IF l_region_auth_res = FALSE OR l_page_auth_res = FALSE THEN
  -- User cannot export this report
  htp.p('You are not Authorized to export this report.'
    || '<br /><a href="f?p=' || p_app_id || ':'
    || p_app_page_id || ':' || p_app_session || '">Back</a>'),
  mime_footer;
In the case that both checks returned a TRUE, the next step is to call the corresponding export procedure. Additional checks can also be made at this point, such as ensuring that only a specific user or set of users can export a report. The possibilities of what else can be checked here are limitless.
In this example, p1_emp_classic and p1_emp_interactive are procedures that will be called based on which export link was clicked. The custom export package can have several additional procedures added to it, based on how many reports need custom export routines. For more reusability, you could even use the APEX views and dynamically create the SQL statements that will be run for the export. Listing 10-12 shows how the custom_export procedure determines which export procedure to run.
Listing 10-12. Determining Which Procedure to Run Is Based on the Static ID
ELSE
  -- Determine which export procedure to run
  CASE
    WHEN l_static_id = 'p1EmpClassic' THEN p1_emp_classic;
    WHEN l_static_id = 'p1EmpInteractive' THEN p1_emp_interactive;
 ELSE
   -- No procedure for Static ID
   htp.p('There is no procedure for the static ID'
    || l_static_id
    || '<br /><a href="f?p=' || p_app_id || ':'
    || p_app_page_id || ':' || p_app_session
    || '">Back to Report</a>'),
    mime_footer;
  END CASE;
END IF;
Let’s assume that the Export link in the classic report on page 1 in the application was clicked. In that case, the procedure p1_emp_classic, as illustrated in Listing 10-13, would be called. p1_emp_classic will first call mime_header, which sets up the MIME type so that the browser will download a file rather than display a page. Next, it simply loops through a subset of the columns in the EMP table. For each row, it produces a line of CSV output followed by a carriage return. Upon completion of the loop, it will call mime_footer, which will indicate that the CSV stream is complete and prevent any additional APEX processes from executing.
Listing 10-13. The Procedure p1_emp_classic, Which Generates the Custom CSV File
PROCEDURE p1_emp_classic IS
BEGIN
mime_header(p_filename => 'emp.csv'),
-- Loop through all rows in EMP
FOR x IN (SELECT e.ename, e.empno, d.dname FROM emp e, DEPT d
  WHERE e.deptno = d.deptno)
LOOP
  -- Print out a portion of a row, separated by commas
  -- and ended by a CR
  htp.prn(x.ename ||','|| x.empno ||','|| x.dname || chr(13));
END LOOP;
mime_footer;
END p1_emp_classic;
This is an extremely simple example of what could be exported. Additional rules could be checked here to limit how many rows or which columns would be exported based on who is logged in. The entire file could also be stored in a CLOB so that there is a record of specifically what was downloaded and by whom. A notification could be sent to an administrator if the data set exceeded 500 rows or a sensitive report was exported. Again, the possibilities of additional checks and functionality here is limitless.
Summary
The ability to export data from an APEX application is a powerful feature. Yet it has a dark side that too often goes undetected because any user can export almost any data set and easily take ownership of potentially sensitive data.
APEX offers some controls as to limiting what columns can be exported. However, those controls are somewhat limited and not very specific. Implementing a custom export mechanism involves a little bit of time and thought, but it can be specifically tailored to meet almost any security requirement imaginable. If done properly, a custom export mechanism will be transparent to both users and developers alike.