
![]()
Shadow Schema
Two approaches can control access when it comes to security: blacklisting and whitelisting. Blacklisting involves building an application with any number of features and functions and then restricting a specific user from accessing a subset of those features. Whitelisting is just the opposite: building an application with any number of features and functions and then granting access on a subset of those features to a specific user. While the end result with either approach is the same, the overall manageability and liability with each differs.
A major drawback with the blacklisting approach is that as new features and functions are added, it must be determined which users can have access to those features and functions. For example, if a new sensitive column was added to a table, that column would need to have the appropriate authorization scheme associated with it anywhere it appears in any APEX application, including reports, forms, charts, calendars, PL/SQL regions, and so on. While this may not be difficult to do with a small system, the level of involvement and potential for error both increase with the size and complexity of the system.
Using the whitelisting approach, several smaller APEX applications could be built, each specifically for a group of users who have the same level of access. This way, when a new column is added, little attention needs to be paid to most of the system, because the applications that should see the new column will, and the ones that don’t need to see it won’t. Thus, if the sensitive column were based on an employee’s salary, it would be added to the core HR application but not the employee lookup application.
This concept of whitelisting can also be applied at the database level to achieve the same results: easier-to-manage access control. If your application has no need to ever create a table or execute any DDL for that matter, then why should the underlying schema have those privileges? Removing privileges from a schema or creating a set of views that interacts with a subset of data greatly enhances the security of any application, because the list of potential features and functions is built from the ground up, not secured from the top down.
Overview
A shadow schema is not a feature but rather represents a methodology that utilizes several features of both APEX and the Oracle Database. When properly followed, APEX applications designed using this methodology offer a higher level of security than those developed the traditional way. However, as stated, security is hard, and this method does involve a little bit more work. Be sure to review the previous two chapters to become familiar with both secure views and virtual private databases (VPDs), because either of those techniques can be used to augment data security when using the shadow schema methodology.
The core concept of the shadow schema is to both strip the APEX parse-as schema of all system privileges and allow only views and synonyms to be created there. The synonyms will reference only those APIs that reference packages that reside in the data schema. These APIs will be used to facilitate all DML processes required in the application, and they contain even more security checks within them. This way, if your application is somehow compromised through SQL injection or a cross-site scripting attack, most, if not all, attempts to access data will be mitigated because the schema has no or little privilege to do anything at all, and the database will simply not execute the nefarious code. An attacker who does manage to compromise the shadow schema will not be able to escalate their privileges beyond that of the shadow schema, greatly mitigating the potential damage that the attacker can inflict. By whitelisting the privileges and objects that the parse-as schema has access to, the number of components that must be secured is not only small but also fixed as the complexity of the system increases.
Either a secure view or a VPD can be used to filter which records are displayed based on who is logged onto the system. This technique, which was described in the previous two chapters, is implemented in the shadow schema in the same way. An application context is also required in support of either the secure views or VPD policy functions.
Lastly, on the APEX side, a couple things must be done. First, the application context must be set as in the previous chapters. Second, instead of using the built-in DML processes, APIs need to be written for any DML transaction that needs to be supported. While this represents more work than using the built-in APEX components, it does offer a lot more flexibility, because each DML operation can be tightly controlled and only columns that need to be included can be added to the API. There is also a little-known API generator in APEX that can greatly reduce the time required to complete this task.
The shadow schema approach actually involves two schemas: the data schema, which is where all tables and PL/SQL packages are, and the shadow schema, which contains nothing more than read-only views and synonyms that point at the data schema. The corresponding APEX application is set to parse as the shadow schema, thus effectively limiting what it can and can’t do at the database level.
Every APEX application must have a corresponding “parse-as” schema associated with it at design time. This mapping is fixed, and once the application is deployed, there is no way to change it. When an APEX application is run, all SQL and PL/SQL executed is as if the application were connected directly to database as the parse-as schema. APEX handles this session alteration securely and transparently behind the scenes. What many don’t realize is that when you set an application to parse as a particular schema, the application inherits all of the system privileges and grants made to that schema.
When building an APEX application with the shadow schema methodology, most of the configuration will take place in three places: the shadow schema, the data schema, and the APEX application itself. To set up the example that will be used to illustrate this concept, the next section provides scripts to create and populate the data schema and create the shadow schema. Note that there is nothing specific or proprietary in how these schemas are created. In fact, if you already have a schema associated with an existing APEX application, you can easily refer to it and use it as the data schema. A shadow schema that has read-only views and synonyms that point to the existing schema can easily be created and configured using this methodology.
The example discussed in this chapter will require SYS access, because two new schemas as well as application contexts need to be created.
Database: Schema and Object Creation
To start, the two schemas and corresponding tables need to be created. Listing 13-1 will create the DATA and SHADOW schemas, and Listing 13-2 will create and populate objects in the DATA schema, specifically, the familiar EMP and DEPT tables. A trigger will also be added to EMP so that as new rows are added, they will be automatically given a new EMPNO.
Listing 13-1. Script to Create the DATA and SHADOW Schemas (Run as SYS)
CREATE USER DATA IDENTIFIED BY ENKITEC;

CREATE USER SHADOW IDENTIFIED BY ENKITEC;

GRANT CONNECT, RESOURCE, CREATE VIEW TO DATA;
Listing 13-2. Script to Create and Populate Objects in the DATA Schema (Run as DATA)
CREATE TABLE EMP
  (
  EMPNO    NUMBER(4) NOT NULL,
  ENAME    VARCHAR2(10),
  JOB      VARCHAR2(9),
  MGR      NUMBER(4),
  HIREDATE DATE,
  SAL      NUMBER(7, 2),
  COMM     NUMBER(7, 2),
  DEPTNO   NUMBER(2),
  CONSTRAINT EMP_PK PRIMARY KEY (EMPNO)
  );

INSERT INTO EMP VALUES
  (7369, 'SMITH', 'CLERK', 7902,
  TO_DATE('17-DEC-1980', 'DD-MON-YYYY'), 800, NULL, 20);
INSERT INTO EMP VALUES
  (7499, 'ALLEN', 'SALESMAN', 7698,
  TO_DATE('20-FEB-1981', 'DD-MON-YYYY'), 1600, 300, 30);
INSERT INTO EMP VALUES
  (7521, 'WARD', 'SALESMAN', 7698,
  TO_DATE('22-FEB-1981', 'DD-MON-YYYY'), 1250, 500, 30);
INSERT INTO EMP VALUES
  (7566, 'JONES', 'MANAGER', 7839,
  TO_DATE('2-APR-1981', 'DD-MON-YYYY'), 2975, NULL, 20);
INSERT INTO EMP VALUES
  (7654, 'MARTIN', 'SALESMAN', 7698,
  TO_DATE('28-SEP-1981', 'DD-MON-YYYY'), 1250, 1400, 30);


INSERT INTO EMP VALUES
  (7698, 'BLAKE', 'MANAGER', 7839,
  TO_DATE('1-MAY-1981', 'DD-MON-YYYY'), 2850, NULL, 30);
INSERT INTO EMP VALUES
  (7782, 'CLARK', 'MANAGER', 7839,
  TO_DATE('9-JUN-1981', 'DD-MON-YYYY'), 2450, NULL, 10);
INSERT INTO EMP VALUES
  (7788, 'SCOTT', 'ANALYST', 7566,
  TO_DATE('09-DEC-1982', 'DD-MON-YYYY'), 3000, NULL, 20);
INSERT INTO EMP VALUES
  (7839, 'KING', 'PRESIDENT', NULL,
  TO_DATE('17-NOV-1981', 'DD-MON-YYYY'), 5000, NULL, 10);
INSERT INTO EMP VALUES
  (7844, 'TURNER', 'SALESMAN', 7698,
  TO_DATE('8-SEP-1981', 'DD-MON-YYYY'), 1500, 0, 30);
INSERT INTO EMP VALUES
  (7876, 'ADAMS', 'CLERK', 7788,
  TO_DATE('12-JAN-1983', 'DD-MON-YYYY'), 1100, NULL, 20);
INSERT INTO EMP VALUES
  (7900, 'JAMES', 'CLERK', 7698,
  TO_DATE('3-DEC-1981', 'DD-MON-YYYY'), 950, NULL, 30);
INSERT INTO EMP VALUES
  (7902, 'FORD', 'ANALYST', 7566,
  TO_DATE('3-DEC-1981', 'DD-MON-YYYY'), 3000, NULL, 20);
INSERT INTO EMP VALUES
  (7934, 'MILLER', 'CLERK', 7782,
  TO_DATE('23-JAN-1982', 'DD-MON-YYYY'), 1300, NULL, 10);

CREATE SEQUENCE emp_seq START WITH 8000;

CREATE OR REPLACE TRIGGER bi_emp
BEFORE INSERT ON emp
FOR EACH ROW
BEGIN
  SELECT emp_seq.NEXTVAL INTO :NEW.empno FROM dual;
END;
/

CREATE TABLE DEPT
  (
  DEPTNO NUMBER(2),
  DNAME  VARCHAR2(14),
  LOC    VARCHAR2(13)
  );

INSERT INTO DEPT VALUES (10, 'ACCOUNTING', 'NEW YORK'),
INSERT INTO DEPT VALUES (20, 'RESEARCH', 'DALLAS'),
INSERT INTO DEPT VALUES (30, 'SALES', 'CHICAGO'),
INSERT INTO DEPT VALUES (40, 'OPERATIONS', 'BOSTON'),

COMMIT
/
Data Schema: Views
The data schema is where all tables, indexes, views, and procedural components will be stored. Views may also be created in the data schema, especially when it is necessary to prevent specific columns from being accessed by the shadow schema or to employ row-level security. In the case of existing applications that don’t make use of a shadow schema, the data schema is typically the parse-as schema. The data schema will never be accessed directly by an APEX application, so it is safe to store tables and procedures there.
The script in Listing 13-1 not only created the DATA schema but also populated it with the standard EMP and DEPT tables. If all columns of the EMP needed to be exposed in the APEX application, then a simple view that selected all columns from EMP could be created. However, if not all columns of a table are required in an application, then there is no reason to add them to a view.
In our example, let’s assume that the APEX application being built is a simple employee management system. Since the requirements don’t call for salary or bonus information to be included in the system, there is no reason to even make those columns available to the shadow schema. Thus, you can create a view in the data schema—DATA.EMP_V—that includes only the columns you need, eliminating any chance of someone accessing the SAL and/or COMM columns from your APEX application. You can then create a second view in the shadow schema—SHADOW.EMP_V—that references the view in the data schema rather than the EMP table. This will limit which columns are available to the shadow schema to those included in the SHADOW.EMP_V view.
In Listing 13-3, the EMP_V read-only view is created in the DATA schema, referencing only the EMPNO, ENAME, JOB, and DEPTNO columns. These will be the only columns that are eventually made available to the APEX application. A grant is also required so that the shadow schema can SELECT from the EMP_V view.
Listing 13-3. Script to Create the EMP_V View and Corresponding Grant in the DATA Schema (Run as DATA)
CREATE OR REPLACE VIEW emp_v AS
SELECT
  empno,
  ename,
  job,
  deptno
FROM
  EMP
WITH READ ONLY
/

GRANT SELECT ON emp_v TO shadow
/
Next, a similar view needs to be created in the SHADOW schema. This view will directly reference the view from the DATA schema, as illustrated in Listing 13-4. Since the shadow schema does not have create session privileges, this script needs to be run as SYS or SYSTEM.
Listing 13-4. Script to Create the EMP_V View in the SHADOW Schema (Run as SYS)
ALTER SESSION SET CURRENT_SCHEMA = SHADOW;

CREATE OR REPLACE VIEW emp_v AS
SELECT
  empno,
  ename,
  job,
  deptno
FROM
  data.EMP_V
/
Revoke Privileges
Most parse-as schemas associated with APEX applications have the same default system privileges in production as they do in development. While necessary to have in a development environment, these system privileges are often unnecessary and actually a liability in a production system. If an APEX application’s parse-as schema has a system privilege, then if an exploit is successful, the hacker will have that same privilege. Thus, revoking access to any privilege that is not required in production is a simple yet highly effective step that should be taken.
For example, a schema created as part of an APEX workspace typically has about 14 system privileges (depending on the version of APEX) that permit the schema to create most common object types. Most applications do not perform any DDL statements during runtime, so all of these unnecessary system privileges are actually a liability. Therefore, any of them that are not required in support of the application should be revoked in production. There is no need for any of them to be there, and any DDL needed to develop or upgrade the system can be executed as SYS or another schema with DBA privileges. Listing 13-5 illustrates a series of revokes that will remove various privileges from the SHADOW schema.
Listing 13-5. Sample SQL That Can Be Used to Revoke System Privileges (Run as SYS)
REVOKE CREATE VIEW FROM SHADOW;
REVOKE CREATE CLUSTER FROM SHADOW;
REVOKE CREATE ANY CONTEXT FROM SHADOW;
REVOKE CREATE PROCEDURE FROM SHADOW;
REVOKE CREATE MATERIALIZED VIEW FROM SHADOW;
REVOKE CREATE DIMENSION FROM SHADOW;
REVOKE CREATE TYPE FROM SHADOW;
REVOKE CREATE SEQUENCE FROM SHADOW;
REVOKE CREATE TABLE FROM SHADOW;
REVOKE CREATE SYNONYM FROM SHADOW;
REVOKE CREATE JOB FROM SHADOW;
REVOKE CREATE OPERATOR FROM SHADOW;
REVOKE CREATE TRIGGER FROM SHADOW;
REVOKE CREATE INDEXTYPE FROM SHADOW;
REVOKE CREATE SESSION FROM SHADOW;
It is important to note that the code in Listing 13-5 is just an example, and the revoke statements required to limit system privileges on your system may vary. To determine which system privileges a schema has, run the SQL in Listing 13-6 while connected to that schema.
Listing 13-6. SQL Used to Determine System Privileges for the Connected User
SELECT * FROM user_sys_privs
To determine which roles a schema has, run the SQL in Listing 13-7 while connected to that schema.
Listing 13-7. SQL Used to Determine Role Privileges for the Connected User
SELECT * FROM user_role_privs
Based on the results of the previous two queries, determine which system privileges and/or roles can be revoked depending on the needs of your specific application.
System and User Event Trigger
Revoking CREATE privileges prevents any additional objects from being created in the shadow schema. However, it does little to prevent objects from being dropped. Many SQL injection attacks will attempt to do this, forcing a DBA to recover the dropped table, which at best translates to downtime for the system and, at worst, data loss. Fortunately, there is a simple way to prevent a user from dropping their own objects: system and user event triggers.
System and user event triggers function much like their table-based counterparts, except they listen for events that occur at the system or user level, not the table level. System triggers can execute when the database is started or stopped, and user-level triggers can execute when users log in or log out or before or after DDL statements. Thus, a user-level trigger can be added that prevents the SHADOW schema from dropping any object at all, thus further protecting the schema.
The code in Listing 13-8 will execute before any object in the database is dropped. If the owner of the object is SHADOW and the currently logged-in user is not SYS or SYSTEM, then the trigger will fire, thus preventing the object from being dropped. Thus, once again, giving the database the final say when it comes to security is often the best approach.
Listing 13-8. Adding a User-Level Trigger to Prevent SHADOW from Dropping Any Object (Run as SYS)
CREATE OR REPLACE TRIGGER prevent_shadow_drop
BEFORE DROP ON SHADOW.SCHEMA
BEGIN
IF ORA_DICT_OBJ_OWNER = 'SHADOW'
  AND ORA_LOGIN_USER NOT IN ('SYS','SYSTEM')
THEN
  RAISE_APPLICATION_ERROR(-20000, ORA_DICT_OBJ_OWNER
    || ' can not drop ' || ORA_DICT_OBJ_TYPE || 'S.'),
END IF;
END;
/
The syntax and specifics of this trigger should be modified to meet your requirements and match your specific schema names. Additional triggers can be created for more granular control, if needed.
APEX: Simple Form and Report
At this point, the SHADOW schema has been stripped of all privileges and is ready for a simple APEX application. If you have not done so already, create a new APEX workspace that parses as the SHADOW schema. Once connected to that workspace, browse to the SQL Workshop and notice that there are no tables in the SHADOW schema, only a single view: EMP_V. At this point, all rows from all columns are visible from the SQL Workshop and any APEX application. Also, any attempt to query the EMP table in the DATA schema will also fail because there are no direct privileges on DATA.EMP granted to SHADOW.
Next, create a simple APEX application that contains a report and form based on the EMP_V view. This application can be created any number of ways—using the Create Application Wizard, creating a blank page and then using the Create Form & Report Wizard, or even creating it by hand. It doesn’t matter which method is used to create the application, because the underlying view will act the same for all. This example will assume that the Create Application Wizard was used.
![]() Note If the application is created with the Create Application Wizard, the name of the EMP_V view will need to be entered by hand because the pop-up list lists only tables. Simply enter EMP_V for the table name and click Add Page to continue.
Note If the application is created with the Create Application Wizard, the name of the EMP_V view will need to be entered by hand because the pop-up list lists only tables. Simply enter EMP_V for the table name and click Add Page to continue.
Once the application is built, run the application. After logging in, the page with the report on EMP_V should look similar to Figure 13-1.

Figure 13-1 . A simple report on the EMP_V view
Your application may look slightly different, depending on the version of APEX used and theme selected. What is important to understand is that your application is able to see all of the rows from the DATA.EMP table by querying the SHADOW.EMP_V view. Any attempt to drop EMP_V or create additional objects will ultimately fail, because either the user-level trigger or the lack of privilege will prevent both from happening.
Upon editing a record, nothing seems out of the ordinary. However, if any change is attempted—whether it’s adding a new record, modifying an existing record, or deleting an existing one—it will result in the following error: ORA-01031: insufficient privileges. This is because the SHADOW schema has access only to a read-only view and nothing else. Even though it seems that any DML transaction is possible, the database has the final say here and prevents any updates from occurring. Therefore, the built-in APEX DML processes are essentially useless in this scenario, and an alternative needs to be implemented.
A common approach when managing data is to use table APIs, which are a set of PL/SQL procedures that facilitate all inserts, updates, and deletes on a specific table. Technically speaking, the APEX built-in DML processes can be considered APIs themselves, because they take in parameters by way of page items and use those values to insert, update, or delete data. In addition to the core operations performed, the APEX DML processes also checks for lost updates before committing an update.
Table APIs offer a number of benefits over directly manipulating data in a table. First, a single API can be called from anywhere in the system, thus centralizing the business rules. A table API may have to insert records into multiple tables for a single transaction. Centralizing that call in a single place makes for a system that is easier to manage over time. Table APIs can also be called from different platforms, ensuring that business rules are consistent as platforms and technologies change.
Table APIs also offer security. As part of their business rules, a table API can restrict which user can perform which operation. For instance, perhaps only a specific set of users can even delete records based on their membership in a group. A table API can easily enforce this rule by restricting the delete procedure to only those authorized to call it. Table APIs also limit what type of access needs to be granted to the parse-as schema. In this example, the only grant that is required is one on the table API package to the parse-as schema. No direct access by way of inserts, updates, or deletes needs to be granted to the parse-as schema, resulting in a more secure system.
Given all of the benefits, creating a table API may seem like a complex undertaking. Fortunately, there is a quick and easy way to create robust table APIs right within APEX’s SQL Workshop. This little known feature is also named “create a package with methods on database tables” and can be found in the Object Browser. When started, a wizard will step through the different options for creating the table APIs. Once they are created, they are nothing more than a PL/SQL package that can be further modified to suit business rules and requirements.
Using the shadow schema methodology, no objects aside from views and synonyms can reside in the SHADOW schema. Therefore, the table APIs should be created in the DATA schema. To do this easily and with the APEX wizard, a new workspace that has a parse-as schema of DATA needs to be created. Once created, the table APIs are easy to create.
Navigate to the SQL Workshop and then select the Object Browser. From there, click the Create button. A list of object types should appear. Click Package. At this point, the next screen will look like Figure 13-2. Select “Package with methods on database table(s),” and click Next.

Figure 13-2 . Creating a package with methods on database tables
On the next screen, enter EMP_DML for the package name, and click Next. While the package can be named anything, it is best to adhere to a naming standard, especially if multiple packages will be used in your application. The one used here was table name followed by _DML. Any naming scheme will work, as long as it is easy to remember and used by everyone.
This wizard provides the ability to create APIs for up to ten tables at once. In this example, only one is needed, so enter EMP in the field for Table 1 and click Next. Confirm the creation of the package on the next page by clicking Create Package. At this point, a new package—EMP_DML—will be created in the DATA schema. Listing 13-9 shows the specification of the EMP_DML package.
Listing 13-9. The Specification of the EMP_DML Package
create or replace package "EMP_DML" is
--------------------------------------------------------------
-- create procedure for table "EMP"
   procedure "INS_EMP" (
      "P_EMPNO"    in number,
      "P_ENAME"    in varchar2  default null,
      "P_JOB"      in varchar2  default null,
      "P_MGR"      in number    default null,
      "P_HIREDATE" in date      default null,
      "P_SAL"      in number    default null,
      "P_COMM"     in number    default null,
      "P_DEPTNO"   in number    default null
   );
--------------------------------------------------------------
-- update procedure for table "EMP"
   procedure "UPD_EMP" (
      "P_EMPNO" in number,
      "P_ENAME"    in varchar2  default null,
      "P_JOB"      in varchar2  default null,
      "P_MGR"      in number    default null,
      "P_HIREDATE" in date      default null,
      "P_SAL"      in number    default null,
      "P_COMM"     in number    default null,
      "P_DEPTNO"   in number    default null,
      "P_MD5"      in varchar2  default null
   );
--------------------------------------------------------------
-- delete procedure for table "EMP"
   procedure "DEL_EMP" (
      "P_EMPNO" in number
   );
--------------------------------------------------------------
-- get procedure for table "EMP"
   procedure "GET_EMP" (
      "P_EMPNO" in number,
      "P_ENAME"    out varchar2,
      "P_JOB"      out varchar2,
      "P_MGR"      out number,
      "P_HIREDATE" out date,
      "P_SAL"      out number,
      "P_COMM"     out number,
      "P_DEPTNO"   out number
   );
--------------------------------------------------------------
-- get procedure for table "EMP"
   procedure "GET_EMP" (
      "P_EMPNO" in number,
      "P_ENAME"    out varchar2,
      "P_JOB"      out varchar2,
      "P_MGR"      out number,
      "P_HIREDATE" out date,
      "P_SAL"      out number,
      "P_COMM"     out number,
      "P_DEPTNO"   out number,
      "P_MD5"      out varchar2
   );
--------------------------------------------------------------
-- build MD5 function for table "EMP"
   function "BUILD_EMP_MD5" (
      "P_EMPNO" in number,
      "P_ENAME"    in varchar2  default null,
      "P_JOB"      in varchar2  default null,
      "P_MGR"      in number    default null,
      "P_HIREDATE" in date      default null,
      "P_SAL"      in number    default null,
      "P_COMM"     in number    default null,
      "P_DEPTNO"   in number    default null,
      "P_COL_SEP"  in varchar2  default '|'
   ) return varchar2;

end "EMP_DML";
Notice that in the package specification, all columns are referenced. In the view EMP_V, only a subset of the columns is referenced. Thus, only the columns that you want to be able to be updated should be exposed in the EMP_DML package. Any reference to the MGR, HIDEDATE, SAL, and COMM columns should be stripped from the package specification and body. This will ensure that those columns that were not included as part of the view can never be updated by an undiscovered security hole or malicious code. It will also ensure that the package will work properly, because it will no longer rely on values that are not passed to it.
Entire procedures can also be removed from the package, effectively limiting the API as to which DML transactions it supports. In this example, the insert and delete procedures are not part of the business requirements and thus should be removed from the package entirely. Again, this prevents even the most remote possibility that either of these procedures could be executed maliciously.
Listing 13-10 shows a modified package specification for EMP_DML.
Listing 13-10. Modified Package Specification for EMP_DML
create or replace package "EMP_DML" is
--------------------------------------------------------------
-- update procedure for table "EMP"
   procedure "UPD_EMP" (
      "P_EMPNO" in number,
      "P_ENAME"    in varchar2  default null,
      "P_JOB"      in varchar2  default null,
      "P_DEPTNO"   in number    default null,
      "P_MD5"      in varchar2  default null
   );
--------------------------------------------------------------
-- get procedure for table "EMP"
   procedure "GET_EMP" (
      "P_EMPNO" in number,
      "P_ENAME"    out varchar2,
      "P_JOB"      out varchar2,
      "P_DEPTNO"   out number,
      "P_MD5"      out varchar2
   );
--------------------------------------------------------------
-- build MD5 function for table "EMP"
   function "BUILD_EMP_MD5" (
      "P_EMPNO" in number,
      "P_ENAME"    in varchar2  default null,
      "P_JOB"      in varchar2  default null,
      "P_DEPTNO"   in number    default null,
      "P_COL_SEP"  in varchar2  default '|'
   ) return varchar2;

end "EMP_DML";
/
Since the package specification was changed, the body will also have to be updated to reflect the modifications. A similar approach will be taken, and all references to the MGR, HIDEDATE, SAL, and COMM columns will be removed. Also, the insert and delete routines are removed. Listing 13-11 details the updated version of EMP_DML.
Listing 13-11. Modified Package Specification for EMP_DML
create or replace package body "EMP_DML" is
--------------------------------------------------------------
-- update procedure for table "EMP"
   procedure "UPD_EMP" (
      "P_EMPNO" in number,
      "P_ENAME"    in varchar2  default null,
      "P_JOB"      in varchar2  default null,
      "P_DEPTNO"   in number    default null,
      "P_MD5"      in varchar2  default null
   ) is

      "L_MD5" varchar2(32767) := null;

   begin

      if "P_MD5" is not null then
         for c1 in (
            select * from "EMP"
            where "EMPNO" = "P_EMPNO" FOR UPDATE
         ) loop

            "L_MD5" := "BUILD_EMP_MD5"(
               c1."EMPNO",
               c1."ENAME",
               c1."JOB",
               c1."DEPTNO"
            );

         end loop;

      end if;

      if ("P_MD5" is null) or ("L_MD5" = "P_MD5") then
         update "EMP" set
            "EMPNO"      = "P_EMPNO",
            "ENAME"      = "P_ENAME",
            "JOB"        = "P_JOB",
            "DEPTNO"     = "P_DEPTNO"
         where "EMPNO" = "P_EMPNO";
      else
         raise_application_error (-20001,'Current version of data in database has changed since user initiated update process. current checksum = "'||"L_MD5"||'", item checksum = "'||"P_MD5"||'".'),
      end if;

   end "UPD_EMP";
--------------------------------------------------------------
-- get procedure for table "EMP"
   procedure "GET_EMP" (
      "P_EMPNO" in number,
      "P_ENAME"    out varchar2,
      "P_JOB"      out varchar2,
      "P_DEPTNO"   out number,
      "P_MD5"      out varchar2
   ) is

   begin

      for c1 in (
         select * from "EMP"
         where "EMPNO" = "P_EMPNO"
      ) loop
         "P_ENAME"    := c1."ENAME";
         "P_JOB"      := c1."JOB";
         "P_DEPTNO"   := c1."DEPTNO";
         "P_MD5" := "BUILD_EMP_MD5"(
            c1."EMPNO",
            c1."ENAME",
            c1."JOB",
            c1."DEPTNO"
         );
      end loop;

   end "GET_EMP";
--------------------------------------------------------------
-- build MD5 function for table "EMP"
   function "BUILD_EMP_MD5" (
      "P_EMPNO" in number,
      "P_ENAME"    in varchar2  default null,
      "P_JOB"      in varchar2  default null,
      "P_DEPTNO"   in number    default null,
      "P_COL_SEP"  in varchar2  default '|'
   ) return varchar2 is

   begin

      return sys.utl_raw.cast_to_raw(sys.dbms_obfuscation_toolkit.md5(input_string=>
         "P_ENAME"    ||"P_COL_SEP"||
         "P_JOB"      ||"P_COL_SEP"||
         "P_DEPTNO"   ||"P_COL_SEP"||
         ''
      ));

   end "BUILD_EMP_MD5";

end "EMP_DML";
/
As additional business rules need to be applied, they can easily be added to any of the procedures in the EMP_DML package. For example, either the insert or delete procedure can be added back if a future business requirement necessitates that type of transaction. Additional checks may be added before any transaction to ensure that only specific users or specific values are present.
It may seem intuitive to use a grant and synonym to access the EMP_V in the DATA schema versus creating a separate view. While this would work in many other environments, the APEX wizards do not work well with synonyms for views and tables. Thus, by adding the view in the SHADOW schema, the APEX wizards can be used to create reports and forms, speeding up the development process significantly and, at the same time, reducing the chance of errors.
Using a grant and synonym works just fine for packages, procedures, and functions in APEX. The next step is to grant access on the EMP_DML API to the SHADOW schema. This can be achieved by running two simple commands as SYS, shown in Listing 13-12.
Listing 13-12. Grant and Synonym for the EMP_DML Package (Run as SYS)
GRANT EXECUTE ON data.emp_dml TO shadow;

CREATE OR REPLACE SYNONYM shadow.emp_dml FOR data.emp_dml;
The example application that parses as the SHADOW schema should now be able to execute the EMP_DML package, which of course resides in the DATA schema. Any additional PL/SQL call can be configured in a similar manner, ensuring that only what is needed is exposed to the SHADOW schema via a synonym.
Table API Processes
Once the grant and synonym are created, the built-in DML processes in APEX need to be replaced with calls to the EMP_DML table API for both fetching and processing records. Since the built-in APEX DML processes no longer work, they can safely be removed from the application. To do this, edit the page that contains the form on the view EMP_V. In the Page Rendering column, look for the process called Fetch Row from EMP. Edit that process by double-clicking it. On the next page, click the Delete button and confirm the delete. Repeat these steps for the Process Row of EMP process, which is in the Page Processing column.
At this point, the form is relatively useless because it can neither fetch nor insert, update, or delete data. Creating new processes that reference the EMP_DML API calls will return the form to its original functionality—save for the bits that you leave out on purpose. To add the fetch process back, right-click the Processes node under Before Header, as shown in Figure 13-3.
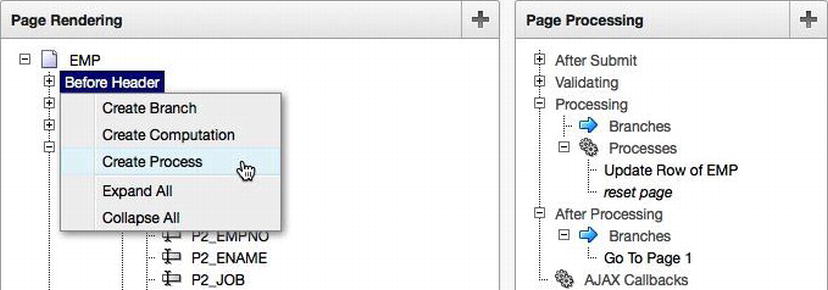
Figure 13-3 . Creating a new fetch process
On the next page, select PL/SQL as the process type, and click Next. Enter Fetch Row from EMP for the name of the process, and click Next, as shown in Figure 13-4.

Figure 13-4 . Naming the fetch DML process
Next, enter the code in Listing 13-13 into the field Enter PL/SQL Page Process, and click Create Process.
Listing 13-13. PL/SQL to Be Entered in the Enter PL/SQL Page Process Text Area
emp_dml.get_emp
  (
  p_empno  => :P2_EMPNO,
  p_ename  => :P2_ENAME,
  p_job    => :P2_JOB,
  p_deptno => :P2_DEPTNO,
  p_md5    => :P2_MD5
  );
Sharp readers will note that the previous PL/SQL block made reference to an item called P2_MD5, and no such item exists on the page. This item is used to store an MD5 hash of the value of the row being edited. This hash is generated by the get_emp procedure as part of the EMP_DML API. Before an update occurs, the hash will be recalculated on the current value stored in the database. If the two hashes do not match, then the value in the database is newer than the value in the web browser, and APEX will not let any change be saved until the web browser is refreshed with the current version of the data.
Comparing two hashes in this manner is called lost update detection. Since APEX is not directly connected to the database, this extra step is required to ensure that an update overwrites a more current version of the data in the database. APEX’s built-in DML processes automatically handle lost update detection, and no additional item is required to use it with them. Unfortunately, this solution requires you to manage and compare the hashes on your own, and thus you need an additional hidden item—P2_MD5—to help facilitate this.
Creating an item is simple and can be done in almost no time. To start, right-click the Items node of the tree, just below the EMP region, and select Create Page Item, as illustrated in Figure 13-5.

Figure 13-5 . Creating a new item in the EMP region
On the next page, select Hidden, and click Next. Enter P2_MD5 for the item name on the next page, and click Next. Ensure that Value Protected is set to Yes, and click Next on the next page. This will prevent a malicious user from tampering with the value of this item using a tool such as Firebug. Take all of the defaults on the final page, and click Create Item to complete the wizard and create the item for the MD5 hash.
Speaking of items, a small tweak must be made to the remaining items on the page. Because they were created with the Report and Form Wizard, they anticipate that an APEX built-in process will be providing their values. Since this is no longer the case, a small change to the Source attribute of the items must be made.
The Source attribute of an item determines whether to use the value stored in session state or to use the value defined in the Source Type field when rendering the page. Since the wizard created all items on the page, the value of this attribute is initially set to “Always, replacing any value in session state.” This option is used almost exclusively for when Source Type is set to Database Column to ensure that the value from the database overwrites any stale values in session state.
To retrofit the items on page 2, first edit the item P2_EMPNO by double-clicking it. Next, scroll down to the Source region. Change the value of Source Used to “Only when current value in session state is null.” Change the Source Type value to “Static Assignment (values equals source attribute).” Lastly, delete any value for the source value or expression. Your region should now resemble Figure 13-6. When finished, scroll to the top of the page, and click Apply Changes. Repeat these steps for each item on the page—P2_ENAME, P2_JOB, and P2_DEPTNO.

Figure 13-6 . Changing the Source attributes of an item
Next, a reference to the EMP_DML API needs to be added to the page-processing portion of the page. This reference will call the UPD_EMP procedure, which is used to update a record of EMP.
To create a new process in the page-processing column, right-click the Processes node and select Create, as illustrated in Figure 13-7.

Figure 13-7 . Creating a new page-processing process
On the next page, select PL/SQL, and click Next. Enter Update EMP for the name, take the rest of the defaults, and click Next. Enter the SQL in Listing 13-14 for the Enter PL/SQL Page Process region, and click Next.
Listing 13-14. SQL to Update a Record of EMP via the EMP_DML.UPD_EMP Procedure
emp_dml.upd_emp
  (
  p_empno  => :P2_EMPNO,
  p_ename  => :P2_ENAME,
  p_job    => :P2_JOB,
  p_deptno => :P2_DEPTNO,
  p_md5    => :P2_MD5
  );
For the Success Message text area, enter Record Updated, and click Next. On the next page, set When Button Pressed to SAVE (Apply Changes), as illustrated in Figure 13-8, and click Create Process. This will ensure that the process is executed only when the corresponding button—in this case, Save (Apply Changes)—is clicked by the user.

Figure 13-8 . Setting the Update Record process to execute only when the Save button is clicked
There still may be a process on the page that is no longer necessary for the application: reset page. The reset page process was created by the wizard, and its purpose was to clear the cache of page 2 when the Delete button was clicked. Since the example business rules do not allow for deletes, there is no reason to keep this process in place. Simply edit the process by double-clicking it and delete it. If support for deleting records is added later, care should be taken to either add this process back or ensure that the cache for page 2 is cleared within the table API call.
Lastly, two buttons from the form need to be removed: CREATE and DELETE. Since the example business requirements allow only for updates, there is no reason to present these buttons to the end user, because they will simply not work when clicked. Thus, they should each be removed. To delete either button, double-click the button name, and then click Delete. Confirming the delete action will complete the removal process. The same holds true for the CREATE button on page 1.
At this point, the application should be functional and allow any user to edit—but not delete—any record in the EMP table. Also, there is no way to create a new record from this application, because the API simply does not support it. End users will notice no difference between applications built with the shadow schema methodology versus applications built using the traditional approach.
Securing Data
Securing data with a shadow schema is still possible using the same techniques discussed in Chapters 11 and 12. The only difference is that the procedure used to set the application context would reside in the data schema, much the same way the API package does. Since views are already created in the shadow schema, they need be modified only slightly to accommodate the call to SYS_CONTEXT.
The next three sections will illustrate how to secure the data in the EMP_V view based on DEPTNO. You can find more in-depth discussion of application contexts, secure views, and virtual private databases in Chapters 11 and 12.
Application Context
First, a package to set and unset the application context must be created. This package will be created in the DATA schema, and then a grant and synonym will be added so that the SHADOW schema can execute it. The package will determine the DEPTNO of the currently signed-on user and set the application context accordingly. Listing 13-15 shows the deptno_ctx_pkg package.
Listing 13-15. The deptno_ctx_pkg Package, Which Will Set and Unset the DEPTNO_CTX Application Context (Run as DATA)
CREATE OR REPLACE PACKAGE deptno_ctx_pkg
AS
PROCEDURE set_ctx
  (p_user_name               IN VARCHAR2,
   p_app_session             IN VARCHAR2);

PROCEDURE unset_ctx
  (p_app_session             IN VARCHAR2);

END deptno_ctx_pkg;
/

CREATE OR REPLACE PACKAGE BODY deptno_ctx_pkg
AS

PROCEDURE set_ctx
  (p_user_name               IN VARCHAR2,
   p_app_session             IN VARCHAR2)
IS
  l_deptno                   NUMBER;
BEGIN

-- Fetch the DEPTNO based on the currently signed on APP_USER
SELECT deptno INTO l_deptno FROM emp
  WHERE UPPER(ename) = UPPER(p_user_name);

-- Set the Context
dbms_session.set_context(
  namespace => 'DEPTNO_CTX',
  attribute => 'G_DEPTNO',
  value     => l_deptno,
  username  => p_user_name,
  client_id => p_app_session);

EXCEPTION
WHEN no_data_found THEN
  -- If no data is found, then clear the context
  dbms_session.clear_context('DEPTNO_CTX', p_app_session);
END set_ctx;

PROCEDURE unset_ctx
  (p_app_session             IN VARCHAR2)
IS
BEGIN
  dbms_session.clear_context('DEPTNO_CTX', p_app_session);
END;

END deptno_ctx_pkg;
/
Next, the application context and grant on deptno_ctx_pkg to shadow need to be created in the SYS schema, as illustrated in Listing 13-16.
Listing 13-16. Creating the Application Context and Granting Execute to the Shadow Schema (Run as SYS)
CREATE CONTEXT deptno_ctx USING deptno_ctx_pkg;

GRANT EXECUTE ON DATA.deptno_ctx_pkg TO shadow;
The deptno_ctx_pkg package will be called from the APEX application each time a page is rendered, thus ensuring that it is always set to the proper value.
Views
To simplify application development, the view in the DATA schema can be modified rather than the one in the SHADOW schema. This way, no code changes need to be made to the APEX application. At this point, there is only a single reference to EMP_V in the application, but for larger, more mature systems, the number of references may be much higher. Thus, changing the view in the DATA schema limits the impact on the application. The updated SQL for EMP_V is identical to the original, save for the WHERE clause that makes reference to the application context, as shown in Listing 13-17. Additional data security measures can be implemented in a similar manner.
Listing 13-17. SQL for emp_v, which Incorporates the DEPTNO_CTX Application Context (Run as DATA)
CREATE OR REPLACE VIEW emp_v AS
SELECT
  empno,
  ename,
  job,
  deptno
FROM
  emp
WHERE
  deptno = SYS_CONTEXT('DEPTNO_CTX', 'G_DEPTNO')
WITH READ ONLY;
Running the APEX application now will yield no records, because the application context is being applied in the view, but it not yet being set in the APEX application.
Synonym
Only a single change needs to be made to the SHADOW schema; a new synonym must be created that references the deptno_ctx_pkg package so that the application context can be properly set. The grant was already created as part of Listing 13-16, so only the synonym needs to be created. Listing 13-18 shows code for this.
Listing 13-18. Creating the Synonym for set_ctx (Run as SYS)
CREATE SYNONYM SHADOW.deptno_ctx_pkg FOR data.deptno_ctx_pkg;
At this point, all that’s left to add is the call to deptno_ctx_pkg from the APEX application.
Lastly, to execute the deptno_ctx_pkg package—which will, in turn, set the value of the DEPTNO_CTX—it needs to be called before each and every page view. APEX has a special attribute that is designed just for this called PL/SQL Initialization Code, which can be found in the Security Attributes portion of an application’s shared components. By placing the call to deptno_ctx_pkg here, APEX will be sure to execute it before every page view, including those that are called asynchronously via dynamic actions.
To set the PL/SQL Initialization and Cleanup code, edit the application’s shared components and then click Security Attributes. Scroll to the Database Session region, and copy the SQL from Listing 13-19 into the Initialization PL/SQL Code text area.
Listing 13-19. PL/SQL Call to Set the DEPTNO_CTX Application Context
deptno_ctx_pkg.set_ctx
  (p_user_name               => :APP_USER,
   p_app_session             => :APP_SESSION);
Next, copy the SQL from Listing 13-20 into the Cleanup PL/SQL Code text area.
Listing 13-20. PL/SQL Call to Unset the DEPTNO_CTX Application Context
deptno_ctx_pkg.unset_ctx
  (p_app_session             => :APP_SESSION);
Scroll to the top of the page, and click Apply Changes. Now, when the application is run—and the user name matches any user names from the EMP table—the report will show only those records from the same department as the logged-in user. For instance, if the user KING signs on to the application, the results will look like those in Figure 13-9.
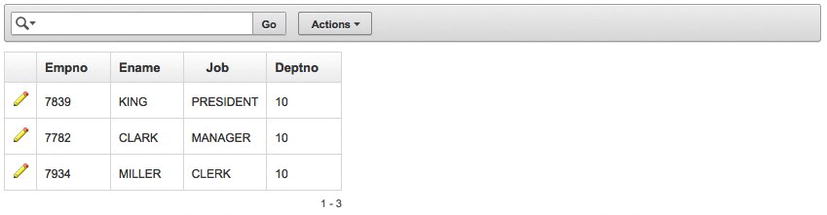
Figure 13-9 . Results of the report with the DEPTNO_CTX application context applied
Logging on as different users from the EMP table will yield potentially different results, depending on the associated DEPTNO of that user. If a user does not have a corresponding record in the EMP table, then no records will be displayed, because the set_ctx procedure will clear the DEPTNO_CTX when no records are returned. The way that the application context is set is of course completely configurable based on specific business rules and needs.
Summary
Granting access to a small set of components is much easier to manage than restricting access to a much larger set. The whitelist approach will remain unaltered as new components are added, which ensures that users do not accidentally get privileges added as new components are introduced. Whitelisting can be achieved with an APEX application, but it does take a little bit of work. It is also far easier to design your application with a shadow schema in mind versus trying to retrofit it later.
Using a shadow schema, developers can ensure that their APEX applications present only a small, finite number of components to their users. Combined with some flavor of data security—either secure views or virtual private databases—this approach offers the most security for applications that demand it.