
![]()
In an APEX environment, a workspace is what matches developers with applications. It’s where all of the hard work to design, develop, and deploy an application takes place. Fortunately, APEX makes it quite simple to configure and manage any number of workspaces within an instance of APEX.
Since APEX is designed to be a multitenant environment, there are many settings that can be managed at the individual workspace level. By distributing the management of the day-to-day tasks in this fashion, an instance of APEX becomes easier to manage because each workspace administrator needs to worry only about their specific workspace.
This chapter will provide an overview of the tasks of a workspace administrator. It will start by covering the different settings of a workspace and how to control access to different modules. It will then discuss some of the lesser-known yet powerful utilities available to workspace administrators. Lastly, it will conclude with an overview of the different user types and advice on how to manage users and groups.
You can find all administration utilities for a workspace on the Administration tab in the application development environment. While this tab is visible to all types of APEX users, a workspace administrator will see far more options than others. From a security point of view, it is important to understand how to configure the settings within a workspace to ensure that users cannot see data that they are not supposed to see. It is also important to understand the difference between the user roles available and what each role gives a user.
You can find most options for workspaces in the Manage Service section, as shown in Figure 5-1. Here, a workspace administrator can make requests for additional schemas or storage, configure which modules are available across the entire workspace, and configure module-specific options.

Figure 5-1 . The Manage Service page of the Administration section of a workspace
While some of the options here are not directly related to security, they are worth noting.
Workspace administrators can make three service requests: request an additional schema to be associated with the workspace, request additional storage, or request termination of the workspace itself, as illustrated in Figure 5-2.
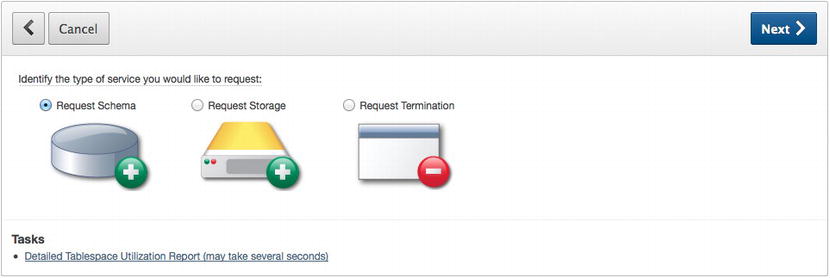
Figure 5-2 . The Make a Service Request options
When any of these requests are made, the instance administrator is notified and can either approve or deny them via the APEX instance administration console. Only then is the result of the actual request applied or not.
A workspace can have any number of schemas associated with it. This mapping can be made directly by the instance administrator at any time or via a request from the workspace administrator. In either case, the instance administrator has to be involved in this process, so a workspace administrator cannot self-grant access to a schema.
As soon as a schema is associated with a workspace, any developer within that workspace will be able to view and manage any database objects that the schema owns or has access to. Therefore, before any additional schemas are associated with a workspace, ensure that all developers in that workspace are authorized to view the new schema’s database objects and associated data.
When editing a workspace user in the Manage Users & Groups section, there is an attribute called Accessible Schemas that would seem to allow more granular developer-to-schema mappings, as shown in Figure 5-3.

Figure 5-3 . The Accessible Schema option for an APEX developer
Unfortunately, this attribute applies only to the SQL Workshop. It has no impact on which schema a developer can access in the Application Builder. And since a developer can easily build an application to provide access to all of the parse-as schema’s objects and data, this feature does not protect against a developer accessing a seemingly restricted schema. The online help for this attribute accurately states that it impacts only the SQL Workshop, but if you don’t read the help documentation, it is easy to misinterpret the purpose of this attribute.
Thus, it is important to confirm that all workspace users are allowed to access a schema before it is associated with a workspace. If you cannot confirm this, then you might have to create an additional workspace that contains the mapping of the new schema and only those developers authorized to see it.
Workspace administrators can also manage several workspace preferences. These preferences come in two categories: Account Login Control and Module Access. Account Login Control preferences are used to manage APEX account password expiration and locking conditions, as shown in Figure 5-4.

Figure 5-4 . The Account Login Control preferences
The Account Expiration and Locking setting should be immediately enabled in each and every workspace. When enabled, accounts will be subject to a specific number of invalid passwords used to access them and a password lifetime duration. The values for these two attributes can also be altered to adhere to any specific security policies within an organization.
The remainder of the preferences are used mainly to control whether a specific module is available within the workspace, as illustrated in Figure 5-5.

Figure 5-5 . Controlling access to each of the workspace modules
By disabling a specific module, all access to that module is removed from all users. The workspace-level attribute will supersede what is set at the account level. For more granular control, access to each module can be controlled on a user-by-user basis.
In the SQL Workshop section, there is an attribute used to control whether RESTful services are enabled. This applies to whether a user can create RESTful services via the SQL Workshop. It has nothing to do with whether a report from an application can be published as a RESTful service. When enabled, a developer who has access to the SQL Workshop can create and publish RESTful services that expose data from the underlying schemas associated with the workspace. Thus, if there is no need to use RESTful services, then this option should be disabled.
The Workspace Announcement setting provides the workspace administrator with a tool that will display an announcement on the home page of the application development environment. As previously mentioned, the output of this attribute is not properly escaped. Therefore, a malicious workspace administrator could potentially implement a cross-site scripting attack by using this attribute. However, this possibility is quite remote, and a workspace administrator would have little to gain by this since that person already has complete control of the workspace.
Manage Meta Data
Tucked away on the right side of the page are another set of administration reports and utilities labeled Manage Meta Data. These reports and utilities allow for the more discrete management of a workspace and its associated components. Some of them provide a simple interface used to purge one type of data, while others display only data. Some of these reports are worth noting in the context of security.
The Session State link leads to a page with a number of additional reports and utilities, as shown in Figure 5-6.

Figure 5-6 . The Manage Session State and Preferences reports
The first report in the Session State section allows a workspace administrator to view details of any active session state from applications within the current workspace, including those in the application development environment. After selecting a session to inspect, both the session details and any items and their values are displayed on the next page, as illustrated in Figure 5-7.
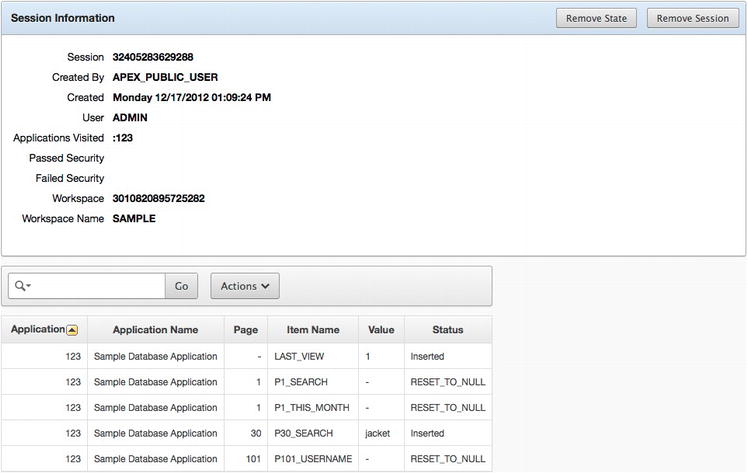
Figure 5-7 . The session details report
Additionally, the session can be either cleared of any values set in session state or removed altogether. Clearing the session will simply remove any values that are set in that session, whereas removing the session will terminate the session and any associated values and will result in the user being logged out of the application. When either of those options is selected, there is no confirmation page or alert. The action selected will be performed immediately and cannot be undone.
Workspace administrators can use these reports to assist in troubleshooting issues from users. Here, they can view any item set in a user’s session state and compare that against the expected results. This greatly assists in the troubleshooting process because users do not always communicate the most accurate results when encountering an issue.
Sessions can also be purged based on how old they are via the Purge Sessions report. Unfortunately, there is no other metric than can be used when purging a batch of sessions.
On a similar note, the workspace administrator can also view and purge user preferences. Preferences are defined in an APEX application by calling the APEX_PREFERENCES API. This API will automatically manage user preferences in internal APEX tables, eliminating the need for this feature to be custom developed. Preference values can be purged only on a per-user basis.
The next utility in the Manage Meta Data list that has to do with application security is the application build status report. This report lists all applications within a workspace in a tabular form that allows their status and build status attributes to be updated, as illustrated in Figure 5-8.

Figure 5-8 . The application build status report
Applications have two attributes that control their availability and whether a developer can edit them. Those attributes are called Status and Build Status, respectively. These attributes are typically managed as part of an application’s shared components on a per-application basis. This report provides a place to modify these two attributes for more than one application at a time. You can find more details about the different settings for these attributes in Chapter 7.
An important thing to note when considering the build status of an application is that if a developer updates the build status to Run Application Only, that application can no longer be edited in the workspace by anyone—developer or workspace administrator alike. The only recourse at this point would be for a workspace administrator to reset that attribute to Run and Build Application using this report.
Manage Users and Groups
Most of the workspace administrator’s tasks will be spent using the Manage Users & Groups pages. This is where all APEX users and groups for a specific workspace are created and managed. The instance administrator can also create and manage users from any workspace but does not have the ability to create and manage groups.
User Types
As mentioned in previous chapters, there are three types of APEX users: end users, developers, and workspace administrators. In all cases, a workspace user is specific and unique to a single workspace. For example, a user named SCOTT in workspace A would be a completely different user than one named SCOTT in workspace B. The two accounts are in no way related and could have different levels of access in their respective workspaces. A future release of APEX has pledged to allow all APEX users be managed from an external repository.
End users in APEX have little access to any part of the application development environment, save for Team Development. End users can be used in conjunction with any application developed with APEX. While this approach is simple and straightforward to implement, it is not recommended for most applications because of a number of reasons.
First, APEX end users are associated only with applications from the same workspace in which they were created. End users from workspace A would not work with applications created in workspace B, for example. This severely limits the utility of APEX end users across applications from multiple workspaces.
Second, there is no way to discretely create a user who can only manage APEX users. Since access to the workspace administrator role is an “all or nothing” approach, any user who would be able to manage users could also potentially modify applications in production or create additional developers within the workspace. Also, in order to access these controls for production applications, the instance of APEX cannot be placed in runtime mode, thus reducing the overall security footprint.
Finally, any additional user repository, regardless of whether it is APEX end users or something else, detracts from a solid identity management strategy. Duplicating credentials in multiple places make things that much harder to manage and introduces the possibility of abandoned, valid accounts when employees leave the organization without all of their credentials being revoked.
In some cases in development or training environments, using APEX end users is acceptable. First, when developing an APEX application, APEX users can be used in place of a more robust, enterprise-grade identity management system when one is not available. For testing purposes, a portion of the users and roles of a system can be mimicked with APEX users, and the application can be tested against that. APEX cannot differentiate where and how a user was authenticated, and thus all associated authorization schemes will treat a user called SCOTT the same. APEX end users can also be used in classroom or training environments where the data is artificial and security concerns about user access are low.
Developers
Most APEX users should be configured as developers. An APEX developer has full access to build any application and interact with any schema mapped to a workspace. While much of their time will be spent in the Application Builder, they typically also have access to the SQL Workshop and Team Development. Developers will also be able to see the Administration tab but have access only to a subset of its functionality.
Any individual who will be developing applications should always be assigned the developer role in APEX. The developer role has ample privileges within a workspace to be able to build both applications and the associated database objects. Only a handful of functions within a workspace cannot be executed by a user with the developer role.
The last and most powerful user role is the workspace administrator. This role encompasses all features of the developer role but also includes the functions associated with managing the workspace. Workspace administrators are limited to managing only the workspace in which they are created. They do not have the ability to do anything outside of their specific workspace. Most of the functionality described in this chapter requires the workspace administrator role.
In most organizations, the workspace administrator role is given to one or two people for a given workspace. These people are sometimes not even developers but rather act as administrators for the workspace and are called upon only when needed. This allows a level of separation to be added between the developers and the workspace administrator that many organizational policies require.
Another way to manage workspace administration is to delegate the task to the instance administrators. Many of the day-to-day administration tasks can be done via the instance administration console. For those tasks that cannot be performed through the console, the instance administrator can easily create a workspace administrator within any workspace.
Regardless of which strategy is adopted, it is important to keep the workspace administrator account separate and out of the hands of all developers. This way, only trusted personnel will be able to manage and create users and perform other administrative tasks within the workspace.
Managing Users
One of the primary tasks that the workspace administrator will be faced with is managing workspace users and their associated options. While this task is simple and not time-consuming, it is nevertheless a critical one because it establishes access to the workspace and its associated applications and schemas.
Creating a user is simple and can be done in a single step. Simply click the Create User button on the main Manage Users & Groups page and fill out the resulting form. Editing a user results in the same form, only this time populated with information about the user being edited.
In the User Identification section, only the user name and e-mail address fields are required, as shown in Figure 5-9. All of the rest of the fields are optional but, in many cases, should be completed with at least the user’s first and last names.
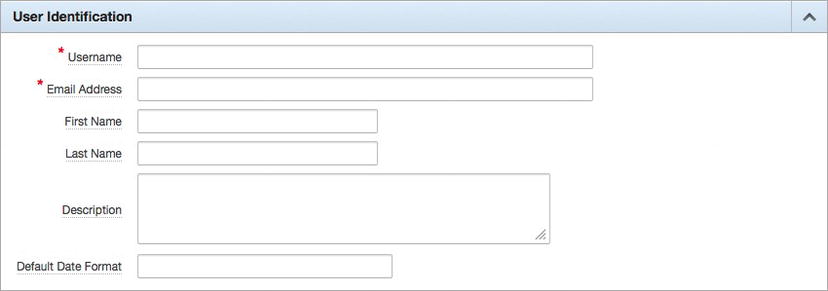
Figure 5-9 . The User Identification region when creating or editing a user
Next, the Account Privileges section, as shown in Figure 5-10, needs to be completed. This is where the user’s role and access to modules are defined. Additionally, the default and any additional schemas that the user will have access to in the SQL Workshop are defined here.

Figure 5-10 . The Account Privileges region when creating or editing user
If an account were to be locked because of it exceeding the maximum allowed logins with an invalid password, the Set Account Availability attribute would be set to Locked. Unlocking a locked account is as simple as setting the Set Account Availability option to Unlocked and saving the user.
The next section is where the password of the user is set, as pictured in Figure 5-11. Any password entered not only must be confirmed by reentering it but also must adhere to whatever password policy was created by the instance administrator.

Figure 5-11 . The Password region when creating a user
When editing a user, the Password region will contain two additional attributes, as shown in Figure 5-12.

Figure 5-12 . The Password region when editing a user
The first new attribute—Developer/Administrator Password—will determine whether the password is valid for the APEX development environment. The second new option—Expire Password—allows a workspace administrator to expire the user’s password, automatically forcing that user to create a new password upon the next login.
Any time the password of a user is changed and the credentials are sent out in e-mail, the Require Change of Password on First Use attribute should be set to Yes. This way, the user is forced to reset their password as soon as the account is created. The new password will also have to adhere to the instance password policy as determined by the APEX instance administrator.
Lastly, the user can optionally be assigned to a group or groups, as illustrated in Figure 5-13.

Figure 5-13 . The User Groups region when creating a user
For some reason, the User Groups region uses a different item type when creating a user versus when editing a user. The one used when creating a user is a simple multiselect list. When assigning a user to a group when creating them, simply select the corresponding group. If assigning more than one group, use either Ctrl+click on a Windows or Linux machine or Cmd+click on a Mac when selecting multiple groups.
When editing a user, the User Groups region contains a shuttle item, as shown in Figure 5-14.

Figure 5-14 . The User Groups region when editing a user
In this case, simply either double-click a group to move it from one side to another or use the built-in controls. Upon completion of creating or editing a user, simply click either Create or Apply Changes to complete the task.
Groups in APEX are simply collections of users that are can be mapped to some form of security role. Each workspace can contain any number of groups. Groups themselves are not hierarchical, meaning that all groups are peers of one another and membership in a single group will not automatically include membership in another group.
Mapping users to groups is done at the user level, where any number of groups can be assigned to a single user. Because of this design, groups work best when used in conjunction with APEX users. If an authorization scheme other than APEX users is used, then APEX groups are relatively useless. In this case, it is recommended to create and manage groups and user-to-group associations outside of APEX in a table or via LDAP.
Creating a group is fairly straightforward. From the Administration home page, click the Manage Users and Groups icon. At the top of the page, there is a Groups tab, immediately next to the Users tab, as highlighted in Figure 5-15.
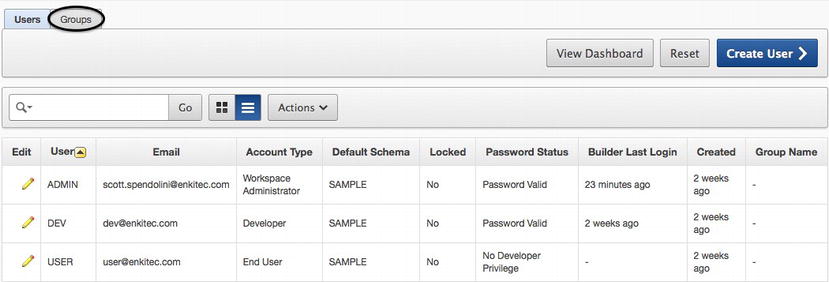
Figure 5-15 . The Manage Users & Groups page, with the Groups tab circled
Click that tab to switch to the Manage Groups page. To create a group, click the Create User Group button. Next, simply fill out the form with a group name and optionally a description, as shown in Figure 5-16.
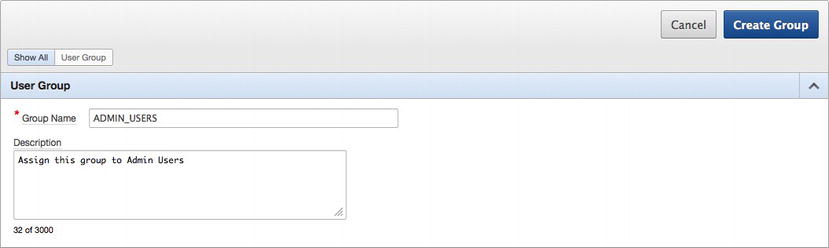
Figure 5-16 . Creating a new user group
Clicking Create Group will do just that. To assign the group to a specific user or users, edit the user, and in the User Groups region, select the group or groups that user is to be assigned. This process will have to be repeated for each user.
To determine whether a user is a member of a specific group, the API APEX_UTIL.CURRENT_USER_IN_GROUP can be called. When passed the name of a group, the API will return a TRUE if the currently logged in user is a member of that group or a FALSE if they are not. A call to this API can be associated with an authorization scheme, and then APEX components associated with that scheme would be accessible only by members of that group. You can find more details on authorization schemes in Chapter 9.
Monitor Activity
The Monitor Activity section in a workspace contains a similar set of the reports available from the instance administration console. While there are a few subtle differences in reports, the major difference between the workspace reports and their counterparts at the instance level is that the workspace reports contain data only from that specific workspace.
While it is possible that the responsibility for monitoring an instance of APEX be delegated to the respective workspace administrators, that is rarely the case. Typically, this falls on the shoulders of the instance administrator. Thus, the workspace administrator is typically not concerned with monitoring the workspace for usage and potential hackers, especially in a development environment.
Refer to Chapter 4 to see more details about the specific reports that have to do with security. Keep in mind that when similar reports are run within a workspace, only activity and applications from that workspace will appear in the data.
Workspace Management Best Practices
Perhaps one of the most common oversights that are made about workspaces in a development environment is that little or even no real security needs to be applied to them. Organizations simply make all developers administrators and allow weak passwords to be used. This approach of lax security is anything but a best practice. All workspaces—whether on the development, test, or production server—need to be secured and treated as if they were production. The same or at least similar security principles and criteria should be applied everywhere.
The following list highlights some of the best practices that should be applied when managing APEX workspaces:
- Use HTTPS to access the APEX development environment: An instance administrator can restrict access to the APEX development environment to only HTTPS. This is recommended so that all data that is displayed on a development instance is also encrypted. It is not only likely but also probable that your developers have changed their passwords to match those on either production or even other applications, internal or external. Thus, ensuring that these passwords are encrypted as they travel from their local PCs to the web server is of utmost importance.
- Use HTTPS to secure any and all applications: Using HTTPS for the APEX development environment is not enough. All applications should also be configured to use only HTTPS so that any actual data that is displayed is also encrypted. In many organizations, the development instance is a clone of the production instance and little, if any, effort is put forth to obfuscate the actual data. To ensure that this data is secured, HTTPS should also be enforced at the application level. You can find details on how to configure an application to use only HTTPS in Chapter 6.
- Ensure that developers are given the developer role: It cannot be stressed enough that developers should be given the developer role, not the workspace administrator role. The developer role provides adequate functionality for developers to do their job. A designated individual and perhaps a backup can act as workspace administrators, or the task can be delegated to the instance administrator.
- Maintain a strong password policy: The password policy in a development workspace should be as strict and robust as that on production. Longer, more complex passwords are better, and keeping the interval at which they need to be changed shorter is best. Also, ensure that after four or five invalid password attempts the account will be locked and require the assistance of a workspace or instance administrator to unlock.
- Remove stale or terminated users: Since APEX users cannot easily be synchronized with a central identity management system, it is up to the workspace administrator to be proactive and ensure that as developers leave the organization for whatever reason, their APEX accounts are summarily expired and/or deleted. This is especially important in an environment where contractors are present because they tend to come and go much more often than full-time employees. Stale accounts present a simple way for malicious ex-employees or contractors to access the database and cause all kinds of trouble.
Summary
Securely managing a workspace is neither a difficult nor involved task. But it is something that does need to be taken seriously because APEX users have the same access to the database as schemas do. After configuring some of the workspace options and ensuring that both the workspace and applications are running over HTTPS, only occasional service and user-related tasks will need to be addressed, all of which take only minutes to complete.