
![]()
Securing an instance of APEX starts at the instance level and continues down to the workspace level. However, merely securing a few attributes or even putting the entire instance in runtime mode is nowhere near enough protection to completely secure your applications. Some of the most important security settings can be controlled only at the application level. Fortunately, many of these settings are declarative in nature, making it relatively simple to secure.
This chapter is dedicated to outlining these attributes and the best values for the most secure applications possible. It starts with the highest level of settings—those at the application level—and drills down from there to attributes on pages and even regions that need to be configured properly. It also discusses one of APEX most powerful constructs—conditions—and why using them for security is not always the best idea. It concludes with a brief discussion of securing mobile applications.
This chapter also discusses how to use an automated security tool, such as Enkitec’s eSERT. Such tools save a tremendous amount of time and also detect potential vulnerabilities that developers may have missed.
Application Settings
Each application contains a fixed set of attributes that control the high-level properties of the application. Found in an application’s shared components, these settings can be broken up into four categories in APEX 4.2: Definition, Security, Globalization, and User Interface. APEX 4.1 and some previous releases did not have the User Interface section but did contain the other three. Each of these sections contains a group of attributes that controls how the application runs, applies security, works in an international environment, and renders, respectively.
While it is obvious that the Security section has a lot to do with security, there are several key attributes that can be found in the Definition and User Interface sections that are covered here as well.
Definition
The Definition section of an application contains a number of attributes that impact everything from the name and alias of the application to whether it can be edited. Most of the attributes here have a direct correlation to the overall security of an application. In some cases, the values specified in a development instance will be different from those in a production instance.
Logging
Logging determines whether page views are logged automatically by APEX to the table APEX_WORKSPACE_ACTIVITY_LOG. Starting in APEX 4.2, there is an instancewide feature that, when enabled, will automatically set this attribute to Yes for all applications. This setting cannot be overridden by anyone at the workspace level, even a workspace administrator. If this setting is disabled, then the Logging attribute can be set on a per-application basis by either a developer or workspace administrator.
All applications should have their Logging attribute to Yes, either by forcing it from the instance level on down or by doing it for each application. This way, all page views from within an application get recorded to the internal APEX logs, where they can be inspected in the case of suspicious or malicious activity.
As mentioned in Chapter 4, APEX will store at most up to a year or so worth of log data. If a longer period of data is required, then a custom routine will need to be set up to archive older data to a more permanent place.
Debugging
The Debugging attribute of an application determines whether an application can be run in debug mode. While in debug mode, APEX will write detailed information about all the steps that occur as pages are rendered and processed to the central debug tables.
For development instances, this attribute is quite often enabled because the information gained from running a page in debug mode often assists developers in troubleshooting and resolving issues. However, debug mode should be disabled in production because passing the value YES through the fifth parameter of the URL for any APEX page can easily activate it. Disabling debug mode will prevent such alteration of the URL from triggering debug mode. Starting with APEX 4.2, and when logged into APEX as both a developer and user of an application in the same workspace, debug mode will always be enabled, regardless of the setting. Thus, debug mode can safely be disabled for all environments.
Also new in APEX 4.2, it is now possible to programmatically call debug mode, regardless of what the status of the Debugging attribute is set to. By using the new API APEX_DEBUG, a developer can instrument PL/SQL code to either enable or disable debug mode. Please consult the Oracle Application Express API Reference guide for more details about the capabilities of APEX_DEBUG.
Allow Feedback
While enabling this setting is not a direct security risk, it could become one if a developer modified the process that inserts the feedback into the database and introduced a SQL injection or cross-site scripting risk. In its default state, the process that is called to record feedback resembles Listing 6-1.
Listing 6-1. Default Code Used to Submit Feedback
apex_util.submit_feedback (
    p_comment         => :P102_FEEDBACK,
    p_type            => :P102_FEEDBACK_TYPE,
    p_application_id  => :P102_APPLICATION_ID,
    p_page_id         => :P102_PAGE_ID,
    p_email           => null);
Since this code is using the bind variable syntax, an attempt at passing SQL into the p_comment parameter would not result in that SQL being executed, but rather it would simply be passed into the APEX feedback table. If a developer altered the call to this API so that instead of referencing the item P102_FEEDBACK using the bind variable notation, they referenced it using the item notation, there would be the potential for a SQL injection attack.
However, if a cross-site scripting attack was implemented and malicious JavaScript was passed into the p_comment parameter, there is a chance that it could be executed when querying the APEX_TEAM_FEEDBACK view, if all columns are not properly escaped. In the Team Development module, all feedback is properly escaped, so if a cross-site scripting attack were implemented via the feedback page, it would prove to be unsuccessful when that feedback is viewed in Team Development. Custom reports on the feedback tables would need to be properly secured from such an attack.
From a security point of view, it is acceptable to use feedback in an application so as long as the default constructs or properly secured methods are used to call the feedback APIs and precautions are taken if data from APEX_TEAM_FEEDBACK is ever queried directly.
Compatibility Mode
New in APEX 4.2, this attribute will change some of the core behavior of the APEX engine based on the value that is selected. The intention of adding this attribute is to allow the developer to provide some legacy support for applications that do not work as well with some of the new features in APEX 4.2.
There are three options for this attribute: 4.2, 4.1, and pre-4.1. The differences are outlined here:
- Pre 4.1: When set to Pre 4.1, the APEX engine will allow items mapped to column names to render and process, even if the corresponding column does not exist in the underlying table. Obviously, no value is set in session state if the column mapping is incorrect. Additionally, in Pre 4.1 mode, there are two attributes that are automatically defaulted to less secure values: Browser Cache and Embed in Frames. APEX will default these two attributes to Enabled and Allowed, respectively. These settings are the least secure of those available and could cause numerous security issues. The specifics of each of these attributes are discussed later in this chapter.
- 4.1: Setting Compatibility Mode to 4.1 requires all items mapped to a database columns to have a corresponding column in the underlying table. Failure to do so will result in an error message. Additionally, the attributes Browser Cache and Embed in Frames will respect the value that is set at the application or page level.
- 4.2: Lastly, if Compatibility Mode is set to 4.2 (which is the default for all new applications), there are a few changes with regard to how regions are rendered and processes and computations are executed. First, all regions that are mapped to a specific display point are first evaluated to determine whether they will render. Only after all regions are evaluated will the rendering begin. In 4.1 and previous releases, regions were evaluated to determine whether they were to render and, if so, were immediately rendered. This is done to support the new grid layout feature in APEX 4.2. Additionally, computations and processes that are set to fire Before Regions and After Regions will now fire before or after any region at all is rendered, respectively. Despite the name, in APEX 4.1 and earlier releases, Before Regions and After Regions actually fired just before and just after Page Template Body (1-3), respectively.
The Compatibility Mode attribute should always be set to 4.2 or, if necessary, 4.1. Some testing and perhaps modifications may need to be made in order for the application to function properly when changing this attribute to 4.2 or even 4.1. However, as APEX as a product progresses, it will be important to ensure that all applications function properly at the latest release possible.
Application E-mail from Address
This attribute will be used when e-mails are sent from an application via an interactive report download via e-mail or subscription. While this attribute supports both a static e-mail address and an APEX item that can store an e-mail address, it is best to use a static e-mail because the APEX item will not be evaluated when an interactive report is sent out via a subscription.
Set this value to a well-monitored e-mail address so that if any issues with the reports arise, the user will have a place to easily reply to and report them.
Availability
The Availability attribute determines whether the application can be used by end users and, if not, what is displayed instead. Depending on the setting, it is used in conjunction with the “Message for unavailable application” and “Restrict to comma separated user list (status must equal Restricted Access)” attributes. The following list outlines the options for the Availability attribute:
- Available: This is the only setting that should be considered for a functioning application in a production environment. When Availability is set to Available, the application functions as normal but will not display the developer’s toolbar when the end user is also logged into the corresponding workspace.
- Available with Edit Links: When Availability is set to Available with Edit Links, the application will be available for end users like it is when set to Available. However, if an end user is also signed on as an APEX developer, the developer’s toolbar will be available. Since the build status of an application in production should be set to Run Application Only, the developer will not be able to make any changes anyway. Thus, using this attribute in production may be acceptable, but for consistency’s sake, Available is a better option.
- Available to Developers Only: This option will allow only end users who are also logged in as an APEX developer to access the application. Designed to be a temporary status used during troubleshooting an issue, this option is viable only for short periods of time where access to an application needs to be restricted.
- Restricted Access: Setting an application’s Availability option to Restricted Access will allow only those users specified in the “Restrict to comma separated user list (status must equal Restricted Access)” attribute. The users specified can be from any repository and do not have to be APEX developers. As long as the user name is in the list, they will be able to access the application. Again, this is a temporary value that should be used when actively troubleshooting an issue and other users need to be kept out.
- Unavailable: When Availability is set to Unavailable, the application is unavailable to all users, regardless of whether they are logged in as an APEX developer or otherwise. A simple generic message will be displayed to any user who attempts to access any portion of the application. This status is useful if access to a single application needs to be immediately halted because of a security breach or other issue.
-
Unavailable (Status shown with PL/SQL): Similar to Unavailable, this option will prevent any access to the application. However, rather than displaying a generic message, a PL/SQL block entered in the “Message for unavailable application” field can be called to either render a custom message or even dynamically redirect the end user to a different application or URL. For instance, a more specific message can be displayed by using a little bit of PL/SQL like this:
htp.prn('Site will be back at 12:00 PM EST'),Instead of a message, a line of PL/SQL can be used to redirect the user to a different application or URL entirely:
owa_util.redirect_url('http://somewhere-else.com'),
- Unavailable (Redirect to URL): A slightly more limited version of Unavailable (Status shown with PL/SQL), this option will simply redirect the user to a static URL entered in the “Message for unavailable application” field.
The Availability status of an application can also be controlled via Oracle SQL Developer or with the WWV_FLOW_API API. If your instance of APEX is set to Runtime mode, this is the only way to modify the application’s availability status.
From SQL Developer, connect to the database as either SYS, SYSTEM, or the parse-as schema that is associated to the application that will be modified. Expand the schema’s tree to reveal all of the different objects and components. Locate the Application Express node and expand it, revealing any application associated with that schema. Next, right-click the application name, select Modify Application, and then select Status from the second menu, as illustrated in Figure 6-1.
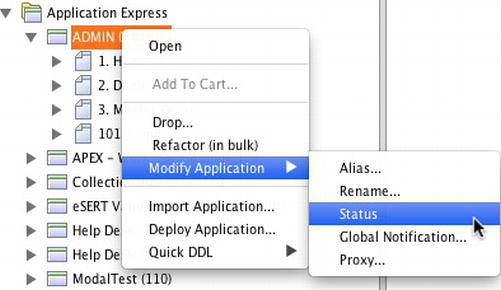
Figure 6-1 . Editing an application’s availability status via SQL Developer
Next, set Status to the level desired, and click Apply. Notice that not all values that are available within the application are presented in this list. Inspecting the SQL used to alter the application’s status reveals that there are two API calls made, as shown in Listing 6-2.
Listing 6-2. The SQL Used to Change an Application’s Status via SQL Developer
declare
  PRAGMA AUTONOMOUS_TRANSACTION;
begin
  wwv_flow_api.set_security_group_id
  (
  p_security_group_id => 1044509116395059
  );
    wwv_flow_api.set_flow_status
    (
    p_flow_id           => 117,
    p_flow_status       => 'AVAILABLE'
    );
  commit;
end;
The first call sets the workspace ID, while the second one sets the actual availability status of the application. By inspecting the signature of the SET_FLOW_STATUS procedure, it is evident that a couple of different parameters are not available via SQL Developer, as shown in Listing 6-3.
Listing 6-3. The Description of the WWV_FLOW_API.SET_FLOW_STATUS Procedure
    PROCEDURE SET_FLOW_STATUS
 Argument Name            Type          In/Out  Default?
 -----------------------  ------------  ------  -------
 P_FLOW_ID                NUMBER          IN
 P_FLOW_STATUS            VARCHAR2        IN
 P_FLOW_STATUS_MESSAGE    VARCHAR2        IN    DEFAULT
 P_RESTRICT_TO_USER_LIST  VARCHAR2        IN    DEFAULT
These additional parameters—p_flow_status_message and p_restrict_to_user_list—can be mapped to the “Message for unavailable application” and “Restrict to comma separated user list (status must equal Restricted Access)” attributes, respectively.
The last piece of the puzzle can be found in the HTML source of the Definition page. By inspecting the HTML for the Availability page item, you can see the valid values that can be passed to the SET_FLOW_STATUS procedure, as shown in Figure 6-2.

Figure 6-2 . The HTML source of the Availability item, including values
Armed with all the parameters and valid values, it is possible to programmatically change the Availability status of an application from SQL*Plus or other SQL utility that can connect to the database. This makes the decision to move to a runtime-only environment easier because the same management tools are available outside of APEX, even if it’s not as obvious as it could be.
Build Status
The Build Status setting of an application determines whether developers will be able to edit the application. If it’s set to Run and Build Application, then developers will be able to modify the application in any way they see fit. If it’s set to Run Application Only, then developers will not be able to even view the pages or components of an application. It will function the same when run by end users, however.
For development, the Build Status setting obviously has to be set to Run and Build Application; otherwise, it would be impossible to actually build the application. For a production environment, set the Build Status setting to Run Application Only. This will prevent any developer who needs access to the workspace from being able to edit the application on a production server.
A note of caution: once the Build Status setting is set to Run Application Only, only a workspace administrator can change it back.
Global Notification
The Global Notification attribute is designed to display its contents on every page of an application, replacing the #GLOBAL_NOTIFCATION# substitution string in templates. By default, all APEX templates contain the #GLOBAL_NOTIFCATION# substitution string. This attribute can be useful to broadcast a message to all active users of an application. For example, if an application needed to be taken offline, a message could be added to the Global Notification attribute that stated so and offered guidance as to when it would return.
Similar to the Availability attribute, the Global Notification attribute can be managed via the SQL Developer or the WWV_FLOW_API API, making the management of a runtime-only installation easier. There is, however, one security concern about the Global Notification attribute: its output is not properly escaped when rendered on a page. Thus, it is possible that a cross-site scripting attack could be implemented via the Global Notification attribute. This type of attack would have to be implemented either by a workspace administrator or by someone with access to the parse-as schema, however, making it an unlikely put possible scenario.
Substitutions
APEX provides up to 20 generic substitution strings for use in any application. These value-attribute pairs can be defined only by the developer at design time and can be named and reference any value at all. They are similar to application items in that they do not have a UI component. In fact, they act as a combination of an application item and a static computation all in one.
The benefit to using substitution strings is that it is a lot faster and easier to create a value-attribute pair because it can be done with just two fields. Despite this, they should be avoided for a couple of reasons. First, if the value of a substitution string needed to change, the entire application would need to be redeployed. Aside from editing an application in production, there is no other way to make a discrete change to the value of a substitution string.
Second, when rendered on the page using either the &ITEM. or bind variable syntax, the values of substitution string are not escaped anywhere by design—including places such as region titles, items, tabs, lists, and breadcrumb entries. Therefore, if a developer were to implement a cross-site scripting attack by using a substitution string, it would likely succeed. Although this is an unlikely scenario, it is possible.
ENKITEC’S VULNERABILITY SCANNER
Enkitec eSERT is an APEX application that quickly evaluates other APEX applications for potential security vulnerabilities. When run, eSERT produces an intuitive, easy-to-use report that highlights any vulnerability it discovers.
Figure 6-3 shows the results of a scan. Most results are green, indicating no trouble. Two of the results are red, indicating that a possible problem has been found by the scanner.
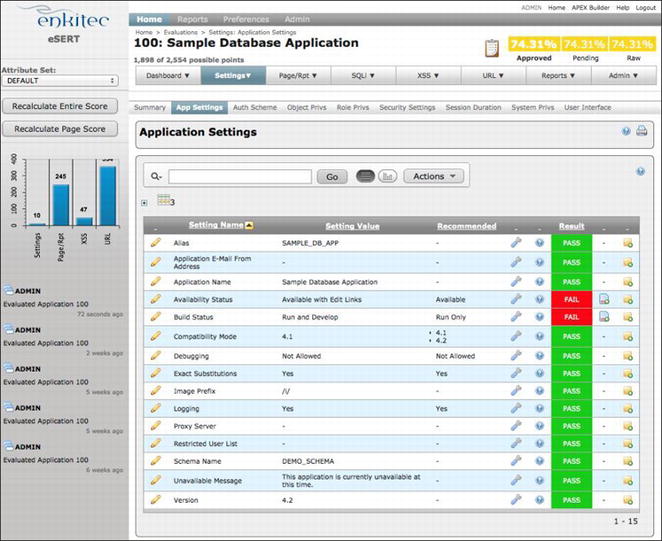
Figure 6-3 . Example of output from an eSERT scan
eSERT also outlines the details of each vulnerability as well as the steps used to remedy it. Completely integrated with the APEX development environment, fixing any identified issue takes only seconds. For more details, please visit www.enkitec.com/esert.
Security Attributes
The security attributes of an application determine the high-level security settings for the application, including the parse-as schema, how it authenticates, session timeout, and session state protection, among other things. Unlike the Definition section, the values here are typically unchanged when moving an application from development to production.
Public User and Authentication Scheme
This attribute is a bit of an enigma. By default, it is typically set to APEX_PUBLIC_USER, and it should be left that way in almost every case. According to the APEX documentation, the value of this can be derived from APEX_APPLICATION.G_PUBLIC_USER, but as of APEX 4.2.1, this global variable does not exist.
The authentication scheme selected is the current scheme or the one that the application will use when users log in to validate their credentials. While there can be more than one authentication scheme associated with a single application, only one of them can be the current scheme at any given time. A developer can set this attribute only at design time. While there is no “correct” value for this attribute, it is important to ensure that the authentication scheme selected as the current scheme is the intended one. In many cases, an application in development may be pointed to a development LDAP server, for instance. Before promoting the application to production, ensure that the authentication scheme is pointing to the production set of credentials.
![]() Note You can find more details on authentication schemes in Chapter 8.
Note You can find more details on authentication schemes in Chapter 8.
Deep Linking
The Deep Linking attribute of an application determines whether users will be able to bookmark a specific page and be able to return to that page. This extra overhead is required because the bookmarked URL will likely contain a stale session ID. When enabled, the APEX engine will be able to “remember” the original page, authenticate the session, and then redirect the user to the bookmarked page.
However, there are a number of potential issues with enabling deep linking. First, if the page that is being bookmarked has session state protection enabled, the user will likely get an error when trying to view the page because the checksum bookmarked may not be what APEX expects. More details about session state protection are provided later in this chapter.
Second, a bookmarked page may cause functional issues, especially if it is the third page in a four-page wizard. Session state values may be set on the first two that determine what is displayed on the third or even fourth page. If the user skips the first two pages, then the third page may erroneously display content or items that should otherwise be hidden. To combat this, a check can be made on each page to ensure that the values on previous pages are set. If they are found to be null, then a redirect to the first page of the wizard can be initiated.
If necessary, Deep Linking can be set to Enabled and then disabled on pages where it is not appropriate. The drawback to this approach is that users will likely assume that it will work on any page and thus encounter errors on pages where it is not enabled. Thus, it may be best to simply set Deep Linking to Disabled at the application level and publish that this feature is simply not supported.
Authorization Scheme
Each application can have an authorization scheme associated it. This scheme will evaluate before every page, and if the result of the scheme is false, the user will be denied access to that application. Each and every application should have an authorization scheme associated with it to limit which users can use it.
Consider this example: a 25,000-person organization starts to use APEX. They integrate APEX with their LDAP server so that users can use their own credentials to log in and not have to remember another user name and password. They deploy their first APEX application, with the intended audience of a small group of 10 people. By not associating an authorization scheme with the application to limit who can use the application, what they have essentially done is allow any one of the 25,000 valid users to be able to log in to this application. This was clearly not the original intent. Therefore, some sort of “gatekeeper” authorization scheme should always be associated with every application in order to allow only authorized users for that application.
Run on Public Pages
Associating an authorization scheme with your application means that the authorization scheme will fire on every page—public or otherwise. This presents quite a predicament for end users. On one hand, you want to protect your application from unauthorized end users. But on the other, you at least want to give your end users a change to authenticate so that you can check to see who they are and determine whether they can run this application.
Thus, the Run on Public Pages option, when set to No, will forgo checking the authorization scheme for pages that are set to public. The idea here is that if the page was purposely set to public by the developer, it should not be restricted by the application-level authorization scheme.
Run on Public Pages should normally be set to No so that public pages can properly run. Be sure to verify that all pages that are set to public are intended to be set to public and were not accidentally left that way.
Parsing Schema
The Parsing Schema setting will be the schema in which all SQL and PL/SQL will be executed from. It can be set to any schema that is associated with the workspace, even if the developer doing the modification does not have direct access to that schema in the SQL Workshop. Parsing Schema is a required value, and while there is no correct answer, ensure that the schema selected has the appropriate privileges that the application requires and nothing more. Chapter 13 discusses techniques to limit the privileges the parse-as schema contains for better security.
Session Timeout
APEX has a built-in mechanism that allows the developer to set the maximum length of a session and the maximum session idle time permitted before a session times out. For each of these two events, the user can be directed to a different URL, as illustrated in Figure 6-4.

Figure 6-4 . The Session Timeout attributes of an application
If either of the URLs is left blank, APEX will redirect the user to the Session Not Valid location as per the authentication scheme definition. The values specified for the Maximum Session Length and Maximum Session Idle Time settings really depend on the level of sensitivity of the application. A general rule of thumb is that the more sensitive the data, the shorter the time span. Leaving either of the duration fields will cause APEX to default to the instance-level settings.
Keep in mind that there is an APEX job—ORACLE_APEX_PURGE_SESSIONS—that is by default configured to run every hour and kill any session that is older than 24 hours. This means setting the Maximum Session Length option to a value larger than 86,400 seconds (60 seconds per minute x 60 minutes per hour x 24 hours) will have little impact because that session will be purged by the job automatically.
Session State Protection
The Session State Protection option is a feature of APEX that prevents a hacker or malicious user from changing values that are passed through the URL when calling an APEX page. It works by adding an additional checksum as part of the URL itself. Before the page is rendered, the APEX engine will compare the checksum in the URL to a precomputed value. If there is any difference at all, APEX will cease all operations and display an error message because some portion of the URL was tampered with.
The first step in getting the Session State Protection option to work is to ensure that it is enabled at the application level. This is done by simply setting it to Enabled, as shown in Figure 6-5, and saving the changes. Once it is enabled here, each page and item that needs to be protected also needs to be configured.
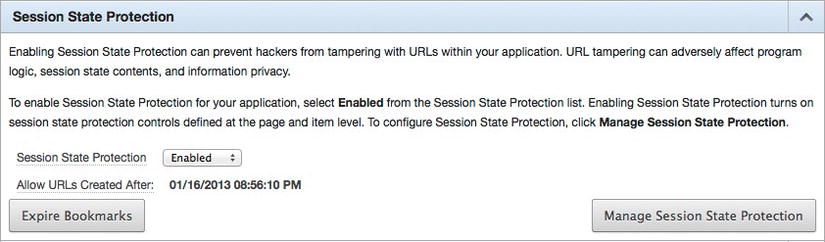
Figure 6-5 . Enabling the Session State Protection option
Items that are protected with session state protection can be expired by clicking the Expire Bookmarks button. This will invalidate any bookmark that also includes a reference to an item that is protected. Clicking Manage Session State Protection will display a page with four additional options, as shown in Figure 6-6.

Figure 6-6 . The Application Session State Protection controls page
Clicking either Page, Page Item, or Application Item will produce a report that displays the current session state protection for the respective component. That report will allow the developer to click the corresponding page number for Pages and Page Items, which will lead to the same updatable report for both components. The updatable report will allow a developer to set both the page- and item-level session state protection attributes all at once, as illustrated in Figure 6-7.
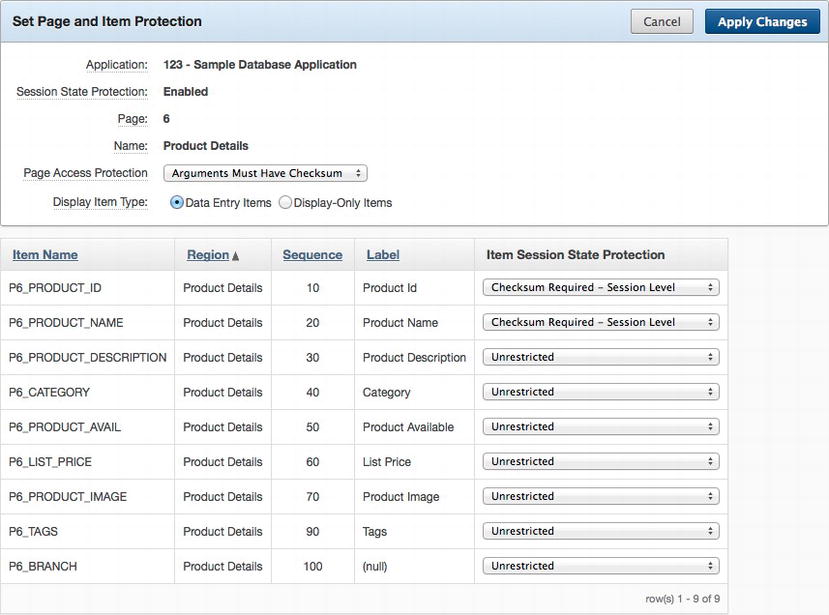
Figure 6-7 . Setting session state protection attributes for a page and its associated items
Alternatively, the value of session state protection can be set at the page or item level, depending on which component is being secured. Session state protection for application items can be defined only as part of the application item definition.
The fourth option—Set Protection—allows the developer to enable, disable, or configure session state protection. By default, the Session State Protection option is set to Enabled, and it should be left that way. There is a third option available on this page: Configure. Configure allows the developer to pick a setting for the four categories and have that setting applied to all components within an application, as shown in Figure 6-8.

Figure 6-8 . The Configure option in session state protection
It is best to exercise some level of caution when using the Configure option because certain parts of your application—specifically JavaScript that sets item values—may no longer function properly when session state protection is applied. Also, if the settings chosen are too strong, things such as the ability to pass parameters via the URL may stop working altogether. To be safe, it is a good idea to make a backup of your application before using the Configure feature so that it can be restored to its previous state if need be.
Again, enabling session state protection is only the first step. Additional configuration needs to be done at both the page and item levels for the feature to take effect. You can find details about how to configure pages and items with session state protection later in this chapter in the “Page & Region Settings” section and in Chapter 7.
Cache
If the Cache attribute is enabled, then the browser will store previously viewed pages in both memory and on disk. This offers a convenience to the user because they can use the back button to quickly navigate through previously viewed pages because the browser can use the copy of the page from disk rather than have to retrieve a new copy from the server. However, this convenience comes with a high price because sensitive data may be stored locally on a user’s workstation, where it can be accessed by anyone who gains access to the workstation.
Thus, the Cache attribute should always be set to Disabled so that no sensitive data is left on the client. When that is done, an additional directive—Cache-Control—is sent to the browser via the HTTP header, as illustrated in Figure 6-9.

Figure 6-9 . The Cache-Control directive when the Cache attribute is set to Disabled
A common misconception is that if a web page is served over HTTPS, it won’t be cached. While this may be true from some browsers, it is not true for all. Thus, even when running over HTTPS, it is critical that the Cache attribute be set to Disabled.
Embed in Frames
One type of attack that hackers use is called clickjacking. The attack is relatively simple to implement. Basically, a hacker sets up a web site that displays some sort of link—say a banner ad that offers a free iPad. On that same site, the hacker also renders an iFrame with content from another site. The properties of the iFrame are set so that it is not visible, but it is actually rendered in front of the original content. When the user clicks the link for the free iPad, the click is actually registered within the iFrame. Oftentimes, the iFrame will contain content from popular sites that users don’t need to authenticate to each day, like Facebook or Twitter. So, what happens is that the user thinks he is clicking an ad for an iPad when essentially the click is passed to Facebook as a “like” for a specific page. Thus, the term clickjacking was coined to describe this type of attack.
One of the methods used to combat this type of attack is adding the X-Frame-Options response header to all pages. When set to DENY, this directive will prevent a web page from being rendered as an iFrame if the source page’s site or origin is different from its own. When set to SAMEORGIN, a page can be rendered within an iFrame only if the origin sites of both the iFrame and containing page are the same. A third option—ALLOW_FROM uri—allows the developer to specify a specific site that the content is allowed to render within an iFrame from.
The Embed in Frames attribute is designed to help combat these clickjacking attacks by allowing the developer to specify the value of the X-Frames-Options directive. Setting this value to Deny will prevent any page within that application from rendering within an iFrame. “Allow from same origin” will restrict the application to render only in iFrames from the same origin, and Allow will not restrict the application from rendering within iFrames at all, regardless of the origin. APEX currently does not support an option that would let a developer specify a valid site where the content could be rendered as an iFrame from.
When Embed in Frames is set to Deny and the HTTP page headers from any page in the application are inspected, the directive is clearly visible, as shown in Figure 6-10.

Figure 6-10 . The X-Frame-Options directive in the HTTP header
This option should be set to at least “Allow from same origin” or Deny, depending on whether there is a legitimate need for an APEX application to be used within an iFrame. While the chance that an APEX application would be used in a clickjacking attack is small, a simple setting change can reduce that chance to zero.
HTML Escaping Mode
The core of a cross-site scripting attack has to do with being able to inject and execute an external, illicit JavaScript function on a valid web page. One of the best defenses against cross-site scripting attacks is to ensure that all data generated on the page is properly escaped. Escaping data will yield special characters, such as < and >, completely harmless. Rather than be interpreted as HTML, they will be rendered on the page just like all of the other text, and the scripts they attempted to inject will fail to execute.
The APEX engine itself goes great lengths to ensure that any output it produces is also escaped. Prior to APEX 4.2, content was escaped with the htf.escape_sc function, which is installed in conjunction with APEX. Starting with APEX 4.2, all instances of the older htf.escape_sc have been replaced with the new apex_escape.html function.
The HTML Escaping Mode attribute actually controls how apex_escape.html will escape content. When set to Basic, apex_escape.html will escape content just like htf.escape_sc did. For this reason, applications that have been upgraded from a prior release of APEX will have this attribute set to Basic. When set to Extended, apex_escape.html will escape everything that htf.escape_sc did and then some. New applications created in APEX 4.2 will have this attribute set to Extended by default.
Figure 6-11 shows the subtle differences between how the two functions escape special characters.
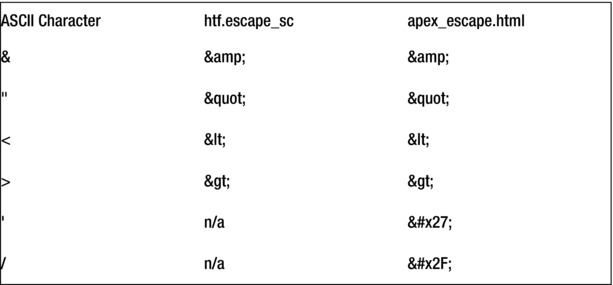
Figure 6-11 . The differences between htf.escape_sc and apex_escape.html
What is not illustrated is that the newer apex_escape.html function will also escape Unicode characters if the database or web server’s character set is not set to UTF-8. This is done to protect against an attack that attempted to hide its malicious payload in Unicode characters. Because of this, the results for the same string may be longer when rendered in Extended mode versus Basic mode.
Thus, the Extended mode should be used where possible. Before switching from Basic to Extended mode on older applications, they should each be thoroughly tested to ensure that no new issues arise as a result of the change.
Initialization PL/SQL Code
Previously called and slightly misnamed “Virtual Private Database PL/SQL call to set security context” in APEX 4.0 and previous releases, the Initialization PL/SQL Code attribute is designed to give the developer a place to execute PL/SQL code before any other APEX component executes. Unlike the previous name implied, there are no limitations as to what the code executed here can do. However, this attribute is quite frequently used to set a security context that is later used in conjunction with VPD or secure views in other APEX components.
By adding a call to apex_debug.info to the Initialization PL/SQL Code attribute and running any page in debug mode, it can be seen that this code is executed just before the Before Header position, as illustrated in Figure 6-12.

Figure 6-12 . Debug output from a page, highlighting where code in the Initialization PL/SQL Code attribute executed
It is worth noting that there are several additional calls that APEX makes before the Initialization PL/SQL Code contents that are not shown in Figure 6-12. Most of these additional calls are used to set the NLS settings for this specific APEX session. Since there is no way that APEX can guarantee that each of its page views will be done by the same database session, the NLS settings must be set for every page. They are also set before anything else so that any calculation in any subsequent process is performed after the proper data and numeric format masks have been applied.
Several practical examples of how to use the Initialization PL/SQL Code setting to add data security controls to an APEX application can be found throughout this book in later chapters.
Cleanup PL/SQL Code
Introduced in APEX 4.1, the Cleanup PL/SQL Code setting is similar to the Initialization PL/SQL Code setting except it gets executed at the end of an APEX page view versus close to the beginning. There is nothing else that gets executed after the Cleanup PL/SQL Code contents, as highlighted in Figure 6-13.
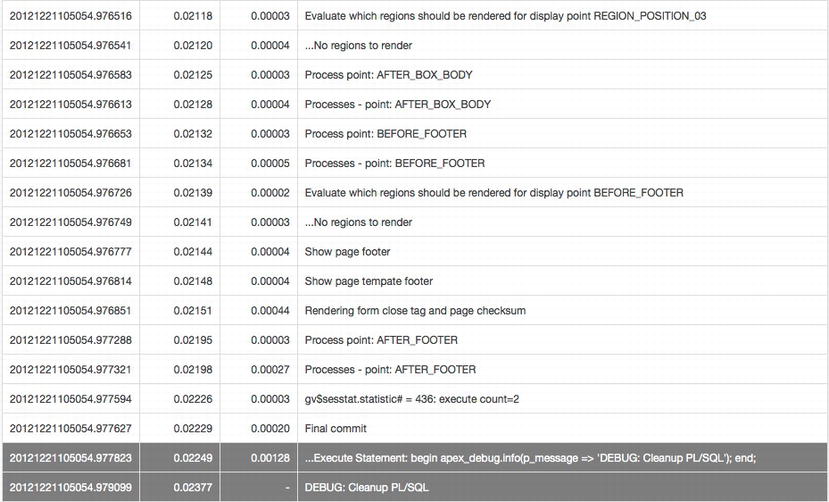
Figure 6-13 . Debug output from a page, highlighting where code in the Cleanup PL/SQL Code attribute executed
A common use of the Cleanup PL/SQL Code attribute is to unset any security context values that may have been set in the Initialization PL/SQL Code attribute. This best practice is employed so that another APEX session that happens to be sharing the same database session does not inherit any security context values that may have been previously set by it. When a security context is set in the Initialization PL/SQL Code attribute, it should also be unset in the Cleanup PL/SQL Code attribute.
User Interface
The User Interface attributes of an application are new in APEX 4.2. As the name implies, these attributes deal with user interface attributes of an application. However, there is one that is worth highlighting in the name of security: Include Legacy JavaScript.
When enabled, this attribute will include an additional JavaScript library called legacy.js when rendering any APEX page. Located at /i/libraries/apex/ on the web server, legacy.js contains a number of older, deprecated JavaScript functions that APEX has made use of throughout the years. By disabling this attribute, the legacy.js file will no longer be included when APEX pages are rendered.
There are a couple of things to consider with this attribute. First, simply disabling the legacy functions may negatively impact existing, older applications that make use of them. Some advice for switching to more modern, supported versions of these functions exist within the file itself for a portion of the legacy functions.
Second, and just as important, it may be the case that Oracle will no longer be supporting these functions, given that they are referred to as legacy. If that is in fact true, then any security or even functionality issues with them may potentially never be addressed by Oracle. For many organizations, this is a deal-breaker because their internal policies dictate that any software used must be supported in full by the vendor.
Therefore, you should replace any instance of legacy JavaScript functions in your application with either a supported version or a corresponding dynamic action. While simply disabling this attribute may not be possible, effort should be made to break any relationship with these legacy functions.
Page and Region Settings
Like application settings, page settings need to be properly configured in order to have a secure application. However, depending on the page, including its purpose and sensitivity, page settings may vary greatly from one page to another. Some pages may be available to any user, whether they are authenticated or not, while others will require a user have a specific authorization scheme in order to be accessed.
The same holds true for region settings. Some regions may be available to any user who can view the page, whereas others may have multiple rules that are evaluated to determine whether a specific user can view it. Additionally, APEX reports also contain a few attributes that security-conscious developers need to be made aware of, such as the ability and amount of data able to be downloaded.
Each page in an APEX application has its own, distinct set of attributes. While a couple of these attributes may defer to an application attribute, most of them are unique and specific to the page. Of the page attributes, most of the ones that have to do with the security of a page are grouped under the Security region. However, there are a couple of them in other sections that are worth considering.
Read Only
Items in APEX contain an attribute called Read Only. When the condition associated with this attribute returns a TRUE, then the associated item will render in “read-only” mode, making it uneditable to all users. If the Read Only attribute returns a FALSE, then the item will render as normal, and any user will be able to change the value of the item.
Traditionally, the Read Only attribute has been associated with each individual item. Making a 30-item form conditionally read-only was an arduous and time-consuming task because each item had to be configured individually. In APEX 4.2, there is now a page-level Read Only attribute available. Identical in mechanics and functionality to the item-level attribute, the page-level Read Only attribute will control all items on a specific page. However, if an individual item has its Read Only attribute set to Never, then that value will override the page-level Read Only attribute. Additionally, each region has a similar setting, making the task of creating a read-only form much easier and straightforward.
This attribute can be very useful for when an entire page should be rendered in read-only mode for a specific set of users. Since it’s a best practice to control user access to APEX components via authorization schemes and not conditions, the same practice should be also applied to Read Only conditions. The APEX_UTIL.PUBLIC_CHECK_AUTHORIZATION API can be used to easily determine whether the currently logged on user is a member of a specific authorization scheme.
Keep in mind that if the user does pass the API check, it will return a TRUE, which when applied to a Read Only attribute will render the page with all items as read-only. It may be necessary to include a NOT before calling the API, as illustrated in Figure 6-14, to achieve the desired result.

Figure 6-14 . Configuring the page-level Read Only attribute to call the APEX_UTIL.PUBLIC_CHECK_AUTHORIZATION API
To summarize, when using the read-only page-level attribute, it is best to use an API to reference an authorization scheme. This way, all management of which users are mapped to which authorization scheme can be done outside the application itself, allowing for a more centrally administered system.
Authorization Scheme
Each page can also have an authorization scheme associated with it. Authorization schemes are used to determine which authorized users can have access to which APEX components. If the currently signed on user is a member of the specified authorization scheme, then that user can run the corresponding page. If not, then the page will not render, and an error message will be displayed.
By default, APEX will not assign an authorization scheme with freshly created pages. It is totally up to the developer to create and assign these schemes manually. This task should not be saved for the end of the development cycle but rather done as early as possible.
All pages should have an authorization scheme associated with them. Even if there is only a single scheme associated with an application, adding that scheme early on will be beneficial if the application requires multiple schemes in the future. Chapter 9 discusses the specifics of authorization schemes in more detail.
Authentication
The Authentication page attribute determines whether a user must be authenticated. There are two options for this attribute: Page Requires Authentication and Page is Public. When Authentication is set to the first option—which is also the default—the user will have to be successfully authenticated before the page is rendered. It does not matter which user or which authorization schemes pass or not; the check here is simply for a valid authenticated user. When Authentication is set to Page is Public, anyone who can access the server and enter the URL will be able to view this page.
If a page’s Authentication attribute is set to Page is Public, the associated authorization scheme may or may not apply, based on the application-level attribute Run on Public Pages, as discussed earlier in this chapter.
More often than not, this attribute should be set to Page Requires Authentication. However, there are cases where pages within an application are intended to be public. When this is the case, ensure that all other sensitive components on the page are properly secured with an authorization scheme so that they do not inadvertently render for public users.
Deep Linking
The Deep Linking attribute of a page determines whether users will be able to bookmark that specific page and be able to return to that page successfully. The page-level attribute is identical to the application-level Deep Linking attribute discussed earlier in this chapter.
At the page level, there are three options for Deep Linking: Enabled, Disabled, and Application Default. Enabled and Disabled function the same as the application-level options do. Application Default will defer to the value defined for the application-level Deep Linking attribute. Unless there is a specific requirement for deep linking, the Deep Linking option should be disabled because it may not work correctly in all places within an application, causing confusion among the users.
Page Access Protection
Page Access Protection is designed to prevent the user from altering or tampering with the URL and resubmitting it, which could result in sensitive data being displayed on the page. There are four settings for Page Access Protection, and they are listed from the least restrictive to the most restrictive:
- Unrestricted: Unrestricted is the default setting for newly created pages in APEX. Any parameter can be passed to any portion of the URL, and the APEX engine will simply accept it as valid.
- Arguments Must Have Checksum: When any parameters or values are passed through the URL, this option requires the URL to contain an additional checksum value. The APEX engine will compare that checksum value to what it expects, and if there is any discrepancy, the page will not be rendered. This option is the most commonly used when adding security to an APEX page.
- No Arguments Allowed: This option prohibits any parameters from being passed via the URL. This includes not only item and value pairs but also request, clear cache, and pagination directives.
- No URL Access: This is the most restrictive of the group; when this is set to No URL Access, the only way to access that specific page is to end up there as the result of an APEX branch. Trying to get to that page by changing the URL to reflect the corresponding page number will fail.
Every page in an application should have its Page Access Protection attribute set to at least Arguments Must Have Checksum. This will trigger any link to this page from a declarative APEX component to automatically include a checksum as part of the link. Even for pages that do not contain items, it is important to set them to Arguments Must Have Checksum as well, since any page can be used to set any item in APEX. For instance, if only the page with the form on it is configured to use Arguments Must Have Checksum, a malicious user could always use a page that is set to Unrestricted to set the item and simply change the URL to return to the page that contains the form to see the potentially unauthorized data.
If any links to this page are produced in a PL/SQL region or as part of a SQL statement, they will need to be modified so that the checksum is included. This is done by passing the URL to the APEX_UTIL.PREPARE_URL API. This API will return a URL that includes the session state protection checksum, starting with the f?p portion. For example, if the URL in Listing 6-4 were passed into the APEX_UTIL.PREPARE_URL API, the result would look similar to that in Listing 6-5.
Listing 6-4. An APEX URL That Passes a Value to P2_EMPNO
f?p=150:2:31029755::::P2_EMPNO:7499
Listing 6-5. An APEX URL That Includes a Checksum Value Appended Automatically or by Calling the APEX_UTIL.PREPARE_URL Function
f?p=150:2:31029755::::P2_EMPNO:7499&cs=314C4BD3626E0E3A29B1FB0
Without the additional checksum or with a manipulated or absent checksum, the page will simply not render, and an error message will be displayed.
Enabling Page Access Protection is a layer of protection that is APEX-specific. Given that it is quick and easy to do, it should be set up for every page within an application. However, it is also worth considering using a database-level data security mechanism as well, such as virtual private database or secure views. These approaches are also relatively simple to set up and will work across platforms, whereas Page Access Protection is APEX-specific. Taking the dual-layer approach is best and ensures that all data is protected from inside and outside of APEX.
You can find more details about Page Access Protection and Item Protection in Chapter 7.
Form Auto Complete
The Form Auto Complete attribute controls whether an APEX page will remember previous values input into the page item and display them in a drop-down list the next time the page is rendered, as illustrated in Figure 6-15.

Figure 6-15 . An APEX item displaying previous values, as Form Auto Complete is enabled
By default, Form Auto Complete is set to On, which can be extremely dangerous. First, if sensitive data such as account or credit card numbers is being collected, the values will be stored on the local PC. This data is not well protected because it can be easily harvested using a tool like Form History Control (https://addons.mozilla.org/en-us/firefox/addon/form-history-control), as illustrated in Figure 6-16.

Figure 6-16 . Using Form History Control, any previously entered value can be easily viewed
Second, since at the HTML form level all APEX item names are the same (p_t01 through p_t200), it would be simple to create a static HTML page using those names and harvest all previously entered values without the need for a particular tool. Listing 6-6 illustrates a simple HTML file that can be loaded into any browser.
Listing 6-6. A Simple HTML File That Can Be Used to Harvest Previously Entered Values from Any APEX Application
<form action="none">
t01<input name="p_t01">
t02<input name="p_t02">
t03<input name="p_t03">
t04<input name="p_t04">
</form>
When this file is run from a browser, the user can place the cursor in any field, hit the down arrow key, and see previously entered values, as shown in Figure 6-17.

Figure 6-17 . Using a simple HTML file, previous values entered into an APEX application can be displayed
Notice that the three values in Figure 6-17—Bob, James, and Scott—are the same three values entered in the APEX applications shown in Figure 6-15.
Because of how easy it is to harvest potentially sensitive information from previously entered values, Form Auto Complete should always be set to Off. When set to Off, an additional parameter will be added to the HTML form tag: autocomplete="off". This directive will prevent the browser from remembering values that are entered into forms on that page, thus preventing them from being later harvested by a malicious user.
Browser Cache
The Browser Cache page-level attribute is the same as the Cache application-level attribute. Essentially, it controls whether pages will be stored in the browser’s local cache. While enabling the user to use the back button, enabling the Browser Cache may also store sensitive data in the browser’s local cache.
At the page level, there are three options for Browser Cache: Enabled, Disabled and Application Default. Enabled and Disabled function the same as the application-level options do. Application Default will defer to the value defined for the application-level Cache attribute.
At the page level, Browser Cache should always be disabled—either by setting the application-level attribute Cache to Disabled and each page-level attribute to Application Default or by setting each page-level attribute to Disabled directly.
Duplicate Submissions
While not directly related to security, the “Allow duplicate page submissions page” attribute is worth mentioning. As the name implies, this attribute determines whether a single page can be submitted more than once. By default, it is set to “Yes—Allow page to be re-posted.” The danger of leaving this attribute enabled is that a user may either accidentally or intentionally try to submit the same form twice. The results of a duplicate submission can vary widely, from nothing at all to charging a user’s credit card twice. Therefore, in most cases this attribute should be disabled by setting it to “No—Prevent page from being re-posted.”
Server Cache
APEX offers a very basic caching feature at the page and region levels. When enabled, APEX will cache the HTML from either the page or the region that was just rendered. On each subsequent page view, if the cache duration has not expired, APEX will use the cached version of the page or region instead of dynamically rendering either.
This feature is useful for poorly performing pages or regions that contain data that does not need to be updated frequently. For example, a page that contains summary reports from yesterday’s data that takes ten seconds to render would be a good candidate for caching.
Since the cache is handled automatically and transparently by APEX on the server side, there is no danger of any users accessing it directly. However, there is one option that could potentially open up a security vulnerability. The Cache by User option determines whether the page cache is created for each individual user or is shared among all users.
By default, this attribute is set to No, meaning that a single cache will be shared among all users. The drawback to this is that if any region or report on the page contained data that was specific to a user, other users would see that data. For example, if one of the cached regions were a report that detailed a specific user’s salary, all users who accessed that page would see the original user’s details because the cache would be created for the first user who accessed the page and then shared with all other users.
If enabling a server cache on a page that contains regions with data specific to individual users, be sure to set the Cache by User option to Yes. This way, each user will have to create their own specific cache that will not be shared with any others.
![]() Note Enkitec eSERT can also provide insight as to which page settings have been secured properly and which have not, allowing the developer to spend time with only those that present a potential vulnerability. Figure 6-18 shows an example summary.
Note Enkitec eSERT can also provide insight as to which page settings have been secured properly and which have not, allowing the developer to spend time with only those that present a potential vulnerability. Figure 6-18 shows an example summary.

Figure 6-18 . A summary of page and region access issues generated by eSERT
All regions—regardless of their type—share some basic security controls. Each region contains a condition, an authorization scheme, and, new in APEX 4.2, a read-only attribute. As each region is generated, each of these attributes is checked to determine whether the region is rendered and, if so, whether to render it in read-only mode.
Conditions
Like most components in APEX, each region contains a condition attribute. When the condition specified returns a TRUE, then that region, as well as any items, buttons, and subregions associated with that region, is rendered on the page. Conversely, when the condition returns a FALSE, that region and any items, buttons, and subregions associated with it do not render.
Many types of conditions are available, as outlined in Listing 6-7. Some are simple and straightforward, whereas others are more complex and require additional data elements. Despite the long list of potential conditions, most developers find that they utilize only a small subset of conditions when building applications.
Listing 6-7. All Available APEX Conditions
- No Condition -
Exists (SQL query returns at least one row)
NOT Exists (SQL query returns no rows)
SQL Expression
PL/SQL Expression
PL/SQL Function Body Returning a Boolean
Request = Expression 1
Request != Expression 1
Request Is Contained within Expression 1
Request Is NOT Contained within Expression 1
Value of Item / Column in Expression 1 = Expression 2
Value of Item / Column in Expression 1 != Expression 2
Value of Item / Column in Expression 1 Is NULL
Value of Item / Column in Expression 1 Is NOT NULL
Value of Item / Column in Expression 1 = Zero
Value of Item / Column in Expression 1 != Zero
Value of Item / Column in Expression 1 Is NULL or Zero
Value of Item / Column in Expression 1 Is NOT null and the Item Is NOT Zero
Value of Item / Column in Expression 1 Contains No Spaces
Value of Item / Column in Expression 1 Is Numeric
Value of Item / Column in Expression 1 Is Not Numeric
Value of Item / Column in Expression 1 Is Alphanumeric
Value of Item / Column in Expression 1 Is Contained within Colon Delimited List in Expression 2
Value of Item / Column in Expression 1 Is NOT Contained within Colon Delimited List in Expression 2
Value of User Preference in Expression 1 = Expression 2
Value of User Preference in Expression 1 != Expression 2
Current page = Expression 1
Current page != Expression 1
Current Page Is Contained Within Expression 1 (comma delimited list of pages)
Current Page Is NOT in Expression 1 (comma delimited list of pages)
Current Page = Page Submitted (this page was posted)
Current Page != Page Submitted (this page was not the page posted)
Current Page Is in Printer Friendly Mode
Current page is NOT in Printer Friendly Mode
Text in Expression 1 Is Contained in Value of Item / Column in Expression 2
Text in Expression 1 Is Contained within the Text in Expression 2
Text in Expression 1 Is NOT Contained within the Text in Expression 2
Text in Expression 1 = Expression 2 (includes &ITEM. substitutions)
Text in Expression 1 != Expression 2 (includes &ITEM. substitutions)
Page/Region is Read Only
Page/Region is NOT Read Only
User is Authenticated (not public)
User is the Public User (user has not authenticated)
Inline Validation Errors Displayed
No Inline Validation Errors Displayed
SQL Reports (OK to show the forward button)
SQL Reports (OK to show the back button)
Client Browser: Mozilla, Netscape 6.x/7x or higher
Client Browser: Microsoft Internet Explorer 5.5, 6.0 or higher
Client Browser: XHTML / CSS capable browser
Client Browser: Other browsers (or older version)
Current Language Is Contained within Expression 1
Current Language Is NOT Contained within Expression 1
Current Language != Expression 1
Current Language = Expression 1
When CGI_ENV DAD_NAME = Expression 1
When CGI_ENV DAD_NAME != Expression 1
When CGI_ENV SERVER_NAME = Expression 1
When CGI_ENV SERVER_NAME != Expression 1
When CGI_ENV HTTP_HOST = Expression 1
When CGI_ENV HTTP_HOST != Expression 1
Never
Always
Despite the lengthy list, all conditions at their core essentially make a PL/SQL call to determine whether the condition is met. This is important to understand because in some cases the business rule at hand may not be able to be evaluated with a single condition. In that case, a condition of type PL/SQL Function Body Returning a Boolean can be used. In the function, multiple checks can be made, and if all checks are successful, the function can return TRUE.
Conditions were designed to facilitate business rules in an APEX application, not security. However, many developers will use them for both. While this does not present any security risk, security rules should be mapped to authorization schemes and conditions should be reserved for business rules as much as possible.
There are multiple benefits for this approach. First, if a condition is used for a security role and later that region needs a business rule associated with it, there is no place to put that business rule. The condition will have to be either moved to an authorization scheme or rewritten to accommodate both business rules and security roles.
Second, consistently using authorization schemes for security roles provides an easier-to-manage and more declarative approach. A developer can query the APEX views to determine which components are associated with which authorization scheme quite easily. It would be a lot more difficult to query the conditions of all components and determine which role they mapped to, because there is no declarative way to do so.
Lastly, using authorization schemes over conditions for security roles makes it a lot easier to map to an external role repository. This enables the role management to occur outside of APEX at a centralized source, such as an LDAP directory, ensuring that all identity management occurs at the same place.
Authorization Schemes
Authorization schemes are used to determine which APEX components an authorized APEX user has access to. They can be associated with every APEX component, from the application itself to a specific column in a report. If the Authorization Scheme setting passes or evaluates to TRUE, then the corresponding APEX components will execute or render. Otherwise, a FALSE is returned, and the corresponding APEX components do not execute or render.
Each region in APEX can have an authorization scheme associated with it. The results of the authorization scheme will determine whether to render the region. The authorization scheme is evaluated independent of the condition, but if either returns a FALSE, the region will not render.
As mentioned in the previous section, security should be mapped to authorization schemes rather than conditions when possible. The benefits of this approach were discussed when discussing the previous attribute, Conditions. For more details on authorization schemes, please refer to Chapter 9.
Read Only
Much like the new page-level attribute, regions in APEX 4.2 also now have a Read Only attribute. When the region-level Read Only attribute returns TRUE, all items within that region will render in read-only mode. When the region-level Read Only attribute returns FALSE, then all items in that region will render normally.
The value for Read Only determined at the region level will override any value determined at the page level. For example, if the page-level Read Only attribute returned TRUE and the region-level Read Only attribute returned FALSE, the items within that region would be editable.
Furthermore, any item that has its Read Only setting set to Never will never render in read-only mode, regardless of what the region or page setting is. You can find more details about the Read Only attribute and how to use the APEX_UTIL.PUBLIC_CHECK_AUTHORIZATION API earlier in this chapter.
Caching
Similar to page-level caching, an APEX region can also be cached. When enabled, APEX will cache the HTML from the corresponding region the first time it is rendered. On each subsequent view, the cache will be used until it expires, thus increasing performance of that region.
When using region caching with a report, only the first set of rows displayed in the region is cached. For example, if the report contains 10,000 records displayed in sets of 15, only those first 15 records are cached. As soon as the user clicks the pagination controls, APEX will have to dynamically fetch the next set of records.
When enabling the region cache, there are two options to choose from: Cached and Cached by User. Selecting Cached will create a single cached region that will be reused among all users of an application. This can have security implications if the data in the region is specific and private to the end user. The Cached by User option is much more secure but potentially less efficient because a new cache will be created for each individual user who renders the region. However, with this option, data specific to a user will not be shared among other users of the application. Thus, when caching regions, ensure that the Cached by User option is selected.
The four region settings in the previous section are available in any and all types of regions in APEX. When using reports, there are a few additional attributes that need to be secured as well. Most of them have to do with being able to download the contents of a report to a CSV or other type of file. While this feature does add convenience for the developer and takes just seconds to enable, it does so at a potentially great cost. Chapter 10 outlines some techniques to apply to applications to make downloading data much more secure and regulated.
The adoption rate of mobile applications is off the charts. From Facebook to banking and from video games to travel planning, virtually every facet of our lives can be planned, purchased, and monitored from a mobile platform. As smartphones become cheaper and more common, this adoption rate will continue to skyrocket.
Hesitancy Toward Corporate Adoption
Despite the explosive growth on the personal side, corporations have been a little more hesitant to adopt mobile applications. There are a couple of major reasons for this. First, corporations are always concerned about security. Let’s face it: you’re far more likely to leave your mobile phone than you are your laptop at a restaurant or on a plane. Because of this risk, many have been reluctant to extend their enterprise to a device that they have little direct control over.
Second, custom native mobile application development is not cheap. Before even starting to develop a native application, a choice needs to be made as to which platform or platforms to develop on—Android, iOS, Windows Mobile, or BlackBerry. Each additional platform will obviously require more resources and take more time to develop, not to mention the additional associated maintenance costs. To further complicate this approach, many organizations are allowing employees to bring their own device (BYOD). This will guarantee a mix of different platforms, making it impractical to support all of them natively.
Another approach to mobile development is to build an HTML-based application that runs on the smartphone’s browser. With this approach, a single application can run on any popular device, regardless of the platform. This greatly reduces the time and cost to develop and maintain each application. As new devices are introduced, it matters little as which operating system they run on, so as long as they have a modern, standards-compliant browser.
This is the approach that APEX has taken—HTML-based mobile applications that will run on virtually any modern smartphone. To achieve this, APEX incorporates the jQuery Mobile framework. This framework is designed to work properly and securely on all modern mobile browser platforms. Since APEX utilizes it, any APEX application that uses jQuery Mobile will also be able to run on all modern mobile browsers. While APEX 4.1 introduced loose integration with jQuery Mobile, APEX 4.2 is the first release that is truly mobile-ready right out of the box. With APEX 4.2 and absolutely no knowledge of jQuery mobile or HTML, it is possible to build robust, fully functional mobile applications that run on all popular smartphones.
The beauty of this approach is that as an APEX developer, there is almost nothing additional to learn. APEX mobile applications are designed in the same development environment as their desktop counterparts. They can call the same PL/SQL packages, write to the same tables, and be deployed on the same server because they are technically an APEX application with a different set of mobile-optimized templates. Because of this, nearly every single concept and technique discussed in this book also applies to mobile development. The few that differ are highlighted in the next few paragraphs.
Mobile Considerations for Security
Without getting into the specifics of mobile application development design techniques, there are a few high-level concepts that are important to consider from a security point of view. First, there are a couple of different methods to build a mobile application. One method, which is used in some of the Oracle packaged applications, is to include both a desktop and mobile interface in a single application. Another method is to use a separate application for mobile entirely.
On the surface, the integrated approach may seem like the better choice. A single application is perfectly capable of running in either desktop or mobile mode, thanks to a new feature introduced in APEX 4.2. One application is also less to manage over two applications. But dig a little deeper, and some of the flaws of this approach become apparent.
First, the users of a desktop application may or may not be the same as the users of a mobile application. In many cases, it is a subset of users. If that is the case, additional care must be taken to ensure that both the mobile and desktop pages have the proper authorization scheme associated with them so that each is secured based on the corresponding group of authorized users. It is much easier to manage two distinct user lists—desktop and mobile—and associate one with the corresponding application. This way, as either application is expanded, there is less work to do in order to ensure that new pages are associated with the corresponding authorization scheme.
Second, most mobile applications offer a subset of transactions of their desktop counterparts. Given that, mobile applications will typically need to access less of the schema as their desktop applications. In fact, some mobile applications may be largely read-only, with only a screen or two that can update the database. By creating a separate mobile application, a different, much more limited parse-as schema can be associated with it. This will ensure that even if a user discovers a vulnerability, the potential damage that can be done will be mitigated by the limited privilege schema. Chapter 13 discussed this technique, called a shadow schema, in more detail.
Third, having the mobile application separate from the desktop application allows the developer to adjust the session idle time and duration. For desktop application, it is common to allow the length of a session to span eight hours, or a typical workday. This way, a user can sign in to the application in the morning and potentially not have to sign in again all day. Additionally, the session idle time is typically set to around one hour. For mobile applications—which have much more brief use patterns—these values should be greatly reduced. Depending on specific security requirements and the sensitivity of the data, the total session time may span only 20 or 30 minutes, while the idle time may be set to as low as 5 minutes. This guarantees that if a phone is in fact lost, by the time someone finds it and potentially accesses the browser, the duration of the session idle time will have been exceeded, and the user will automatically be logged out of the application.
Lastly, and perhaps the least related to security, is the overall maintenance of the mobile application. If the mobile application is separated from the desktop application, then bugs and enhancements in each can be made independent of one another. An issue in the mobile application can quickly be fixed and deployed, regardless as to what is currently being worked on in the desktop application.
Both methods of supporting mobile can be properly secured and managed. The integrated approach often requires more work and maintenance but also allows for a single application that supports both mobile and desktop applications. If the users for each interface are the same, then this method works well. However, the second method offers a strong case, especially when looking at it from a security point of view. No matter which one is used, at the end of the day, they are both APEX applications, and the same secure best practices and techniques should be applied to either.
It is worth repeating that requiring mobile applications to run over HTTPS is absolutely essential. Keep in mind that many users of mobile devices will jump onto a WiFi hotspot when they can in order to get better performance. In most cases, these hotspots are completely unencrypted. Using HTTPS is essential in these cases because being connected to the hotspot over HTTP only means network packets that are sent in the clear can easily be viewed by others.
Summary
Configuring application, page, and regions settings is one of the easier phases of securing APEX applications because most of the attributes have a finite list of values to choose from. Despite this, these settings are also critical to be secured. If any number of application- or page-level attributes are configured incorrectly, the results could be disastrous because these attributes apply to either the application itself or the contents of a specific page or pages.
Using an automated tool such as Enkitec eSERT is also recommended because it will not skip anything and will save a great deal of time in evaluating an application for improper application and page settings. eSERT will also provide guidance as to why an attribute is important and also how to fix it if a vulnerability is detected.