
![]()
If you have read every other chapter in this book, you should have a relatively good grasp on what needs to be done to properly secure an APEX application. Each previous chapter focused on proper settings, planning, or techniques that, when implemented, will provide a solid and secure foundation for your applications. These techniques include things such as authentication, authorization, data security, and tamper-proofing an application. The common thread with these techniques is that they are designed to manage the day-to-day, normal, secure operations of your applications.
The last component of security in this book—encryption—has a different purpose. Encryption is a mathematical formula that, when applied to data in combination with a key, renders the data unreadable. Only those who possess the key can reverse the process and reveal the original data. Encryption should be applied to sensitive data so that if the data ends up in the wrong hands, it cannot be read. This applies to both while the data is in transit and when the data is at rest.
This chapter revisits and emphasizes using HTTPS, highlighting specific places in APEX that are designed to enforce its use. It then covers how to encrypt APEX item vales that are stored in session state, illustrating how other users can see these values when encryption is not applied. Next, it covers different techniques and technologies that can be used to encrypt data as it is stored in the database, APEX collections, and even backup files. It concludes with a summary of the Advanced Security Option and the benefits that that feature brings when it comes to securing your data.
Encryption
The path that data takes in a web-based application is quite predictable. Most data originates at the end user’s PC and then travels over some sort of network to the web server. From there, the web server will pass the data back to the database, where in an APEX environment, it will initially be stored in a user’s session state. Upon a commit, the data will then be written to both the redo logs and the database files. Finally, the redo logs will occasionally be copied to archive log files. Each time the data travels from one point to another, it is susceptible to being intercepted, as shown in Figure 14-1.

Figure 14-1 . Points at which unencrypted data can be vulnerable
As developers, it is our responsibility to ensure that all precautions are taken so that the data is encrypted not only while it’s in transit but also when it arrives at its final destination. Unfortunately, there is no single technology or feature that can be enabled that will ensure that data is encrypted from end to end. Instead, a combination of features and techniques must be implemented and configured to provide end-to-end encryption of the data, as illustrated in Figure 14-2.

Figure 14-2 . Different technologies and features are used to encrypt data at different points of its journey
Each of these features or techniques is covered in this chapter, starting with HTTPS and concluding with Transparent Data Encryption. In some cases, the specifics on how to implement a feature are out of scope for this book. In those cases, references to other documents with more specifics are provided.
One final point about encryption: it is not a substitute for data access control but rather a mechanism put in place to protect data that may be stolen. It is important to manage data access control with either a secure view, VPD, or Oracle Label Security combined with authorization schemes to limit what a specific user can do. Relying on encryption to provide data access control is a bad design decision.
HTTPS
The importance of using HTTPSin each and every APEX environment—development, test, QA, and production—simply cannot be overstated. HTTPS ensures that all data sent from your browser to the web server is encrypted. This way, anyone who is sniffing the network packets will not be able to read the data sent. When running over only HTTP, it is possible that a malicious user could intercept the data that is being sent either to or from the web server.
Packet Peeper is an open source network packet sniffer available for Mac OS X. (For an open source alternative that runs on all popular platforms, take a look at Wireshark.) Within seconds of downloading and installing Packet Peeper, it is possible to begin capturing and analyzing network packets, all with just a single click of the mouse. The results are simple text files that can easily be saved and searched at any time.
After capturing some network traffic, Packet Peeper will display a list of the captured data, as shown in Figure 14-3. In this example, a simple authentication to an APEX workspace was captured. Simply click any of the rows to see a snippet of that specific capture. Data can also be sorted by length, making it easier to identify potentially valuable packets by their larger sizes.
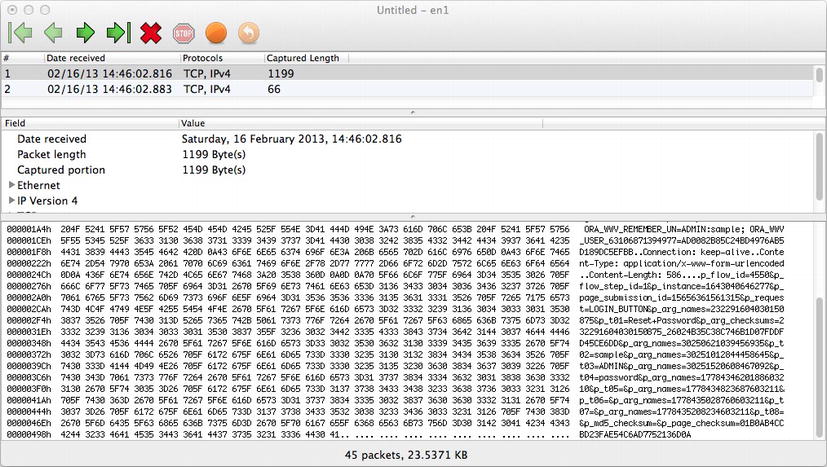
Figure 14-3 . A packet capture from Packet Peeper
By right-clicking any element and selecting Reassemble TCP Stream, a much easier-to-read version of the packet will be displayed, as shown in Figure 14-4.

Figure 14-4 . The raw text from a Packet Peeper capture of traffic over HTTP, with the reference to APEX credentials highlighted
After a closer inspection, you can see that the highlighted section of Figure 14-4 contains the workspace, user name, and password used to authenticate to an APEX workspace. For clarity’s sake, you can see the highlighted snippet in Listing 14-1.
Listing 14-1. The Highlighted Region from Figure 14-4, with the Values of the Workspace, User Name, and Password Underlined
&p_t02=sample&p_arg_names=30251012844458645
&p_t03=ADMIN&p_arg_names=30251520608467092
&p_t04=password&p_arg_names=1778434620188603210
If this were a real attack, the perpetrator would have all they needed to log into this APEX workspace as the ADMIN user. Fortunately, this problem is quite simple to solve: use HTTPS. When the same actions are taken over HTTPS, the results are dramatically different. No longer is any identifiable information captured, but rather a bunch of garbage characters is the only result in Packet Peeper, as shown in Figure 14-5.

Figure 14-5 . The raw text from a Packet Peeper capture over HTTPS. Notice that there are no readable or identifyable strings in the raw text
This time, since all the data sent across the network is encrypted, Packet Peeper is unable to capture anything meaningful. The only data that it did capture is simply a bunch of garbage characters that cannot be read by anyone.
HTTPS should be installed and enforced on every APEX instance, no matter what its purpose. All too often, developers will use the same credentials on a development instance as they will on a QA or even production instance. Thus, if the development instance is not using HTTPS, user credentials can be sniffed there and simply reused on the QA or even production instances.
APEX HTTPS Settings
HTTPS needs to be installed and configured at the web server tier, not from within APEX. Depending on the web server used, the specific instructions on how to configure HTTPS will vary slightly. All of the supported web listeners are capable of running HTTPS, with the exception of the APEX Listener in Standalone mode. Once HTTPS is installed and configured, there are a few places within APEX that can be configured to ensure that the user is coming over a secured connection.
Instance Admin Console and Application Development Environment
The entire instance can be configured so that any attempt to access the instance administration console or application development environment over HTTP will be refused. This setting must be managed by an instance administrator and can be found in the Security section of Instance Settings, as illustrated in Figure 14-6. A similar setting exists for outbound communications, such as calls to web services. These settings have no impact on applications developed with APEX. Refer to the next section for information about requiring a developed application to require HTTPS.
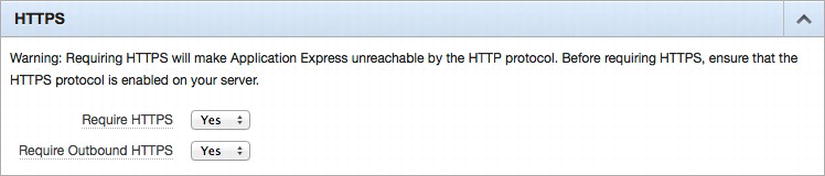
Figure 14-6 . Configuring an instance of APEX to require HTTPS for both inbound and outbound transactions
Before enabling either of these settings, be sure to test and ensure that your instance of APEX and any associated web service can be reached over HTTPS. If the Require HTTPS setting is enabled and the instance of APEX cannot be accessed over HTTPS for some reason, it can be reverted by calling the APEX_INSTANCE_ADMIN.SET_PARAMETER API, as illustrated in Listing 14-2.
Listing 14-2. Resetting the Require HTTPS Parameter via the APEX_INSTANCE_ADMIN API
APEX_INSTANCE_ADMIN.SET_PARAMETER
     (
     p_parameter => 'REQUIRE_HTTPS',
     p_value => 'N'
     );
Calling APEX_INSTANCE_ADMIN must be done from SYS, SYSTEM, or any other schema that has been granted the APEX_ADMINISTRATOR_ROLE role.
Applications
Each application has a setting that will require that it be accessed over HTTPS, similar to the workspace-level Require HTTPS attribute. However, the name and the location of that setting are anything but obvious. Called simply Secure, this setting can be found embedded within an authentication scheme in the Secure Cookie Attributes section, as shown in Figure 14-7.
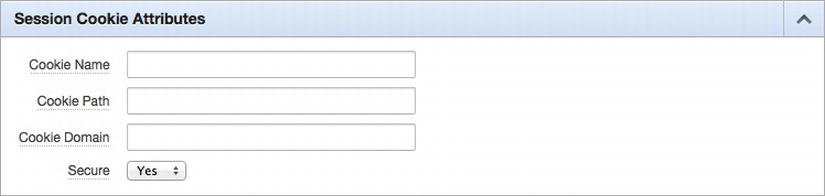
Figure 14-7 . The Secure attribute, which, when enabled, will require application to run over HTTPS
When set to Yes, the corresponding application can be accessed only over HTTPS. This ensures that a network sniffer cannot compromise the session cookie that APEX sends to the client. Additionally, by running over HTTPS, any sensitive information displayed via an APEX form or report will also be encrypted. Most browsers also will prevent pages run over HTTPS from being cached, too.
APEX Item Encryption
APEX has a robust session state management component that is completely integrated into both APEX itself as well as any application developed with APEX. It does not require any code or configuration to enable it; it simply works. In fact, most developers will quickly learn how to use and take advantage of it within their own applications by using the associated APIs.
One of the major benefits of APEX’s session state is that it keeps values from one session completely isolated from all other sessions. Therefore, there is no chance that one user in an application can view the values set by another user in the same or even different application. Again, this level of security is automatically enabled, and nothing special needs to be done to take advantage of it.
However, it is possible for others to see the data stored in APEX session state. Any workspace administrator or developer can run the Active Sessions report from the Administration section of a workspace, which will display all information about all active sessions. It will also allow the user to inspect that session’s page views, browser details, and item values. When the Monitor attribute is set to Session State Details, as it is in Figure 14-8, all currently set items in that session state will be displayed.

Figure 14-8 . The Active Sessions report, as viewed by an APEX developer
While there is no similar report available to the instance administrator, they can easily create an account in any workspace, log in to that, and then view any session details in any application within the instance of APEX.
Additionally, all values for APEX session state are stored in a table called WWV_FLOW_DATA, which can be found in the APEX_040200 schema. This table is adequately secured so that other schemas cannot view it. However, SYS, SYSTEM, and schemas that have been granted DBA can still view all data stored there and potentially see sensitive information. Listing 14-3 shows a simple SQL query that will return the value of an APEX item called P3_SAL from application 159, if run by SYS, SYSTEM, or any schema with the DBA role.
Listing 14-3. A SQL Statement That Will Display the Value of an APEX Session State Item
SELECT
  flow_id application_id,
  item_name,
  is_encrypted,
  item_value
FROM
  wwv_flow_data
WHERE
  item_name = 'P3_SAL'
SQL> /

APPLICATION_ID ITEM_NAME       IS_ENCRYPTED  ITEM_VALUE
-------------- --------------- ------------- ----------
           159 P3_SAL          N                   5500
To combat this threat, there is an item-level attribute in APEX that, when enabled, will store all session state values in an encrypted format. To enable this attribute, edit any item in your application, and in the Security region, set the value of “Store value encrypted in session state” to Yes, as shown in Figure 14-9; then save your changes.
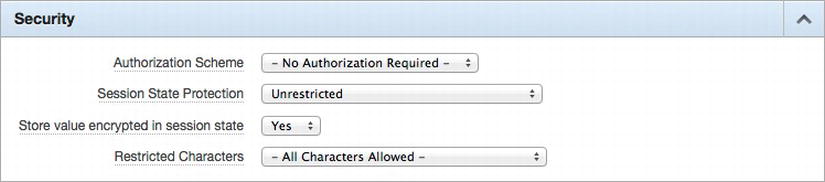
Figure 14-9 . Enabling item-level encryption
Once enabled, APEX will store any value associated with that item in an encrypted format. As a developer, there is nothing at all that needs to be changed in code that refers to that item, regardless of how it is done. APEX will automatically decrypt the value when the item is referenced anywhere within a report or programmatically via one of the APIs.
If the same Active Sessions report is run after item encryption is enabled on P3_EMP, the value of that item is no longer displayed. Rather, the Item Value column for P3_EMP is set to *****, denoting that the value of this item has been encrypted, as shown in Figure 14-10.

Figure 14-10 . The Active Sessions report, after item-level encryption has been enabled for P3_SAL. Notice that the value of P3_SAL is displayed as *****, denoting that it is encrypted
Also, the same SQL statement in Listing 14-3 will return the raw encrypted value of the item P3_EMP, as shown in Listing 14-4. Once encrypted in APEX session state, sensitive values will always be encrypted as they are written to redo logs, then written to database files, and ultimately backed up, ensuring that no one will be able to view sensitive data at any point in the chain of ownership of an application’s data.
Listing 14-4. The Same SQL Statement as Listing 14-3, This Time Returning the Raw Encrypted Value of P3_SAL
SELECT
  flow_id application_id,
  item_name,
  is_encrypted,
  item_value
FROM
  wwv_flow_data
WHERE
  item_name = 'P3_SAL'
SQL> /

APPLICATION_ID ITEM_NAME  IS_ENCRYPTED  ITEM_VALUE
-------------- ---------- ------------- ----------------
           159 P3_SAL                 N 9839BEFE425E74DX
                                        5C0318373DE67FCD
                                        C8B66BEF97B13AB3
Enabling item encryption is a simple, unobtrusive feature that should be done for any item that could store sensitive data. Even though APEX has plenty of safeguards to ensure that data is protected from other users, a malicious APEX developer or DBA could still easily view any data stored unencrypted in APEX session state.
Data Encryption
Encrypting sensitive data in APEX session state is sufficient protection against curious APEX developers and even DBAs, but at the end of the day, that data will eventually end up in a regular table outside of the APEX schema. Sensitive data that must be stored in a more permanent manner—such as credit card numbers, account numbers, and Social Security numbers—should also be encrypted so that if the database itself is compromised, it will be protected. In fact, in some industries, there are laws that dictate what type of data must be encrypted.
With Oracle, there are a couple of different mechanisms that can be used to facilitate the actual encryption. Which one you use will largely depend on one thing: how much money you want to spend.
DBMS_CRYPTO
The DBMS_CRYPTO packageis included with all editions of the database—Standard One, Standard, and Enterprise. Prior to Oracle 10g, this package was referred to as DBMS_OBFUSCATION_TOOLKIT. DBMS_CRYPTO contains a number of API calls that can be used to both encrypt and decrypt your data before it is stored in a table. No matter how it is implemented, there will be three challenges when using DBMS_CRYPTO: how to integrate it into your applications, where to store the key, and what performance impacts using it will have.
First, implementing DBMS_CRYPTO requires some planning because calling the API to encrypt and decrypt the data will be the sole responsibility of the developer. Each time before sensitive data is written to a table, a separate call must be made to encrypt the data. And on the other side, each time encrypted data is fetched from the table and used in any way—be it a report, form, chart, or procedure—another call must be made to decrypt the data.
Encrypted data is always returned in a binary format. Therefore, to store it, either a RAW or BLOB column must be used. If the base tables of your applications do not have a RAW or BLOB column—and they probably don’t—then one must be added. If adding such a column is simply not possible, then the encrypted data can be converted back to text and stored in a VARCHAR or VARCHAR2 format, but this takes yet another procedure call and additional code to facilitate.
The second challenge when using DBMS_CRYPTO is where to store the key. Encryption is a two-way algorithm—anything that can be encrypted can also be decrypted, so as long as you have the key used to encrypt it in the first place. Thus, when calling your procedure to either encrypt or decrypt your data, the key must be retrieved and used as part of that procedure. If that key were compromised, a malicious user would be able to decrypt all of the data, making the encryption a mere inconvenience.
One recommendation is to store the key in a separate schema that is otherwise completely locked down. That schema could have a single procedure that, when called by an authorized application, either encrypts or decrypts the data and returns the corresponding value. The key could be embedded in that procedure and then that procedure could be wrapped for an added level of protection. However, if a competent malicious user were able to somehow access that schema, they may still be able to gain access to the key. Even if the key is stored outside of the database, it would still need to be accessed and retrieved every time that encrypted data was used in the application, making the management of external keys difficult.
Lastly, and probably the least critical of the three drawbacks of using DBMS_CRYPTO, is the performance impact it may have. Calling additional APIs each time encrypted data is accessed is going to add to the total amount of processing required for your application, as compared to using Transparent Data Encryption. How much it impacts performance will of course depend on a number of factors, such as size of data, number of page views, and number of times DBMS_CRYPTO is referenced.
Using DBMS_CRYPTO definitely comes with some baggage. In some cases, this baggage may cause a developer to consider an alternative approach. One such approach is to use the Advanced Security Option (ASO), which is a for-cost option of the Enterprise Edition of the database. ASO can transparently encrypt data in either a column or an entire tablespace and protect the network connection between the web server and database, among other things. It can do all of this transparently, without changing a single line of code, and uses Oracle Wallet to store keys securely outside of the database.
However, ASO does come at a cost—the list price is $11,500 USD per processor as of early 2013. While that may seem excessive and even unaffordable, consider the cost of implementing the same or similar solution on your own. It can quickly seem like a better deal when approached from the “what if I were to build that” angle, especially when it comes to something that has to be correct like security.
As discussed in the first couple of chapters, there is no hard formula that can be applied to determine whether ASO is required. It is a combination of a number of factors, one of which includes the associated security budget. If purchasing ASO is simply not possible, then a solution built using DBMS_CRYPTO should be considered because despite its drawbacks, it is much better to deploy than no encryption.
Encrypted Collections
Since APEX sessions do not map directly to a database session, it is simply not possible to use a construct such as a global temporary table to store data temporarily. Thus, the developers of APEX created a feature called collections. Collections are essentially temporary tables that are mapped to and secured by an APEX session. While data in a collection can be seen by querying the view APEX_COLLECTIONS, all inserts, updates, and deletes are facilitated by the APEX_COLLECTION API.
APEX_COLLECTIONS, which is actually a public synonym for the view APEX_040200.WWV_FLOW_COLLECTIONS, contains a number of generic columns, namely, fifty VARCHAR2, five NUMBER, five DATE, and one of each of a CLOB, BLOB, and XMLTYPE. Developers can use any of these columns to temporarily store and retrieve data from within their applications. An example of APEX collections is an application that uses a shopping cart. Items placed in the shopping cart are associated with the user’s specific session. Only when the user actually checks out are the rows in the collection copied to a table in the parse-as schema of the application.
The WWV_FLOW_COLLECTIONS view joins the two collections base tables—WWV_FLOW_COLLECTIONS$ and WWV_FLOW_COLLECTION_MEMBERS$—together so that the only data returned is the data associated with that APEX session. All data stored in a collection is done so in an unencrypted fashion. Thus, any data that ends up in a collection in an APEX application will persist in that collection unencrypted for up to a day, when the collections are typically purged. Additionally, collection data will also be written to redo logs, database files, and backups, where it may remain unprotected permanently.
Therefore, if an application is going to use a collection to store sensitive information, steps should be taken to ensure that the data is first encrypted. In this case, DBMS_CRYPTO may be the only practical option. Ideally, column encryption—a feature of the Advanced Security Option discussed in the next section—would be used. However, column encryption requires that the base tables used for collections be altered, which could jeopardize the support status of your instance of APEX. Transparent Data Encryption may also seem like an option, but that would need to have been decided when installing APEX, because it would encrypt the data files used in the tablespace that APEX is associated with.
When using DBMS_CRYPTO with collections, the three drawbacks previously outlined still exist, but none of them is nearly as severe. Manipulating APEX collections requires calls to APIs. Thus, the burden of additional code is already there when using collections. Adding a line or two to ensure that data is encrypted to an existing procedure is a lot easier than having to create the procedures from scratch.
The problem of key management is also a bit easier when it comes to collections. Since collections are temporary data structures, their associated keys can also be temporary. For instance, the key associated with a collection can be created and stored as an APEX application page item with encryption enabled and used through that specific session. Once the session is terminated, so is the collection and APEX item value; thus, the key is no longer needed.
Only the issue with performance still exists, and unfortunately, there is no way to mitigate or change this. Each time a value needs to be encrypted or decrypted, a call to DBMS_CRYPTO will still be necessary. There is simply no way to avoid this, but in most cases, the performance impact will be minimal, if noticeable at all.
Example
To illustrate how encrypted collections could be implemented, a simple application with an encrypted collection based on the EMP table will be created. To encrypt and decrypt the data, a package with calls to DBMS_CRYPTO is required. The package in Listing 14-5 contains two functions—encrypt_data and decrypt_data—which are used to encrypt and decrypt data, respectively. Be sure that the schema in which this package will be created has been granted EXECUTE on DBMS_CRYPTO prior to creating it.
Listing 14-5. The encrypt_collection_pkg Package
CREATE OR REPLACE PACKAGE encrypt_collection_pkg
AS
FUNCTION encrypt_data
  (
  p_data IN VARCHAR2
  )
RETURN RAW;

FUNCTION decrypt_data
  (
  p_data IN RAW
  )
RETURN VARCHAR2;

END encrypt_collection_pkg;
/

CREATE OR REPLACE PACKAGE BODY encrypt_collection_pkg
AS
  g_character_set    VARCHAR2(10)  := 'AL32UTF8';
  g_encryption_type  PLS_INTEGER   :=
    dbms_crypto.encrypt_aes256 +
    dbms_crypto.chain_cbc +
    dbms_crypto.pad_pkcs5;
  g_key              RAW(32)       :=
    UTL_I18N.STRING_TO_RAW(v('P1_EMP_KEY'));

FUNCTION encrypt_data
  (p_data IN VARCHAR2)
RETURN RAW
IS
BEGIN

RETURN dbms_crypto.encrypt
  (
  src => utl_i18n.string_to_raw
    (
    data        => p_data,
    dst_charset => g_character_set
    ),
  typ => g_encryption_type,
  key => g_key
  );

END encrypt_data;

FUNCTION decrypt_data
  (p_data IN RAW)
RETURN VARCHAR2
IS
BEGIN

RETURN utl_i18n.raw_to_char
  (
  data        => dbms_crypto.decrypt
    (
    src => p_data,
    typ => g_encryption_type,
    key => g_key
    ),
  src_charset => g_character_set
  );
EXCEPTION
WHEN OTHERS THEN
  raise_application_error(-20000,'Invalid Key.'),
END decrypt_data;

END encrypt_collection_pkg;
/
The functions in encrypt_collection_pkg are little more than calls to DBMS_CRYPTO, with a couple of exceptions worth noting. First, the key will be stored in a page item called P1_EMP_KEY. Putting the key in a page item versus an application item allows for it to be itself encrypted, because only page items have that ability. Second, the encryption type used is stored in the package constant g_encryption_type. This can be altered as needed, depending on the specific needs of the application.
Once the package is created, create a new APEX application with a single blank page. On that page, create a report based on the SQL in Listing 14-6.
Listing 14-6. The SQL for the Report on Page 1 of the Application
SELECT
  c001,
  c002,
  encrypt_collection_pkg.decrypt_data(blob001) sal
FROM
  apex_collections
WHERE
  collection_name = 'EMP_E'
This SQL will query the APEX_COLLECTIONS view for the collection called EMP_E. It will also use the decrypt_data function on the BLOB column, which will decrypt any data stored there and display it in the report.
Next, create a hidden page item in the report region called P1_EMP_KEY, which will be used to store the key that is referenced by the encrypt_collection_pkg package. This item should have its value both protected and encrypted. The item protection will prevent the user from modifying it, while the encryption will prevent the user from being able to view the key.
At some point in your application, there will be code to populate the collection with data. This may be done as items are added to a shopping cart or as the users select rows in a report. No matter how the collection gets populated, it can be done so only by calling either the APEX_COLLECTION.ADD_MEMBER or ADD_MEMBERS API. In this example, you will simulate this event by creating and calling an application process that executes after a button has been clicked.
Next, create a button in the report region that will submit the page and name it Seed Collection or something similar. The name and layout position of the button are not important. After the button is created, create a page process by right-clicking the Processing node in the Page Processing region, as shown in Figure 14-11.

Figure 14-11 . Creating a page process to seed the encrypted collection
For the process type, select PL/SQL. On the next screen, give the process a name, such as seed encrypted collection, and click Next. Copy the code from Listing 14-7 into the region labeled Enter PL/SQL Page Process, and click Next.
Listing 14-7. The Source for the Page Process Used to Seed the Encrypted Collection
apex_collection.create_or_truncate_collection
  (
  p_collection_name => 'EMP_E'
  );

FOR x IN (SELECT * FROM emp)
LOOP
  apex_collection.add_member
  (
    p_collection_name => 'EMP_E',
    p_c001 => x.empno,
    p_c002 => x.ename,
    p_blob001 => encrypt_collection_pkg.encrypt_data(x.sal)
  );
END LOOP;
There is no need to enter a value for the success or failure messages, so simply click Next. Finally, ensure that the value of the attribute When Button Pressed is set to the button created in the previous step. Click Create Process to finish.
One last component needs to be created before the example will function properly. Navigate to the shared components of your application, and click Application Computations. Create a new application computation by clicking the Create button. Set Computation Item to P1_EMP_KEY, ensure that Computation Point is set to On New Instance (new session), set the computation type to SQL Query (return single value), and then copy the code from Listing 14-8 into the Computation region.
Listing 14-8. The Source of the Application ComputationUsed to Calculate P1_EMP_KEY
SELECT dbms_random.string('A',32) FROM dual
Click Create Computation when done. This computation will set the key with a random value each time the user logs in. Because the key is going to be used only to secure collections—which are also session-based—there is no need to store the key permanently anywhere because each session will get its own unique key.
When the application is run, there should initially be no rows in the report. To populate it, click the Seed Collection button. This will call the page process that loops through the EMP table and inserts a row into the collection for each row in EMP. The value of the SAL column will be encrypted before being stored in the collection. When the page reloads, the report will now contain data from the EMP table and will resemble Figure 14-12.

Figure 14-12 . The report on the EMP_E encrypted collection
The results of the report after the collection populated are not terribly impressive. In fact, it looks like a simple query directly against the EMP table. However, if the SQL used in the report is altered to include the raw data from the column used to store the encrypted value of the SAL column, things will look different. Edit the report in your application and replace all of the SQL there with that in Listing 14-9.
Listing 14-9. An Updated Version of the SQL Used for the Report on Page 1 of the Application
SELECT
  c001,
  c002,
  encrypt_collection_pkg.decrypt_data(blob001) sal,
  utl_i18n.raw_to_char
    (
    data => blob001,
    src_charset => 'AL32UTF8'
    ) sal_encrypted
FROM
  apex_collections
WHERE
  collection_name = 'EMP_E'
Notice the additional column—sal_encrypted—in this version of the SQL. This column will call an API to convert the stored encrypted value to a VARCHAR so that it can be displayed on a report. When run, the report with the updated SQL will look similar to Figure 14-13.

Figure 14-13 . The report on the encrypted collection, this time displaying the raw encrypted colum values
Clearly, the encrypted SAL column has no resemblance to the unencrypted SAL column at all. And without the key—which is stored in encrypted format in APEX session state—there is no way that a malicious user would be able to decrypt those values.
To summarize, implementing collections that incorporate encryption is not a lot of additional work because code is required to manage collections anyway. The problem of storing the key is also solved because it can be randomly generated and then discarded after the duration of the APEX session. Anytime that sensitive data is stored in a collection, the incremental extra effort to ensure that it is encrypted is essential.
Advanced Security Option
The Advanced Security Option is a for-cost feature of the Oracle Database Enterprise Edition only. If you are using either Standard Edition One or Standard Edition, this feature is not available. ASO provides a number of advanced security features that complement the security provided by the database. In regard to APEX applications, there are three main features that are most commonly used: Transparent Data Encryption, column encryption, and network encryption.
Transparent Data Encryption
Transparent Data Encryption (TDE) is a feature of ASO that encrypts either a specific column or an entire tablespace automatically and transparently. The three major shortcomings of using DBMS_CRYPTO are all resolved with TDE. Implementing TDE is completely transparent to all applications; no triggers, views, or additional PL/SQL code is required. Also, storing a key with TDE is more secure because the keys can be stored outside the database and secured via Oracle Wallet Manager. And third, there is little performance impact when using TDE, since the encryption is done at the data file level. When using specific hardware, TDE can even take advantage of hardware acceleration when encrypting and decrypting data, thus making the performance hit negligible.
TDE can be divided into two components: column-level encryption and tablespace encryption. When enabled, column-level encryption will automatically encrypt the values of the columns that it is associated with. Additionally, when the column values are read into the SGA, they will be encrypted there, too. Any undo or redo associated with the column will also be encrypted, ensuring that the data is protected throughout.
Column-level encryptionis much preferred over DBMS_CRYPTO for securing data stored in a column, given that the three major drawbacks of DBMS_CRYPTO are not an issue. Also, the fact that column-level encryption can be enabled without changing any code or adding any additional objects is a clear benefit, since the data will be secured when any application—APEX or otherwise—accesses the data.
Tablespace-level encryptionis an option that has to be defined before creating a tablespace. Existing tablespaces cannot simply be converted to encrypted ones. Essentially, tablespace encryption will automatically and transparently encrypt all data before writing it to disk and decrypt it as it reads it. While both undo and redo logs are encrypted, the data cached in the SGA from an encrypted tablespace is not.
When using either of these features with APEX, there are no special considerations because they are truly transparent in nature. Simply enable them as you would for any other development tool. You can find more details about the specifics required to configure TDE in the Oracle Database Advanced Security Administrator’s Guide.
Network Encryption
Another component of TDE is network encryption, which ensures that all network traffic from a web server or the APEX listener is encrypted as it travels to the database server. Like TDE, no changes to the application are required. Once enabled, network encryption will instantly and automatically begin encrypting packets with a configurable algorithm, such as AES, Triple DES, and RC4.
Think of network encryption as HTTPS for the connection between the web server and the database because that is essentially what it does. Network encryption is an essential component when securing APEX, because without it, there is a noticeable gap. Even though the distance that the packets need to travel from the web server to the database may be short, if a malicious user were to gain access to that part of the network, he would be able to sniff and read the contents of those packets.
Summary
Applications come and go, but data lives forever, as the saying goes. Given that fact, you must take precautions to ensure that sensitive data that does live forever does so with adequate protection. Applying encryption at all points along the path that the data will travel is the only way to ensure that it is not compromised either while in transit or at rest. Unfortunately, there is no single, turnkey solution to do this; rather, a number of different features and techniques need to be applied, as outlined in this chapter.