
![]()
In this chapter, we will expand on your knowledge of Java applications by showing how to instantiate (create) an object and demonstrating how constructors work. We will highlight the key differences between running a Java class as an application and creating an object. We will also provide a more detailed explanation of how Java “works” and “what comes with” Java. This explanation will also cover what really happened when you clicked buttons and chose RAD (Rational Application Developer) options in the previous chapter. In addition, we will explore some online documentation that explains the classes that “come with” Java.
After completing the chapter, you should understand the following:
- Instantiation and objects
- The SDK, JVM, and JRE
- Bytecode
- .java and .class files
Compiling Using WebSphere, you will be able to:
- Create Java classes that pass and receive parameters
Java Applications
In the previous chapter, the Java class EmployeeApp was created to be run as a Java application (i.e., EmployeeApp had a main method). In the real world, very few Java classes are run as applications. Most Java classes are instantiated. In other words, an instance of the class (called an object) is created. When an object is created the class variables are created and the constructor method is run. For example, if there was a class called Employee and an Employee object was created, the Employee class variables would be created and the Employee constructor would be run.
Constructors are primarily used to perform “set up” functions. This may mean initializing variables, creating objects, setting property values, establishing connections to remote resources, etc. Initially the constructor examples will seem very simple but as we expand the examples in future chapters, the real power and purpose of the constructor will become apparent.
In the previous chapter’s example, we created a single Java class. In this chapter, we will create a second Java class called Employee that will be instantiated. Employee’s purpose will be to display Employee information. We will modify EmployeeApp to pass an Employee name to Employee and then execute the Employee display method.
Tutorial: Passing Parameters and Formatting Source Code
Let’s get started:
- 1. Start RAD and in the Package Explorer pane, select myFirstPackage in MyFirstProject/src by clicking on its name.
- 2. On the menu bar, click File, New, and then Class to display the “New Java Class” window.
Notice that the source folder and package names are already specified. Because myFirstPackage was selected in step 1, RAD assumed that was where the class should be created. A different project and package can be specified by simply entering their names in the appropriate text fields.
- 3. Specify Employee in the Name field.
Notice that the access modifier public has already been selected. Other modifiers can be chosen by clicking the other modifier’s option radio button or check boxes.
- 4. Make sure none of the method stub options are selected.
Employee will be instantiated, not run as an application. Therefore, Employee does not need a main method.
- 5. Click the Finish button to redisplay the Java perspective.
The Employee class should appear in the Navigation tree (along with the already existing EmployeeApp) and the Employee source code generated by RAD will be displayed.
- 6. Click on the blank line (line number 4) that follows the class header.
- 7. The insertion cursor (a blinking vertical line) should appear at the far left of the line.
- 8. Press the Enter key to insert a blank line.
- 9. Define a String class variable by entering the following statement on the new line:
String empName = new String();
- 10. Press Enter to insert another blank line.
- 11. Define a constructor by entering the following 3 lines:
public Employee(String name) {
        empName = name;
}
The Employee method is considered a constructor because it has the same name as the class and does not return a value. The Employee constructor is defined as public (on line 6), meaning any class can access/use it. Notice that Employee is expecting a String and will assign it to a String variable called name. On line 7, the value associated with name will be assigned to empName (a class variable that was defined on line 5). The source code should look like Figure 2-1.
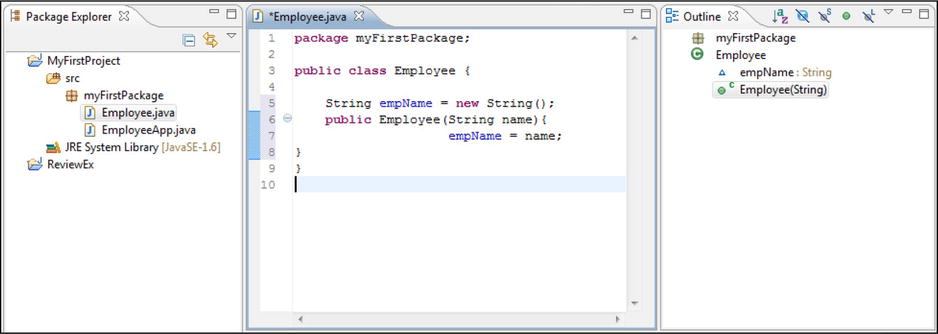
Did you notice that when the Enter key is hit, RAD automatically indents the insertion cursor and after a token is entered, repositions the token correctly? This is done to make the code easier to understand (e.g., clearly show which statements are in a method, which brace closes a method and the class, etc.) Although RAD tried to format the code as it was entered, the code is not formatted as well as it could be. Badly formatted code can be difficult to read and therefore easier to make mistakes. Fortunately, we can make RAD reformat all the source code and even specify the formatting rules to follow.
- 12. On the menu bar, click Source and then Format.
RAD will indent any nonindented or incorrectly indented class variable definitions and methods within the class. In addition, any method statements are positioned as if they were indented twice. Notice that the statement on line 7 was moved to the left and the constructor’s closing brace on line 8 was indented. RAD also added a blank line to clearly separate the class variable definition from the constructor. Again, the purpose of the indentation and spacing is to make it clear where methods begin and end and which statements are contained within a method.
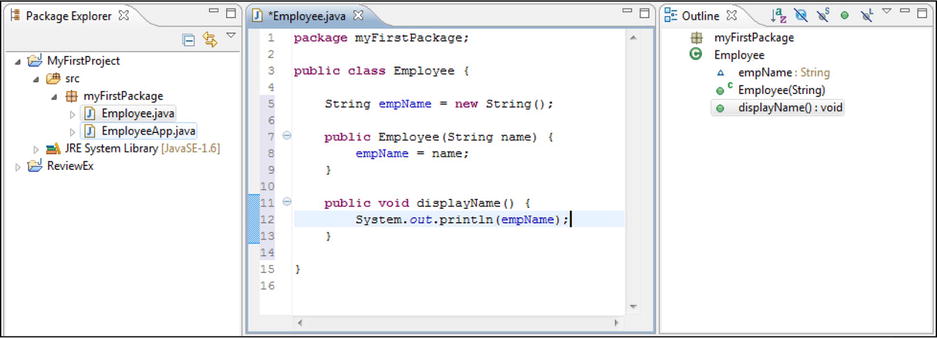
- 13. Enter the following statements after the constructor to define a method called displayName:
public void displayName() {
}
This new method is intended to display the employee name that is associated with the variable empName. Because empName is a class variable it does not have to be passed to the displayName method (remember class variables can be accessed by any method within the class). displayName( ) is also defined as public (so other classes, like EmployeeApp, can access it) and void was specified because nothing is returned.
- 14. Add a blank line after the opening brace ({ ) of the displayName method and then enter the following statement:
System.out.println(empName);
This statement displays the employee name by passing empName to the println method.
- 15. Click Source (on the Menu bar), and then Format to reformat the source code.
The code should look like Figure 2-2 .
- 16. Save the source code by clicking File and then Save.
Tutorial: Defining a Java Application
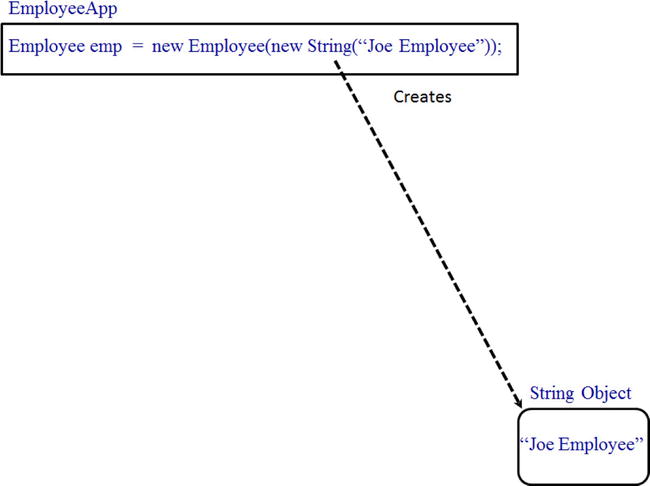
We need to change EmployeeApp to create (instantiate) an Employee object and then invoke the Employee object’s displayName method. Figure 2-3 shows the relationship between the user, EmployeeApp, and the Employee object.

- 1. In the Package Explorer pane, double click EmployeeApp to display the Java source code.
Just as EmployeeApp currently creates (instantiates) a String object, we will change it to instantiate an Employee object.
- 2. Replace the statement that creates sample with the following:
Employee emp = new Employee( new String("Joe Employee"));
Notice that the syntax for creating the Employee object and assigning it to a variable is the same as creating a String object. First you specify the variable type (the class name Employee) followed by at least one space and the name of the variable (emp). emp is assigned (=) a new Employee object (new Employee). Finally, the new Employee object’s constructor is passed the String object it is expecting (in this case, a String object with the text “Joe Employee”).
Let’s go into a little more detail about what exactly is happening between the Employee and EmployeeApp classes.
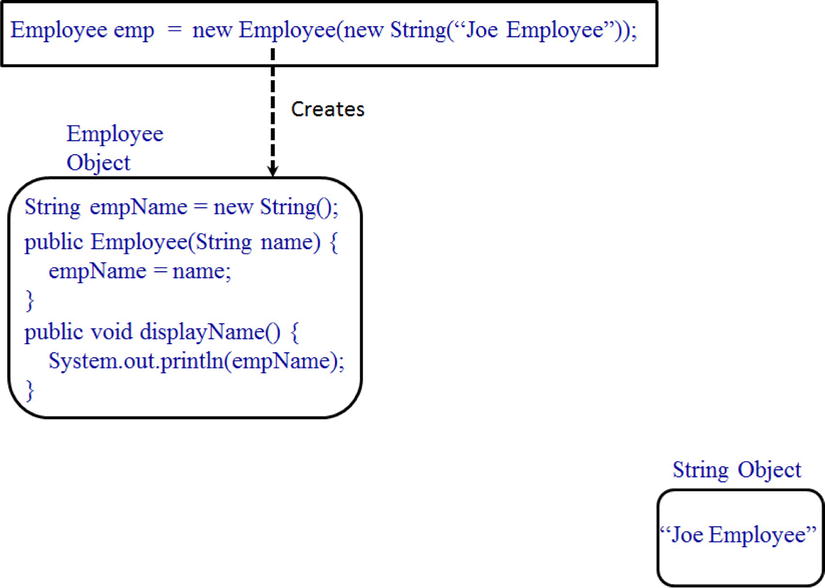
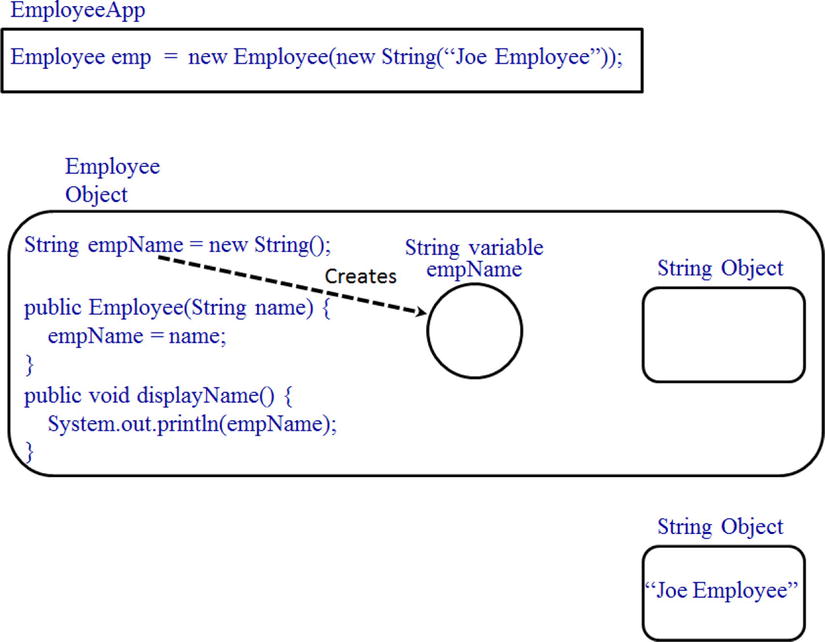
A. When you invoke/run EmployeeApp as an application, the computer “knows” to load the statements in EmployeeApp’s main method into main memory and execute them. The square in Figure 2-4 represents the main method in main memory.
The EmployeeApp statement is considered an assignment statement and is doing quite a bit of work. It creates two objects (one String and one Employee) and an Employee variable. It assigns the Employee object to the variable and passes the String object to Employee. Wow! We better look a little closer at each piece of the statement and explain what each does.
First of all, in an assignment statement everything to the right of the equal sign is executed first. Then everything on the left side of the equal sign is executed and lastly the assignment is done. If there are multiple functions within a statement, any statements in parentheses are executed first and then they are executed from right to left. So in this example:
B. The code new String("Joe Employee") is executed first because it is on the right side of the equal sign and in parentheses. The code creates a new String object (represented by the first rounded corner rectangle in Figure 2-4) with the text “Joe Employee”.
C. Then the code new Employee( ) is executed. This creates a new Employee object (represented by the second rounded corner rectangle in Figure 2-5). When an object is created all the executable code from the class is loaded into main memory, the class variable statements are executed, and if there are values being passed to the new object, they are given to the constructor and the constructor is executed.
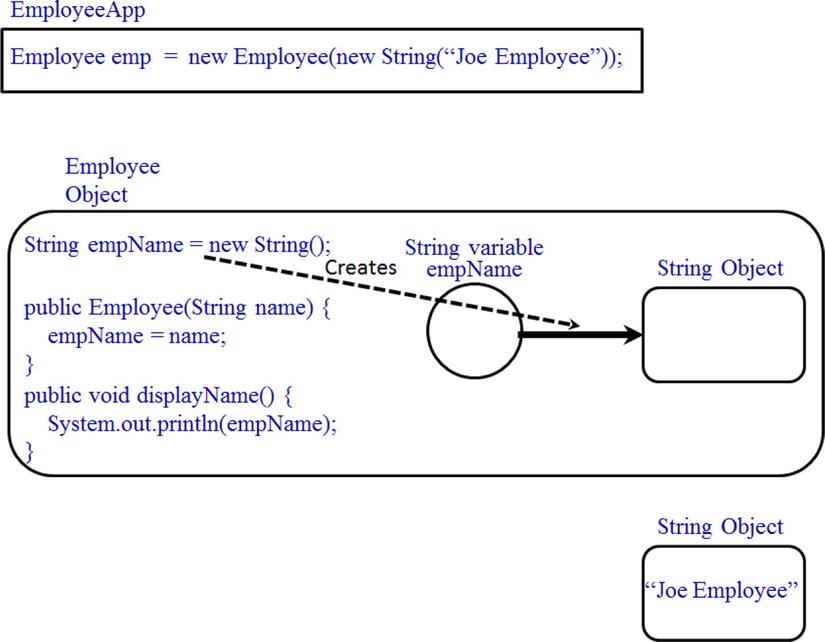
D. In the Employee example, the first Employee statement executed is String empName = new String();. This is another assignment statement so the code on the right of the equal sign (new String()) is executed first. This creates another String object (represented by the third rounded corner rectangle in Figure 2-6) with no text.

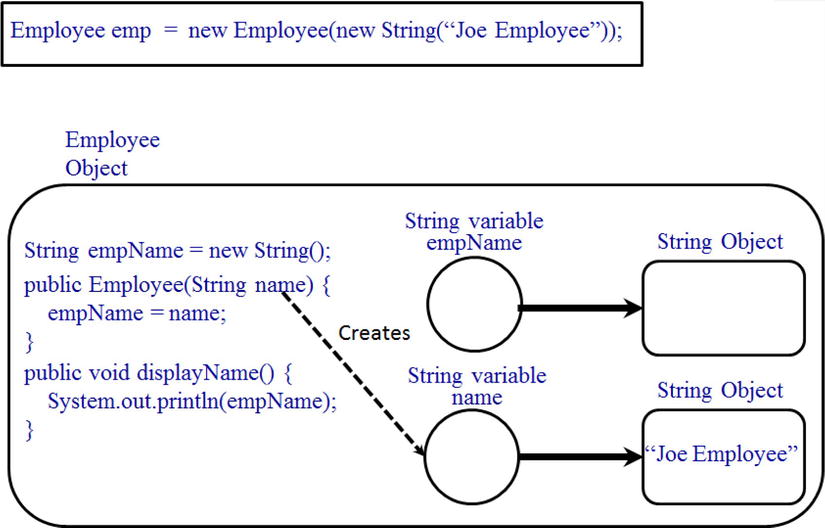
E. Next the code on the left of the equal sign (String empName) is executed and the variable empName is created. (This is represented by the circle in Figure 2-7.)
F. Finally the assignment is made (i.e., the equal sign is executed) that ties the variable empName to the newly created empty String object (see Figure 2-8).
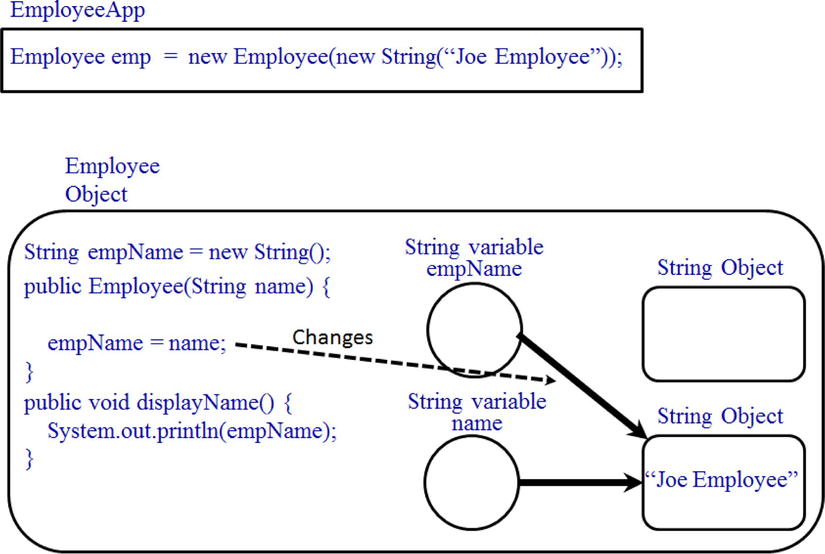
G. Then the Employee constructor (i.e., the Employee method) is executed. The Employee method header creates a new String variable called name. The computer (i.e., the JRE) then assigns the String object with the text “Joe Employee” that was passed by EmployeeApp to this new String variable called name (see Figure 2-9).
H. The Employee constructor then assigns the String object that is assigned to name (i.e., the “Joe Employee” String object) to empName (empName = name;) See Figure 2-10. Notice that the original empty String object, created and assigned to empName (on line 5), still exists but is no longer assigned to any variable.
I. The Employee constructor finishes executing (and the Employee object is complete). Execution returns to EmployeeApp’s main method. The statements to the right of the assignment are complete so the statement to the left of the assignment is executed (Employee emp). This creates an Employee variable called emp (see Figure 2-11).
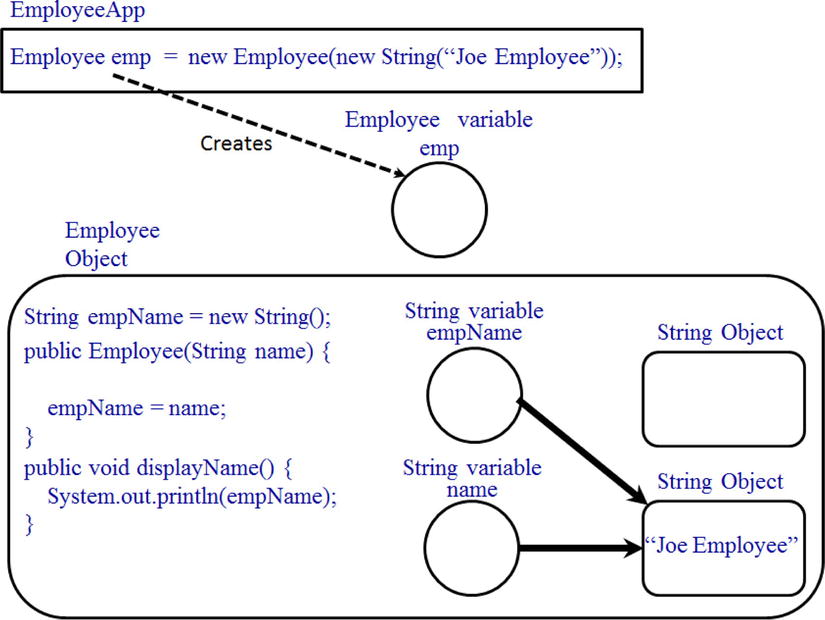
J. Finally, the assignment is performed and Employee object is tied to the Employee variable emp (see Figure 2-12).
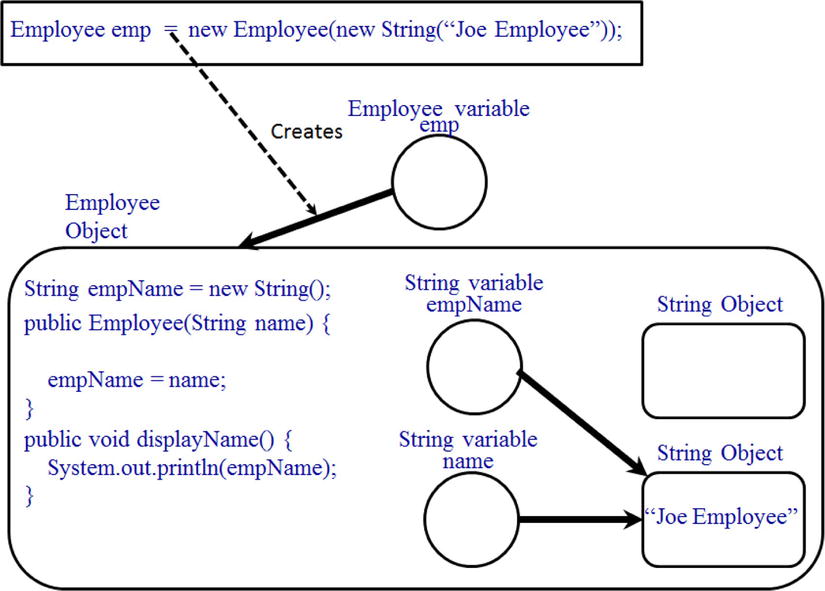
So, the result of running EmployeeApp is three objects and three variables. Of course, there is no visible evidence of any of this activity. We need to change EmployeeApp to invoke the Employee method displayName. To invoke an object method, specify the variable name (emp) that the object is assigned to, followed by a period, the method name, parentheses and a semicolon (i.e., emp.displayName();). Notice that the variable name, not the class name is specified. In this example, this means you are specifying emp not Employee. If the method being called required data, that data would be specified within the parentheses.
- 3. Replace the println statement in EmployeeApp with the following:
emp.displayName();
The executable code should look like the following:
package myFirstPackage;

public class EmployeeApp {

    public static void main(String[] args) {
        Employee emp = new Employee( new String("Joe Employee"));
        emp.displayName();
    }
}
- 4. Save EmployeeApp, then click Run, Run As, and then Java Application.
The text “Joe Employee” will be displayed in the Console pane.
- 5. In EmployeeApp, change the text “Joe Employee” to “Mary Worker”.
- 6. Save EmployeeApp and click the Run button (the green circle with a white arrowhead).
The text “Mary Worker” will be displayed in the console pane. This exercise has proven two things:
A. When a class is run as an application, the class’s main method is run.
B. When an object is instantiated (i.e., an instance of the class is created), the class constructor method is run.
In addition, this exercise showed you how to execute/invoke a method and how to pass information to an object.
Tutorial: Breaking the Code, Public vs. Private Access
Let’s break some code:
- 1. Display the Employee class source code by clicking the Content pane tab for Employee.java.
- 2. Highlight the keyword public on line 11 as seen in Figure 2-13 and type private.
- 3. Save the source code.
- 4. Click the Run drop down button and select EmployeeApp.
- 5. At the Errors in Workspace window, continue the launch by clicking the Proceed button.
Even though you are editing Employee, RAD runs EmployeeApp because that is the launch that was selected. The following error message will be displayed in the console:
Exception in thread "main" java.lang.Error: Unresolved compilation problem:
       The method displayName() from the type Employee is not visible
              at myFirstPackage.EmployeeApp.main(EmployeeApp.java:10)
If the comments have been removed from EmployeeApp, the line number 10 in the third line of the message will be 7. Because displayName’s access modifier is now private, only methods within Employee can access displayName. In other words, EmployeeApp cannot use the private displayName method because EmployeeApp is a different class.
Notice that in the Navigation tree RAD has flagged EmployeeApp, the package, and the project as having an error.
- 6. Click on the Content pane’s EmployeeApp.java tab to display the source code.
Notice that RAD has also flagged line 10 as in error.
We will change EmployeeApp and Employee so that the displayName method is called from within Employee not EmployeeApp.
- 7. In EmployeeApp, select the entire statement on line 10:
emp.displayName();
- 8. Click Edit and Cut to remove the line of code.
- 9. Redisplay the source code for Employee.java (i.e., Click the Content pane Employee tab).
- 10. Move your cursor to the end of line 8 and press Enter to insert a blank line after empName = name;
- 11. Click Edit and then Paste to place emp.displayName(); on line 9.
Notice that the line is flagged as an error and emp has a red squiggly line beneath it.
Because we are trying to run displayName from within the Employee class, we can’t refer to the variable emp that was created in EmployeeApp. We must specify that we want to execute the displayName method within this (i.e., the Employee) object/class.
- 12. On line 9, replace emp with this so that the statement looks like the following:
this .displayName();
The executable code should look like the following:
package myFirstPackage;
public class Employee {
              String empName = new String();
              public Employee(String name) {
                     empName = name;
                     this .displayName();
              }

              private void displayName() {
                    System.out.println(empName);
              }
}
There is a shorter and simpler syntax for identifying/running a method within the same class: simply specify the method name, parentheses, and a semicolon as in the following:
displayName();
Are you wondering, “How/why does this work?” Well, because an object is not specified (i.e., emp in emp.displayName( ); is not specified), the JVM assumes that the displayName method is in the same class (Employee). However, because this seems like “magic” we will continue to use the token this for clarity.
- 13. Run EmployeeApp again.
RAD will display the “Save and Launch” window listing both classes because they both have unsaved changes.
- 14. Click the OK button to save the changes and run EmployeeApp.
Notice that the classes no longer have errors and the employee name is correctly displayed in the console pane.
Tutorial: Breaking the Code, Parameters, and Signatures
Let’s begin:
- 1. On line 9 in EmployeeApp, remove the text “new String("Mary Worker")” so that the statement looks like the following:
Employee emp = new Employee();
Notice that RAD flags the line as an error and puts a red squiggle under new Employee().
- 2. Move your cursor over the red squiggle.
The message “The constructor Employee( ) is undefined” is displayed. This brings up an interesting point. We mentioned earlier that a method has a name (for instance, Employee). However, the name does not fully identify a method. A method is fully identified by its signature. A method signature is comprised of both the method name and the parameters the method is expecting. In our example, we defined a method called Employee that expects one string as a parameter. With the change, we no longer specify a string, therefore, the computer tries to run a constructor method called Employee that expects no parameters. Because Employee does not have a method with this signature, an error is generated.
- 3. Put the text “new String("Mary Worker")” back in the statement on line 9.
- 4. In Employee on line 9, add the text “new String("Frank")” so that the statement looks like the following:
this.displayName( new String("Frank"));
Notice that again, RAD indicates there is an error.
- 5. Move the mouse cursor over the red squiggly line to display the following message:
“The method displayName( ) in the type Employee is not applicable for the arguments (String)”
Sometimes RAD’s messages leave something to be desired.
Unfortunately, in Java-speak, parameters can be referred to as arguments and classes can be referred to as types (i.e., as in class type). So this message is inferring (in its own way) that there is no method with the correct signature.
Remember, the correct parameters must be passed to a method; otherwise, the statement will result in an error. We will explore parameter passing in more detail in future chapters.
- 6. Click Edit then Undo until the text is removed.
- 7. Save the source code for both EmployeeApp and Employee.
Although we have criticized RAD a little for its messages, you should drop to your knees and thank RAD for how easy it is to run applications. Here’s why.
The Big Cruel Java World
RAD has hidden a great deal of the complexity of creating and running Java applications. For example, if you used Windows Explorer to display the PC file that contained the Employee class and you double clicked the file name, Windows would not know what to do with the Java statements in the file. In other words, Windows does not “speak” Java. Windows (like all operating systems) speaks machine language. Machine language is a set of instructions that the hardware of the computer understands. When you click on a button, select an option, hit Enter, or select a menu option, Windows interprets the action and issues the appropriate machine language instructions to the computer hardware. Because the Java classes contain Java statements, neither the computer hardware nor the operating system (Windows) can execute those statements. The Java statements need to be converted to machine language.
In Chapter 1, RAD generated the machine language for you. When you run an application in RAD, RAD generates the machine language commands and the commands are sent to the computer’s central processing unit (CPU) for execution. Because there is no Java Run button in Windows, the programmer must explicitly generate the machine language and run the machine language version of the Java class. Doing this isn’t difficult; it’s just easier with RAD.
Java on a PC
As mentioned, Java source statements have to be translated into machine language. This is actually a two-step process comprised of compiling and interpreting. Compiling Java source code creates bytecode. Bytecode is a “language” that is neither machine language nor source code. (However, bytecode is a step closer to machine language than source code.) When a Java application is run or a class is instantiated, the bytecode is translated into machine language. You may be asking, why bother with bytecode? Translating bytecode takes less time than translating source code (because bytecode is closer to machine language). In addition, bytecode is the same regardless of the computer system. In other words, the bytecode generated from the Employee class’s source code is the same on a computer running Windows, Linux, Solaris or any other operating system. This makes the bytecode portable to any computer system. When the bytecode is interpreted, the unique machine language (for the type of computer system you are working on) is generated and executed.
Oracle provides the software to compile and interpret Java (for free). There are two primary groupings of the free software called a JDK and a JRE. The JRE (Java Runtime Environment) has the interpreter (the JVM) not the compiler. As implied from the earlier discussion of converting bytecode to machine language, the JRE therefore must be unique for each computer’s operating system. In other words, there is a different JRE for Windows, Linux, and Solaris.
In addition to a compiler, Oracle provides other free software tools for Java programmers. All of this software—compiler, JRE, programmer tools—is provided in a JDK (Java Development Kit sometimes also abbreviated as SDK). Early releases were simply named JSDK 1.0, JSDK 1.1, and so on. However, there are now different “editions” of Java and associated JDKs. For instance, there is a Java SE (Java Standard Edition), Java FX, and Java EE (Java Enterprise Edition). To explain the difference between them simply: SE is used to create client based applications, FX has functions for a richer client interface and alternative platforms such as mobile phones, and EE supports applications that have both server and client based components.
Each edition has a JDK included. For instance, a recent release of Java SE 6 is formally called: Java (TM) SE Development Kit 1.6 Update 25. However, the acronyms followed by their version and/or release numbers are used for identification. For example, the files for recent EE and SE releases have the acronyms java_ee_sdk-6u1-jdk and jdk-6u25 in their names.
However, users don’t need everything in the JDK/SDK. To run a Java application all that is needed is the JRE for your operating system. The JRE contains all the classes (like String) that make your programming life easier, the machine language instructions that correspond to the bytecode commands, and the Java Virtual Machine (JVM). The JVM (i.e., the Java interpreter) is the software that translates bytecode into machine language.
Wasn’t life so much simpler in RAD?
Figure 2-14 shows the three steps involved in creating and running a Java application on a PC and the various Java components involved.
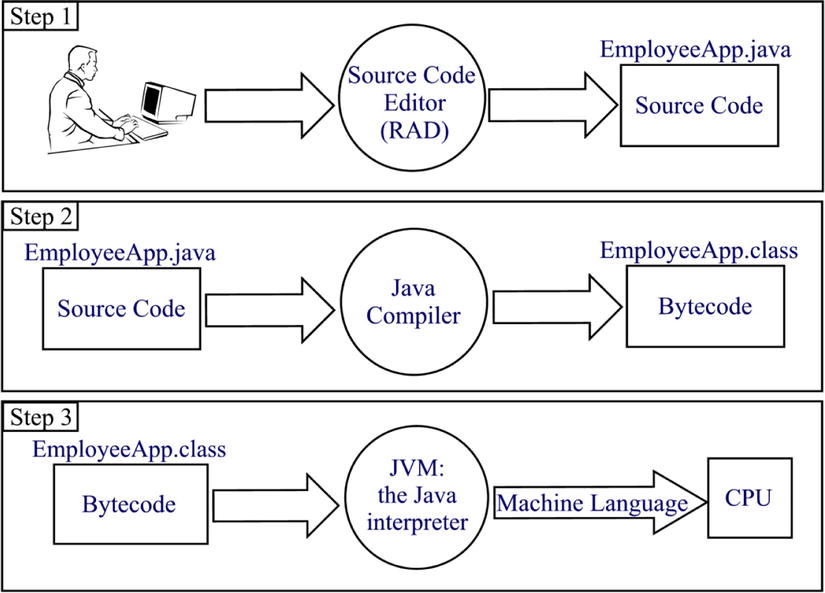
Step 1: The programmer enters the source code
Step 2: The source code is translated into bytecode by the compiler
Step 3: The bytecode is translated into machine language by the JVM and sent to the CPU to be executed
In Chapter 1, you performed step 1 when you typed in the source code using the RAD editor. When you saved the source code, RAD performed step 2 and when you clicked the Run button RAD performed step 3.
Please notice two important items in Figure 2-14, the .java file and .class file. Source code is stored in a file with an extension of “java” (i.e., EmployeeApp.java) and bytecode is stored in a file with an extension of “class” (i.e., EmployeeApp.class). The RAD Java perspective hides the class files. However, RAD did show the Java file names both in the Content pane tabs and the Navigation tree (see Figure 2-13).
Let’s take a more detailed look at the JRE using RAD and the online documentation. In addition, we’ll prove that RAD does steps 2 and 3 as stated above.
Tutorial: Exploring the JRE with RAD
Now let’s start exploring:
- 1. If necessary, start RAD.
RAD “remembers” what was worked on last. As long as you are using the same PC and no one else has used RAD since you did, RAD will display MyFirstProject in the Java perspective and any source code that was left open in the content pane.
- 2. If necessary, display the contents of MyFirstProject and myFirstPackage by clicking their expansion icons in the Project Explorer view.
Notice that the navigation tree shows the file names of the two Java classes created so far.
- 3. If necessary, in the navigation tree, double click Employee.java to display the source code in the content pane.
The tab at the top of the content pane will show the file name along with the RAD icon that represents a Java source code file (a white sheet of paper with a blue J).
In the navigation tree, notice that there is another item within MyFirstProject called “JRE System Library”. When the project was created, RAD made sure all the classes in the project had access to a JRE. As a matter of fact, RAD contains a full JDK. (In the case of the Enterprise Edition, there is a JEE JDK). You never had to worry about a JDK, JVM, or JRE because they came prepackaged. (Wasn’t that nice of RAD?) These software items are further examples of what was meant by “development tools” in Chapter 1 when we said “WebSphere is an IBM software product that includes all the ‘development tools’ a programmer would need to write, debug, and install application software.”
- 4. Click on the JRE System Library expansion icon.
The displayed item’s text is too long to fit in the Package Explorer pane. Move the cursor over an item to display the full text in a pop-up box. Alternatively, the RAD panes can be resized. Simply move the cursor over the border of the pane, click, and drag.
- 5. Move the cursor over the right border of the Package Explorer pane.
When the cursor is over a border, the mouse cursor icon will change from a white, single headed arrow to a white, double-headed, horizontal, arrow.
- 6. Click and drag the Package Explorer pane’s right border so that all the text for each item can be seen (see Figure 2-15).
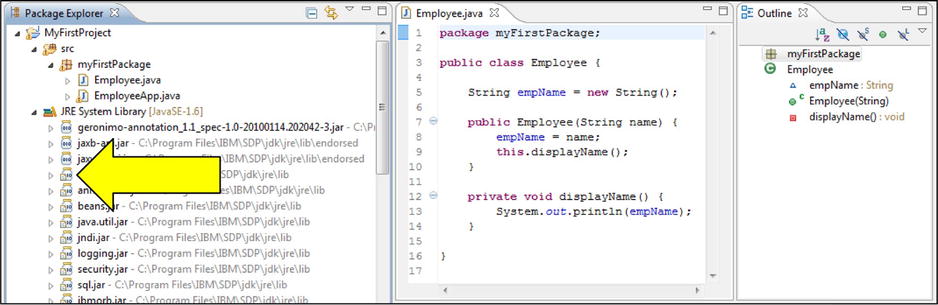
The new items are “jar” (java archive) files. A jar file holds java resources but uses less space. (A “jar” file is actually a specialized “zip” file.) These jar files hold the packages that contain the Java classes (like String) that “come with Java.”
- 7. Expand the vm.jar file (listed under the JRE System Library).
The package names within vm.jar are listed in alphabetical order and often contain the name of the organization supplying the package or class. Notice that the first several packages are from IBM.
- 8. Within vm.jar, expand the java.lang package and resize the Package Explore pane so that it looks like Figure 2-16.
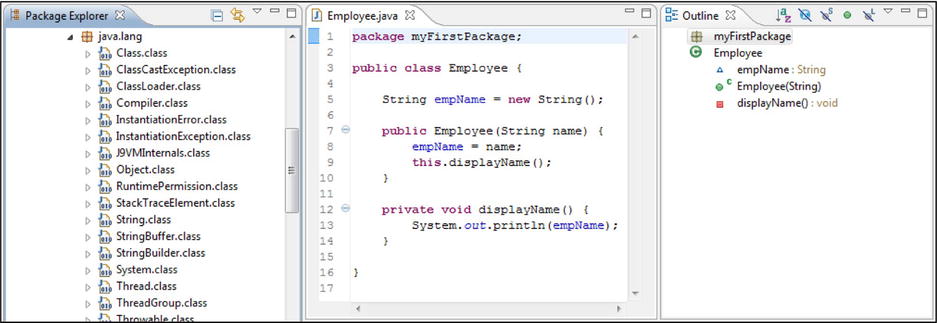
Notice that the classes within the package are listed in alphabetical order and that the String.class file is displayed.
The java.lang package contains the basic set of classes that come with Java. In fact, the classes are so fundamental that all JREs automatically look in the java.lang package. What this means is that even though the class String is stored in a different package (the java.lang package) than your application, the JRE will find the class.
Try to remember: the java.lang package is an exception. To access any other package’s classes, the package must be imported into your class. We will cover importing in detail in a later chapter.
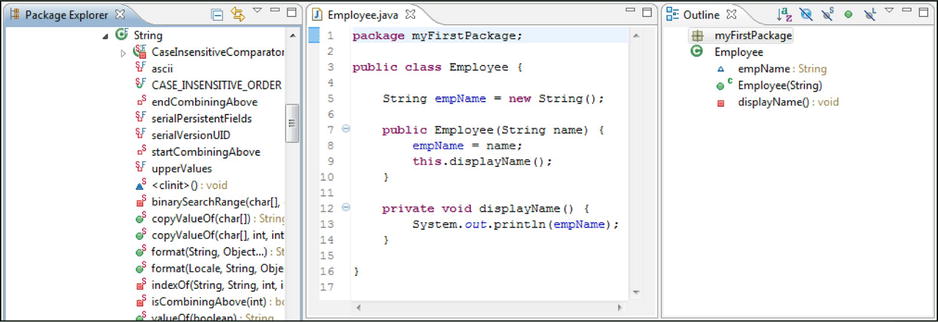
- 9. Click on the String.class expansion icon.
The display should look like Figure 2-17. All of the variables and methods that comprise the String class are displayed in the Navigation tree. We have said that Java classes (like Strings) are more complicated than we have let on. This list should convince you.
You may have noticed the various symbols and letters next to Navigation tree items. Each icon describes the item. For instance, a green circle (![]() ) represents a public method, whereas an orange square (
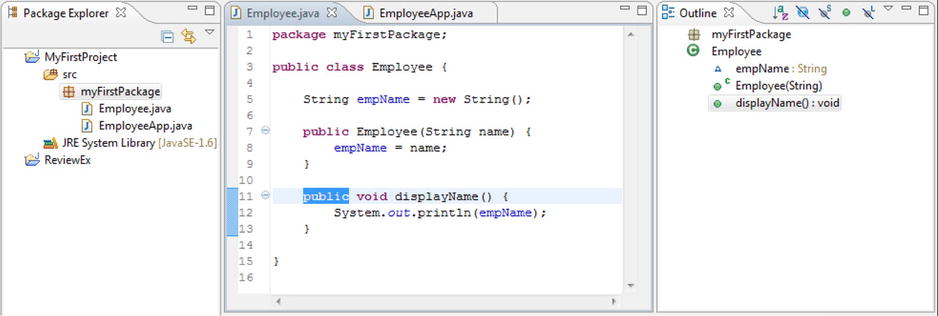
) represents a public method, whereas an orange square (![]() ) represents a private method. Notice in the Outline view (on the far right of the window) that the variables and methods in Employee also have icons. Can you figure out what a blue triangle with a white center (
) represents a private method. Notice in the Outline view (on the far right of the window) that the variables and methods in Employee also have icons. Can you figure out what a blue triangle with a white center (![]() ) represents? (See the text following step 7 for the answer.)
) represents? (See the text following step 7 for the answer.)
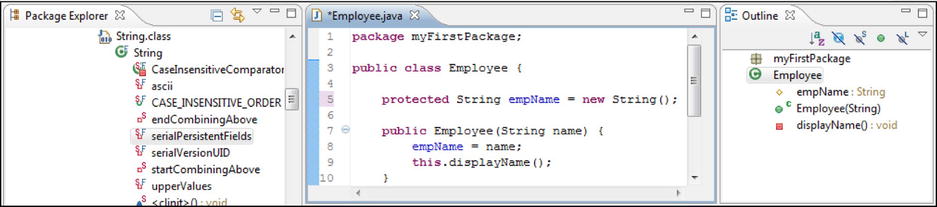
- 1. Click on the beginning of line 5 in the Employee class (i.e., before the String keyword).
- 2. Type private and then a space.
The triangle icon changes to a red box with a white circle in the center (![]() ). This new icon represents a private variable.
). This new icon represents a private variable.
- 3. After the keyword private, type static and a space.
A red S is added to the icon. This means that the variable is static and can be accessed even if the class is not instantiated as an object.
- 4. Delete the keyword private.
The blue triangle is displayed and the red S remains.
- 5. Type the word final and a space before static.
A blue F is added to the icon after the red S to represent that this variable is unchangeable (more on final later).
- 6. Replace the keywords final and static with public.
The icon changes to a green circle with a white center.
- 7. Replace the keyword public with protected.
protected is in between private and public. Protected allows access to subclasses or classes within the same package. The blue triangle represents an access of default (or none). When no modifier is specified, access is restricted to classes within the same package.
There are couple of other RAD icons you should be familiar with. Notice that a constructor is indicated with a green C (![]() ) and a package has a black plus sign (+) superimposed over a square (
) and a package has a black plus sign (+) superimposed over a square (![]() ). The plus sign is the “ribbon/string” on the package icon. (Get it?). The color of the square changes depending on the view and its contents. Notice that myFirstPackage’s box is gray in the Outline view but golden in the navigation tree. In addition, if the package is empty, the box will be white.
). The plus sign is the “ribbon/string” on the package icon. (Get it?). The color of the square changes depending on the view and its contents. Notice that myFirstPackage’s box is gray in the Outline view but golden in the navigation tree. In addition, if the package is empty, the box will be white.
Lastly, a class header is indicated with a green circle with a white C in the center (![]() ), see Employee in the outline view) and the class file, which holds bytecode, is indicated with a white piece of paper with a blue J, zeros, and a one (
), see Employee in the outline view) and the class file, which holds bytecode, is indicated with a white piece of paper with a blue J, zeros, and a one (![]() ), see the icon next to String.class item in the navigation window.)
), see the icon next to String.class item in the navigation window.)
- 8. Change the size of the source code pane so that it only displays 10 lines (see Figure 2-18).
- 9. In the Outline view, click on displayName( ).
Notice that the source code is shifted to display the item that was clicked (i.e., the displayName method) and the name of the item clicked is selected. In addition, in the marker bar (located to the left of the line numbers) a blue bar indicates the source code that comprises the clicked item.
In addition to quickly moving to locations within the source code, RAD allows “hiding” portions of the source code. Notice the circles with a minus sign to the left of each method header (for instance, lines 7 and 12). These lines are the start of a block of source code (or comments). Moving the mouse cursor over the circle will display a black bracket that indicates the lines “controlled” by the circle. Clicking the circle will hide the indicated lines, in this case, the body of the method. (You can tell there is hidden code because the minus sign will change to a plus sign. In addition, if you look at the line numbers, you will see that some line numbers are missing.) Again, this is a useful tool for “simplifying” the source code that is displayed.
- 10. Click on the green circle with the white C, next to Employee in the outline view.
Within the source code, the cursor is moved to the class name in the class header. As your classes get larger moving within the source code using the outline view is very handy.
Although icons are helpful, they do not thoroughly explain the various variables and methods. Fortunately, there is wealth of documentation available online that does.
Tutorial: Exploring the JRE through Online Documentation
There are several sites that provide a wealth of information for Java programmers. We will show a couple.
- 1. Start Internet Explorer and enter http://download.oracle.com/javase/6/docs/
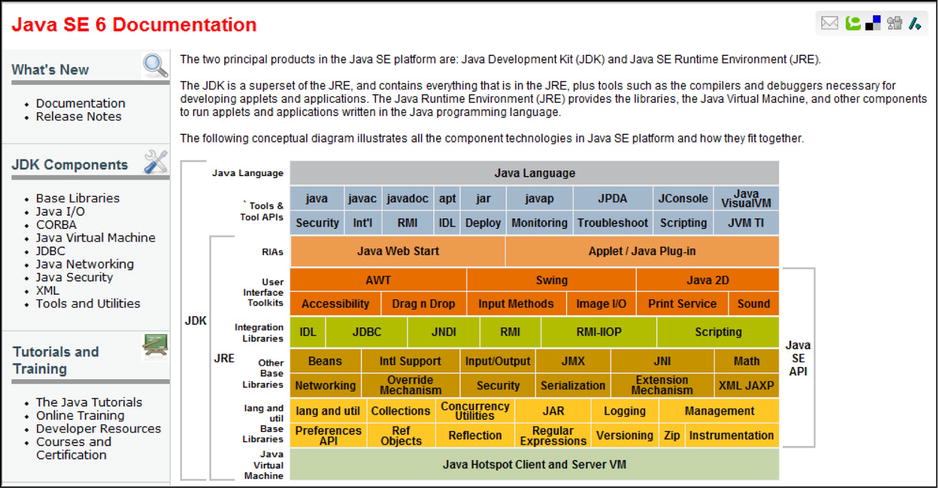
A nice diagram is displayed that shows the various components of the JDK and JRE (see Figure 2-19). As you can see there is a lot more to both of these than we have discussed (or will discuss). You can click on any of the components in the diagram to get further information.
- 2. In the browser address field, add api/ after docs/ (i.e., the URL http://download.oracle.com/javase/6/docs/api/ should appear in the address) and press Enter.
API stands for Application Programmers Interface. This site has programmer documentation for all the JRE classes. The browser window should look like Figure 2-20.
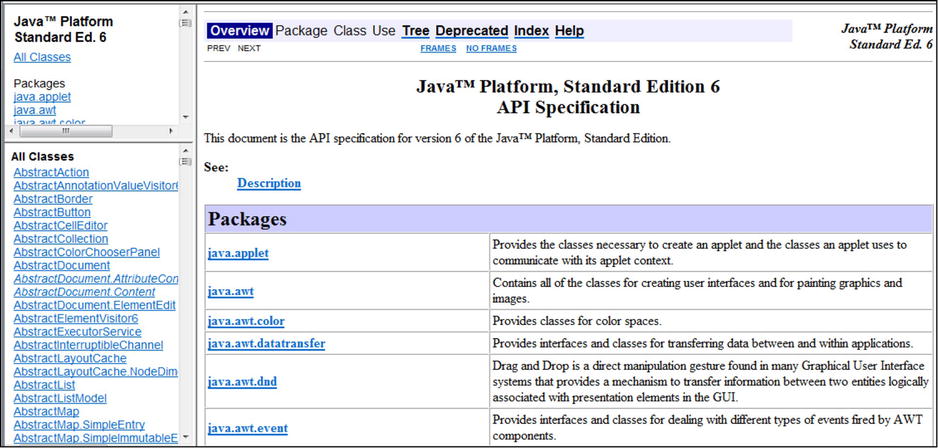
The two panes on the left provide navigation links to the individual class documentation pages. The upper left pane controls (by package) the documentation links displayed in the lower left pane. Initially, all class links are displayed in the lower left pane. When a class link is clicked, the large pane on the right will display the documentation.
- 3. On the Menu bar, click Favorites and then Add to Favorites.
- 4. At the “Add Favorite” window, specify Java Documentation in the Name field and click the Add button.
- 5. Click Favorites and verify that Java Documentation has been added at the end of the menu.
- 6. In the lower left pane, scroll down until the String link is displayed.
- 7. Click the String link.
The browser should look like Figure 2-21.
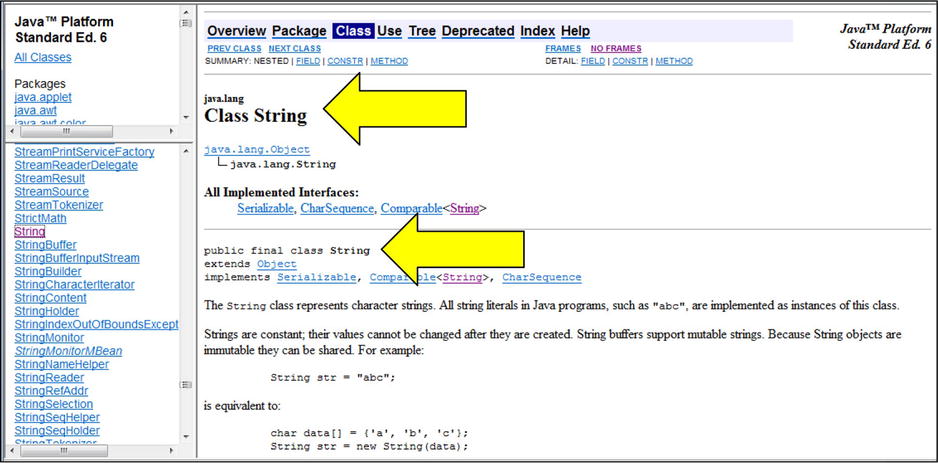
There is a lot of information on these pages (much of which you will not understand at this point in your Java education). Basically, the first section simply identifies the class. (i.e., the class name, String, and the package it belongs to, java.lang, are displayed.) The remainder of the content pane has the good stuff. The second arrow in Figure 2-21 points to detailed information regarding how the class was defined. For instance, String is defined as public and final. You can confirm this in RAD by displaying the String class in the Package Explorer pane. The icon to the left of the String class header is a green circle with a white C in the center and a blue F indicating that the String class was defined as public and final.
If you compare the RAD navigation tree to the online documentation, you may notice some differences. For instance, RAD lists the String class’s private variables and methods. Because these cannot be accessed by the programmer, the online documentation does not include them. The remainder of the online documentation will further explain what the class does and provide examples of how to instantiate the class and use its public methods. For instance, scrolling down the String documentation will reveal three tables. The first table documents each of the public variables in the class. The second table lists and defines the class constructors. The third table describes all the public methods. After the three tables, there are more detailed explanations of each variable, constructor, and method.
- 8. Scroll down to the length() entry in the method list table (the third table, see Figure 2-22).
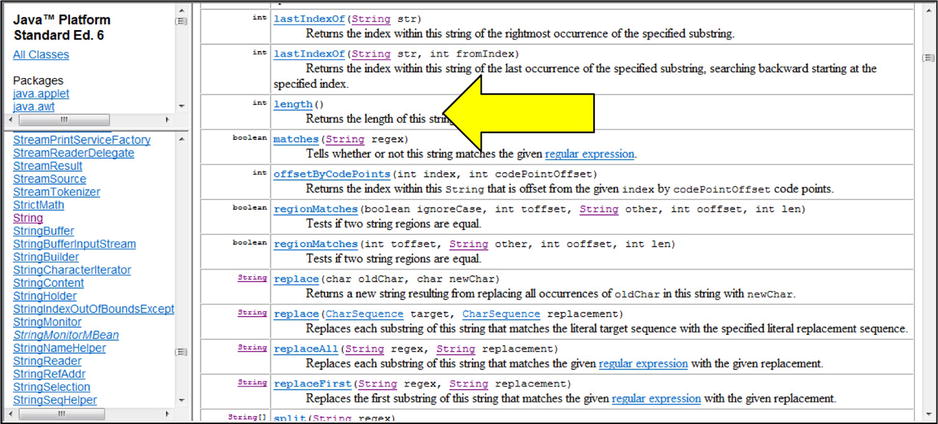
From left to right, each method entry explains:
A. What the method returns. In this case, the length method returns a variable of type int (integer). We will discuss int variables in a little while.
B. The method signature (i.e., the method name and parameters the method is expecting). In this case, the length method expects nothing, indicated by the empty parentheses. Notice that the other methods in Figure 2-22 expect at least one parameter.
C. What the method does. The length method returns the number of characters assigned to the string (i.e., the length of the string).
- 9. Click the length method name.
The detailed documentation for the method will be displayed.
When you are having trouble understanding a class, remember this site. It has lots of useful information.
Tutorial: Changing RAD Perspectives
Now let’s begin:
- 1. If needed, switch to the RAD session and resize the source code pane.
- 2. In the Package Explorer pane, scroll back to the top of the navigation tree.
- 3. Click the JRE System Library expansion box to close all the sub-trees.
- 4. Click the “Open a Perspective” icon (see Figure 1-5).
The “Open a Perspective” menu will be displayed.
- 5. From the short cut menu, click Other . . . .
- 6. In the Select Perspective window, scroll down, click Resource and then the OK button.
The Resource perspective will be opened and become the active perspective. There can be only one active perspective at a time. For instance, notice that the Java perspective icon still appears. This means that the Java perspective is open but not active. To make an open perspective active, simply click its icon.
There are two noticeable differences in the Resource perspective: the Outline view has moved from the right side of the window to the lower left and the upper left pane now has the Project Explorer view.
- 7. In Project Explorer, expand MyFirstProject.
The Resource perspective is simpler than the Java perspective. For instance, there are fewer functions available. Notice that there are no tool bar buttons to create a new class or package. (Source code, however, can still be edited.)
- 8. Close the Resource perspective by right clicking the Resource Perspective icon and select Close from the short cut menu.
- 9. Open the Web perspective.
Toggle back and forth between the Web and Java perspectives. Notice that the Web perspective has a lot more tool bar buttons and different views.
Now we will prove that RAD does create the bytecode and store it in class files.
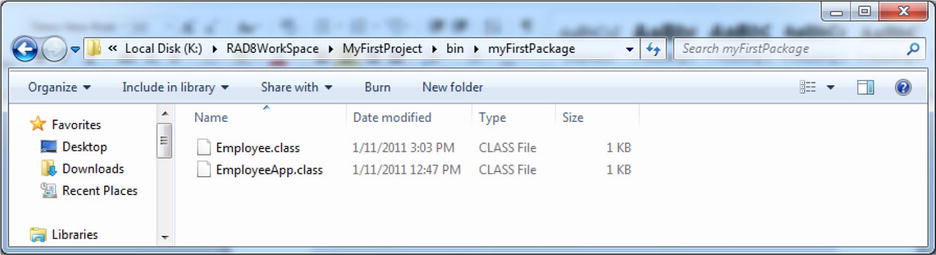
- 10. Using My Computer, display the class files by displaying the RAD workspace folder, then the MyFirstProject, bin, and myFirstPackage folders.
If the workspace was on the K: drive and named RAD8WorkSpace, the My Computer window would look like Figure 2-23.
- 11. Right click Employee.class and select Delete from the short cut menu.
- 12. In RAD run EmployeeApp.
A “no EmployeeApp class in myFirstPackage” message will be displayed. This is very true because we just deleted it in step 11. We can force RAD to generate the bytecode by resaving the source code. However, if we display either class’s source code, neither the floppy disk button or the Save option (in the File menu) will be active. This is because there are no changes in the source code to be saved. An easy way to get around this is to make a simple change.
- 13. Display the Employee.java source code, insert a space anywhere and then delete the space.
- 14. Save the Employee.java source code.
Notice that both class files were generated even though we only saved Employee. Well, isn’t RAD helpful?! Not only does RAD perform the compilation of Employee for us but because EmployeeApp creates (instantiates) an Employee object, RAD also creates the Employee.class file. Because EmployeeApp “depends” on Employee, in Java-speak, the classes are said to have a dependency relationship. This is just another example of the great help RAD provides.
Results of the Tutorial
Here’s what we now have:
- In myFirstPackage, one new file called Employee.java.
- The executable source code in Employee should look like the following:
package myFirstPackage;
public class Employee {
       public String empName = new String();
       public Employee(String name) {
              empName = name;
              this .displayName();
       }
       private void displayName() {
              System. out .println(empName);
       }
} - The executable source code in EmployeeApp should look like the following:
package myFirstPackage;
public class EmployeeApp {
       public static void main(String[] args) {
              Employee emp = new Employee("Mary Worker");
       }
}
Review Questions
- What is the function of the JVM?
- Which are executable: java files, class files, or both?
- What is a method signature?
- What is the purpose of a jar file?
- How does RAD indicate source code errors?
- Explain the differences between perspectives.
- What is the relationship between source code, machine language, and bytecode.
Review Exercise
In this exercise, a new Java class called Shipment will be created. Shipment will accept information about a shipment being received and will have a method to display this information. ShipmentApp will be modified to instantiate an object of type Shipment, assign the object to a variable named shipObj, and invoke Shipment object’s display method.
- 1. In the ReviewEx/src, create a new Java package called c2.
- 2. Copy ShipmentApp from c1 to c2 by performing the following:
- A. Click on ShipmentApp.java in the Navigation tree to select it
- B. Click Edit then Copy
- C. Click on c2 to select it
- D. Click Edit then Paste
- 3. In c2, create a public class called Shipment without any method stubs.
- 4. Define five class String variables called shipmentNum, supplierName, rcvDate, rcvTime, employeeNum.
- 5. Create a constructor that:
- A. Accepts 5 strings and stores them in 5 method variables (parameters) called
sNum, sName, rDate, rTime, eNum
(Hint: When specifying multiple parameters they must be separated by commas.) - B. Moves the method parameter’s values to the class variables
- 6. Save the Shipment source code and verify that there are no errors.
- 7. Change ShipmentApp’s main method to:
- A. Create a Shipment object and assign it to a variable called shipObj
- B. Pass the following five pieces of information to the Shipment object:
99, Costco, 12/15/2011, 10:25 AM, 33
(Hint: When specifying multiple parameters they must be separated by commas.)
- 8. In Shipment, create a public method called display that accepts nothing, returns nothing and uses System.out.println to display the five values as below:
- 99
- Costco
- 12/15/2011
- 10:25 AM
- 33
- 9. Change ShipmentApp to invoke the Shipment objects display method.
Check that the Exercise Was Done Correctly
Finally, let’s check everything ran as expected:
- Verify that within c2 there are two tree items called Shipment.java and ShipmentApp.java.
- Run ShipmentApp and verify that the data is displayed in the console as specified earlier.