
![]()
Conditional Logic and Checkboxes
In this chapter, we will tackle conditional logic. Conditional logic, also called “If Then Else” logic, is used extensively in programming. It has probably been used in almost every “real-world” program ever written! We will use conditional logic to enhance our applications so that frames can perform multiple functions and execute calculations that are more realistic. (Conditional logic can be a little baffling to first-time programmers but I have confidence in you!) In addition, we will cover some new GUI components, item events, and delve deeper into comparison operators.
Because our application logic will be getting much more complex, we will also begin working with the Debug perspective to find and resolve errors in the source code.
In this chapter, you will learn about:
- Comparisons
- Conditional logic
- Events
- Checkboxes
- Checkbox groups
- Dispose versus System.exit
After this chapter, you should be able to:
- Use an if/else statement
- Use an ItemEvent
- Check a component’s state
- Build compound conditions with ands and ors
- Set breakpoints
- Step through statements in the Debug perspective
Conditional Logic
The term “conditional logic” sounds imposing but the concept is very simple: a statement is performed only if a condition is true. Another way to say it is: If condition is true then perform this action. You use conditional logic every day. For instance, when you are driving: If traffic light is red then stop. Or said another way, the function stop is only performed when the condition is true. Pretty simple, right?
Every high-level programming language provides commands to execute statements conditionally. Java uses the keyword if and optionally the else keyword to perform conditional logic.
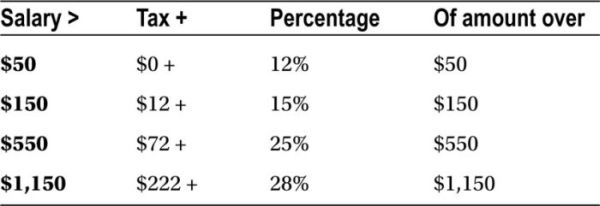
Let’s use an example. Our gross salary calculation (pay rate * 40) is not very useful. For instance, most organizations need a net salary calculation that takes into consideration income tax. The tax rate is dependent on how much is earned. For instance, if an employee’s weekly salary is less than $50, no taxes are withheld. However, if the weekly salary is greater than $50, then the tax is 12 percent on all income above $50 up to $150. If the weekly salary is greater than $150, then the tax is $12 (that’s 12 percent of the salary from $50 to $150) plus 15 percent of all income over $150 up $550. (These salary numbers and tax percentages are, of course, fictional.)
Of course, there are exemptions. For each declared exemption, $60 of the gross weekly salary is not taxed. If you think I’m making things unnecessarily complicated, I’m sorry, but this is really a very simplified version of the tax calculation. For instance, we aren’t taking into consideration: state, province, or city taxes, FICA, pretax retirement deductions, pre-tax medical deductions, pre-tax tuition deductions, and so on.
We’ll use the following rules for our new calculation.
Another way to depict the calculation is shown in Figure 6-1.
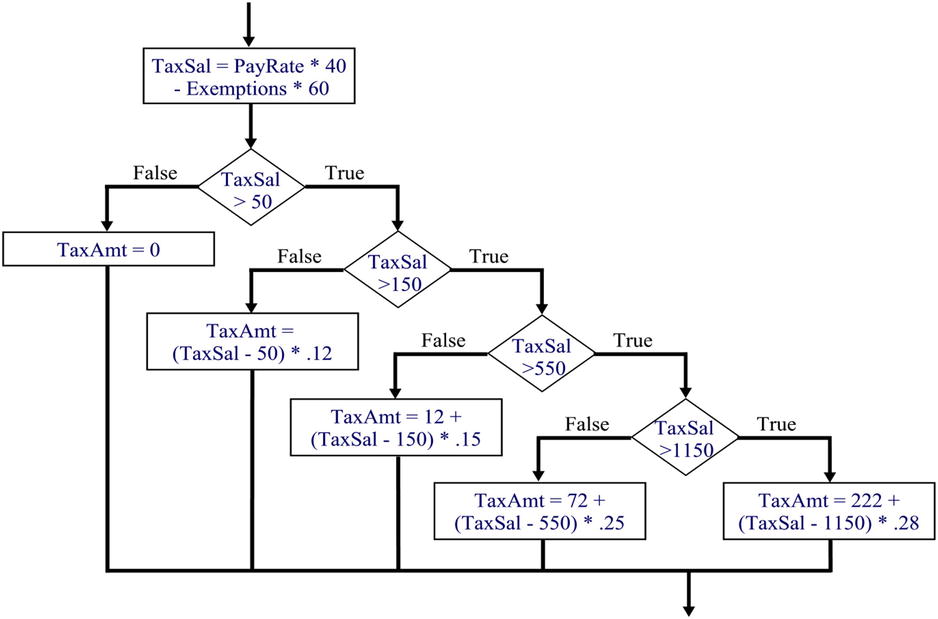
Notice that we slipped in a new symbol, > (greater than). The greater than symbol is an example of a comparison operator. We spoke earlier about mathematical operations and their symbols, such as +, -, or *. Comparison operations (also called logical operations) are also represented by symbols. Comparison operators are at the heart of a condition. Many conditions are comprised of two fixed constants or variables (operands) separated by a comparison operator. When a condition is encountered, the computer compares the values on either side of the comparison symbol and returns a Boolean value of true or false. (This Boolean value can then be used as the basis for an if statement.) The following table shows the various comparison symbols, an example using primitive values in a condition, and the condition example results.
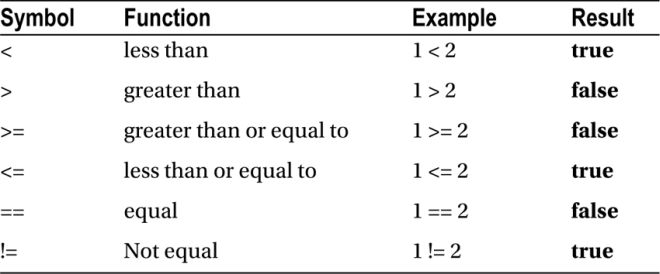
Please note that the equal operator is represented by two equal signs! A common rookie mistake (that happens to pros too!) is to use a single equal sign when trying to define a condition. A single equal sign is the assignment operator. For instance, trying to assign 2 to 1 (1 = 2) makes no sense and not only does not result in a Boolean value of true or false but will result in an error message.
Let’s have a go at comparisons:
- In the Tutorials project, copy the c5 package.
- Paste the c5 package into Tutorials/src with the new name c6.
- Create a new class in c6 called CondTestApp that has a main method stub.
Enter the following statement in the main method:
System.out.println(1=>2);
You should get an error (i.e., a red squiggly line beneath the >). Can you figure out what the problem is?
The “greater than or equal to” comparison must have the greater than symbol first and then the equal sign. Yes, the JVM is that picky! The same is true for the “less than or equal” comparison.
Change the comparison to >=, save the source, and run CondTestApp as a Java application.
Notice the Boolean value that is displayed. Just like an addition operation, the computer performs the comparison operation and returns the result. In this case, instead of adding two numbers and returning the sum, the comparison operation is performed/evaluated and the Boolean result is returned. The result (in either the addition or comparison case) is then displayed by the println method.
Comment out the println statement and add the following statement.
System.out.println(1=2);
Another red squiggly line! Notice the error message says that a variable must be on the left-hand side of an assignment. Remember, the single equal sign represents an assignment not a comparison.
Add a second equal sign to make an equal comparison, save the source and run the application.
The evaluation is performed and false is displayed because 1 is not equal to 2.
The if statement syntax is: the keyword if, followed by the condition in parentheses, and the statement to be executed when the condition is true. It is customary to indent the executable statement(s) on the line following the condition. The indentation signifies that the statement is dependent on the condition.
- 1. In CondTestApp, comment out the println statement, add the following statements, save the source, and run the application.
double doubleSalary = 6.50 * 40;
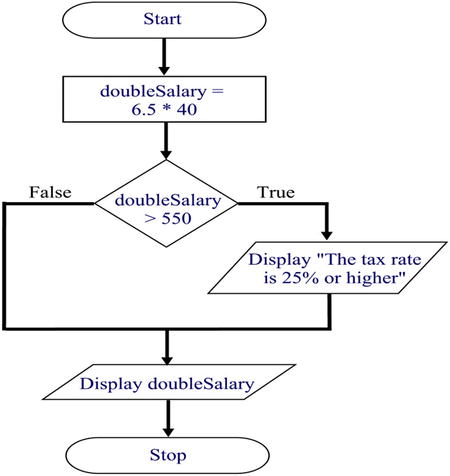
if (doubleSalary > 550)
System.out.println("The tax rate is 25% or higher");
Are you surprised by the result? Does Figure 6-2 help?
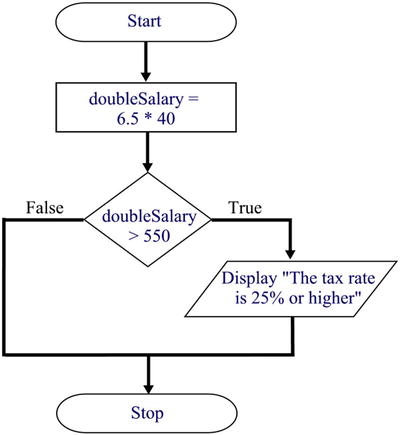
Because doubleSalary is less than 550, nothing is displayed in the console and it seems that the application does nothing. In actuality, the calculation of doubleSalary and the comparison were performed. Let’s prove it.
- 2. Add the following statement after the println statement, save the source, and run the application.
System.out.println(doubleSalary);
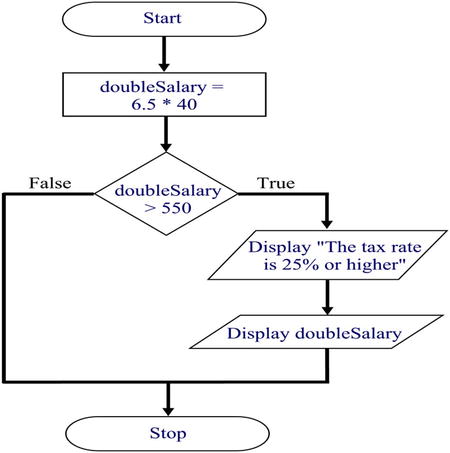
Notice that the value of doubleSalary (260.0) is displayed, proving that the calculation is being performed. Why was the doubleSalary value displayed but not the text “The tax rate is 25% or higher”? Because only one statement is tied to the condition (see Figure 6-3). To associate more than one statement to a condition, the statements must be enclosed in braces. Because we did not have the println statement inside braces, the value is displayed whether the condition is true or false.
- 3. Change the source code so that there is an opening brace after the condition and a closing brace after the last statement (see below).
if (doubleSalary > 550) {
       System.out.println("The tax rate is 25% or higher");
       System.out.println(doubleSalary);
}
Notice that it is customary to place the closing brace on the line following the executable statements and to align the closing brace with the if keyword.
- 4. Save the source and run the application.
Nothing appears again! Well, that’s right, because the condition is still false. Our logic flow (as seen in Figure 6-4) still dictates that nothing is done when the condition is false. Let’s code an else clause so that when the condition is false, something happens.
- 5. Change the source so that an else clause follows the closing brace as follows:
if (doubleSalary > 550) {
       System.out.println("The tax rate is 25% or higher");
       System.out.println(doubleSalary);
} else {
       System.out.println("The tax rate is 15% or lower");
       System.out.println("Somebody needs a raise!");
}
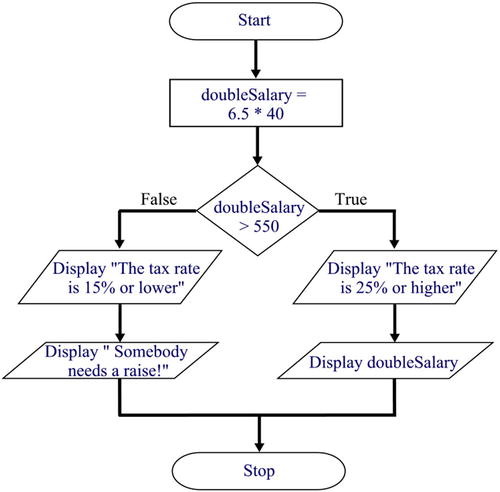
Again it is customary (but not required) to slightly indent the else to denote that the else is associated with the if. This makes the code much easier to understand, especially when there are multiple ifs and elses. Multiple statements can also be tied to an else. Just as with the if, simply enclose the statements in braces. The logic flow can be seen in Figure 6-5.
- 6. Save the source and run the application.
Notice that the else statements are executed.
- 7. Change the calculation so that the pay rate is 15.50, save and print the source code, and run the application.
Notice that the appropriate statements are executed when the condition is true.
Tutorial: Tax Calculation—Part I
In Tutorial/c6.Employee:
- 1. Create two private class variables of type double called taxAmt and taxSal.
- 2. Create a new public method called fedTaxCalc that returns the variable taxAmt and expects 2 parameters: a double variable called payRate and an int variable called exemptions.
- 3. Based on the taxSal calculation in Figure 6-1, in the fedTaxCalc method, enter the formula to calculate the value of taxSal.
- 4. Inside the fedTaxCalc method, enter an if statement that sets taxAmt to zero if taxSal is less than or equal to 50 but 100 if taxSal is not less than or equal to 50.
Okay, that’s enough coding; let’s test a little.
- 5. Add a main method.
- 6. In the main method, add the following statements:
      Employee emp;
emp = new Employee("","","","","");
       System.out.println(emp.fedTaxCalc(15.50, 2));
Can you explain what these statements do?
The first statement creates a reference variable of type Employee called emp. The second statement creates an Employee object (with blank values for all its properties) and assigns the object to the variable emp. The third statement invokes the fedTaxCalc method using a payRate of 15.50 and 2 exemptions. The returned taxAmt is then displayed in the console.
- 7. Save the Employee source and run Employee as a Java application.
The result 100.0 should be displayed. If not, compare your source to the following to determine where the mistake is.
private double taxAmt;
private double taxSal;
public double fedTaxCalc( double payRate, int exemptions) { taxSal = payRate * 40 - exemptions * 60;
       if (taxSal <= 50) {
              taxAmt = 0;
       } else {
              taxAmt = 100;
       }
       return taxAmt;
}

public static void main(String[] args) {
       Employee emp;
       emp = new Employee("","","","","");
       System.out.println(emp.fedTaxCalc(15.50, 2));
}
Compound Conditions versus Nested Ifs
There are actually several ways to code the tax calculation. We will cover two methods: one using compound conditions and the other using nested ifs.
The condition examples so far have been simple conditions: one comparison operator and two values. You can actually build a condition with multiple comparisons by linking the comparisons with && (and) and || (or) operations. For instance, if you were searching for employees with pay rates less than $10 and exemptions greater than 5, the condition could be written as follows:
if ((payRate < 10) && (exemptions > 5))
Notice that the entire condition is enclosed in parentheses. The individual comparisons do not have to be in parentheses but for clarity purposes, we have done so. You can use many &&’s and ||’s in any combination within a single condition; however, the logic becomes very tricky, so be careful.
We could write the tax calculation code using the && operation and four if statements as follows:
if (taxSal <= 50)
        taxAmt = 0;

if ((taxSal > 50) && (taxSal <= 150))
         taxAmt = taxSal - 50 * .12;

if ((taxSal > 150) && (taxSal <= 550))
         taxAmt = 12 + taxSal - 150 * .15;

if ((taxSal > 550) && (taxSal <= 1150))
         taxAmt = 72 + taxSal - 550 * .25;
 else
         taxAmt = 222 + taxSal - 1150 * .28;
Figure 6-6 shows this logic.
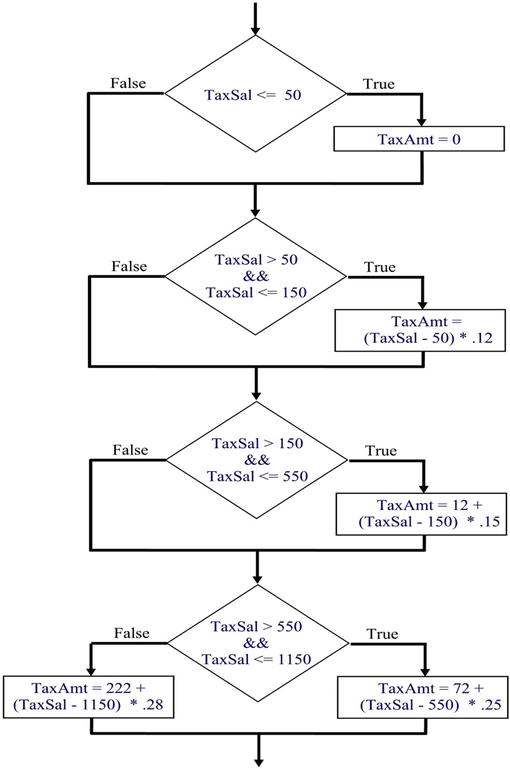
This solution is clear and concise but not efficient. For instance, if the taxable salary amount is less than 50, the tax amount is set to zero but the three succeeding if conditions are still executed. We want the computer to ignore the other comparisons after the tax amount is determined. This can be done by nesting the ifs.
Nesting ifs means that an if statement is placed within another if statement. In this case we will add else keywords to the first three ifs and place each succeeding if inside the previous else clause. For instance, the first if condition checks if the amount is less than 50. Only if this condition is false do we want the computer to check the other conditions. So we add an else clause and place the next if inside the else as follows:
if (taxSal <= 50)
       taxAmt = 0;
else {
       if ((taxSal > 50) && (taxSal <= 150))
              taxAmt = taxSal - 50 * .12;}
Now, only when the tax salary amount is greater than 50 will the second condition be tested. We also only want to check the third condition when the second is false and the fourth condition only when the third is false. So, we will nest those ifs as follows:
if (taxSal <= 50)
       taxAmt = 0;
else {
       if ((taxSal > 50) && (taxSal <= 150))
              taxAmt = taxSal - 50 * .12;
       else {
              if ((taxSal > 150) && (taxSal <= 550))
                       taxAmt = 12 + taxSal - 150 * .15;
              else {
                       if ((taxSal > 550) && (taxSal <= 1150))
                            taxAmt = 72 + taxSal - 550 * .25;
                       else
                            taxAmt = 222 + taxSal - 1150 * .28;
              }
       }
}
This source code matches the logic shown in Figure 6-1.
Notice how the indentation helps identify under which condition the taxAmt calculation will be performed. This will help when trying to debug the application.
If you were really trying to improve efficiency, you would research the employee pay rates and determine which salary ranges were the most prevalent and arrange the order of the conditions so the most frequent salary range was checked first, then the second most, third most, and so on. This would reduce the number of conditions tested even further. Of course, the code would be much more difficult to understand and, if there were problems, harder to debug.
Tutorial: Tax Calculation—Part II
With the above discussion in mind, we will take the middle ground between efficiency and understandability and implement the nested ifs as above.
- 1. Replace the if condition in fedTaxCalc with the nested ifs as above.
- 2. Click to the right of the brace on the first else statement.
Notice that the matching brace 13 lines below is outlined in gray. Because Java uses so many braces and parentheses, this is an extremely helpful RAD feature.
- 3. Move the cursor before the brace.
Notice that the matching brace is not highlighted anymore. To display a paired symbol’s matching symbol, the cursor must be placed after the symbol.
- 4. In the following statement, click to the right of the last parenthesis:
if ((taxSal > 50) && (taxSal <= 150))
Notice that the matching parenthesis after the if is outlined in gray.
- 5. Move the cursor one character to the left.
The parenthesis following the && is now highlighted.
Great, we have the calculation, now we need to test that it is correct. We will code a series of “test cases” in the main method. Once we are satisfied that the calculation is correct, we will then modify the rest of the application to use this new feature.
- 6. After the println statement in the main method, add these four statements:
System.out.println(emp.fedTaxCalc(15.50, 0));
System.out.println(emp.fedTaxCalc(30.75, 0));
System.out.println(emp.fedTaxCalc(7.75, 0));
System.out.println(emp.fedTaxCalc(7.75, 3));
There are many strategies for testing. A simple one is to ensure that every condition and calculation is tested at least once. These added pay rates will test many of the conditions but not all.
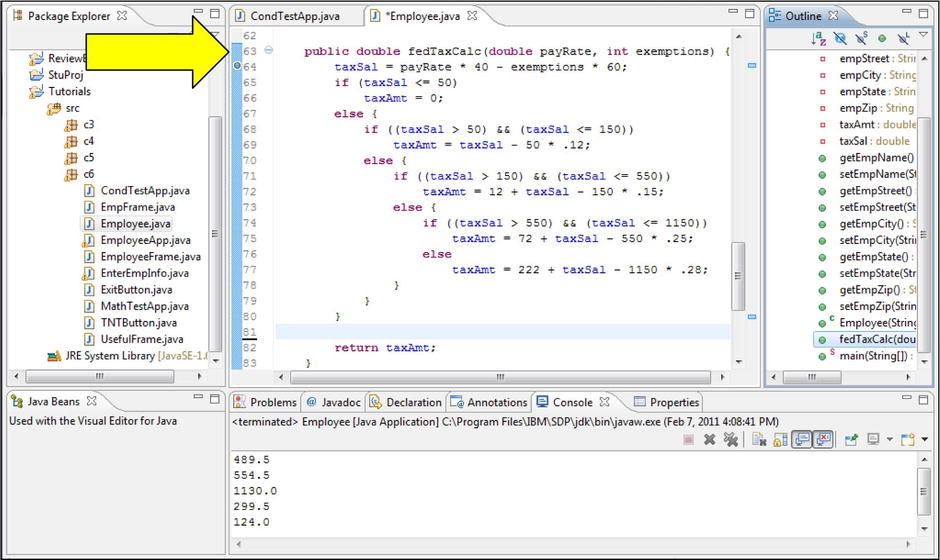
- 7. Save the Employee source and run Employee as a Java application.
Based on the results, is the application ready? Can you explain the results?
There are many different types of errors: syntax errors, compilation errors, and runtime errors. RAD will identify the first two types but is not smart enough to catch the third type of error. Runtime errors can occur for many different reasons: logic errors, user input errors, missing resources (e.g., a required data file is not available), and security (e.g., the application doesn’t have authority to a required data file) are only a few of the possibilities. Fortunately, most source code editors provide two tools to find logic errors: breakpoints and stepping.
Breakpoints are statements that when reached during program execution will temporarily halt program execution. Once a breakpoint is reached, stepping allows the programmer to control when the next statement(s) will be executed. Both of these capabilities are provided by RAD in the Debug perspective.
In case you didn’t notice, there is a major problem with the test results: the values are all incorrect. For instance, the very first test is for a pay rate of 15.50 per hour. For a forty-hour work week this results in a gross salary of $620 per week. Our calculation is returning a tax amount of $489.50. That seems a little steep, don’t you think? On top of that, the example is for two exemptions, which decreases the taxable amount by $120 for a total taxable amount of $500. So, our calculation is saying that $489.50 of the taxable $500 is going to taxes.
Why get out of bed to go to work?
Tutorial: Debugging
We’ll use the Debug perspective to look at what is going on within the calculation.
- 1. In the fedTaxCalc source code, define the taxSal calculation statement as a breakpoint by double-clicking the marker bar (the vertical light blue area to the left of the line numbers) next to the taxSal calculation line number.
A blue circle (indicated by the arrow in Figure 6-7) will be placed in the marker bar to indicate a breakpoint has been defined for the statement.
- 2. To open the Debug perspective, click on the Debug button (the button with the bug icon, to the left of the Run button), and answer yes to the Confirm Perspective Switch prompt.
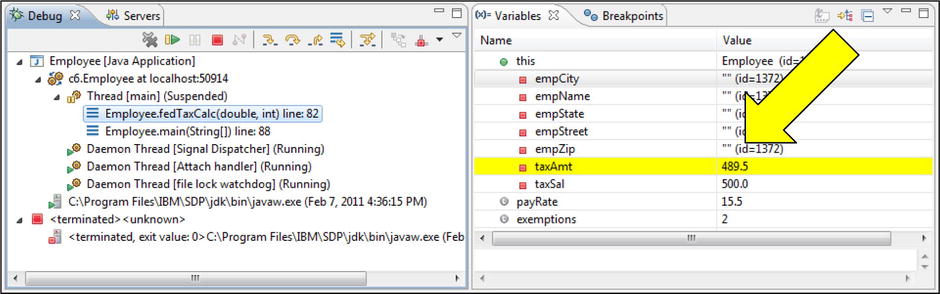
The Debug perspective will be displayed (see Figure 6-8). To start finding the problem, the programmer first determines if the processing (up to the breakpoint) was correct. By examining the variable values, the programmer can usually determine if the processing was correct. (Fortunately, variable values are easily displayed in the Debug perspective.) If the processing was not correct, then the programmer has narrowed down where the problem lies (e.g., the statements before the breakpoint probably contain the error(s)). If the processing was correct, then the statements after the breakpoint probably contain the error(s).
The default Debug perspective is broken up into five panes, several of which support multiple views. We will cover the default views.
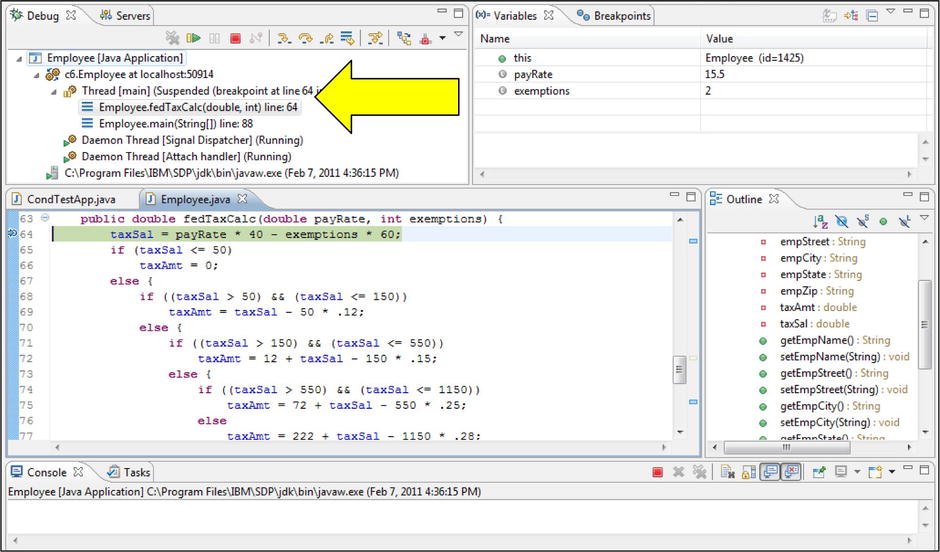
The upper left pane (the Debug view) displays the “thread stack.” The thread stack allows you to trace the path of execution through the various objects and methods up to the breakpoint. At the top of the stack will be an entry displaying the breakpoint line number and method. Additional entries will be for the previous methods that were executed (and the specific line within each that called the next method). In Figure 6-8, notice the first (and highlighted) stack entry for the breakpoint statement (Employee.fedTaxCalc method, line 64) and then the entry for line 88 in the Employee.main method, which invoked the fedTaxCalc method. Essentially, the thread stack shows that the main method was executed first, then the fedTaxCalc method. This “trace of the methods executed” is very helpful for finding logic errors. In this case, the path in the stack trace is the path that we expected the application logic to follow. (Beware: even if the processing flow is correct, there can still be errors in particular statements.)
The upper right pane shows the Variables view. It displays the current method’s parameters and the object (i.e., Employee). Click on the object’s expansion icon (to the left of the green circle) to display the object’s variables and their values.
You can change a variable value by right clicking the variable name, choosing Change Value, and entering a new value.
- 3. Click on the Employee object’s expansion box and adjust the Variables view to display the five properties, all the variables, and their values.
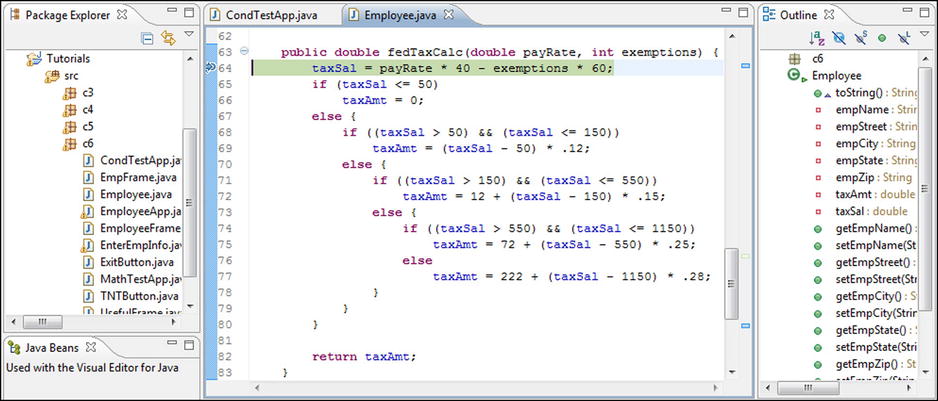
The final three panes provide the same functions as in the Java perspective. At the bottom, the Console view shows the results of println statements. The Outline view displays a tree of all the object’s variables and methods and allows you to traverse the source code by clicking the tree items. Finally, the source code pane displays the object’s source code and allows the programmer to modify the source. One difference with the Debug source pane is that the next executable statement is highlighted, in this case, the breakpoint statement (i.e., line 46).
Note that the breakpoint statement has not been executed. (You can verify this in the Variable view because the taxAmt and taxSal are still equal to zero.) At a breakpoint, the programmer can continue execution, terminate the application, or begin “stepping through” individual statements. If the programmer continues execution, the breakpoint statement is the next statement executed.
Notice that the Debug view (upper left) has its own tool bar. The following table shows the most commonly used buttons (i.e., their icons) and functions.
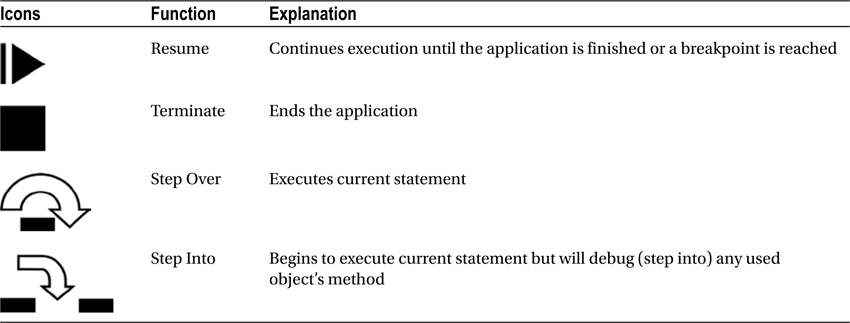
Generally, you will want to use the “step over” function. However, with complex applications that are comprised of many objects, you may need to use “step into.” Step into will “bore into” any other object used in the current statement. For instance, stepping into a statement that used a String object would mean the String class’s source statements would be executed one at a time. Usually the Java-supplied classes are not the source of problems, so you will not want to step into these.
Looking in the Variable view, we see that the payRate and exemptions values have been correctly set. This tells us that the processing up to the breakpoint was correct, so the problem probably lies in or after the breakpoint statement. Therefore, we want to continue program execution until we find a statement that generates an incorrect value.
- 4. Click the “step over” button.
The breakpoint statement is executed, the next statement (line 65) is highlighted in the source code and listed in the stack trace (meaning it is the current statement), and the new value for taxSal (calculated in line 64) is displayed in the variable pane (see Figure 6-9).
Again, the programmer must determine if the processing was correct. Because the taxSal value of 500 is correct, we will step to the next statement.
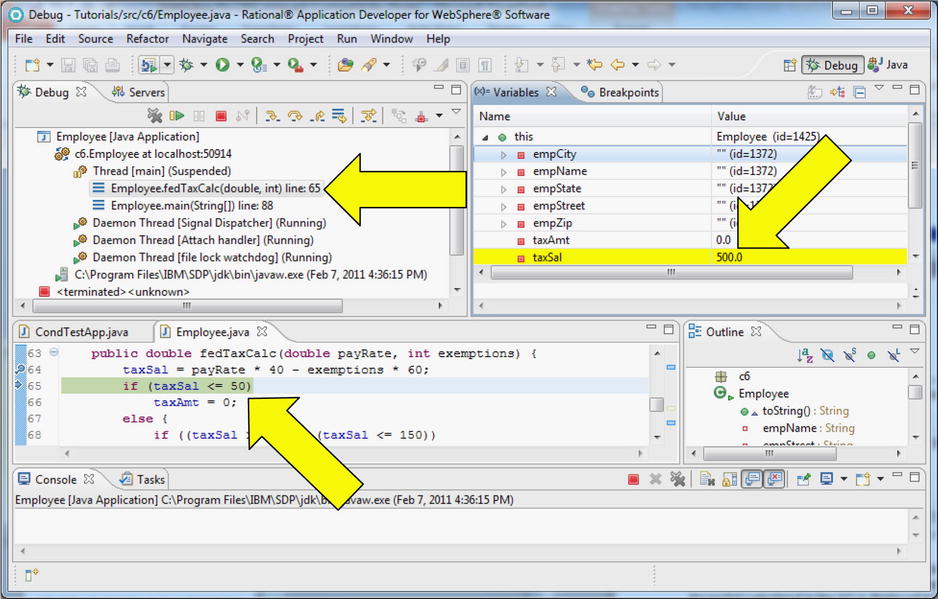
- 5. Click the “step over” button.
Notice that the condition in line 65 was evaluated and the current statement is now line 68. This means that the condition in line 65 was false and processing proceeded to the else clause. This is just as we expected.
- 6. Click the “step over” button.
Again the condition was false, and processing proceeded to the else clause, just as we expected.
- 7. Click the “step over” button.
This time the condition is true, so the taxAmount calculation should be performed. Once again, this is exactly as expected.
- 8. Click the “step over” button.
The calculation is performed (as expected) but the value (489.50) is incorrect (see Figure 6-10). We have found the culprit! Take a closer look at the calculation and try to figure out what is wrong.
The formula’s individual operations are performed in the following order. First, the multiplication is performed (150 * .15) resulting in:
taxAmt = 12 + taxSal – 22.5;
The addition is performed next (12 + taxSal), resulting in:
taxAmt = 512 – 22.5;
Finally, the subtraction is done, resulting in:
taxAmt = 489.5;
This was not expected. The individual operations should have been executed as follows: subtract the already taxed amount (150) from taxSal, calculate the additional tax amount, and add that amount to 12 (the tax amount on the first 150 dollars of income). The formula should be:
taxAmt = (taxSal – 150) * .15 + 12;
There is actually another way that the formula can be specified. Can you figure it out?
Here’s a debugging lesson that will save you a lot of time and aggravation in your programming future: if there is an error in a statement, then similar statements are highly likely to contain errors and should also be checked. In this case, it means you should review the other calculations for errors. Lo and behold, three of the other calculations are also wrong.
- 9. Close the Debug perspective, by right clicking the Debug perspective icon (on the far right of the window) and selecting Close from the pop-up menu.
- 10. Correct the formulas and save the Employee source code.
Figure 6-11 shows the alternative formula solution.
- 11. Run Employee as a Java application.
The results in the console should be:
64.5
89.5
244.4
36.0
9.6
Tutorial: Comparisons between Reference Variables
Comparing primitive variables is easy. Comparing reference variables is a little more complicated. Remember, reference variables contain memory addresses not data. So, when comparing two reference variables, they must both point to the same object in storage. We will use Employee variables first and then String variables to drive this concept home.
- 1. Create a new Java class in c6 called StringCompApp that has a main method stub.
- 2. Enter the following statements in the main method to define two Employee objects and variables:
Employee emp1 = new Employee("Joe","1 Main St.","","","");
Employee emp2 = new Employee("Joe","1 Main St.","","",""); - 3. Enter the following statements after the string definitions:
System.out.println(emp1);
System.out.println(emp2);
if (emp1==emp2)
System.out.println("emp1 is equal to emp2");
else
System.out.println("emp1 is NOT equal to emp2"); - 4. Save the source, and run StringCompApp as a Java application.
The results will be:
Joe
Joe
emp1 is NOT equal to emp2
Are you surprised by the results? Can you explain these results?
emp1 and emp2 are reference variables that contain the location of two different Employee objects. These Employee objects have the same values for their name and street address properties but they are two different objects. Now, the println statements may have confused you. They both display the employee names (not the memory location) because we changed the toString method to return the Employee object name. If we comment out the toString method, you will see a little better why the two objects are not equal.
- 5. In c6.Employee, comment out the toString method.
- 6. Run StringCompApp as a Java application.
The results will look like the following (the memory addresses will probably be different from the following):
c6.Employee@646d646d
c6.Employee@64796479
emp1 is NOT equal to emp2
Notice that the addresses in the variables are different, therefore the comparison results in a value of false.
- 7. In StringCompApp, enter the following statements after the if/else statements:
if (emp1.getEmpName() == emp2.getEmpName())
System.out.println("emp1 name is equal to emp2 name");
else
System.out.println("emp1 name is NOT equal to emp2 name"); - 8. Save the source, and run StringCompApp as a Java application.
The results should be the following:
c6.Employee@7a807a80
c6.Employee@7ac87ac8
emp1 is NOT equal to emp2
emp1 name is equal to emp2 name
Notice that the comparison between the name values was equal. This is the same as comparing two character strings.
- 9. Comment out all the main method statements.
- 10. Add the following statement after the main method header:
System.out.println("Joe" == "Joe"); - 11. Save and run the application.
The result will be the Boolean value true in the console. This same comparison was done between the different objects’ name values. The Employee name getters returned two identical character strings that were compared and found to be equal.
Unfortunately, comparing strings gets a little complicated.
Tutorial: Comparisons between String Variables
Now let’s try to compare string variables:
- 1. Comment out the current main method statement and add the following:
String name1 = new String("Joe");
String name2 = new String("Joe");
System. out .println(name1 == name2); - 2. Save the source and run the application.
As you probably expected, the result is false. We compared two String variables that point to two different String objects (just as we did with the Employee variables earlier).
- 3. Comment out the current main method statements, add the following, and run the application:
String name1 = new String("Joe");
String name2 = name1;
System. out .println(name1 == name2);
This result is true because we set name2 equal to name1. In this case, both String variables point to the same object.
- 4. Comment out the current main method statements, add the following, and run the application:
String name1 = "Joe";
String name2 = "Joe";
System.out.println(name1 == name2);
This produces the surprising result of true. Using the shorthand notation to define the strings activates a JVM feature called “string optimization.” Explaining in detail what happens in the first two statements will clarify “string optimization”.
The first statement does the exact same thing as the first statement in steps 1 and 3: a String object is created and name1’s value is set to the String object’s memory location.
The second statement, because it does not explicitly tell the JVM to create a new object, activates “string optimization.” The JVM searches for any already existing String object that contains the same value (Joe). If there is an already existing object, the memory address of the already existing object is assigned to name2 (as in step 3). This is done rather than creating a new object and assigning the new object’s memory address to name2 (as in step 1). In other words, step 4 saves memory space because only one object is created (as in step 2) instead of two objects (as in step 1).
Now that we have opened up this can of worms, we need to explain another String “feature” regarding changing values. If you change the value of a String, the JVM creates a new String object and changes the variable to point to the new object. The old String object still resides in memory: however, no String variable points to it.
- 5. Comment out the current main method statements, add the following, and run the application:
String name1 = new String("Joe");
String name2 = name1;
System. out .println(name1 == name2);
name1 = "Mary";
System. out .println(name2 + " " + name1);
The results will be as follows:
true
Joe Mary
The fourth statement (name1 = "Mary";) creates a new object (just as if you had specified name1 = new String("Mary");) and the old object, with the value “Joe”, is still in memory. We know this because name2 is still pointing to it. If we added a statement to change name2 to “Sam”, a new object would be created, name2 would be set to point to the new object, and the original object with “Joe” would be in memory with no variable pointing to it.
Intuitively most people think that strings should work the same as primitives (i.e., a new value simply replaces the old value in the original memory location), as seen in Figure 6-12:
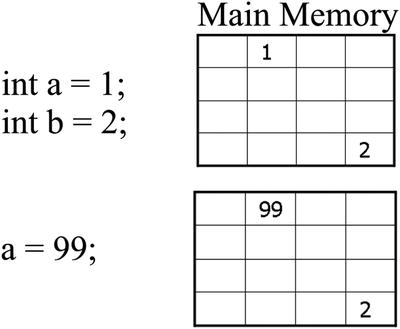
The new value 99 replaces the old value 1.
However, when a new value is assigned to a string, a new object is created and the old object stays in main memory. The memory allocation looks like Figure 6-13.
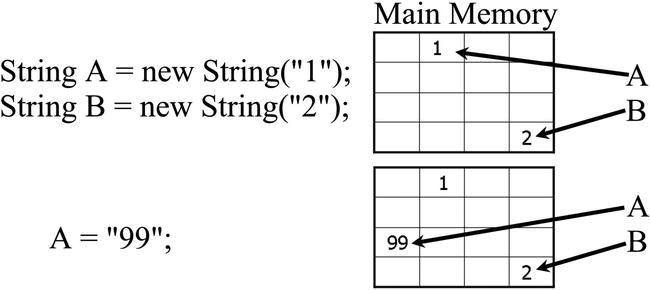
Notice that the object holding the original value of “1” is still in memory and that there are actually three objects. If we then set A equal to B and assigned B a new value of “50”, memory would look like Figure 6-14.
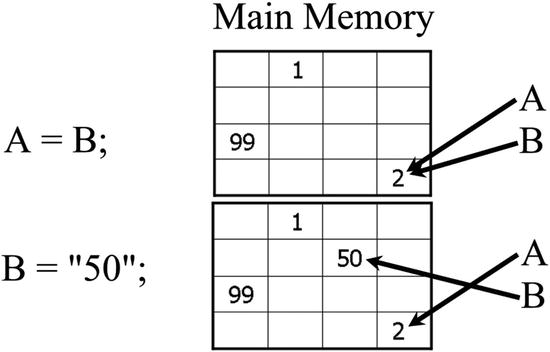
Yikes! Once again, this topic may seem unnecessarily complicated. However, the purpose is to show that String objects are more complicated than they appear and that you should be careful when comparing and changing their values. When using strings you should strive for simplicity and try to avoid complicated value assignments.
Checkboxes
A checkbox appears as a small square text field, with a label to the right. A checkbox is like a toggle switch: it has two states. A toggle switch can be on or off, and a checkbox can be checked or unchecked. Clicking on a checkbox will change the state from unchecked to checked or from checked to unchecked. When in the checked state, the checkbox’s small text field will contain a checkmark and when in the unchecked state, the text field is empty.
Just as a button can be associated with an ActionListener, a checkbox can be assigned an ItemListener. To use an ItemListener, simply implement the ItemListener in the class header, add the ItemListener to the checkbox, and code an itemStateChanged method. The itemStateChanged method will be executed whenever the checkbox’s state is changed.
Checkboxes can also be grouped. Grouped checkboxes have a small round text field (like a Web page radio button). The checkbox will be empty when unchecked and will have a small black circle when checked. Within a checkbox group, only one checkbox can be in a checked state. If a checkbox in a group is checked, checking any another checkbox will change the state of the original checkbox to unchecked.
To create a checkbox group, you must perform the follow steps:
- A. Import the following classes:
- Checkbox
- CheckboxGroup
- ItemListener
- ItemEvent
- B. Add an itemStateChanged method
- C. Implement the ItemListener
- D. Define at least one Checkbox object
- E. Add the ItemListener to the checkbox(es)
- F. Create a CheckboxGroup object
- G. Add the checkbox(es) to the checkbox group
- H. Add the checkbox(es) to the frame
Tutorial: Coding a Checkbox
Now let’s code the checkbox:
- 1. Using RAD, create a new Java class (not a visual class) in Tutorials/src/c6 called CBTestApp as follows:
- c6.UsefulFrame is the superclass;
- an ItemListener interface is implemented; and
- main and inherited abstract method stubs are created.
The source code should look like the following:
package c6;
import java.awt.event.ItemEvent;
import java.awt.event.ItemListener;

public class CBTestApp extends UsefulFrame implements ItemListener {

       public void itemStateChanged(ItemEvent e) {
       }

       public static void main(String[] args) {
       }
}
So far, part of step A and all of steps B and C (from above) have been coded. Because we coded a little, let’s test a little.
- 2. Add the following constructor:
public CBTestApp() {
       setVisible( true );
} - 3. Add the following statement to the main method:
CBTestApp cbta = new CBTestApp();
- 4. Save the source and run CBTestApp as a Java application.
A very boring frame should be displayed. This boring frame, however, proves that everything has been coded correctly, so let’s not ridicule it too much.
- 5. Click the Close button to close the frame.
- 6. After the existing import statements, add the following statements:
import java.awt.Checkbox;
import java.awt.CheckboxGroup;
This finishes step A.
- 7. Add the following statement to create a class variable of type Checkbox called empAppCB and assign a new Checkbox object with the text “Employee Application” to empAppCB.
private Checkbox empAppCB = new Checkbox("Employee
              Application");
This starts step D.
- 8. In the constructor, before the frame is set visible, add the following statements.
empAppCB.setBounds(94, 62, 148, 23);
empAppCB.addItemListener( this );
add(empAppCB);
The first statement finishes the checkbox definition (as specified in step D). The second statement adds the ItemListener to the checkbox (as specified in step E). The third statement adds the checkbox to the frame (as specified in step H). So far, we have done steps A through E and step H. This is enough code to test that the checkbox appears on the frame and that the ItemListener has been added correctly.
- 9. Add the following statement to the itemStateChanged method:
System.out.println("Checkbox was clicked!");
Can you explain why/how this new statement tests that the ItemListener has been tied to the checkbox?
- 10. Save the source and run CBTestApp as a Java application.
- 11. On the frame, click the checkbox four times and click the Window Close button.
The text from the println statement should appear four times in the console. In addition, the check mark should have appeared and/or disappeared each time the checkbox was clicked. Notice also that clicking anywhere on the checkbox (the label or the tiny text field) changes the state.
Tutorial: Coding a Checkbox Group
We need to add a couple more checkboxes, define a checkbox group (step F), and then add the checkboxes to the checkbox group (step G).
- 1. Define two more checkboxes by placing each of the following statements in its correct location within CBTestApp:
private Checkbox shipAppCB = new Checkbox(
"Shipment Application");
private Checkbox sortAppCB = new Checkbox(
"Sorting Application");
shipAppCB.setBounds(94, 142, 148, 23);
add(shipAppCB);
shipAppCB.addItemListener( this );
sortAppCB.setBounds(94, 222, 148, 23);
add(sortAppCB);
sortAppCB.addItemListener( this );
setExitButtonLocation();
Let’s test that you added the statements in the right places.
- 2. Save the source and run CBTestApp as a Java application.
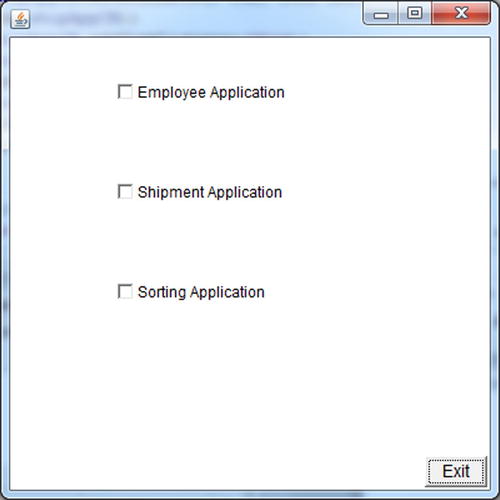
If you added the statements correctly, the frame should appear as in Figure 6-15.
- 3. Click the Exit button to close the application.
Now we need to perform steps F and G.
- 4. Add the following statement to create a CheckboxGroup object and class variable:
private CheckboxGroup cbg = new CheckboxGroup();
Can you explain what this statement does?
- 5. Add each of the following statements after the appropriate checkbox’s setBounds statement:
empAppCB.setCheckboxGroup(cbg);
shipAppCB.setCheckboxGroup(cbg);
sortAppCB.setCheckboxGroup(cbg); - 6. Save the source and run CBTestApp as a Java application.
Notice that the checkboxes are now round, indicating they are in a checkbox group.
- 7. Click the shipAppCB checkbox, then empAppCB, then sortAppCB, then the Exit button.
Notice that clicking one checkbox unchecks the previously clicked checkbox and that the itemStateChanged method is being called each time any checkbox is clicked.
Tutorial: Working with an ItemEvent and States
Until now, we’ve glossed over events by simply saying they are passed to the itemStateChanged (or actionPerformed) methods. Events are objects and have useful methods and properties. For example, we have added the ItemListener to three checkboxes. Wouldn’t it be nice to be able to tell which checkbox has been clicked? Well, it just so happens that the ItemEvent’s getSource method will return the object that was clicked. Alternatively, checkboxes have a method called getState that returns a Boolean value. If the checkbox is checked, the state value is true, and it is false if not checked. We will show how to use both methods to determine which checkbox has been selected.
- 1. Replace the source code in the CBTestApp itemStateChanged method with the following nested ifs:
if (empAppCB == e.getSource()){
System.out.println("Employee App was selected!");}
else if (shipAppCB == e.getSource()){
        System.out.println("Shipment App was clicked!");}
else if (sortAppCB == e.getSource()){
               System.out.println("Sorting App was clicked!");}
The earlier if examples had comparisons between primitive variables and fixed constants. Notice that this time we are comparing the reference variable empAppCB to the object returned by the ItemEvent’s getSource method. When the objects match, the appropriate message will be displayed and no other checkboxes will be tested.
- 2. Save the source and run CBTestApp as a Java application.
- 3. Click the shipAppCB checkbox, then empAppCB, then sortAppCB, then the Exit button.
Notice that the appropriate message was displayed each time. Now we’ll use the getState method in the if conditions to determine which checkbox is selected.
- 4. Comment out the code in the itemStateChanged method, add the following nested ifs, and run CBTestApp:
if (empAppCB.getState())
System.out.println("Employee App was selected!");
else if (shipAppCB.getState())
               System.out.println("Shipment App was clicked!");
        else if (sortAppCB.getState())
System.out.println("Sorting App was clicked!"); - 5. Click the shipAppCB checkbox, then empAppCB, then sortAppCB, then the Exit button.
Again, the appropriate message is displayed each time.
- c6.UsefulFrame as the superclass;
- an ItemListener interface; and
- main and inherited abstract method stubs.
- 2. In the Design pane, click the frame to display the Properties view.
- 3. Modify the frame properties so the title is “Application Menu” and the size is 300, 300.
- 4. Drag and drop three checkboxes onto the frame and name them empAppCB, shipAppCB, and sortAppCB.
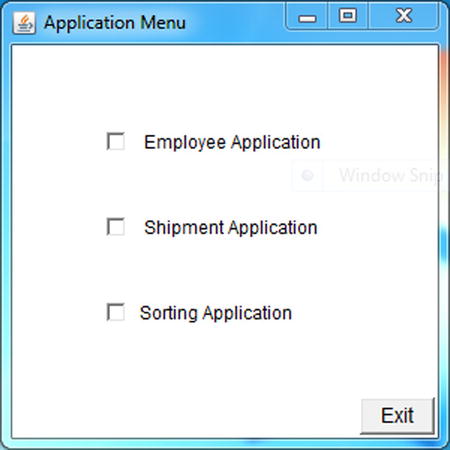
- 5. Modify the checkboxes such that when displayed they will look like Figure 6-16.
Now comes the tricky part. A checkbox group is not a visual component; therefore, it does not appear in the AWT (or any GUI) list of components.
- 6. At the top of the Palette, click on Choose Bean.
The “Choose a Bean” frame will be displayed. A bean is a Java class that has a default constructor and a getter and setter method for each property. (By requiring beans to have getters and setters, it is easy for RAD [and other IDEs] to determine what a bean’s properties are and create an appropriate property pane.) Beans are an important concept that will be covered in much more detail in later chapters. However, for something that has received so much hype they are pretty simple!
- 7. On the “Choose a Bean” frame, begin typing checkboxgroup (see Figure 6-17).
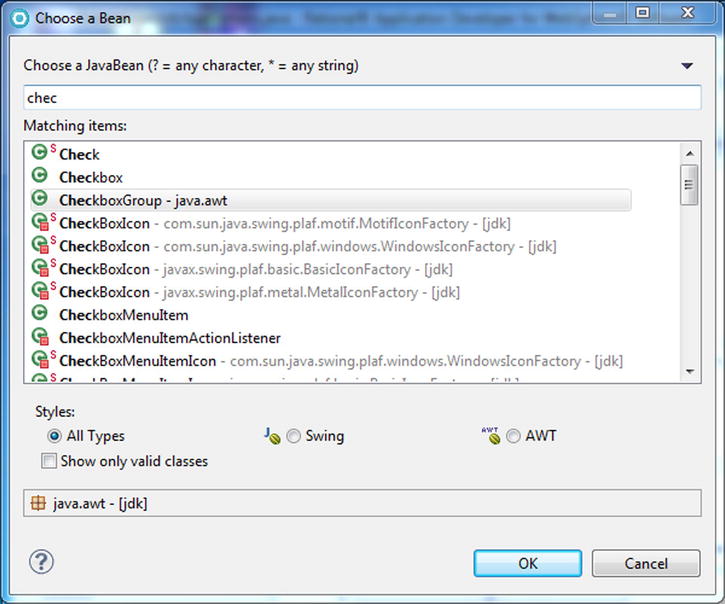
A list of matching class names will be displayed. You must select the component and then add it to the design view (just as you would to select a label or checkbox). RAD, however, requires that the checkbox group icon be added outside the frame.
- 8. In the class list, click on CheckboxGroup
- 9. Click the OK button.
The checkbox group has been selected. It must now be added to the class.
- 10. Move the cursor over the frame.
Notice the cursor changes to the universal “no” symbol. This is because a checkbox group is a nonvisual component and cannot be added to a visual component (the frame). You must add the checkbox group to the Design pane but outside the frame.
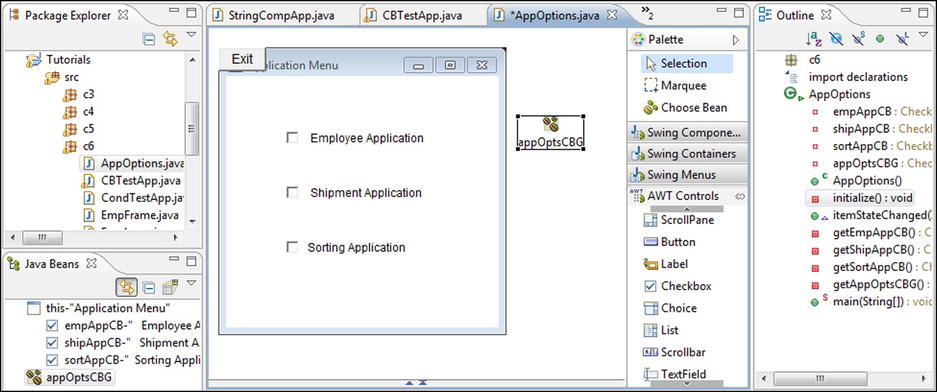
- 11. In the Design pane, click anywhere to the right of the frame and specify appOptsCBG as the name.
The name of the variable and the icon for a Java bean will be placed in the white area to the right of the frame. See Figure 6-18.
Because the CheckboxGroup is a nonvisual component, VE does not “work” well with it. For example, in the Properties view you can’t specify appOptsCBG in the checkboxGroup property value area. (Very strange.) So, we will have to enter the source code by hand.
- 12. In the getEmpAppCB method, add the following code to assign the empAppCB checkbox to appOptsCBG.
empAppCB.setCheckboxGroup(this.getAppOptsCBG());
- 13. Update the getShipAppCB and getSortAppCB methods so the other two checkboxes are added to appOptsCBG.
All of the checkboxes are now round indicating they are part of a group.
Tutorial: Tying the Frames Together
We now must finish modifying the application so that the AppOptions frame is displayed first. Then, based on the checkbox selected, the correct application frame will be displayed. In other words, we’ll create a new class called TNT that displays the AppOptions frame. If someone checks the Employee Applications checkbox, we’ll then display the EnterEmpInfo frame.
- 1. Create a new Java class called TNT that has a main method.
- 2. Enter the code to create an AppOptions object assigned to a variable called ao.
- 3. Save the TNT source code and run TNT as a Java application.
Why doesn’t anything happen? Because the AppOptions frame’s visible property was never set to true, nothing was displayed.
- 4. In AppOptions, set the visible property to true.
- 5. In AppOptions, add the source code to reset the Exit button location.
- 6. Save the AppOptions source code and run TNT as a Java application.
The AppOptions frame will be displayed with the Exit button correctly positioned.
- 7. Click the Exit button to end the application.
- 8. In the AppOptions source code, add the ItemListener to each of the checkboxes.
- 9. In AppOptions, add the nested ifs to check each checkbox’s state.
- 10. Add the source code such that if empAppCB is checked the EnterEmpInfo frame is displayed. (Define the EnterEmpInfo variable name as eei.)
- 11. Add the source code such that if either of the other checkboxes is selected, the message “Sorry that application is not available” is displayed in the console.
- 12. Save the AppOptions source code and run TNT as a Java application.
The “Application Menu” frame should be displayed.
- 13. Click the Sorting Application checkbox.
The “Sorry that application not available” message should be displayed in the console.
- 14. Click the Employee Application checkbox.
The “EnterEmpInfo” frame should be displayed.
- 15. On the EnterEmpInfo frame, click the Exit button.
Notice that both the AppOptions and EnterEmpInfo frame disappear. This is because the Exit button uses the System.exit() statement, which shuts down the entire JVM.
- 16. Run TNT as a Java application, click the Employee Application checkbox, and, on the EnterEmpInfo frame, click the window close button in the upper right of the frame.
Notice that the AppOptions frame is still displayed. This is because EnterEmpInfo frame’s windowClosing method (which it inherited from UsefulFrame) uses the dispose method, not System.exit(). The dispose method only deletes the current object (the EnterEmpInfo frame), whereas System.exit() ends the JVM, thereby deleting all objects.
Earlier we mentioned that there are other GUI component sets available. Swing is one of them and now is a good time to demonstrate how Swing and AWT are different yet similar. We will duplicate the frame we just created using Swing components.
- 1. In c6, create a new visual class called AppOptionsSwing.
- 2. On the New Java Visual Class frame, in the Style pane, specify the superclass by expanding Swing and selecting Frame.
- 3. Also, on the New Java Visual Class frame, implement an AWT action listener, create a main method stub, and have stubs for the inherited abstract methods.
- 4. In the Visual Editor, click on the JFrame title and display the properties view.
Notice that JFrame properties are almost exactly the same as a Frame. However, some of the default values are different, for instance, the background color.
- 5. Display the JFrame source code.
Components are not placed directly on a JFrame. Instead, a JFrame must have a content pane on which the components are added. Notice that there is a JPanel variable called jContentPane (defined on line 14) and that in the initialize method (line 49) the JContentPane property is set to the JPanel object (created and returned by the getJContentPane method). So, a JFrame is a little more complicated than a Frame because it needs a content pane. However, the Visual Editor hides this from the programmer by creating a JPanel and assigning it to the JFrame’s content pane property.
- 6. In the Visual Editor Design pane, watch the properties view and click on the content pane area (center of the JFrame).
Notice that the properties change. This is because the JFrame and JPanel are two different classes with different properties.
- 7. In the Swing Components tray, click on JCheckBox and move the mouse cursor over the panel.
Notice how the panel “lights up” with various sections. This occurs because the JPanel has a default layout of BorderLayout (just like Frame).
- 8. In the Properties view, change the JPanel Layout property to null and press Enter.
- 9. Place a JCheckBox on the panel and accept the default name.
Notice that there are quite a few more JCheckBox properties than there are AWT checkbox properties. Many of these properties are very useful. For instance, flyover text can be defined (the toolTipText property) or a keystroke shortcut can be assigned (the mnemonic property).
- 10. Specify “Starts Shipment Application” for the toolTipText property.
- 11. Click on the mnemonic property to display the Java Property Editor button.
- 12. Click on the Java Property Editor button to display the Java Property Editor.
You can scroll through the list of options and select a key. Selecting a key as a shortcut means that the selected key when pressed with the Alt key will automatically select the check box.
- 13. From the list, select B.
- 14. Click the OK button and save AppOptionsSwing.
- 15. Create a Java class called TNTSwing that creates an AppOptionsSwing object and assigns it to variable aos.
- 16. Run TNTSwing.
Nothing happened—why? We never changed the AppOptionsSwing’s visible property to true!
- 17. Change the AppOptionsSwing’s visible property to true and run TNTSwing.
- 18. Move the mouse cursor over the JCheckBox.
Notice the flyover text is displayed.
- 19. Press and hold the Alt key and then press the B key.
Notice that the checkbox has been checked.
- 20. Close the JFrame.
JCheckBoxes can be grouped just like Checkboxes, however, the class is ButtonGroup not CheckBoxGroup. Again, the Swing implementation of a checkbox group is very similar to AWT but there is a twist: the checkboxes do not become round in Swing. Now this may sound minor, but it is a standard that radio buttons (round check boxes) are used to indicate that only one item can be selected from the group. So, to abide by this standard, we need to use JRadioButton, not JCheckBox.
- 1. In the Visual Editor, delete the JCheckBox and add three JRadioButtons called empAppRB, shipAppRB, sortAppRB with the same text and positioning as the checkboxes in AppOptions.
Notice that the class has a new warning message. Even though you deleted the checkbox from the frame, RAD left the import JCheckBox statement in the source code. Since the JCheckBox is never used, the import statement is not needed and RAD flags the statement with a warning. (One would think that because RAD is smart enough to know that the statement isn’t needed, it would have been smart enough to delete the statement. Oh well.)
- 2. Assign the same mnemonic and toolTipText property values to shipAppRB that were assigned to the deleted JCheckBox in steps 10 and 13 above.
- 3. In the Visual Editor palette, click on Choose a Bean.
- 4. In the Choose a Bean window, begin typing ButtonGroup and when it appears in the Matching types pane, click on it to select it.
- 5. Click the OK button.
- 6. In Visual Editor, click to the right of the JFrame and accept the default name.
The variable buttonGroup will be placed in the Design pane. As with AWT checkboxes, you will have to add code to tie the radio buttons to the button group. However, instead of changing each checkbox’s property, the JRadioButtons are added to the ButtonGroup.
- 7. In the getButtonGroup method, make the radio buttons part of the button group by adding the following after the ButtonGroup object is assigned to the variable buttonGroup.
buttonGroup.add(empAppRB);
buttonGroup.add(shipAppRB);
buttonGroup.add(sortAppRB); - 8. In the getJContentPane method, after sortAppRB is added to the content pane, make the button group part of the content pane by adding getButtonGroup();.
- 9. Run TNTSwing.
Click the radio buttons and prove that only one can be selected.
To finish the Swing implementation, we must tie the action listener to the radio buttons and write the code for the actionPerformed.
- 10. Add the action listener to each button by inserting the following statements in the appropriate getXXXAppRB method:
empAppRB.addActionListener(this);
shipAppRB.addActionListener(this);
sortAppRB.addActionListener(this);
In the actionPerformed method, we want to display the EnterEmpInfo frame if the first radio button is clicked. When the other two buttons are clicked, display text saying that the other applications are not available. To determine which radio button was clicked we will use the action event’s getSource method to retrieve the radio button object that was clicked and compare it to the three radio buttons. This was also very similar to one of the techniques we used with the AWT checkboxes.
- 11. In the actionPerformed method, add the following code:
if (empAppRB == e.getSource()) {
EnterEmpInfo eei = new EnterEmpInfo();}
else if (shipAppRB == e.getSource())
System. out .println("Sorry the ship app is not available");
       else if (sortAppRB == e.getSource())
System. out .println("Sorry the sort app is not available"); - 12. Run TNTSwing and click the Employee Application radio button.
Notice that a Swing-based object (AppOptionsSwing) can create an AWT-based object (EnterEmpInfo) and vice versa. Mixing AWT and Swing components is considered bad design because the application lacks a consistent “look and feel.” However, the purpose of this exercise was not to demonstrate good design but to show how similar yet different the two GUI component sets are. Remember, the AWT components are easier to use but the Swing components have extra functions/features.
Tutorial: Using the New Calculation
Let’s use the new calculation:
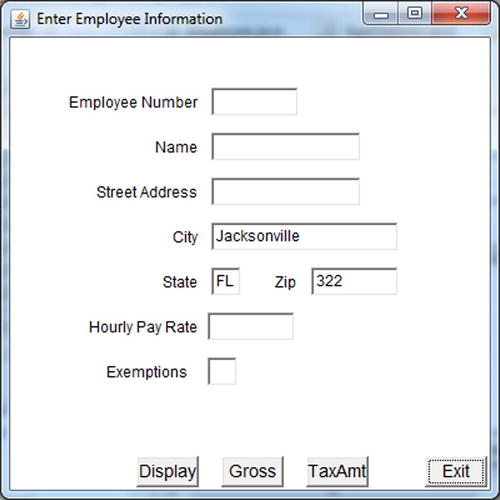
- Set the Title to “Enter Employee Information”
- Change the names of empCSZlbl to cityLbl and empCSZTF to cityTF
- Change the text of cityLbl to “City”
- Change the text of cityTF to “Jacksonville”
- exmpLbl with the text “Exemptions”
- stateLbl with the text “State”
- zipLbl with the text “Zip”
- exmpTF (accept the default size)
- stateTF with the text “FL” (accept the default size)
- zipTF with the text “322”
- Same size as the Gross button
- Labels that say “Display” and “TaxAmt”
- 5. Adjust the position of the components so that the frame looks like Figure 6-19.
- 6. Change the source code to add the ActionListener to the two new buttons.
- 7. In the actionPerformed method, comment out the println statement.
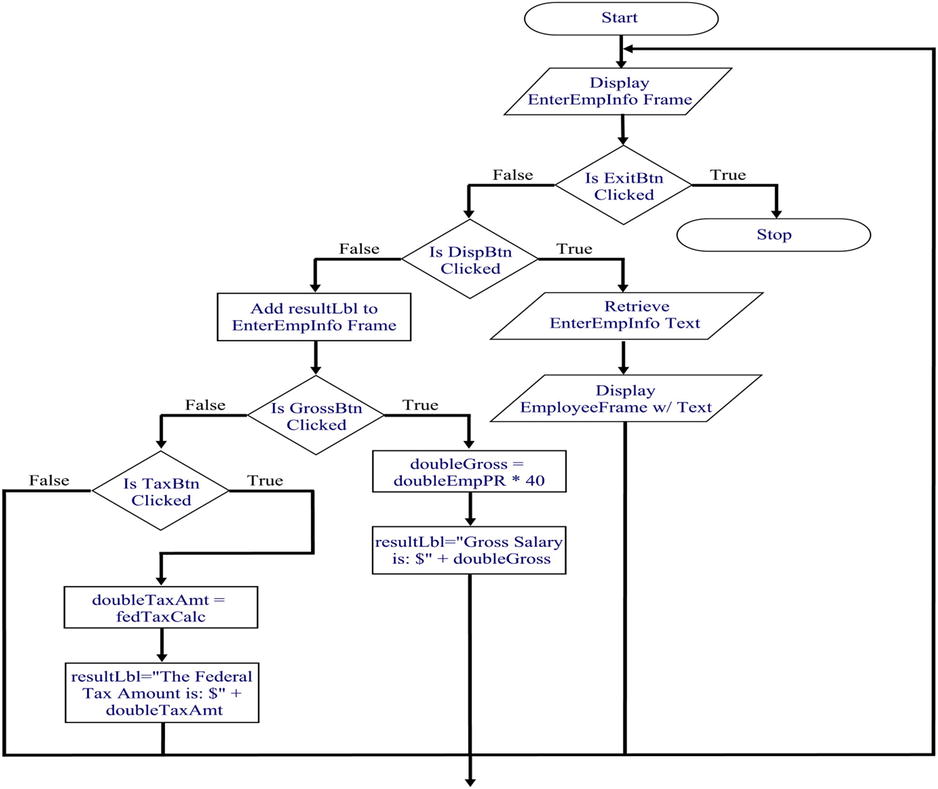
- 8. In the actionPerformed method, enter a nested if that uses the ActionEvent’s getSource method to determine which button was clicked and perform the following logic:
If the Display button is clicked
Create an EmployeeFrame object with the text field information from the EnterEmployeeInfo frame and assign it to a variable called ef.
Else Add the result label to the frame
If the Gross button is clicked
Calculate doubleGross and set the result label’s text
Else If the TaxAmt button is clicked
Run the Employee fedTaxCalc method and set the result label text to “The
Federal Tax amount is: $” concatenated to the amount returned by fedTaxCalc
The flowchart for this logic can be seen in Figure 6-20.
- 9. Save the source code.
- 10. Test that the tutorial was done correctly by running TNT as a Java application and then select Employee Application.
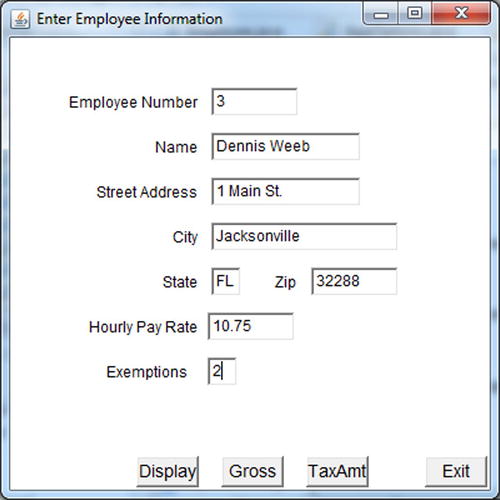
The Enter Employee Information Frame should appear as in Figure 6-21.
- 11. Enter the information as seen in Figure 6-21 and click the Display button.
The Employee Information frame should be displayed as in Figure 6-22.
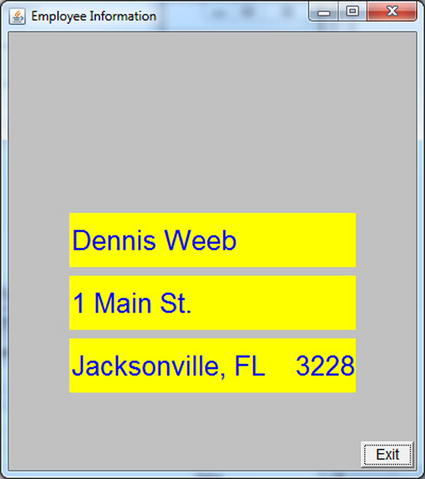
- 12. On the Employee Information frame, click the Window Close button.
- 13. On the Enter Employee Information frame, click the Gross button.
The message “Gross salary is: $430.00” will be displayed.
- 14. On the Enter Employee Information frame, click the TaxAmt button.
The message “The Federal Tax amount is: $36.00” will be displayed. Congratulations, you have created a full-fledged Java application!
The EnterEmpInfo actionPerformed method should look similar to the following:
public void actionPerformed(ActionEvent e) {
String empPayRate = empPRTF.getText();
double doubleEmpPR, doubleGross;
doubleEmpPR = Double.parseDouble(empPayRate);

if (dispBtn == e.getSource()){
        Employee emp =
        new Employee(empNameTF.getText(),
                      empStreetTF.getText(),
                      cityTF.getText(),
                      stateTF.getText(),
                      zipTF.getText());
       EmployeeFrame ef = new EmployeeFrame(emp);
}
else {
        this .add(resultLbl);

        if (grossBtn == e.getSource()){
              doubleGross = doubleEmpPR * 40;
               resultLbl.setText("Gross Salary is: $" +
              doubleGross + "0");
        }
        else {
              if (taxBtn == e.getSource()){
                      Employee emp =
                          new Employee("","","","","");
                      String exmp = exmpTF.getText();
                      int intExmp = Integer.parseInt(exmp);
                      double doubleTaxAmt =
                          emp.fedTaxCalc(doubleEmpPR, intExmp);
                      resultLbl.setText("The Federal Tax amount
                                 is: $" + doubleTaxAmt + "0");
              }
        }
}
//              System.out.println(empPayRate);
}
Tutorial Results
Let’s go over the results:
- In the Tutorials project, a new package called c6.
- In c6, new classes called CondTestApp, StringCompApp, CBTestApp, AppOptions, TNT, AppOptionsSwing, and TNTSwing.
- A new method in Employee called fedTaxCalc.
- Changes to the EnterEmpInfo class as explained in the tutorials.
- A printout of the CondTestApp and StringCompApp source code.
Review Questions
Here are the review questions:
- Explain the difference between the System.exit and dispose methods.
- What is the difference between the following two operators =, = = ?
- What is the thread stack?
- What is a runtime error? Give examples of what could cause a runtime error.
- What does an event’s getSource method do?
- Explain the relationship between an ActionListener, a Button, an ActionEvent, and an actionPerformed method.
- What are the differences between stand-alone checkboxes and checkboxes that have been assigned to a checkbox group?
- Explain the difference between primitive and reference variable comparisons.
- Describe the function of the plus sign (+) when used with numeric values versus character values.
- What are the advantages and disadvantages of using AWT versus Swing?
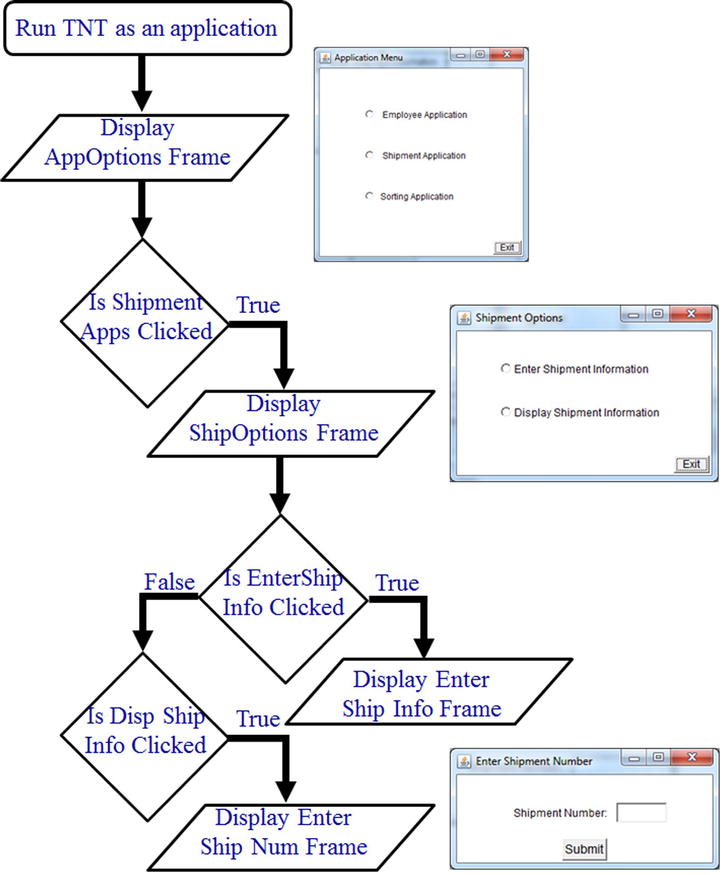
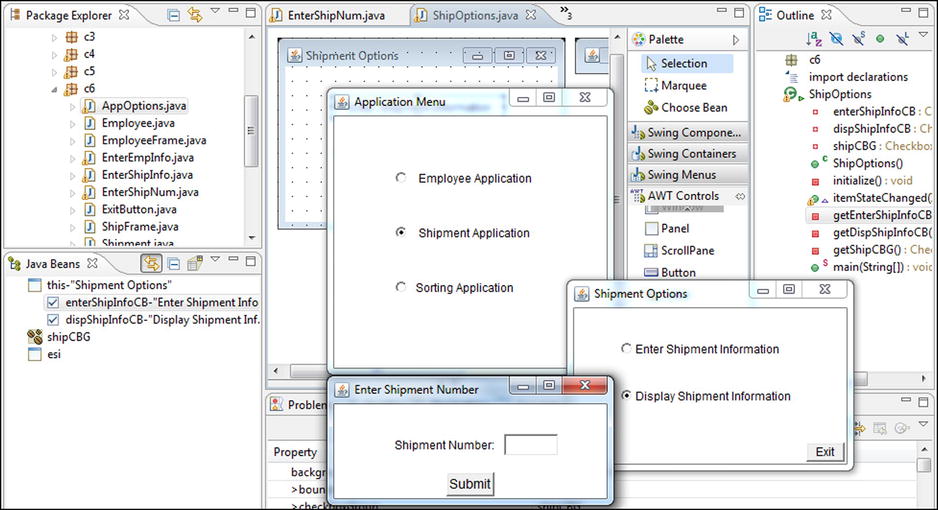
In this exercise, you will create two new frames called EnterShipNum (see Figure 6-14) and Ship-Options (see Figure 6-15). ShipOptions will provide choices to enter or display shipment information. When a user chooses the Display Shipment Information option, they will be prompted to supply the shipment number (i.e., the EnterShipNum will be displayed). When someone chooses the Enter Shipment Information option, the EnterShipInfo frame will be displayed.
The flow between the new and old frames can be seen in Figure 6-23. (Note that thumbnail images of the new frames appear to the right of the I/O operation that displays the frame.)
In the ReviewEx project:
- Create a new package called c6.
- Select all the classes in ReviewEx’s c5 package, then copy and paste them into c6
- From Tutorials/c6, copy the Java files AppOptions, Employee, EmployeeFrame, EnterEmp- Info, TNT, and TNTButton into ReviewEx/c6.
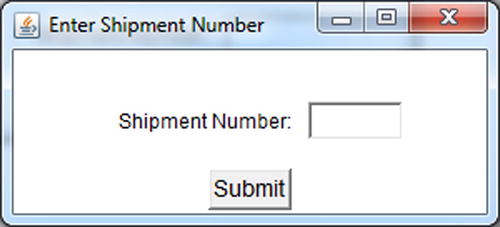
- Create a UsefulFrame subclass called EnterShipNum that looks like Figure 6-24, implements an ActionListener that is tied to the Submit button (which is a TNTButton), and has an actionPerformed method. The text field name should be shipNumTF.
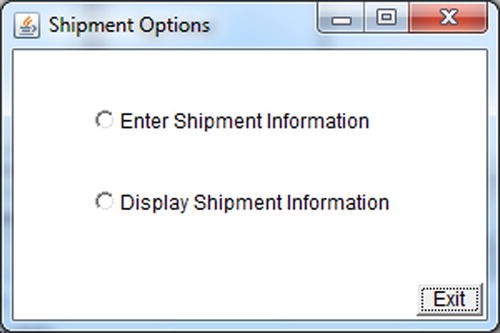
- Create another new UsefulFrame subclass called ShipOptions that looks like Figure 6-25 and implements an ItemListener that is tied to the checkboxes in a checkbox group.
- Code an itemStateChanged method such that the EnterShipInfo frame is displayed when the Enter Shipment Information checkbox is clicked, and when the Display Shipment Information checkbox is clicked, the EnterShipNum frame is displayed.
- Modify AppOptions so that ShipOptions frame is displayed when the Shipment Application checkbox is clicked.
- Arrange the frame locations so they appear as in Figure 6-26.
Results of the Review Exercise
Let’s go over the results:
- A new package called c6 in the ReviewEx project.
- Two newly coded classes in c6 (of 15 total classes) called ShipOptions and EnterShipNum that perform as specified above.
- AppOptions modified to display ShipOptions.
Check that the Exercise Was Done Correctly
Time to check that we did everything correctly:
- Run TNT and verify that the Enter Employee Info frame and the Shipment Options frame are displayed when the appropriate Application Menu checkbox is clicked.
- On Shipment Options, verify that the Enter Shipment Info frame and Enter Shipment Number frame are displayed when the appropriate checkbox is clicked.
In this exercise, you will tie the SortItem frame to the Application Menu frame and insure that all the frames work correctly.
- In the CE project, create a new package called c6.
- Copy the following into CE/c6 and overwrite any duplicate classes:
All the classes in CE/c5              ReviewEx/c6.AppOptions
ReviewEx/c6.Employee                  ReviewEx/c6.EmployeeFrame
ReviewEx/c6.EnterEmpInfo              ReviewEx/c6.EnterShipNum
ReviewEx/c6.ShipOptions ReviewEx/c6.TNT - Change EnterEmpInfo, AppOptions, ShipOptions, and EnterShipNum (and another frames that need it) so the header label is positioned correctly and the other components fit with the header label. Hint: for EnterShipNum you will have to make the frame larger.
- Change AppOptions so that the SortItem frame is displayed when the Sorting Application option is chosen.