
![]()
Application Improvements
In this chapter, we will add functions to not only make our application easier to use, but also decrease the chance of “runtime” errors. For instance, we will begin using choice components to insure that only valid data is supplied to the Java application. In addition, we will “catch” errors before the user sees them. Once an error is caught, the application will either resolve the error or tell the user (in much clearer/simpler language than the JVM error messages) what the problem is and how to solve it. We will also explain the concept of iteration (looping) and show how programmers incorporate iteration to increase efficiency.
We will also introduce some new Java formatting classes that make displayed information easier to read, understand, and produce and, finally, demonstrate a powerful Java technique: method overloading.
In this chapter, you will learn about:
- Editing and auditing data
- Formatting numeric, date, and time data
- The StringBuffer class
- Exceptions
- try and catch keywords
- The Choice class
- Iteration (looping)
- Method overloading
After this chapter, you should be able to:
- Define, throw, and catch an exception
- Create, populate, and read selected text from a Choice object
- Define a loop
- Control the format of numeric, date, and time data
- Use and manipulate string buffers
Exceptions are “thrown” by the JVM when a problem is encountered during execution of a Java application. Again, there can be many reasons for a “run time” exception: user error, system error, security violation, network problems, and so on. The JVM tries to identify the problem and puts this information in an Exception object. The Exception object contains information such as the type of exception that was encountered, an error message, and the stack trace. When a problem is encountered, the JVM’s standard procedure is to display the Exception object and end the application.
You have seen what this looks like. (See the console pane in Figure 7-1 at the end of the next tutorial if you need a reminder.) How do you think a user would react to receiving these types of messages? This is why it is a good programming practice to anticipate what errors may occur (i.e., what exceptions may be thrown) and stop the JVM from responding (i.e., catch the exception within the application program). Once the ugly JVM message is stopped from being displayed (i.e., the application catches the exception), the application should either resolve the problem or display a user-friendly message with information so that the user can resolve the problem.
Tutorial: Exceptions
Let’s look at exceptions:
- In Tutorials/src, create a new package called c7.
- Copy all of the following classes from c6 to c7:
AppOptions       Employee        EmployeeApp
EmployeeFrame    EnterEmpInfo    ExitButton
TNT TNTButton UsefulFrame - Run c7.TNT as an application.
- Select Employee Application
- Enter “$9.50” (including the $ in the text field) for Hourly Pay Rate, “six” for Exemptions, and click the Gross button.
The result should look like Figure 7-1. The text in the console pane is the JVM’s printout of the Exception object. Notice that the first line contains a general error message that identifies the type of exception (NumberFormatException) and the offending piece of input ($9.50). The remaining lines show the stack trace. Most of the stack trace is unintelligible because you don’t know how the supplied classes (Frame, String, Double, etc.) work internally. For example, the Double class’s parseDouble method creates objects and invokes methods of which you are blissfully unaware. The second line in the console pane shows that the readJavaFormatString method in the FloatingDecimal class (of which you know nothing) was actually where the error occurred.
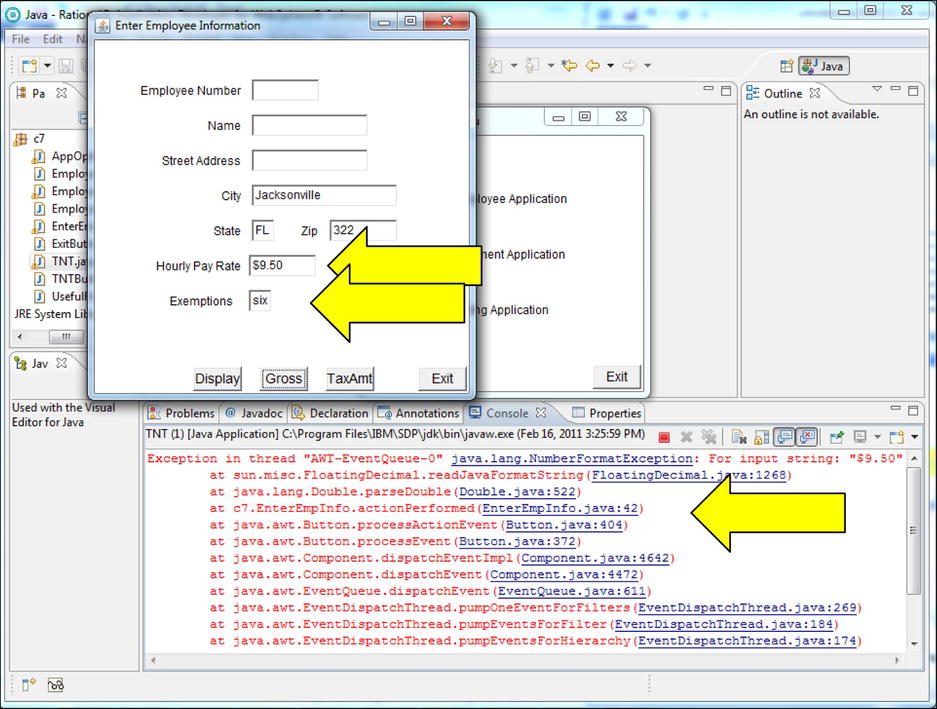
However, some of the stack trace will make sense to you. In this case, it is the fourth line that indicates that line 42 within c7.EnterEmpInfo (in the actionPerformed method) was the statement that triggered the problem.
Now, was it really the Java statement that caused the problem, or was the data passed to the statement the problem? It was the data. Because the value being parsed contained a text character ($), the parse method failed. So what is a programmer to do? Fortunately, programmers can add code to handle (i.e., catch) exceptions when they occur (i.e., are thrown).
Identifying an Exception
Programmers can determine which exceptions may be generated (thrown) through testing. In other words, a programmer could type in a variety of incorrect information to generate exceptions. However, this is a very time consuming technique and not very thorough.
Fortunately, the online documentation for class methods lists the exceptions that can be thrown (i.e., generated). Figure 7-2 shows the online documentation for the Double class’s parseDouble method. (Notice that the lower-left-hand pane shows that the Double class was selected and in the right-hand pane, we have scrolled down to the parseDouble method.) The exceptions that can be thrown are identified in both the method header and the text explanation below the header. So, based on the documentation, we now know that every parseDouble statement can generate a NumberFormatException object.

In addition to the online documentation, RAD has a very nice feature that will figure out the exceptions that can be thrown by a statement. More on that a little later.
Tutorial: Catching an Exception
The two keywords try and catchare needed to catch an exception. A try block identifies the Java statements that may throw an exception. The try block consists of the keyword try followed by braces that enclose the statements that can throw the exception.
Following the try block are catch blocks. Each catch block identifies the exception to be handled and contains executable statements. If an exception is thrown and there is a catch for the thrown exception, the JVM will execute the statements specified in the catch. In other words, the JVM ignores the exception (i.e., the JVM does not stop the application and display the exception information).
For instance, we know that the parseDouble statement on line 42 is throwing a number format exception. We will enclose that statement in a try and then code the catch to display a user-friendly message asking the user to specify the pay rate in the correct format.
- 1. In the c7.EnterEmpInfo actionPerformed method, select the statement that parses empPayRate, click Source, Surround With, then Try/catch Block.
The resulting code will be:
try {
       doubleEmpPR = Double. parseDouble (empPayRate);
} catch (NumberFormatException e1) {
       // TODO Auto-generated catch block
       e1.printStackTrace();
}
Notice that RAD knew which exception(s) could be thrown and inserted the correct catch block(s). However, putting the parseDouble statement into the try block caused new errors. The JVM is smart enough to know that a statement in a try block may not be executed (because of an exception). If the parseDouble statement is never executed, no value will be assigned to doubleEmpPR. Therefore, statements that use doubleEmpPR are flagged with an error.
To avoid this error, we will initialize the variable to negative one. (Later in the application we determine if we should continue processing by checking if the pay rate value is still –1 or not.)
- 2. In actionPerformed, change the variable’s definition statement to the following:
double doubleEmpPR = -1, doubleGross; - 3. Change the catch block to the following:
catch (NumberFormatException error) {
              empPRTF.setText("");
              resultLbl.setForeground(Color.red);
              resultLbl.setText("Pay rate must be a numeric " +
        "value: 1, 2, 3...");
}
The first statement clears the invalid value in the empPRTF field. This makes it harder for the user to reenter the incorrect value. The second statement changes the result label’s text color to red (so that the message will be more noticeable and because red is the universal color for errors), but notice that the statement has an error. The value red that was specified is not just simple text. It is actually a variable stored in the class Color. Because of this, we must include an import statement for the class Color.
- 4. Click on the text Color so the insertion point is in the text.
- 5. Press and hold the Ctrl and Shift keys, and then press the M key.
After clicking on a class name, Ctrl-Shift-M is a RAD shortcut for adding the correct import statement. In this case, import java.awt.Color; is added. (If there are classes with the same name in different packages, a window will be displayed with the available options to select from.)
Finally, notice that the third statement in the catch block displays a “matter of fact” message that identifies the field that had the incorrect value and provides examples of valid values. Most organizations will have their own standards for error messages (i.e., their color, content, etc.) and these standards could dictate much more elaborate messages. For instance, an error message could include instructions for resolving the error, provide a contact person for help, contain a hyperlink to more detailed error information, etc. However, this is an example of a good simple error message.
After parsing (and the try/catch blocks), we only want to keep processing if a valid value for pay rate has been entered. So, we need to check if the pay rate is still –1. If pay rate is still –1 (meaning invalid data was entered), we want the JVM to redisplay the frame. In other words, we don’t want the remaining statements in the method to be executed. To stop the statements from being executed, we will surround the statements in the following if statement:
if (doubleEmpPR != -1) {
       remaining method statements
}
- 6. Select all the remaining statements in the method (but not the last closing brace) and click Source, Surround With, then 3 if (if statement).
RAD surrounds the statements with the if statement but doesn’t know what condition should be coded. So, the placeholder text “condition” is put in the parenthesis as follows:
if (condition) {
        remaining method statements
}
- 7. Replace the text “condition” with:
doubleEmpPR != -1
Now, when the pay rate value is invalid (i.e., doubleEmpPR’s value was not changed from –1), this if prevents the remaining statements from executing. We have coded a little, so it’s time to test a little.
- 8. Save and run the application.
- 9. Try to calculate tax amounts for the following pay rate and exemptions values and notice all the errors.
Pay Rate Exemptions Ten 4 10 four 10 4 10.33 4
You should have noted the following “problems”:
- A. The error message is not always displayed
- B. The tax amount is not always formatted correctly. For example:
- a. it is displayed in red
- b. it has too many decimal places
- C. The message does not always fit in the label
- D. Entering an invalid exemptions value results in an exception being thrown that is not being caught. In addition, the previous message remains on the frame thereby indicating there is no problem or incorrectly identifying the problem.
Tutorial: Solving Program Errors
Problem “A” is an example of a logic problem. Logic errors are the most difficult to solve because the reason and location of the error is totally unknown. For instance, if the application generated an incorrect tax amount, you would probably examine the calculation statement(s). If the calculation looked good, you would then try to verify that the values entered by the user were actually being used in the calculation. Ninety-nine percent of the time, this would result in finding the mistake. However, with the error message not appearing, there is no obvious starting point or procedure to find the error. For instance, is the setText statement wrong, or is the text erased somewhere in the code, or is the label never defined, or…, or…, or…? Even if you stepped through the source code statements in the Debug perspective, the error would not be obvious.
The cause of this problem is that the result label is added to the frame in the actionPerformed method after it is determined that a button other than the display button has been clicked. In other words, when the incorrect values are entered the first time, the add statement is never reached. This is an example of poor program structure. The initialize method (that RAD created) is the correct place to specify all of the frame’s components. The result label should have been added to the frame in initialize not in the actionPerformed method.
- 1. Cut the following statement from the actionPerformed method and paste it at the end of the initialize method.
this .add(resultLbl); - 2. Save the source and run the application with the test data again.
Well, problem “A” is solved (because the error message is now being displayed). However, a new problem (which we will call problem “E”) has been uncovered: when the frame is initially displayed, the result label has the text Label. Dang, another error!! (Changes can often have unintended results and this is why you should test, test, and then test again.) Can you figure out how to fix this?
This is an excellent example of a “soft” error. “Hard” errors are program failures, incorrect results, etc. Problems “A” and “D” are examples of hard errors. This new error is considered a soft error because it does not produce incorrect results; however, soft errors may confuse a user. As mentioned earlier, red text traditionally indicates an error. So, if correct results are displayed in red (as in problem "B1"), the user may think that the results are incorrect. Problems “B” and “C” are considered soft errors because the results are correct but poorly formatted.
Soft errors are usually fixed after the hard errors are resolved. However, we will use a new visual component to solve problem “D.” Since the new component will require an explanation, we will instead solve the soft problems ("B1", “C” and “E”) now, and then solve problem “D.” Problem “B2” is also a soft problem, but formatting is a topic that needs an explanation, so we will also tackle it later in the chapter.
- 3. In the actionPerformed method, after the double variables are defined, add the following statement:
resultLbl.setForeground(Color. black );
This will set the result label text to black each time the actionPerformed method is executed. If the label color was previously changed to red, this will reset the color to black.
- 4. In the initialize method, change the label’s text to blanks, length to 350, and horizontal location to 25 (see the following):
resultLbl.setText("");
       resultLbl.setSize( new Dimension( 350 , 23));
resultLbl.setLocation( new Point( 25 , 332)); - 5. Run the tests again to prove that problems “B1”, “C”, and “E” have been resolved.
The Choice Component
One way that we could cut down on data entry errors (like an incorrect value for exemptions) is to always check the user-entered values and make sure it is numeric. However, an even better technique is to provide a “list” of correct values and only allow users to select and submit values from the list. A Choice component looks like a text field with a small rectangular button on the right. When the button is clicked, a drop-down menu containing text is displayed. The text displayed in the drop-down menu can be defined in the application and when a user clicks one of the values, the application can retrieve the selected value.
Because there are a limited number of correct values, the exemptions value is a good candidate for a choice. Other data, for instance pay rate, are not good candidates because there are thousands of correct values (e.g., 10.50, 10.75, etc.) We will delete the exemptions text field and add a Choice component.
- 1. In Visual Editor, click the exemptions text field and press the Delete key.
A statement in the actionPerformed method will be flagged with an error because it references the exemptions text field. We will fix this (a little later) by replacing the statement with one that will work with the choice we are about to add.
- 2. In the component palette, click on the AWT Choice component then click on the frame location where the exemptions text field was.
- 3. Specify the name as exmpChoice and then change exmpChoice:
So it aligns with the text fields and exmpLbl
Resize to 46, 21
We now need to put some values into the choice’s drop-down menu. Values are added to a choice with the component’s add method.
- 4. At the end of the getExmpChoice method, insert the following statement that adds the value zero to the drop-down menu:
exmpChoice.add("0"); - 5. In the actionPerformed method, replace the flagged statement that retrieved the exemption text field value with the following (which retrieves the choice’s value):
String exmp = exmpChoice.getSelectedItem();
Let’s test and make sure the value appears.
- 6. Save the source and run the application.
When the frame is displayed, the value 0 should appear in the choice.
- 7. Click on the choice field button.
A very small drop-down menu with the single value 0 should be displayed.
- 8. Press the exit button to end the application.
Obviously, the choice needs more values. We could add 10 more add statements for the values one through ten, but this would not be very efficient. Instead, we will define a loop so that the same add method will be performed 11 times with a different value each time.
The ability to perform loops (i.e., iteration) is a basic function provided by all programming languages, and there are usually several different types of loops that can be defined. For example, a loop can be defined to run a set number of times or a loop can have a condition that controls when the loop is performed or discontinued. We will examine three types of Java loops: while, do while, and for.
To define a while loop, use the keyword while followed by a condition in parentheses, and then with in braces, the statements to be executed. For instance:
while ( condition ) {
       statements to be repeated ;
}
The while loop checks the condition at the beginning of the loop. This means that if the condition is initially false, none of the statements to be repeated will be executed.
On the other hand, a do while loop checks the condition at the end of the loop. This means that the statements to be repeated will be executed at least once. The do while loop syntax is the keyword do, followed by the statements to be repeated in braces, then the keyword while, followed by a condition in parentheses and a semicolon. (Beware: forgetting the semicolon after the while condition is a common mistake!) For instance:
do {
       statements to be repeated ;
} while ( condition);
The while and do while loops are conditional loops. Both of these loops can be defined to execute a fixed number of times but the for loop makes that type of processing easier.
The for loop begins with the keyword for. Next, in parentheses, are an initialization, a condition, and an update. The initialization and condition are followed by semicolons. Finally, in braces, the statements to be repeated are specified. For instance:
for ( initialization; condition; update) {
       statements to be repeated ;
}
The initialization defines and/or sets a value for a control variable. The control variable is usually a primitive variable of type int and is commonly called ctr (i.e., the counter). The condition is based on the counter value, and the update changes the counter by a set value. For instance:
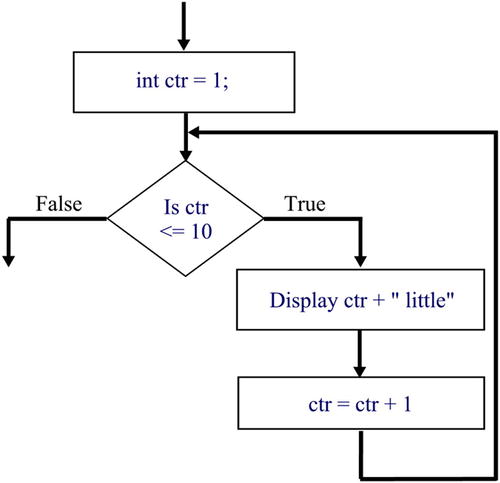
for (int ctr = 1; ctr <= 10; ctr = ctr + 1 ) {
       statements to be repeated;
}
Tutorial: Iteration
Let’s take more time to go over iteration:
- 1. In c7, create a new Java class called LoopTestApp with a main method.
- 2. In the main method add the following:
for ( int ctr = 1; ctr <= 10; ctr = ctr + 1) {
       System.out.println(ctr + " little");
} - 3. Save and run LoopTestApp as a Java application.
In the console, there should be 10 lines with the counter (ctr) value followed by the word “little.” Please note a couple of the for loop’s nuances. For example, the value 1 is displayed on the first line. Even though the increment of ctr is defined at the beginning of the loop, the increment is not performed until the end of the loop. Essentially the increment is implemented as if it were a statement at the end of the for loop. Because of this, you could have specified a pre-increment (++ctr) or post-increment (ctr++) and they both would have worked the same as ctr = ctr + 1.
The initialization (which is only performed once) and the condition check are performed before the statements to be repeated are executed. Finally, because ctr was defined in the initialization, ctr can only be used by statements within the for loop. In other words, ctr is a local variable with a scope of the for loop. If ctr was defined as a class variable and initialized in the for statement, ctr would be accessible by any statement in any method in the class. In other words, the variable would have a class scope.
If you were to create a flow chart for the for loop, it would look like Figure 7-3.
- 4. Comment out the for loop and add the following while loop:
while (ctr <= 10) {
       System.out.println(ctr + " little");
}
RAD displays two errors because the variable ctr has not been defined. The while statement does not allow a counter variable to be defined or initialized, therefore the counter must be defined before the while statement.
- 5. Add the following statement before the while loop:
int ctr = 1;
This statement defines and initializes a counter but we have not defined a counter update. Because the counter is never updated, the condition will always be true and the println statement will execute endlessly. What we have created is called an endless (or infinite) loop. Do I need to tell you that this is a bad thing?
If you were to run the application now, it would run until you either terminated it from the Console view or closed RAD.
We definitely need to update the ctr so that it reaches 10 and the loop is ended.
- 6. After the println statement, add the following:
ctr = ctr + 1; - 7. Save and run LoopTestApp.
The results will be the same as the for loop: 10 lines with the counter (ctr) value followed by the word “little.”
- 8. Comment out the while loop (don’t comment out the ctr definition).
- 9. Add the following do while loop after the ctr definition:
do {
       System.out.println(ctr + " little");
       ctr = ctr + 1;
} while (ctr <= 10); - 10. Save and run LoopTestApp.
Once again, the same results will be displayed. You may be wondering why there are three methods for defining loops. Unfortunately, you do not have enough programming experience to appreciate the subtle differences between the three methods. When we change our application to access a database, your appreciation of loops will grow considerably.
Tutorial: More About Iteration
The keywords break and continueare often used with loops. A break statement ends the loop. This means that the first statement following the loop will be executed. A continue statement bypasses any remaining statements within the loop but does not end the loop. A continue statement in a for loop results in the counter being updated, and the next iteration is performed. In while and do while loops, a continue forces the JVM to perform the condition test and either perform another iteration or end the loop.
Both keywords are usually used within an if statement to stop looping or to skip the remaining statements in one iteration of a loop. Let’s try to skip the “5 little” text.
- 1. In LoopTestApp, comment out the do while loop (don’t comment out the ctr definition).
- 2. Add the following do while loop and run the application:
do {
        System.out.println(ctr + " little");
        if (ctr == 5) {
                break ;
        }
        ctr = ctr + 1;
} while (ctr <= 10);
Only five lines are displayed as follows:
1 little
2 little
3 little
4 little
5 little
If you changed the break to a continue, an endless loop would be created. Why, you ask? Because the continue occurs before the increment, ctr will never be incremented beyond 5. This means that the condition will always be true. So, after displaying the first 4 lines, the application endlessly displays “5 little.”
This “skipping the 5th line” is a tough nut to crack!
We want to be sure that the update is always performed but that the println is not performed. So, we need to rearrange the statements such that the increment is done first and then the println is performed. We will then put the if statement (with the continue) before the println statement.
- 3. Comment out the do while loop (don’t comment out the ctr definition).
- 4. Add the following do while loop:
do {
        ctr = ctr + 1;
        if (ctr == 5) {
                continue ;
        }
        System.out.println(ctr + " little");
} while (ctr <= 10); - 5. Save and run LoopTestApp.
This time the results don’t include the “5 little” line. However, notice that the “1 little” line does not appear at the beginning and that there is now an “11 little” line at the end.
Because the increment is done at the beginning of the loop, the initial value of 1 is never displayed. To fix this we will have to change the ctr initialization to 0. The “11 little” line, however, is displayed because the condition check is performed at the end of the loop. When ctr is equal to 10, the condition is true and control passes to the top of the loop. ctr is then incremented to 11 and the “11 little” is displayed. So, to fix this we need to change the condition to continue processing when ctr is less than or equal to 9.
- 6. Change the ctr definition from 1 to 0 and the condition from 10 to 9.
- 7. Save and run LoopTestApp.
Finally, nine lines are displayed, with the 5 line being skipped.
There are occasions where you will want to nest loops (i.e., have loops within loops). For instance, we will build an initial nested loop and then add continue and break statements to display the classic “Ten Little Indians” song.
- 8. Comment out the do while loop (don’t comment out the ctr definition).
- 9. Change the ctr definition back to 1.
- 10. Add the following nested loops:
while (ctr <= 10) {
       for ( int i = 1; i <= 3; i++) {
              System.out.print(" " + ctr + " little");
              ctr = ctr + 1;
              System.out.print(",");
       }
       System.out.print(" Indians");
       System.out.println("");
}
In this case, the while loop is referred to as the outer loop and the for loop is called the inner loop.
- 11. Save and run LoopTestApp.
The results will be the following:
1 little, 2 little, 3 little, Indians
4 little, 5 little, 6 little, Indians
7 little, 8 little, 9 little, Indians
10 little, 11 little, 12 little, Indians
Close, but no cigar.
We need to break out of the inner loop before the third comma on each line is printed. In addition, we want to break out of the inner loop when the counter reaches 10. To do this we need to set up a compound if statement that checks for the inner counter (i) value of 3 and the outer counter (ctr) value of 10. When either of these conditions is true, a break should be performed.
- 12. Add the following if condition after ctr is incremented but before the print of the comma:
if (ctr > 10 || i == 3){
break ;
} - 13. Save and run LoopTestApp.
The results will be the following:
1 little, 2 little, 3 little Indians
4 little, 5 little, 6 little Indians
7 little, 8 little, 9 little Indians
10 little Indians
Not bad. The first three lines are good, but the last line should say “Indian boys” not “Indians.” So, we will insert an outer loop break when ctr is greater than 10. We will also add a print statement outside the outer loop to display “Indian boys” as the last line.
- 14. Add the following if condition before the print “Indians” statement in the outer loop:
if (ctr > 10){
break ;
} - 15. Save and run LoopTestApp.
The results will be the following:
1 little, 2 little, 3 little Indians
4 little, 5 little, 6 little Indians
7 little, 8 little, 9 little Indians
10 little
- 16. Add the following statement after the outer loop:
System.out.print(" Indian boys"); - 17. Save and run LoopTestApp.
The results will be the following:
1 little, 2 little, 3 little Indians
4 little, 5 little, 6 little Indians
7 little, 8 little, 9 little Indians
10 little Indian boys
- 18. Print out a copy of the LoopTestApp source code.
The LoopTestApp executable source code should be the following:
package c7;
public class LoopTestApp {
       public static void main(String[] args) {
              int ctr = 1;
              while (ctr <= 10) {
                     for (int i = 1; i <= 3; i++) {
                                 System. out .print(" " + ctr + " little");
                                 ctr = ctr + 1;
                                 if (ctr > 10 || i == 3){
                                  break;
                                 }
                                 System. out .print(",");
                     }
                     if (ctr > 10){
                      break;
                     }
                     System. out .print(" Indians");
                     System. out .println("");
              }
              System. out .print(" Indian boys");
       }
}
Now this may seem like a childish example, but please don’t think that nested loops are childish. You will have many occasions in your programming career to use them.
Tutorial: Finishing the Choice
You will now use your newfound looping skills to add the choice exemption values using only one add statement.
- 1. In the EnterEmpInfo’s getExmpChoice method, add a for loop (around the ExmpChoice.add statement) to go from zero to ten, incrementing by one as follows:
for ( int ctr = 0; ctr <= 10; ctr = ctr + 1) {

} - 2. Change the add statement to add ctr as follows:
exmpChoice.add(ctr);
Notice the error stating that the add method expects a String and ctr is an int. We must convert ctr to a String. We will use the String class’s valueOf method.
- 3. Change the add statement to the following:
exmpChoice.add(String. valueOf (ctr));
- 4. Save EnterEmpInfo source and run as an application.
- 5. Click the choice button.
The values 0 through 10 should be displayed.
- 6. Select 3 for exemptions, enter 15 for pay rate, and click the tax amount button.
The tax amount displayed will be $52.50. Notice that the values are listed in the order they are added to the choice. A good programmer/analyst would determine the most common number of exemptions and define that value as the default for the choice. A default value is specified with the choice’s select method.
- 7. Click the Exit button and in the EnterEmpInfo’s getExmpChoice method, after the for loop, add the following statement:
exmpChoice.select("2");
Notice that the default value is simply passed to the select method. When the frame is displayed, the default value will already be selected in the choice. If the drop-down menu is shown, the values will still appear in the order in which they were added, and the default value will still be selected.
- 8. Save EnterEmpInfo source and run as an application.
“2” should be displayed in the choice. The choice source code should look like the following:
private Choice getExmpChoice() {
       if (exmpChoice == null ) {
              exmpChoice = new Choice();
              exmpChoice.setBounds( new Rectangle(195, 299, 46, 21));
              for ( int ctr = 0; ctr <= 10; ctr = ctr + 1) {
                     exmpChoice.add(String. valueOf (ctr));
              }
              exmpChoice.select("2");
       }
       return exmpChoice;
}
- 9. Click the Exit button.
The choice has solved problem "D" because the user cannot enter an invalid value.
Several very useful classes provide greater control over character and numeric data. The first one we will explore is StringBuffer.
A string buffer acts just like a string but has more methods for content manipulation. For instance, the append method allows you to easily concatenate strings, numbers, or constant text to a string buffer.
Another useful string buffer method is insert. The insert method allows the programmer to insert text anywhere within the string buffer. The programmer must supply the insertion location within the string buffer, and you should be aware that the beginning of the string buffer is position 0 not position 1.
The substring method lets you extract a range of characters (i.e., a substring) from within a string buffer. With substring you must specify the starting and ending locations (separated by a comma) of the substring within the string buffer.
Finally, the replace method lets you substitute characters within the string buffer. Again, you must specify the range (i.e., location) of the characters to be replaced and the new text. Note that the number of new characters can be smaller or larger than the number of characters being replaced.
Assuming the following:
StringBuffer a = new StringBuffer("abc");
String b = new String("def");
The following table shows these four methods with examples.
| Method | Example | Result |
|---|---|---|
| .append | a.append(b); a.append(55); a.append("xyz"); |
abcdef abc55 abcxyz |
| .insert | a.insert(0, b); a.insert(1, 55); a.insert(2, "xyz"); |
defabc a55bc abxyzc |
| .substring | a.substring(0, 1); a.substring(0, 2); a.substring(2, 3); |
a ab c |
| .replace | a.replace(0, 2, b); a.replace(1, 3, b); a.replace(2, 3, "xyz"); |
defc adef abxyz |
The NumberFormat class provides numeric formatting functions; however, you cannot instantiate an object of type NumberFormat. Instead, the getInstance method, which returns a NumberFormat object, is used. The following is an example of the syntax:
NumberFormat nf = NumberFormat.getInstance();
Of course, the NumberFormat class must also be imported as follows:
import java.text.NumberFormat;
Once the number formatter has been created, you can modify its formatting properties. For example, the following sets the number of displayed decimal digits to 2.
nf.setMaximumFractionDigits(2);
nf.setMinimumFractionDigits(2);
If you now used nf to format numbers, they would be rounded to two decimal digits. For instance, the following statements:
System.out.println(nf.format(10/3));
System.out.println(nf.format(34.565));
System.out.println(nf.format(34.5651));
Would result in the following values being displayed:
3.00
34.56
34.57
You may be a little surprised by the results. Note that the first calculation is between two integers so the result is truncated to 3 before the formatter even gets the results. The next two numbers demonstrate the formatter’s rounding feature. Any fractional value of .5 or lower (beyond the maximum number of digits) is rounded down. In this example, the second number’s fractional value beyond the 2 fractional digits is .5 but the third number’s is .51. So the first number is truncated (or rounded down) and the second is rounded up.
Another very useful formatter is the currency formatter. Once again, use the NumberFormat class to create and return an instance as follows:
NumberFormat cf = NumberFormat.getCurrencyInstance();
If we then formatted and displayed the following two numbers:
System.out.println(cf.format(34.565));
System.out.println(cf.format(34.5651));
The results would be:
$34.56
$34.57
Other formatting options can be specified such as the type of currency symbol or decimal symbol to use. However, because these options are used less frequently, we will leave you to explore them in the online documentation for the NumberFormat class.
Finally, we need to cover date and time formatting. It cannot be overemphasized how important dates and times are in business applications. Not only are there many important dates (due date, payment date, birthday, hire date, etc.), but every transaction that occurs in an organization is documented and stored in a database. A very important piece of this stored information is the date and time of the transaction. Reports, information retrieval, and editing, are all performed and generated according to these “date/time stamps.”
Most organizations develop a standard format for all dates and times so that there is consistency across all reports. In addition, a standard makes programming simpler because the programmer never has to figure out what format to use. However, there are many different standards; for instance, universal (i.e., 24 hour) time versus HH:MM am/pm, and some countries have their own standards. In addition, there is a SQL standard for storing dates and times in a database. Java supports many standards and allows you to create your own display “pattern.” We will first look at some predefined formats and then show how to define a pattern.
Tutorial: Date and Time Formatting
Java comes with a Date class that, when instantiated, contains the current date and time (retrieved from the operating system). The Date object stores the current date and time as the number of milliseconds since January 1, 1970. Not a very useful number for programmers; however, when displayed, the date is converted into a user-friendly format. The DateFormat class has predefined formats that can be used and the SimpleDateFormat class allows programmers to define their own date format patterns. To define a date (like due date or birthday), a Calendar object is needed.
- 1. Create a new Java class called DateTimeApp with a main method in c7.
- 2. In the main method, add the following statements to create and print a Date object:
Date d = new Date();
System.out.println(d);
Notice that the first line is identified as an error. You must import the Date class.
- 3. Add the following import statement:
import java.util.*;
This will also insure the JVM can find the Calendar class, which we will use later.
- 4. Save and run DateTimeApp as a Java application.
The date and time will be displayed as a three-letter day of the week, three-letter month, two-digit day of the month, the time in universal format (HH:MM:SS), a three-digit time zone, and a four-digit year. For instance:
Thu Feb 17 14:30:48 EST 2011
Although complete, rarely will the date and time be stored or displayed in this format. To display the current date or time in a different format, use the DateFormat class to get a date formatter or time formatter instance (i.e., object) for a particular format.
- 5. Add the following import statement so that the DateFormat class can be accessed:
import java.text.*; - 6. At the end of the main method, add the following to define date and time formatter objects:
DateFormat dfShort = DateFormat.getDateInstance(DateFormat.SHORT);
DateFormat dfMedium = DateFormat.getDateInstance(DateFormat.MEDIUM);
DateFormat dfLong = DateFormat.getDateInstance(DateFormat.LONG);
DateFormat dfFull = DateFormat.getDateInstance(DateFormat.FULL);
DateFormat tfShort = DateFormat.getTimeInstance(DateFormat.SHORT);
DateFormat tfMedium = DateFormat.getTimeInstance(DateFormat.MEDIUM);
DateFormat tfLong = DateFormat.getTimeInstance(DateFormat.LONG); - 7. At the end of the main method, add the following statements to display the date and time in the various formats:
System.out.println(dfShort.format(d));
System.out.println(dfMedium.format(d));
System.out.println(dfLong.format(d));
System.out.println(dfFull.format(d));
System.out.println(tfShort.format(d));
System.out.println(tfMedium.format(d));
System.out.println(tfLong.format(d));
The current date and time will appear in the following formats:
Thu Feb 17 14:32:50 EST 2011
2/17/11
Feb 17, 2011
February 17, 2011
Thursday, February 17, 2011
2:32 PM
2:32:50 PM
2:32:50 PM EST
- 8. Comment out the statements added in steps 6 and 7.
We are going to create a SimpleDateFormat object and define a unique pattern (format). We will then modify the pattern.
- 9. Add the following statements (after the println statement, in the main method), to create two SimpleDateFormat objects:
SimpleDateFormat sdf = new SimpleDateFormat("MM/dd/yyyy");
SimpleDateFormat stf = new SimpleDateFormat("hh:mm:ss a");
A pattern is defined with “date format symbols” and constant text. The following is a partial list of the various date format symbols and the data each symbol represents. As always, upper- and lowercase letters make a difference.
| Symbol | Data | Example |
|---|---|---|
| y | Year | yy : 12 yyyy : 2012 |
| M | Month | MM : 01 MM : 10 MMM : Oct MMMM : October |
| d | Day of month | d : 1 d : 31 dd : 01 |
| H | Hour (0-23) | H : 1 H : 23 HH : 01 |
| h | Hour (0-12) | h : 1 h : 12 |
| m | Minutes | m : 1 m : 59 mm : 01 |
| s | Seconds | s : 1 s : 59 ss : 01 |
| a | AM/PM | a : PM |
- 10. Add the following two statements to display the date and time in the defined patterns:
System.out.println(sdf.format(d));
System.out.println(stf.format(d)); - 11. Save the DateTimeApp source code and run as an application.
The results should be the current date and time in the default format and the two new patterns:
Thu Feb 17 14:37:56 EST 2011
02/17/2011
02:37:56 PM
- 12. Comment out the statements added in step 10.
To set a date such as a due date or birth date, you would first create a Calendar object and then set its month, day, and year. You can then use the Calendar object’s getTime method to retrieve a Date object with the defined date.
- 13. Insert the following statements to define a birthday of January 23, 1991 and display it in the SimpleDateFormat pattern (sdf) defined earlier:
Calendar cal = Calendar.getInstance();
cal.set(1991, Calendar.JANUARY, 23);
Date bday = cal.getTime();
System.out.println(sdf.format(bday));
Notice in the second statement that the date is specified as year, month, and then day and that the Calendar object’s static fields (JANUARY, FEBRUARY, etc.) are used to specify the month. You can use numbers instead of the month fields but beware: the numbers to specify the individual months begin at 0 and end at 11 (i.e., 0 for January, 1 for February, 11 for December). Boy, oh boy! Is that numbering sequence a potential source of error and confusion or what?! That’s why it is best to use the month fields.
- 14. Save DateTimeApp and run as an application.
The results should be:
Thu Feb 17 14:42:02 EST 2011
01/23/1991
- 15. Change the calendar set statement to the following and run the application.
cal.set(1988, Calendar. FEBRUARY , 30);
Bet you weren’t expecting that. The calendar property lenient controls whether the date specified is validated. The default is not to check (i.e., lenient is true), so we will change that.
- 16. Change the calendar lenient property by adding the following on the line after the calendar is created but before the date is set.
cal.setLenient( false );
- 17. Run the application.
Notice in the console that an IllegalArgumentException was generated for the Month field.
- 18. Change the day of the month to 29 and run the application.
Notice that 29 is valid for February 1988. This proves that Calendar takes into account leap years.
As you can probably tell, working with dates and times is a little awkward. This is a prime area for a company/organization to create their own date and time classes to simplify and standardize formatting.
- 19. Print out a copy of the DateTimeApp source code.
So far, we have been unsuccessful in using concatenation to format the employee salary and tax values. Let’s apply our newfound formatting knowledge to fix the application. First, we need to determine where the formatting should be done. We had been formatting in EnterEmpInfo but formatting should be performed in Employee. Why? The philosophy of object-oriented programming is to store all related data and functions in one object, in this case, Employee. The EnterEmpInfo object’s function is to receive and validate information about an Employee, not store the information or provide Employee functions. Calculating the gross salary and tax amount has nothing to do with entering employee information. These functions should be in Employee not EnterEmpInfo.
So, we will move the gross salary calculation from EnterEmpInfo into Employee where it belongs. In addition, we will create new methods to return the information as formatted strings.
- 1. In Employee, add the following import statement:
import java.text.NumberFormat; - 2. In Employee at the end of the class variable definitions, add the following statement to create a currency formatter object called cf:
NumberFormat cf = NumberFormat.getCurrencyInstance(); - 3. In Employee, after the fedTaxCalc method, create a new method called fedTaxCalcFormatted as follows:
public String fedTaxCalcFormatted( double payRate, int exemptions) {
       String taxAmt = new String();
       taxAmt = cf.format( this .fedTaxCalc(payRate, exemptions));
       return taxAmt;
}
Notice that this method doesn’t duplicate the fedTaxCalc function. Rather, it uses the fedTaxCalc method to perform the tax calculation and then simply formats the result. We need to change EnterEmpInfo to call this new method and use the returned string.
- 4. In EnterEmpInfo, at the beginning of the actionPerformed method, enter the following statement to create a string called stringTaxAmt that will hold the formatted tax amount:
String stringTaxAmt = new String();
- 5. In EnterEmpInfo’s actionPerformed method, change the following statement:
double doubleTaxAmt =
emp.fedTaxCalc(doubleEmpPR, intExmp);
to:
stringTaxAmt =
emp.fedTaxCalcFormatted(doubleEmpPR, intExmp); - 6. In EnterEmpInfo’s actionPerformed method, change the following statement:
resultLbl.setText("The Federal Tax amount is: $" +
       doubleTaxAmt + "0");
to:
resultLbl.setText("The Federal Tax amount is: " +
stringTaxAmt); - 7. Save EnterEmpInfo and run as an application.
- 8. Enter 10.3338 for the payRate and 4 for the number of exemptions.
- 9. Click the TaxAmt button.
The result will be the message: “Federal Tax amount is: $15.50”.
- 10. Click the Gross button.
The result will be the message: “Gross Salary is: $413.3520.” So, the tax amount is being formatted correctly, but we now need to format the gross salary amount.
- 11. Click the Exit button and in Employee, add the following statement at the end of the class variable definitions, to create a new class variable called doubleGrossSalary:
private double doubleGrossSalary; - 12. In Employee, after the fedTaxCalc method, create two new methods called grossSalary Calc and grossSalaryCalcFormatted as follows:
public double grossSalaryCalc( double payRate){
       doubleGrossSalary = payRate * 40;
       return doubleGrossSalary;
}

public String grossSalaryCalcFormatted( double payRate) {
       String grossSalaryFormatted = new String();
       this .grossSalaryCalc(payRate);
       grossSalaryFormatted = cf.format(doubleGrossSalary);
       return grossSalaryFormatted;
} - 13. Save the Employee source code.
- 14. In EnterEmpInfo’s actionPerformed method, replace the following statements:
doubleGross = doubleEmpPR * 40;
resultLbl.setText("Gross Salary is: $" +
doubleGross + "0");
with:
Employee emp = new Employee("", "", "", "", "");
resultLbl.setText("Gross Salary is: " +
              emp.grossSalaryCalcFormatted(doubleEmpPR));
Notice that this removes the gross salary calculation and substitutes a call to the Employee object’s (emp’s) grossSalaryCalcFormatted method.
- 15. Save EnterEmpInfo and run as an application.
- 16. Enter 10.3338 for the payRate and 4 for the number of exemptions.
- 17. Click the Gross button.
The result will be the message: “Gross Salary is: $413.35.” Notice that the currency formatter rounded the result to two digits.
The actionPerformed method should look like the following:
public void actionPerformed(ActionEvent e) {
String stringTaxAmt = new String();
String empPayRate = empPRTF.getText();
double doubleEmpPR = -1, doubleGross;
resultLbl.setForeground(Color. black );
try {
       doubleEmpPR = Double. parseDouble (empPayRate);
} catch (NumberFormatException Error) {
       empPRTF.setText("");
       resultLbl.setForeground(Color. red );
       resultLbl.setText("Pay rate must be a numeric " +
"value: 1, 2, 3...");
}

if (doubleEmpPR != -1) {
       if (dispBtn == e.getSource()) {
        Employee emp = new Employee(empNameTF.getText(),
empStreetTF.getText(), cityTF.getText(), stateTF.getText(), zipTF.getText());
        EmployeeFrame ef = new EmployeeFrame(emp);
       } else {
              if (grossBtn == e.getSource()) {
                     Employee emp = new Employee("", "", "", "", "");
                     resultLbl.setText("Gross Salary is: " +
                      emp.grossSalaryCalcFormatted(doubleEmpPR));
               } else {
                     if (taxBtn == e.getSource()) {
                             Employee emp = new Employee("", "", "", "", "");
                                 String exmp = exmpChoice.getSelectedItem();
                                 int intExmp = Integer. parseInt (exmp);
                                 stringTaxAmt = emp.fedTaxCalcFormatted(doubleEmpPR, intExmp);
                                 resultLbl.setText("The Federal Tax amount is: " + stringTaxAmt);
                     }
               }
       }
//                                 System.out.println(empPayRate);
}
}
Tidying Up Our Messy Method
We have incrementally added source code to EnterEmpInfo with very little thought about the eventual scope and function of the application. Whoa, that’s a big statement! Essentially it means that we have been adding on to a house room by room instead of first designing the house (i.e., flowcharting the class’s function) and then building the needed foundation, walls, plumbing, and so on (i.e., class variables, methods, and method variables). Because of this, we have redundancy and inefficiency in our class.
For instance, notice in the actionPerformed method that the method variable emp is defined three separate times and assigned three different Employee objects. We should have created one class variable and Employee object. In addition, we created several method variables to hold information from the frame. We already had a perfect place to store this information: the Employee object.
We will change the Employee class to include new properties for pay rate and exemptions and define getter and setter methods for the properties. We will also allow the user to specify different parameters when instantiating an Employee object by using a technique called method overloading.
Method overloading takes advantage of the fact that a class can contain many methods with the same name. Methods within a class must have a unique signature (the method name and expected parameters), not a unique method name. Therefore, methods can have the same name as long as they expect a different set of parameters.
Method overloading is used to make a class’s interface (i.e., public methods) easier to use. For instance, the String class uses method overloading for the valueOf method. If you look at the String documentation, you will see several methods named valueOf. However, each valueOf method expects a parameter of a different type (int, double, long, etc); therefore, each method has a different signature. Overloading makes converting primitives to strings easier because the programmer only has one method name to remember, valueOf. The JVM determines the correct valueOf method to execute based on the parameter variable type.
All I can say is, “Thank you, JVM.”
Tutorial: Method Overloading
In Employee, we will create overloaded calculation and constructor methods to make the class easier to use. Yes, you can overload constructors. Have you noticed how every time we try to create an Employee object, we had to pass five empty strings? We are going to create a null constructor: a constructor that does not expect any parameters. The null constructor makes it easier to create an “empty Employee” object but still ensures that the object and class variables are created.
In Employee:
- 1. Add the following statements to define new private class variables:
private int exemptions;
private double payRate;
private String stringTaxAmt;
private String stringGrossSalary;
These class variables will be used for the employee’s new properties and take the place of the method variables used in the calculations.
- 2. Click on the first statement you just added to select it.
- 3. Click Source then Generate Getters and Setters...
- 4. At the “Generate Getters and Setters” window, click on the payRate check box and make sure that exemptions is selected.
The bottom of the window should say 4 of 16 selected.
- 5. Click the OK button.
Four new methods will be generated: two getters and two setters.
- 6. Before the constructor, add the following null constructor:
public Employee(){}
That wasn’t too hard was it? Notice that the null constructor does nothing. However, the class variables, defined before the constructor will be created.
- 7. In the fedTaxCalcFormatted method, remove the statement that defines taxAmt and change the two other references to taxAmt to stringTaxAmt. The method should look like the following:
public String fedTaxCalcFormatted(double payRate,
int exemptions){
       stringTaxAmt = cf.format(this.fedTaxCalc(payRate,
exemptions));
       return stringTaxAmt;
}
Essentially, we substituted the global (i.e., class) variable stringTaxAmt (created in Step 1) for the method variable taxAmt. We will now put it to good use in a new method.
- 8. Before the already existing method of the same name, add the following method:
public String fedTaxCalcFormatted(){
       this .fedTaxCalcFormatted( this .payRate, this .exemptions);
       return stringTaxAmt;
}
Notice that this method expects no parameters. Instead, the method uses the Employee object’s payRate and exemptions properties (i.e., to supply those values to the fedTaxCalcFormatted method). Also, notice that no variable is needed to receive the result (a string) returned by the fedTaxCalcFormatted method. Because these methods are within the same class, the global variable stringTaxAmt can hold the result and be returned by both methods.
- 9. In the grossSalaryCalcFormatted method, remove the statement that defines the string grossSalaryFormatted and change the two other references to grossSalaryFormatted to stringGrossSalary.
The method should look like the following:
public String grossSalaryCalcFormatted( double payRate) {
       this .grossSalaryCalc(payRate);
       stringGrossSalary = cf.format(doubleGrossSalary);
       return stringGrossSalary;
}
We created a global variable stringGrossSalary earlier and have substituted it for the method variable grossSalaryFormatted.
- 10. Before the already existing method of the same name, add the following method:
public String grossSalaryCalcFormatted() {
       this .grossSalaryCalcFormatted( this .payRate);
       return stringGrossSalary; }
As with the fedTaxCalcFormatted method, we used the Employee object’s properties and a global variable (instead of a method variable) to simplify using this class. Now we need to change the EnterEmpInfo class to use the new methods.
Tutorial: Tidying Up Our Messy Method
In addition to using the new and improved Employee class, we want to organize EnterEmpInfo better and use a few global (class) variables instead of many local (method) variables. In addition, when actionPerformed is executed, the frame information should be retrieved and placed in an Employee object. However, currently actionPerformed creates an Employee object. This means a new Employee object is created each time the user clicks a button. This is not very efficient. Instead, a single global Employee variable (and object) should be created and its properties changed each time actionPerformed is invoked (i.e., each time the user clicks a button). So, the Employee variable (emp) will be changed to a class (global) variable and assigned an Employee object only once.
The source code to retrieve the text field values and assign them to the Employee properties will be placed in a private method called setEmployeeProperties. (Creating a new private method allows other methods in the class to invoke this function.) The setEmployeeProperties method will be invoked from the actionPerformed method. In EnterEmpInfo:
- 1. Add the following new class variable definition:
private Employee emp = new Employee();
- 2. Before the main method, add the following method that retrieves the various text field values and assigns them to the appropriate Employee property:
private void setEmployeeProperties() {
       emp.setEmpName(empNameTF.getText());
       emp.setEmpStreet(empStreetTF.getText());
       emp.setEmpCity(cityTF.getText());
       emp.setEmpState(stateTF.getText());
       emp.setEmpZip(zipTF.getText());
       emp.setPayRate(Double.parseDouble(empPRTF.getText()));
       emp.setExemptions(Integer.parseInt(exmpChoice.getSelectedItem()));
}
The first five statements are relatively easy. We simply used each text field’s getText statement as a parameter in the appropriate property setter method. Notice that we eliminated the need for a method variable by using the result of the getText method as the setter parameter. This efficiency becomes even more apparent in the last two statements. In addition to retrieving the text, these statements also parse the text into a primitive. Earlier three statements and two method variables were used as follows:
String stringPayRate = EmpPRTF.getText();
double doubleRate = Double.parseDouble(stringPayRate);
emp.setPayRate(doubleRate);
- 3. In actionPerformed, add the following as the first statement so that the setEmployeeProperties method is invoked:
this .setEmployeeProperties();
Notice that many of the remaining statements set up method variables. We have eliminated the need for many of these by using an Employee object and the setEmployeeProperties methods.
- 4. Delete the statements that define the method variables stringTaxAmt, empPayRate, double-EmpPR and doubleGross.
This will cause several syntax errors to be flagged in the source code.
- 5. Delete the following statement (contained in the try block):
doubleEmpPR = Double.parseDouble(empPayRate);
This statement is no longer needed because setEmployeeProperties retrieves and parses the pay rate.
- 6. In the if statement, after the catch block, replace doubleEmpPR with emp.getPayRate() as follows:
if (emp.getPayRate() != -1) {
Originally, doubleEmpPRwas initialized to –1 so that we could ensure that a valid numeric pay rate value had been retrieved from the frame. However, we really should use a separate and more descriptive variable to indicate an error. In addition, we should add further validation checks on the pay rate value. For instance, do you think that a pay rate of 99 cents is valid?
To summarize, we need to do two important things:
- A. Check for the number format exception when the text is parsed
- B. Validate that the pay rate value is valid
One of these functions should be included in the setEmployeeProperties method, and the other should be in the Employee class. Can you identify which function should go where?
The number format exception check should be in EnterEmpInfo’s setEmployeeProperties method. Because setEmployeeProperties retrieves text data and parses the text to a primitive, it is the logical place to perform the check.
Data validation is one of the key functions of a setter. Therefore, the validation that the pay rate is within a certain range should be in the setPayRate method of Employee class. We will code the setter data validation in the next section.
- 7. Cut and paste the try and catch from actionPerformed to setEmployeeProperties and change the code it so that the setPayRate and setExemptions appears as follows:
try {emp.setPayRate(Double.parseDouble(empPRTF.getText()));
              emp.setExemptions(Integer.parseInt(exmpChoice.getSelectedItem()));
}
catch (NumberFormatException error) {
              resultLbl.setForeground(Color.red);
              resultLbl.setText("Pay rate must be a" +
"numeric value: 1, 2, 3...");
} - 8. After the catch header but before setting the foreground color to red, add the following statements to erase the incorrect pay rate from the textfield and set pay rate to -1:
empPRTF.setText("");
emp.setPayRate(-1);
The beginning of the actionPerformed method should look like the following:
public void actionPerformed(ActionEvent e) {
       this .setEmployeeProperties();
       resultLbl.setForeground(Color.black);
       if (emp.getPayRate() != -1) {
Notice that in the code that follows the above (which is executed when the Display button is pressed) an Employee object is created and passed information from the frame. This is no longer needed as setEmployeeProperties now performs this function.
- 9. Delete the statement that creates the Employee object.
The code should look like the following:
if (dispBtn == e.getSource()) {
       EmployeeFrame ef = new EmployeeFrame(emp);
In the next set of code (executed when the Gross button is pressed), another method variable and Employee object was created. Because we created a global Employee variable and object, we don’t need this statement anymore.
- 10. Delete the statement that creates the Employee object when the Gross button is pressed.
The code should look like the following:
if (grossBtn == e.getSource()) {
              resultLbl.setText("Gross Salary is: " +
                     emp.grossSalaryCalcFormatted(doubleEmpPR));
The statement setting the result label should be changed because it tries to calculate the gross salary with the doubleEmpPR variable. This local variable’s value is no longer set because the Employee object’s pay rate property is used to hold the value (set in setEmployeeProperties). To calculate the gross salary, simply execute the grossSalaryCalcFormatted method.
- 11. Change the statement to the following:
resultLbl.setText("Gross Salary is: " +
       emp.grossSalaryCalcFormatted());
Finally, the code that executes when the tax amount button is pressed tries to read the text and parse it. This is redundant because setEmployeeProperties is performing this function.
- 12. Delete the first four statements and change the fifth statement to the following:
resultLbl.setText("The Federal Tax amount is: " +
emp.fedTaxCalcFormatted()); - 13. Save EnterEmpInfo and run as an application.
- 14. Enter 10.3338 for the payRate and 4 for the number of exemptions.
- 15. Click the Gross button.
The result will be the message: “Gross Salary is: $413.35.” Notice that the dollar value is formatted as currency and rounded to two digits. At this point, a good programmer would run tests to ensure that the tax amount calculation works and that the numeric value validity check is working for pay rate.
- 16. Run tests to ensure that the tax amount is correct and only numeric values can be entered for pay rate and then click the Exit button.
You should have discovered another soft error: the error message does not appear in red. We always want to reset the color to black when we start actionPerformed. Remember that the error color is set to red in setEmployeeProperties, and we called setEmployeeProperties before the color is reset to black.
- 17. Move the setForeground statement before the setEmployeeProperties statement.
The actionPerformed method should look like the following:
public void actionPerformed(ActionEvent e) {
resultLbl.setForeground(Color.black);
this .setEmployeeProperties();
if (emp.getPayRate() != -1) {
if (dispBtn == e.getSource()) {
              EmployeeFrame ef = new EmployeeFrame(emp);
       } else {
              if (grossBtn == e.getSource()) {
                     resultLbl.setText("Gross Salary is: " +
                            emp.grossSalaryCalcFormatted());
              } else {
                     if (taxBtn == e.getSource()) {
                      resultLbl.setText("The Federal Tax amount is: "
               + emp.fedTaxCalcFormatted());
                     }
              }
       }
}
}
Now, isn’t that a cleaner method? In addition, this method is much more efficient because we eliminated almost all the method variables and all the duplicate Employee objects.
Up until now, we have only caught exceptions thrown by the system. Not only can your Java classes throw exceptions but the messages can be customized. For instance, no employee can make less than $6.50 an hour, nor is there any employee who can earn more than $35.00 an hour. The setter should check that the value supplied is within this range, and if not, an exception should be thrown. We will throw an InvalidValue exception and customize the message based on the invalid value.
After making this change to setPayRate, any method that uses the setPayRate method must be changed to check for the exception. So, we will add try and catch blocks to the setEmployeeProperties method in EnterEmpInfo.
- 1. In Employee, add the following import statement.
import org.omg.CORBA.DynAnyPackage.InvalidValue;
As usual, we must first import the class before we can use it.
Method headers must specify which exception(s) can be thrown. Exceptions are identified in the method header with the throws keyword.
- 2. Change the setPayRate method header to following:
public void setPayRate( double d) throws InvalidValue {
- 3. Change the setPayRate method body to the following:
if (d < 6.5 || d > 35) {
       throw new InvalidValue("The value for a pay rate " +
       "must be at least $6.50 but no more than $35." +
       " Please reenter the pay rate.");
} else {
       this .payRate = d;
}
This statement checks if the value is outside the valid range. If so, an InvalidValue exception is created with a descriptive message and then thrown. If not, the employee pay rate is set to the parameter value that was passed.
- 4. Save the Employee source code.
The EnterEmpInfo source code should have errors in the setEmployeeProperties method because InvalidValue is unhandled. We need to change setEmployeeProperties to catch the InvalidValue exception.
- 5. In the EnterEmpInfo source code, add the following import statement.
import org.omg.CORBA.DynAnyPackage.InvalidValue;
The exception class must be imported even if the program is only catching the exception.
- 6. In the setEmployeeProperties method, add the following catch after the already existing catch and save the source code:
catch (InvalidValue e) {
       empPRTF.setText("");
       resultLbl.setForeground(Color.red);
       resultLbl.setText(e.getMessage());
}
This solves one of the errors. However, the statement that sets empPayRate to –1 is still an error because –1 is an invalid value for pay rate. We were using the –1 value as an error flag within the actionPerformed method. This is really a misuse of the empPayRate variable. Instead, we will create a boolean variable called inputError and, if the pay rate value is invalid, set inputError to true. We’ll change actionPerformed to check inputError, not empPayRate. In addition, we need to reset inputError to false each time actionPerformed is executed.
- 7. In the EnterEmpInfo, add the following statement to create a class boolean variable called inputError.
private boolean inputError = false ;
- 8. In the setEmployeeProperties method, replace emp.setPayRate(-1); with the following statement:
inputError = true ;
- 9. In the InvalidValue catch block, add the following statement:
inputError = true ;
- 10. In actionPerformed, change if (emp.getPayRate() != -1) { to the following:
if (inputError == false) { - 11. Add the following else block to the above if:
else {
       inputError = false ; }
This statement resets inputError back to false because setEmployeeProperties removed the invalid value from the text field.
- 12. Save EnterEmpInfo and run as an application.
- 13. Enter 39 as the pay rate value and click the Gross button.
The EnterEmpInfo frame should look like Figure 7-4. Obviously, the message is too large to fit in the label. We need to go back and fix that.
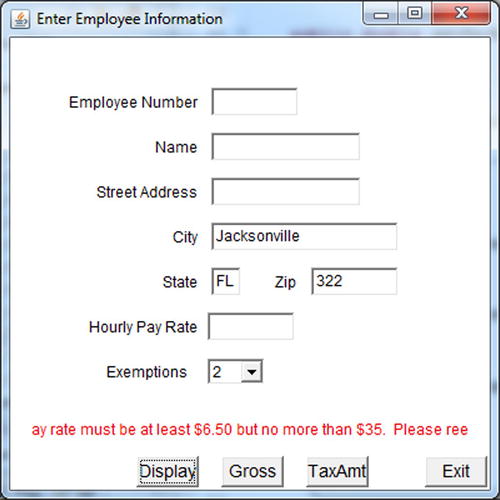
- 14. In Employee’s setPayRate method, change the message to the following:
throw new InvalidValue("Please re-enter a pay rate " +
"between 6.50 and 35."); - 15. Save EnterEmpInfo, run as an application and verify that the message is correct.
Results of the Tutorial
Let’s examine the results of the tutorial:
- 1. In Tutorials, a new package called c7 with 11 classes, two of which are the new classes LoopTestApp, and DateTimeApp.
- 2. Printouts of the LoopTestApp and DateTimeApp source code.
- 3. The EnterEmpInfo frame should have a choice for exemptions that displays the values zero through ten using a loop.
- 4. EnterEmpInfo should check that the pay rate value is numeric.
- 5. Employee’s setPayRate method should verify that a pay rate value is between $6.50 and $35.00.
- 6. EnterEmpInfo’s actionPerformed method should look like the following:
public void actionPerformed(ActionEvent e) {
resultLbl.setForeground(Color.black);
this .setEmployeeProperties();
if (inputError == false ) {
       if (dispBtn == e.getSource()) {
              EmployeeFrame ef = new EmployeeFrame(emp);
       } else {
              if (grossBtn == e.getSource()) {
                     resultLbl.setText("Gross Salary is: " +
emp.grossSalaryCalcFormatted());
              } else {
                     if (taxBtn == e.getSource()) {
                                 resultLbl.setText(
                                 "The Federal Tax amount is: " +
emp.fedTaxCalcFormatted());
                     }
              }
       }
}
else {
       inputError = false ;
}
} - 7. EnterEmpInfo’s setEmployeeProperties method should look like the following:
private void setEmployeeProperties() {
emp.setEmpName(empNameTF.getText());
emp.setEmpStreet(empStreetTF.getText());
emp.setEmpCity(cityTF.getText());
emp.setEmpState(stateTF.getText());
emp.setEmpZip(zipTF.getText());
try {
emp.setPayRate(Double.parseDouble(empPRTF.getText()));
emp.setExemptions(Integer.parseInt(exmpChoice.getSelectedItem()));
}
catch (NumberFormatException Error) {
empPRTF.setText("");
       inputError = true ;
       resultLbl.setForeground(Color.red);
       resultLbl.setText("Pay rate must be a " +
"numeric value: 1, 2, 3...");
}
catch (InvalidValue e) {
       inputError = true ;
empPRTF.setText("");
       resultLbl.setForeground(Color.red);
       resultLbl.setText(e.getMessage());
}
}
Review Questions
- What are formatters?
- What is the difference between the String and StringBuffer classes?
- What is the purpose of the try and catch keywords and how do they work together? How does an exception object fit in with these two keywords?
- Describe the function of the Choice class.
- What are the three primary types of iteration and what are their differences?
- What is method overloading, and why would a programmer use method overloading?
- What are the functions of the break and continue keywords?
Review Exercise
In this exercise, you will create six new classes that are subclasses of the Choice class. These new classes will display the current date and time and will replace the EnterShipInfo frame’s date and time text fields. You will also create a new method to retrieve the information from the frame, verify that information has been supplied for all fields, and then populate a Shipment object.
- 1. In the ReviewEx/src, create a new package called c7.
- 2. Copy all the classes from c6 into c7
- 3. From Tutorials/src/c7, copy the Java files EnterEmpInfo and Employee into ReviewEx/src/c7.
We want to replace the older versions copied from c6 in step 2, so click Yes To All when the system prompts you with an overwrite message.
- 4. Create three new visual Java classes that are subclasses of the AWT Choice class called MonthCh, DayCh, and YearCh.
- 5. In MonthCh’s initialize method:
- 6. Set the size to 44, 21
- 7. Set the values to 1 through 12 using a loop.
- 8. In MonthCh, add the following statements to get a Calendar object, retrieve the current month, and set the selected value to the current month.
Calendar c = Calendar.getInstance();
select(String.valueOf(c.get(Calendar.MONTH)+1));
Because Java always assigns a value of zero to the first item in a group (i.e., the first character in a string is at location zero, not location one), you must add 1 to the returned value to obtain the correct value for the current month. In other words, the value of MONTH during January is zero. (Ouch!) So, the “trick” to get the commonly accepted month number is to add 1 to the returned value. We placed the get inside of the select statement so that the correct value will be selected when the choice is first displayed.
- 9. In DayCh:
- Set the size to 44, 21
- Set the values to 1 through 31 using a loop
- Retrieve the current day (the DAY_OF_MONTH field in a Calendar object)
- Make the current day the selected value
- 10. In YearCh:
- Set the size to 51, 21
- Retrieve the current year (a Calendar object’s YEAR field)
- Set the values to the previous year, the current year, and the next year using a loop
- Make the current year the selected value
- 11. Create 3 new visual Java classes that are extensions of the Choice class called HourCh, MinCh, and AMPMCh and set all their sizes to 44, 21.
- 12. In HourCh:
- Set the values to 0 through 12 using a loop.
- Retrieve the current hours (the HOUR_OF_DAY field).
The HOUR_OF_DAY field contains a value between 0 and 23, so you will need to change any value greater than 12 to the correct value before selecting it in the choice. The logic for doing this is as follows:
- if the current hours is less than or equal to 12 select the value in the choice values
- else subtract 12 from the value and select the result in the choice values
- 13. In MinCh:
- Set the values to 0 through 59 using a loop.
- Retrieve the current minutes (the MINUTE field).
- Make the current minutes the selected value.
- 14. In AMPMCh:
- Set the values to AM and PM.
- Retrieve the current hour.
- Using an if statement select AM if the returned value is less than 12 else select PM.
In EnterShipInfo:
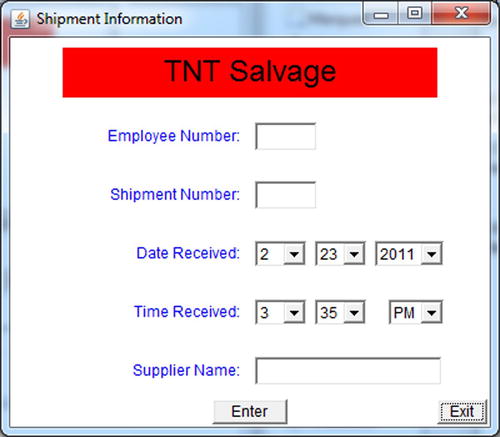
- 15. Replace the dateTF text field with MonthCh, DayCh, and YearCh components called monthCh, dayCh, and yearCh. (Hint: In the VE palette, select the Choose Bean option, and specify c7.MonthCh, then c7.DayCh, etc.)
- 16. Replace the TimeTF text field with HourCh, MinCh and AMPMCh components called hourCh, minCh, and aMPMCh.
The fields should look like Figure 7-5 when displayed.
We will now change the application to check that data is entered in all the text fields and, if data is missing, issue a message specifying which fields must be supplied. We will also retrieve and format the information from the frame components.
- 17. Move the components so that a new label field (called msgLbl that will be used to display messages) can fit beneath the Supplier Name and above the Enter button. Set the length to 290, the initial text to blank, center the label and define the alignment as CENTER.
- 18. Create a new private method (after actionPerformed) called setShipmentProperties that does the following for each text field:
- Retrieves the value of the text field
- Checks that the length of the value is greater than zero (use the String method length)
if (length is not greater than zero)
- 19. Define an error message in the msgLbl field stating which field value must be entered
- 20. Set an error flag (a boolean variable called isDataEntryError) to true
- 21. Create several new private class variables to help with the formatting as follows:
- A. Two new SimpleDateFormat class variables called sdf and stf and assign SimpleDateFormat objects with the following formats to the variables
MM/dd/yyyy hh:mm a - B. One new Calendar variable called cal and assign a calendar instance as follows
private Calendar cal = Calendar.getInstance();
- 22. Create a Date variable called shipDateTime and assign null to it as follows:
private Date shipDateTime = null ;
- 23. Create an int variable called shipHour.
- 24. In setShipmentProperties, if the error flag (isDataEntryError) is false, execute the following source code to retrieve and format the date and time choice field’s values, create a shipment object called ship, and set the shipment object’s properties:
shipHour = Integer.parseInt(hourCh.getSelectedItem());
if (aMPMCh.getSelectedItem().equals("PM")&& shipHour < 12){
       shipHour = shipHour + 12;
}
if (aMPMCh.getSelectedItem().equals("AM")&&shipHour == 12){
       shipHour = 0;
}
cal.set(
       Integer.parseInt(yearCh.getSelectedItem()),
       Integer.parseInt(monthCh.getSelectedItem()) - 1,
       Integer.parseInt(dayCh.getSelectedItem()),
       shipHour,
       Integer.parseInt(minCh.getSelectedItem())
);
shipDateTime = cal.getTime();
ship = new Shipment(
       shipNumTF.getText(),
       supplTF.getText(),
       sdf.format(shipDateTime),
       stf.format(shipDateTime),
       empNumTF.getText()
);
The first statement retrieves the selected text for the hour choice, parses the value to an int, and assigns it to the variable shipHour. Because the Calendar object needs an hour value from 0 to 23, we need to calculate this by checking if AM or PM was selected. The if statements retrieve the aMPMCh value and checks the hour value. If PM was selected and the hour value is less than 12, 12 is added to the hour value. (E.g., if 12 && PM, then 12 is correct. If 1 && PM, then 13 is correct.) Similarly, if the user specified 12 and AM, the correct hour value for the calendar object is 0.
Next, the Calendar object (cal) is set to the values specified in the other choice fields and the calculated shipHour value. Notice that for each choice, the selected value must be parsed to int. Also, the month value must be decreased by one. (Because cal uses 0 to represent January, 1 to represent February, etc., we need to change a user specified 1 to a 0, a 2 to a 1, etc.)
We then use cal to get a Date object (for the date and time specified) and assign it to the Date variable.
The last statement assigns the values from the text fields and the formatted date and time values to ship’s properties.
- 25. Change the actionPerformed method to do the following:
Execute the setShipmentProperties method
Check the error flag
If (error flag is true )
Set error flag to false
Else
Create a ShipmentFrame object (passing ship) - 26. Save the EnterShipInfo source code.
Results of the Review Exercise
Here are the results:
- A new package called c7 in the ReviewEx project.
- Six newly coded classes in c7 (of 21 total classes) that are subclasses of Choice and that display the current date and time.
- EnterShipInfo has:
- A new method called setShipmentProperties that uses the new classes
- Several new private class variables to work with dates and times
- A new label to display messages
Check that the Exercise Was Done Correctly
Finally, let’s check everything went as planned:
- Run TNT and ensure that the EnterShipInfo frame can be accessed.
- Verify that EnterShipInfo initially displays the current date and time in the choices.
- Verify that EnterShipInfo ensures that information is entered in the text fields and if not, displays an error message in the new label.
- Enter several different dates and times and verify that ShipmentFrame displays the information in the correct format.