
![]()
Java Server Pages
In this chapter, we will make your programming life easier by introducing Java Server Pages (JSPs). In addition to making it easier to build a GUI interface, JSPs can use JSP tags and Expression Language (EL) instead of Java statements. JSP tags (and EL) are very useful because their syntax is much simpler than Java statements.
This chapter will also demonstrate how to create and use Java beans. We will then explore the Model-View-Controller (MVC) architecture and show how JSPs, beans, and servlets fit into the MVC framework. In addition, we will expand your knowledge of Web page components and introduce several very useful objects and functions that the server provides to applications.
In this chapter, you will learn about:
- JSPs
- Scriptlets, Expressions, Declarations, and Directives
- JSP tags and Expression Language
- Java Beans
- Implicit Objects
- Drop-down Menus and List Boxes
- Redirect and RequestDispatcher
After this chapter, you should be able to:
- Create a JSP
- Invoke JSPs from servlets
- Define and use beans in JSPs and servlets
- Use JSP tags and Expression Language
JSPs are Web pages that have Java code mixed in with HTML statements that define the page. The advantage of the JSP is that instead of writing a servlet, that laboriously embeds HTML statements into a response; a programmer can use a GUI tool to generate the HTML (that defines a Web page) and then enter the much smaller amount of Java code that performs the desired functions. Of course, an example is worth a thousand words of explanation.
- 1. In the Web Perspective, click the TutorialsWeb/WebContent folder to select it.
- 2. Click File, New, and then Folder.
- 3. At the New Folder frame, specify c9 as the folder name and click the Finish button.
- 4. With the folder c9 still selected, click File, New, and then Web Page.
- 5. At the New Web Page frame, expand the Basic Templates item, and select JSP.
- 6. Specify HowdyJSP for the file name and click the Finish button.
The JSP file will be created and an edit session will be started. Notice that the initial page is the same as when creating a Web page and, like the Web page, the JSP can be modified from either the Design or Source views.
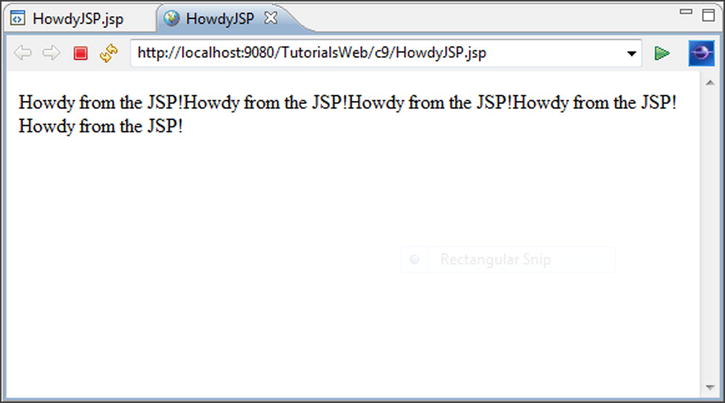
- 7. In the Design view, type: Howdy from the JSP!
- 8. Click before the “H” in “Howdy” to position the cursor before the text.
- 9. Click JSP, and then Insert Scriptlet.
A scriptlet icon (a scroll) will be inserted before Howdy.
In the Design view, embedded Java statements are specified in the scriptlet’s Properties view. In this case, we will insert a for loop so that the text is displayed five times. We will need one scriptlet before the text (containing the beginning of the for loop) and one scriptlet after the text (to finish the for loop).
- 10. In the Properties view, enter the following in the jsp:scriptlet: input area:
for (int i = 0; i < 5; i++) { - 11. In the Design view, click after the text to position the cursor at the end of the line.
- 12. Click JSPand then Insert Scriptlet.
- 13. In the jsp:scriptlet input area, enter an ending brace (}) to finish the for loop.
- 14. Save the source and run HowdyJSP on the server.
The result should look like Figure 9-1.
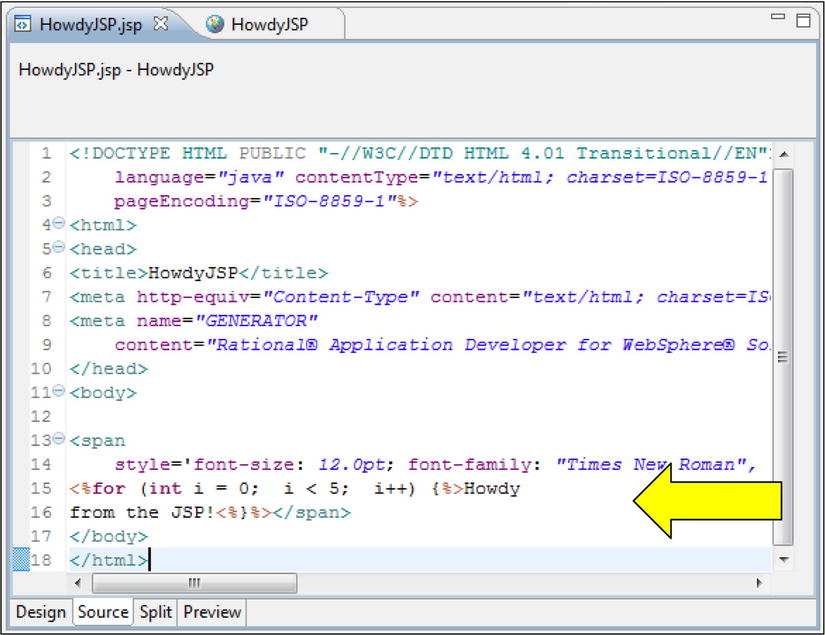
The result should look like Figure 9-2.
More About JSPs
JSPs can contain four major types of Java “scripts:” scriptlets, expressions, declarations, and directives. Notice in Figure 9-2 that even though the Java scripts and HTML statements are mixed together, the Java is differentiated by tags. Each type of script has its own unique tags. As you can see in Figure 9-2, scriptlets begin with a <% tag and end with a %> tag. The following table shows each of the four major tag types, its purpose, and an example.
| Statement Type | Purpose | Tag Example |
|---|---|---|
| scriptlet | Perform Java snippets or statements | <% error(); %> <% ctr = ctr + 1; %> |
| expression | Expression evaluated, converted to String, displayed on page | <%= new Date() %> <%= 1+1 %> |
| declaration | Define Java methods and variables | <%! private void error() { System.out.println("Error!"); } %> |
| directive | Define JSP wide information | <%@ page import = "java.util.*" %> |
Although these tags work, they are not XML-compatible and don’t follow the same format as other JSP tags. Therefore, the following JSP tags are preferred.
| Statement Type | Tag Example |
|---|---|
| scriptlet | <jsp:scriptlet> error(); </jsp:scriptlet> |
| expression | <jsp:expression> 1+1 </jsp:expression> |
| declaration | <jsp:declaration> private void error() { System.out.println("Error!"); } </jsp:declaration> |
| directive | <jsp:directive.page import = "java.io.*"/> |
A JSPs’ appearance can also be easily enhanced by using the Design views’ GUI to drag and drop components, as well as, specify formatting options (rather than typing HTML commands, as we did with servlets). Aren’t JSPs so much easier than servlets? In addition, JSPs can be called from Web pages (just like servlets), and JSPs can call servlets (just like Web pages). So, JSPs are just as powerful as servlets but as easy to build as Web pages.
Of course, now the bad news: JSPs aren’t that simple. In actuality, the application server converts a JSP into a servlet. Within the server are containers that are responsible for handling various pieces of the server-side application. (A container is simply a subsection/piece of the application server software.) For example, there is a container that manages all servlets and JSPs. Part of this container’s responsibility is to take all the HTML and Java source code in a JSP and create a servlet. When a JSP is accessed for the first time, it will often take a long time to be displayed because the container translates the JSP into a servlet, compiles the servlet source code, and then runs the generated class file.
Tutorial: JSP Standard Tag Library (JSTL)
There are actually many JSP tags and programmers can even create tags. Tags are better than Java scripts because of their simpler syntax. In addition, using tags makes the code more standard. One very popular set of tags, JSTL tags, provide the function of many commonly coded Java scripts. For example, instead of coding the Java for statement in a scriptlet, the JSTL forEach tag can be used. As an example, we will change the HowdyJSP to use the forEach tag.
JSTL comes with RAD. As a matter of fact, in the Design view palette, there is a tray for JSP Tags that includes JSTL tags.
- 1. In the JSP Tags tray, scroll down the options and click on the For Loop to select it.
- 2. In the Design view, click on the line after the second scriptlet to insert the forEach tag.
The For Loop icon will be displayed.
- 3. Switch to the Source view and notice that the following tags were inserted:
<c:forEach items=""></c:forEach>
Just like HTML tags, many JSTL tags have an open and close tag. The JSTL syntax is a little more involved than the HTML tags but we can easily avoid the syntax by using RAD’s Properties view. First, we will add the text we want and then delete the scriptlets.
- 4. In between the forEach start and end tags, add the following text, “Howdy from the forEach tags!”
The tags and text should look like the following:
<c:forEach items="">Howdy from the forEach tags!</c:forEach>
- 5. In the source, delete the two scriptlets and the old text.
- 6. Switch to the Design view.
Notice that the scriptlet icons and the old text are no longer displayed.
RAD should look like Figure 9-3.

You can control many forEach properties. For instance, you can define a counter variable such as ctr (in the Name property) or specify an increment value (i.e., the step property). However, to run a fixed number of iterations only begin and end values are needed.
- 8. In the Properties view, click on the Iterate fixed number of times radio button to select it.
- 9. Specify 1 for the Begin value and 5 for the End value.
- 10. Switch to the Source view.
Look at the simplicity of the tag syntax compared to the scriptlet—no semicolons, parentheses, braces, or variable definitions! Are you a tag fan yet?
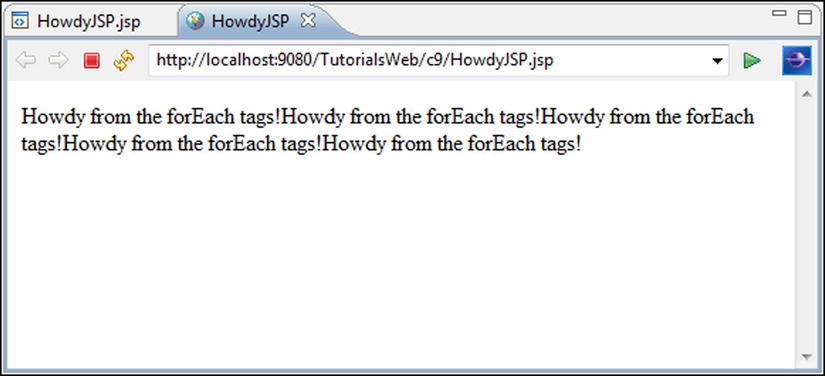
The results should look like Figure 9-4.
Tutorial: Enhancing the Web Application
Currently, our server-side application does not provide all the functions of the client-based application. For instance, data entered by the user is never validated and there is no gross salary or tax calculation. This is because static Web pages can’t perform these types of functions. However, servlets and JSPs can.
We will add new fields to the Web page and then add/modify JSPs and servlets to provide the application functions. We will then show how we can substitute a JSP (with tags) for the servlet.
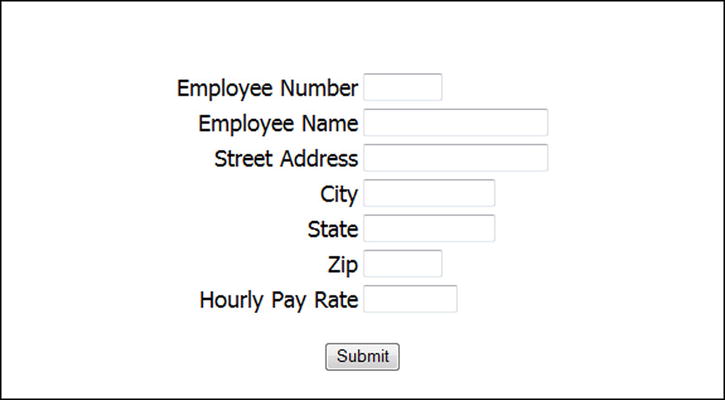
Specifically, we are going to add an exemption drop-down menu and a function list box to EnterEmpInfoForm. We will then create a servlet (called EmpServlet) to verify the data and determine which function to perform. Then we will create three JSPs to display the employee information. Lastly, we will create a JSP with tags (called EnterEmpInfoJSP) and show how a JSP can perform the function of the Web page (EnterEmpInfoForm) and servlet (EmpServlet).
- 1. Display EnterEmpInfoForm in the Design view.
- 2. Click File, Save As, and then specify the parent folder as TutorialsWeb/WebContent/c9.
This will create a new copy of the page in the c9 folder.
- 3. Move the cursor to the last row of the table and press Ctrl+Shift+z to add a row beneath the last row.
- 4. Add another row beneath the row you added in step 3.
- 5. Copy the text “Hourly Pay Rate” into the first cell of each new row.
This ensures that the new cells have the correct text formatting.
- 6. Change the text in the first cell of the first new row to Exemptions and in the second new row to Function.
- 7. In the Palette’s Form Tag tray click on Drop-Down Box then click the cell to the right of the Exemptions text.
- 8. At the Insert Drop-Down Menu window, specify exmpDDM as the name.
- 9. Add a drop-down menu value by:
- Clicking the Add button
- Specifying “zero” for the value name
- Specifying “0” for the value
- 10. Add values 1 through 10 with the appropriate names.
- 11. Change value two’s Selected property to “true” and click the OK button.
This will ensure that 2 is automatically selected when the page is displayed. Notice in the Design view that zero is displayed. To see the default value, you must save the file and switch to Preview view.
- 12. In the Palette’s Form Tag tray click on List Box then click the cell to the right of the Function text.
- 13. At the Insert List Box window, specify functionLB as the name.
- 14. Add the following three values “Display,” “Gross,” and “TaxAmt” (with names that are the same as the values) to functionLB, then click the OK button.
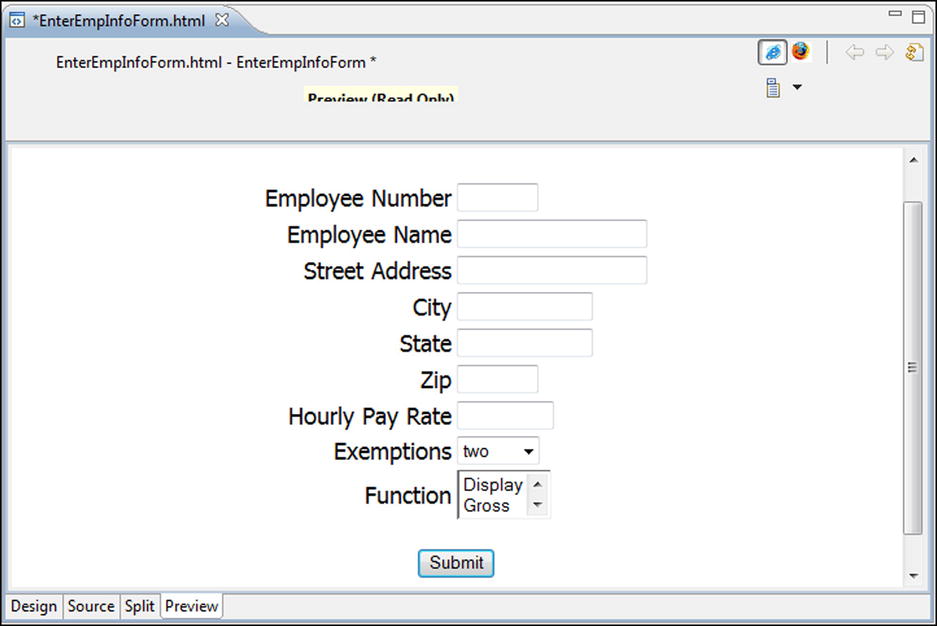
- 15. Click the Preview tab.
The display should look like Figure 9-5. Notice that the default value two is displayed in the drop-down menu.
Tutorial: Creating a Servlet for
It’s now time to create the complementary servlet.
- 1. Create a new servlet in TutorialsWeb/Java Resources/src called EmpServlet.
- 2. In EmpServlet’s source code, change the request and response variable names to req and resp.
- 3. In the doPost method, add the following statements:
String function = req.getParameter("functionLB");
System.out.println(function);
String exmp = req.getParameter("exmpDDM");
System.out.println(exmp);
The println statements will simply test that the servlet is retrieving the values from the new Web page components. After we have verified that the values are being retrieved, we will remove the println statements.
- 4. Return to the EnterEmpInfoForm and, if needed, change back to the Design view.
- 5. Display the form’s properties.
- 6. Change the Action property to the servlet EmpServlet.
- 7. Run EnterEmpInfoForm on the server, select Gross, and click the Submit button.
A blank page will be displayed in the browser pane but the function and number of exemptions will be displayed in the console as follows:
[3/9/12 12:40:42:994 EDT] 0000002c SystemOut O Gross
[3/9/12 12:40:42:994 EDT] 0000002c SystemOut O 2
(Of course, the date/time information displayed at the beginning of each line will be different for you.) This proves that the Web page is tied to the servlet, that the doPost is invoked, and that the information entered in the new page components can be accessed. Notice that even though the exemption value names (one, two, three, etc.) are displayed on the Web page, the values (1, 2, 3, etc.) are returned in the request. Please remember that the values (1, 2, 3, etc.) are still strings and will have to be parsed into primitives before being used in calculations.
We will now change doPost to invoke the correct JSP based on the selected function.
- 8. Replace the last three statements in doPost with the following:
if (function.equals("Display")) {
       resp.sendRedirect("DispEmpInfoJSP.jsp");
} else {
       if (function.equals("Gross")) {
             resp.sendRedirect("DispEmpGrossJSP.jsp");
       } else {
             if (function.equals("TaxAmt")) {
                    resp.sendRedirect("DispEmpTaxAmtJSP.jsp");
             }
       }
}
The response’s sendRedirect method tells the browser to submit a new request, in this case, for a particular JSP based on the function selected by the user. In other words, the name of the JSP file is inserted into the response and the server sends the response back to the browser. The browser then creates another request (for the JSP) and sends the new request to the server.
This is not an efficient way to access the JSPs but it is syntactically simple. In the next section we will use a more “system efficient” technique that is, unfortunately, more complicated for the programmer.
In addition, we have some work to do because these JSPs don’t exist.
Tutorial: Creating JSPs
At first, we will code the three JSPs to print static text. This will allow us to test/prove that the browser is requesting the JSPs (i.e., this will prove that the servlet’s redirects work). We will then use a RequestDispatcher object to forward the request and response directly to the JSPs rather than have the browser make a new request for the JSPs.
- 1. Click on the TutorialsWeb project to select it, and then click File, New, and Web Page.
- 2. At the New Web Page frame, specify DispEmpInfoJSP as the file name, JSP as the Template, and click the Finish button.
- 3. In the Design view, specify “Got to DispEmpInfoJSP.” as the text to be displayed.
- 4. Create two more JSPs called DispEmpGrossJSP and DispEmpTaxAmtJSP.
- 5. Change the text of the two JSPs to “Got to DispEmpGrossJSP.” and “Got to DispEmpTaxAmtJSP.”
- 6. Save all the changes to the servlet and JSPs and run the EnterEmpInfo Web page on the server.
When a new JSP is created, RAD updates the server’s directory and the JSP can be accessed immediately. This is not the case with servlets. When creating a servlet you have to restart the server to get the servlet information into the directory. Advantage JSP. More about this later.
- 7. In the Function list box, select Display and click the submit button.
Verify that “Got to DispEmpInfo JSP” is displayed.
- 8. Use the browser pane’s “back arrow” to redisplay EnterEmpInfo.
- 9. Select the other functions and confirm that the other JSPs are accessed.
You might have noticed a little wait for the JSP text to be displayed. One of the reasons for this delay is that we are taking the “long way around” to the JSPs by using the redirect command. It is more efficient to have the servlet get a RequestDispatcher object and use its forward method to send the request and response directly to the JSP. This eliminates the “round trip” between the client and server.
- 10. Display the EmpServlet source code.
- 11. Add the following import statement:
import javax.servlet.RequestDispatcher; - 12. Add the following statement to create a class RequestDispatcher variable:
RequestDispatcher dispatcher;
We now need to create a RequestDispatcher object and associate it with the variable dispatcher. Like a number formatter, a RequestDispatcher object is retrieved, not created. The ServletContext class provides a getRequestDispatcher method to do this. ServletContext has many useful methods that allow the servlet to communicate with the servlet container (i.e., the server). In addition, the getRequestDispatcher method allows you to associate the RequestDispatcher with a particular JSP. Of course, you must first get a ServletContext object before executing its getRequestDispatcher method. Fortunately, servlets inherit a getServletContext method from the HTTPServlet superclass.
The syntax to create the RequestDispatcher object is as follows:
dispatcher = getServletContext().getRequestDispatcher("xxx.jsp");
There is quite a bit happening with this statement, so we’ll go through the statement step by step.
The getServletContext method is the first part of this statement executed. The getServletContext method, as its name implies, returns a ServletContext object that is not assigned to a variable. Instead, its getRequestDispatcher method is invoked and passed the JSP name. The getRequestDispatcher method returns a RequestDispatcher object and that object is assigned to the variable dispatcher.
- 13. In each if statement, replace the redirect statement with a statement that creates a Request Dispatcher object for each JSP and assigns it to the dispatcher such as the following:
dispatcher =
getServletContext().getRequestDispatcher("DispEmpInfoJSP.jsp"); - 14. After the nested ifs, add the following statement:
dispatcher.forward(req, resp);
The RequestDispatcher object’s forward method will send the request and response directly to the JSP that was specified in the if statements. By invoking the JSPs from the servlet, we have taken the browser “out of the loop” thereby speeding up access to the JSPs.
The EmpServlet source code should look like the following:
import java.io.IOException;
import javax.servlet.ServletException;
import javax.servlet.annotation.WebServlet;
import javax.servlet.http.HttpServlet;
import javax.servlet.http.HttpServletRequest;
import javax.servlet.http.HttpServletResponse;
import javax.servlet.RequestDispatcher;
public class EmpServlet extends HttpServlet {
       private static final long serialVersionUID = 1L;
RequestDispatcher dispatcher;
public EmpServlet(){
super ();
}
protected void doGet(HttpServletRequest req,
               HttpServletResponse resp)
throws ServletException, IOException {
}
       protected void doPost(HttpServletRequest req,
                    HttpServletResponse resp)
throws ServletException, IOException {
              String Function = req.getParameter("functionLB");
              if (Function.equals("Display")) {
dispatcher =
getServletContext().getRequestDispatcher("DispEmpInfoJSP.jsp");
              } else {
                    if (Function.equals("Gross")) {
                           dispatcher =
getServletContext().getRequestDispatcher("DispEmpGrossJSP.jsp");
                    } else {
                           if (Function.equals("TaxAmt")) {
                                     dispatcher =
getServletContext().getRequestDispatcher("DispEmpTaxAmtJSP.jsp");
                           }
                    }
              }
              dispatcher.forward(req, resp);
       }
}
- 15. Save the EmpServlet source code.
- 16. Run c9/EnterEmpInfoForm on the server and verify that all three JSPs are displayed as expected.
Tutorial: Adding Function to the Server-Based Application
We will expand the server-side application to provide the same functions as the client-based application. As a matter of fact, we will reuse the client code that performs these functions. In addition, we will define a new property for employee number in the Employee class.
- 1. Create a new folder in TutorialsWeb/Java Resources/src called c9java.
Because Employee class contains most of the application’s functions, wouldn’t it be a lot easier to simply include Employee in the server-based application rather than code a servlet or JSP to perform the same function? I hope you said, “Yes, it would,” because that’s what we’re going to do.
- 2. Copy Tutorials/c7/Employee.java into c9java.
- 3. In c9java/Employee.java, add a new class level private String variable called empNum.
- 4. Have RAD generate a getter and setter for empNum and save the source code.
This is all that was needed to add a new property to Employee. If this were a client-based application, making this change to the application would require that the new Employee class be installed on many PCs. With a server-based application, only the one class file on the server needs to be reinstalled. This is one of the advantages of a server-based application.
However, just copying the class into the project does not include Employee in the server-based application. The application needs to do two things:
- A. Get the data from EnterEmpInfoForm into an Employee object
- B. Have the JSPs access the Employee object
We will solve the first part with a new class called EmpExtractor. EmpExtractor will retrieve the employee data from the request and create an Employee object whose properties hold the request data.
- 5. Click on c9java to select it.
- 6. Click File, New, and then Class.
- 7. At the New Java Class window, specify EmpExtractor as the class name, then click the Finish button.
An edit session will be started.
We want EmpExtractor to create an Employee object, retrieve the form information from the request, and set the Employee object’s properties. The Employee object will then be passed to the JSPs. Each JSP will use the appropriate Employee object’s method(s) to perform the requested function (Gross, TaxAmt, or Display) and display the results.
- 8. Click Source, Generate Constructors from Superclass...., and then the OK button.
This will generate a null constructor.
- 9. In EmpExtractor, add the following import statements:
import javax.servlet.http.HttpServletRequest;
import org.omg.CORBA.DynAnyPackage.InvalidValue;
The HttpServletRequest class has to be imported because the class is going to receive a request object (from the JSPs) and create a method variable to reference the request. The InvalidValue class needs to be imported because the setPayRate method in the Employee class can throw an InvalidValue exception.
- 10. Add the following to define a class variable and Employee object:
Employee emp = new Employee();
- 11. After the null constructor, add the following to define a new method called getEmployeeInstance:
public Employee getEmployeeInstance(HttpServletRequest request){
              return emp;
}
Notice that the method expects a request object. We will now add the code to retrieve the information from the request object and set emp’s properties.
- 12. Before the return statement in getEmployeeInstance, add the following statements:
emp.setEmpName(request.getParameter("empNameTF"));
emp.setEmpStreet(request.getParameter("streetAddrTF"));
emp.setEmpCity(request.getParameter("cityTF"));
emp.setEmpState(request.getParameter("stateTF"));
emp.setEmpZip(request.getParameter("zipTF"));
try {
emp.setPayRate(Double.parseDouble(
request.getParameter("hPRTF")));
} catch (NumberFormatException Error) {
System.out.println("Pay rate must be a numeric" +
"value: 8 or 7.25");
} catch (InvalidValue Error) {
       System.out.println(Error.getMessage());
}
emp.setExemptions(Integer.parseInt(
request.getParameter("exmpDDM")));
Does this source code seem familiar? This is the same logic that’s in EnterEmpInfo’s setEmployeeProperties method. The difference is that setEmployeeProperties retrieved the information from a frame’s text fields, whereas getEmployeeInstance is retrieving the information from a request object. Even though EmpExtractor and EnterEmpInfo are very similar, we had to create them because the client and server-side applications use two different interfaces to gather the Employee information: AWT (for the client-side application) versus a Web page (for the server-side application).
Notice that regardless of the interface, however, the core logic of the two applications (i.e., the Employee class) is the same. Separating the client-based application’s core logic (creating the Employee class) from the interface (i.e., the frame classes) was a very wise decision. Because of this, we are able to reuse the Employee class with a different interface (e.g., the Web page in our server-based application). As a matter of fact, if we wanted to provide alternative interfaces for PDAs, cell phones, or holograms (just kidding), Employee could still be used. We will talk more about this “application architecture” later in the chapter.
The JSPs must be modified to call EmpExtractor and then use the returned Employee object to perform the requested functions. We will modify DispEmpInfoJSP first.
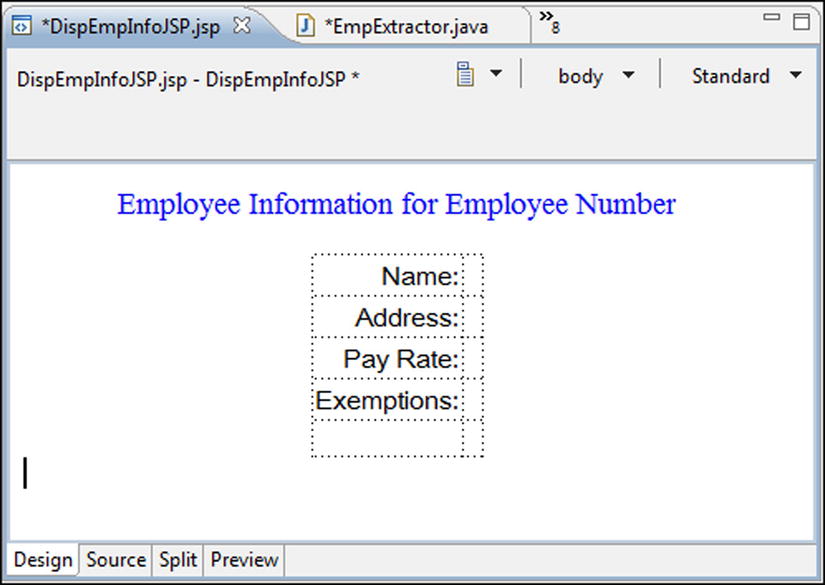
- 1. In the Design view, edit DispEmpInfoJSP so that it contains text and a table like Figure 9-6.
- 2. Change to the Source view.
- 3. Add the following statement to the end of DispEmpInfoJSP’s page directive (the page directive is toward the beginning of the source code):
import="c9java.*"
Because DispEmpInfoJSP will be using Employee and EmpExtractor objects, we have to import c9java. (If Employee and EmpExtractor were in the default package of the JavaResources folder, no import statement would have been required.)
- 4. After the page directive, add the following scriptlet:
<jsp:scriptlet> Employee emp;
EmpExtractor ee = new EmpExtractor();
emp = ee.getEmployeeInstance(request);
</jsp:scriptlet>
This scriptlet creates:
- A. An Employee variable called emp
- B. An EmpExtractor variable called ee
- C. An EmpExtractor object
The scriptlet also assigns the EmpExtractor object to the variable ee.
Finally, the scriptlet invokes the getEmployeeInstance method and sends the request object referenced by the variable request. Hey, where did the variable request come from? In fact, where did the request object come from? There was no import statement for the Request class nor was a request object passed from the server to the JSP! Are you starting to wonder what’s going on?
The variable request is another example of the server making your programming life easier. The JSP container provides what are called JSP implicit objects. Essentially, these are predefined variables and objects that all JSPs can access. (In addition to the request, there is also a response object and a variable named response that can be used by JSPs.) Not having to write the Java code to define and pass these variables is one more reason why JSPs are so much easier to use than servlets.
- 5. Change back to the Design view.
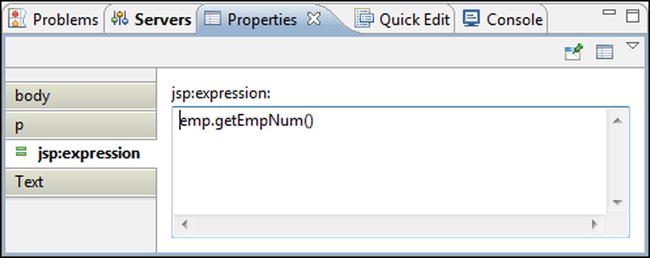
- 6. Put a space after the first line of text and click JSP, then Insert Expression.
- 7. In the Properties view, add the statement as seen in Figure 9-7.
- 8. As done in step 7, add the following expressions in the appropriate cells of the table’s second column:
emp.getEmpName()
emp.getEmpStreet()
emp.getPayRate()
emp.getExemptions()
The Design view should look like Figure 9-8.

Currently, the address cell only displays the street information. We need to modify the cell contents to include the city, state, and zip code.
- 9. Insert a new line in the address cell (click to the right of the expression icon that retrieves the employee’s street address and press the Enter key).
- 10. Change to the Source view and insert a new line after the line break tag (<br>).
We switched to the Source view because sometimes it is easier to enter the Java source code rather than use the GUI.
- 11. At the new line enter the following and save the source code:
<%=emp.getEmpCity()%>, <%=emp.getEmpState()%> <%=emp.getEmpZip()%>
It’s important to include the three spaces after the comma and the four spaces between the employee’s state and zip code so that the information is formatted correctly.
Time to test!
- 12. Run c9.EnterEmpInfoForm on the server.
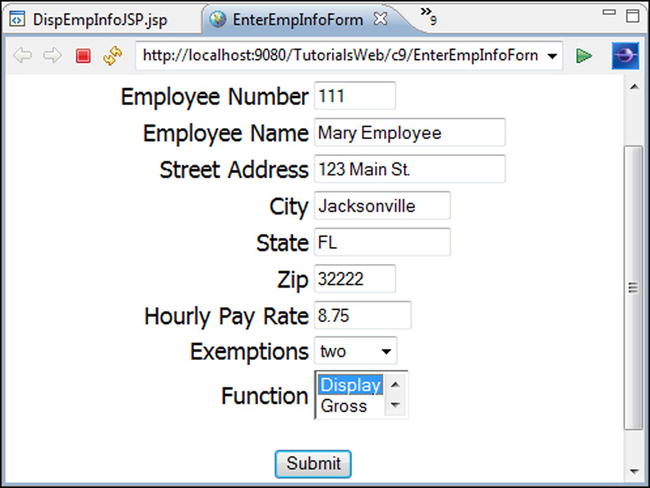
- 13. In the browser pane, enter the information as in Figure 9-9.
- 14. Click the Submit button.
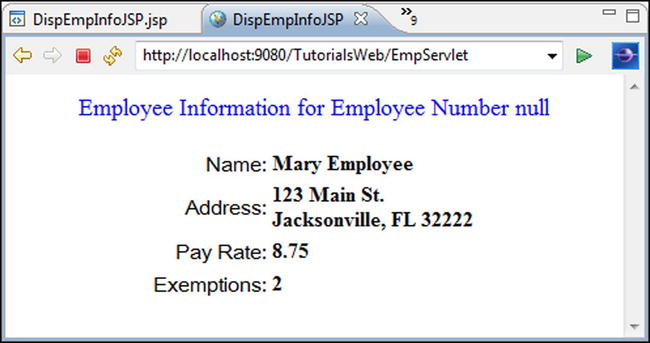
The result should appear as in Figure 9-10. Notice anything wrong with Figure 9-10?

The most noticeable error is that the value null is displayed where employee number is supposed to appear. A look at the JSP code shows that there is an expression to retrieve the employee number, however, a look into at the EmpExtractor source code shows that empNum property is never set. Obviously, this needs to be fixed.
Although not errors, we should make some formatting improvements. For instance, the data values should be left justified so they are nearer the labels (yours may already be left justified) and made bold to differentiate them from the labels and emphasize them as results.
- 15. In the Design view, modify the JSP so that the data is formatted as in Figure 9-11.
- 16. Add the following statement to getEmployeeInstance in EmpExtractor and save the source code:
emp.setEmpNum(request.getParameter("empNumTF"));
This statement retrieves the employee number from the request object and sets the Employee object’s employee number property.
Steps 15 and 16 should result in the page displaying the employee number instead of null as in Figure 9-11. The source code for DispEmpInfoJSP should be as follows:
<!DOCTYPE HTML PUBLIC "-//W3C//DTD HTML 4.01 Transitional//EN"><%@page
language="java" contentType="text/html; charset=ISO-8859-1" pageEncoding="ISO-8859-1" import="c9java.*"%>
<jsp:scriptlet> Employee emp;
EmpExtractor ee = new EmpExtractor();
emp = ee.getEmployeeInstance(request);
</jsp:scriptlet>
<html>
<head>
<title>DispEmpInfoJSP</title>
<meta http-equiv="Content-Type" content="text/html; charset=ISO-8859-1">
<meta name="GENERATOR"
content="Rational® Application Developer for WebSphere® Software">
</head>
<body>
<p align="center"><font size="4" color="blue"> Employee
Information for Employee Number <%=emp.getEmpNum()%></font> </p>
<center><table border= "0" >
<tbody>
       <tr>
<td align= "right" ><font face= "@Arial Unicode MS" >Name: </font></td>>
               <td align="left"><b><%=emp.getEmpName()%></b></td>
       </tr>
       <tr>
               <td align= "right" ><font face= "@Arial Unicode MS" >Address:</font></td>
               <td align="left"><b><%=emp.getEmpStreet()%><br>
<%=emp.getEmpCity()%>, <%=emp.getEmpState()%> <%=emp.getEmpZip()%> </b></td>
       </tr>
       <tr>
               <td align= "right" ><font face= "@Arial Unicode MS" >Pay Rate:</font></td>
               <td align="left"><b><%=emp.getPayRate()%></b></td>
       </tr>
       <tr>
               <td align= "right" ><font face= "@Arial Unicode MS" > Exemptions:</font></td>
               <td align="left"><b><%=emp.getExemptions()%></b></td>
       </tr>
       <tr>
               <td align="right"></td>
               <td align="left"></td>
       </tr>
</tbody>
</table></center>
</body>
</html>
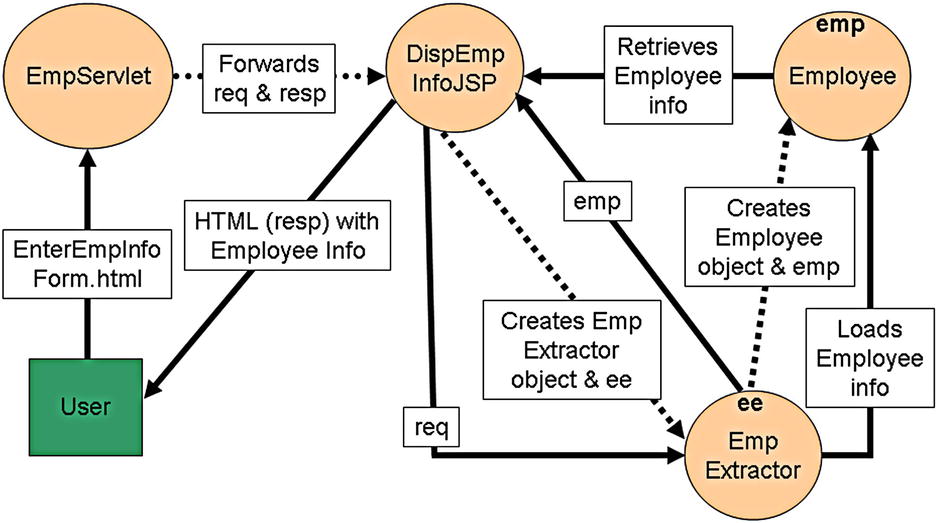
If you are a little confused about all the pieces in our server-based application, Figure 9-12 contains a diagram showing how the user and the various components interact.
We still need to modify the other JSPs to display the employee gross salary and tax amounts.
- 17. Add the statements to DispEmpGrossJSP and DispEmpTaxAmtJSP that were added to DispEmpInfoJSP in steps 3 and 4.
- 18. Replace the current text in DispEmpGrossJSP with “The gross salary for” and DispEmpTax-AmtJSP’s current text with “The tax amount for.”
- 19. Center the text on the pages.
- 20. In DispEmpGrossJSP and DispEmpTaxAmtJSP, add an expression so that the employee’s name appears after the text.
- 21. In DispEmpGrossJSP and DispEmpTaxAmtJSP, add an expression so that the appropriate value appears in bold and centered beneath the text.
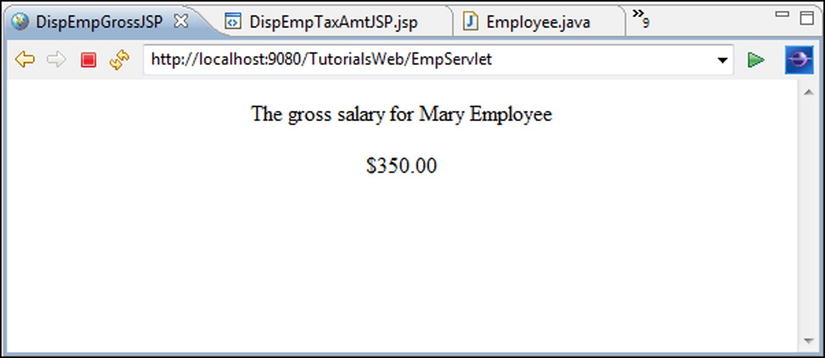
- 22. Test by entering the information in Figure 9-9 and selecting the Gross and TaxAmt functions.
The results should look like Figures 9-13 and 9-14.

Of course, a professional Web site would never display such plainly formatted information as seen in Figures 9-13 and 9-14. In addition, a good Web page would include navigation buttons, graphics, hyperlinks, etc. However, these additional components have more to do with Web site design than with Java. Even though WebSphere provides many Web page design tools, Java programmers generally don’t use them. This is because most organizations hire lower-salaried Web page designers to create and format pages rather than have higher-priced Java programmers perform these tasks. This “economic factor” is another reason companies separate the application logic from the interface and also a reason that this application architecture is very popular.
In the Java literature, many different models or architectures have been proposed to handle the most common types of Java applications. One of the most popular is the MVC (Model-View-Controller) architecture. MVC dictates that any Java class should only perform functions from one of the three MVC categories.
For instance, classes that are part of the Model perform application business logic and/or maintain the application’s data. If data needs to be stored or retrieved, only classes in the Model access the database. The View classes gather input (data and instructions) from the user and format and display the application results. The Controller classes receive input via the View and invoke those portions of the Model and View to perform the user requested functions and display the results.
Throughout this text, you have been gently guided toward the MVC architecture. For instance, in the client-based application, the frame classes were separated from the application logic classes. In addition, there was always a Java class that kicked off the application. These are the three components of the MVC architecture. The Employee class performed the application logic (the Model). The EmployeeFrame displayed the results (the View). The user ran EmployeeApp (the Controller), which created an Employee object (the Model) and the EmployeeFrame object (the View) where the employee data was displayed. When we created EnterEmpInfo, we were trying to expand the view to have a new input portion.
Figure 9-15 shows the basic structure of the MVC architecture and Figure 9-16 shows how the client-based application (with the EnterEmpInfo frame) “sort of” fits into the MVC architecture.
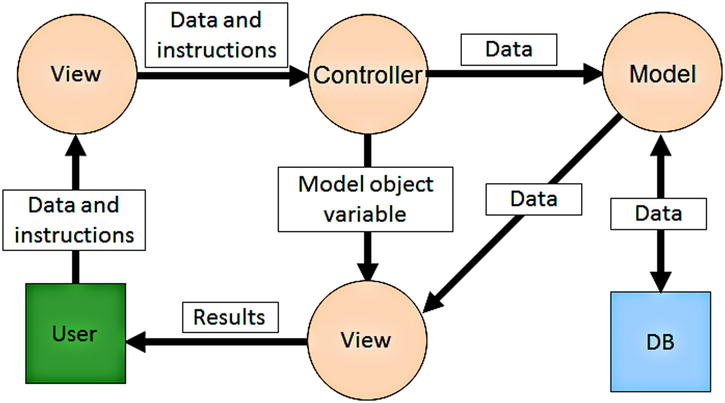
Figure 9-16 is quite busy, so we’ll walk through it step by step.
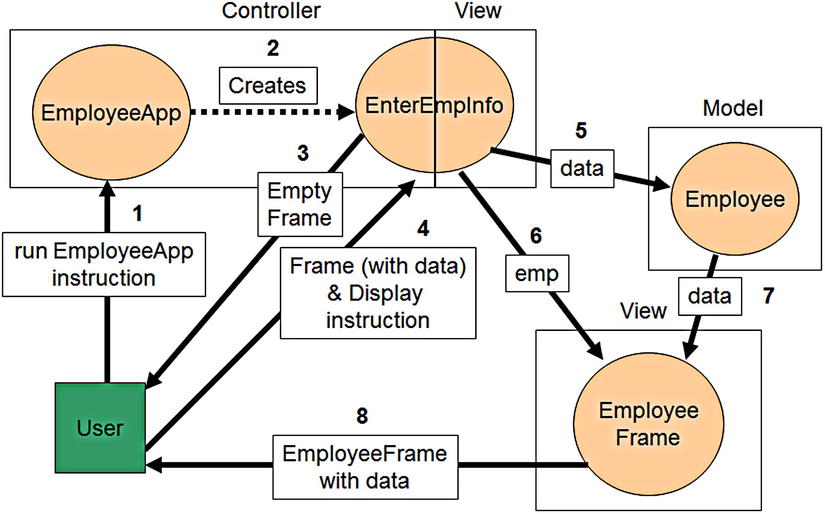
Step 1: The user starts the application. For example, a user issues the java EmployeeApp command or within RAD runs the EmployeeApp class as an application by clicking the Run button. Either way, the user is running a Java class that is considered part of the Controller.
Step 2: The EmployeeApp class is run and it creates an EnterEmpInfo object.
Step 3: The EnterEmpInfo frame is displayed.
Step 4: The user enters the information and clicks a button. In this case, clicking a button is how the user specifies a new instruction to the controller. The diagram assumes that the user clicked the Display button.
Step 5: Based on the button that was clicked, EnterEmpInfo snaps into action. An Employee object (part of the Model) is created, and its properties are set to the values entered in the frame.
Step 6: EnterEmpInfo then creates an EmployeeFrame object and passes the Employee variable emp. EmployeeFrame is part of the View because it will display the employee information.
(The client-based Java technology doesn’t let us fully segment the classes into the MVC categories. For example, EnterEmpInfo actually has both View and Controller functions. When the empty EnterEmpInfo frame was displayed and the data returned, EnterEmpInfo was acting as part of the View. However, when it responds to the button and creates the Model component, Employee, and View component, EmployeeFrame, it is performing Controller functions.)
Step 7: EmployeeFrame retrieves the data from the Employee object and displays it.
For server-based applications, the Controller is usually comprised of servlets that are invoked from Web pages (which are part of the View). The Model is made up of Java beans, which we will explain in more detail in a later section. The View is comprised of Web Pages and JSPs. Figure 9-17 shows this architecture.
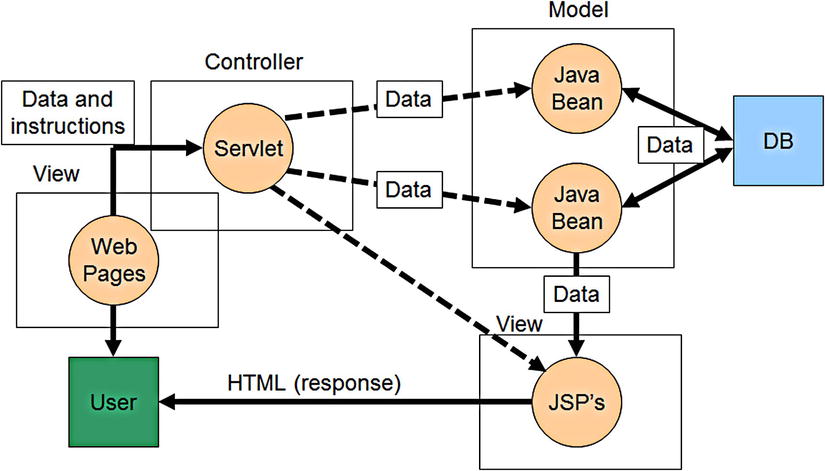
Now there are many MVC variations. Sometimes the Model and the View are combined so that data access is faster. Or, the View interfaces with the Model instead of the Controller. This last variation is how we implemented the Employee application in TutorialsWeb. Figure 9-18 shows how the server-based Employee application fits the MVC architecture.

Next, we will further explore JSP tags and show how JSP tags are much easier to code and use than scriptlets and expressions.
More JSP Tags
We are going to change our Controller from a servlet to a JSP, called EnterEmpInfoJSP, which uses JSP tags to perform the servlet’s functions. We will explain the standard JSP action tags include and forward and the JSTL tags if and choose. In addition, we will introduce Expression Language (EL). EL makes using tags even easier.
In our new architecture, we want EnterEmpInfoJSP to display all the EnterEmpInfoForm fields when it is initially invoked with a get request. When the submit button is clicked, the EnterEmpInfoJSP will be invoked again but with a post request. When EnterEmpInfoJSP receives a post request, the functionLB value should be retrieved and the correct JSP invoked. Essentially the logic is:
- If request is a get
- Display EnterEmpInfoForm fields
- If request is a post
- Retrieve the selected function and forward to the correct JSP
Now there are two ways to create EnterEmpInfoJSP with all the required fields. We could copy EnterEmpInfoForm (i.e., the HTML code contained in the body of the page) into EnterEmpInfoJSP.jsp. This would create the form and all the components (i.e., text fields, labels, button, etc.) in the JSP. Or, we could include EnterEmpInfoForm.html in EnterEmpInfoJSP.jsp using the JSP action tag include and change EnterEmpInfoForm’s action from EmpServlet to EnterEmpInfoJSP.
The include tag works as follows. When there is a request for a JSP, the container retrieves any resources specified in an include tag and imbeds them in the response. Any changes made to the resource since the last request will be reflected in the new request. In other words, the include tag allows dynamic content to be added to the JSP. For example, the following include tag will embed the EnterEmpInfo.html file into a JSP:
<jsp:include page="EnterEmpInfoForm.html" flush="true"> </jsp:include>
If we ran the JSP, it would appear as in Figure 9-19.
If we had an image file that contained the TNT banner (in this example, a JPEG file called TNTBanner) and added it to EnterEmpInfo.html file with the following code:
<P align="center">
<IMG border="0" src="TNTBanner.jpg" width="465" height="99">
</P>
Running EnterEmpInfoJSP would result in Figure 9-20.
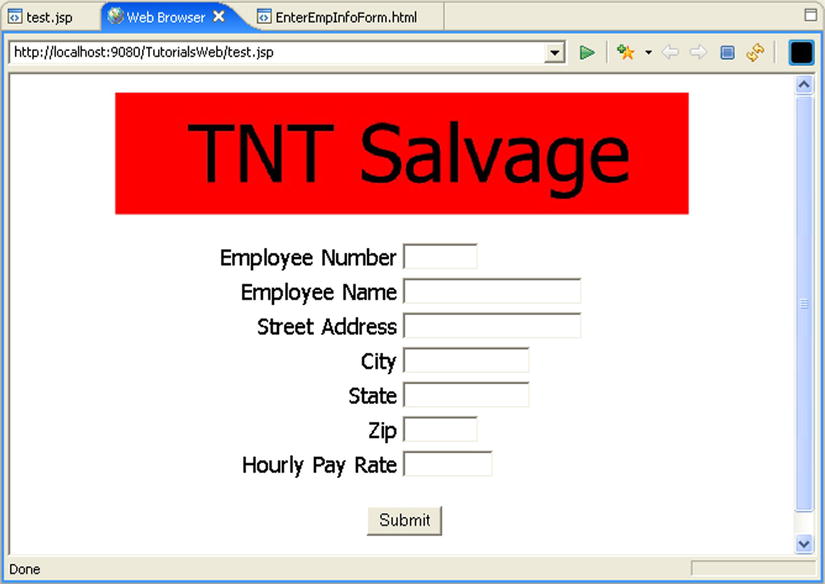
Can you feel the power of the include tag?
The second JSP standard action tag we will need is forward. The forward tag takes the place of the RequestDispatcher’s forward method with the big advantage of much simpler syntax. For example, the following tag:
<jsp:forward page = "DispEmpInfoJSP.jsp">
</jsp:forward>
performs the same function as the following EmpServlet code:
RequestDispatcher dispatcher;
dispatcher =
getServletContext().getRequestDispatcher("DispEmpInfoJSP.jsp");
dispatcher.forward(req, resp);
Which source code would you rather type in?
Now that know how to forward to a JSP, the trick is that we only want to forward to a JSP after the user has selected a function and clicked the submit button. In other words, if the user simply requests EnterEmpInfoJSP (with a get request), we want to display the form. When the user clicks the submit button and invokes EnterEmpInfoJSP with a post request, we want the form to check which function was selected. We will use the JSTL if tag to check for the request type and the JSTL choose tag to determine which function was selected. Both of these tags will use Expression Language (EL) to access the request object.
<c:if test='${ condition }'> body </c:if>
The condition, of course, needs to be specified and the body contains whatever function should be performed when the condition is true. For example, inserting 1==1 as the condition and the text “Yikes it works” for the body as follows:
<c:if test='${1==1}'> Yikes it works </c:if>
would result in the text “Yikes it works” appearing in the browser. The body of the if tag is not limited to static text. Tags, scriptlets, expressions, or HTML can all be specified. This example also includes your first look at Expression Language (EL). Everything within the quotes of the test value is considered EL. The EL syntax dictates that any condition begin with a $ and be enclosed in braces. Not too tough to remember but it doesn’t seem very useful either. The real power of EL is that it allows you to access information contained in the JSP container (like the implicit request and response objects, parameters, beans, etc.) without using the cumbersome Java syntax. Also, all the Java comparison operators (e.g., >, ==, <, etc.) can be used to define conditions. For example, in the servlet we used:
String function = req.getParameter("functionLB");
if (function.equals("Display")) { }
to get the functionLB value and check its value. Now this is a slightly unfair comparison, because in the servlet example we retrieved the functionLB value and assigned it to a variable and then used the variable in the if statements. A fairer comparison would be between the following if statement:
if(req.getParameter("functionLB").equals("Display")) {}
and the following if tag with EL:
<c:if test='${param.functionLB=="Display"}'> </c:if>
If we strip away the required if syntax in the two examples, we are left with the following Java code in the servlet:
req.getParameter("functionLB").equals("Display")
and the following EL code in the if tag:
${param.functionLB=="Display"}
It’s pretty obvious that EL is simpler than Java.
The last piece of the puzzle is the choose tag. A choose tag is used with when tags, where each when tag identifies a different condition to test. The following is an example with two when tags:
<c:choose>
<c:when test=' EL Expression '}'>
body
</c:when>
<c:when test=' EL Expression '}'>
body
</c:when>
</c:choose>
We will use the choose and when tags to determine which function was selected and then go to the correct JSP.
Tutorial: More JSP Tags
Let’s continue our application:
- 1. In c9.EnterEmpInfoForm source code, change the form action from EmpServlet to EnterEmpInfoJSP.jsp.
- 2. In TutorialsWeb/WebContent/c9, create a new JSP called EnterEmpInfoJSP.
- 3. In the palette’s JSP Tags tray, click on the Include item and then click on design pane.
- 4. On the Insert JSP Include window, specify EnterEmpInfoForm.html in the File name text field.
- 5. Click the Flush check box in the lower left and then the OK button.
The Page Designer will display the EnterEmpInfoForm page.
So, not only are tags simpler to use, they can be easily inserted using Page Designer. It just keeps getting better!
If you switch to the Source view, you will see the flush parameter in the include tag. Previously, flush was a required parameter, however, in this case, it can be removed and the tag will still work. (Essentially flushing ensures that the entire contents of the included file are displayed. There are some nuances regarding the flush parameter, however, we will leave a detailed explanation to a more exhaustive Java text and always specify true.)
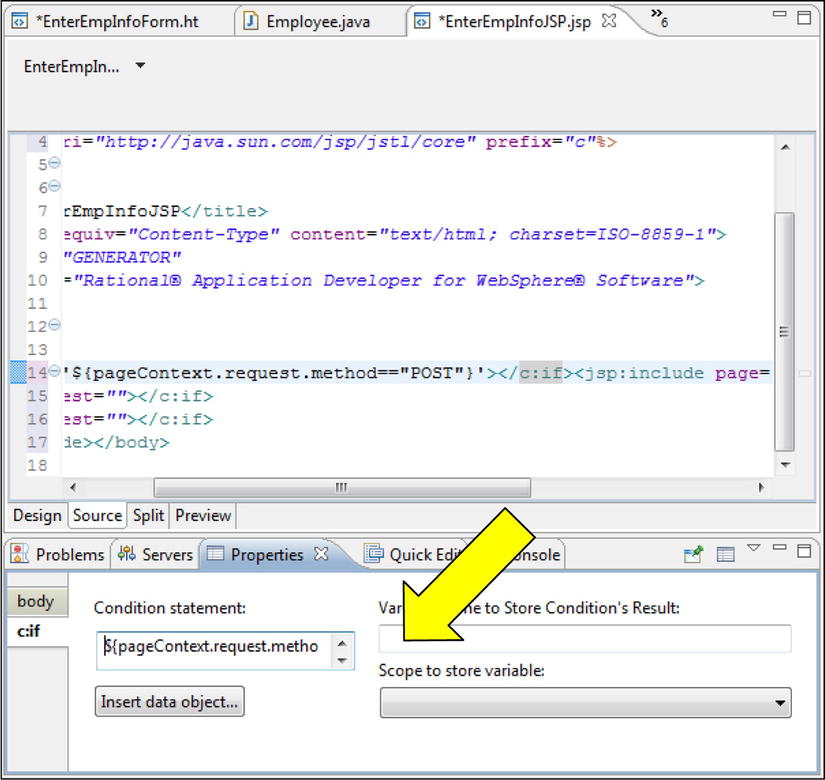
- 6. If necessary, switch to the Design View, and click on the If item in the JSP Tags tray.
- 7. Click anywhere before the EnterEmpInfoForm. (I.e., Click above the thick black line not the dashed line.)
The if tag icon will be placed on the Design view.
- 8. Display the Properties view and enter the following EL condition statement as the if condition (see Figure 9-21):
${pageContext.request.method=="POST"} - 9. Switch to the Source view.
The following if tag should have been inserted:
<c: if test='${pageContext.request.method=="POST"}'></c:if>
Notice that the EL condition checks the value of the request object’s method variable. This variable contains the request type (e.g., POST or GET) that invoked the JSP.
Time to test.
- 10. Change the body of the if tag as follows so that the text “Got to post” is displayed:
<c: if test='${pageContext.request.method=="POST"}'>
Got to post
</c:if> - 11. Save the source code and run EnterEmpInfoJSP on the server.
EnterEmpInfoJSP should be displayed with all the form fields.
- 12. Click the submit button.
The text “Got to post” should be displayed before the form. This means that the form’s action was successfully changed and the if tag was coded correctly.
Now we need to add the choose and when tags to determine which function was selected and the forward tags to invoke the appropriate JSPs.
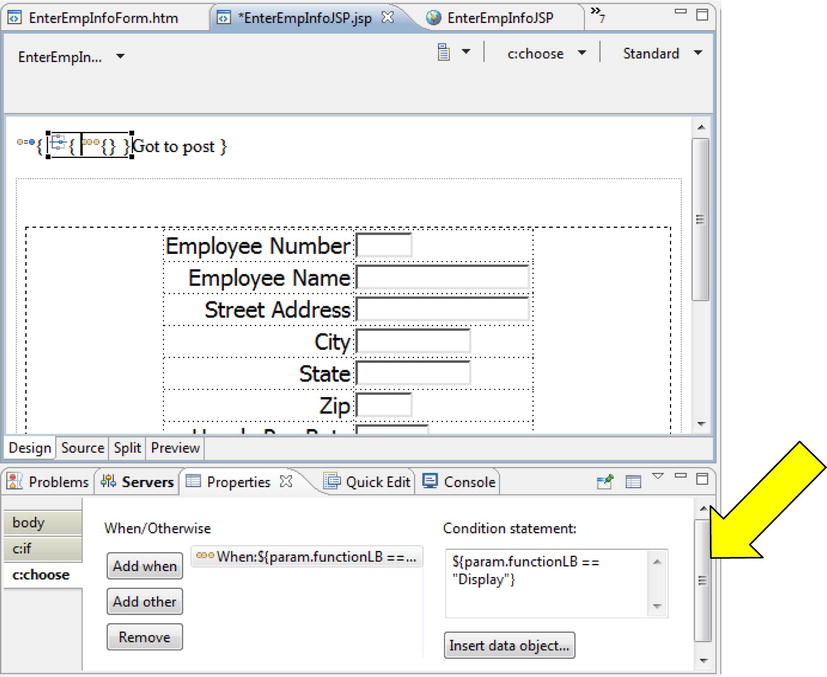
- 13. In the Design view’s palette, click on the Choose item in the JSP Tags tray and click before the “Got to post” text.
This will insert the choose tag inside the if tag.
- 14. Display the choose tag in the properties view and enter the following as the condition statement for the first when tag (see Figure 9-22):
${param.functionLB == "Display"} - 15. In the JSP Tags tray click on Forward and then in the Design view, click between the innermost braces in the Choose icon (the innermost braces represent the when tags).
The Insert JSP Forward window will be displayed.
- 16. At the Insert JSP Forward window, click the Browse button, select File, then expand the WebContent folder, select DispEmpInfoJSP.jsp and click the OK button.
The Insert JSP Forward window will now have DispEmpInfoJSP.jsp as the Page name.
- 17. Click the OK button.
The forward tag should be within the when tag and the source code should look like the following:
<c:if test='${pageContext.request.method=="POST"}'>
       <c:choose>
              <c:when test='${param.functionLB == "Display"}'>
                    <jsp:forward page="../DispEmpInfoJSP.jsp">
</jsp:forward>
              </c:when>
       </c:choose>
Got to post
</c:if>
As you can see, you must be a bit of a sharpshooter to use the Page Designer GUI to insert within tags. Sometimes it’s easier to copy the code from somewhere else and modify it.
- 18. Using either the GUI or cut-and-paste, add two more when tags inside the choose tag that check for values of “Gross” and “TaxAmt” and forward to the appropriate JSP.
- 19. Remove the text “Got to post.”
The tag icons in the Design view should look like Figure 9-23.
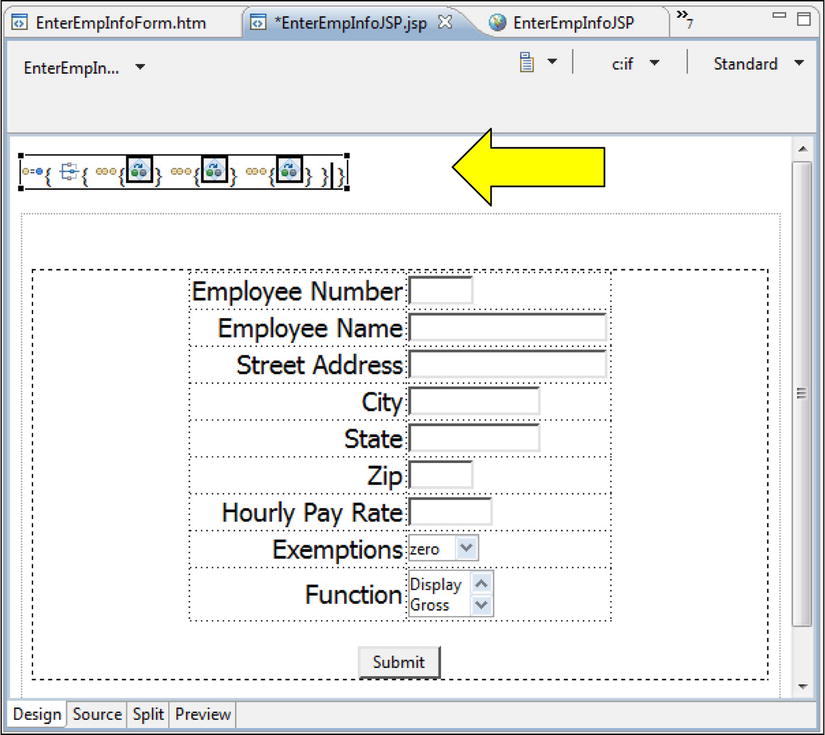
The source code should look like the following:
<c:if test='${pageContext.request.method=="POST"}'>
              <c:choose>
                    <c:when test='${param.functionLB == "Display"}'>
                           <jsp:forward page="../DispEmpInfoJSP.jsp">
                    </jsp:forward></c:when>
                    <c:when test='${param.functionLB == "Gross"}'>
                           <jsp:forward page="../DispEmpGrossJSP.jsp">
</jsp:forward></c:when>
                    <c:when test='${param.functionLB == "TaxAmt"}'>
                           <jsp:forward page="../DispEmpTaxAmtJSP.jsp">
</jsp:forward></c:when>
              </c:choose>
</c:if>
- 20. To test the application, save the EnterEmpInfoJSP source code and run it on the server.
- 21. Select Display as the function and click the Submit button.
Validate that DispEmpInfoJSP is run.
- 22. In the browser window click the back button, select Gross, and then click Submit.
Validate that DispEmpGrossJSP is run.
- 23. Validate that DispEmpTaxAmtJSP is run when the TaxAmt function is chosen.
Java Beans
Officially, for a Java class to be declared a Java Bean it must be defined as a public class and follow a couple of simple rules:
- A. Have a public null constructor
- B. Implement the Serializable interface
If a bean has properties, a getter and setter should be defined for each property (so that visual tools, such as RAD, can provide easy access to the values), but it is not a requirement.
All of the visual components (buttons, text fields, etc.) are beans, and if we imported the Serializable class and added “implements Serializable” to the Employee class’s header as follows:
import java.io.Serializable;
public class Employee implements Serializable {
Employee would be defined as a bean. (Implementing Serializable makes storing an object easier and, since beans may be stored, this is a requirement. Note that no new methods need to be coded when implementing the Serializable interface.) You should be aware that a class does not have to implement Serializable or have any getters or setters to be defined as a bean by RAD/WAS. The bean rules are for ease of use and standardization, however, RAD/WAS will let you define just about any Java class as a bean. So, even though we are going to create an Employee bean, we will not implement Serializable in Employee.
Beans may not sound like much, but server-based beans are very useful because of their “scope.” In addition, using JSP bean tags makes creating objects, defining them as beans, and accessing their methods and properties much easier.
JSP Bean Tags
JSP Bean tags relieve the page designer of having to understand the Java concept of instantiation (i.e., creating objects) and the associated Java syntax to create an object. In other words, instead of creating objects and executing methods, beans are defined and properties values are assigned and retrieved. Again, the function of the tags is very similar to Java script statements but the syntax is much simpler.
For instance, the following JSP useBean tag creates a Java bean:
<jsp:useBean id="EmpBean" class="c9java.Employee"
                scope="session">
</jsp:useBean>
The keyword id identifies the name of the bean and the class keyword identifies the Java class to which the bean refers. The tag essentially performs the same function as the following Java scriptlet:
<% c9java.Employee EmpBean = new c9java.Employee();%>
The key difference between the useBean tag and the scriptlet is the tag’s scope parameter. The scope keyword defines which other objects can access the bean. The four scope values that can be specified are page, request, session, and application. Page means that only this JSP can use the bean. Request ties the bean to the request that was passed to the JSP. This means that any object that can access the request can access the bean. When session is specified, any object created during the user’s browser session can access the bean. Specifying application means that any object within the project created by any session (i.e., any user) can access this bean. Of course, if the server is rebooted, all beans are deleted regardless of scope.
To perform the same function of the scope parameter with Java commands we would define the new employee object as an attribute of the session, request, etc. For example, the following statements would define the variable EmpBean a session bean called EmpBean.
HttpSession session = req.getSession();
session.setAttribute("EmpBean", EmpBean);
A request object has a method called getSession, which, as the name implies returns the current browser session as an object. Session objects can have attributes and we use the session object’s setAttribute method to define EmpBean as an attribute of the current session. This means EmpBean can be accessed by any other object created in the session. In other words, the programmer does not have to pass variables to share objects.
Regardless of how the bean is defined (tags or scripts), bean property values are assigned and retrieved by setProperty and getProperty tags. These tags invoke an object’s getters and setters. For instance, the following setProperty tag:
<jsp:setProperty name="EmpBean" property="empName"
param="empNameTF" />
performs that same function as the following scriptlet:
<% EmpBean.setEmpName(request.getParameter("empNameTF")); %>
Notice how simple the setProperty tag syntax is compared to the Java statement. Once again, the server’s JSP container is making things easy for you. When converting the JSP to a servlet, the JSP container translates the information specified in the tags into the complex Java statements. For example, because we used the keyword param, the container recognizes EmpNameTF as a request object parameter. (You can specify value instead of param to assign a static value to the property.) As a matter of fact, if the bean property has the same name as the request parameter (i.e., if we had called the text field empName instead of empNameTF) we could have coded the tag as follows:
<jsp:setProperty name="EmpBean" property="empName"/>
In addition, if the parameter value must be converted from one type to another type (e.g., from a primitive to string) the container automatically inserts the code to perform the conversion.
To retrieve a parameter, use a getProperty tag as follows:
<jsp:getProperty name="EmpBean" property="empName"/>
This is the equivalent of the following expression:
<%= EmpBean.getEmpName() %>
Remember, the purpose of JSP tags is to make using the Java classes that comprise the Model easier for the page designer. Notice that someone coding the bean tags doesn’t need to comprehend objects, instantiation or Java’s syntax rules.
Tutorial: Using JSP Bean Tags
To make full use of JSP bean tags in our application, we need to create two new properties in the Employee class for taxAmount and grossAmount. These are a little different from our previously defined properties in that they are calculated values. Earlier we mentioned that properties don’t have to have getters and setters. Bean properties can be read-only or write-only and the new properties (gross salary and tax amount) are perfect examples of read-only properties. In other words, no user of the bean should be able to set these values; they should always be calculated based on the pay rate and exemptions properties.
- 1. In src/c9java.Employee, create two new class private variables by adding the following statements:
private String taxAmount;
private String grossAmount; - 2. Click Source and then Generate Getters and Setters....
- 3. Select the options to generate only getters for the properties taxAmount and grossAmount and click the OK button.
RAD will generate two new methods that return the strings taxAmount and grossAmount.
- 4. Replace the code in getGrossAmount with the following statements:
grossSalaryCalcFormatted();
return stringGrossSalary; - 5. Replace the code in getTaxAmount with the following statements:
fedTaxCalcFormatted();
return stringTaxAmt;
Now that wasn’t too hard, was it? These getters simply invoke the methods to calculate and format the appropriate value, then return the result.
We now need to restructure the application so that EnterEmpInfoJSP creates and populates the bean. Currently this function is performed by each of the display JSPs when they invoke EmpExtractor. However, this is very redundant. The application should create the bean once and then the various JSPs should access the bean. This is a perfect function for the Controller to handle and, since EnterEmpInfoJSP is acting as the Controller, we will include the JSP tags to define and populate the bean in EnterEmpInfoJSP. We will then add the tags in the display JSPs to retrieve the correct properties.
- 6. In the Design view of EnterEmpInfoJSP, click on Bean in the JSP tags tray.
We want to create the bean after the user has entered the employee information and clicked the Submit button. So we need to place the useBean tag after the if tag but before the choose tag. Get out your sharpshooter scope.
- 7. Click to the right of the first open brace.
The Insert JSP Bean window will be displayed.
- 8. Specify the three bean parameters as seen in Figure 9-24.
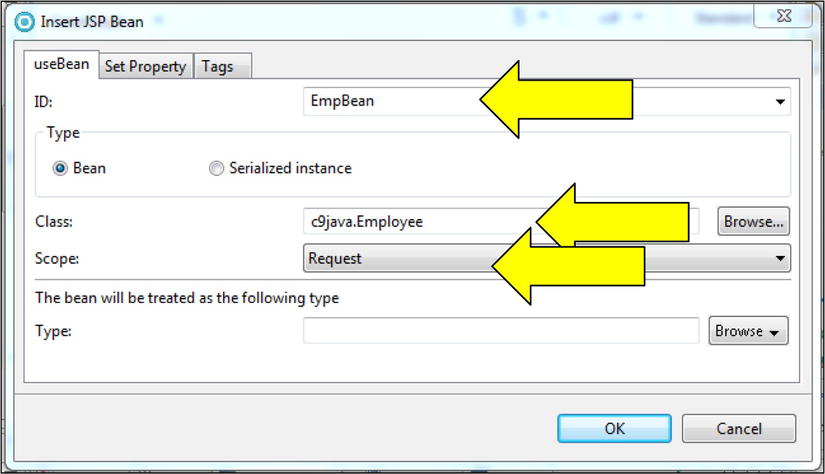
From this information, RAD generates the following tag:
<jsp:useBean id="EmpBean" class="c9java.Employee" scope="request">
</jsp:useBean>
Now that the bean is created, the bean properties need to be set to the values entered by the user. RAD provides an easy GUI to generate the various setProperty tags.
- 9. At the Insert JSP Bean window, click the Set Property tab, and then the Add button.
The cursor will be placed in the first row’s Property column.
- 10. Click on the options button (at the right of the cell) to display all the available properties and then select empNum (see Figure 9-25).
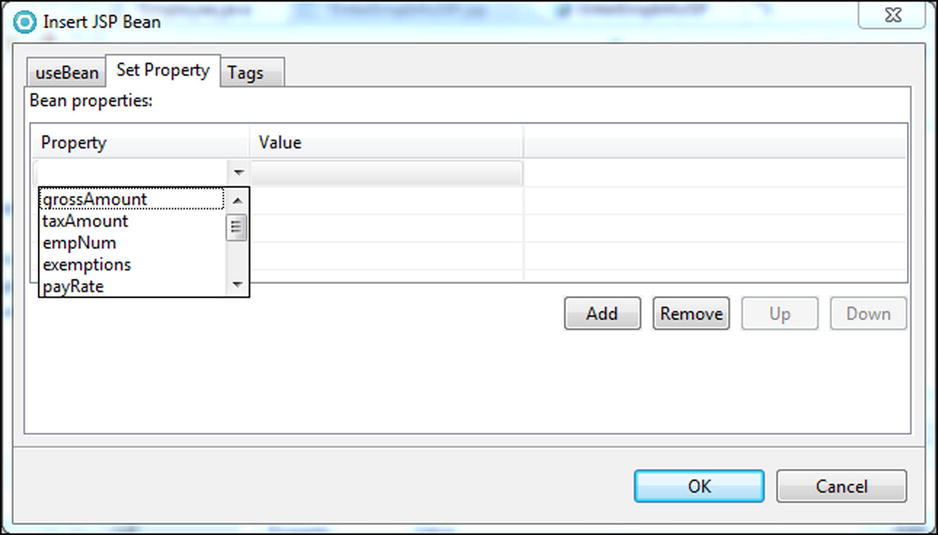
Curiously, RAD will allow you to specify a static value for the property but not a parameter. Later, we will have to specify the param keyword for each setProperty tag.
- 11. Add setProperty tags for all the remaining properties except grossAmt and taxAmt.
- 12. Change to the Source view and confirm that the following tags were added to the source code after the if tag.
<jsp:useBean id="EmpBean" class="c9java.Employee" scope="request">
       <jsp:setProperty name="EmpBean" property="empNum" />
       <jsp:setProperty name="EmpBean" property="empStreet" />
       <jsp:setProperty name="EmpBean" property="exemptions" />
       <jsp:setProperty name="EmpBean" property="empZip" />
       <jsp:setProperty name="EmpBean" property="empState" />
       <jsp:setProperty name="EmpBean" property="payRate" />
       <jsp:setProperty name="EmpBean" property="empName" />
       <jsp:setProperty name="EmpBean" property="empCity" />
</jsp:useBean> - 13. In the Source view, click on the first setProperty tag (i.e., the tag for empNum).
Notice in the Properties view that the Value radio button is already selected. This is because specifying a static value is the default. RAD, however, does provide a Parameter field.
- 14. Click the Parameter radio button to activate the Parameter field, enter empNumTF in the Parameter field and press Enter.
The Parameter radio button should be selected and the param keyword will be added to the first tag.
- 15. Add the correct parameters for the remaining properties.
Be careful that you specify the correct EnterEmpInfoForm field name.
- 16. Change to the Design view of DispEmpGrossJSP and click on Get Property (in the JSP Tags tray).
- 17. Click on the getEmpName expression icon.
The Insert JSP Get Property window will be displayed.
- 18. At the Insert JSP Get Property window, specify EmpBean as the Bean name, empName as the Property name, and then click OK.
A getProperty icon will be inserted after the expression icon.
- 19. Display the source code for the expression and the new entered getProperty tag.
Even though the tag is lengthier, notice how much simpler the syntax is. There is no need for the page designer to understand objects and reference variables, and, most enjoyably, say good-bye to parentheses!
However, you, as the programmer, need to understand that the tags in EnterEmpInfoJSP:
- 1. Created an Employee object and defined it as a bean
- 2. Defined the bean to be accessible by other objects that can access the request
- 3. Set the Employee bean’s properties to the entered values
- 20. Delete the getEmpName expression by clicking on the icon (in the Design view) and pressing the Delete key.
Time to test.
- 21. Run c9.EnterEmpInfoJSP on the server.
- 22. Enter 999 for the employee number, select Display, and click the Submit button.
DispEmpInfoJSP should display 999 as the employee number and 2 for exemptions.
- 23. Change to the Source view of DispEmpInfoJSP.
- 24. Delete the import="c9java.*" statement from the page directive and the following scriptlet:
<jsp:scriptlet> Employee emp;
EmpExtractor ee = new EmpExtractor();
emp = ee.getEmployeeInstance(request);
</jsp:scriptlet> - 25. In the Design view of DispEmpInfoJSP, replace each of the expressions with the appropriate getProperty tag and save the source code.
This is a good time to test DispEmpInfoJSP.
- 26. Run EnterEmpInfoJSP on the server, enter values for all the employee properties, select display, and click the Submit button.
Verify that all the data entered on EnterEmpInfoJSP is displayed by DispEmpInfoJSP.
To finish the application, we need to replace the scriptlets in DispEmpGrossJSP and DispEmpTaxAmtJSP with tags to access EmpBean.
- 27. In DispEmpGrossJSP and DispEmpTaxAmtJSP, remove the following statements:
import="c9java.*"
<jsp:scriptlet> Employee emp;
EmpExtractor ee = new EmpExtractor();
emp = ee.getEmployeeInstance(request);
</jsp:scriptlet> - 28. In DispEmpTaxAmtJSP, replace the expression:
<%=emp.getEmpName()%>with:
<jsp:getProperty name="EmpBean" property="empName"/> - 29. In DispEmpGrossJSP, replace the expression:
<%=emp.grossSalaryCalcFormatted()%>with:
<jsp:getProperty name="EmpBean" property="grossAmount"/> - 30. In DispEmpTaxAmtJSP, replace the expression:
<%=emp.fedTaxCalcFormatted()%>with:
<jsp:getProperty name="EmpBean" property="taxAmount"/>
Notice that neither of the JSPs defines EmpBean. They simply retrieve two EmpBean properties.
Time to test again.
- 31. Save both JSPs and run EnterEmpInfoJSP on the server.
- 32. Enter Joe Programmer as the employee name, 25 as the pay rate, select Gross, and click the Submit button.
The JSP will display the following:
The gross salary for Joe Programmer
$1,000.00
- 33. In RAD’s Web browser pane, click the back arrow to return to the EnterEmpInfoJSP.
The previously entered information should still be there.
- 34. Select three as the number of exemptions, TaxAmt as the function, and click the Submit button.
The JSP will display the following:
The tax amount for Joe Programmer
$139.50
Because DispEmpTaxAmtJSP used the bean created by EnterEmpInfoJSP, it proves that the bean is accessible by other JSPs.
Results of the Tutorial
- In the TutorialsWeb/WebContent folder, three JSP files:
DispEmpInfoJSP DispEmpGrossJSP DispEmpTaxAmtJSPand two HTML files:
Howdy EnterEmpInfoForm - In TutorialsWeb/WebContent, a folder called c9 containing three files:
EnterEmpInfoForm.html EnterEmpInfoJSP.jsp HowdyJSP.jsp - In TutorialsWeb/Java Resources/src, a folder called c9java containing two java files:
Employee EmpExtractor - In the TutorialsWeb/ Java Resources/src/default package, two java files:
EmpServlet MyServlet
- What is a JSP?
- What rules must a java class follow to be a Java bean?
- What is the MVC?
- How are JSPs and servlets related?
- Why are JSP JSTL and bean tags preferred over scriptlets and expressions?
- What are the advantages of JSPs over Java servlets?
- Explain the difference between a response’s redirect method and a request dispatcher’s forward method.
The Web page ShipInfoForm does not display the current date and time. So, in this exercise you will create a JSP called EnterShipInfoJSP with this information to replace the static Web page. The new date and time components will be implemented as beans. Each date and time bean will simply return HTML (as a string) to define a drop down menu with the appropriate value selected. For example, if MonthBean is accessed in April, it will return the following HTML that defines a drop-down menu with the values 1 through 12, and 4 as the selected value.
<SELECT name='MonthDDM'>
<OPTION value='1'>1</OPTION>
<OPTION value='2'>2</OPTION>
<OPTION value='3'>3</OPTION>
<OPTION value='4' selected>4</OPTION>
<OPTION value='5'>5</OPTION>
<OPTION value='6'>6</OPTION>
<OPTION value='7'>7</OPTION>
<OPTION value='8'>8</OPTION>
<OPTION value='9'>9</OPTION>
<OPTION value='10'>10</OPTION>
<OPTION value='11'>11</OPTION>
<OPTION value='12'>12</OPTION>
</SELECT>
EnterShipInfoJSP will use tags to access the various beans.
- 1. In ReviewExWeb/Java Resources/src, create a new folder called c9.
- 2. In ReviewExWeb/ Java Resources/src/c9, create a new Java class called MonthBean.
- 3. Replace the MonthBean default source code with the following:
package c9;
import java.util.Calendar;
public class MonthBean {
       public String monthDDM = new String();
       private int currMonth;
       private Calendar c = Calendar.getInstance();

       public MonthBean() {
       }
       public String getMonthDDM() {
              currMonth = c.get(Calendar.MONTH) + 1;
              StringBuffer monthDDM =
new StringBuffer("<SELECT name='MonthDDM'>");
              for ( int ctr = 1; ctr <= 12; ctr++) {
                    monthDDM.append("<OPTION value='");
                    monthDDM.append(String.valueOf(ctr));
                    if (ctr == currMonth) {
                           monthDDM.append("' selected>");
                    } else {
                           monthDDM.append("'>");
                    }
                    monthDDM.append(String.valueOf(ctr));
                    monthDDM.append("</OPTION>");
              }
              monthDDM.append("</SELECT>");
              this .monthDDM = String.valueOf(monthDDM);
              return this .monthDDM;
       }
       public static void main(String[] args) {
              MonthBean mb = new MonthBean();
              System.out.println(mb.getMonthDDM());
       }
}
Notice that MonthBean has a null constructor and one property, monthDDM, which can only be retrieved. In addition, the getter should look familiar because the logic is the same as the MonthCh class (in the client-based application). The difference is that the getter returns HTML that defines a Select component (i.e., drop-down menu), whereas MonthCh was a subclass of Choice. Notice also that MonthBean has two variables named monthDDM. One is a string and the other is a string buffer. The string buffer is used to build the HTML because the append function makes it much easier to manipulate the characters. However, the HTML must be returned as a string. Therefore, the string buffer’s final value is converted to a string, and the class String variable monthDDM is returned. Verify that MonthBean works correctly by running the class as a Java application. The main method contains code that will create a MonthBean object and then display the text returned by getMonthDDM. Verify that the HTML returned matches the HTML shown earlier.
In the rest of the exercise, you will create beans that perform the same functions as the remaining time and date choice components from the client-based application.
- 4. In Java Resources/src/c9, create a new Java class called DayBean.
- 5. Change the DayBean source to the following:
package c9;
import java.util.Calendar;
public class DayBean {
       public String dayDDM = new String();
       private int currDay;
       private Calendar c = Calendar.getInstance();
       public DayBean() {}
       public String getDayDDM() {
              currDay = c.get(Calendar. DAY_OF_MONTH);
              StringBuffer dayDDM =
new StringBuffer("<SELECT name='DayDDM'>");
              for ( int ctr = 1; ctr <= 31; ctr++) {
                    dayDDM.append("<OPTION value='");
                    dayDDM.append(String.valueOf(ctr));
                    if (ctr == currDay) {
                           dayDDM.append("' selected>");
                    } else {
                           dayDDM.append("'>");
                    }
                    dayDDM.append(String.valueOf(ctr));
                    dayDDM.append("</OPTION>");
              }
              dayDDM.append("</SELECT>");
              this .dayDDM = String.valueOf(dayDDM);
              return this .dayDDM;
       }
} - 6. In Java Resources/src/c9, create a new Java class called YearBean.
- 7. Change the YearBean source to the following:
package c9;
import java.util.Calendar;
public class YearBean {
       public String yearDDM = new String();
       private int currYear;
       private Calendar c = Calendar.getInstance();

       public YearBean() {
       }
       public String getYearDDM() {
        currYear = c.get(Calendar.YEAR);
        StringBuffer YearDDM =
new StringBuffer("<SELECT name='YearDDM'>");
        for ( int ctr = currYear - 1; ctr <= currYear + 1; ctr++) {
                       YearDDM.append("<OPTION value='");
                       YearDDM.append(String.valueOf(ctr));
                       if (ctr == currYear) {
                              YearDDM.append("' selected>");
                       } else {
                              YearDDM.append("'>");
                       }
                       YearDDM.append(String.valueOf(ctr));
                       YearDDM.append("</OPTION>");
              }
        YearDDM.append("</SELECT>");
        this .yearDDM = String.valueOf(YearDDM);
        return this .yearDDM;
       }
} - 8. In ReviewExWeb/WebContent, create a new folder called c9.
- 9. In ReviewExWeb/WebContent/c9, create a new JSP called EnterShipInfoJSP.
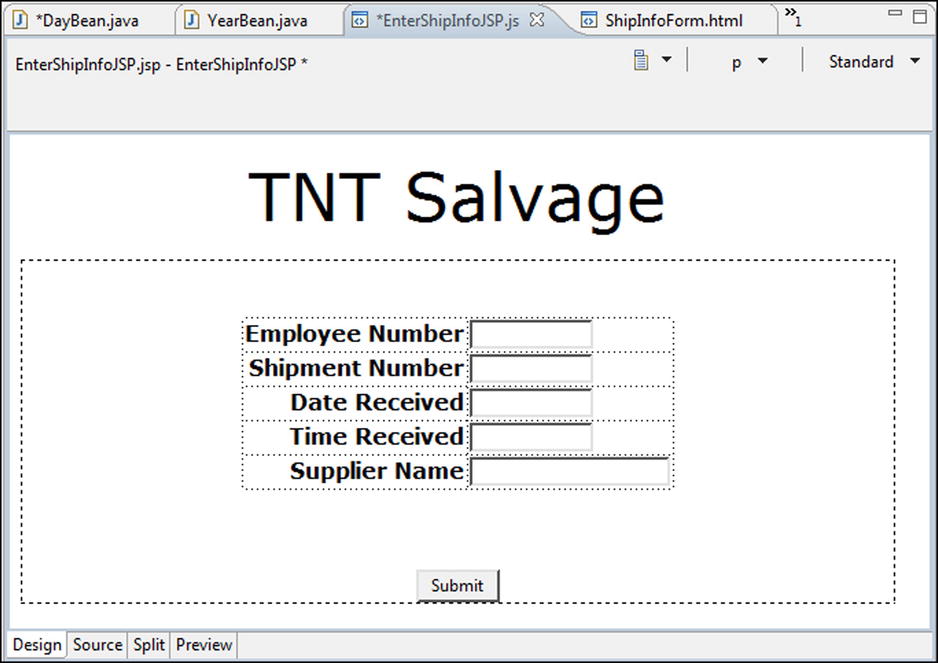
Instead of recreating an entry form for the shipment information, you will copy all the components from ShipInfoForm.
- 10. Display the ShipInfoForm in the Design view.
- 11. Select all the components on the page (i.e., the text and form), click Edit, and then Copy.
- 12. Display EnterShipInfoJSP in the Design view.
- 13. Click Edit, then Paste.
EnterShipInfoJSP should look like Figure 9-26.
- 14. Click on the form to select it and then in the Properties view click the Action button and select servlet from the pop up menu.
- 15. At the Select Servlet window, select ShipInfoServlet and click the OK button.
- 16. In the Design view of EnterShipInfoJSP, click on dateRcvdTF to select it, and then press the Delete key.
The text field should be deleted, and the cursor should still be in the table cell.
- 17. Click JSP, and then Insert Bean.
The Insert JSP Bean window will be displayed.
- 18. At the Insert JSP Bean window, specify MonthDDM as the ID then click the Class browse button (see Figure 9-27).
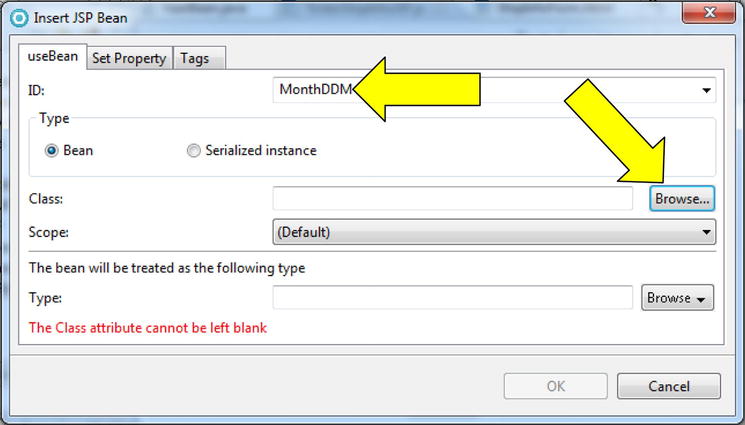
The Class Selection window will be displayed.
- 19. In the Choose a class text field, start typing MonthBean.
MonthBean will appear in the Matching types pane (see Figure 9-28).
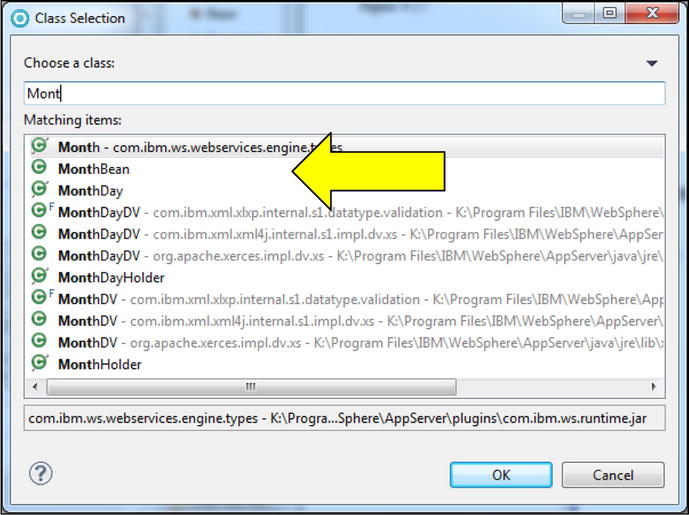
- 20. Select MonthBean and click the OK button.
In the Insert JSP Bean window, the class name will be displayed.
- 21. On the Insert JSP Bean window, click the OK button.
In the Design view, a bean icon will appear in the table. Displaying the source code will show that the following JSP useBean tag was inserted into the table cell.
<jsp:useBean id="MonthDDM" class="c9.MonthBean"></jsp:useBean>
- 22. In the Design view, Click JSP, and then Insert Get Property....
The Insert JSP Get Property window will be displayed. The listed items are the implicit objects supplied by the JSP container.
- 23. On the Insert JSP Get Property window, in the Beans and properties pane, scroll to the end of the list.
- 24. Expand the MonthDDM list item and click the monthDDM property.
Notice that the bean information is inserted into the text fields (see Figure 9-29).

- 25. Click the OK button.
There should be two icons in the table, representing the use bean and get property tags.
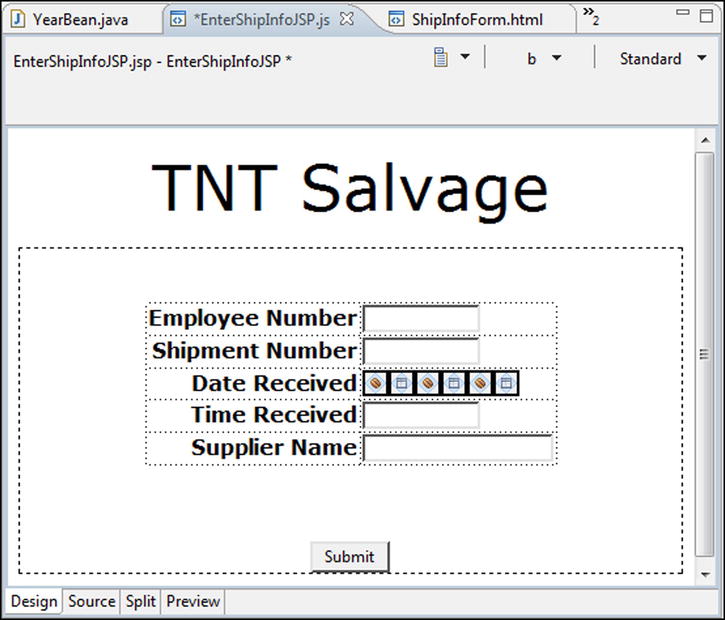
- 26. In the table cell, add two new beans called DayDDM and YearDDM (that are associated with the DayBean and YearBean classes) and display their properties immediately after the MonthDDM bean by performing steps 17 through 25 for the new beans.
The EnterShipInfoJSP Design pane should look like Figure 9-30.
Changing to the Preview pane will not show the new drop-down menus. To see the drop-down menus, the JSP must be run on the server. However, before we do that we must change the servlet to use the drop-down menus instead of the deleted text field, DateRcvdTF.
- 27. In ShipInfoServlet, replace the following statement:
req.getParameter("dateRcvdTF")
with the following statement that retrieves and formats the date information from the beans:
req.getParameter("MonthDDM") + "/" + req.getParameter("DayDDM")
+ "/" + req.getParameter("YearDDM")
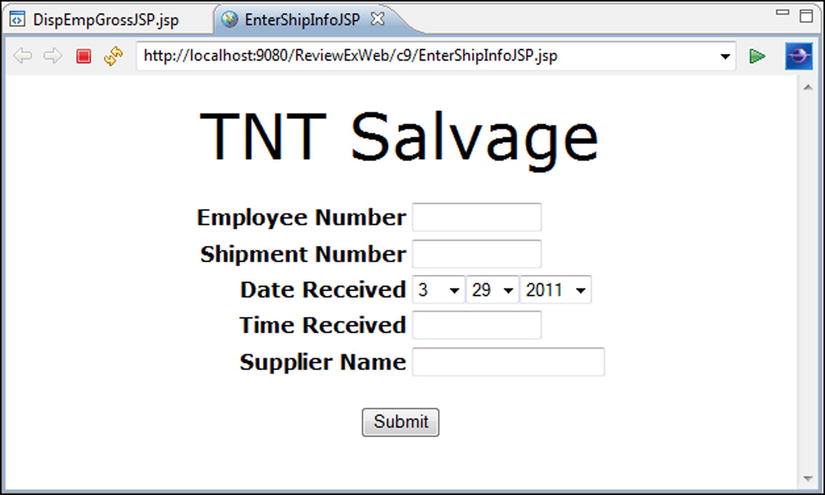
- 28. Run EnterShipInfoJSP on the server.
The EnterShipInfoJSP should be displayed in a Web Browser (see Figure 9-31) with the current date.
- 29. Click the submit button
The ShipInfoServlet will be run, and the browser pane will display the following:
Shipment from was received by employee number on 3/29/2011 at
Now the hard part.
- 30. Create one new class (called TimeBean) that has three getProperty methods (getHourDDM, etc.) to return HTML definitions for hour, minute, and AM/PM drop-down menus. Make sure the current time is selected in the drop-down menus.
- 31. In EnterShipInfoJSP, replace timeRcvdTF with useBean and getProperty tags for one new bean and its three properties. Have the component names follow the same format as the date information (i.e., HourDDM).
- 32. Change ShipInfoServlet to retrieve and format the time information from the drop-down menus instead of the text field timeRcvdTF.
Results of the Review Exercise
Here are the results:
- In ReviewExWeb/Java Resources/src, a new folder called c9.
- In c9, four new classes called:
MonthBean             DayBean
YearBean TimeBean - Changes to the ShipInfoServlet to retrieve and format the date and time information from the drop-down menus instead of text fields.
- In ReviewExWeb/WebContent/c9, a new JSP called EnterShipInfoJSP.
Check that the Exercise Was Done Correctly
Finally, let’s check it all worked:
- Run EnterShipInfoJSP on the server and click the Submit button.
- Verify that the current date and time are displayed in the browser pane.
- Click the submit button and verify that the current date and time are displayed and formatted appropriately.