
![]()
Database Access
In this chapter, you will learn about the objects needed to access a DBMS (Database Management System). In addition, we will cover the architectural topic of data encapsulation and use SQL as the data access language. We will then demonstrate how to configure the RAD and PC environment to connect to a DBMS and how to access the database from Java applications.
In this chapter, you will learn about:
- JDBC
- ODBC
The following objects:
Class
DriverManager
Statement
Connection
ResultSet- Drivers
- SQL
- CRUD
After this chapter, you should be able to:
- Access an IBM DB/2, Oracle, or Microsoft Access (MS Access) database from a Java application
- Create a database table
- Insert, modify, retrieve, and delete information from a database table
Databases hold the information most organizations need to perform their daily activities. For instance, a grocery store keeps all their prices in a database. When you go through checkout, the price for each item in the cart is retrieved and used to calculate the total amount owed. Databases are so essential that if the database is unavailable, most applications cannot function. In Java-speak this is because DBMSs provide “data persistence.” Java objects do not provide data persistence. In other words, when an object is deleted any information the object contained is also deleted. With a DBMS, data is safely stored and accessible whether an object exists or not.
Applications don’t have to use databases. However, without a database, applications are very difficult and time-consuming to use. For instance, would a payroll application be easy to use if all the employee’s information had to be entered each time the application was run? If instead all the employee information is entered into a database once, the application can access that information at any time.
Establishing a connection to a database is a little cumbersome but, if coded wisely, only has to be specified once. In fact, a primary goal is to hide (from the programmers) the specifics of how to access a database. Organizations try to hide the specifics such that Java programmers have no idea what DBMS is being accessed or even where the database is located. This “design” goal goes by many names such as “data encapsulation,” “transparency,” “information hiding,” and/or “implementation ignorance.”
First, we will explain and demonstrate the basics for accessing a database and then show how to efficiently define and use the necessary classes/objects.
Several new classes will help establish a database connection and then access the database. However, there is one piece of the puzzle, the driver, which does not “come with” Java. This is because the individual DBMS vendors must supply the driver software to access their DBMS. In other words, the Java developers specify how a database driver must work, but it is up to the DBMS provider (IBM, Oracle, Microsoft, etc.) to create and supply the software for Java to work with their DBMS (DB2, Oracle, Access, etc.). Most DBMS providers are very eager to supply drivers because if there is no driver, Java applications cannot use the DBMS. Of course, this means they cannot sell you their DBMS. You can tell that the DBMS providers are very eager to supply the driver software because they provide it for free! When downloaded, a driver is usually supplied as a ZIP or JAR file. (Microsoft, however, includes the driver for its Access DBMS within the Windows operating system.)
To use the driver, you must identify the driver’s location (on the PC) to RAD. One way to do this is to add the driver location to the “Java Build Path.” RAD uses the Java Build Path to find classes that are not in the project. Therefore, we need to add an external JAR to RAD’s Java Build Path. For this discussion, we have assumed that the driver (in a JAR) is on the PC’s C: drive. (Microsoft Access, however, is different. The MS Access driver must be identified when defining an Access DB as an ODBC data source in Windows.)
Once the driver is identified, the Java class must load the driver. You can think of loading the driver as creating an instance of the driver class. However, as with the formatting classes (covered in an earlier chapter), the programmer does not explicitly create the driver object. Instead, the Class class’s forName method is used. (Yes, there is a class called Class!) The forName method returns an object of the class type specified. For instance, the following statement:
Class.forName("com.ibm.as400.access.AS400JDBCDriver");
returns a driver object that can be used to access a DB2 database on a Power System (an IBM midrange computer).
Next, a Connection object must be created. Once again, you do not directly create this object. Instead, you use the DriverManager class’s getConnection method. The getConnection method requires the following information to create the connection:
- The protocol (type of driver) used to access the database.
- The location of the database. This will include at least the IP address or URL where the database resides. The driver type dictates what other location information is required.
- Driver properties. Most drivers require a user ID and password. Optional properties can be specified to control other aspects of the database interface.
A Statement object then needs to be created. Statement objects have execute methods that allow the programmer to run SQL commands that insert, retrieve, delete, or update data in the database. Again, the programmer does not explicitly create the needed object. Instead, the Connection object’s createStatement method is used.
To review, the application environment must first be set up correctly. This means:
- Downloading the correct database driver (not necessary for MS Access)
- Specifying the driver
Then a Java class must do the following to access a database:
- Load the driver with the Class.forName method
- Create a Connection object using the DriverManager.getConnection method
- Create a Statement object using the Connection object’s createStatement method
- Use the Statement object’s execute methods to perform SQL commands
First, we will perform the generic tasks that are required regardless of the DBMS being used. Then there will be three tutorials showing how to connect to three different types of DBMSs. The way the tutorials are written, you can only do one of these. (If you do not have access to an Oracle database or DB2 on a Power System, do the “Set Up for Accessing a Microsoft Access Database” tutorial. Even though Access is rarely used for commercial applications, it is widely available and this tutorial will give you a taste of database programming.) We assume that each of these DBMSs has a database called tntdb and a table called Employee with fields that correspond to the Employee class’s properties.
Let’s do it!
Tutorial: Setting up the Project
The first task is to set up the project.
- 1. In the Java Perspective, click the Tutorials/src package to select it.
- 2. Click File, New, and then Package.
- 3. At the New Java Package window, specify c10 as the name and click the Finish button.
- 4. With the folder c10 still selected, click File, New, and then Class.
- 5. At the New Java Class window, specify DBAccess as the class name, make sure a main method is created, and click the Finish button.
A new class called DBAccess is created in c10 and the source code will be displayed.
- 6. Add the following source code to define a null constructor:
public DBAccess() { }
We will now add code to the main method so that we can test the class.
- 7. Add the following statement to the main method.
DBAccess dba = new DBAccess();
- 8. Save the source code.
Tutorial: Accessing DB2 on an IBM Power System
You must first download the driver. As of this writing, IBM offers the driver free as part of a product called JTOpen To download the driver, go to http://sourceforge.net/projects/jt400/ (see Figure 10-1) and click the link for downloading the latest version of JTOpen as a single zip file. (Be aware that the Web is constantly changing and you may have to search for JTOpen.) For this tutorial, we assume that the file was downloaded to the F: drive and named jtopen_7_3.zip.

- 1. Create a folder on the F: drive called jtopen
- 2. Unzip jtopen_7_3.zip into F:jtopen.
This assumes you have an unzip program already installed. If not, you will have to download one. A very popular version is WinZip. To unzip, simply double-click the zip file icon, follow the prompts, and at the “unzip to folder” window specify F:jtopen.
- 3. In RAD, right-click on the Tutorials project and select Properties from the shortcut menu.
- 4. In the left pane of the “Properties for Tutorials” window, click on Java Build Path then click the Libraries tag (see Figure 10-2).
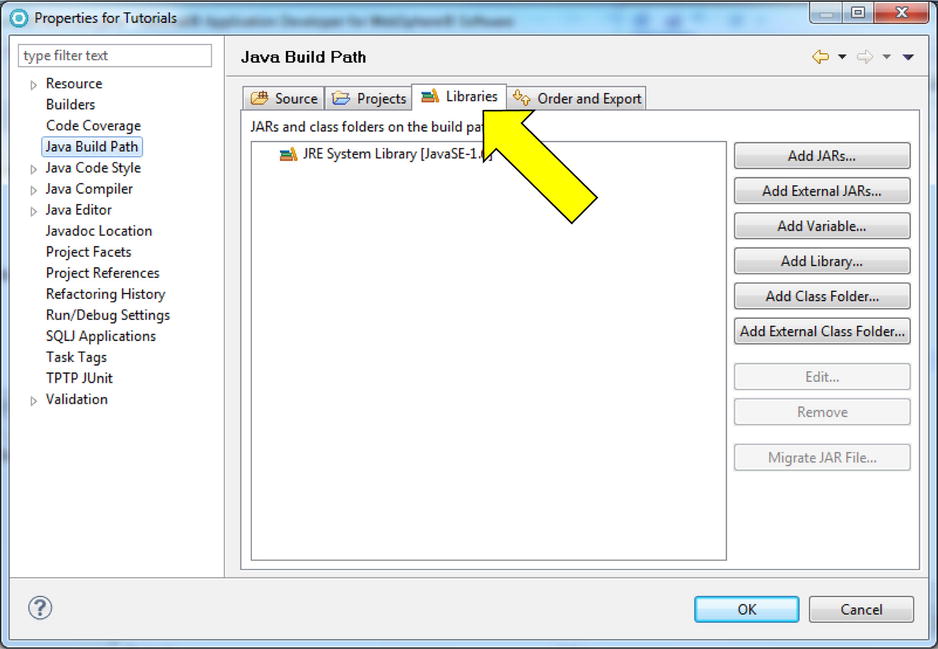
- 5. Click the Add External JARs... button.
The JAR Selection window will be displayed.
- 6. In the JAR Selection window, drill down into F:jtopenlib, select the file named jt400.jar and click the Open button.
The file jt400 will appear in the Libraries pane of the “Properties for Tutorials” window.
- 7. On the “Properties for Tutorials” window, click the OK button.
In the Package Explorer pane, expand the Tutorials project then Referenced Libraries. If jt400.jar is listed, you have successfully added the file to the Java Build Path.
We now need four strings in the DBAccess class to hold unique information about the DB2 database.
- 8. In DBAccess, add the following statement to create a class String variable that holds the name of the driver:
private String driver = new
String("com.ibm.as400.access.AS400JDBCDriver"); - 9. In DBAccess, add the following three statements that identify the location of the DB2 database, as well as the user ID and password to access the database. Then modify the statements to reflect your information. In other words, in the first statement, substitute the host systems IP address or domain name that you will be using in place of 111.22.333.444. In the second and third statements, change the user ID and password (bjanson and jeter) to your user ID and password.
private String url = new String("jdbc:as400: 111.22.333.444 ");
private String userid = new String(" bjanson ");
private String pw = new String(" jeter ");
Notice that when specifying the URL, the protocol (jdbc:as400:) is specified before the IP address. As mentioned earlier, each DBMS will have a different protocol name and syntax for specifying the URL
Tutorial: Accessing an Oracle Database
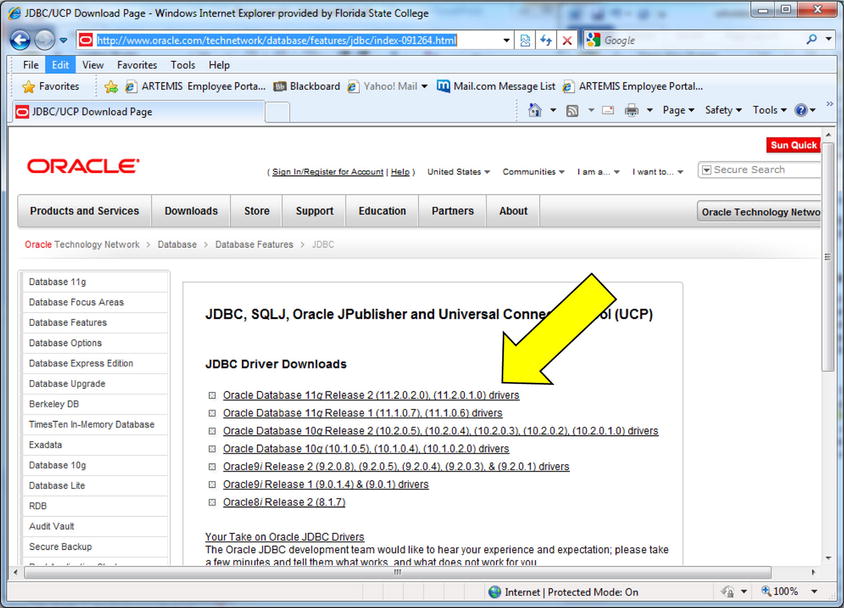
You must first download the driver. As of this writing, Oracle offers the driver free and can be downloaded http://www.oracle.com/technetwork/database/features/jdbc/index-091264.html (see Figure 10-3). Follow the links for downloading the driver that corresponds to the Oracle and JDK versions you are using. The arrow in Figure 10-3 points at the driver for Oracle 11g Release 2. Double-click the correct driver for your Oracle system.
A license agreement page will be displayed. Accept the terms. A page of JDK options will be displayed (see Figure 10-4). Oracle 11g supports many different JDK versions. RAD 8 can run at JDKs ranging up to 6.0, so choose the appropriate JDK for your installation of RAD. (Note: drivers for earlier JDK versions will work with later JDK versions. The arrow in Figure 10-4 points to a JDK 6.0 option).
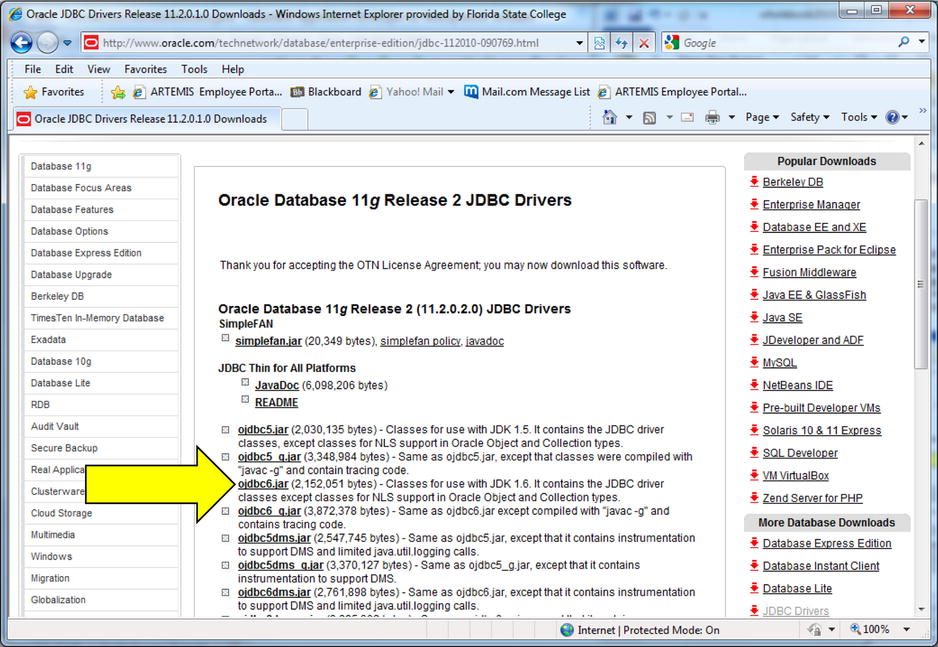
Oracle, as with most vendors, will then require you to register with them and provide contact information. Select the option to save a zip file to a drive on your PC. For this tutorial, we will assume that the file is named ojdbc6.zip and that you saved it to the F: drive.
- 1. In the Package Explorer pane, right-click on the Tutorials project and select Properties from the shortcut menu.
The “Properties for Tutorials” window will be displayed.
- 2. In the left pane of the “Properties for Tutorials” window, click on Java Build Path, the Libraries tab, and then click the Add External JARs... button.
- 3. In the JAR selection window, drill down into the F: drive, select the file ojdbc6.zip, and click the Open button.
The file ojdbc6.zip will appear in the Libraries pane of the “Properties for Tutorials” window.
- 4. On the “Properties for Tutorials” window, click the OK button.
In the Package Explorer pane, expand Tutorials then Referenced Libraries. If ojdbc6.zip is listed, you have successfully added the file to the Java Build Path.
We will now define four strings to hold unique Oracle information.
- 5. In DBAccess, add the following statement to create a class String variable that holds the name of the driver:
private String driver = new
String("oracle.jdbc.driver.OracleDriver"); - 6. In DBAccess add the following three statements that identify the location of the Oracle database, as well as the user ID and password to access the database. Then modify the statements to reflect your information. In other words, in the first statement, substitute the IP address or URL where Oracle is installed in place of 111.22.333.444. You may have to change the port (even though 1521 is the default for Oracle); but you will definitely have to substitute the Oracle System ID for the text SID. In the second and third statements, change the user ID and password (bjanson and jeter) to your Oracle user ID and password.
private String url = new
 String("jdbc:oracle:thin:@ 111.22.333.444 :1521:SID");
private String userid = new String(" bjanson ");
private String pw = new String(" jeter ");
Notice that in the URL, the protocol (jdbc:oracle:thin) is specified before the IP address. In addition, for Oracle, you must specify a port and SID. As mentioned earlier, each DBMS will have a different protocol name and syntax for specifying the location of the DBMS.
Tutorial: Accessing a Microsoft Access Database
Microsoft supports a protocol called ODBC (Open Database Connectivity). You must identify the Microsoft Access Database as an ODBC data source within Windows. This tutorial assumes that a database called TNTDB was created in Access and has been imported into the project Tutorial
- 1. Within Windows 7, click on the Start button, then Control Panel.
- 2. On the Control Panel, click on Administrative Tools, then Data Sources (ODBC) (see arrow 1 in Figure 10-5). (If you are running 64 bit Windows 7, to see the MS Access driver you will need to run the following c:windowssysWOW64odbcad32.exe.)
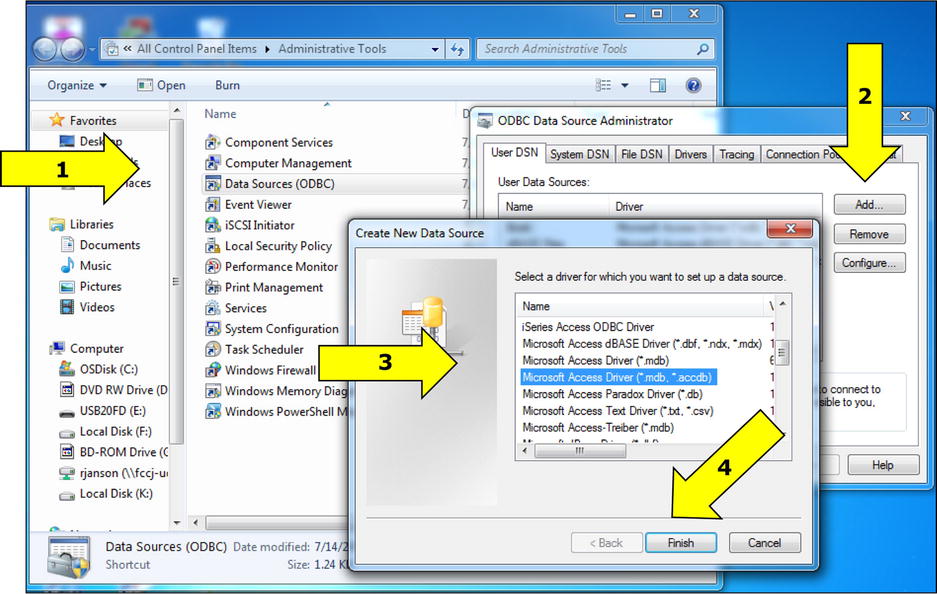
The ODBC Data Source Administrator window is displayed. On this window, you will select the correct ODBC driver for the MS Access database.
- 3. At the ODBC Data Source Administrator window, click the Add button (see Figure 10-5).
- 4. At the Create New Data Source window, scroll down through the options and click on Microsoft Access Driver (*.mdb) to select it, and then click the Finish button (arrows 3 and 4 in Figure 10-5).
- 5. At the ODBC Microsoft Access Setup window, specify TNT Database as the Data Source Name and click the Select button (see Figure 10-6).
- 6. At the Select Database window, drill down the drive and path to the Tutorials folder (in the Workspace folder), click on the TNTDB database (see Figure 10-7), and then click the OK button.
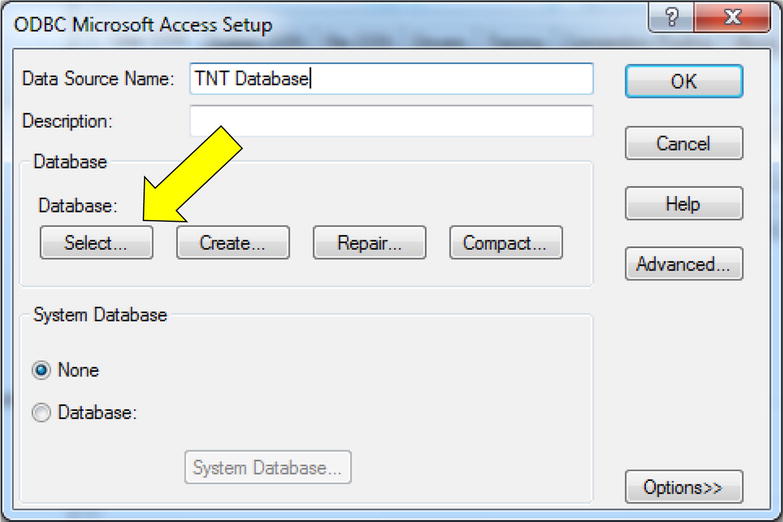

The ODBC Microsoft Access Setup window is redisplayed with the database location and name specified.
- 7. At the ODBC Microsoft Access Setup, click the OK button.
The ODBC Data Source Administrator window will now show the new Data Source Name (TNT Database).
- 8. At the ODBC Data Source Administrator window, click the OK button to close the window.
We will now define four strings to hold the Microsoft Access DBMS information.
- 9. In DBAccess, add the following statement to create a class String variable and store the name of the driver:
private String driver = new
        String("sun.jdbc.odbc.JdbcOdbcDriver");
JdbcOdbcDriver is the driver/class we will be using to connect to the database. Fortunately, this class comes with RAD’s JRE and is in every project. (You can prove this by drilling down into the JRE System Library, in the Package Explorer view. Then expand rt.jar and the sun.jdbc.odbc package to show the JdbcOdbcDriver class file.)
- 10. In DBAccess, add the following three statements that identify the location of the MS Access database, as well as the user ID and password to access the database.
 private String url = new String("jdbc:odbc:TNT Database");
 private String userid = new String("anonymous");
 private String pw = new String("guest");
When specifying the URL (location) of the database, the protocol (jdbc:odbc:) is specified before the ODBC Data Source Name (TNT Database). Notice that the ODBC data source name is specified not TNTDB (the PC file name). Each DBMS will have a different protocol name and syntax for specifying the database location.
Tutorial: Set-Up for Accessing All Databases
The next stage is setting up access for our databases:
- 1. Modify the url, userid and pw strings to reflect your information. In other words, change the userid and pw strings from the values specified above to the values for the database you will be using. Also, don’t forget to modify the String url to contain the database name/location you will be using.
- 2. In DBAccess, on a new line after the package statement, add the following import statement:
import java.sql.*;
This will give us access to various classes (like Connection) that we need to access the database.
- 3. Add the following statements to create three class variables:
Connection con = null ;
ResultSet rs = null ;
Statement stmt = null ;
Next, we will create and assign objects to these variables. We mentioned earlier how the Connection and Statement objects are used; however, this is the first time a result set has been mentioned.
When information is retrieved from a database using SQL, the information is returned in the form of an object called a result set. You can think of a result set as a table that can have multiple columns (fields) and rows (records) filled with data. To retrieve the field and record information, a variety of result set getter methods are used. Each result set getter is associated with a particular data type (i.e., getString, getDouble, etc.). We’ll show how to use these getters a little later.
- 4. In DBAccess’s constructor, add the following statements to register the driver:
try {
       Class.forName(driver);
       System.out.println("Driver class found!");
} catch (ClassNotFoundException e) {
       System.out.println("Driver class not found: " + e);
}
We added try/catch statements because a ClassNotFoundException can be thrown by the forName method. In addition, we added println statements to help with testing and debugging. Notice that the catch block not only displays an appropriate message but also displays the exception object. Displaying an exception object provides extra information regarding the problem and is a good debugging practice.
- 5. Add the following statements to the constructor to create Connection object:
try {
       con = DriverManager.getConnection(url, userid, pw);
       System.out.println("Connection created!");
       con.close();
} catch (SQLException e) {
       System.out.println("No connection: " + e);
}
The constructor now performs the first two steps mentioned earlier: registering the driver and getting a Connection object. Notice that we also closed the connection. You can think of a Connection object as a link to a database just as a telephone call is a link to person. When you are done with a connection, you should close it - just as when a phone conversation is finished, you should hang up the phone so that the line is not tied up.
The last thing we need is a Statement object.
- 6. Add the following statements after the “Connection created” println statement but before the connection close statement:
stmt = con.createStatement();
System.out.println("Statement created!"); - 7. Save and run DBAccess as a Java application.
If the driver name and location were specified correctly, the following will be displayed in the Console view:
Driver class found!
Connection created!
Statement created!
Tutorial: Breaking the Code, Drivers, and Connections
Accessing databases can be very frustrating, especially when things go wrong because you really do not know what is going on. For instance, you use classes (like Class and DriverManager) with no idea of how they work. Often new programmers feel that if they knew how these classes worked, they could solve the problems that do occur. However, understanding how they work will not help and, trust me, you do not want to know how they work! How a connection to the database is made is complicated and understanding the process will not help solve the problems that are likely to arise. Usually things go wrong because of simple programming mistakes and typos, not because of the special database classes or the DBMS you are trying to access. We will replicate the most common mistakes and highlight some good testing techniques so you will be able to recognize and solve these common problems quickly.
- 1. In DBAccess, change the first letter in the text of the String driver from lowercase to uppercase.
- 2. Run DBAccess as a Java application.
The following message will appear in the Console:
Driver class not found: java.lang.ClassNotFoundException:
       Xxx.xxxxx.xxxxDriver
where Xxx.xxxxx.xxxxDriver is the incorrectly capitalized driver name.
“Driver class not found” is a straightforward message, especially in this case, because we incorrectly specified the driver class name. The lesson is: be careful of capitalization, spelling, and the use of special characters (periods, forward slashes, colons, etc.) because when problems occur, these are the usual culprits.
- 3. Change the first letter of the driver text back to lowercase.
- 4. Comment out the first six lines of the DBAccess constructor that register the driver (including the try/catch statements).
- 5. Run DBAccess as a Java application.
Notice that this time we get the error message:
No connection:java.sql.SQLException : No suitable driver
“No suitable driver” is not very descriptive, but it means that the JVM could not find the correct driver. When the connection is attempted, the JVM searches the registered drivers for the correct driver. In this case, we specified the driver name correctly but did not register it, so the JVM cannot find the driver and an exception is thrown.
- 6. Uncomment the six lines.
- 7. In the String url, delete the last character.
- 8. Run DBAccess as a Java application.
The following messages are displayed (with Xxxxxx being unique text for each DBMS):
Driver class found!
No connection: java.sql.SQLException : Xxxxxx
Notice that the driver was successfully registered but no connection was created because we did not specify the correct location. This error will also occur if the DBMS you are trying to access is not available. A DBMS may not be available for a variety of reasons. For example, the communication link between your computer and the DBMS could be down, the database could be off line for maintenance work, or the computer where the database resides is turned off. Usually this error is generated because the programmer has simply mistyped the IP address or URL.
- 9. Undo the last deletion.
- 10. In the String pw, delete the last character.
The resulting message (or lack of message) depends on the driver used and whether the database you are trying to access is password protected. (For instance, the default for MS Access databases is no password-protection but the DB2 and Oracle examples returns a “Password is incorrect” message.) A similar error will be generated for mistakes with the user ID value.
- 11. Undo the last deletion.
Tutorial: Using a Statement Object to Insert Data
So far, we have created all the objects needed to insert, modify, retrieve, and delete data in a database. Now we just have to use those objects and methods. This section assumes knowledge of SQL. (If you are not familiar with SQL, please see Appendix B.)
Statement objects have two primary methods (executeQuery and executeUpdate) that allow the programmer to perform SQL statements in a Java class. Each method expects an SQL statement as a string. executeQuery is used for SQL select statements and will return a result set with the requested database information. executeUpdate is used for SQL insert, update, and delete statements and does not return data from the database. However, executeUpdate does provide the option of returning the number of rows affected by the SQL statement.
Each of the statements assumes that the database (schema in SQL-speak) tntdb has been created and a connection has been established. In addition, we assume that a table named employee was created in tntdb with the following SQL statement (please note that if Oracle is being used, payrate must be defined as NUMBER not DOUBLE):
CREATE TABLE tntdb.employee
        (empnum CHAR(10), empname CHAR(25),
         street CHAR(15), city CHAR(12),
         state CHAR(2), zip CHAR(5),
         payrate DOUBLE, exempts INT)
Enough talking, let’s get our hands dirty.
- 1. In DBAccess, before the con.close() statement, add the following statement:
stmt.executeUpdate("INSERT INTO tntdb.employee " +
         "VALUES('111', 'Mary Worker', '1 Main St.'," +
         "'Enid', 'OK', '77777', 17.50, 3)");
Remember, the SQL statement is simply a string parameter for the executeUpdate method. RAD does not check for SQL syntax errors and, unfortunately, the statement syntax is complex. For instance, notice that both single and double quotes are used. Double quotes surround the entire SQL statement, but single quotes surround the values being inserted into character fields.
In addition, the SQL statement must be passed as a single string. If the string spans multiple lines, each line is a separate string (surrounded by double quotes) and must be concatenated to the others. Within the SQL statement, commas separate each value and there must be at least one space after the table name. Finally, the entire string is enclosed in parentheses. Expect many mistakes typing SQL statements, and try not to get too upset at yourself.
- 2. Run DBAccess as a Java application.
The three messages will appear in the Console but there will be no indication that the SQL statement successfully executed.
- 3. Add the following to declare a class variable:
int returnValue; - 4. Comment out the statement added in step 1 and add the following immediately after the new comments:
returnValue = stmt.executeUpdate("INSERT INTO " +
        "tntdb.employee(empnum, empname, payrate, exempts) " +
        "VALUES('222', 'Joe Programmer', 17.50, 2)");
System. out .println(returnValue); - 5. Run DBAccess as a Java application.
The following three messages and the number 1 will appear in the Console as follows:
Driver class found!
Connection created!
Statement created!
1
The one (1) indicates the number of rows affected by the executeUpdate and, in this case, proves that a row was inserted. However, a returned value of 1 does not instill a lot of confidence. So, we will prove that the data was correctly inserted by retrieving and displaying the data.
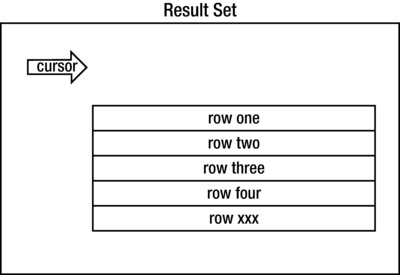
As mentioned, a SQL select statement returns data as a result set. Therefore, you must create a ResultSet variable and assign the ResultSet object (returned by the SQL statement) to that variable. Receiving the result set is only half the battle. You must then retrieve the data from the result set. Several ResultSet methods provide access to the data in a particular row. Which row is accessed is dictated by the result set’s cursor. Just as a word processor’s cursor indicates which line you are on in a document, a result set cursor indicates which row you are on in a table.
To retrieve data, the cursor must point to a row in the result set. The row indicated by the cursor is called the current row. Whenever an operation (like retrieving data) is executed, the operation is performed against the current row. The problem is that when a result set is returned from the SQL statement, the cursor is positioned before the first row (see Figure 10-8). The programmer must code a statement to move the cursor to the first row.
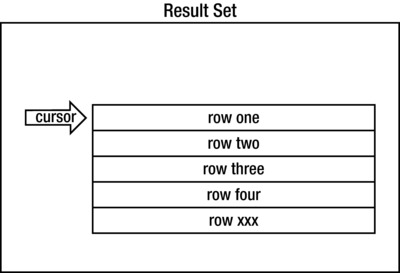
The cursor is moved sequentially between rows with the next method. Assuming that the ResultSet variable is named rs, executing the next method as follows:
rs.next();
positions the cursor to the first row as seen in Figure 10-9. Each time the next method is executed, the cursor is moved to the next row. In addition, when the cursor is successfully moved to the next row, a Boolean value of true is returned by the next method. If the cursor is at the last row and the next method is performed, a Boolean value of false will be returned. This Boolean return value is very useful. For example, it can be used to determine if the result set is empty.
Yes, it is possible for a select statement to return a result set with no rows. Therefore, to ensure that there is data to retrieve, you will want to check the returned value each time the next method is executed. Also, trying to retrieve data when the cursor is not pointing at a row, results in an SQL exception and the message "Cursor position not valid."
Once the cursor is pointing at a valid row, there is a series of ResultSet getter methods ::to retrieve the individual column values in the row. The programmer must use the correct getter method for the data type being retrieved and must specify which column is being retrieved. The three getters we will work with are getString, getInt, and getDouble. There are, of course, getters for the other data types. (A quick trip to the Oracle documentation website will show you all the available ResultSet methods.)
Again, assuming that rs is a valid ResultSet variable and the cursor is pointing at a row, the following would retrieve the empnum column’s text data and assign it to a String variable called empNum:
empNum = rs.getString(empnum);
In the above example, the column was identified by the column name. You can also reference a column by its number. For instance, assuming empNum is the first column, the following statement would also work:
empNum = rs.getString(1);
Unfortunately, the column number is dependent on the select statement. For instance, if the select statement had specified the fields as follows:
SELECT empname, empnum FROM tntdb.employee
empname would be column 1 and empnum would be column 2.
Generally, specifying column numbers and retrieving the result set columns from left to right provides the fastest retrieval.
Tutorial: Retrieving Data from a Database
Let’s get some data out of those databases:
- 1. In DBAccess, comment out the insert statement and the return value println statement.
- 2. Add the following statements:
rs = stmt.executeQuery("SELECT * FROM tntdb.employee");
System.out.println(rs.next());
System.out.println(rs.getString(1) + rs.getString(2));
System.out.println(rs.next());
System.out.println(rs.getString(1) + rs.getString(2));
System.out.println(rs.next()); - 3. Run DBAccess as a Java application.
The results will be the following:
Driver class found!
Connection created!
Statement created!
true
111 Mary Worker
true
222 Joe Programmer
false
Even though the select returned all the columns, we only retrieved data from the first two columns. This is not a terrible mistake. However, if only two columns are required, for efficiency’s sake, the select should specify only those columns.
Notice how inefficient the source code is. What if we want to retrieve 50 rows? Should we perform the gets 50 times each?! That does not seem right. We need to improve our data retrieval. In fact, we will use the returned Boolean values to build a loop to access the result set. We included the Boolean value println statements to demonstrate that the first two times the next method was executed there were rows to move the cursor to and the returned value was true. The third time next was executed there was no row, therefore, a false value was returned.
- 4. Comment out the statements added in step 2.
- 5. Add the following select statement:
rs = stmt.executeQuery(
         "SELECT empname, empnum, payrate, exempts" +
         " FROM tntdb.employee");
This select will only retrieve four columns. Note that two of the columns contain non-string data.
- 6. Add the following code:
while (rs.next()){
        System.out.println(rs.getString(1) + rs.getString(2) +
               rs.getDouble(3) + " " + rs.getInt(4)); }
This code defines a loop that moves the cursor to each row. When there are no more rows (i.e., the next method returns a false value), the loop will end. For each row, the appropriate getter retrieves each column’s data and the println statement displays the information.
- 7. Run DBAccess as a Java application.
The results will be as follows:
Driver class found!
Connection created!
Statement created!
Mary Worker 111 17.5 3
Joe Programmer 222 17.5 2
- 8. Comment out the statements added in step 5 and 6.
- 9. Add the following to display all the rows and columns:
rs = stmt.executeQuery("SELECT * FROM tntdb.employee");
while (rs.next()){
 System.out.println(rs.getString(1) + rs.getString(2) +
 rs.getString(3) + rs.getString(4) + rs.getString(5) +
 rs.getString(6) + rs.getDouble(7) + " " +
 rs.getInt(8));
} - 10. Run DBAccess as a Java application.
The results will be as follows:
Driver class found!
Connection created!
Statement created!
111 Mary Worker 1 Main St. Enid OK7777717.5 3
222 Joe Programmer nullnullnullnull17.5 2
Notice the null values for Joe Programmer. In the original insert statement, no address information was supplied, so the DBMS assigned null values to those fields. We will rectify this by using the update command to change the information in the existing row for Joe Programmer.
- 11. Add the following code before the code added in step 9:
stmt.executeUpdate("UPDATE tntdb.employee " +
                   "SET street = '2 Maple Ave.', " +
                   "city = 'Enid', " +
                   "state = 'OK', " +
                   "zip = '77777', payrate = 19 " +
                   "WHERE empnum = '222'");
This update command not only supplies information for the address fields (that previously had null values) but also changes the pay rate value for employee number 222. Beware: if no WHERE clause had been specified, all the rows in the table would have been changed and all the rows would have had the same values for the address columns and payrate. The update command is powerful, but dangerous if used incorrectly!
- 12. Run DBAccess as a Java application.
The results will be as follows:
Driver class found!
Connection created!
Statement created!
111 Mary Worker 1 Main St. Enid OK 7777717.5 3
222 Joe Programmer 2 Maple Ave. Enid OK 7777719.0 2 - 13. Print out the DBAccess source code.
Encapsulationis a design goal for Java classes. Encapsulation (also called class abstraction) tries to hide the internal workings of a class from users of the class (called clients). This means that clients cannot directly access the data or any “internal” objects used by the class to perform its function. Essentially, this means that internal variables and methods are defined as private and the encapsulated class provides easy-to-use public methods to manipulate the private variables and invoke the internal methods. These public methods define the class’s client interface. Encapsulation is good because it simplifies using the class and cuts down on client errors.
There is no better example of the benefits of encapsulation than with a class that accesses a database. Certainly accessing a database was not easy. Connection objects, driver managers, and statement objects are enough to drive any programmer nuts! Why not hide all those objects and the required coding inside of private class methods and have clients execute relatively simple public methods to retrieve and insert to the database?
In the following example, we will also put inheritance to good use and define the various objects needed to access the database only once in a superclass. All classes that provide DBMS access will be defined as subclasses thereby inheriting the needed variables, objects, and methods from the superclass. For instance, we already created a class called DBAccess with all the needed objects. Instead of redefining the database objects in Employee, Employee will be declared a subclass of DBAccess and inherit them. (We will have to modify DBAccess a little.) If any other classes need database access, they will also be defined as subclasses of DBAccess. This is going to save you a lot of typing and errors.
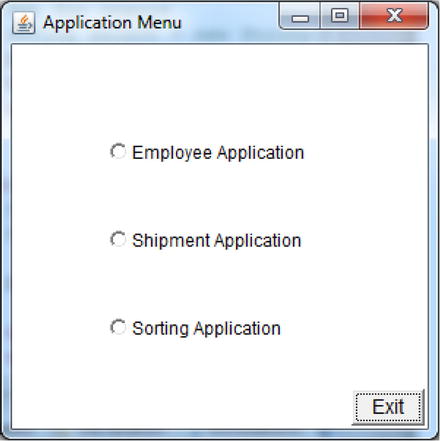
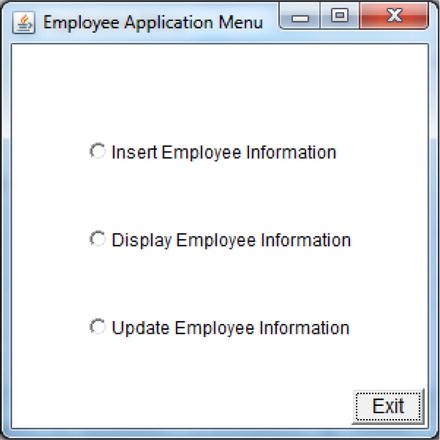
Finally, we are going to modify the employee application to provide the ability to insert, update, and display employee information stored in TNTDB. When a user selects the Employee Application option from AppOptions (see Figure 10-10), the new database options will be displayed in a frame called EmpOptions (see Figure 10-11).
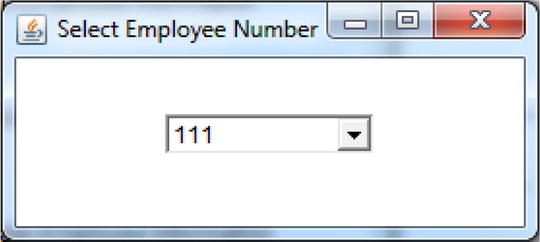
When a user selects the display or update options on EmpOptions, a new frame, EmpNumFrame, will be displayed. EmpNum-Frame’s choice box will contain all the employee numbers from TNTDB, so that the user can click on which employee’s information (i.e., employee number) to update or display (see Figure 10-12). We will modify the Employee and EnterEmpInfo classes to support these new features.
Tutorial: Using a Database in an Application
Now it’s time to use the database:
- 1. Copy the following classes from Tutorials/c7 to Tutorials/c10:
AppOptions       EmployeeFrame       EnterEmpInfo
ExitButton       TNT                 TNTButton
UsefulFrame
There will be several errors displayed because c10 doesn’t have an Employee class.
- 2. Copy the Employee class from TutorialsWeb/src/c9java to Tutorials/c10
- 3. In DBAccess’s constructor, comment out the println statements that display the following:
Driver class found!
Connection created!
Statement created! - 4. In DBAccess’s constructor, comment out the statements that were added in steps 9 and 11 of the last tutorial.
- 5. In DBAccess, comment out the close connection statement and the main method.
The executable code should look like the following (with your information substituted in the driver, url, userid and pw strings):
package c10;
import java.sql.*;
public class DBAccess {
        private String driver = new String("xxx.xxx.xDriver");
        private String url = new String("jdbc:xxx:111.22.333.444");
        private String userid = new String("xxx");
        private String pw = new String("xxxx");
        Connection con = null ;
        ResultSet rs = null ;
        Statement stmt = null ;
        int returnValue;

        public DBAccess() {
                try {
                        Class.forName(driver);
                } catch (ClassNotFoundException e) {
                        System.out.println("Driver class not found: " +
                                e);
                }
                try {
                        con =
                         DriverManager.getConnection(url, userid, pw);
                        stmt = con.createStatement();
                } catch (SQLException e) {
                        System.out.println("No connection: " + e);
                }
        }
}
- 6. In Employee, add the following in the class header:
extends DBAccess - 7. Add the following import statement:
import java.sql.*; - 8. Add the following to define a class ResultSet variable:
private ResultSet rs; - 9. In Employee, add the following code to create a new method called doSelect
private void doSelect(String select) {
        try {
                  rs = stmt.executeQuery(select);
        } catch (SQLException e) {
                  System.out.println("Problem with " + select + e);
        }
}
This method will be the “utility” method that executes all possible selections in the Employee class. Clients will access other public methods (like getEmpNums) to retrieve Employee information. These public methods will create the correct SQL select statements and invoke doSelect. Because there is no reason for clients to use doSelect (or even know that it exists), doSelect is “hidden” by being defined as private. Notice also that the results are assigned to the class variable rs.
- 10. In Employee, add the following code to create the getEmpNums method:
public ResultSet getEmpNums() {
         String select =
         new String("SELECT empnum FROM tntdb.employee ");
         this .doSelect(select);
         return rs;
}
The method getEmpNums defines the SQL statement that will retrieve all the employee numbers. The SQL statement is assigned to the String variable named select and select is passed to the doSelect method for execution. The doSelect method executes the SQL statement and assigns the results to rs. getEmpNums then returns rs to the calling method (i.e., the client).
- 11. Create a new Java class called EmpNumFrame and enter the following code:
package c10;
import java.awt.Choice;
import java.awt.event.ItemEvent;
import java.awt.event.ItemListener;
import java.sql.*;
public class EmpNumFrame extends UsefulFrame
         implements ItemListener {
        private String empNum, txType;
        private Choice EmpNumCh = null ;
        private Employee emp = new Employee();
        public EmpNumFrame(String tx) {
                super ();
                initialize();
                txType = tx;
        }
        private void initialize() {
        this .setSize(278, 125);
        this .setLocation(450, 303);
        this .setLayout( null );
        this .add(getEmpNumCh(), null );
        this .setTitle("Select Employee Number");
                 this .setVisible( true );
        }
        private Choice getEmpNumCh() {
                if (EmpNumCh == null ) {
                        EmpNumCh = new Choice();
                        EmpNumCh.setBounds(85, 59, 108, 21);
                        EmpNumCh.addItemListener( this );
                        ResultSet rs = emp.getEmpNums();
                        try {
                                while (rs.next()) {
                                        EmpNumCh.add(rs.getString(1));
                                }
                        } catch (SQLException e) {
                                System.out.println("No connection: " + e);
                        }
                }
                return EmpNumCh;
        }
        public void itemStateChanged(ItemEvent arg0) {
                empNum = EmpNumCh.getSelectedItem();
                System.out.println("We are getting ready to " +
                 txType + " emp num " + empNum);
                this .dispose();
        }
}
Notice that EmpNumFrame’s constructor is expecting a String variable. The function specified by the user on EmpOptions (update or display) must be passed to EmpNumFrame. This is because if display is selected, EmpNumFrame will create an EmployeeFrame object, but if update is specified, an EnterEmpInfo object will be created. Later we will modify the itemStateChanged method to do this. For now, itemStateChanged will help us test by simply displaying the employee number specified and the function.
In addition, notice that itemStateChanged deletes the EmpNumFrame object (the dispose statement does this). This means that after the user has specified the employee number, the frame will disappear.
- 12. Copy Tutorials/c10.AppOptions and name the new class EmpOptions.
- 13. Open EmpOptions with the Visual Editor and change the name and text of the check boxes to the following:
insEmpCB                 Insert Employee Information
dispEmpCB                Display Employee Information
updEmpCB Update Employee Information - 14. Resize and reposition the check boxes so all the text is displayed and they appear as in Figure 10-11.
- 15. Change the EmpOptions title to “Employee Application Menu.”
- 16. Change the EmpOptions ItemStateChanged method to the following:
if (insEmpCB.getState()) {
 EnterEmpInfo eei = new EnterEmpInfo();}
else if (dispEmpCB.getState()){
         EmpNumFrame enf = new EmpNumFrame ("display");}
         else if (updEmpCB.getState()){
               EmpNumFrame enf =
                     new EmpNumFrame ("update");}
Notice that EmpNumFrame is only created if the function display or update is chosen and that the function is passed to EmpNumFrame. If insert is selected, the EnterEmpInfo frame is displayed. Now we need to change AppOptions so that it will display EmpOptions.
- 17. In the AppOptions ItemStateChanged method, change the following:
if (empAppCB.getState()) {
        EnterEmpInfo eei = new EnterEmpInfo();}
to:
if (empAppCB.getState()) {
        EmpOptions eo = new EmpOptions();}
Time to test.
- 18. Run TNT as an application.
The Application Menu should be displayed as in Figure 10-10.
- 19. On the Application Menu, select Employee Application.
The Employee Application Menu should be displayed as in Figure 10-11.
- 20. On the Employee Application Menu, select Update Employee Information.
The Select Employee Number frame should be displayed.
- 21. On the Select Employee Number frame, click on the choice arrow and select employee number 222.
The Select Employee Number frame should disappear and the following should be displayed in the Console:
We are getting ready to update emp num 222
- 22. Click the Exit button on the Employee Application Menu to close all frames.
Tutorial: Finishing the Employee Application, Part 1
We must add the ability to insert and update to the Employee class and modify EnterEmpInfo to invoke the correct Employee methods based on the function selected. Remember, Employee will be performing all the database functions. EnterEmpInfo is simply the user interface to enter the information and specify what function (insert or update) to perform. In addition, we need to modify EnterEmpNum so that when the employee number is specified, an Employee object is created. This Employee object should retrieve the employee information from the database and populate the properties. EnterEmpNum will then pass the Employee object to EnterEmpInfo (for an update) or EmployeeFrame (for a display).
First, we will add the Employee methods to retrieve, insert, and update an employee’s information. Then we will modify EnterEmpNum and EnterEmpInfo to invoke the correct Employee methods.
- 1. In Employee, add a new method called getEmpInfoFromRS by inserting the following code:
private void getEmpInfoFromRS() {
       try {rs.next();
               this .setEmpNum(rs.getString(1));
               this .setEmpName(rs.getString(2));
               this .setEmpStreet(rs.getString(3));
               this .setEmpCity(rs.getString(4));
               this .setEmpState(rs.getString(5));
               this .setEmpZip(rs.getString(6));
               this .setPayRate(rs.getDouble(7));
               this .setExemptions(rs.getInt(8));
       } catch (SQLException e) {
               System.out.println("Problem getting emp info from"
                       + " result set " + e);
       } catch (InvalidValue e) {
       System.out.println("Bad pay rate value retrieved " + e);
       }
}
This will set the Employee object’s properties to the information retrieved from the Employee table (which is in the result set rs). This is one of the private methods that the clients don’t need to know about. In other words, clients will never have to deal with SQL statements, database-related objects (result sets, connections, etc.), or methods (getString, getStatement, etc).
- 2. In Employee, add a new method called getEmpInfo by inserting the following code:
public void getEmpInfo(String empNum) {
        String select = new String("SELECT * FROM " +
        "tntdb.employee WHERE empnum = '" + empNum + "'");
        this .doSelect(select);
        this .getEmpInfoFromRS();
}
This method builds the select statement, invokes doSelect to retrieve the data, and then invokes getEmpInfoFromRS to set the object’s properties.
Now we will change EmpNumFrame to invoke getEmpInfo for the employee number (specified by the user) and then create an EmployeeFrame object to display the information.
- 3. In EmpNumFrame’s itemStateChanged method, replace the println statement with the following:
emp.getEmpInfo(empNum);
if (txType.equals("display")) {
           EmployeeFrame ef = new EmployeeFrame(emp);
}
Let’s test.
- 4. Run TNT as an application.
- 5. On the Application Menu, select Employee Application.
- 6. On the Employee Application Menu, select Display Employee Information.
- 7. On the Select Employee Number frame, click on the choice arrow and select employee number 222.
The Select Employee Number frame will disappear and the Employee Information frame will be displayed with the Joe Programmer information.
- 8. Click the Exit button on the Employee Information frame to close all frames.
Well, display was fairly easy to implement.
For updates, we must change the EnterEmpInfo frame to receive the Employee object (from EmpNumFrame), display the properties, and then update the data in the Employee table.
For inserts, the EnterEmpInfo frame must create an Employee object and then issue the command to insert the data. Oh, and we have to create methods in Employee to insert and update the information in the table.
Tutorial: Finishing the Employee Application, Part 2
Because we have put the option to display employee information on the Employee Application Menu, the display button on EnterEmpInfo isn’t needed any more. What we really need is an update/insert button We will change the display button’s name to actionBtn and, depending on the function selected from the menu, set the button’s label to the appropriate text.
- 1. Open EnterEmpInfo in the Visual Editor.
- 2. Rename dispBtn to actionBtn and change the button text from “Display” to “Insert.”
This will define the default button text as “Insert.” The application must change the button text to “Update” when the user has selected update as the function. If an Employee object is passed from EmpNumFrame, EnterEmpInfo knows that the function is update. So, we need to create a new constructor that
- Accepts an Employee object
- Changes the button text to Update
- Retrieves the information from the Employee object
- Puts the Employee object’s property information into the text fields
- 3. Add the following Java statements to start creating the new constructor
public EnterEmpInfo(Employee e) {
        this ();
        emp = e;
        actionBtn.setLabel("Update");
}
That first statement probably looks funny. The first statement executes the class’s null constructor. Since all of the set-up functions still need to be performed, we simply run the null constructor instead of duplicating the code in the new constructor.
The second statement assigns the employee object (assigned to the method variable e) to the class variable emp (so other methods can access the object). And, of course, the last statement changes the button text.
Now we need to modify EmpNumFrame to send the Employee object when update is selected by the user.
- 4. In EmpNumFrame’s itemStateChanged method, after the current if statement, add the following:
if (txType.equals("update")) {
         EnterEmpInfo eei = new EnterEmpInfo(emp);
}
We should be able to select a particular employee for update, and when the EnterEmpInfo frame is displayed, the button should have update as the text. Let’s test.
- 5. Run TNT, select Employee Application, Update Employee Information, and then select employee number 111.
The EnterEmpInfo frame should be displayed, and the action button text should be Update. None of the employee information is displayed, because we still must insert the code to retrieve the employee information and populate the text fields. We will create a separate method called populateTFs to do this and have the constructor invoke the method.
- 6. In EnterEmpInfo, insert the following code to define the method populateTFs
private void populateTFs() {
 empNumTF.setText(emp.getEmpNum());
 empNameTF.setText(emp.getEmpName());
 empStreetTF.setText(emp.getEmpStreet());
 cityTF.setText(emp.getEmpCity());
 stateTF.setText(emp.getEmpState());
 zipTF.setText(emp.getEmpZip());
 empPRTF.setText(String.valueOf(emp.getPayRate()));
 exmpChoice.select(String.valueOf(emp.getExemptions()));
} - 7. Add the following as the last statement in the EnterEmpInfo(Employee e) method:
this .populateTFs(); - 8. Run TNT, select Employee Application, Update Employee Information, and then select employee number 111.
The Mary Worker information should be displayed in the text fields.
We will now add the insert and update functions to Employee, and then modify EnterEmpInfo to invoke those functions
- 9. In Employee, add the following methods:
private void doUpdate(String update) {
      try {
             stmt.executeUpdate(update);
      } catch (SQLException e) {
             System.out.println("Problem with " + update + e);
      }
}
public void doInsert() {
      String insert = "INSERT INTO tntdb.employee " +
             createValuesClause();
      doUpdate(insert);
}
public void doUpdate() {
      String update = "UPDATE tntdb.employee " +
             createSetClause() + createWhereClause();
      doUpdate(update);
}

public void doDelete() {
      String delete = "DELETE FROM tntdb.employee " +
             createWhereClause();
      doUpdate(delete);
}

private String createValuesClause() {
      String values = "VALUES ('" +
             empNum + "', '" +
             empName + "', '" +
             empStreet + "', '" +
             empCity + "', '" +
             empState + "', '" +
             empZip + "', " +
             payRate + ", " +
             exemptions + ") ";
      return values;
}
private String createSetClause() {
      String set = "SET " +
             "empNum = '" + empNum + "', " +
             "empName = '" + empName + "', " +
             "street = '" + empStreet + "', " +
             "city = '" + empCity + "', " +
             "state = '" + empState + "', " +
             "zip = '" + empZip + "', " +
             "payRate = " + payRate + ", " +
             "exempts = " + exemptions + " ";
      return set;
}

private String createWhereClause() {
      String where = "WHERE empNum = '" + empNum+ "' ";
             return where;
}
Notice that only three of the new methods are public. These public methods are the interface that clients of the Employee class use to perform the insert, update, and delete functions. Data encapsulation dictates that the encapsulating class should provide public CRUD(Create, Read, Update, and Delete) functions for other classes to access the data. The getEmpInfo method provides the read function, and the constructors provide the create function. We just added the doInsert, doUpdate, and doDelete methods to provide the UD in CRUD.
In actuality, the three public classes simply build the SQL statement string and then pass that string to the private methods doSelect(String) or doUpdate(String) for execution. Looking even closer, you will see that we have split the creation of the set, values, and where clauses into separate methods. Because updates, deletes, inserts, and selects may use the same clauses, we created separate methods so we only define the clauses once. Notice that the createXxxx methods do not use the public getters and setters to access the property values, they access the private variables directly. Because the methods are private, there is no danger in modifying the private variables directly. We will now enable the Insert and Update functions in EnterEmpInfo.
- 10. In EnterEmpInfo’s setEmployeeProperties method add the following to the beginning of the method
emp.setEmpNum(empNumTF.getText()); - 11. In EnterEmpInfo’s actionPerformed method, change:
if (actionBtn == e.getSource()) {
        EmployeeFrame ef = new EmployeeFrame(emp);
to:
if (actionBtn == e.getSource()) {
        if (actionBtn.getLabel().equals("Insert")) {
                emp.doInsert();
        }
        else { if (actionBtn.getLabel().equals("Update")) {
                emp.doUpdate();
             }
        }
        this .dispose();
Time to test.
- 12. Run TNT, select Employee Application, Insert Employee Information, and then enter the following employee information
333
Anne Analyst
3 Logic La
Jacksonville
FL 32233
22
1 - 13. Click the Insert button.
- 14. At the Employee Application Menu, select Display Employee and then, from the Select Employee Number frame, select employee number 333.
The Anne Analyst information should be displayed in the Employee Information frame.
- 15. Close the Employee Information frame and from the Employee Application Menu, select Update Employee Information.
- 16. Select employee number 333 from the Select Employee Number frame.
The Anne Analyst information will be shown on the Enter Employee Information frame.
- 17. Change the street address to 4 Logic La and click the Update button.
- 18. From the Employee Application Menu, select Display Employee Information and then, from the Select Employee Number frame, select employee number 333.
The Employee Information frame will be displayed with the Anne Analyst information and the new value of 4 Logic La for the street address.
Yay, it works!! However, there are several shortcomings with our application. For instance, deleting an employee’s information is not an option on any of the frames, nor are there any checks to stop duplicate employee information from being inserted into the database. This could have been easily solved by adding the delete option to the Employee Options frame, coding the call to Employee’s doDelete method, and doing a simple check before inserting the new employee information. Also, navigating the frames to access the various functions is awkward. Certainly, a Web page with links to all the functions (on the left side of the page) would be much easier. We also have not been very careful about closing the connection—which wastes system resources. Finally, the way we create and execute the SQL commands (dynamically) is very inefficient, especially for high-volume database applications. Using PreparedStatement objectsinstead of Statement objects is more efficient. However, adding code to overcome these shortcomings would have added to the complexity of the application and taken the focus away from the point of the chapter, which was how to access a database.
Data Access in a Complex Environment
Most large organizations have multiple DBMSs and often many different DBMS types. In these complex environments, tables are often moved between the DBMSs, database locations are changed, and there are constant changes to the structure of tables (i.e., adding and deleting fields, changing field sizes, etc.) These types of changes will require changes to the Java classes. Programmers can minimize the coding needed to implement these changes by using super classes and inheritance to eliminate duplicate code. In addition, abstract classes should be used to enforce standards across the different DBMS types.
As an example, we’ll assume an organization has one installation of each DBMS type (DB2, Oracle, and Access). To support the DBMSs, a “DBAccess-like” class should be created for each DBMS. This means the programmer would create three Java classes (called DB2DB, OracleDB, and AccessDB) with properties to hold the unique information required to access that particular DBMS. (If the three DBMSs were of the same type, you could put the IP address or URLs of the different hosts in the Java class name (e.g., OracleDB111. 222.333.4) to distinguish between them.
The smart programmer will also implement a common interface for all the DBMSs. Our example will consist of public methods called doInsert, doUpdate, and doDelete. Regardless of the DBMS type, internally, each class should work the same way. So, we will force each class to have non-public methods called createValuesClause, createSetClause, createWhereClause, getFieldsFromRS, doSelect(String), and doUpdate(String). A superclass (called DB) will be created that defines each of these required methods as abstract. In addition, DB will have a method (called init) that creates all the needed DB objects (connection, statement, etc.) and common variables that the table classes need, such as a ResultSet variable called rs, a Statement variable called stmt, and so on.
The code for DB would be as follows:
package c10;
import java.util.*;
import java.sql.*;
abstract class DB {
        Connection con = null ;
        String url = null ;
        String user, pw;
        Properties p = new Properties();
        String driver = null ;
        public boolean conExists = false ;
        ResultSet rs = null ;
        Statement stmt = null ;
        int returnValue;
        public void init() {
                if (conExists == false ) {
                        try {
                                Class. forName (driver);
                                p.put("naming", "sql");
                                p.put("user", user);
                                p.put("password", pw);
                                con = DriverManager. getConnection (url, p);
                                stmt = con.createStatement();
                        } catch (ClassNotFoundException e) {
                                System. out .println("couldn't find driver");
                                e.printStackTrace();
                                System. exit (1);
                        } catch (SQLException e) {
                                System. out .println("couldn't connect");
                                e.printStackTrace();
                                System. exit (1);
                        }
                }
                conExists = true ;
        }
        public abstract void doInsert();
        public abstract void doUpdate();
        public abstract void doDelete();
        abstract String createValuesClause();
        abstract String createSetClause();
        abstract String createWhereClause();
        abstract void getFieldsFromRS();
        abstract void doSelect(String string);
        abstract void doUpdate(String string);
}
Notice that before creating a connection object the init method checks to see if a connection object already exists. This will cut down on the overhead of creating and maintaining multiple connections. Of course, each individual “table class” will have to invoke the init method to ensure that the connection is created at least once.
Notice also that the init method uses a Properties object. Instead of dealing with all the individual property variables, a Properties object is defined to hold many of the values and then passed to the DriverManager. Lastly, note all the abstract methods. The various “table” subclasses of DB will be required to define these methods.
We need the “database classes” AccessDB, DB2DB, and OracleDB. As mentioned, each will contain the information unique to that DBMS. The source code for each is:
package c10;
abstract class AccessDB extends DB{

        public AccessDB () {
                driver = "sun.jdbc.odbc.JdbcOdbcDriver";
                url = "jdbc:odbc:TNT Database";
                user = "anonymous";
                pw = "guest";
        }
}
package c10;
abstract class DB2DB extends DB{
        public DB2DB () {
                driver = "com.ibm.as400.access.AS400JDBCDriver";
                url = "jdbc:as400:111.22.333.444";
                user = "bjanson";
                pw = "jeter";
        }
}
package c10;
abstract class OracleDB extends DB {
        public OracleDB () {
                driver = "oracle.jdbc.driver.OracleDriver";
                url = "jdbc:oracle:thin:@111.22.333.444:1521:SID";
                user = "bjanson";
                pw = "jeter";
        }
}
Notice that each of the DB classes is defined as abstract and extends DB. Because they are abstract, they do not have to implement the abstract methods defined in DB. However, all of the abstract methods will have to be defined in Employee and the ones that are currently defined as private will have to have the access modifier removed. Because DB defines the methods as protected, Employee can’t define them more restrictively as private. Speaking of changes to Employee, Employee must call the init method (to establish the connection to the database) and we need to implement a getFieldsFromRS method. We could rename getEmpInfo-FromRS to getFieldsFromRS, however, it’s simpler to code getFieldsFromRS to invoke get-EmpInfoFromRS. Finally, of course, you would substitute all your connection information for the example information above.
In Employee, we would change the constructor to invoke init as follows:
public Employee(){
        init();
}
If there are multiple constructors, all must invoke the default constructor. In Employee, there is a constructor that accepts five strings. It would be modified to the following:
public Employee(String name, String street, String
         city, String state, String zip) {
        this ();
        this .setEmpName(name);
        this .setEmpStreet(street);
        this .setEmpCity(city);
        this .setEmpState(state);
        this .setEmpZip(zip);
}
As mentioned, each of the private methods headers must be changed as follows:
String createValuesClause() {...
String createSetClause() {...
String createWhereClause() {...
void doSelect(String select) {...
void doUpdate(String update) {..
and getFieldsFromRS can be coded as follows:
void getFieldsFromRS() {
        getEmpInfoFromRS();
}
Assuming Employee is currently in the DB2 database, the Employee class header would look like the following:
public class Employee extends DB2DB{...
and the class diagram would look like Figure 10-13. Now comes the magic of inheritance.
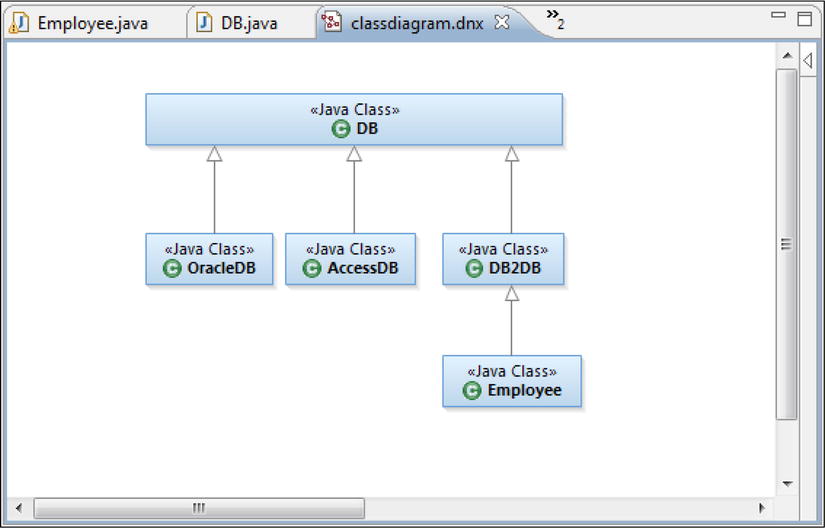
If the Employee table is moved to the Oracle DBMS, all a Java programmer would have to change is the Employee header to extend the OracleDB class as follows:
public class Employee extends OracleDB{...
And, as you probably guessed, if the Employee table were moved to the Access DBMS, the Employee header would be changed to:
public class Employee extends AccessDB{...
Because we specified the DBMS information in separate classes (e.g., OracleDB, AccessDB) rather than in the “table classes” (e.g., Employee) and built a superclass/subclass relationships (so that the required objects, methods, and variables are inherited), physical changes to table locations have a minimal impact on the Java classes. In addition, if the DBMS was moved to a different host or a password was changed, only the DBMS classes (containing the URL address and password) would need to be changed. Even if the Java technology for accessing a database changed (e.g., connection objects were replaced), only the DB class’ init method would be affected.
A great deal of the advances in Java (Java Server Faces (JSFs), Enterprise Java Beans (EJBs), etc.) are in the area of working with databases. In the next chapters, we will examine some of these new technologies.
Let’s look at the results:
- 1. In the Tutorials project, a new package named c10.
- 2. In Tutorials/c10, the following new Java classes:
DBAccess EmpNumFrame EmpOptions - 3. A printout of the DBAccess source code.
- 4. In Tutorials/c10, the following Java classes copied from c7 and c9:
AppOptions              Employee                EmployeeFrame
EnterEmpInfo            ExitButton              TNT
TNTButton UsefulFrame - 5. The employee application can now insert, display, and update employee information in a database.
Review Questions
- What is a result set?
- What is a driver?
- In a result set, what is the function of the cursor?
- What is the purpose of data encapsulation?
- What is SQL’s function regarding databases?
- What is the purpose of the result set’s next method?
- What is CRUD?
- Explain the term “data persistence”?
You will modify the Shipment application to insert, update, display, and delete shipment information in a DBMS. In addition, the Enter Shipment Information frame will offer the capability to delete and update shipment information.
To perform all this, the ShipOptions class must be modified to pass the selected function to EnterShipNum. EnterShipNum will receive the shipment number entered by the user and create a Shipment object for that shipment number. EnterShipNum will pass the selected function and the Shipment object to EnterShipInfo. EnterShipInfo will display the correct button text (insert, delete, etc.). The Shipment class will accept a shipment number, access the database for that shipment’s information, and populate the Shipment object’s properties with the database information. Shipment will also be modified to provide all the CRUD functions.
- 1. In ReviewEx, create a new folder called c10.
- 2. Copy all the files in c7 into c10.
- 3. Copy the following Employee application files from Tutorials/c10, into ReviewEx/c10:
AppOptions                DBAccess                Employee
EmpNumFrame EmpOptions EnterEmpInfo - 4. At the Confirm Overwriting window, click the Yes To All button.
- 5. If you are accessing a DB2 or Oracle DBMS, add the External JAR to point to the appropriate driver. If you are accessing an Access table, import the TNTDB DB from Tutorials into ReviewEx.
- 6. Run TNT and verify that the Employee application works correctly.
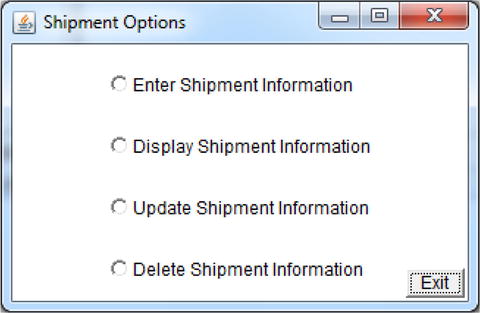
- 7. In the Shipment Options frame, add checkboxes called updShipCB and dltShipCB to the frame and checkbox group. Shipment Options frame should look like Figure 10-14.
- 8. Add the item listener to the two checkboxes by adding the following statements in the appropriate getter methods (hint: if unsure of how to do this, look at the other checkboxes’ getter methods):
updShipCB.addItemListener( this );
dltShipCB.addItemListener( this ); - 9. In AppOptions, change the following statement in the ItemStateChanged method:
else if (shipAppCB.getState())
        System.out.println("Sorry that application is not " + "available");
to:
else if (shipAppCB.getState()){
        ShipOptions so = new ShipOptions();}
This means that the Shipment Options frame will be displayed when that option is selected from the Application Options frame
- 10. In Shipment, create a new null Constructor.
- 11. In Shipment, create a Constructor that receives a String variable called sNum by adding the following code:
public Shipment(String sNum) {
} - 12. Save the Shipment source code.
- 13. In EnterShipInfo, add a constructor that expects a Shipment variable called ship and a String variable called func. In addition, invoke the null constructor.
The code should look like the following:
public EnterShipInfo(Shipment ship, String func) {
        this ();
}
By accepting a Shipment object, EnterShipInfo will be easier for other classes to use.
- 14. In EnterShipNum, add the ActionListener to the Submit button and add the following statement to create a class private String variable called function.
private String function;
Since we will change EnterShipNum to perform deletes and updates, the user selected function needs to be passed to EnterShipNum and stored in this class level variable.
- 15. Change EnterShipNum’s constructor so that a String variable called func is received and the class variable function is set to func.
The source code should look like the following:
public EnterShipNum(String func) {
        super ();
        initialize();
        function = func;
}
- 16. Change EnterShipNum’s actionPerformed such that:
- a. A String variable called sNum is created
- b. The shipment number is retrieved from the text field and assigned to sNum
- c. A shipment object is created for the shipment number and assigned to a variable called shipment
- d. If the function is update or delete, create an EnterShipInfo object and pass the variables shipment and function
- e. If the function is display, create a ShipmentFrame object and pass the shipment variable
- f. Delete the EnterShipNum frame
The code should look like the following:
public void actionPerformed(ActionEvent e) {
        String sNum = shipNumTF.getText();
        Shipment shipment = new Shipment(sNum);
        if (function.equals("Display")) {
              new ShipmentFrame(shipment);
        } else {
              new EnterShipInfo(shipment, function);
        }
        this .dispose();
}
Notice that neither the EnterShipInfo nor the ShipmentFrame objects are assigned to a variable. Because we will never reference the objects in the source code, there is no need to assign variables to them.
- 17. In ShipOptions, create a private class String variable called function by adding the following:
private String function;
- 18. Change ShipOptions’ itemStateChanged method such that:
- A. If the enter option is chosen, the EnterShipInfo frame is displayed
- B. If display, update, or delete are selected, the EnterShipNum frame is displayed
- C. If display is selected, pass the string “Display” to EnterShipNum
- D. If update is selected, then pass “Update” to EnterShipNum
- E. If delete is selected, then pass “Delete” to EnterShipNum
To do this, change the source to the following:
if (dispShipCB.getState())
       function = "Display";
 else {
      if (updShipCB.getState()) {
             function = "Update";
      } else {
             if (dltShipCB.getState()) {
                    function = "Delete";
             }
      }
}
if (enterShipCB.getState()) {
       EnterShipInfo esi = new EnterShipInfo();
} else {
       EnterShipNum esn = new EnterShipNum(function);
}
So far the steps you have performed have defined “the plumbing” necessary for the classes to communicate correctly. The next steps will add the CRUD methods to Shipment and change EnterShipInfo and EnterShipNum to invoke the appropriate Shipment methods. We assume that the Shipment table was created in TNTDB with the following SQL command:
CREATE TABLE tntdb.shipment
        (empnum        CHAR(10),
        shipnum CHAR(10),
        rcvmon        CHAR(2),
        rcvday        CHAR(2),
        rcvyear       CHAR(4),
        rcvhour       CHAR(2),
        rcvmin        CHAR(2),
        rcvampm       CHAR(2),
        supplier      CHAR(20))
- 19. Make Shipment a subclass of DBAccess.
- 20. In the Shipment class, add the following private String variables along with getters and setters for each:
rcvMon   rcvDay         rcvYear
rcvHour rcvMin rcvAMPM - 21. Copy the five doXxxx and three createXxxx methods from Tutorials.c10 Employee into Shipment. We will edit these methods to fit Shipment instead of entering them in from scratch. This will cut down on errors especially with the SQL commands.
- 22. If needed, in the Shipment class, add the import statement for the SQL Exception class.
- 23. In the appropriate Shipment class doXxxx methods, replace the references to the employee table with shipment table. (Be careful: this step and the following seven steps require specifying the correct field and table names, as well as, the correct data types, button names, and text fields for the Shipment class and table.)
- 24. In the Shipment class createXxxx methods, replace the references to the employee properties with the shipment properties (i.e., the private variables).
- 25. Copy the getEmpInfoFromRS and getEmpInfo methods from Employee into the Shipment class.
- 26. Change the Shipment class method names (copied in the step above) to getFieldsFromRS and getShipInfo.
- 27. Change the two new methods to use Ship information and the appropriate Shipment methods not the Employee information and methods.
- 28. Delete the catch for invalid value in getFieldsFromRS. (This was needed in Employee because of numeric data but is not needed for the shipment information.)
- 29. Modify the Shipment constructor that receives the ship number string so that the shipment number is moved into the class variable shipmentNumber and getShipInfo is invoked as follows:
public Shipment(String sNum) {
        this .setShipmentNum(sNum);
        this .getShipInfo(sNum);
} - 30. In EnterShipInfo, change the name of the enterBtn to actionBtn.
- 31. In EnterShipInfo, change the definition of the class variable ship from:
public Shipment ship;to :
private Shipment ship = new Shipment();
and, in the initialize, method comment out the following:
ship = new Shipment("","","","","");
- 32. In EnterShipInfo, create a populateTFs method (as was done in EnterEmpInfo) so that the Shipment text fields and the choice values from the Shipment object are displayed.
- 33. Change EnterShipInfo’s constructor that accepts a Shipment and a String variable (as follows), so that the shipment information is put in the labels and the button has the correct text:
public EnterShipInfo(Shipment ship, String func) {
        this ();
        this .ship = ship;
        populateTFs();
        actionBtn.setLabel(func);
}
- 34. In the EnterShipInfo setShipmentProperties method, after the new shipment object is created also set the six individual properties that make up the receiving date and time.
- 35. Change EnterShipInfo’s actionPerformed method so the correct doXxxx methods are called for the functions insert, update and delete and that appropriate message text is displayed for each operation.
- 36. Change EnterShipInfo’s actionPerformed method so that a ShipmentFrame object is created when the display function has been selected.
- 37. Save all the source code.
Results of the Review Exercise
Below are the results:
- In ReviewExWeb/Java Resources, there is a new folder called c10.
- c10 should contain 24 classes.
- Modifications to Shipment such that the CRUD functions are available.
- Changes to the Shipment application such that inserts, deletes, and updates can be performed on the shipment table and shipment information is displayed on ShipmentFrame.
Check that the Exercise Was Done Correctly
Let’s check if everything is working:
- 1. Run TNT and insert the following information for a shipment: employee 222, shipment number 1000, supplier Fred Meyers, and the current date and time.
- 2. Choose the display function, specify shipment number 1000, and verify the information is displayed.
Notice that the message text does not fit in the labels and there are extra spaces following the shipment number. These problems will be addressed in the Challenge Exercise.
- 3. Close the ShipmentFrame window.
- 4. Choose the update function, specify shipment 1000, and change the employee number to 111.
- 5. Choose the display function, specify shipment 1000, and verify that employee number 111 is displayed.
- 6. Close the ShipmentFrame window.
- 7. Choose the delete function and specify shipment 1000.
- 8. Choose the display function and specify shipment 1000. The following message should be generated:
Problem getting ship info from result set java.sql.SQLException: Xxxxx xxxxx.
Because shipment 1000 was deleted, the result set returned by the select is empty. When Shipment tries to read the result set (to put the values in the properties), we should check to see if the result set is empty. This is another deficiency the Challenge Exercise will correct.
Finally, let’s try a challenge:
- 1. Copy ReviewEx/c10 into CE (and, if using Access, copy TNTDB from ReviewEx).
- 2. Change EnterShipInfo’s empNumTF to a choice called empNumCh and have EnterShipInfo populate the choice with Employee numbers from the employee table. (Hint: copy the code from the EmpNumFrame class and modify as needed.)
- 3. Change Shipment’s getFieldsFromRS method to check if the shipment was found in the database. If the shipment is not in the database, display the following message (where the actual shipment number is display instead of xxxxx) in the Console:
Shipment number xxxxx does not exist in the database. - 4. In EnterShipNum, check if the shipment was retrieved from the database and if not, do not display ShipmentFrame.
There are several reasons the shipment information is not displayed correctly:
- A. The first label is too small.
- B. If a string value does not fill a table’s column, the database “pads” the value with blanks.
(In other words, if the month value is 4, the retrieved value will be “4 ” - the character 4 followed by a blank space. This results in the spacing being “off”. In addition, because of the blank space, trying to parse “4” will result in a number format exception being thrown.)
- 5. Change the Shipment class’s getFieldsFromRS method so that the fields RcvDate and RcvTime are built and use the String class’s trim method on all the data fields retrieved from the result set that may be padded with spaces.
- 6. Change the Shipment class’s setRcvDate(String) and setRcvTime(String) methods so that the six individual properties (hour, minute, day, month, etc.) values are also set.
- 7. In ShipmentFrame, make the first label wider so that all the text will appear.
Check that the Exercise Was Done Correctly
Perform the same tests as were done for the Review Exercise and confirm that the problems have been resolved.