
Chapter 15. Ethernet and Networking
15.0. Introduction
Want to share your sensor data? Let other people take control of your Arduino’s actions? Your Arduino can communicate with a broader world over Ethernet and networks. This chapter describes the many ways you can use Arduino with the Internet. It has examples that demonstrate how to build and use web clients and servers, and it shows how to use the most common Internet communication protocols with Arduino.
The Internet allows a client (e.g., your web browser) to request information from a server (a web server or other Internet service provider). This chapter contains recipes showing how to make an Internet client that retrieves information from a service such as Google or Yahoo! Other recipes in this chapter show how Arduino can be an Internet server that provides information to clients using Internet protocols and can act as a web server that creates pages for viewing in web browsers.
The Arduino Ethernet library supports a range of methods (protocols) that enable your sketches to be an Internet client or a server. The Ethernet library uses the suite of standard Internet protocols, and most of the low-level plumbing is hidden. Getting your clients or servers up and running and doing useful tasks will require some understanding of the basics of network addressing and protocols, and you may want to consult one of the many references available online or one of these introductory books:
Head First Networking by Al Anderson and Ryan Benedetti (O’Reilly)
Network Know-How: An Essential Guide for the Accidental Admin by John Ross (No Starch Press)
Windows NT TCP/IP Network Administration by Craig Hunt and Robert Bruce Thompson (O’Reilly)
Making Things Talk by Tom Igoe (O’Reilly)
(Search for O’Reilly titles on oreilly.com.)
Here are some of the key concepts in this chapter. You may want to explore them in more depth than is possible here:
- Ethernet
This is the low-level signaling layer providing basic physical message-passing capability. Source and destination addresses for these messages are identified by a Media Access Control (MAC) address. Your Arduino sketch defines a MAC address value that must be unique on your network.
- TCP and IP
Transmission Control Protocol (TCP) and Internet Protocol (IP) are core Internet protocols built above Ethernet. They provide a message-passing capability that operates over the global Internet. TCP/IP messages are delivered through unique IP addresses for the sender and receiver. A server on the Internet uses a numeric label (address) that no other server will have so that it can be uniquely identified. This address consists of four bytes, usually represented with dots separating the bytes (e.g., 64.233.187.64 is an IP address used by Google). The Internet uses the Domain Name System (DNS) service to translate the common service name (http://www.google.com) to the numeric IP address. This capability was added in Arduino 1.0; Recipe 15.3 shows how to use this capability in your sketches.
- Local IP addresses
If you have more than one computer connected to the Internet on your home network using a broadband router or gateway, each computer probably uses a local IP address that is provided by your router. The local address is created using a Dynamic Host Configuration Protocol (DHCP) service in your router. The Arduino Ethernet library now (from release 1.0) includes a DHCP service. Most of the recipes in this chapter show a user-selected IP address that you may need to modify to suit your network. Recipe 15.2 shows how the IP address can be obtained automatically using DHCP.
Web requests from a web browser and the resultant responses use Hypertext Transfer Protocol (HTTP) messages. For a web client or server to respond correctly, it must understand and respond to HTTP requests and responses. Many of the recipes in this chapter use this protocol, and referring to one of the references listed earlier for more details will help with understanding how these recipes work in detail.
Web pages are usually formatted using Hypertext Markup Language (HTML). Although it’s not essential to use HTML if you are making an Arduino web server, as Recipe 15.9 illustrates, the web pages you serve can use this capability.
Extracting data from a web server page intended to be viewed by people using a web browser can be a little like finding a needle in a haystack because of all the extraneous text, images, and formatting tags used on a typical page. This task is simplified by using the Stream parsing functionality in Arduino 1.0 to find particular sequences of characters and to get strings and numeric values from a stream of data. If you are using an earlier Arduino release, you can download a library called TextFinder, available from the Arduino Playground. TextFinder extracts information from a stream of data. Stream parsing and TextFinder have similar functionality (Stream parsing is based on the TextFinder code that was written for the first edition of this book). However, some of the methods have been renamed; see the TextFinder documentation in the Playground if you need help migrating sketches from TextFinder to Arduino 1.0.
Web interchange formats have been developed to enable reliable extraction of web data by computer software. XML and JSON are two of the most popular formats, and Recipe 15.5 shows an example of how to do this using Arduino.
Arduino 1.0 Enhancements
The Arduino Ethernet library has had a number of improvements in the 1.0 release that make it easier to use and added capabilities such as DHCP and DNS that previously required the download of third-party libraries. Some of the class and method names have changed so sketches written for previous releases will require modification to compile with Arduino 1.0, here is a summary of the required changes to sketches written for earlier Arduino releases:
SPI.hmust be included before the Ethernet include at the top of the sketch (as of Arduino 0018).Client client(server, 80);changed toEthernetClient client;.if(client.connect())changed toif(client.connect(serverName, 80)>0).Server server(80)changed toEthernetServer server(80).DHCP does not require an external library (see Recipe 15.2).
DNS does not require an external library (see Recipe 15.3).
Word and number searching simplified through new Stream parsing capability (see Recipe 15.4).
F(text)construct added to simplify storing text in flash memory (Recipe 15.11).
Note
The code in this chapter is for Arduino release 1.0. If you are running an earlier version, use the download code from the first edition at http://oreilly.com/catalog/9780596802486.
The code in this book was tested with the Arduino 1.0 release candidates. Any updates to sketches will be listed in the changelog.txt file in the code download file at http://shop.oreilly.com/product/0636920022244.do.
Alternative Hardware for Low Cost Networking
If you want a low-cost DIY-friendly Ethernet board that doesn’t require surface-mount technology, you can use the open source design created for a project called Nanode. This uses the same ATmega328 controller as Arduino but replaces the Wiznet chip with the lower cost ENC28J60 device. This chip is capable of providing the functionality described in this chapter, but it uses a different set of libraries, so you would need to use sketches written specifically for the ENC28J60.
For more information, see the Nanode home page at: http://www.nanode.eu/.
15.1. Setting Up the Ethernet Shield
Solution
This sketch is based on the Ethernet client example sketch
distributed with Arduino. Check the documentation for your network to
ensure that the Arduino IP address (the value of the ip variable) is valid for your network:
/*
* Simple Web Client
* Arduino 1.0 version
*/
#include <SPI.h>
#include <Ethernet.h>
byte mac[] = { 0xDE, 0xAD, 0xBE, 0xEF, 0xFE, 0xED };
byte ip[] = { 192, 168, 1, 177 }; // change to a valid address for your network
byte server[] = { 209,85,229,104 }; // Google
// see text for more on IP addressing
EthernetClient
            client;
void setup()
{
Serial.begin(9600); // start the serial library:
Ethernet.begin(mac,ip);
delay(1000); // give the ethernet hardware a second to initialize
Serial.println("connecting...");
if (client.connect(server, 80)) {
Serial.println("connected");
client.println("GET /search?q=arduino HTTP/1.0"); // the HTTP request
client.println();
}
else {
Serial.println("connection failed");
}
}
void loop()
{
if (client.available()) {
char c = client.read();
Serial.print(c); // echo all data received to the Serial Monitor
}
if (!client.connected()) {
Serial.println();
Serial.println("disconnecting.");
client.stop();
for(;;)
;
}
}Discussion
This sketch performs a Google search using the word “arduino.” Its purpose is to provide working code that you can use to verify that your network configuration is suitable for the Arduino Ethernet shield.
There are up to four addresses that may need to be configured correctly for the sketch to successfully connect and display the results of the search on the Serial Monitor:
byte mac[] = { 0xDE, 0xAD, 0xBE, 0xEF, 0xFE, 0xED };The MAC address uniquely identifies your Ethernet shield. Every network device must have a different MAC address, and if you use more than one Arduino shield on your network, each must use a different address. Recent Ethernet shields have a MAC address printed on a sticker on the underside of the board. If you have a single Ethernet shield, you don’t need to change this:
byte ip[] = { 192, 168, 1, 177 }; // change to a valid address for your networkThe IP address is used to identify something that is communicating on the Internet and must also be unique on your network. The address consists of four bytes, and the range of valid values for each byte depends on how your network is configured. IP addresses are usually expressed with dots separating the bytes—for example, 192.168.1.177. In all the Arduino sketches, commas are used instead of dots because the bytes are stored in an array (see Recipe 2.4).
If your network is connected to the Internet using a router or
gateway, you may need to provide the IP address of the gateway when
you call the ethernet.begin
function. You can find the address of the gateway in the documentation
for your router/gateway. Add two lines after the IP and server
addresses at the top of the sketch with the address of your DNS server
and gateway:
// add if needed by your router or gateway
byte dns_server[] = { 192, 168, 1, 2 }; // The address of your DNS server
byte gateway[] = { 192, 168, 1, 254 }; // your gateway addressAnd change the first line in setup to include the gateway address in the
startup values for Ethernet:
Ethernet.begin(mac, ip, dns_server, gateway);
The server address consists of the 4-byte IP address of the server you want to connect to—in this case, Google. Server IP addresses change from time to time, so you may need to use the ping utility of your operating system to find a current IP address for the server you wish to connect to:
byte server[] = { 64, 233, 187, 99 }; // GoogleNote
The line at the top of the sketch that includes <SPI.h> is required for Arduino
releases starting at 0019.
See Also
The web reference for getting started with the Arduino Ethernet shield is at http://arduino.cc/en/Guide/ArduinoEthernetShield.
15.2. Obtaining Your IP Address Automatically
Problem
The IP address you use for the Ethernet shield must be unique on your network and you would like this to be allocated automatically. You want the Ethernet shield to obtain an IP address from a DHCP server.
Solution
This is similar to the sketch from Recipe 15.1 but without passing an IP
address to the Ethernet.begin
method:
/*
* Simple Client to display IP address obtained from DHCP server
* Arduino 1.0 version
*/
#include <SPI.h>
#include <Ethernet.h>
byte mac[] = { 0xDE, 0xAD, 0xBE, 0xEF, 0xFE, 0xED };
byte server[] = { 209,85,229,104 }; // Google
EthernetClient client;
void setup()
{
Serial.begin(9600);
if(Ethernet.begin(mac) == 0) { // start ethernet using mac & DHCP
Serial.println("Failed to configure Ethernet using DHCP");
while(true) // no point in carrying on, so stay in endless loop:
;
}
delay(1000); // give the Ethernet shield a second to initialize
Serial.print("This IP address: ");
IPAddress myIPAddress = Ethernet.localIP();
Serial.print(myIPAddress);
if(client.connect(server, 80)>0) {
Serial.println(" connected");
client.println("GET /search?q=arduino HTTP/1.0");
client.println();
} else {
Serial.println("connection failed");
}
}
void loop()
{
if (client.available()) {
char c = client.read();
// uncomment the next line to show all the received characters
// Serial.print(c);
}
if (!client.connected()) {
Serial.println();
Serial.println("disconnecting.");
client.stop();
for(;;)
;
}
}Discussion
The library distributed with the Arduino 1.0 now supports DHCP (earlier releases required a third-party library from http://blog.jordanterrell.com/post/Arduino-DHCP-Library-Version-04.aspx.
The major difference from the sketch in Recipe 15.1 is that there is no IP (or
gateway) address variable—these values are acquired from your DHCP
server when the sketch starts. Also there is a check to confirm that
the ethernet.begin statement was
successful. This is needed to ensure that a valid IP address has been
provided by the DHCP server (Internet access is not possible without a
valid IP address).
This code prints the IP address to the Serial Monitor using a
the IPAddress.printTo
method introduced in Arduino 1.0:
Serial.print("This IP address: ");
IPAddress myIPAddress = Ethernet.localIP();
Serial.print(myIPAddress);Note
The argument to Serial.print above may look odd but the
new IPAddress class has the capability to
output its value to objects such as Serial that derive from the Print class.
If you are not familiar with deriving functionality from
classes, suffice it to say that the IPAddress object is smart enough to
display its address when asked.
15.3. Resolving Hostnames to IP Addresses (DNS)
Problem
You want to use a server name—for example, yahoo.com—rather than a specific IP address. Web providers often have a range of IP addresses used for their servers and a specific address may not be in service when you need to connect.
Solution
You can use DNS to look up a valid IP address for the name you provide:
/*
* Web Client DNS sketch
* Arduino 1.0 version
*/
#include <SPI.h>
#include <Ethernet.h>
byte mac[] = {0xDE, 0xAD, 0xBE, 0xEF, 0xFE, 0xED };
char serverName[] = "www.google.com";
EthernetClient client;
void setup()
{
Serial.begin(9600);
if (Ethernet.begin(mac) == 0) { // start ethernet using mac & IP address
Serial.println("Failed to configure Ethernet using DHCP");
while(true) // no point in carrying on, so stay in endless loop:
;
}
delay(1000); // give the Ethernet shield a second to initialize
int ret = client.connect(serverName, 80);
if (ret == 1) {
Serial.println("connected"); // report successful connection
// Make an HTTP request:
client.println("GET /search?q=arduino HTTP/1.0");
client.println();
}
else {
Serial.println("connection failed, err: ");
Serial.print(ret,DEC);
}
}
void loop()
{
// Read and print incoming butes from the server:
if (client.available()) {
char c = client.read();
Serial.print(c);
}
// stop the client if disconnected:
if (!client.connected()) {
Serial.println();
Serial.println("disconnecting.");
client.stop();
while(true) ; // endless loop
}
}Discussion
This code is similar to the code in Recipe 15.2; it does a Google search for “arduino.” But in this version it is not necessary to provide the Google IP address—it is obtained through a request to the Internet DNS service.
The request is achieved by passing the “www.google.com” hostname
instead of an IP address to the client.connect method:
char serverName[] = "www.google.com";
int ret = client.connect(serverName, 80);
if(ret == 1) {
Serial.println("connected"); // report successful connectionThe function will return 1 if the hostname can be resolved to an
IP address by the DNS server and the client can connect successfully.
Here are the values that can be returned from client.connect:
1 = success 0 = connection failed -1 = no DNS server given -2 = No DNS records found -3 = timeout
If the error is –1, you will need to manually configure the DNS server to use it. The DNS server address is usually provided by the DHCP server, but if you’re configuring the shield manually you’ll have to provide it (otherwise connect will return –1).
15.4. Requesting Data from a Web Server
Problem
You want Arduino to get data from a web server. For example, you want to find and use specific values returned from a web server.
Solution
This sketch uses Yahoo! search to convert 50 kilometers to miles. It sends the query “what+is+50+km+in+mi” and prints the result to the Serial Monitor:
/*
Simple Client Parsing sketch
Arduino 1.0 version
*/
#include <SPI.h>
#include <Ethernet.h>
byte mac[] = { 0xDE, 0xAD, 0xBE, 0xEF, 0xFE, 0xED };
char serverName[] = "search.yahoo.com";
EthernetClient client;
int result; // the result of the calculation
void setup()
{
Serial.begin(9600);
if(Ethernet.begin(mac) == 0) { // start ethernet using mac & IP address
Serial.println("Failed to configure Ethernet using DHCP");
while(true) // no point in carrying on, so stay in endless loop:
;
}
delay(1000); // give the Ethernet shield a second to initialize
Serial.println("connecting...");
}
void loop()
{
if (client.connect(serverName, 80)>0) {
Serial.print("connected... ");
client.println("GET /search?p=50+km+in+miles HTTP/1.0");
client.println();
} else {
Serial.println("connection failed");
}
if (client.connected()) {
if(client.find("<b>50 Kilometers")){
if(client.find("=")){
result = client.parseInt();
Serial.print("50 km is " );
Serial.print(result);
Serial.println(" miles");
}
}
else
Serial.println("result not found");
client.stop();
delay(10000); // check again in 10 seconds
}
else {
Serial.println();
Serial.println("not connected");
client.stop();
delay(1000);
}
}
Discussion
The sketch assumes the results will be returned in bold (using
the HTML <b> tag)
followed by the value given in the query and the word
kilometers.
The searching is done using the Stream parsing functionality
described in this chapter’s introduction. The find method searches through the received
data and returns true if the target
string is found. The code looks for text associated with the reply. In
this example, it tries to find “<b>50 kilometers” using this
line:
if (client.find("<b>50 kilometers")){client.find is used
again to find the equals sign (=) that precedes the numerical value of the
result.
The result is obtained using the parseInt method and
is printed to the Serial Monitor.
parseInt returns an integer
value; if you want to get a floating-point value, use parseFloat
instead:
float floatResult = client.parseFloat(); Serial.println(floatResult);
If you want your searches to be robust, you need to look for a unique tag that will only be found preceding the data you want. This is easier to achieve on pages that use unique tags for each field, such as this example that gets the Google stock price from Google Finance and writes the value to analog output pin 3 and to the Serial Monitor (see Chapter 7 if you want to read about using analog output pins):
/*
* Web Client Google Finance sketch
* get the stock value for google and write to analog pin 3.
*/
#include <SPI.h> // needed for Arduino versions later than 0018
#include <Ethernet.h>
byte mac[] = { 0xDE, 0xAD, 0xBE, 0xEF, 0xFE, 0xED };
char serverName[] = "www.google.com";
EthernetClient client;
float value;
void setup()
{
Serial.begin(9600);
if(Ethernet.begin(mac) == 0) { // start ethernet using mac & IP address
Serial.println("Failed to configure Ethernet using DHCP");
while(true) // no point in carrying on, so stay in endless loop:
;
}
delay(1000); // give the Ethernet shield a second to initialize
}
void loop()
{
Serial.print("Connecting...");
if (client.connect(serverName, 80)>0) {
client.println("GET //finance?q=google HTTP/1.0");
client.println("User-Agent: Arduino 1.0");
client.println();
}
else
{
Serial.println("connection failed");
}
if (client.connected()) {
if(client.find("<span class="pr">"))
{
client.find(">"); // seek past the next '>'
value = client.parseFloat();
Serial.print("google stock is at ");
Serial.println(value); // value is printed
}
else
Serial.print("Could not find field");
}
else {
Serial.println("Disconnected");
}
client.stop();
client.flush();
delay(5000); // 5 seconds between each connect attempt
}These examples use the GET command to
request a specific page. Some web requests need data to be sent to the
server within the body of the message, because there is more data to
be sent than can be handled by the GET command. These requests are handled
using the POST command. Here
is an example of POST that uses the
Babel Fish language translation service to translate text from Italian into English:
/*
* Web Client Babel Fish sketch
* Uses Post to get data from a web server
*/
#include <SPI.h>
#include <Ethernet.h>
byte mac[] = { 0xDE, 0xAD, 0xBE, 0xEF, 0xFE, 0xED };
char serverName[] = "babelfish.yahoo.com";
EthernetClient client;
// the text to translate
char * transText = "trtext=Ciao+mondo+da+Arduino.&lp=it_en";
const int MY_BUFFER_SIZE = 30; // big enough to hold result
char buffer [MY_BUFFER_SIZE+1]; // allow for the terminating null
void setup()
{
Serial.begin(9600);
if(Ethernet.begin(mac) == 0) { // start ethernet using mac & IP address
Serial.println("Failed to configure Ethernet using DHCP");
while(true) // no point in carrying on, so stay in endless loop:
;
}
delay(1000); // give the Ethernet shield a second to initialize
}
void loop()
{
Serial.print("Connecting...");
postPage( "/translate_txt", transText);
delay(5000);
}
void postPage(char *webPage, char *parameter){
if (client.connect(serverName,80)>0) {
client.print("POST ");
client.print(webPage);
client.println(" HTTP/1.0");
client.println("Content-Type: application/x-www-form-urlencoded");
client.println("Host: babelfish.yahoo.com");
client.print("Content-Length: ");
client.println(strlen(parameter));
client.println();
client.println(parameter);
}
else {
Serial.println(" connection failed");
}
if (client.connected()) {
client.find("<div id="result">");
client.find( ">");
memset(buffer,0, sizeof(buffer)); // clear the buffer
client.readBytesUntil('<' ,buffer, MY_BUFFER_SIZE);
Serial.println(buffer);
}
else {
Serial.println("Disconnected");
}
client.stop();
client.flush();
}Warning
POST requires the content
length to be sent to tell the server how much data to expect.
Omitting or sending an incorrect value is a common cause of problems
when using POST. See Recipe 15.12 for another example of a
POST request.
Sites such as Google Weather and Google Finance generally keep the tags used to identify fields unchanged. But if some future update to a site does change the tags you are searching for, your sketch will not function correctly until you correct the search code. A more reliable way to extract data from a web server is to use a formal protocol, such as XML or JSON. The next recipe shows how to extract information from a site that uses XML.
15.5. Requesting Data from a Web Server Using XML
Problem
You want to retrieve data from a site that publishes information in XML format. For example, you want to use values from specific fields in one of the Google API services.
Solution
This sketch retrieves the weather in London from the Google Weather site. It uses the Google XML API:
/*
* Simple Client Google Weather
* gets xml data from http://www.google.com/ig/api?weather=london,uk
* reads temperature from field: <temp_f data="66" />
* writes temperature to analog output port.
*/
#include <SPI.h> // needed for Arduino versions later than 0018
#include <Ethernet.h>
byte mac[] = { 0xDE, 0xAD, 0xBE, 0xEF, 0xFE, 0xED };
char serverName[] = "www.google.com";
const int temperatureOutPin = 3; // analog output for temperature
const int humidityOutPin = 5; // analog output for humidity
EthernetClient client;
void setup()
{
Serial.begin(9600);
if(Ethernet.begin(mac) == 0) { // start ethernet using mac & IP address
Serial.println("Failed to configure Ethernet using DHCP");
while(true) // no point in carrying on, so stay in endless loop:
;
}
delay(1000); // give the Ethernet shield a second to initialize
Serial.println("connecting...");
}
void loop()
{
if (client.connect(serverName,80)>0) {
// get google weather for London
client.println("GET /ig/api?weather=london HTTP/1.0");
client.println();
}
else {
Serial.println(" connection failed");
}
if (client.connected()) {
// get temperature in fahrenheit (use field "<temp_c data=" for Celsius)
if(client.find("<temp_f data=") )
{
int temperature = client.parseInt();
analogWrite(temperatureOutPin, temperature); // write analog output
Serial.print("Temperature is "); // and echo it to the serial port
Serial.println(temperature);
}
else
Serial.print("Could not find temperature field");
// get temperature in fahrenheit (use field "<temp_c data=" for Celsius)
if(client.find("<humidity data=") )
{
int humidity = client.parseInt();
analogWrite(humidityOutPin, humidity); // write value to analog port
Serial.print("Humidity is "); // and echo it to the serial port
Serial.println(humidity);
}
else
Serial.print("Could not find humidity field");
}
else {
Serial.println("Disconnected");
}
client.stop();
client.flush();
delay(60000); // wait a minute before next update
}Each field is preceded by a tag, and the one indicating the
temperature in Fahrenheit on Google Weather is "<temp_f data=".
On this site, if you want the temperature in Celsius you would
look for the tag "<temp_c data=".
You will need to consult the documentation for the page you are interested in to find the relevant tag for the data you want.
You select the page through the information sent in
your GET statement. This
also depends on the particular site, but in the preceding example, the
city is selected by the text after the equals sign following the
GET statement. For example, to
change the location from London to Rome, change:
client.println("GET /ig/api?weather=london HTTP/1.0"); // weather for Londonto:
client.println("GET /ig/api?weather=Rome HTTP/1.0"); // weather for RomeYou can use a variable if you want the location to be selected under program control:
char *cityString[4] = { "London", "New%20York", "Rome", "Tokyo"};
int city;
void loop()
{
city = random(4); // get a random city
if (client.connect(serverName,80)>0) {
Serial.print("Getting weather for ");
Serial.println(cityString[city]);
client.print("GET /ig/api?weather=");
client.print(cityString[city]); // print one of 4 random cities
client.println(" HTTP/1.0");
client.println();
}
else {
Serial.println(" connection failed");
}
if (client.connected()) {
// get temperature in fahrenheit (use field "<temp_c data="" for Celsius)
if(client.find("<temp_f data=") )
{
int temperature = client.parseInt();
analogWrite(temperatureOutPin, temperature); // write analog output
Serial.print(cityString[city]);
Serial.print(" temperature is "); // and echo it to the serial port
Serial.println(temperature);
}
else
Serial.println("Could not find temperature field");
// get temperature in fahrenheit (use field "<temp_c data="" for Celsius)
if(client.find("<humidity data=") )
{
int humidity = client.parseInt();
analogWrite(humidityOutPin, humidity); // write value to analog port
Serial.print("Humidity is "); // and echo it to the serial port
Serial.println(humidity);
}
else
Serial.println("Could not find humidity field");
}
else {
Serial.println("Disconnected");
}
client.stop();
client.flush();
delay(60000); // wait a minute before next update
}
// the remainder of the code is the same as the previous sketchNote
Information sent in URLs cannot contain spaces, which is why New York is written as “New%20York”. The encoding to indicate a space is %20. Your browser does the encoding before it sends a request, but on Arduino you must translate spaces to %20 yourself.
15.6. Setting Up an Arduino to Be a Web Server
Problem
You want Arduino to serve web pages. For example, you want to use your web browser to view the values of sensors connected to Arduino analog pins.
Solution
This is the standard Arduino Web Server example sketch distributed with Arduino that shows the value of the analog input pins. This recipe explains how this sketch works and how it can be extended:
/*
* Web Server
* A simple web server that shows the value of the analog input pins.
*/
#include <SPI.h>
#include <Ethernet.h>
byte mac[] = { 0xDE, 0xAD, 0xBE, 0xEF, 0xFE, 0xED };
byte ip[] = { 192, 168, 1, 177}; // IP address of this web server
EthernetServer server(80);
void setup()
{
Ethernet.begin(mac, ip);
server.begin();
}
void loop()
{
EthernetClient client = server.available();
if (client) {
// an http request ends with a blank line
boolean current_line_is_blank = true;
while (client.connected()) {
if (client.available()) {
char c = client.read();
// if we've gotten to the end of the line (received a newline
// character) and the line is blank, the http request has ended,
// so we can send a reply
if (c == '
' && current_line_is_blank) {
// send a standard http response header
client.println("HTTP/1.1 200 OK");
client.println("Content-Type: text/html");
client.println();
// output the value of each analog input pin
for (int i = 0; i < 6; i++) {
client.print("analog input ");
client.print(i);
client.print(" is ");
client.print(analogRead(i));
client.println("<br />");
}
break;
}
if (c == '
') {
// we're starting a new line
current_line_is_blank = true;
} else if (c != '
') {
// we've gotten a character on the current line
current_line_is_blank = false;
}
}
}
// give the web browser time to receive the data
delay(1);
client.stop();
}
}Discussion
As discussed in Recipe 15.1, all of the sketches using the Ethernet library need a unique MAC address and IP address. The IP address you assign in this sketch determines the address of the web server. In this example, typing 192.168.1.177 into your browser’s address bar should display a page showing the values on analog input pins 0 through 6 (see Chapter 5 for more on the analog ports).
As described in this chapter’s introduction, 192.168.1.177 is a local address that is only visible on your local network. If you want to expose your web server to the entire Internet, you will need to configure your router to forward incoming messages to Arduino. The technique is called port forwarding and you will need to consult the documentation for your router to see how to set this up. (For more on port forwarding in general, see SSH, The Secure Shell: The Definitive Guide by Daniel J. Barrett, Richard E. Silverman, and Robert G. Byrnes; search for it on oreilly.com.)
Warning
Configuring your Arduino Ethernet board to be visible on the Internet makes the board accessible to anyone with the IP address. The Arduino Ethernet library does not offer secure connections, so be careful about the information you expose.
The two lines in setup
initialize the Ethernet library and configure your web server to the
IP address you provide. The loop
waits for and then processes each request received by the web
server:
EthernetClient client = server.available();
The client object here is
actually the web server—it processes messages for the IP address you
gave the server.
if (client) tests that the
client has been successfully started.
while (client.connected())
tests if the web server is connected to a client making
a request.
client.available() and client.read()
check if data is available, and read a byte if it is.
This is similar to Serial.available(),
discussed in Chapter 4, except the data
is coming from the Internet rather than the serial port. The code
reads data until it finds the first line with no data, signifying the
end of a request. An HTTP header is sent using the client.println commands followed by the printing of the values of
the analog ports.
15.7. Handling Incoming Web Requests
Problem
You want to control digital and analog outputs with Arduino acting as a web server. For example, you want to control the values of specific pins through parameters sent from your web browser.
Solution
This sketch reads requests sent from a browser and changes the values of digital and analog output ports as requested.
The URL (text received from a browser request) contains one or more fields starting with the word pin followed by a D for digital or A for analog and the pin number. The value for the pin follows an equals sign.
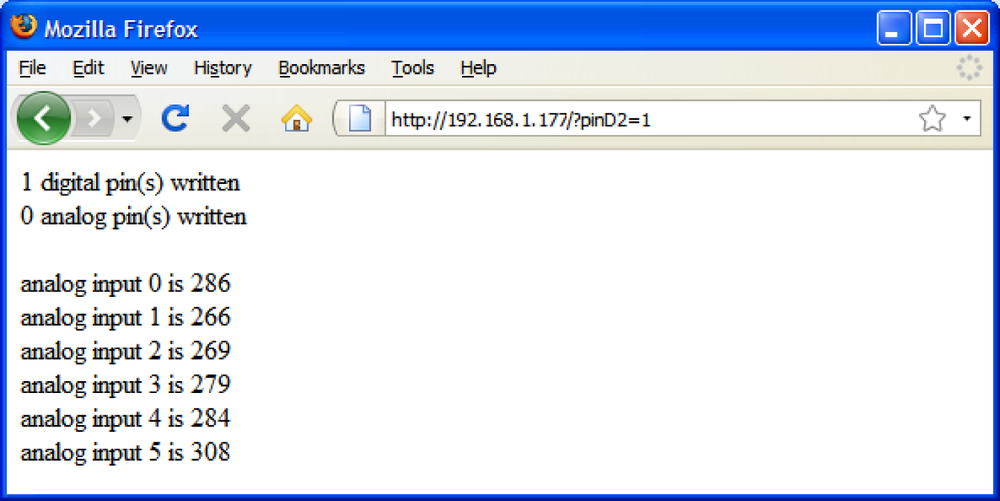
For example, sending http://192.168.1.177/?pinD2=1 from your browser’s address bar turns digital pin 2 on; http://192.168.1.177/?pinD2=0 turns pin 2 off. (See Chapter 7 if you need information on connecting LEDs to Arduino pins.)
Figure 15-1 shows what you will see on your web browser when connected to the web server code that follows.
/*
 * WebServerParsing
 * Respond to requests in the URL to change digital and analog output ports
 * show the number of ports changed and the value of the analog input pins.
 * for example:
 *   sending http://192.168.1.177/?pinD2=1 turns digital pin 2 on
 *   sending http://192.168.1.177/?pinD2=0 turns pin 2 off.
 * This sketch demonstrates text parsing using the 1.0 Stream class.
 */

#include <SPI.h>
#include <Ethernet.h>

byte mac[] = { 0xDE, 0xAD, 0xBE, 0xEF, 0xFE, 0xED };
byte ip[] = { 192,168,1,177 };

EthernetServer server(80);

void setup()
{
  Serial.begin(9600);
  Ethernet.begin(mac, ip);
  server.begin();
  Serial.println("ready");
}

void loop()
{
  EthernetClient client = server.available();
  if (client) {
    while (client.connected()) {
      if (client.available()) {
        // counters to show the number of pin change requests
        int digitalRequests = 0;
        int analogRequests = 0;
        if( client.find("GET /") ) {  // search for 'GET'
          // find tokens starting with "pin" and stop on the first blank line
          // search to the end of line for 'pin'
          while(client.findUntil("pin", "

")){
            char type = client.read(); // D or A
            // the next ascii integer value in the stream is the pin
            int pin = client.parseInt();
            int val = client.parseInt(); // the integer after that is the value
            if( type == 'D') {
              Serial.print("Digital pin ");
              pinMode(pin, OUTPUT);
              digitalWrite(pin, val);
              digitalRequests++;
            }
            else if( type == 'A'){
              Serial.print("Analog pin ");
              analogWrite(pin, val);
              analogRequests++;
            }
            else {
              Serial.print("Unexpected type ");
              Serial.print(type);
            }
            Serial.print(pin);
            Serial.print("=");
            Serial.println(val);
          }
        }
        Serial.println();

        // the findUntil has detected the blank line (a lf followed by cr)
        // so the http request has ended and we can send a reply
        // send a standard http response header
        client.println("HTTP/1.1 200 OK");
        client.println("Content-Type: text/html");
        client.println();

        // output the number of pins handled by the request
        client.print(digitalRequests);
        client.print(" digital pin(s) written");
        client.println("<br />");
        client.print(analogRequests);
        client.print(" analog pin(s) written");
        client.println("<br />");
        client.println("<br />");


        // output the value of each analog input pin
        for (int i = 0; i < 6; i++) {
          client.print("analog input ");
          client.print(i);
          client.print(" is ");
          client.print(analogRead(i));
          client.println("<br />");
        }
        break;
      }
    }
    // give the web browser time to receive the data
    delay(1);
    client.stop();
  }
}
Discussion
This is what was sent:
http://192.168.1.177/?pinD2=1. Here is how the
information is broken down: Everything before the question mark is
treated as the address of the web server (192.168.1.177 in this
example; this address is the IP address set at the top of the sketch
for the Arduino board). The remaining data is a list of fields, each
beginning with the word pin followed by a
D indicating a digital pin or
A indicating an analog pin. The numeric value
following the D or A is the
pin number. This is followed by an equals sign and finally the value
you want to set the pin to. pinD2=1
sets digital pin 2 HIGH. There is
one field per pin, and subsequent fields are separated by an
ampersand. You can have as many fields as there are Arduino pins you
want to change.
The request can be extended to handle multiple parameters by using ampersands to separate multiple fields. For example:
| http://192.168.1.177/?pinD2=1&pinD3=0&pinA9=128&pinA11=255 |
Each field within the ampersand is handled as described earlier. You can have as many fields as there are Arduino pins you want to change.
15.8. Handling Incoming Requests for Specific Pages
Problem
You want to have more than one page on your web server; for example, to show the status of different sensors on different pages.
Solution
This sketch looks for requests for pages named “analog” or “digital” and displays the pin values accordingly:
/*
 * WebServerMultiPage
 * Respond to requests in the URL to view digital and analog output ports
 * http://192.168.1.177/analog/   displays analog pin data
 * http://192.168.1.177/digital/  displays digital pin data
 */

#include <SPI.h>
#include <Ethernet.h>

byte mac[] = { 0xDE, 0xAD, 0xBE, 0xEF, 0xFE, 0xED };
byte ip[] =  { 192,168,1,177 };

const int MAX_PAGE_NAME_LEN = 8;  // max characters in a page name
char buffer[MAX_PAGE_NAME_LEN+1];  // page name + terminating null

EthernetServer server(80);
EthernetClient client;

void setup()
{
  Serial.begin(9600);
  Ethernet.begin(mac, ip);
  server.begin();
  Serial.println("Ready");
}

void loop()
{
  client = server.available();
  if (client) {
    while (client.connected()) {
      if (client.available()) {
        if( client.find("GET ") ) {
          // look for the page name
          memset(buffer,0, sizeof(buffer)); // clear the buffer
          if(client.find( "/"))
            if(client.readBytesUntil('/', buffer, MAX_PAGE_NAME_LEN ))
            {
              if(strcmp(buffer, "analog") == 0)
                showAnalog();
              else if(strcmp(buffer, "digital") == 0)
                showDigital();
              else
                unknownPage(buffer);
            }
        }
        Serial.println();
        break;
      }
    }
    // give the web browser time to receive the data
    delay(1);
    client.stop();
  }
}

void showAnalog()
{
  Serial.println("analog");
  sendHeader();
  client.println("<h1>Analog Pins</h1>");
  // output the value of each analog input pin

    for (int i = 0; i < 6; i++) {
    client.print("analog pin ");
    client.print(i);
    client.print(" = ");
    client.print(analogRead(i));
    client.println("<br />");
  }
}

void showDigital()
{
  Serial.println("digital");
  sendHeader();
  client.println("<h1>Digital Pins</h1>");
  // show the value of digital pins
  for (int i = 2; i < 8; i++) {
    pinMode(i, INPUT);
    client.print("digital pin ");
    client.print(i);
    client.print(" is ");
    if(digitalRead(i) == LOW)
      client.print("LOW");
    else
      client.print("HIGH");
    client.println("<br />");
  }
  client.println("</body></html>");
}

void unknownPage(char *page)
{
  sendHeader();
  client.println("<h1>Unknown Page</h1>");
  client.print(page);
  client.println("<br />");
  client.println("Recognized pages are:<br />");
  client.println("/analog/<br />");
  client.println("/digital/<br />");
  client.println("</body></html>");
}

void sendHeader()
{
  // send a standard http response header
  client.println("HTTP/1.1 200 OK");
  client.println("Content-Type: text/html");
  client.println();
  client.println("<html><head><title>Web server multi-page Example</title>");
  client.println("<body>");
}
Discussion
You can test this from your web browser by typing http://192.168.1.177/analog/ or http://192.168.1.177/digital/ (if you are using a different IP address for your web server, change the URL to match).
Figure 15-2 shows the expected output.
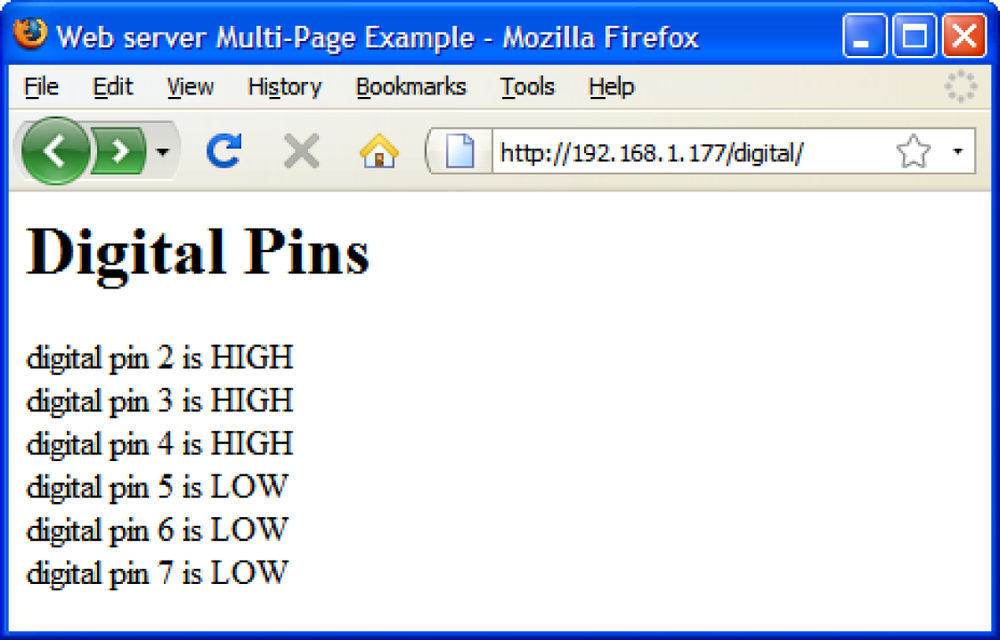
The sketch looks for the “/” character to determine the end of the page name. The server will report an unknown page if the “/” character does not terminate the page name.
You can easily enhance this with some code from Recipe 15.7 to allow control of
Arduino pins from another page named update. Here is the new loop code:
void loop()
{
  client = server.available();
  if (client) {
    while (client.connected()) {
      if (client.available()) {
        if( client.find("GET ") ) {
          // look for the page name
          memset(buffer,0, sizeof(buffer)); // clear the buffer
          if(client.find( "/"))
            if(client.readBytesUntil('/', buffer, MAX_PAGE_NAME_LEN ))
            {
              if(strcmp(buffer, "analog") == 0)
                showAnalog();
              else if(strcmp(buffer, "digital") == 0)
                showDigital();
              // add this code for new page named: update
              else if(strcmp(buffer, "update") == 0)
                doUpdate();
              else
                unknownPage(buffer);
            }
        }
        Serial.println();
        break;
      }
    }
    // give the web browser time to receive the data
    delay(1);
    client.stop();
  }
}
Here is the doUpdate
function:
void doUpdate()
{
  Serial.println("update");
  sendHeader();
  // find tokens starting with "pin" and stop on the first blank line
  while(client.findUntil("pin", "

")){
    char type = client.read(); // D or A
    int pin = client.parseInt();
    int val = client.parseInt();
    if( type == 'D') {
      Serial.print("Digital pin ");
      pinMode(pin, OUTPUT);
      digitalWrite(pin, val);

    }
    else if( type == 'A'){
      Serial.print("Analog pin ");
      analogWrite(pin, val);

    }
    else {
      Serial.print("Unexpected type ");
      Serial.print(type);
    }
    Serial.print(pin);
    Serial.print("=");
    Serial.println(val);
  }
}
Sending
http://192.168.1.177/update/?pinA5=128 from your
browser’s address bar writes the value 128 to analog output pin 5.
15.9. Using HTML to Format Web Server Responses
Problem
You want to use HTML elements such as tables and images to improve the look of web pages served by Arduino. For example, you want the output from Recipe 15.8 to be rendered in an HTML table.
Solution
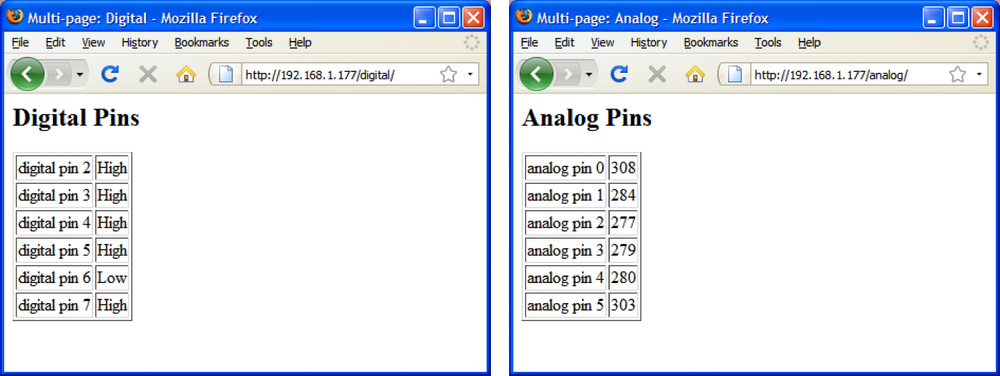
Figure 15-3 shows how the web server in this recipe’s Solution formats the browser page to display pin values. (You can compare this to the unformatted values shown in Figure 15-2.)
This sketch shows the functionality from Recipe 15.8 with output formatted using HTML:
/*
 * WebServerMultiPageHTML
 * Arduino 1.0 version
 * Display analog and digital pin values using HTML formatting
 */

#include <SPI.h>         // needed for Arduino versions later than 0018
#include <Ethernet.h>

byte mac[] = { 0xDE, 0xAD, 0xBE, 0xEF, 0xFE, 0xED };
byte ip[] =  { 192,168,1,177 };

// Buffer must be big enough to hold requested page names and terminating null
const int MAX_PAGE_NAME_LEN = 8+1;  // max characters in a page name + null
char buffer[MAX_PAGE_NAME_LEN];

EthernetServer server(80);
EthernetClient client;

void setup()
{
  Serial.begin(9600);

  Ethernet.begin(mac, ip);
  server.begin();
  pinMode(13,OUTPUT);
  for(int i=0; i < 3; i++)
  {
     digitalWrite(13,HIGH);
     delay(500);
     digitalWrite(13,LOW);
     delay(500);
  }
}

void loop()
{
  client = server.available();
  if (client) {
    while (client.connected()) {
      if (client.available()) {
        if( client.find("GET ") ) {
          // look for the page name
          memset(buffer,0, sizeof(buffer)); // clear the buffer
          if(client.find( "/"))
            if(client.readBytesUntil('/', buffer, MAX_PAGE_NAME_LEN ))
            {
              if(strcasecmp(buffer, "analog") == 0)
                showAnalog();
              else if(strcasecmp(buffer, "digital") == 0)
                showDigital();
              else
                unknownPage(buffer);
            }
        }
        break;
      }
    }
    // give the web browser time to receive the data
    delay(1);
    client.stop();
  }
}

void showAnalog()
{
  sendHeader("Multi-page: Analog");
  client.println("<h2>Analog Pins</h2>");
  client.println("<table border='1' >");
  for (int i = 0; i < 6; i++) {
    // output the value of each analog input pin
    client.print("<tr><td>analog pin ");
    client.print(i);
    client.print(" </td><td>");
    client.print(analogRead(i));
    client.println("</td></tr>");
  }
  client.println("</table>");
  client.println("</body></html>");
}

void showDigital()
{
  sendHeader("Multi-page: Digital");
  client.println("<h2>Digital Pins</h2>");
  client.println("<table border='1'>");
  for (int i = 2; i < 8; i++) {
    // show the value of digital pins
    pinMode(i, INPUT);
    digitalWrite(i, HIGH); // turn on pull-ups
    client.print("<tr><td>digital pin ");
    client.print(i);
    client.print(" </td><td>");
    if(digitalRead(i) == LOW)
      client.print("Low");
    else
      client.print("High");
    client.println("</td></tr>");
  }
  client.println("</table>");
  client.println("</body></html>");
}

void unknownPage(char *page)
{
  sendHeader("Unknown Page");
  client.println("<h1>Unknown Page</h1>");
  client.print(page);
  client.println("<br />");
  client.println("Recognized pages are:<br />");
  client.println("/analog/<br />");
  client.println("/digital/<br />");
  client.println("</body></html>");
}

void sendHeader(char *title)
{
  // send a standard http response header
  client.println("HTTP/1.1 200 OK");
  client.println("Content-Type: text/html");
  client.println();
  client.print("<html><head><title>");
  client.println(title);
  client.println("</title><body>");
}
Discussion
The same information is provided as in Recipe 15.8, but here the data is formatted using an HTML table. The following code indicates that the web browser should create a table with a border width of 1:
client.println("<table border='1' >");The for loop defines the
table data cells with the <td> tag and
the row entries with the <tr> tag. The
following code places the string "analog
pin" in a cell starting on a new row:
client.print("<tr><td>analog pin ");This is followed by the value of the variable i:
client.print(i);
The next line contains the tag that closes the cell and begins a new cell:
client.print(" </td><td>");This writes the value returned from analogRead into the cell:
client.print(analogRead(i));
The tags to end the cell and end the row are written as follows:
client.println("</td></tr>");The for loop repeats this
until all six analog values are written. Any of the books mentioned in
Series 1 configuration or one of the many HTML
reference sites can provide more details on HTML tags.
See Also
Learning Web Design by Jennifer Niederst Robbins (O’Reilly)
Web Design in a Nutshell by Jennifer Niederst Robbins (O’Reilly)
HTML & XHTML: The Definitive Guide by Chuck Musciano and Bill Kennedy (O’Reilly)
(Search for O’Reilly titles on oreilly.com.)
15.10. Serving Web Pages Using Forms (POST)
Problem
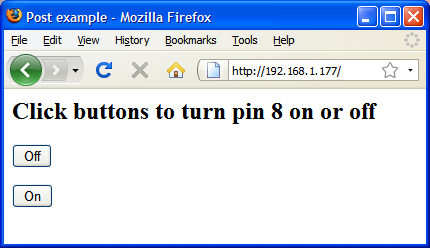
You want to create web pages with forms that allow users to select an action to be performed by Arduino. Figure 15-4 shows the web page created by this recipe’s Solution.
Solution
This sketch creates a web page that has a form with buttons. Users navigating to this page will see the buttons in the web browser and the Arduino web server will respond to the button clicks. In this example, the sketch turns a pin on and off depending on which button is pressed:
/*
 * WebServerPost sketch
 * Turns pin 8 on and off using HTML form
 */

#include <SPI.h>
#include <Ethernet.h>

byte mac[] = { 0xDE, 0xAD, 0xBE, 0xEF, 0xFE, 0xED };
byte ip[] =  { 192,168,1,177 };

const int MAX_PAGENAME_LEN = 8; // max characters in page name
char buffer[MAX_PAGENAME_LEN+1]; // additional character for terminating null

EthernetServer server(80);

void setup()
{
  Serial.begin(9600);
  Ethernet.begin(mac, ip);
  server.begin();
  delay(2000);
}

void loop()
{
  EthernetClient client = server.available();
  if (client) {
    int type = 0;
    while (client.connected()) {
           if (client.available()) {
        // GET, POST, or HEAD
        memset(buffer,0, sizeof(buffer)); // clear the buffer
        if(client.find("/"))
          if(client.readBytesUntil('/', buffer,sizeof(buffer))){
            Serial.println(buffer);
            if(strcmp(buffer,"POST ") == 0){
              client.find("

"); // skip to the body
              // find string starting with "pin", stop on first blank line
              // the POST parameters expected in the form pinDx=Y
              // where x is the pin number and Y is 0 for LOW and 1 for HIGH
              while(client.findUntil("pinD", "

")){
                int pin = client.parseInt();       // the pin number
                int val = client.parseInt();       // 0 or 1
                pinMode(pin, OUTPUT);
                digitalWrite(pin, val);
              }
            }
            sendHeader(client,"Post example");
            //create HTML button to control pin 8
            client.println("<h2>Click buttons to turn pin 8 on or off</h2>");
            client.print(
            "<form action='/' method='POST'><p><input type='hidden' name='pinD8'");
            client.println(" value='0'><input type='submit' value='Off'/></form>");
            //create HTML button to turn on pin 8
            client.print(
            "<form action='/' method='POST'><p><input type='hidden' name='pinD8'");
            client.print(" value='1'><input type='submit' value='On'/></form>");
            client.println("</body></html>");
            client.stop();
          }
        break;
      }
    }
    // give the web browser time to receive the data
    delay(1);
    client.stop();
  }
}
void sendHeader(EthernetClient client, char *title)
{
  // send a standard http response header
  client.println("HTTP/1.1 200 OK");
  client.println("Content-Type: text/html");
  client.println();
  client.print("<html><head><title>");
  client.print(title);
  client.println("</title><body>");
}
Discussion
A web page with a user interface form consists of HTML tags that identify the controls (buttons, checkboxes, labels, etc.) that comprise the user interface. This recipe uses buttons for user interaction.
These lines create a form with a button named pinD8 that is labeled “OFF,” which will send
back a value of 0 (zero) when
clicked:
client.print("<form action='/' method='POST'><p><input type='hidden' name='pinD8'");
client.println(" value='0'><input type='submit' value='Off'/></form>");
When the server receives a request from a browser, it looks for
the "POST " string to identify the
start of the posted form:
if (strcmp(buffer,"POST ") == 0) // find the start of the posted form

   client.find("

"); // skip to the body
   // find parameters starting with "pin" and stop on the first blank line
   // the POST parameters expected in the form pinDx=Y
   // where x is the pin number and Y is 0 for LOW and 1 for HIGH
If the OFF button was pressed, the received page will contain
the string pinD8=0, or pinD8=1 for the ON button.
The sketch searches until it finds the button name (pinD):
while(client.findUntil("pinD", "

"))
The findUntil method in the preceding code will search for “pinD” and
stop searching at the end of a line (
is the newline carriage return sent by
the web browser at the end of a form).
The number following the name pinD is the pin number:
int pin = client.parseInt(); // the pin number
And the value following the pin number will be 0 if button OFF was pressed or 1 if button ON was pressed:
int val = client.parseInt(); // 0 or 1
The value received is written to the pin after setting the pin mode to output:
pinMode(pin, OUTPUT);
	digitalWrite(pin, val);
More buttons can be added by inserting tags for the additional controls. The following lines add another button to turn on digital pin 9:
//create HTML button to turn on pin 9
client.print("<form action='/' method='POST'><p><input type='hidden' name='pinD9'");
client.print(" value='1'><input type='submit' value='On'/></form>");
15.11. Serving Web Pages Containing Large Amounts of Data
Problem
Your web pages require more memory than you have available, so you want to use program memory (also known as progmem or flash memory) to store data (see Recipe 17.4).
Solution
This sketch combines the POST
code from Recipe 15.10 with
the HTML code from Recipe 15.9 and adds new code
to access text stored in progmem. As in Recipe 15.9, the server can
display analog and digital pin status and turn digital pins on
and off (see Figure 15-5).
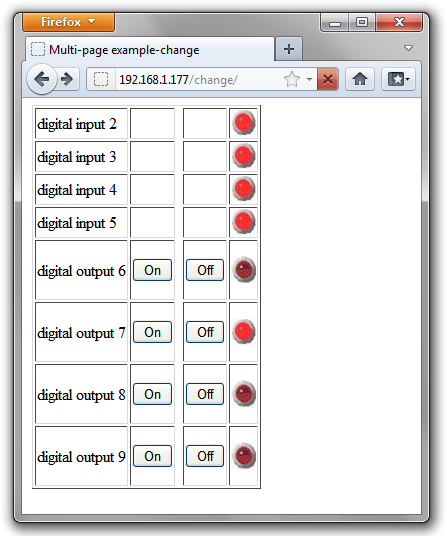
/*
* WebServerMultiPageHTMLProgmem sketch
*
* Respond to requests in the URL to change digital and analog output ports
* show the number of ports changed and the value of the analog input pins.
*
* http://192.168.1.177/analog/ displays analog pin data
* http://192.168.1.177/digital/ displays digital pin data
* http://192.168.1.177/change/ allows changing digital pin data
*
*/
#include <SPI.h> // needed for Arduino versions later than 0018
#include <Ethernet.h>
#include <avr/pgmspace.h> // for progmem
#define P(name) static const prog_uchar name[] PROGMEM // declare a static string
byte mac[] = { 0xDE, 0xAD, 0xBE, 0xEF, 0xFE, 0xED };
byte ip[] = { 192,168,1,177 };
const int MAX_PAGENAME_LEN = 8; // max characters in page name
char buffer[MAX_PAGENAME_LEN+1]; // additional character for terminating null
EthernetServer server(80);
EthernetClient client;
void setup()
{
Serial.begin(9600);
Ethernet.begin(mac, ip);
server.begin();
delay(1000);
Serial.println(F("Ready"));
}
void loop()
{
client = server.available();
if (client) {
int type = 0;
while (client.connected()) {
if (client.available()) {
// GET, POST, or HEAD
memset(buffer,0, sizeof(buffer)); // clear the buffer
if(client.readBytesUntil('/', buffer,MAX_PAGENAME_LEN)){
if(strcmp(buffer, "GET ") == 0 )
type = 1;
else if(strcmp(buffer,"POST ") == 0)
type = 2;
// look for the page name
memset(buffer,0, sizeof(buffer)); // clear the buffer
if(client.readBytesUntil( '/', buffer,MAX_PAGENAME_LEN ))
{
if(strcasecmp(buffer, "analog") == 0)
showAnalog();
else if(strcasecmp(buffer, "digital") == 0)
showDigital();
else if(strcmp(buffer, "change")== 0)
showChange(type == 2);
else
unknownPage(buffer);
}
}
break;
}
}
// give the web browser time to receive the data
delay(1);
client.stop();
}
}
void showAnalog()
{
Serial.println(F("analog"));
sendHeader("Multi-page example-Analog");
client.println("<h1>Analog Pins</h1>");
// output the value of each analog input pin
client.println(F("<table border='1' >"));
for (int i = 0; i < 6; i++) {
client.print(F("<tr><td>analog pin "));
client.print(i);
client.print(F(" </td><td>"));
client.print(analogRead(i));
client.println(F("</td></tr>"));
}
client.println(F("</table>"));
client.println(F("</body></html>"));
}
// mime encoded data for the led on and off images:
// see: http://www.motobit.com/util/base64-decoder-encoder.asp
P(led_on) = "<img src="data:image/jpg;base64,"
"/9j/4AAQSkZJRgABAgAAZABkAAD/7AARRHVja3kAAQAEAAAAHgAA/+4ADkFkb2JlAGTAAAAAAf/b"
"AIQAEAsLCwwLEAwMEBcPDQ8XGxQQEBQbHxcXFxcXHx4XGhoaGhceHiMlJyUjHi8vMzMvL0BAQEBA"
"QEBAQEBAQEBAQAERDw8RExEVEhIVFBEUERQaFBYWFBomGhocGhomMCMeHh4eIzArLicnJy4rNTUw"
"MDU1QEA/QEBAQEBAQEBAQEBA/8AAEQgAGwAZAwEiAAIRAQMRAf/EAIIAAAICAwAAAAAAAAAAAAAA"
"AAUGAAcCAwQBAAMBAAAAAAAAAAAAAAAAAAACBAUQAAECBAQBCgcAAAAAAAAAAAECAwARMRIhQQQF"
"UWFxkaHRMoITUwYiQnKSIxQ1EQAAAwYEBwAAAAAAAAAAAAAAARECEgMTBBQhQWEiMVGBMkJiJP/a"
"AAwDAQACEQMRAD8AcNz3BGibKie0nhC0v3A+teKJt8JmZEdHuZalOitgUoHnEpQEWtSyLqgACWFI"
"nixWiaQhsUFFBiQSbiMvvrmeCBp27eLnG7lFTDxs+Kra8oOyium3ltJUAcDIy4EUMN/7Dnq9cPMO"
"W90E9kxeyF2d3HFOQ175olKudUm7TqlfKqDQEDOFR1sNqtC7k5ERYjndNPFSArtvnI/nV+ed9coI"
"ktd2BgozrSZO3J5jVEXRcwD2bbXNdq0zT+BohTyjgPp5SYdPJZ9NP2jsiIz7vhjLohtjnqJ/ouPK"
"co//2Q=="
""/>";
P(led_off) = "<img src="data:image/jpg;base64,"
"/9j/4AAQSkZJRgABAgAAZABkAAD/7AARRHVja3kAAQAEAAAAHgAA/+4ADkFkb2JlAGTAAAAAAf/b"
"AIQAEAsLCwwLEAwMEBcPDQ8XGxQQEBQbHxcXFxcXHx4XGhoaGhceHiMlJyUjHi8vMzMvL0BAQEBA"
"QEBAQEBAQEBAQAERDw8RExEVEhIVFBEUERQaFBYWFBomGhocGhomMCMeHh4eIzArLicnJy4rNTUw"
"MDU1QEA/QEBAQEBAQEBAQEBA/8AAEQgAHAAZAwEiAAIRAQMRAf/EAHgAAQEAAwAAAAAAAAAAAAAA"
"AAYFAgQHAQEBAQAAAAAAAAAAAAAAAAACAQQQAAECBQAHBQkAAAAAAAAAAAECAwAREhMEITFhoSIF"
"FUFR0UIGgZHBMlIjM1MWEQABAwQDAQEAAAAAAAAAAAABABECIWESA1ETIyIE/9oADAMBAAIRAxEA"
"PwBvl5SWEkkylpJMGsj1XjXSE1kCQuJ8Iy9W5DoxradFa6VDf8IJZAQ6loNtBooTJaqp3DP5oBlV"
"nWrTpEouQS/Cf4PO0uKbqWHGXTSlztSvuVFiZjmfLH3GUuMkzSoTMu8aiNsXet5/17hFyo6PR64V"
"ZnuqfqDDDySFpNpYH3E6aFjzGBr2DkMuFBSFDsWkilUdLftW13pWpcdWqnbBzI/l6hVXKZlROUSe"
"L1KX5zvAPXESjdHsTFWpxLKOJ54hIA1DZCj+Vx/3r96fCNrkvRaT0+V3zV/llplr9sVeHZui/ONk"
"H3dzt6cL/9k="
""/>";
;
void showDigital()
{
Serial.println(F("digital"));
sendHeader("Multi-page example-Digital");
client.println(F("<h2>Digital Pins</h2>"));
// show the value of digital pins
client.println(F("<table border='1'>"));
for (int i = 2; i < 8; i++) {
pinMode(i, INPUT);
digitalWrite(i, HIGH); // turn on pull-ups
client.print(F("<tr><td>digital pin "));
client.print(i);
client.print(F(" </td><td>"));
if(digitalRead(i) == LOW)
printP(led_off);
else
printP(led_on);
client.println(F("</td></tr>"));
}
client.println(F("</table>"));
client.println(F("</body></html>"));
}
void showChange(boolean isPost)
{
Serial.println(F("change"));
if(isPost)
{
Serial.println("isPost");
client.find("
"); // skip to the body
// find parameters starting with "pin" and stop on the first blank line
Serial.println(F("searching for parms"));
while(client.findUntil("pinD", "
")){
int pin = client.parseInt(); // the pin number
int val = client.parseInt(); // 0 or 1
Serial.print(pin);
Serial.print("=");
Serial.println(val);
pinMode(pin, OUTPUT);
digitalWrite(pin, val);
}
}
sendHeader("Multi-page example-change");
// table with buttons from 2 through 9
// 2 to 5 are inputs, the other buttons are outputs
client.println(F("<table border='1'>"));
// show the input pins
for (int i = 2; i < 6; i++) { // pins 2-5 are inputs
pinMode(i, INPUT);
digitalWrite(i, HIGH); // turn on pull-ups
client.print(F("<tr><td>digital input "));
client.print(i);
client.print(F(" </td><td>"));
client.print(F("  </td><td>"));
client.print(F(" </td><td>"));
client.print(F("  </td><td>"));
if(digitalRead(i) == LOW)
//client.print("Low");
printP(led_off);
else
//client.print("high");
printP(led_on);
client.println("</td></tr>");
}
// show output pins 6-9
// note pins 10-13 are used by the ethernet shield
for (int i = 6; i < 10; i++) {
client.print(F("<tr><td>digital output "));
client.print(i);
client.print(F(" </td><td>"));
htmlButton( "On", "pinD", i, "1");
client.print(F(" </td><td>"));
client.print(F(" </td><td>"));
htmlButton("Off", "pinD", i, "0");
client.print(F(" </td><td>"));
if(digitalRead(i) == LOW)
//client.print("Low");
printP(led_off);
else
//client.print("high");
printP(led_on);
client.println(F("</td></tr>"));
}
client.println(F("</table>"));
}
// create an HTML button
void htmlButton( char * label, char *name, int nameId, char *value)
{
client.print(F("<form action='/change/' method='POST'><p><input type='hidden' name='"));
client.print(name);
client.print(nameId);
client.print(F("' value='"));
client.print(value);
client.print(F("'><input type='submit' value='"));
client.print(label);
client.print(F("'/></form>"));
}
void unknownPage(char *page)
{
Serial.print(F("Unknown : "));
Serial.println(F("page"));
sendHeader("Unknown Page");
client.println(F("<h1>Unknown Page</h1>"));
client.println(page);
client.println(F("</body></html>"));
}
void sendHeader(char *title)
{
// send a standard http response header
client.println(F("HTTP/1.1 200 OK"));
client.println(F("Content-Type: text/html"));
client.println();
client.print(F("<html><head><title>"));
client.println(title);
client.println(F("</title><body>"));
}
void printP(const prog_uchar *str)
{
// copy data out of program memory into local storage, write out in
// chunks of 32 bytes to avoid extra short TCP/IP packets
// from webduino library Copyright 2009 Ben Combee, Ran Talbott
uint8_t buffer[32];
size_t bufferEnd = 0;
while (buffer[bufferEnd++] = pgm_read_byte(str++))
{
if (bufferEnd == 32)
{
client.write(buffer, 32);
bufferEnd = 0;
}
}
// write out everything left but trailing NUL
if (bufferEnd > 1)
client.write(buffer, bufferEnd - 1);
}
Discussion
The logic used to create the web page is similar to that used in the previous recipes. The form here is based on Recipe 15.10, but it has more elements in the table and uses embedded graphical objects to represent the state of the pins. If you have ever created a web page, you may be familiar with the use of JPEG images within the page. The Arduino Ethernet libraries do not have the capability to handle images in .jpg format.
Images need to be encoded using one of the Internet standards such as Multipurpose Internet Mail Extensions (MIME). This provides a way to represent graphical (or other) media using text. The sketch in this recipe’s Solution shows what the LED images look like when they are MIME-encoded. Many web-based services will MIME-encode your images; the ones in this recipe were created using the service at http://www.motobit.com/util/base64-decoder-encoder.asp.
Even the small LED images used in this example are too large to
fit into Arduino RAM. Program memory (flash) is used; see Recipe 17.3 for an explanation
of the P(name) expression.
The images representing the LED on and off states are stored in a sequence of characters; the LED on array begins like this:
P(led_on) = "<img src="data:image/jpg;base64,"
P(led_on) = defines led_on as the name of this array. The
characters are the HTML tags identifying an image followed by the
MIME-encoded data comprising the image.
This example is based on code produced for the Webduino web server. Webduino is highly recommended for building web pages if your application is more complicated than the examples shown in this chapter.
See Also
See Recipe 17.4 for
more on using the F("text")
construct for storing text in flash memory.
Webduino web page: http://code.google.com/p/webduino/
15.12. Sending Twitter Messages
Problem
You want Arduino to send messages to Twitter; for example, when a sensor detects some activity that you want to monitor via Twitter.
Solution
This sketch sends a Twitter message when a switch is closed. It
uses a proxy at: http://www.thingspeak.com to
provide authorization so you will need to register on that site to get
a (free) API key. Click on the Sign Up button on the home page and
fill in the form (your desired user ID, email, time zone, and
password). Clicking the Create Account button will get you a
ThingSpeak API key. To use the ThingSpeak service, you’ll need to
authorize your Twitter account to allow ThingTweet to post messages to
your account. After that is set up, replace "YourThingTweetAPIKey" with the key string
you are given and upload and run the following sketch:
/*
 * Send tweet when switch on pin 2 is pressed
 * uses api.thingspeak.com  as a Twitter proxy
 * see: http://community.thingspeak.com/documentation/apps/thingtweet/
 */

#include <SPI.h>
#include <Ethernet.h>

byte mac[] = { 0xDE, 0xAD, 0xBE, 0xEF, 0xFE, 0xED };
byte server[]  = { 184, 106, 153, 149 };  // IP Address for the ThingSpeak API

char *thingtweetAPIKey = "YourThingTweetAPIKey";  // your ThingTweet API key

EthernetClient client;

boolean MsgSent = false;
const int Sensor = 2;

void setup()
{
  Serial.begin(9600);
  if (Ethernet.begin(mac) == 0) { // start ethernet using mac & DHCP address
    Serial.println("Failed to configure Ethernet using DHCP");
    while(true)   // no point in carrying on, so stay in endless loop:
      ;
  }
  pinMode(Sensor, INPUT);
  digitalWrite(Sensor, HIGH);  //turn on  pull-up resistors
  delay(1000);
  Serial.println("Ready");
}

void loop()
{
  if(digitalRead(Sensor) == LOW)
  { // here if mailbox is open

    if(MsgSent == false){ // check if message already sent
       MsgSent = sendMessage("Mail has been delivered");
       if(MsgSent)
           Serial.println("tweeted successfully");
       else
           Serial.println("Unable tweet");
    }
  }
  else{
      MsgSent = false;  // door closed so reset the state
  }
  delay(100);
}

boolean sendMessage( char *message)
{
boolean result = false;

  const int tagLen = 16; // the number of tag character used to frame the message
  int msgLen = strlen(message) + tagLen + strlen(thingtweetAPIKey);
  Serial.println("connecting ...");
  if (client.connect(server, 80) ) {
    Serial.println("making POST request...");
    client.print("POST /apps/thingtweet/1/statuses/update HTTP/1.1
");
    client.print("Host: api.thingspeak.com
");
    client.print("Connection: close
");
    client.print("Content-Type: application/x-www-form-urlencoded
");
    client.print("Content-Length: ");
    client.print(msgLen);
    client.print("

");
    client.print("api_key=");          // msg tag
    client.print(thingtweetAPIKey);    // api key
    client.print("&status=");          // msg tag
    client.print(message);             // the message
    client.println("
");
  }
  else {
    Serial.println("Connection failed");
  }
  // response string
  if (client.connected()) {
    Serial.println("Connected");
    if(client.find("HTTP/1.1") && client.find("200 OK") ){
       result = true;
    }
    else
       Serial.println("Dropping connection - no 200 OK");
  }
  else {
    Serial.println("Disconnected");
  }
  client.stop();
  client.flush();

  return result;
}
Discussion
The sketch waits for a pin to go LOW and then posts your message to Twitter
via the ThingTweet API.
The web interface is handled by the sendMessage(); function, which will tweet
the given message string. In this sketch it attempts to send the
message string “Mail has been delivered” to Twitter and returns
true if it is able to
connect.
See the documentation on the ThingTweet web site for more details: http://community.thingspeak.com/documentation/apps/thingtweet/
The following version uses the same sendMessage function
but can monitor an array of sensors:
/*
 * Send tweet selected by multiple sensors
 * uses api.thingspeak.com  as a Twitter proxy
 * see: http://community.thingspeak.com/documentation/apps/thingtweet/
 */

#include <SPI.h>
#include <Ethernet.h>

byte mac[] = { 0xDE, 0xAD, 0xBE, 0xEF, 0xFE, 0xED };
byte server[]  = { 184, 106, 153, 149 };  // IP Address for the ThingSpeak API

char *thingtweetAPIKey = "YourThingTweetAPIKey";  // your ThingTweet API key

EthernetClient client;
boolean MsgSent = false;

char frontOpen[] = "The front door was opened";
char backOpen[] = "The back door was opened";

const int frontSensor = 2;  // sensor pins
const int backSensor  = 3;

boolean frontMsgSent = false;
boolean backMsgSent = false;

void setup()
{
//  Ethernet.begin(mac,ip);
  Serial.begin(9600);
  if(Ethernet.begin(mac) == 0) { // start ethernet using mac & IP address
    Serial.println("Failed to configure Ethernet using DHCP");
    while(true)   // no point in carrying on, so stay in endless loop:
      ;
  }
  pinMode(frontSensor, INPUT);
  pinMode(backSensor, INPUT);
  digitalWrite(frontSensor, HIGH);  // pull-ups
  digitalWrite(backSensor, HIGH);
  delay(1000);
  Serial.println("ready");
}

void loop()
{
  if(digitalRead(frontSensor) == LOW)
  { // here if door is open
      if (frontMsgSent == false) { // check if message already sent
         frontMsgSent = sendMessage(frontOpen);
      }
  }
  else{
      frontMsgSent = false;  // door closed so reset the state
  }
  if(digitalRead(backSensor) == LOW)
  {
    if(frontMsgSent == false) {
       backMsgSent = sendMessage(backOpen);
    }
  }
  else {
      backMsgSent = false;
  }
  delay(100);
}

// add the sendMesage function from the sketch above
The code that communicates with Twitter is the same, but the message string here is constructed from the values read from sensors connected to two Arduino digital pins.
See Also
A ThingSpeak Arduino tutorial can be found here: http://community.thingspeak.com/tutorials/arduino/using-an-arduino-ethernet-shield-to-update-a-thingspeak-channel/
15.13. Sending and Receiving Simple Messages (UDP)
Solution
This sketch uses the Arduino UDP (User Datagram Protocol) library to send and receive strings. In this simple example, Arduino prints the received string to the Serial Monitor and a string is sent back to the sender saying “acknowledged”:
/*
 * UDPSendReceiveStrings
 * This sketch receives UDP message strings, prints them to the serial port
 * and sends an "acknowledge" string back to the sender
 * Use with Arduino 1.0
 *
 */

#include <SPI.h>         // needed for Arduino versions later than 0018
#include <Ethernet.h>
#include <EthernetUdp.h> // Arduino 1.0 UDP library

byte mac[] = { 0xDE, 0xAD, 0xBE, 0xEF, 0xFE, 0xED }; // MAC address to use
byte ip[] = {192, 168, 1, 177 };    // Arduino's IP address

unsigned int localPort = 8888;      // local port to listen on

// buffers for receiving and sending data
char packetBuffer[UDP_TX_PACKET_MAX_SIZE]; //buffer to hold incoming packet,
char replyBuffer[] = "acknowledged";       // a string to send back

// A UDP instance to let us send and receive packets over UDP
EthernetUDP Udp;

void setup() {
    // start the Ethernet and UDP:
  Ethernet.begin(mac,ip);
  Udp.begin(localPort);
  Serial.begin(9600);
}

void loop() {
  // if there's data available, read a packet
  int packetSize =  Udp.parsePacket();
  if(packetSize)
  {
    Serial.print("Received packet of size ");
    Serial.println(packetSize);

    // read packet into packetBuffer and get sender's IP addr and port number
    Udp.read(packetBuffer,UDP_TX_PACKET_MAX_SIZE);
    Serial.println("Contents:");
    Serial.println(packetBuffer);

    // send a string back to the sender
    Udp.beginPacket(Udp.remoteIP(), Udp.remotePort());
    Udp.write(replyBuffer);
    Udp.endPacket();
  }
  delay(10);
}
You can test this by running the following Processing sketch on your computer (see Chapter 4 for guidance on installing and running Processing):
// Processing UDP example to send and receive string data from Arduino
// press any key to send the "Hello Arduino" message

import hypermedia.net.*;

UDP udp;  // define the UDP object

void setup() {
  udp = new UDP( this, 6000 );  // create datagram connection on port 6000
  //udp.log( true );            // <-- print out the connection activity
  udp.listen( true );           // and wait for incoming message
}

void draw()
{
}

void keyPressed() {
 String ip       = "192.168.1.177";     // the remote IP address
 int port        = 8888;      // the destination port

 udp.send("Hello World", ip, port );    // the message to send
}

void receive( byte[] data ) {           // <-- default handler
//void receive( byte[] data, String ip, int port ) { // extended handler

 for(int i=0; i < data.length; i++)
     print(char(data[i]));
 println();
}
Discussion
Plug the Ethernet shield into Arduino and connect the Ethernet cable to your computer. Upload the Arduino sketch and run the Processing sketch on your computer. Hit any key to send the “hello Arduino” message. Arduino sends back “acknowledged,” which is displayed in the Processing text window. String length is limited by a constant set in the EthernetUdp.h library file; the default value is 24 bytes, but you can increase this by editing the following line in Udp.h if you want to send longer strings:
#define UDP_TX_PACKET_MAX_SIZE 24
UDP is a simple and fast way to send and receive messages over Ethernet. But it does have limitations—the messages are not guaranteed to be delivered, and on a very busy network some messages could get lost or get delivered in a different order than that in which they were sent. But UDP works well for things such as displaying the status of Arduino sensors—each message contains the current sensor value to display, and any lost messages get replaced by messages that follow.
This sketch demonstrates sending and receiving sensor messages. It receives messages containing values to be written to the analog output ports and replies back to the sender with the values on the analog input pins:
/*
 * UDPSendReceive sketch:
 */

#include <SPI.h>         // needed for Arduino versions later than 0018
#include <Ethernet.h>
#include <EthernetUDP.h>  // Arduino 1.0 UDP library

byte mac[] = { 0xDE, 0xAD, 0xBE, 0xEF, 0xFE, 0xED }; // MAC address to use
byte ip[] = {192, 168, 1, 177 };    // Arduino's IP address

unsigned int localPort = 8888;      // local port to listen on

char packetBuffer[UDP_TX_PACKET_MAX_SIZE]; //buffer to hold incoming packet,
int packetSize; // holds received packet size

const int analogOutPins[] = { 3,5,6,9};  // pins 10 and 11 used by ethernet shield

// A UDP instance to let us send and receive packets over UDP
EthernetUDP Udp;

void setup() {
  Ethernet.begin(mac,ip);
  Udp.begin(localPort);

  Serial.begin(9600);
  Serial.println("Ready");
}

void loop() {
  // if there's data available, read a packet
  packetSize = Udp.parsePacket();
  if(packetSize > 0 )
  {
    Serial.print("Received packet of size ");
    Serial.print(packetSize);
    Serial.println(" with contents:");
    // read packet into packetBuffer and get sender's IP addr and port number
    packetSize = min(packetSize,UDP_TX_PACKET_MAX_SIZE);
    Udp.read(packetBuffer,UDP_TX_PACKET_MAX_SIZE);

    for( int i=0; i < packetSize; i++)
    {
        byte value = packetBuffer[i];
        if( i < 4)
        {
           // only write to the first four analog out pins
           analogWrite(analogOutPins[i], value);
        }
        Serial.println(value, DEC);
    }
    Serial.println();
    // tell the sender the values of our analog ports
    sendAnalogValues(Udp.remoteIP(), Udp.remotePort());
  }
  //wait a bit
  delay(10);
}

void sendAnalogValues( IPAddress targetIp, unsigned int targetPort )
{
  int index = 0;
  for(int i=0; i < 6; i++)
  {
     int value = analogRead(i);

     packetBuffer[index++] = lowByte(value);  // the low byte);
     packetBuffer[index++] = highByte(value); // the high byte);   }
  }
  //send a packet back to the sender
  Udp.beginPacket(targetIp, targetPort);
  Udp.write(packetBuffer);
  Udp.endPacket();
}
The sketch sends and receives the values on analog ports 0 through 5 using binary data. If you are not familiar with messages containing binary data, see the introduction to Chapter 4, as well as Recipes 4.6 and 4.7, for a detailed discussion on how this is done on Arduino.
The difference here is that the data is sent using Udp.write instead of Serial.write.
Here is a Processing sketch you can use with the preceding
sketch. It has six scroll bars that can be dragged with a mouse to set
the six analogWrite levels; it
prints the received sensor data to the Processing text window:
// Processing UDPTest
// Demo sketch sends & receives data to Arduino using UDP

import hypermedia.net.*;

UDP udp;  // define the UDP object

HScrollbar[] scroll = new HScrollbar[6];  //see: topics/gui/scrollbar

void setup() {
  size(256, 200);
  noStroke();
  for(int i=0; i < 6; i++) // create the scroll bars
    scroll[i] = new HScrollbar(0, 10 + (height / 6) * i, width, 10, 3*5+1);

  udp = new UDP( this, 6000 );  // create datagram connection on port 6000
  //udp.log( true );            // print out the connection activity
  udp.listen( true );           // and wait for incoming message
}

void draw()
{
  background(255);
  fill(255);
  for(int i=0; i < 6; i++) {
    scroll[i].update();
    scroll[i].display();
  }
}

void keyPressed() {
  String ip       = "192.168.1.177";    // the remote IP address
  int port        = 8888;               // the destination port
  byte[] message = new byte[6] ;

  for (int i=0; i < 6; i++){
    message[i] = byte(scroll[i].getPos());
    println(int(message[i]));
  }
  println();
  udp.send( message, ip, port );

}

void receive( byte[] data ) {                           // <-- default handler
//void receive( byte[] data, String ip, int port ) {    // <-- extended handler

  println("incoming data is:");
  for(int i=0; i < 6; i++){
     scroll[i].setPos(data[i]);
     println((int)data[i]);
  }
}

class HScrollbar
{
  int swidth, sheight;    // width and height of bar
  int xpos, ypos;         // x and y position of bar
  float spos, newspos;    // x position of slider
  int sposMin, sposMax;   // max and min values of slider
  int loose;              // how loose/heavy
  boolean over;           // is the mouse over the slider?
  boolean locked;
  float ratio;

  HScrollbar (int xp, int yp, int sw, int sh, int l) {
    swidth = sw;
    sheight = sh;
    int widthtoheight = sw - sh;
    ratio = (float)sw / (float)widthtoheight;
    xpos = xp;
    ypos = yp-sheight/2;
    spos = xpos + swidth/2 - sheight/2;
    newspos = spos;
    sposMin = xpos;
    sposMax = xpos + swidth - sheight;
    loose = l;
  }

  void update() {
    if (over()) {
      over = true;
    } else {
      over = false;
    }
    if (mousePressed && over) {
      locked = true;
    }
    if (!mousePressed) {
      locked = false;
    }
    if (locked) {
      newspos = constrain(mouseX-sheight/2, sposMin, sposMax);
    }
    if(abs(newspos - spos) > 1) {
      spos = spos + (newspos-spos)/loose;
    }
  }

  int constrain(int val, int minv, int maxv) {
    return min(max(val, minv), maxv);
  }

  boolean over() {
    if (mouseX > xpos && mouseX < xpos+swidth &&
    mouseY > ypos && mouseY < ypos+sheight) {
      return true;
    } else {
      return false;
    }
  }

  void display() {
    fill(255);
    rect(xpos, ypos, swidth, sheight);
    if (over || locked) {
      fill(153, 102, 0);
    } else {
      fill(102, 102, 102);
    }
    rect(spos, ypos, sheight, sheight);
  }

  float getPos() {
    return spos * ratio;
  }

  void setPos(int value) {
    spos = value / ratio;
  }
}
15.14. Getting the Time from an Internet Time Server
Problem
You want to get the current time from an Internet time server; for example, to synchronize clock software running on Arduino.
Solution
This sketch gets the time from a Network Time Protocol (NTP) server and prints the results as seconds since January 1, 1900 (NTP time) and seconds since January 1, 1970:
/*
 * UdpNtp sketch
 * Get the time from an NTP time server
 * Demonstrates use of UDP sendPacket and ReceivePacket
 */

#include <SPI.h>
#include <Ethernet.h>

#include <EthernetUDP.h>

byte mac[] = { 0xDE, 0xAD, 0xBE, 0xEF, 0xFE, 0xED };  // MAC address to use

unsigned int localPort = 8888;      // local port to listen for UDP packets

IPAddress timeServer(192, 43, 244, 18); // time.nist.gov NTP server
const int NTP_PACKET_SIZE= 48; // NTP time stamp is in the first 48
                               // bytes of the message
byte packetBuffer[ NTP_PACKET_SIZE]; // buffer to hold incoming/outgoing packets

// A UDP instance to let us send and receive packets over UDP
EthernetUDP Udp;

void setup()
{
  Serial.begin(9600);
  // start Ethernet and UDP
  if (Ethernet.begin(mac) == 0) {
    Serial.println("Failed to configure Ethernet using DHCP");
    // no point in carrying on, so do nothing forevermore:
    for(;;)
      ;
  }
  Udp.begin(localPort);
}

void loop()
{
  sendNTPpacket(timeServer); // send an NTP packet to a time server
  // wait to see if a reply is available
  delay(1000);
  if ( Udp.parsePacket() ) {
     Udp.read(packetBuffer,NTP_PACKET_SIZE);  // read packet into buffer

     //the timestamp starts at byte 40, convert four bytes into a long integer
     unsigned long hi = word(packetBuffer[40], packetBuffer[41]);
     unsigned long low = word(packetBuffer[42], packetBuffer[43]);
     unsigned long secsSince1900 = hi << 16 | low;  // this is NTP time
                                                    // (seconds since Jan 1 1900)

    Serial.print("Seconds since Jan 1 1900 = " );
    Serial.println(secsSince1900);

    Serial.print("Unix time = ");
    // Unix time starts on Jan 1 1970
    const unsigned long seventyYears = 2208988800UL;
    unsigned long epoch = secsSince1900 - seventyYears;  // subtract 70 years
    Serial.println(epoch);                               // print Unix time


    // print the hour, minute and second:
    // UTC is the time at Greenwich Meridian (GMT)
    Serial.print("The UTC time is ");
    // print the hour (86400 equals secs per day)
    Serial.print((epoch  % 86400L) / 3600);
    Serial.print(':'),
    if ( ((epoch % 3600) / 60) < 10 ) {
     // Add leading zero for the first 10 minutes of each hour
      Serial.print('0'),
    }
     // print the minute (3600 equals secs per minute)
    Serial.print((epoch  % 3600) / 60);
    Serial.print(':'),
    if ( (epoch % 60) < 10 ) {
      // Add leading zero for the first 10 seconds of each minute
      Serial.print('0'),
    }
    Serial.println(epoch %60); // print the second
  }
  // wait ten seconds before asking for the time again
  delay(10000);
}

// send an NTP request to the time server at the given address
unsigned long sendNTPpacket(IPAddress& address)
{
  memset(packetBuffer, 0, NTP_PACKET_SIZE);  // set all bytes in the buffer to 0

  // Initialize values needed to form NTP request
  packetBuffer[0] = B11100011;   // LI, Version, Mode
  packetBuffer[1] = 0;     // Stratum
  packetBuffer[2] = 6;     // Max Interval between messages in seconds
  packetBuffer[3] = 0xEC;  // Clock Precision
  // bytes 4 - 11 are for Root Delay and Dispersion and were set to 0 by memset
  packetBuffer[12]  = 49;  // four byte reference ID identifying
  packetBuffer[13]  = 0x4E;
  packetBuffer[14]  = 49;
  packetBuffer[15]  = 52;

  // all NTP fields have been given values, now
  // you can send a packet requesting a timestamp:
  Udp.beginPacket(address, 123); //NTP requests are to port 123
  Udp.write(packetBuffer,NTP_PACKET_SIZE);
  Udp.endPacket();
}
Discussion
NTP is a protocol used to synchronize time through Internet messages. NTP servers provide time as a value of the number of seconds that have elapsed since January 1, 1900. NTP time is UTC (Coordinated Universal Time, similar to Greenwich Mean Time) and does not take time zones or daylight saving time into account.
NTP servers use UDP messages; see Recipe 15.13 for an introduction
to UDP. An NTP message is constructed in the function named sendNTPpacket and you are unlikely to need
to change the code in that function. The function takes the address of
an NTP server; you can use the IP address in the preceding example or
find a list of many more by using “NTP address” as a search term in
Google. If you want more information about the purpose of the NTP
fields, see the documentation at http://www.ntp.org/.
The reply from NTP is a message with a fixed format; the time
information consists of four bytes starting at byte 40. These four
bytes are a 32-bit value (an unsigned long integer), which is the
number of seconds since January 1, 1900. This value (and the time
converted into Unix time) is printed. If you want to convert the time
from an NTP server to the friendlier format using hours, minutes, and
seconds and days, months, and years, you can use the Arduino Time
library (see Chapter 12). Here is a
variation on the preceding code that prints the time as 14:32:56 Monday 18 Jan 2010:
/*
 * Time_NTP sketch
 * Example showing time sync to NTP time source
 * This sketch uses the Time library
 * and the Arduino Ethernet library
 */

#include <Time.h>
#include <SPI.h>         // needed for Arduino versions later than 0018
#include <Ethernet.h>
#include <EthernetUDP.h>

byte mac[] = { 0xDE, 0xAD, 0xBE, 0xEF, 0xFE, 0xED };
byte ip[] = { 192, 168, 1, 44 }; // set this to a valid IP address (or use DHCP)

unsigned int localPort = 8888;      // local port to listen for UDP packets

IPAddress timeServer(192, 43, 244, 18); // time.nist.gov NTP server

const int NTP_PACKET_SIZE= 48; // NTP time stamp is in first 48 bytes of message
byte packetBuffer[ NTP_PACKET_SIZE]; // buffer to hold incoming/outgoing packets

time_t prevDisplay = 0;    // when the digital clock was displayed

// A UDP instance to let us send and receive packets over UDP
EthernetUDP Udp;

void setup()
{
  Serial.begin(9600);
  Ethernet.begin(mac,ip);
  Udp.begin(localPort);
  Serial.println("waiting for sync");
  setSyncProvider(getNtpTime);
  while(timeStatus()== timeNotSet)
     ; // wait until the time is set by the sync provider
}

void loop()
{
  if( now() != prevDisplay)   //update the display only if the time has changed
  {
    prevDisplay = now();
    digitalClockDisplay();
  }
}

void digitalClockDisplay(){
  // digital clock display of the time
  Serial.print(hour());
  printDigits(minute());
  printDigits(second());
  Serial.print(" ");
  Serial.print(dayStr(weekday()));
  Serial.print(" ");
  Serial.print(day());
  Serial.print(" ");
  Serial.print(monthShortStr(month()));
  Serial.print(" ");
  Serial.print(year());
  Serial.println();
}

void printDigits(int digits){
  // utility function for digital clock display: prints preceding
  // colon and leading 0
  Serial.print(":");
  if(digits < 10)
    Serial.print('0'),
  Serial.print(digits);
}

/*-------- NTP code ----------*/

unsigned long getNtpTime()
{
  sendNTPpacket(timeServer); // send an NTP packet to a time server
  delay(1000);
  if ( Udp.parsePacket() ) {
     Udp.read(packetBuffer,NTP_PACKET_SIZE);  // read packet into buffer

     //the timestamp starts at byte 40, convert four bytes into a long integer
     unsigned long hi = word(packetBuffer[40], packetBuffer[41]);
     unsigned long low = word(packetBuffer[42], packetBuffer[43]);
     // this is NTP time (seconds since Jan 1 1900
     unsigned long secsSince1900 = hi << 16 | low;
     // Unix time starts on Jan 1 1970
     const unsigned long seventyYears = 2208988800UL;
     unsigned long epoch = secsSince1900 - seventyYears;  // subtract 70 years
     return epoch;
  }
  return 0; // return 0 if unable to get the time
}

// send an NTP request to the time server at the given address
unsigned long sendNTPpacket(IPAddress address)
{
  memset(packetBuffer, 0, NTP_PACKET_SIZE);  // set all bytes in the buffer to 0

  // Initialize values needed to form NTP request
  packetBuffer[0] = B11100011;   // LI, Version, Mode
  packetBuffer[1] = 0;     // Stratum
  packetBuffer[2] = 6;     // Max Interval between messages in seconds
  packetBuffer[3] = 0xEC;  // Clock Precision
  // bytes 4 - 11 are for Root Delay and Dispersion and were set to 0 by memset
  packetBuffer[12]  = 49;  // four-byte reference ID identifying
  packetBuffer[13]  = 0x4E;
  packetBuffer[14]  = 49;
  packetBuffer[15]  = 52;

  // send the packet requesting a timestamp:
  Udp.beginPacket(address, 123); //NTP requests are to port 123
  Udp.write(packetBuffer,NTP_PACKET_SIZE);
  Udp.endPacket();
}
See Also
Chapter 12 provides more information on using the Arduino Time library.
Details on NTP are available at http://www.ntp.org/.
NTP code by Jesse Jaggars that inspired the sketch used in this recipe is available at http://github.com/cynshard/arduino-ntp.
If you are running an Arduino release prior to 1.0 you can download a UDP library from https://bitbucket.org/bjoern/arduino_osc/src/tip/libraries/Ethernet/.
15.15. Monitoring Pachube Feeds
Problem
You want Arduino to respond to information on a web service that offers security and data backup. Pachube is a web-based service that manages real-time data feeds; you want to activate a device or raise an alarm based on the value of data on a Pachube feed.
Solution
This sketch gets the first four data fields from feed number 504 and prints the results on the Serial Monitor:
/*
 * Monitor Pachube feed
 * Read feed using V2 API using CSV format
 */

#include <SPI.h>
#include <Ethernet.h>

const unsigned long feedID  =    504; // this is the ID of the
                                      // remote Pachube feed that
                                      // you want to connect to
const int  streamCount     =      4; // Number of data streams to get
const long PACHUBE_REFRESH = 600000; // Update every 10 minutes
const long PACHUBE_RETRY   = 10000;  // if connection fails/resets
                                      // wait 10 seconds before trying
                                      // again - should not be less than 5

#define PACHUBE_API_KEY  "your key here . . ." // fill in your API key

// mac address, make sure this is unique on your network
byte mac[] = { 0xCC, 0xAC, 0xBE, 0xEF, 0xFE, 0x91 };
char serverName[] = "api.pachube.com";

int streamData[streamCount];    // change float to long if needed for your data

EthernetClient client;

void setup()
{
  Serial.begin(9600);
  if (Ethernet.begin(mac) == 0) {
    Serial.println(F("Failed to configure Ethernet using DHCP"));
    // no point in carrying on, so do nothing forevermore:
    for(;;)
      ;
  }
}

void loop()
{
   if( getFeed(feedID, streamCount) == true)
   {
      for(int id = 0; id < streamCount; id++){
        Serial.println( streamData[id]);
      }
      Serial.println("--");
      delay(PACHUBE_REFRESH);
   }
   else
   {
      Serial.println(F("Unable to get feed"));
      delay(PACHUBE_RETRY);
   }
}

// returns true if able to connect and get data for all requested streams
boolean getFeed(int feedId, int streamCount )
{
boolean result = false;
  if (client.connect(serverName, 80)>0) {
    client.print(F("GET /v2/feeds/"));
    client.print(feedId);
    client.print(F(".csv HTTP/1.1
Host: api.pachube.com
X-PachubeApiKey: "));
    client.print(PACHUBE_API_KEY);
    client.print("
User-Agent: Arduino 1.0");
    client.println("
");
  }
  else {
    Serial.println("Connection failed");
  }
  if (client.connected()) {
    Serial.println("Connected");
    if(  client.find("HTTP/1.1") && client.find("200 OK") )
       result = processCSVFeed(streamCount);
    else
       Serial.println("Dropping connection - no 200 OK");
  }
  else {
    Serial.println("Disconnected");
  }
  client.stop();
  client.flush();
  return result;
}

int processCSVFeed(int streamCount)
{
  int processed = 0;
  client.find("

"); // find the blank line indicating start of data
  for(int id = 0; id < streamCount; id++)
  {
    int id = client.parseInt(); // you can use this to select a specific id
    client.find(","); // skip past timestamp
    streamData[id] = client.parseInt();
    processed++;
  }
  return(processed == streamCount );  // return true if got all data
}
Discussion
To start using Pachube, you have to sign up for an account, and the Pachube Quickstart page explains how: http://community.pachube.com/?q=node/4. Once you’re signed up, you will be emailed a username and API key. Add your key to the following line in the sketch:
#define PACHUBE_API_KEY "your key here . . ." // fill in your API key
Every Pachube feed (data source) has an identifying ID; this
example sketch uses feed 504 (environmental data from the Pachube
office). In the sketch below, feeds are accessed using the getFeed method with the feed ID and the
number of items of data to get passed as arguments. If this is successful,
getFeed returns true, and you can process the data using the
processFeed method. This returns
the value for the data item you are interested in (each data item is
called a stream in Pachube).
Pachube supports a number of data formats and the sketch above uses the simplest, CSV (comma-separated variables) (see: http://api.pachube.com/v2/#data-formats for more on Pachube data formats).
You can extract more information about a feed using the XML format. Here is an example of Pachube XML data for the stream used in this recipe:
<environment updated="2010-06-08T09:30:11Z" id="504"
    creator="http://www.pachube.com/users/hdr">
    <title>Pachube Office environment</title>
    <feed>http://api.pachube.com/v2/feeds/504.xml</feed>
    <status>live</status>
    <website>http://www.haque.co.uk/</website>
    <tag>Tag1</tag>
    <tag>Tag2</tag>
    <location domain="physical" exposure="indoor" disposition="fixed">
      <name>office</name>
      <lat>51.5235375648154</lat>
      <lon>-0.0807666778564453</lon>
      <ele>23.0</ele>
    </location>
    <data id="0">
      <tag>humidity</tag>
      <min_value>0.0</min_value>
      <max_value>847.0</max_value>
      <current_value at="2010-06-08T09:30:11.000000Z">311</current_value>
    </data>
    </environment>
The title Pachube Office
environment indicates the start of the data; each stream is
indicated by the tag data id=
followed by the numeric stream ID. The processXMLFeed function in the following
sketch uses this information to find the desired feed ID and then
extract readings for the min, max, and current value of the desired feed:
/*
 * Monitor Pachube feed
 * V2 API using XML format
 * controls a servo using value of a specified stream
 */

#include <SPI.h>
#include <Ethernet.h>

#include <Servo.h> // this sketch will control a servo

const int  feedID           =    504; // desired pachube feed
const int  streamToGet      =     0;  // data id of the desired stream

const long PACHUBE_REFRESH = 600000; // Update every 10 minutes
const long PACHUBE_RETRY   = 10000;  // if connection fails/resets

#define PACHUBE_API_KEY  "your key here . . ." // fill in your API key

// mac address, make sure this is unique on your network
byte mac[] = { 0xCC, 0xAC, 0xBE, 0xEF, 0xFE, 0x91 };
char serverName[] = "api.pachube.com";

EthernetClient client;

// stream values returned from pachube will be stored here
int currentValue; // current reading for stream
int minValue;     // minimum value for stream
int maxValue;     // maximum value for stream

Servo myservo;  // create servo object to control a servo

void setup()
{
  Serial.begin(9600);
  myservo.attach(9);  // attaches the servo on pin 9 to the servo object

  if (Ethernet.begin(mac) == 0) {
    Serial.println("Failed to configure Ethernet using DHCP");
    // no point in carrying on, so do nothing forevermore:
    for(;;)
      ;
  }
}

void loop()
{
  if( getFeed(feedID, streamToGet) == true)
  {
    Serial.print(F("value="));
    Serial.println(currentValue);
    // position proportionaly within range of 0  to 90 degreees
    int servoPos = map(currentValue, minValue, maxValue, 0,90);
    myservo.write(servoPos);
    Serial.print(F("pos="));
    Serial.println(servoPos);
    delay(PACHUBE_REFRESH);
  }
  else
  {
    Serial.println(F("Unable to get feed"));
    delay(PACHUBE_RETRY);
  }
}

// returns true if able to connect and get data for requested stream
boolean getFeed(int feedId, int streamId )
{
  boolean result = false;
  if (client.connect(serverName, 80)>0) {
    Serial.print("Connecting feed ");
    Serial.print(feedId);
    Serial.print(" ... ");
    client.print("GET /v2/feeds/");
    client.print(feedId);
    client.print(".xml HTTP/1.1
Host: api.pachube.com
X-PachubeApiKey: ");
    client.print(PACHUBE_API_KEY);
    client.print("
User-Agent: Arduino 1.0");
    client.println("
");
  }
  else {
    Serial.println("Connection failed");
  }
  if (client.connected()) {
    Serial.println("Connected");
    if(  client.find("HTTP/1.1") && client.find("200 OK") )
      result = processXMLFeed(streamId);
    else
      Serial.println("Dropping connection - no 200 OK");
  }
  else {
    Serial.println("Disconnected");
  }
  client.stop();
  client.flush();
  return result;
}

boolean processXMLFeed(int streamId)
{
  client.find("<environment updated=");
  for(int id = 0; id <= streamId; id++)
  {
    if( client.find( "<data id=" ) ){  // find next data field
      if(client.parseInt()== streamId){ // is this our stream?
        if(client.find("<min_value>")){
          minValue = client.parseInt();
          if(client.find("<max_value>")){
            maxValue = client.parseInt();
            if(client.find("<current_value ")){
              client.find(">"); // seek to the angle brackets
              currentValue = client.parseInt();
              return true; // found all the neeed data fields
            }
          }
        }
      }
    }
    else {
      Serial.print(F("unable to find data for ID "));
      Serial.println(id);
    }
  }
  return false;  // unable to parse the data
}
Arduino 1.0 Stream parsing is used to search for specific fields, see the Pachube API documentation for a list of all fields.
See Also
The Pachube API documentation is here: http://api.pachube.com/v2/.
An Arduino library to simplify Pachube access can be found here: http://code.google.com/p/pachubelibrary/.
15.16. Sending Information to Pachube
Problem
You want Arduino to update feeds on Pachube. For example, you want the values of sensors connected to Arduino to be published on a Pachube feed.
Solution
This sketch reads temperature sensors connected to the analog input ports (see Recipe 6.8) and sends the data to Pachube:
/*
 * Update Pachube feed
 * sends temperature read from (up to) six LM35 sensors
 * V2 API
 */

#include <SPI.h>
#include <Ethernet.h>

const unsigned long feedID  =    2955; // this is the ID of this feed
const int  streamCount      =      6;  // Number of data streams (sensors) to send
const long REFRESH_INTERVAL = 60000;   // Update every  minute
// if connection fails/resets wait 10 seconds before trying again
// should not be less than 5
const long RETRY_INTERVAL   = 10000;

#define PACHUBE_API_KEY  "Your key here . . . " // fill in your API key

// make sure this is unique on your network
byte mac[] = { 0xCC, 0xAC, 0xBE, 0xEF, 0xFE, 0x91 };
char serverName[] = "www.pachube.com";

EthernetClient client;

void setup()
{
  Serial.begin(9600);
  Serial.println("ready");
  if (Ethernet.begin(mac) == 0) { // start ethernet using mac & IP address
    Serial.println("Failed to configure Ethernet using DHCP");
    while(true)   // no point in carrying on, so stay in endless loop:
      ;
  }
}

void loop()
{
  String dataString = "";
  for (int id = 0; id < streamCount; id++)
  {
     int temperature = getTemperature(id);
     dataString += String(id);
     dataString  += ",";
     dataString += String(temperature);
     dataString  += "
";
  }
  if ( putFeed(feedID, dataString, dataString.length()) == true)
  {
     Serial.println("Feed updated");
     delay(REFRESH_INTERVAL);
  }
  else
  {
      Serial.println("Unable to update feed");
      delay(RETRY_INTERVAL);
  }
}

// returns true if able to connect and send data
boolean putFeed(int feedId, String feedData, int length )
{
boolean result = false;
  if (client.connect(serverName, 80)>0) {
    Serial.print("Connecting feed "); Serial.println(feedId);
    client.print("PUT /v2/feeds/");
    client.print(feedId);
    client.print(".csv HTTP/1.1
Host: api.pachube.com
X-PachubeApiKey: ");
    client.print(PACHUBE_API_KEY);
    client.print("
User-Agent: Arduino 1.0");
    client.print("
Content-Type: text/csv
Content-Length: ");
    client.println(length+2, DEC); // allow for cr/lf
    client.println("Connection: close");
    client.println("
");
    // now print the data:
    Serial.println(feedData); // optional echo to serial monitor
    client.print(feedData);
    client.println("
");
  }
  else {
    Serial.println("Connection failed");
  }
  // response string
  if (client.connected()) {
    Serial.println("Connected");
    if(client.find("HTTP/1.1") && client.find("200 OK") ){
       result = true;
    }
    else
       Serial.println("Dropping connection - no 200 OK");
  }
  else {
    Serial.println("Disconnected");
  }
  client.stop();
  client.flush();
  return result;
}

// get the temperature rounded up to the nearest degree
int getTemperature(int pin)
{
   int value = analogRead(pin);
   int celsius = (value * 500L) / 1024; // 10mv per degree
   return celsius;
}
Discussion
This is similar to Recipe 15.15,
but here you use the putFeed method
to send your information to Pachube. This example sends information
from temperature sensors; see the chapter covering the type of sensor
you want to use to find code suitable for your application.
Pachube requires the number of characters in the data to be sent
prior to the actual content. This is achieved using the string
concatenation function in Recipe 2.5 to create a string
containing all fields, and then using the String.length()
method to get the number of characters.
The following sketch uses a different technique that does not
require any RAM to store the string data. It uses a new capability
introduced in Arduino 1.0 that returns the number of characters
printed. The function outputCSV
counts and returns the number of characters printed. It
is first called to calculate the total character count by printing the
output to serial; it’s called again to output to the Ethernet client
connected to Pachube:
/*
 * Update Pachube feed
 * sends floating point temperatures read from (up to) six LM35 sensors
 * V2 API
 */

#include <SPI.h>
#include <Ethernet.h>

const int  feedID           =    2955; // this is the ID of this feed
const int  streamCount      =      6;  // Number of data streams (sensors) to send
const long REFRESH_INTERVAL = 60000;   // Update every  minute
// if connection fails/resets wait 10 seconds before trying again
// should not be less than 5
const long RETRY_INTERVAL   = 10000;

#define PACHUBE_API_KEY  "Your key here . . . " // fill in your API key

// make sure this is unique on your network
byte mac[] = { 0xCC, 0xAC, 0xBE, 0xEF, 0xFE, 0x91 };
char serverName[] = "www.pachube.com";

EthernetClient client;

void setup()
{
  Serial.begin(9600);
  Serial.println("ready");
  if(Ethernet.begin(mac) == 0) { // start ethernet using mac & IP address
    Serial.println("Failed to configure Ethernet using DHCP");
    while(true)   // no point in carrying on, so stay in endless loop:
      ;
  }
}

void loop()
{
  int contentLen = outputCSV(Serial); // get character count
  if( putFeed(feedID, contentLen) == true){
     Serial.println("Feed updated");
     delay(REFRESH_INTERVAL);
  }
  else {
      Serial.println("Unable to update feed");
      delay(RETRY_INTERVAL);
  }
}

// returns true if able to connect and send data
boolean putFeed(int feedId, int length)
{
boolean result = false;
  if (client.connect(serverName, 80)>0) {
    Serial.print("Connecting feed "); Serial.println(feedId);
    client.print("PUT /v2/feeds/");
    client.print(feedId);
    client.print(".csv HTTP/1.1
Host: api.pachube.com
X-PachubeApiKey: ");
    client.print(PACHUBE_API_KEY);
    client.print("
User-Agent: Arduino 1.0");
    client.print("
Content-Type: text/csv
Content-Length: ");
    client.println(length+2, DEC); // allow for cr/lf
    client.println("Connection: close");
    client.println("
");
    outputCSV(client);
    client.println("
");
  }
  else {
    Serial.println("Connection failed");
  }
  // response string
  if (client.connected()) {
    Serial.println("Connected");
    if(client.find("HTTP/1.1") && client.find("200 OK") ){
       result = true;
    }
    else
       Serial.println("Dropping connection - no 200 OK");
  }
  else {
    Serial.println("Disconnected");
  }
  client.stop();
  client.flush();
  return result;
}

int outputCSV(Stream &stream)
{
  int count = 0;
  for(int id = 0; id < streamCount; id++) {
    float temperature = getTemperature(id);
    count += stream.print(id,DEC);
    count += stream.print(','),
    count += stream.print(temperature,1); // one digit after decimal point
    count += stream.print("
");
  }
  return count;
}

float getTemperature(int inPin)
{
   int value = analogRead(inPin);
   float millivolts = (value / 1024.0) * 5000;  //  see Recipe 6.8
   return millivolts / 10;                      // 10mV per degree C
}