
Chapter 14. Web Apps: Serving HTML

This is the 21st century. Users want web apps. Ruby’s got you covered there, too! Libraries are available to help you host your own web applications and make them accessible from any web browser. So we’re going to spend these final two chapters of the book showing you how to build a full web app.
To get started, you’re going to need Sinatra, a third-party library for writing web applications. But don’t worry, we’ll show you how to use the RubyGems tool (included with Ruby) to download and install libraries automatically! Then we’ll show you just enough HTML to create your own web pages. And of course, we’ll show you how to serve those pages to a browser!
Writing web apps in Ruby
An app that runs in your terminal is great—for your own use. But ordinary users have been spoiled by the Internet and the World Wide Web. They don’t want to learn to use a terminal so they can use your app. They don’t even want to install your app. They want it to be ready to use the moment they click a link in their browser.
But don’t worry! Ruby can help you write apps for the Web, too.
We won’t lead you on—writing a full web app is not a small task, even using Ruby. This is going to require all of the skills you’ve learned so far, plus a few new ones. But Ruby has some excellent libraries available that will make the process as easy as possible!
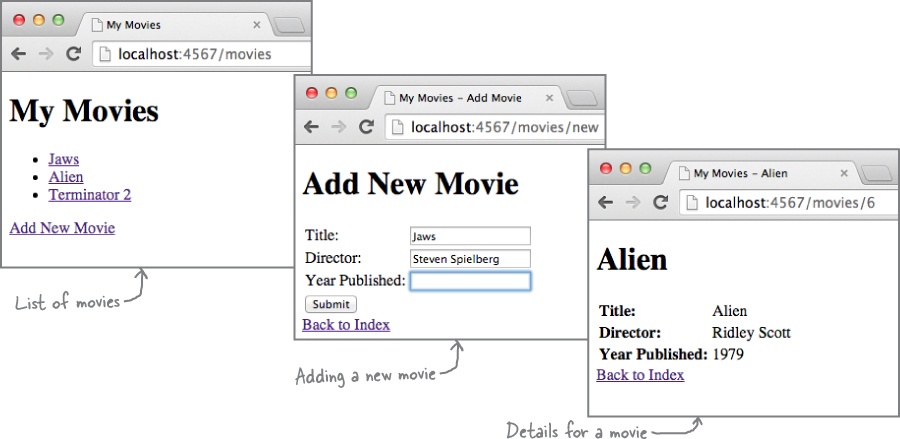
In these final two chapters of the book, we’re going to build a simple online movie database. You’ll be able to enter details about movies, which will be saved to a file. The website will provide a list of links to all movies that have been entered, and you’ll be able to click on a movie’s link to view details for that movie.
Our task list
There’s a lot to cover in the next two chapters, but don’t worry—we’ll be breaking this process down into little steps. Let’s take a look at what will be involved...
This chapter will be focused on creating HTML pages and serving them in a browser. We’ll get as far as creating a form for users to enter new movie data...
Then, in Chapter 15, we’ll show you how to use that form data to set attributes of Ruby objects, and save those objects to a file. Once you’ve done that, you’ll be able to load the data back in, and display it any way you want!
Project directory structure
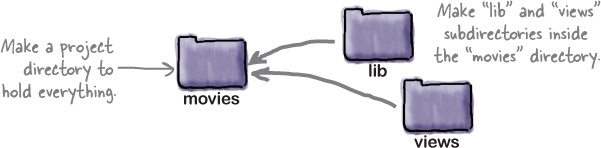
There are going to be several different files in our app before we’re done. So we’ll need a directory to hold the entire project. You can name it whatever you like, but we’ve chosen movies.
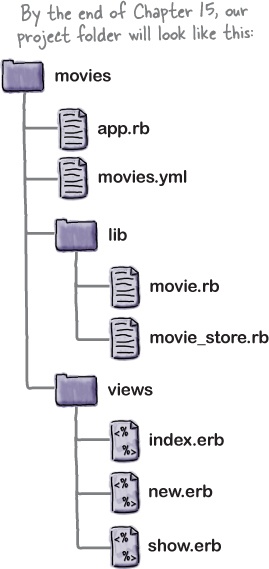
We’ll also need two subdirectories to go inside the project directory. The first, lib, is going to hold Ruby source files (just like the lib directory we set up in Chapter 13).
We’re also going to need a way to view our app’s data. Since the app will be viewed in a web browser, that means we’ll be using HTML files. We’ll need a second subdirectory called views inside the project directory, alongside the lib directory.
So, create a directory named movies, and then place two directories inside it, named lib and views. (Don’t worry about filling them with files right now; we’ll create those as we go.)
That’s all there is to it. Our first task is complete!
Next, we need to “install the Sinatra library for handling web requests.” But what exactly is Sinatra? And what is a web request?
Browsers, requests, servers, and responses
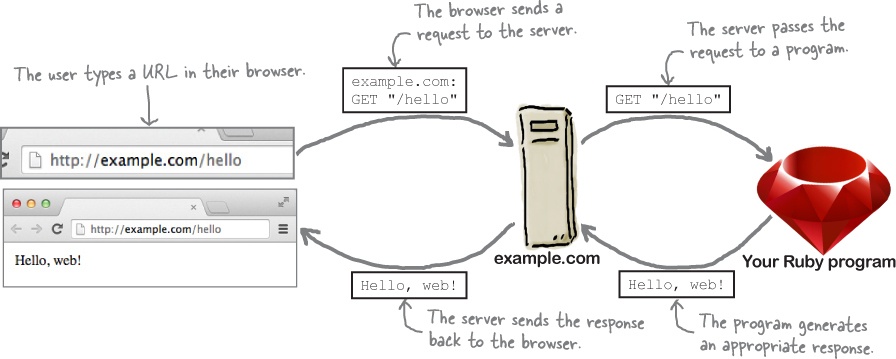
When you type a URL into your browser, you’re actually sending a request for a web page. That request goes to a server. A server’s job is to get the appropriate page, and send it back to the browser in a response.
In the early days of the Web, the server usually read the contents of an HTML file on the server’s hard drive, and sent that HTML back to the browser.

But today, it’s much more common for the server to communicate with a program to fulfill the request, instead of reading from a file. And there’s no reason that the program can’t be written in Ruby!
Sinatra takes requests
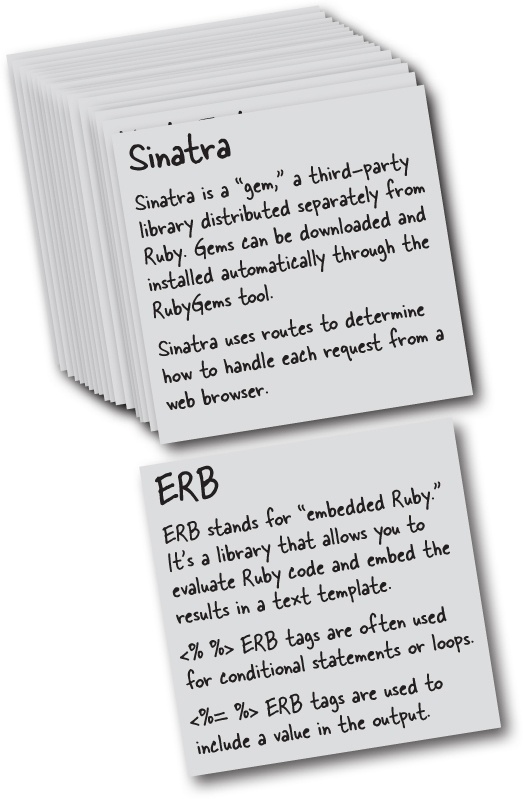
Handling a request from a browser is a lot of work. Fortunately, we don’t have to do it all ourselves. We’re going to rely on a library called Sinatra to receive the requests and return the responses. All we have to do is write the code that generates those responses.
But Sinatra isn’t part of Ruby core (the classes and modules that are loaded every time you run Ruby). It’s not even part of the Ruby standard library (the classes and libraries that are distributed with Ruby, but that have to be explicitly loaded by your program). Sinatra is an independently developed third-party library.
Downloading and installing libraries with RubyGems
When Ruby was a young language, users had to go through a lot before they could use a library like Sinatra:
They had to find and download the source files.
They had to decompress them.
They had to figure out a good directory on their hard drive to put them in.
They had to add that directory to the
LOAD_PATH(the list of directories that Ruby searches in for files to load).If the library depended on other libraries, users had to perform the same steps for each of those libraries.
Needless to say, this was a pain. That’s why Ruby is now distributed with the RubyGems tool, which manages all this complexity. With RubyGems, the process requires a lot less work on the user’s part:
A library author uses the RubyGems command-line tool to compress their source files together into a single, redistributable file, called a gem.
The RubyGems tool uploads the gem to the central gem server, hosted at rubygems.org. (The site is free; it’s supported by community donations.)
Also using the RubyGems tool, users provide the name of a gem they want.
RubyGems downloads the gem, decompresses it, installs it within a central directory of gems on the user’s hard drive, and adds it to Ruby’s
LOAD_PATH. It then does the same for any other gems that the requested gem depends on.
The RubyGems tool is included with Ruby, so it’s already installed on your system. And it makes a vast array of libraries available to you; a recent visit to rubygems.org showed that over 6,500 gems had been uploaded, and more are being added every week.
Installing the Sinatra gem
Let’s try using RubyGems to install Sinatra now. You’ll need an active Internet connection for this.
You invoke RubyGems using the gem command. In your terminal, type gem install sinatra. (It doesn’t matter what directory you’re in.) RubyGems will download and install several other gems that Sinatra depends on, then install Sinatra itself.

Once the gem’s installed, you can simply add require 'sinatra' to any Ruby program, and the Sinatra library will be loaded when that program runs!
Watch it
Some operating systems might not let an ordinary user install files in the gems directory.
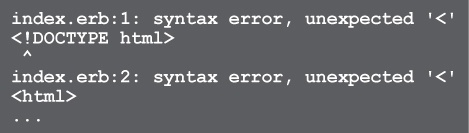
For security reasons, Mac OS X, Linux, and other Unix-based systems usually only let programs run by administrative users save files to the directory where gems are stored. If this is true for your OS, you may see an error message like this:

In such an event, try running the gem command as an administrator by adding sudo (short for “superuser do” in front of it: sudo gem install sinatra. The OS may ask you for a password, and then the install should proceed normally.

A simple Sinatra app
We’ve installed the Sinatra gem, and our second task is complete.
We’re ready to start handling requests from the browser!
We’re still figuring out the basics of Sinatra, though. Before we dive into the movies app, let’s take a few pages to demonstrate a simpler app as a warmup.
Here’s the code for a complete Sinatra app, which will deliver a short response to the browser. Save it to a file named hello_web.rb.
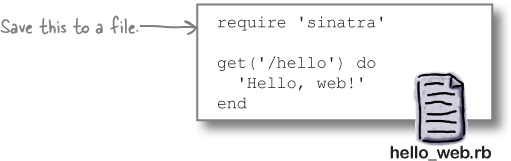
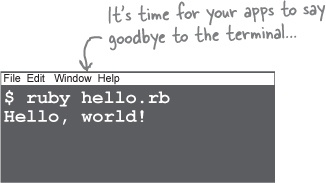
Pretty simple, right? Sinatra handles all the complexity of web requests for us. We’ll describe the details in a couple of pages, but first let’s try it out. In your terminal, change to the directory where you saved the file, and type:
ruby hello_web.rb
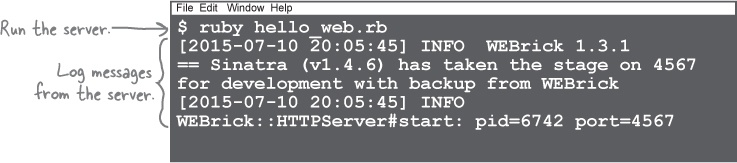
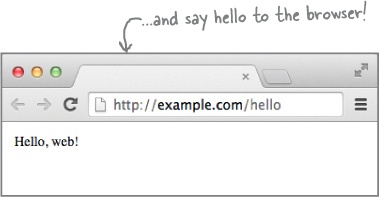
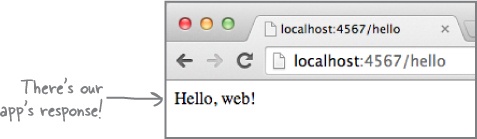
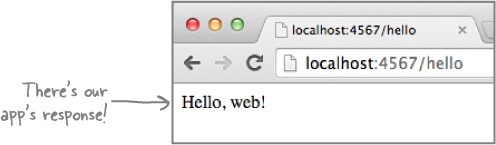
Our app immediately begins printing diagnostic messages to the console, to let us know that it’s running. Now we just need to connect a web browser to it and test it out. Open your browser and type this URL into the address bar. (If the URL looks a little strange to you, don’t worry: we’ll explain what it means in a moment.)
http://localhost:4567/hello
The browser will send a request to the server, which will respond with "Hello, web!". The request will also appear in the messages in your terminal. We’ve just sent our first data to the browser!
Sinatra will keep listening for requests until we stop it. When you’re done with the page, press Ctrl-C in your terminal to signal Ruby to exit.
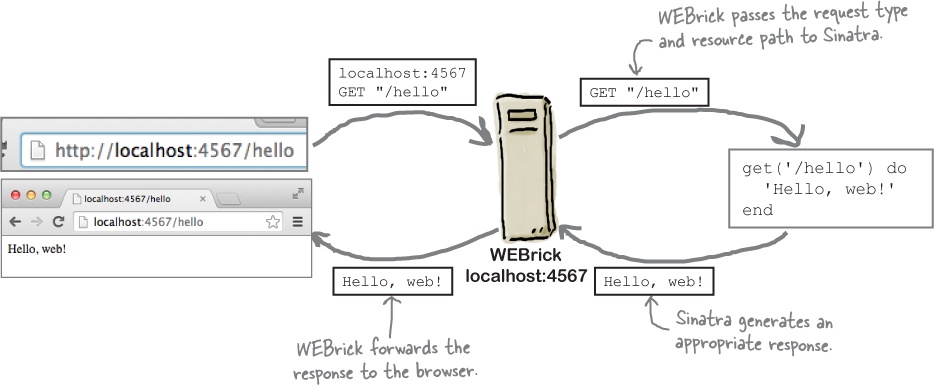
Your computer is talking to itself
When we launched our little Sinatra app, it started its very own web server, right there on your computer, using a library called WEBrick (part of the Ruby standard library). Sinatra relies on a separate server like WEBrick for browsers to actually connect to. WEBrick forwards any requests it gets to Sinatra (or Rails, or whatever other web framework you’re using).
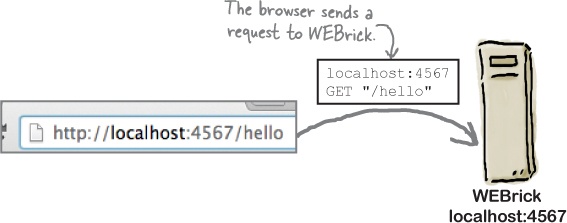
Because the server program is running on your computer (and not somewhere out on the Internet), we use the special hostname localhost in the URL. This tells your browser that it needs to establish a connection from your computer to that same computer.
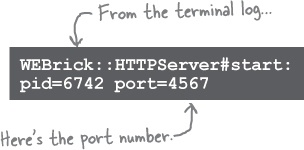
We also need to specify a port as part of the URL. (A port is a numbered network communication channel that an application can listen for messages on.) From the log in the terminal, we can see that WEBrick is listening on port 4567, so we include that in the URL, following the hostname.
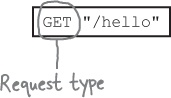
Request type
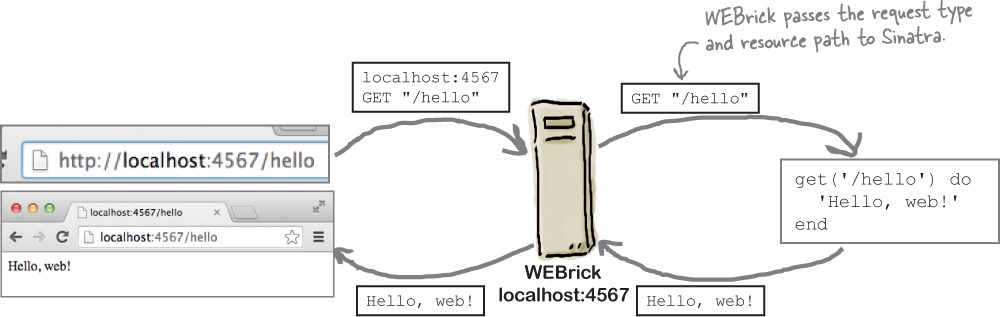
So, thanks to the hostname and port in the URL, your browser’s request got through to WEBrick. Now, WEBrick needs to pass along the request to Sinatra to generate a response.
When forming a response, Sinatra needs to consider the request type. The request type specifies what action the browser wants to perform.
Browsers and servers communicate using HTTP, which stands for “HyperText Transfer Protocol.” HTTP defines several methods (these aren’t Ruby methods, but the meaning is similar) that a request can use. The most common methods are:
GET: Used when your browser needs to get something from the server, usually because you entered a URL or clicked a link. This could be an HTML page, an image, or some other resource.
POST: Used when your browser needs to add some data to the server, usually because you submitted a form with new data.
PUT: Your browser needs to change some existing data on the server, usually because you submitted a form with modified data.
DELETE: Your browser needs to delete some data from the server.
Our current request is a GET request. We entered a URL, and our browser knows that we want to get something in return. So it issued a request of the appropriate type.
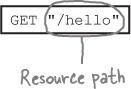
Resource path
But what should we receive in response to our GET request? A server usually has lots of different resources that it can send to a browser, including HTML pages, images, and more.

The answer is there at the end of that URL we entered, following the hostname and port:
That’s the resource path. It tells the server which of its many resources you want to act on. Sinatra pulls the path off the end of the URL, and uses it when deciding how to respond to the request.
So Sinatra is going to receive a GET request for the path '/hello'. How will it respond? That’s up to your code!
Every HTTP request includes a request type (the method) and a resource path (the resource being accessed).
Sinatra routes
Sinatra uses routes to decide how to respond to a request. You specify the type of request that Sinatra should look for (GET, in this case), as well as a resource path. If an incoming request matches the given type and path, Sinatra will return the given response to the web server, which then passes it on to the browser.
Our script starts with require 'sinatra', which loads the Sinatra library. This also defines several methods for setting up routes, including a method called get.
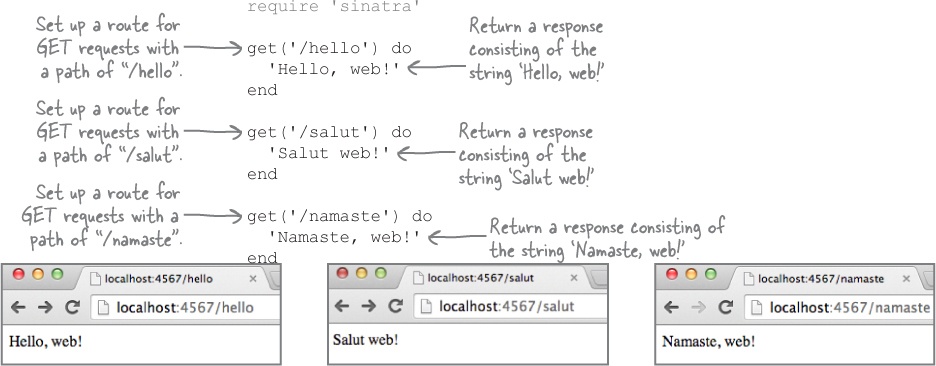
We make a single call to this get method, with the string '/hello' as an argument, and an associated block. This sets up a route for GET requests that have a path of '/hello'. Sinatra will save the block we provide, and call the block anytime it receives a GET request with a path of '/hello'.

Whatever value the block returns, Sinatra will return that value to the web server as its response. We set up this block to return the string 'Hello, web!', so that’s what gets displayed in the browser!
Multiple routes in the same Sinatra app
Your app can’t just respond 'Hello, web!' to every request that comes in, though. You need to have it respond to different request paths in different ways.
You can accomplish this by setting up different routes for each path. Just call get once for each path, and provide a block that returns the appropriate response. Your app will then be able to respond to requests for any of those paths.
A route for the list of movies
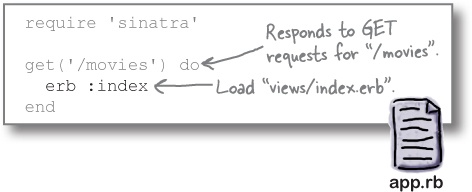
Now that we know how to create a Sinatra route, we’re finally ready to set up a route for the list of movies! Save this code to a file named app.rb. Then move app.rb into your project directory, alongside the lib and views directories.
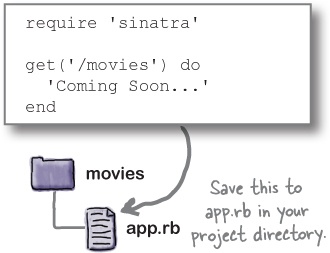
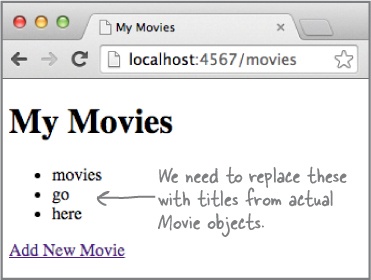
This will set up a route for GET requests to the '/movies' path. We’ll just show some simple placeholder text for now.
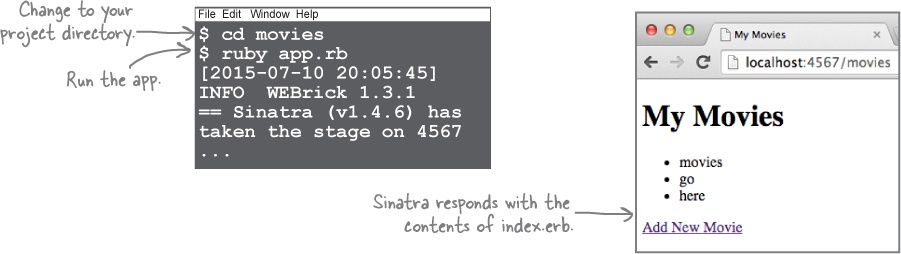
You can run the app by changing to the directory it’s saved to and entering ruby app.rb. Once Sinatra’s running, visit http://localhost:4567/movies to view the page.
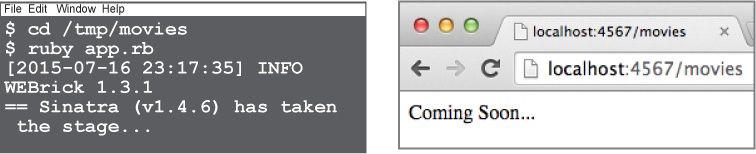
Our next task is done. Up next, we’ll replace this placeholder text with some actual HTML!
Making a movie list in HTML
So far, we’ve just been sending snippets of text to the browser. We need actual HTML, so that we can apply formatting to the page. HTML uses tags to apply formatting to text.
Don’t worry if you haven’t written HTML before; we’ll be covering the basics as we go!
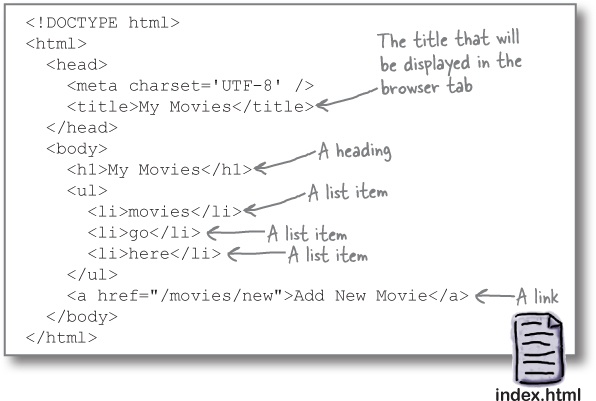
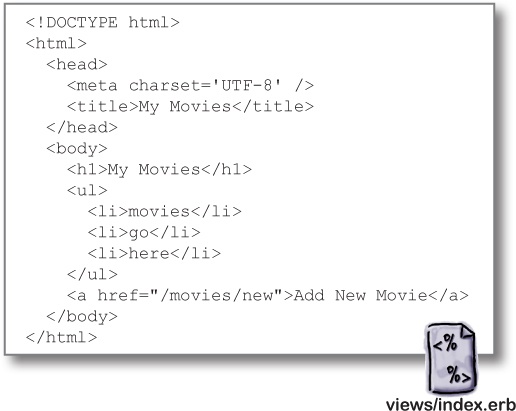
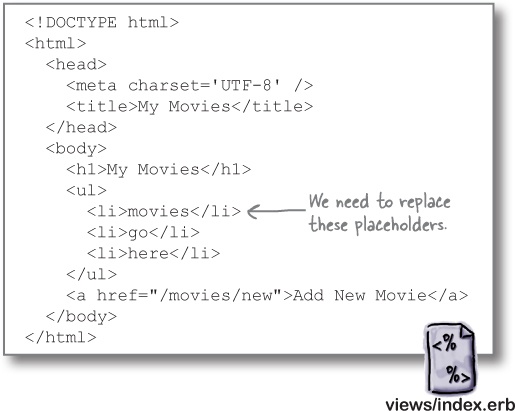
Before we try sending HTML from Sinatra, let’s try making a plain HTML file in our text editor. Save the text below in a file named index.html.
Here are some noteworthy HTML tags used in this file:
< title>:The page title to display in the browser tab.< h1>:A level-one heading. Usually shown in large, bold text.< ul>:An unordered list (usually shown as bullet points).< li>:A list item. Several of these are nested between the< ul>tags to form the list.< a>:Stands for “anchor.” Creates a link.
Now, let’s try viewing the HTML in a browser. Launch your favorite web browser, choose “Open File...” from the menu, and open the HTML file you just saved.
Notice how the elements on the page correspond with the HTML code...
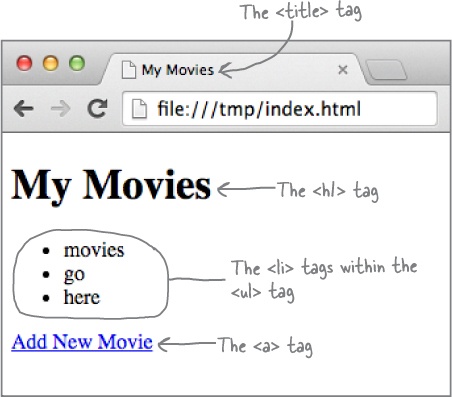
You can click on the link if you want, but it will only produce a “page not found” error right now. We’ll fix that later when we add a page for creating new movies.
Accessing the HTML from Sinatra
Our HTML file works great in the browser. That’s another task complete!
No one else can see our HTML unless we make it available from our Sinatra app, though. Fortunately, there’s an easy solution: Sinatra’s erb method.
The erb method reads the contents of a file within the app directory so that you can include those contents in Sinatra’s response. It also uses the ERB library (part of the Ruby standard library) to let you embed Ruby code within the file, letting you customize the contents for each request. (ERB stands for “embedded Ruby.”)
So all we have to do is place our HTML in a particular file, then call erb to include the HTML in Sinatra’s response!
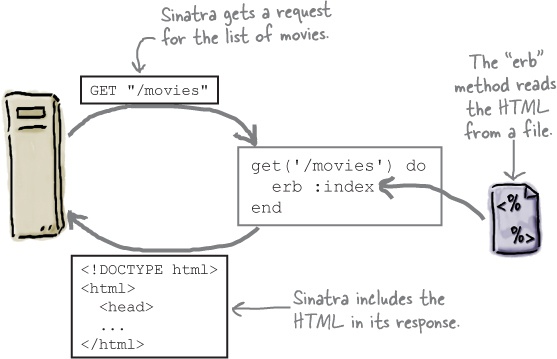
The erb method takes a symbol as an argument, and converts that to a filename it should look for. By default, it looks for files in a subdirectory named views that have a filename ending in .erb. (These are known as ERB templates.)
If you call: | This template will be loaded: |
| movies/views/index.erb |
| movies/views/new.erb |
| movies/views/show.erb |
We want to be able to load our HTML with a call of erb :index. So you’ll need to rename your index.html file to index.erb. Then move it into the views subdirectory within your project directory.
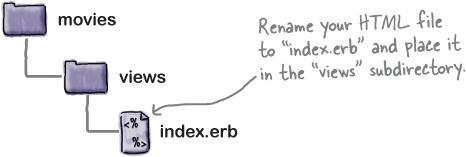
We’ve got our HTML saved in the index.erb template within the views subdirectory:
Now, let’s set up our app to include the HTML in its response. Within the app.rb file you created before, replace the 'Coming soon...' placeholder text with a call to erb :index.
The erb method returns the contents of the template as a string. Since the call to erb is the last expression in the block, that becomes the block’s return value as well. And whatever the block returns becomes Sinatra’s response to the web server.
Let’s see if it works. In your terminal, change to your project directory, and run the app with ruby app.rb. Then, in your browser, visit:
http://localhost:4567/movies
Sinatra will respond with the contents of our index.erb template!
A class to hold our movie data
ERB allows us to load our HTML page from Sinatra. That’s another task complete.
Handling requests
Set up a route to get the list of movies. | |
Create our first HTML page. | |
Set up Sinatra to respond with the HTML. |
Displaying objects with HTML
But the HTML we’re displaying only has placeholder text where our movies are supposed to go. So our next task will be to create Ruby objects to hold our movie data, and then use those objects to fill in our HTML movie list.
Of course, we can’t create movie objects without a Movie class. Let’s create one now. It’ll be a very simple class, with three attributes: title, director, and year.
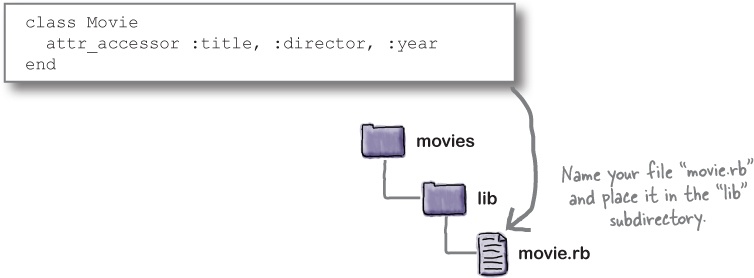
Mixing this class’s code in with our Sinatra code would look rather messy, so let’s save the Movie code in a separate file named movie.rb and place it in our lib directory.
Setting up a Movie object in the Sinatra app
Now let’s create a Movie object within our Sinatra app.
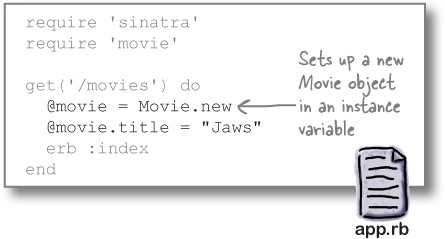
In order to use the Movie class, we need to load the movie.rb file. We can do this with a call to require at the top of app.rb. (Remember, you can leave the .rb off; require will add it for you.)
With that done, we can create a new Movie instance within the block for the get '/movies' route. (We’ll start with just one movie for now, and build up to a list later.) In a moment, we’ll show you how to use the Movie object’s data when generating the HTML page.
Notice that we’re storing the Movie within an instance variable, not a local variable. We’ll talk about the reason for this shortly.

Now that we’re trying to require a file from the lib directory, we can’t just run the app with ruby app.rb anymore. If we try, Ruby will report that it can’t load movie.rb:

As you may remember from Chapter 13, we need to add -I lib to the command line, to include the lib directory in the list of places that Ruby will search for files to load.

We’ve got a movie object. How will we get it into the HTML page? We’ll figure that part out next...
ERB embedding tags
Right now, our page consists of “static” (unchanging) HTML, with placeholder text where our movie titles should go. So how are we going to get our data into the page?
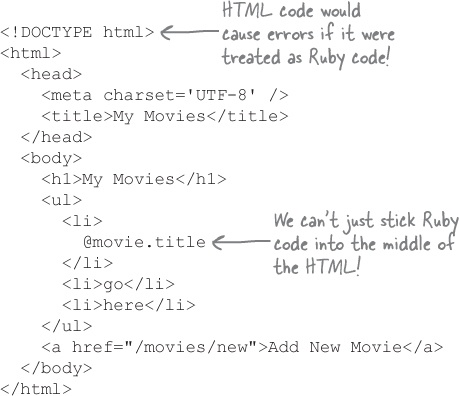
Remember that this isn’t an ordinary HTML file; it’s an “embedded Ruby” template. That means that we can stick Ruby code in the middle of it. When the erb method loads the template, it will evaluate the code. We can use Ruby code to embed the titles of our movies in the HTML!
But we can’t just stick raw Ruby code into the middle of the file. The ERB parser wouldn’t know which parts of the template were HTML, and which parts were Ruby. (If the Ruby interpreter tried to evaluate HTML, trust us, it wouldn’t end well.)
ERB lets you embed Ruby code within a plain-text template using embedding tags.
Instead, we need to embed our code within ERB embedding tags. These tags are used to mark Ruby code within an ERB template.
The ERB output embedding tag
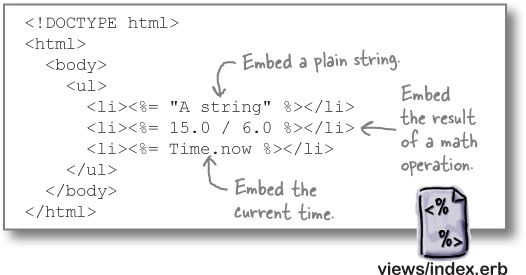
One of the most commonly used ERB tags is < %= %>, the output embedding tag. Whenever ERB sees this tag, it will evaluate the Ruby code contained within the tag, convert the result to a string (if necessary), and insert that string into the surrounding text (in place of the tag).
Here’s a modified version of our index.erb template with several output embedding tags:
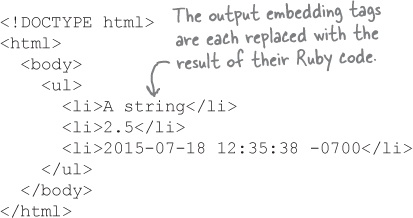
Here’s what that template looks like when converted to HTML:
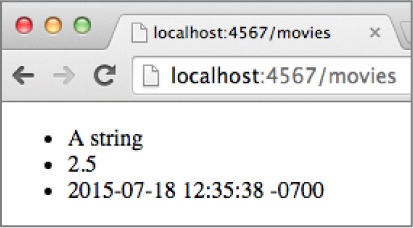
And here’s what that HTML looks like in the browser:
Embedding a movie title in our HTML
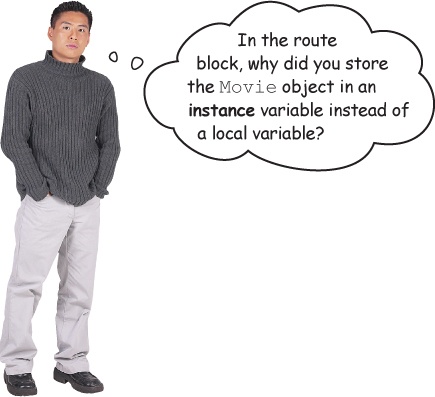
Instance variables defined within your Sinatra route blocks are also accessible within the ERB template. This allows your code in app.rb to work together with the code in your ERB template.
By storing our Movie object in the @movie instance variable within the Sinatra route block, we made it available for use within the ERB template! This will allow us to get data from the app into our HTML.
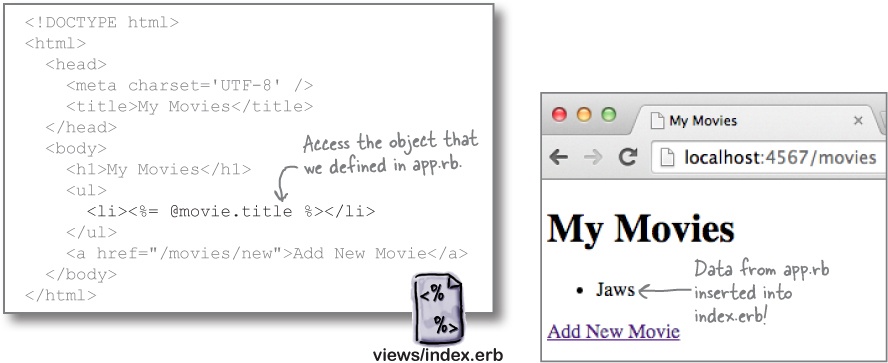
Let’s change the placeholder text in index.erb to an output embedding tag with the title attribute of @movie. If we ensure the app is running and reload the page, we’ll see our movie title!
Watch it
Don’t try to access local variables from your Sinatra route block in an ERB template!
Only instance variables from the main app will still be in scope within a template. (There is a way to set local variables in the template, but you’ll have to consult the Sinatra documentation at http://sinatrarb.com for that.) If you try to access a variable that’s local to the Sinatra route block, you’ll get an error!
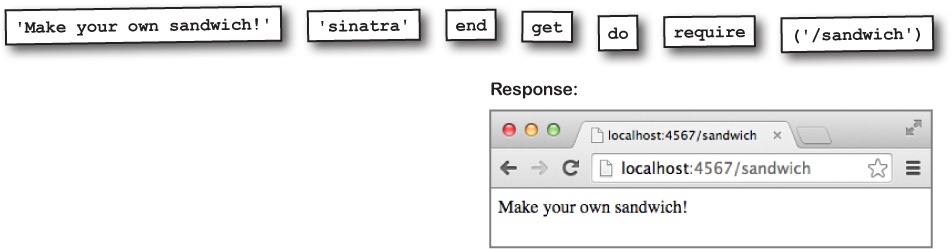
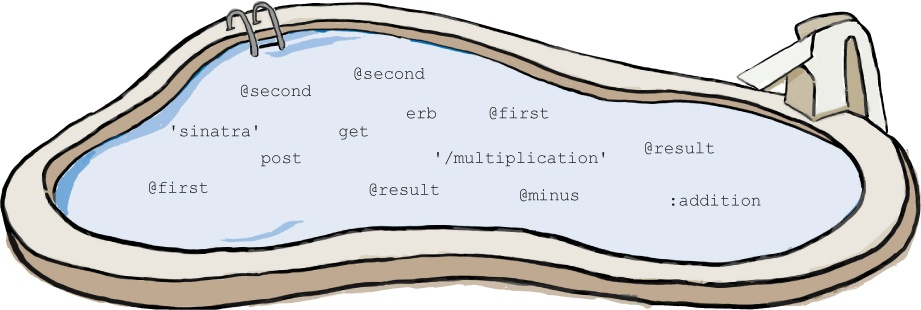
Pool Puzzle
Your job is to take code snippets from the pool and place them into the blank lines in the three files below. Don’t use the same snippet more than once, and you won’t need to use all the snippets. Your goal is to make a Sinatra app that will run and produce the browser responses shown.
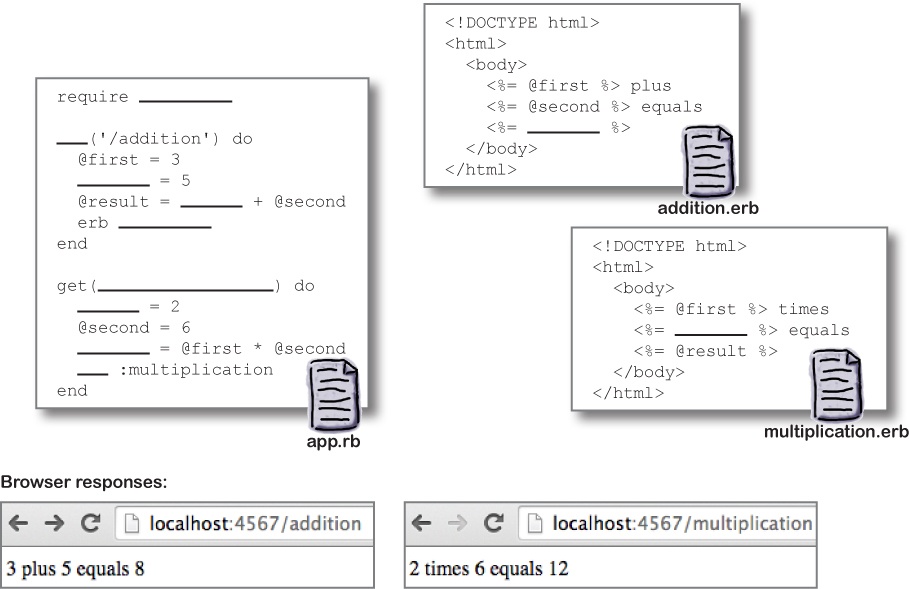
Note: each thing from the pool can only be used once!
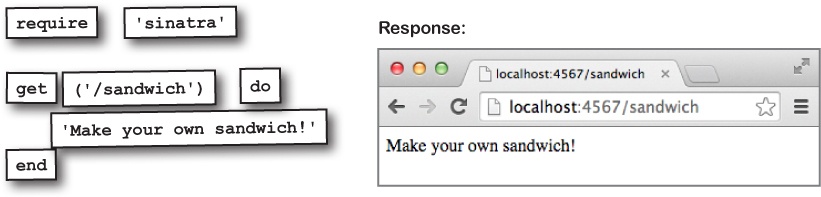
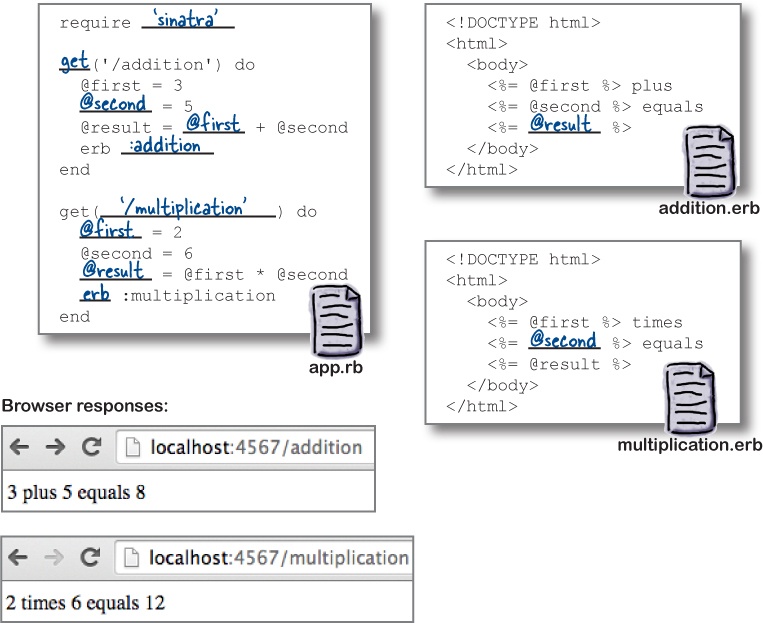
Pool Puzzle Solution
Your job is to take code snippets from the pool and place them into the blank lines in the three files below. Don’t use the same snippet more than once, and you won’t need to use all the snippets. Your goal is to make a Sinatra app that will run and produce the browser responses shown.
The regular embedding tag
The < %= %> output embedding tag allowed us to include one movie in our HTML. But we need to include a whole list. So we’ll have to revise our ERB template.
A second commonly used ERB tag is < % %>, the regular embedding tag. (Unlike the output embedding tag, it doesn’t have an equals sign.) It holds Ruby code that will be evaluated, but the results of which will not be directly inserted into the ERB output.
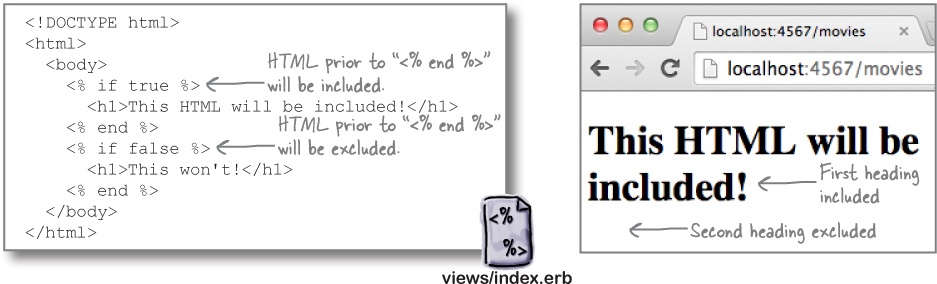
One common use of < % %> is to include certain HTML only if a condition is true, using if and unless statements. For example, if we used this code in index.erb, the first < h1> tag would be included in the output, but the second would be omitted:
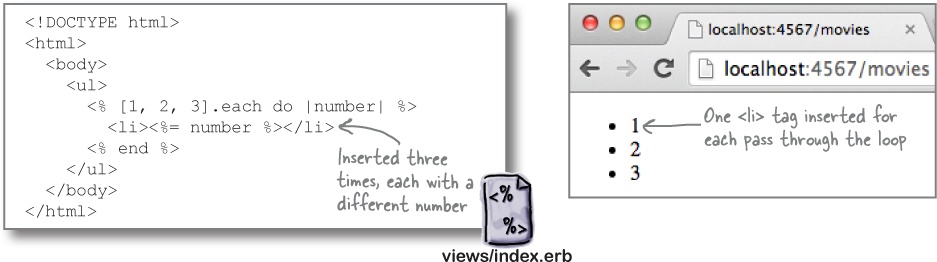
Regular embedding tags are also often used with loops. If you embed a loop within an ERB template, any HTML or output embedding tags within the loop also get repeated.
If we used the below template in index.erb, it would loop over each item in the array, inserting a < li> HTML tag for each. And since the value for the number block parameter changes with each pass through the loop, the output embedding tag will insert a different number each time.
Looping over several movie titles in our HTML
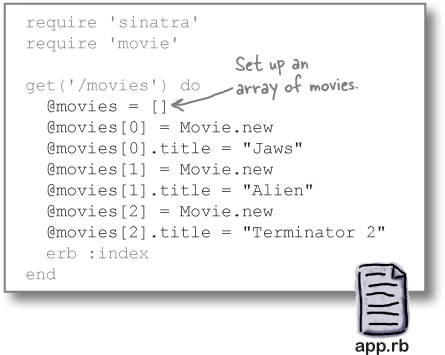
Now that we know how to use < % %> tags to add output for each item in an array, we’re ready to process a whole array of Movie objects. So let’s set up an array to process. (We’ll “hardcode” it for now, to get us started. Later, we’ll load in an array of movies from a file.)
Within the get('/movies') route block in app.rb, we’ll replace the @movie instance variable with a @movies variable that holds an array. Then we’ll add Movie objects to the array.
Now we need to update our ERB template as well. In index.erb, we’ll add < % %> tags that loop through each Movie in the array. Between the < % %> tags, we’ll add an HTML < li> tag, and an ERB tag that outputs the current movie’s title.
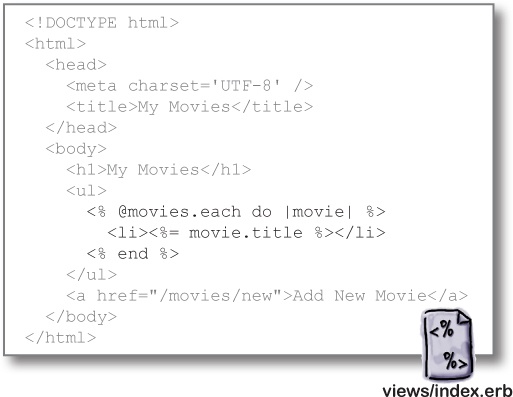
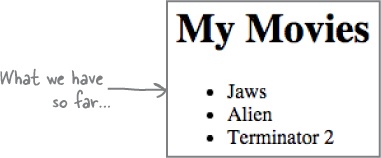
If we restart Sinatra and reload the page, we’ll see that an HTML < li> tag with a movie title has been inserted for each element in our @movies array!
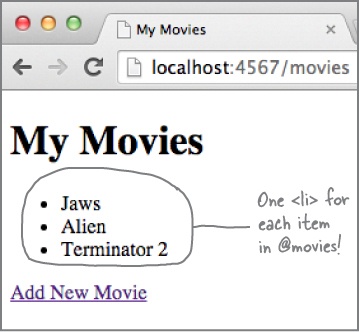
We’ve set up ERB embedding tags to display a list of movie titles in our HTML. That’s another task complete!
Below is an ERB template. Determine what its result will be, then fill in the blanks in the output to the right.
(We’ve filled in the first one for you.)
< !DOCTYPE html>
< html>
  < body>
    < % [1, 2, 3, 4].each do |number| %>
      < % if number.even? %>
        < li> < %= number %> is even. < /li>
      < % else %>
        < li> < %= number %> is odd. < /li>
      < % end %>
    < % end %>
  < /body>
< /html>
Output:
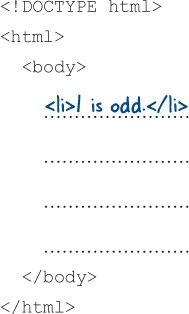
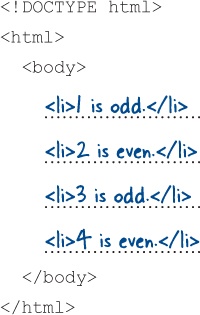
Below is an ERB template. Determine what its result will be, then fill in the blanks in the output to the right.
< !DOCTYPE html>
< html>
  < body>
    < % [1, 2, 3, 4].each do |number| %>
      < % if number.even? %>
        < li> < %= number %> is even. < /li>
      < % else %>
        < li> < %= number %> is odd. < /li>
      < % end %>
    < % end %>
  < /body>
< /html>
Output:
Letting users add data with HTML forms
Our app can display an HTML list of movies now, but it only has three movies. It’s hard to imagine anyone bookmarking our site at this point. To make the app more compelling, we need to give users the ability to add their own movies.
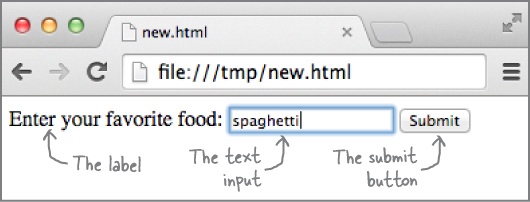
To allow users to add movies to our site, we’re going to need HTML forms. A form usually provides one or more fields that a user can enter data into, and a submit button that allows them to send the data to the server.
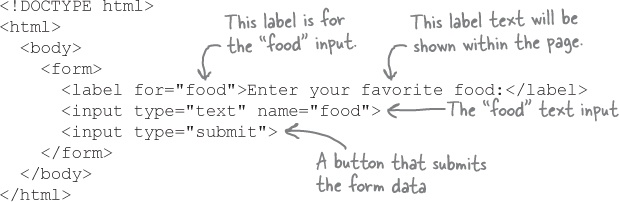
Below is HTML for a really simple form. There are some new tags here that we haven’t seen before:
< form>:This tag encloses all the other form components.< label>:A label for one of the form inputs. The value of itsforattribute needs to match thenameattribute of one of theinputelements.< input>with atypeattribute of"text":A text field where the user can enter a string. Itsnameattribute will be used to label the field’s value in the data sent to the server (kind of like a hash key).< input>with atypeattribute of"submit":Creates a button that the user can click to submit the form’s data.
If we were to load this HTML in the browser, it would look like this:
Seems simple enough! Let’s set up our app to load an HTML form for a movie’s data and display it in the browser.
Getting an HTML form for adding a movie
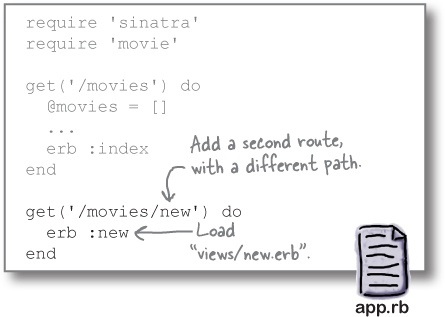
When we visit http://localhost:4567/movies currently, our app calls erb :index and displays the HTML from the index.erb file in the views directory. Now we need to add a second page with the HTML form to add a new movie...
To do that, we’ll need to add a second route to app.rb, right after the first. We’ll set it up to handle GET requests for the '/movies/new' path. In the route’s block, we’ll add a call to erb :new so that it loads an ERB template from new.erb in the views directory.
Now let’s create the ERB template for our form. We don’t need to embed any Ruby objects here, so this file will be pure HTML, without any ERB tags.
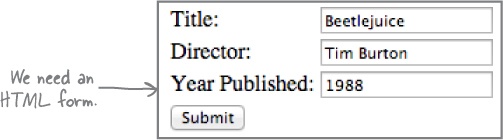
At the top of the page, we’ll set an appropriate title using the
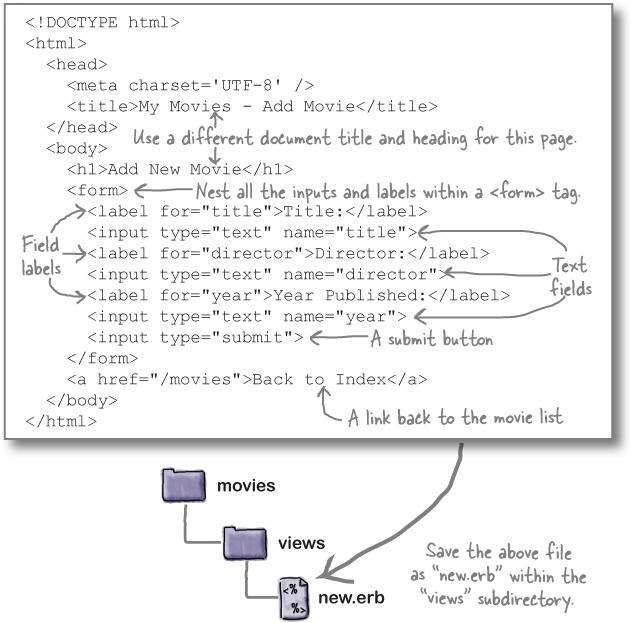
Then we’ll begin the form, using the < form> tag. Instead of having just one text input in this form, we’ll have three: one for the movie’s title, another for its director, and a third for the year it was released. Each < input> tag will have a different name attribute, to differentiate them. Each input will also have a corresponding < label>. As before, there will be a submit button at the end of the form.
Lastly, we include a link to the /movies path at the bottom of the page, which the user can click to return to the movie list.
As before, we need to save the template where the erb method will find it. Save it to a file named new.erb, within the views subdirectory.
HTML tables
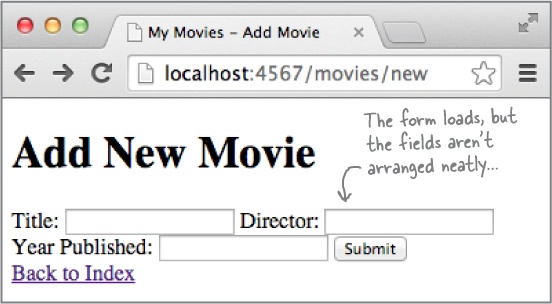
Let’s try out our new form! Restart your Sinatra app, and type the URL:
http://localhost:4567/movies/new
...into your address bar. (Or just click Add New Movie at the bottom of the index page; that link should work now that we’ve added a route for it.)
The form loads, but it’s hard to read! The fields are all jumbled together. Let’s take a moment to fix that, using tables.
HTML tables can arrange your text, form fields, and other content into rows and columns. The most commonly used HTML tags for making tables are:
< table>:This tag encloses all the other table components.< tr>:Stands for “table row.” Each row contains data in one or more columns.< td>:Stands for “table data.” There are usually several< td>elements nested within one< tr>element, each marking a column’s worth of data.
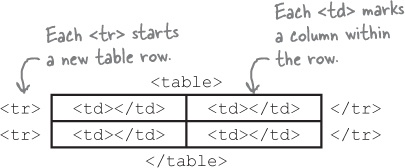
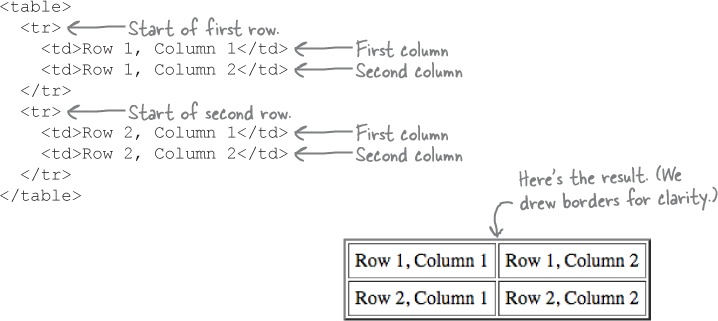
Here’s a simple HTML table, along with what it looks like in the browser. (Normally the table borders are invisible by default, but we’ve added them for clarity.)
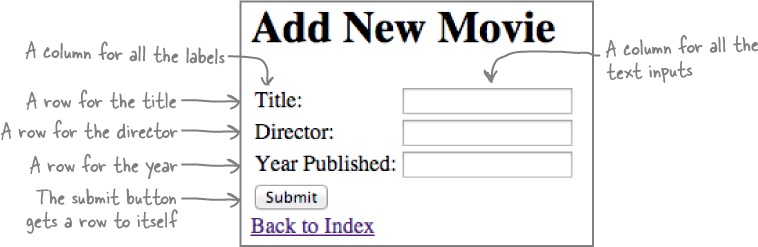
Cleaning up our form with an HTML table
Let’s clean up our form’s crowded appearance using a table. Modify new.erb as you see here:
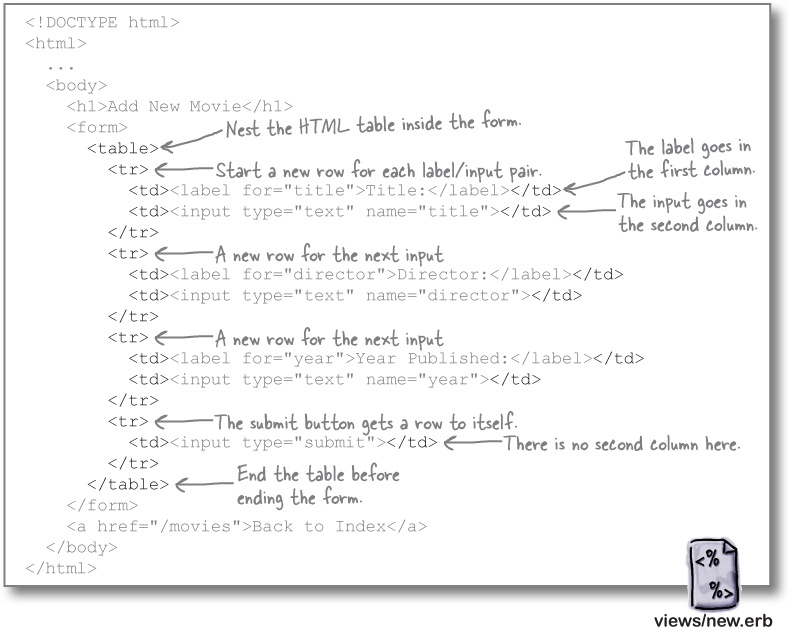
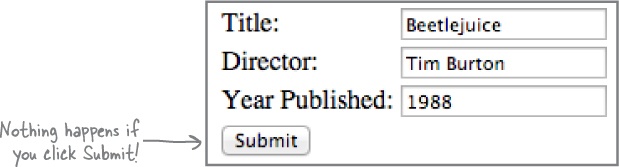
If you visit the '/movies/new' path again, you’ll see the form arranged much more neatly!
There’s still more to do
The '/movies/new' route is responding with our HTML form. That’s the last of our tasks for this chapter!
But...if you fill in that form and click Submit, not much happens! Our Sinatra app is set up to respond to HTTP GET requests to load the form, but there’s no way for the form to post the data back to the server.
Looks like we still have some work to do. Don’t worry—we’ll fix this (and more) in the next chapter!
Up Next...
This is it! The next chapter is the last. (Well, except for the appendix.) We’ve shown you how to present a form for users to enter data in their browser; we’ll wrap things up by showing you how to save that data, and load it back in later.