
After sequencing tasks and assigning resources, you finally have a project schedule (and a feeling of accomplishment). But like a crossword puzzle with some letters out of place, your Microsoft Project schedule can look okay even though mistakes are lurking under the surface. Until you’ve made sure that all elements of your project are based in reality—like task duration, dependencies, and resource assignments—your project’s finish date, cost, and schedule remain in question.
In addition to the inherent inaccuracy of project work and duration estimates, schedules pick up imperfections in several ways. Take tasks, for example. If you forget a link between two tasks, or your mouse snags the wrong task for a dependency, the task sequence doesn’t reflect the real relationships between tasks. In turn, these missing or incorrect task dependencies affect when tasks begin and end. Task constraints and tasks you schedule manually go on the calendar where you tell them to—for example, as soon as possible, no earlier than a specific date, or starting and finishing on specific dates. But if those constraints or dates are wrong—or you accidentally create constraints you don’t need, the schedule is both incorrect and less flexible. This chapter tells you how to find and correct task dependencies and inadvertent constraints.
While your project is under the microscope, you’re bound to find imperfections, like a task that starts before one of its predecessors or tasks that overallocate assigned resources. Project’s Task Inspector scans your file for scheduling problems and ways to improve your schedule, flagging scheduling problems with red squiggly lines and opportunities for improvement with green squiggly lines. When you make changes to your schedule, Project highlights all the fields affected by your edits. In this chapter, you’ll learn how to use the Task Inspector, change highlighting, and other handy tools for fixing your schedule.
Resource assignments are another weak link. It’s crucial to schedule around the availability of people or equipment, but you may have forgotten to tell Project about these schedule idiosyncrasies. In this chapter, you’ll learn how to use calendars to identify working and nonworking times for an entire project as well as individual resources. This chapter also describes other techniques for making a schedule more realistic, including how to handle part-time resources and take productivity levels into account.
After all that, you’re still not quite finished. Are the workloads assigned to resources reasonable? If you discover that some resources have crushing workloads, you can relieve the pressure by reassigning resources, contouring resource assignments, and leveling assignments to match the time resources have available. This chapter explains how to do all of the above.
Project can’t read your mind. It can’t point out missing task dependencies or dependencies that depend on the wrong things. Similarly, Project adds the task constraints you tell it to add. The problem is, seemingly innocuous actions produce constraints you never intended. Review tasks to make sure you have the dependencies and constraints you want—and only those. What Project can do is make it easier to find task dependencies and constraint problems.
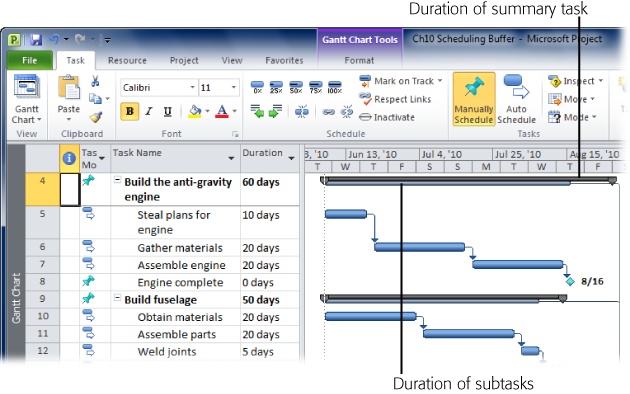
Figure 10-1. If the subtasks stay within the duration of the summary task duration, the rolled up summary task bar is blue, showing that you have extra buffer time. If the subtasks run longer than the summary task duration, the rolled up summary task bar turns red. The Duration field for the summary task shows the duration you specified, while the Scheduled Duration field shows the duration of the subtasks that belong to the summary task.
Following the link lines in a Gantt Chart is like trying to untangle a plate of spaghetti. It’s hard to trace the lines to see if a task links to the right predecessors or if dependencies are set up correctly. Although there’s no shortcut for checking task dependencies, this section describes some techniques to lighten the chore.
Most people find identifying the precursors to a particular task easier than figuring out the downstream effects. However, reviewing both predecessors and successors is the most reliable way to find problems with task dependencies. Here’s how you do it:
If the Task Entry view isn’t visible, choose Task→View. Click the down arrow and choose More Views. In the More Views dialog box, double-click Task Entry.
With the standard Task Entry view, the Gantt Chart table area appears on the left, and the timescale is on the right in the Project window’s top pane. The Task Form appears in the bottom pane.
Scroll through the list of tasks, and review the task link lines in the Gantt Chart timescale for any errors.
Although link lines can look messy, you may still spot problems with task dependencies by quickly scanning the timescale. You may notice a task dependency connected to the wrong task. More often, you spot tasks with missing predecessors; they’re the ones stranded at the project start date. The box on Seeing the Trees, Not the Forest tells you how to make link lines easier to see.
If you find a task that’s missing a predecessor, link it to the appropriate task with your favorite method (Building Relationships Between Tasks).
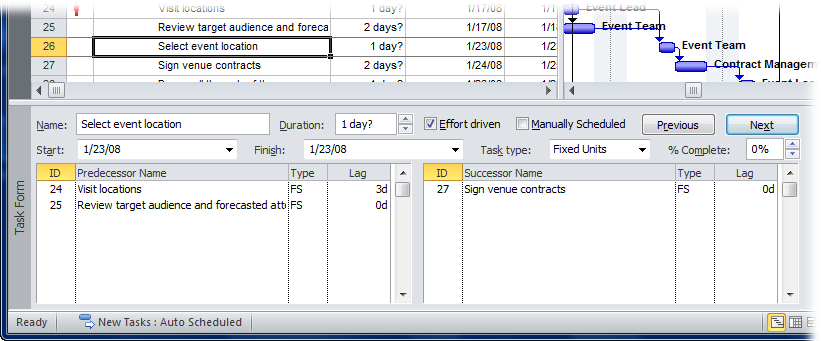
For a clearer look at task dependencies, first right-click the Task Form and then, from the shortcut menu, choose Predecessors & Successors.
Project changes the tables in the Task Form to show predecessors on the left side and successors on the right side, as shown in Figure 10-2. In this view, you can really scrutinize your task dependencies.
To begin reviewing at the very first task, press Ctrl+Home.
Project selects the first task in the Gantt Chart table area. Press the down arrow to select the next task.
For each task in the task list, examine the values in the Task Form.
Look at the tasks in the Predecessor Name column. Make sure that they’re predecessors to the selected task. Are there other predecessor tasks that aren’t listed? If so, link the two tasks as you would normally. Review the tasks in the Successor table in the same way.
Most tasks connect to one another with a Finish-to-Start task dependency (How Tasks Affect One Another). Make sure the dependency type is correct for each predecessor and successor. Also verify the lag or lead time. Remember, lag time (a delay from one task to the other) is a positive number. If the second task gets an early start, the lag becomes a negative number. (The box on Leaving Buffers Between Tasks describes a different kind of buffer—one that many tasks can share in case they require more time.)
As you move through the project dates, use the timeline to quickly scroll to different date ranges in the timescale (Customizing the Timeline).
If the timeline doesn’t appear above the Gantt Chart view, choose View→Split View, and then turn on the Timeline checkbox. (You can display either the timeline or the Details pane, but not both. Displaying the timeline closes the Details pane if it’s visible.) To scroll the timescale, hover the pointer over the blue bar at the top of the timeline. When it changes to a four-headed arrow, drag to the left to move the Gantt Chart timescale back in time or drag to the right to advance forward in time. You can drag either end of the blue bar in the timeline view to adjust the earliest or latest date in the Gantt Chart timescale, as shown in Figure 10-3.
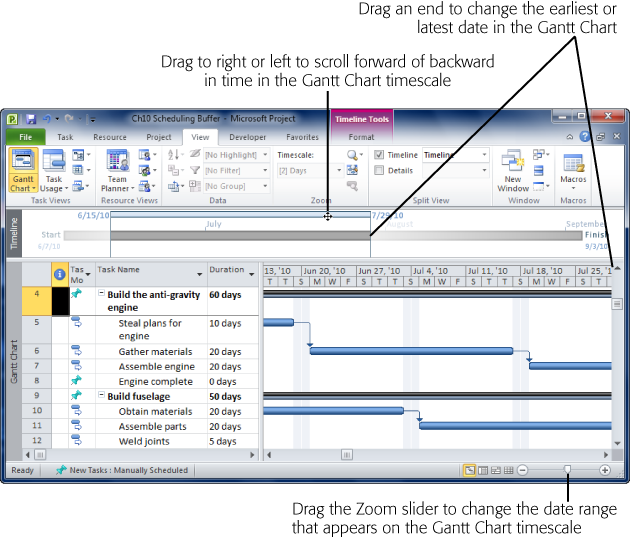
Figure 10-3. Hover the pointer over the blue bar at the top of the Timeline. When it changes to a four-headed arrow, drag to the left to move the Gantt Chart timescale back in time or drag to the right to move forward in time. You can drag either end of the blue bar (the pointer changes to a two-headed arrow) in the Timeline view to change the earliest or latest date in the Gantt Chart timescale. You can also drag the zoom slider in the status bar (at bottom right of the Project window) to change the duration that appears in the Gantt Chart timescale.
Repeat steps 5 and 6 until you’ve reviewed all the tasks in the project.
When you get to the final task or milestone, you’re done!
If some task information was unavailable when you started your project plan, you may have created manually scheduled tasks to record the info you did have. Project changes the task bar’s appearance to indicate what information is available or missing (see Creating Tasks with Incomplete Information). As your task information gains shape, you can fill in the missing task fields and turn many of those manually scheduled tasks into auto-scheduled ones. (In some cases, you create manually scheduled tasks so you can pin the tasks’ dates to the calendar. Those tasks remain manually scheduled for the duration of the project.) Be sure to review all your manually scheduled tasks to make sure you’ve filled in missing task information.
The built-in Tasks Without Dates filter (choose View→Data→Filter→More Filters and then double-click Tasks Without Dates) shows tasks without start and finish dates. However, incomplete task info comes in other forms, like tasks with start dates but no finish dates, so that filter doesn’t show all the tasks you need to see. Filtering your task list to show all manually scheduled tasks is a better place to start. Here’s how you can filter your task list and switch tasks to auto-scheduled as you fill in their missing info:
Display the Entry table by right-clicking the Select All cell at the intersection of the column heading row and the Task ID column and then choosing Entry.
To insert the Task Mode field in the current table, right-click the column heading to the right of where you want to insert the field and then choose Insert Column. In the drop-down list, choose Task Mode.
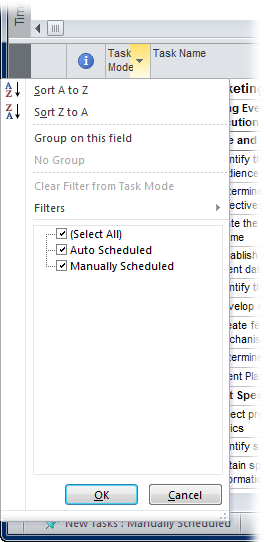
To filter your task list to show only Manually Scheduled tasks, click the down arrow in the Task Mode field, as shown in Figure 10-4; turn off the Auto Scheduled checkbox; and then click OK.
The task list includes all manually scheduled subtasks and the summary tasks to which they belong. A filter icon appears to the right of the Task Mode column name, to indicate that the list is filtered by the column.
Figure 10-4. To return to the full task list, you can click the down arrow in the Task Mode column again and turn on the Auto Scheduled checkbox. An even easier way to restore the full task list is by pressing F3, which removes the filter. To turn off summary tasks, choose Format→Show/Hide, and then turn off the Summary Tasks check box. Keep in mind, turning off the Summary Tasks check box hides all summary tasks, including those that are manually scheduled.
Review each task in the list, and fill in any missing information.
A partially shaded task bar without end caps means you haven’t defined either a start or a finish date. If a task has only one end cap, then the duration or one of the task’s dates is missing. To keep the task manually scheduled, fill in the task’s Start or Finish fields. You can also switch the task to auto-scheduled, as described in step 4, so Project can use the task’s predecessors and successors to calculate its dates.
To switch a task to auto-scheduled, click the task’s Task Mode cell, click the down arrow that appears, and then choose Auto Scheduled. Or right-click the task and then choose Auto Scheduled from the shortcut menu.
The Auto Scheduled icon looks like a task bar with an arrow pointing to the right. In addition, the task bar style in the timescale changes to show that the task is auto-scheduled. The auto-scheduled task remains in the view. To reapply the Manually Scheduled filter, simply press Shift+F3. Project hides any tasks you’ve switched to auto-scheduled.
Repeat steps 3 and 4 until you’ve filled in all the missing information.
When the task list shows only the manually scheduled tasks you created to control task dates, you’re done!
Most schedules originate from a start date, and the project’s finish date is calculated from there. When you schedule a Project file from the start date (Setting Up Options For a Project), Project automatically assigns the As Soon As Possible constraint to new auto-scheduled tasks, so every task begins on the earliest possible date. (If you work backward from a finish date, Project assigns the As Late As Possible constraint.) Other date constraints come in handy now and then. For example, you can change the assignments for a key resource to a Start No Earlier Than constraint to schedule assignments for when she returns from sabbatical. Unfortunately, some Project actions create date constraints you don’t intend (Manually Scheduling Task Dates). For example, typing a specific date in a Start or Finish cell creates a new date constraint for that task.
Tip
In Project 2010, you can go one step further and fix both the Start and Finish dates for a task by changing its Task Mode to Manually Scheduled and then filling in the Start and Finish fields. See Planning with Manually Scheduled Tasks to learn more.
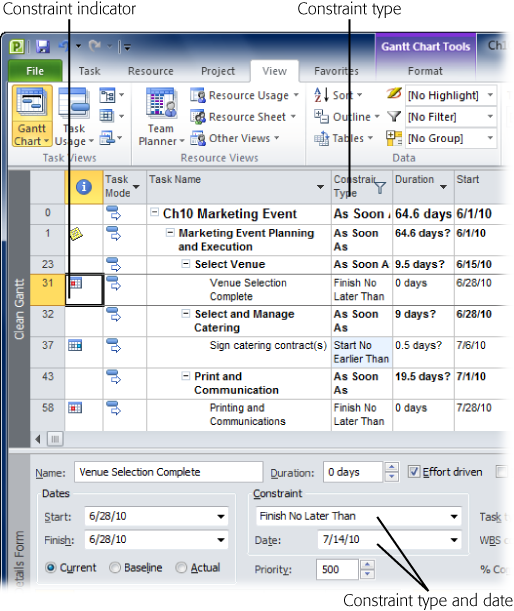
The hunt for unwanted, unintended constraints is a must-do task on every project manager’s checklist. Project offers two ways to examine your date constraints: the Constraint Indicator icons, and the Constraint Type field.
Here are the steps for finding and fixing date constraints:
Display the Task Details Form in the Task Entry view’s bottom pane by choosing View→Split View. If necessary, turn on the Details checkbox. Then choose More Views in the Details drop-down list.
The More Views dialog box appears.
In the More Views dialog box, select Task Details Form, and then click Apply.
The Task Details Form includes the Constraint Type and Constraint Date fields. When the Details pane is turned on, you can temporarily hide it by positioning the cursor over the horizontal gray divider between the top and bottom pane. When the cursor changes to a two-headed arrow, double-click the gray bar. To make the bottom pane visible again, double-click the small rectangle immediately below the vertical scroll bar.
To display the Constraint Type column in the view table, right-click in the table heading area. From the shortcut menu, choose Insert Column, and then choose Constraint Type.
The Constraint Type column appears in the table.
Filter the task list for constraints other than As Soon As Possible by clicking the down arrow to the right of the Constraint Type column heading, turning off the As Soon As Possible checkbox, and then clicking OK.
Project filters the task list showing only tasks that have a constraint type other than As Soon As Possible, as you see in Figure 10-5.
Figure 10-5. Tasks that have a date constraint other than As Soon As Possible or As Late As Possible sport a date constraint icon in the Indicators column. Project shows tasks that pass the filter along with the summary tasks to which they belong.
Tip
You can obtain the DateConstraints custom filter, which hides As Soon As Possible tasks, by downloading the ProjectMM_Customizations.mpp file from www.missingmanuals.com/cds. See Copying Elements Between Files to learn how to copy elements to your global.mpt file.
Select a task with a date constraint so its information appears in the Task Details Form in the bottom pane.
The Task Details Form shows both the constraint type and the date, which can jog your memory about why you set a constraint.
If the constraint shouldn’t be there, choose As Soon As Possible from the Constraint Type drop-down list, and then click OK.
Project changes the constraint date to NA, and the Constraint icon disappears from the Indicators column. When you’re done, the only date constraints you should see are the ones that belong there.
Resources aren’t at your beck and call 24/7. Team members take vacations, attend training and conferences, and get sick. In addition, team members may work part time or work 4 long days and take Friday off. Incorporating nonworking time and specialized work arrangements makes a Project schedule more likely to forecast how the project will actually play out. In Project, calendars carve out working and nonworking times.
Calendars are multitalented: You can apply a calendar to an entire project, individual resources, or specific tasks, as described in Chapters Chapter 6 and Chapter 8. For instance, you can set up a calendar to indicate corporate holidays or factory closures, and use that calendar for all your projects. On the other hand, a resource calendar shows a team member’s particular work schedule and time off.
Project comes with a few built-in calendars (Setting the Standard Workdays), and automatically applies the built-in Standard calendar to new projects you create. However, you can modify existing calendars or build completely new ones, and then apply them to custom-fit your resources’ work hours.
This section explains creating and customizing calendars in Project. (Working with calendars changed radically beginning in Project 2007, as the box on Changing Times in Project 2007 and 2010 explains.) You’ll also find a quick review of how to apply calendars to projects, resources, and tasks. See Building Reality into Assignments on page 253 to learn how to integrate calendars, resource units, and resource availability to resolve common resource scheduling issues.
Tip
You can copy calendars you create using the Organizer so they’re available to other projects. If you modify the Standard calendar in one Project file to include company holidays, copy that calendar into the Project global template to share that calendar with all new projects.
You can create as many calendars as you need. Whether you want to create a calendar for a project, a resource, or task, the steps are the same: Create the new calendar, edit it to reflect your project’s actual working and nonworking times, and then apply it. Here are the steps for creating a new calendar:
Choose Project→Properties→Change Working Time.
The Change Working Time dialog box opens. The “For calendar” box shows the calendar you’ve applied to the project. For example, Standard (Project Calendar) indicates that the Standard calendar is set as the project calendar for the current Project file.
Click Create New Calendar.
The Create New Base Calendar dialog box appears, as shown in Figure 10-6. Base calendar is Project’s name for calendars that act as templates for other calendars. The Standard calendar is a base calendar, because you can use it as the foundation for customized project calendars or for resource calendars.
To use an existing calendar as your starting point, leave the “Make a copy of” option selected, and then, in the “Make a copy of _ _ calendar” drop-down list, choose the calendar you want.
For a calendar that’s very different from any you have already, you can create one from scratch by selecting the “Create new base calendar” option.
In the Name box, be sure to type a new name for the calendar.
If you copy an existing calendar, Project adds “Copy of” in front of the calendar name. If you create a new calendar, Project fills in the box with a name like Calendar 1. The best names are short but give you a good idea of the working time they represent, like “Night Shift.”
Click OK.
The Create New Base Calendar dialog box closes, and the new calendar name appears in the “For calendar” box. Because this new calendar is not the project calendar, only the calendar name appears in the box. (Applying Calendars shows how to make a calendar the project calendar.) Now you’re ready to set the calendar’s working times, which the next section describes in detail.

Any calendar in a Project file, built in or one of yours, is fair game for modification. You can most easily define the work and holiday schedule for your organization by modifying the built-in Standard calendar to match your organization’s work time and days off. Then, if you store that modified Standard calendar in the Project global template (Copying Elements Between Files), every new Project file already knows about your work weeks and time off. (If you’re a Project 2003 veteran, the way you specify working time changed in Project 2007 and takes some getting used to, as the box on Changing Times in Project 2007 and 2010 explains.)
Setting up work schedules for people and tasks is another reason to modify calendars. You could create a “Night Shift” calendar for the teams that work the graveyard shift and specify the work times as 11 p.m. to 8 a.m. Then you apply that calendar to every resource on the night shift.
If you create a brand new calendar, Project selects it as soon as you create it. However, if you want to modify an existing calendar, you have to select it first by performing the following steps:
Choose Project→Properties→Change Working Time.
The Change Working Time dialog box opens, showing the project calendar in the “For calendar” box.
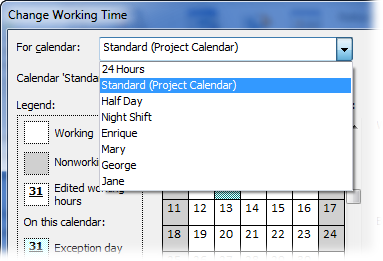
In the “For calendar” drop-down list, choose the calendar you want to modify, as illustrated in Figure 10-7.
The “For calendar” drop-down list starts with built-in calendars and any new calendars you’ve created. Calendars for each resource in the Project file appear at the end of the list.
Every calendar in a Project file comes with one work week. When you select a calendar and select the Work Weeks tab, the name of the first entry is [Default]. The Start and Finish cells are set to NA, which means that the work week applies to all dates. To define the typical work week, simply modify the [Default] work week. For example, the built-in Night Shift calendar schedules work hours from 11 p.m. to 8 a.m. with a break between 3 and 4 a.m. If your night shift runs from 12 a.m. to 8 a.m., then you’d change the work times in the [Default] work week, as described in the next section.
Note
Initially, the [Default] work week considers weekdays as workdays and weekends as non-workdays. In addition, the start and end work times you specify in Project calendar options (Setting calendar options) are the basis for the standard start and end times for work hours for all days in all calendars. To set different work times on specific days, you must specify those work times in either calendar work weeks or exceptions.
Because you can define as many work weeks as you want in a calendar, here are some examples of why you might create additional work weeks:
Company-wide work schedules. Create additional work weeks for company-wide nonworking time that lasts one or more weeks—for example, a factory shutdown for the last two weeks of the year or Fridays off during the winter. If your project team has hockey practice every Friday from December 1 until March 31, you can create a Hockey Season work week in the project-wide Standard calendar to define winter work weeks as Monday through Thursday.
Resource work schedules. Work weeks in a resource calendar are great when someone works an altered schedule for a few weeks or months; for example, when someone works half-days for two months while recuperating from an illness. You simply select the resource calendar and then create a work week for the recuperation schedule.
Resource vacations. Resource calendar work weeks are one way to show people’s vacation time, although a calendar exception achieves the same result.
A new work week needs a name as well as start and stop dates for the modified work schedule. Then you define the working days and hours as you do for the [Default] work week, as described in the previous section. Here are the steps for creating a new work week:
In the Change Working Time dialog box, in the “For calendar” drop-down list, select the calendar, and then click the Work Weeks tab.
[Default] appears in the first row with any other work weeks you’ve defined in Rows 2 and higher.
On the Work Weeks tab, click the first blank Name cell, and then type a name for the work week schedule.
Use a meaningful name, like "Hockey Season,” for the winter work week. If you create a work week in a resource calendar, you might call the work week "Spring Vacation" or "Medical Leave.”
Click the Start cell in the same row, click the down arrow that appears in the cell, and then choose the first date to which the work week applies, as shown in Figure 10-8. Click the Finish cell in the same row, and then choose the last date to which the work week applies.
When you click the down arrow in a Start or Finish cell, a calendar drop-down appears. Click the left arrow or right arrow to move one month into the past or future. To select a date, click the date in the monthly calendar. If the date is several months in the future, typing the date (like 12/1/10) may be faster.
To specify workdays and times, click Details. Then specify the workdays and times as described in the next section. Click OK when you’re done.
When you open the Details dialog box for a work week, the title of the dialog box is “Details for” followed by the name of the work week.

Whether you want to change the workdays or work hours for a calendar’s standard work week or for a special work week you created, here’s how you define workdays and work hours for a work week:
In the Change Working Time dialog box, select the calendar, and then click the Work Weeks tab. Select the work week you want to modify.
If you haven’t added any additional work weeks, the only entry you see in the Work Weeks tab is [Default] in the Name cell of Row 1.
To specify the workdays and times, click Details.
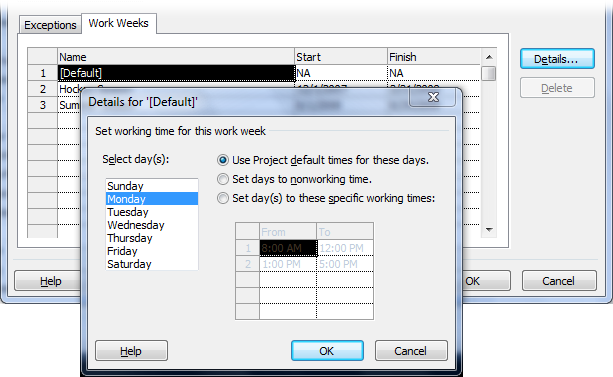
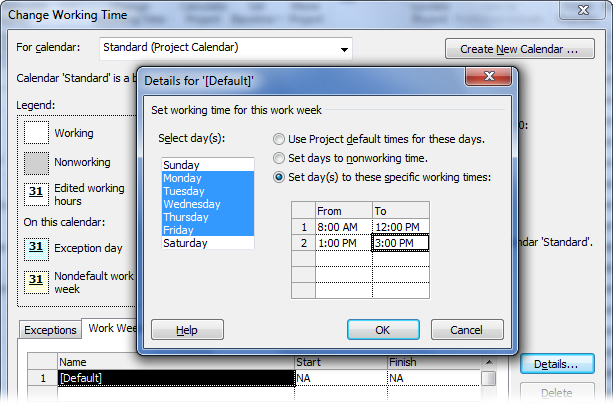
The Details dialog box appears with the heading “Details for ‘work week name’ “, as shown in Figure 10-9.
In the “Select day(s)” list, select the day or days you want to modify.
To select a single day, click it. To select several adjacent days, drag over the days (or click the first day and Shift-click the last). To select nonadjacent days, Ctrl-click each day you want to select.
If you select multiple days that use different settings, none of the options are selected and the work time table is blank. When all selected days use the same settings, Project shows the common work times in the work time table.
Select the appropriate working time option.
The initial setting for every day of the week is “Use Project default times for these days”, which sets weekdays as workdays and weekends as non-workdays. To change a workday to a nonworking day (for example, to change Friday to a nonworking day), select the “Set days to nonworking time” option.
To change the work hours for any workday, select the “Set day(s) to these specific working times” option. This option makes the working time table editable, so you can change the work hours for the selected days. In addition to changing work hours, use this option to change a non-workday like a weekend day to a workday.
To change the work hours in an existing entry, click the cell, and then type the new time.
When you click a cell in the working time table, Project selects the entire contents, so you simply start typing to change the value.
Working time text boxes behave like all other text boxes. You can edit times by clicking to position the insertion point, or by dragging to select the text you want to edit. The box on Telling Project Time provides some shortcuts for editing times.
To add a new row of working time, click the first blank From cell, and then type the starting time.
Suppose you switch to 14-hour days and add a second break a few hours after lunch. You can add a new row for the third set of work hours.
To remove a row of work time, drag across both the From and To cells, and then press Delete.
To change a full workday to a half workday, you can delete the after-lunch work hours. (Don’t delete the value in only one of the cells. If you try to leave an empty cell, Project tells you the value isn’t valid. Press Esc to restore the deleted value, and then drag across the From and To cells and press Delete.)
To specify working times for other days, repeat steps 3–7.
Otherwise, click OK to close the dialog box.
Work weeks assign the same schedule of workdays and times over a period of time. As the name implies, calendar exceptions are better for shorter changes to the work schedule. Consider using calendar exceptions for the following situations:
Single days with a different schedule. A company holiday and a half-day for a corporate meeting are perfect examples of single-day exceptions.
Multiple days with a different schedule. For example, you can set a modified schedule for a multiday training class that someone attends, a conference, or a series of short days when the auditors are in town.
Recurring changes. Use exceptions to specify altered work times that occur on a regular schedule, like company meetings or the monthly ice cream social.
Altered work schedules longer than a week. You can use an exception for a schedule change that lasts longer than a week as long as all the days of an exception are either nonworking days or have the same working times. (For that reason, work weeks and exceptions work equally well for factory shutdowns and people’s vacations.)
Here are the steps for defining an exception in a calendar:
In the Change Working Time dialog box, in the “For calendar” drop-down list, select the calendar, and then click the Exceptions tab.
Project doesn’t set up any exceptions automatically, so all the rows on the Exceptions tab start out blank.
On the Exceptions tab, click the first blank Name cell, and then type a name for the exception, like Quiche Training.
You can create as many exceptions in a calendar as you need—to set each company holiday in the year or to reserve vacation time for someone who frequently flits around the world, for example.
Click the Start cell in the same row, click the down arrow that appears in the cell, and then choose the first date to which the exception applies. Click the Finish cell in the same row, and then choose the last date for the exception.
Start and finish dates can be the same day, a few days apart, or any two dates you want.
To define the days and times for the exception, click Details.
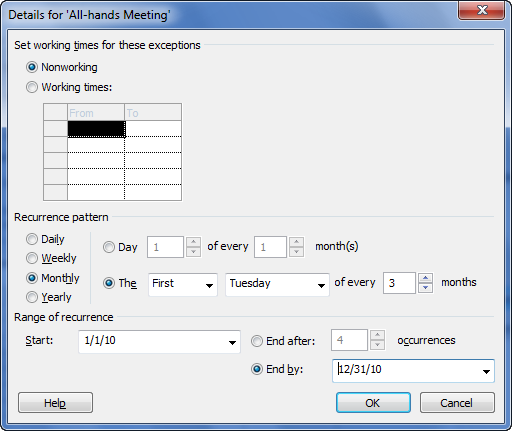
The “Details for” dialog box opens. Because many exceptions are holidays and other days off, Project automatically selects the Nonworking option. If the exception is for nonworking time, just click OK. However, if you’re creating an exception for a few days of altered work times, select the “Working times” option, as shown in Figure 10-10.
For one or more adjacent days, you can ignore the settings in the “Recurrence pattern” and “Range of recurrence” sections. Project automatically sets them to model your nonworking and working settings for every day between the start and finish dates. The next section explains how to create recurring exceptions.
If the exception specifies modified working times, click OK when you’ve finished setting the working times in the Working Times table.
The Details dialog box closes, and the exception is ready to go on the Exceptions tab.
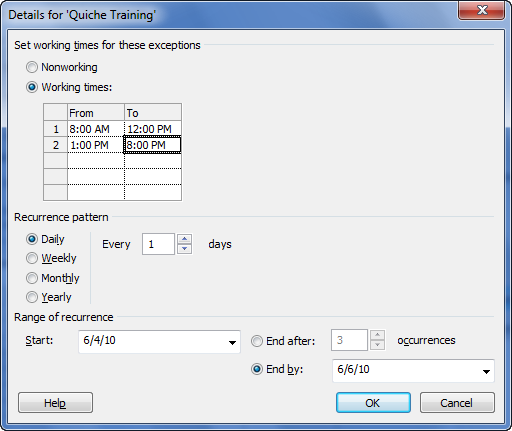
Figure 10-10. When an exception is for one or more days with working times outside the norm, select the “Working times” option. The working times table springs to life, and fills in the standard working times you set in the Project calendar options (page 139). As you do for work week details, fill in the From and To times that apply to every day of the exception, and then click OK.
Sometimes, exceptions to the work week occur on a regular schedule—like the quarterly half-days of nonworking time for all-hands meetings. Recurring tasks and recurring exceptions have the same types of frequency settings, as the box on Recurring Tasks vs. Recurring Exceptions explains. However, recurring tasks represent project work that repeats, while recurring exceptions represent repeating special work times.
The details for a calendar exception specify whether exception days are nonworking or working days (along with the work hours). The lower part of the “Details for” dialog box has options to set a frequency for the exception and when it starts or ends. Here are the steps for defining a recurring exception in a calendar:
In the Change Working Time dialog box, select the calendar from the “For calendar” drop-down list, and then click the Exceptions tab.
The Exceptions tab appears.
Enter the name, start date, and finish date as you would for a regular exception.
Recurring exceptions tend to span longer periods of time than exceptions for holidays or training classes. For example, the start and finish dates for an annual corporate retreat exception could be 3 years apart—if you’re scheduling the next three retreats at once.
Click Details and specify the nonworking or working time settings for the days in the recurring exception.
Defining the working and nonworking days and times for a work week describes how to specify nonworking and working times for days. With a Project calendar exception, every day of the exception must use the same settings.
In the “Recurrence pattern” section, select the option for the frequency, as demonstrated in Figure 10-11.
The frequency options include Daily, Weekly, Monthly, and Yearly. The settings that appear depend on which frequency option you select. For example, the Weekly option has a checkbox for specifying the number of weeks between occurrences (1 represents every week, 2 represents every other week) and checkboxes for the days of the week on which the event occurs. The Monthly option has one option for specifying the day of the month, and another for specifying the week and day of the week (like first Monday).
Figure 10-11. For a recurring exception, you specify the recurring pattern as well as how long the pattern lasts. Project initially sets the pattern to every day by selecting the Daily option and filling in the “Every _ _ days” box with 1. Project also fills in the Start and “End by” dates using the exception start and end dates.
In the “Range of recurrence” section, specify the date range or the number of occurrences.
Project fills in the “Range of recurrence” Start box with the start date from the Exceptions tab—basically, the first date of the first exception. It selects the “End by” option and then fills in that box with the finish date from the Exceptions tab, the latest date for the entire recurrence. Suppose you want to carve out time from your project for a quarterly meeting every 3 months during the calendar year. You could set the Start date to 1/1/10 and the “End by” date to 12/31/10. If the frequency is set to Monthly on the first Tuesday of every 3 months, then Project automatically sets aside 1/5/10, 4/5/10, 7/6/10, and 10/5/10 for the meetings.
Sometimes you want to specify a number of occurrences instead, which is in fact the easier way to schedule a specific number of meetings. You don’t have to change the Start date. However, to set a number of occurrences, select the “End after” option, and then type the number (4 in this example) in the “occurrences” box. If the Finish date you set on the Exceptions tab is too early to schedule all the occurrences, Project automatically changes it. For example, if the Finish date were set to 2/15/10, Project would change it to 10/5/10 to accommodate the four quarterly meetings.
Click OK.
Whether you set dates or a number of occurrences, a recurring exception can repeat up to 999 times. If your recurrence pattern results in 1,000 occurrences or more, Project displays a warning when you click OK.
Sometimes, entire projects follow a different work schedule, like a subproject with a partner who has an enviable holiday schedule. More often, one or more resources need their own work calendars to reflect work shifts, vacations, or unique working hours (like those of the token vampire on your team). The occasional task may have its own calendar, like the highway repaving task that has to run from 9 p.m. to 5 a.m.
To apply a calendar to a project, follow these steps:
With the project open, choose Project→Properties→Project Information.
The Project Information dialog box opens.
In the Calendar box, choose the calendar you want, and then click OK.
Project uses this calendar for the project’s working and nonworking time (except where you’ve applied a special calendar to any resource or task).
Applying a calendar to a resource is even easier:
In the Resource Sheet, at the very right end of the table, click the resource’s Base Calendar cell.
The down arrow appears on the right side of the cell.
In the drop-down list, choose the calendar you want to apply.
Project uses that calendar whenever you assign that resource to tasks.
Tip
Resources start out using the calendar you apply to the project, unless you tell Project otherwise. If you want to define a resource’s vacation time, you make those changes in the resource’s calendar: Choose Project→Properties→Change Working Time. In the “For calendar” drop-down list, choose the resource’s name. Now you can define the work weeks or exceptions for the resource. (If you double-click a resource’s name in the Resource Sheet, the Resource Information dialog box opens. On the General tab, click Change Working Time. The Change Working Time dialog box opens right to that resource’s calendar.)
Sometimes tasks must run at specific times, like a planned outage that has to take place in the middle of the night. Although task calendars aren’t that common, you can apply a calendar directly to a task.
Note
You must create the task calendar you want to apply before you open the Task Information dialog box.
To apply a calendar to a task, do the following:
In the table area of a view, select the task or tasks that require a special calendar, and then choose Task→Properties→Information.
If you select only one task, then the Task Information dialog box opens. If you select more than one task, then the Multiple Task Information dialog box opens instead. The fields in these two dialog boxes are identical.
Click the Advanced tab and, in the Calendar drop-down list, choose the calendar you want to apply. Click OK to close the dialog box and apply the task calendar.
The “Scheduling ignores resource calendars” checkbox is initially turned off, so Project schedules work only during working hours common to both the assigned resources and the task. If the task calendar and resource calendars don’t have any mutual work time, a message box warns you that the calendars don’t jibe. You can change either the task calendar or the resource calendar to create some common time. Another approach is to schedule work by the task calendar only—by turning on the “Scheduling ignores resource calendars” checkbox. Project then assumes that the assigned resources work during the task’s work time.
In Project 2007, the Task Drivers pane showed you the factors that affect when tasks occur. In Project 2010, the Task Inspector takes a more proactive approach to this responsibility. The Task Inspector scans your project for problems like tasks starting before their predecessors or a subtask’s finish date occurring after the summary task’s finish date. Because Project doesn’t calculate dates for manually scheduled tasks, they’re particularly prone to schedule problems. In Project 2010, red squiggly lines indicate potential schedule problems, just like the ones for typos in Microsoft Word. When you right-click a cell with a red squiggly line, you can open the Task Inspector to see what the fuss is about or choose the action you want to perform from the shortcut menu.
Note
The Task Inspector also checks your schedule for ways to improve it. For example, if it sees a task that could start earlier, the program draws a green squiggly line under the Start date value. Make decisions about schedule optimizations in the same way you use Task Inspector to correct problems.
A schedule problem in one task often starts somewhere else in your project—in an element that controls the task’s start date, like predecessors, calendars, or date constraints, to name a few. The Task Inspector lists all the factors that affect the task you select, so you can decide what to do. The Task Inspector can also help after you’ve begun project execution. If an important task is delayed, you can look at the factors that affect the task to identify items to change to get back on track. For instance, you might talk to the team leader for the task that’s causing the delay, or the manager for a person who’s unavailable.
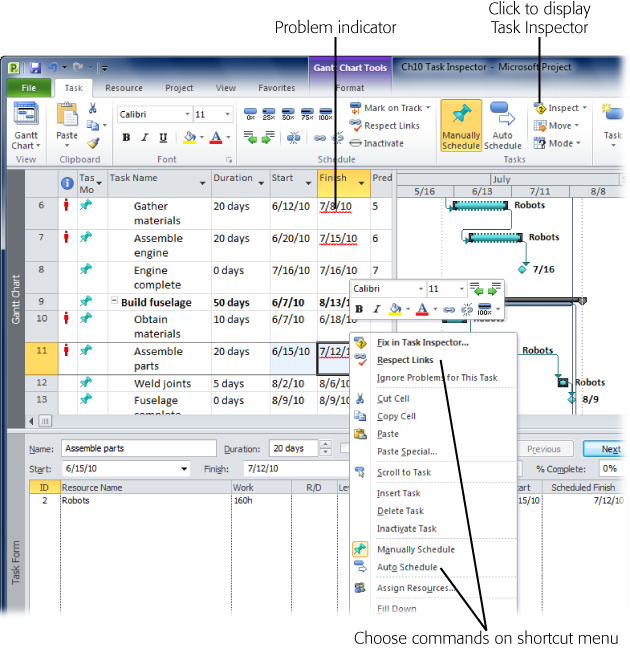
If you see a red or green squiggly line below a task value, right-click the cell to display a shortcut menu, as shown in Figure 10-12. Here are some ways you can fix tasks with the Task Inspector and the commands on the shortcut menu:
Respect Links. Because manually scheduled tasks start and finish when you tell them, those dates may conflict with the task dependencies you’ve defined. Even with auto-scheduled tasks, date constraints you set can conflict with task dependencies. If you want Project to use task dependencies to determine when to schedule tasks, choose Respect Links on the shortcut menu.
Ignore Problems for This Task. Sometimes a problem that Project finds isn’t really a problem. Say you schedule a task to occur over a weekend, and the person you’ve assigned has agreed to that schedule. Sure, you can change the resource’s calendar, but it’s easier to simply ignore the problem. In this case, choose Ignore Problems for This Task, and Project turns off the red squiggly line.
Figure 10-12. The solution to a problem may be to switch a task from Manually Scheduled to Auto Scheduled, so Project can take over calculating the task’s dates. To switch the task mode, on the shortcut menu, choose Auto Schedule. Other commands on the shortcut menu may help resolve a problem as well, such as Assign Resources to shorten the task or remove over-allocations.
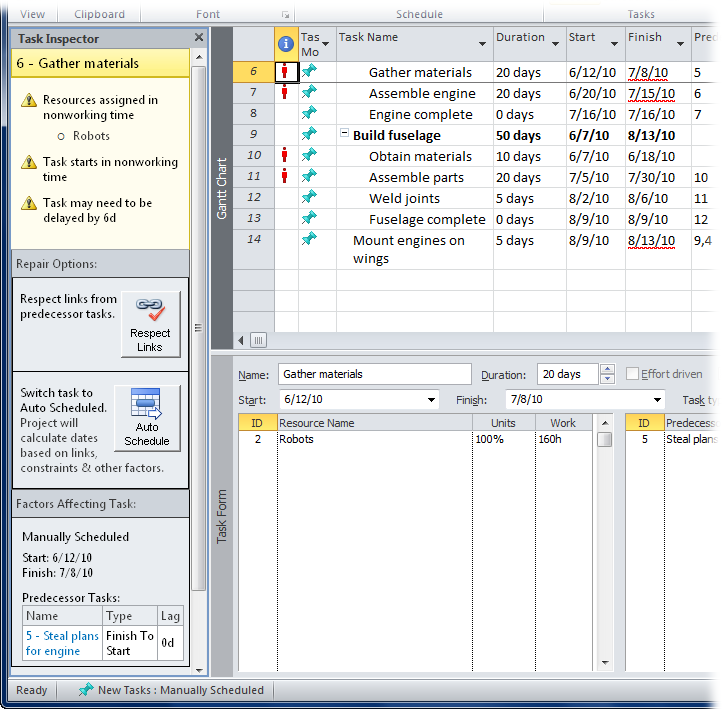
Fix in Task Inspector. If you aren’t sure how to resolve a problem, choose Fix in Task Inspector to open the Task Inspector pane, shown in Figure 10-13. You can open the Task Inspector pane at any time by choosing Task→Tasks→Inspect. The first section of the Task Inspector displays the name of the selected task and the problems the Inspector identified, such as overallocations, resource calendar issues, predecessor conflicts, and so on. The second section provides commands you can use to correct the problem, like Respect Links and Auto Schedule for task scheduling problems or Increase Duration and Assign Resources for resource overallocations. To dig deeper into the source of the problem, look at the Factors Affecting Task section.
Figure 10-13. The factors that appear in the Task Inspector pane may change as you modify the schedule. For example, if you eliminate resource overallocations, that factor disappears. However, with the overallocation no longer an issue, you may discover that the start date of the task is also driven by a date constraint.
Show ignored problems. After you’ve fixed a slew of problems, you may decide to take another look at the problems you ignored. To restore problem indicators to the view, choose Task→Tasks. Click the down arrow to the right of Inspect and then, on the drop-down menu, choose Show Ignored Problems. The red squiggly lines reappear for problems you had previously ignored.
A first-draft schedule almost always represents the way projects would go in an ideal world. But you live in the real world, and just as the jeans you buy never look like they do on the catalog model, your real-world project will have a few bumps and wrinkles. Understanding resource units (Specifying a resource’s work schedule) and calendars is only half the battle. You also have to figure out how to combine them to handle real-world resourcing situations. This section explains how to make Project’s resource features model reality.
Sometimes you know the type of resource you need, but you don’t know exactly who you’ll get. In these situations, you can define a resource based on the role that resource plays, such as database designer, painter, or programmer’s muse. Later on, when the powers that be have assigned a real person to your project, you can replace the generic resource with one that represents the flesh-and-blood team member. The Assign Resources dialog box makes it easy:
In a task view like the Gantt Chart, apply the Entry table by right-clicking the cell at the intersection of the column headings and the row ID numbers and then choosing Entry on the drop-down list.
The Entry table includes the Resource Names field.
Filter the task list to show only tasks assigned to the generic resource you want to replace.
Click the down arrow to the right of the Resource Names column heading and then turn off the Select All checkbox. Turn on the checkbox for the generic resource, such as “Marketing Lead.”
Turn off summary tasks by choosing Format→Show/Hide and then turning off the Summary Task checkbox.
Only subtasks appear in the task list.
Select the tasks that appear in the table by dragging over their ID cells.
Project changes the background for the selected tasks to black.
Choose Resource→Assignments→Assign Resources.
The Assign Resources dialog box opens.
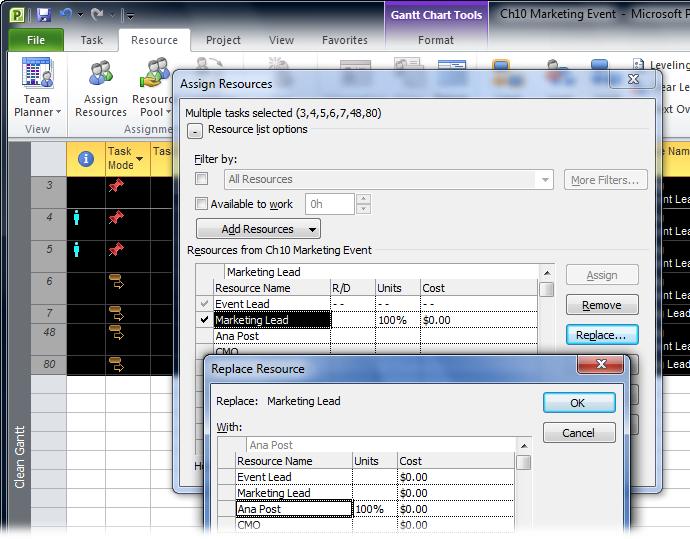
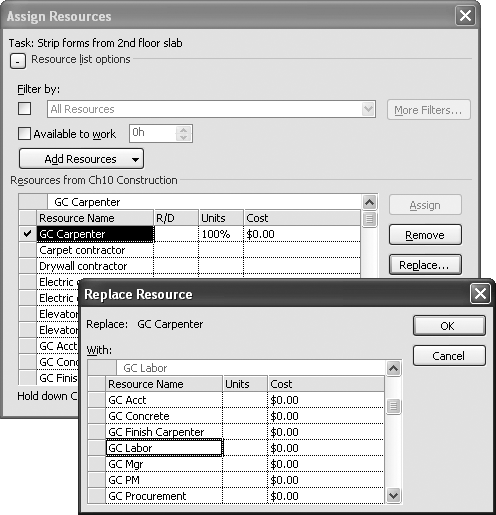
Select the generic resource you want to replace, and then click Replace.
The Replace Resource dialog box opens, as shown in Figure 10-14.
In the Resource Name column, select the named resource you want to use. Type the units to assign the resource, and then click OK.
Project replaces the generic resource with the named resource in every selected task.
Repeat steps 2 through 7 for each generic resource in your project.
To see whether you’ve reassigned all your generic resources, display the Resource Usage view (choose Resource→View→Resource Usage). The generic resources in the project shouldn’t have any tasks listed below their names.
Part-time workers don’t work full days, so they take longer to finish tasks. Someone working half-days takes twice as long, because you get only 4 person-hours a day, instead of 8. To make sure you don’t overassign part-timers, you must adjust the resources’ maximum units and, in some cases, their calendars. Then, when you assign them to tasks, Project automatically doles out time based on their availability.
Here’s how you handle part-time workers in Project:
Set the resource’s maximum units. When someone works the same amount of time each workday, change the Max. Units field (Specifying how much time resources are available) in the Resource Sheet. Click the resource’s Maximum Units cell, and then type the percentage that the person works. For example, the maximum available units for someone who works half-time is 50%.
Change the resource’s work schedule. Project assumes that resources are available every workday up to the percentage in their Maximum Units cells. Some part-time schedules are a combination of a few full days and more days off. For this kind of part-time work, leave the Maximum Units field alone, because the person works 100% of the day on work days. To model a part-time schedule like 3 days on and 4 days off, change the resource’s calendar instead (Applying Calendars). Simply change the resource’s work week to set more days to nonworking time.
Assign a part-time worker to a task. Whether you modify maximum units, the resource calendar, or both, assigning a part-time worker is no different from assigning a full-time person. Project automatically fills in the resource’s Maximum Units value in the assignment’s Units field, whether the percentage is 20%, 50%, or 100%. To assign the resource at a lower percentage, type the percentage in the assignment’s Units field (Assigning Resources with the Dialog Box).
Project calculates the duration of a task based on the resource units assigned to the task and the resource’s calendar. If the resource calendar includes a vacation the first week of June, Project assigns the resource at the assignment units, but skips the week that the resource is absent.
People are usually optimistic about how much they can get done in a given amount of time. (Have you ever had a “5-minute” trip to the grocery store turn into 2 hours?) In the project world, a 40-hour work week does not mean people spend 40 hours on their project assignments. Filling out paperwork, attending meetings, and keeping up with gossip can eat into productive time by as much as 25 percent a day. Widely distributed teams—whether they’re scattered around the world or throughout a skyscraper—often require more time because of time spent communicating, waiting for someone else to complete a task, or even riding elevators. Working on too many simultaneous tasks also hurts productivity, as the box on When Multitasking Is Too Much explains.
If you assign resources at 100 percent, one of two outcomes is likely:
People have to work longer days to stay on schedule. Some folks work longer to finish their tasks according to the schedule, but this won’t last. Eventually, low morale and exhaustion take their toll, and work starts to slip.
The project falls behind. Expecting 100 percent productivity usually leads to late deliveries. People work the normal workday, but their project work gets only a portion of that day, and durations increase beyond what you estimated. For example, a task that requires 24 person-hours takes 3 days when resources work at 100 percent. Reduce the units to 75 percent, and the duration increases to 4 days, 33 percent longer.
You can tackle the productivity problem in a couple of ways in Project. Either approach provides a more realistic estimate of project duration. The one you choose depends on whether or not you want to publicize productivity. Here are the two ways to make a Project schedule reflect your project team’s productivity:
Shorten the standard Project workday. If non-project work consumes 25 percent of each day, an 8-hour day contains only 6 productive hours, and a work week is 30 productive hours. The fastest way to come up with realistic task durations is to reset Project’s standard 8-hour workday to fewer hours, as shown in Figure 10-15.
The downside to shortening the Project workday is that the productivity problem is hidden within Project’s calculations. Resources look like they’re assigned 100%, but Project assigns them only 6 hours of work a day. To make productivity visible in an attempt to correct the problem, use the next method instead.
Figure 10-15. Shortening the workday takes two steps. First, you must change the “Hours per day” and “Hours per week” calendar options (page 139), so Project translates the person-hours into the correct duration in days and weeks. For example, you may change “Hours per day” to 6 and “Hours per week” to 30. You also redefine the standard work week in the project calendar. For example, to snip 2 hours off each day, set each day’s end time 2 hours earlier, as shown here.
Assign resources at lower units. To assign resources at their real percentage of productive time, in the Task Form Units field, fill in the lower percentage. For example, to schedule team members for 6 hours of work each day, in the Task Form, set the resource’s Units field (Assigning Resources in the Task Form) to 75%.
Tired of changing the units in every assignment? Go to the Resource Sheet (Resource→View→Resource Sheet), and then change the Maximum Units values to 75%. Then Project automatically assigns resources at 75%. Moreover, when you look for resource overallocations (Finding Resource Over- and Under-Allocations), Project shows resources assigned at more than 75% as overallocated.
Note
If you use lower assignment units, a stakeholder is bound to ask why people aren’t working full-time. That’s your cue to talk about the drain on productivity and recommend your brilliant plan for increasing productive time. To get some ideas for your plan, read Slack: Getting Past Burnout, Busywork, and the Myth of Total Efficiency by Tom DeMarco (Broadway, 2002).
Occasionally, you get someone who polishes off work like a dog does an untended plate of hamburgers. Other times, you may use trainees who take longer and need more guidance. Most organizations don’t reward fast workers by letting them go home early, and you can’t make newbies work around the clock to keep up. The only way to account for people’s appetite for work is by changing the person-hours you assign to people. When you change the task work or duration, Project recalculates the other value (When Effort Drives the Schedule).
If you change work or duration due to people’s capabilities, keep track of your original estimate, in case you switch resources again.
Consider adding a note to the task to explain the adjustments you made. In a task-oriented view, right-click the task and then, from the shortcut menu, choose Notes. When the Task Information dialog box opens, the Notes tab is visible. Type the note, and then click OK.
Tip
If potential names for an assignment go back and forth faster than an Olympic ping-pong match, consider creating tasks for each potential resource. Activate the task with the current contender and make the other tasks with alternate resources inactive, as described on Playing What-If Games.
When you overload your resources with work, the project finish date may look good, but it’s bogus, because your resources are overallocated. In other words, giving people 20 hours’ worth of work a day doesn’t mean they’re going to do it. On the other hand, resources who don’t have enough work cause a whole other set of problems. Besides distracting the people who are working full out, these resources could cost money without delivering results—like the networking consultant who sits idle while your IT staff puts out the fire in the server room. The ideal workload is when you assign your resources at exactly—or as close as possible to—the amount of time they have to give.
Before you can call a schedule done, you must balance workloads so your assigned resources (people and equipment) are busy, but not burning out. The first step is recognizing the problem, and Project makes it easy to find assignment peaks and valleys.
Then you have to correct the workload imbalances you find. Before you look for additional resources, you can try adjusting work contours (the pace at which work ramps up and down during an assignment), delaying assignments, or leveling resources (rescheduling tasks so that assigned resources aren’t overallocated). This section describes how to spot resource allocation issues, and several ways to fix them. If these strategies don’t help, you can always look for other available resources, or ask resources to work more.
Assigning resources to tasks is like using a credit card. While you’re dealing out time, you don’t see the deficit you’re running up. The Gantt Chart and other task-oriented views that you use when assigning resources show the assignments for the current task, but not all the other tasks a resource may work on, so you can’t see when you’ve assigned someone too much time overall. Project’s resource- and assignment-oriented views provide a better picture of resource allocation. This section identifies the talents of different views and tools for finding overallocations.
For a sneak peak at the workload balancing ahead, the Resource Sheet (Resource→View→Resource Sheet) tells you whether or not resources are overallocated—but not when, how much, or on which assignments. If a resource is overallocated at least once during the project, all the text in the resource’s row is bold and red, and the Indicators column displays a yellow diamond with an exclamation mark. You can quickly spot the resources whose assignments you need to revise.
Tip
The Overallocated Resources filter is another helpful tool for finding resources with too much work, regardless which resource view you use (Resource Sheet, Resource Usage, and so on). This filter displays only resources that are overallocated at some point during a project. Choose View→Data, click the Filter down arrow, and then choose Overallocated Resources. You can apply this filter to any view, from the Resource Sheet to the Resource Graph to the Resource Allocation view (Viewing assignments with the Resource Usage view). To display all resources again, in the Filter drop-down list, choose [No Filter].
The Team Planner view, new in Project 2010, makes it easy to spot overallocated resources. Resource names appear in red in the Resource Name column, and overallocated assignments in the timescale have red stripes at the top and bottom of the assignment bars. Especially for smaller projects, Team Planner offers easy ways to remove overallocations. You can reassign a task by dragging it to a resource who doesn’t have anything to do, or right-clicking the taskbar and choosing Reassign To on the shortcut menu. Or you can drag a task to a date when the assigned resource isn’t busy. See Figure 9-8 on page 215 to see what overallocations look like in Team Planner.
Tip
Team Planner also has a Prevent Overallocations setting, which won’t let you create overallocations in the first place. When the Team Planner view is visible, simply choose Format→Schedule→Prevent Overallocations. Then if you try to assign a task to a resource who’s fully allocated, Project flings the task to the next available spot in the resource’s calendar.
For analyzing each resource’s overallocations individually, the Resource Graph plots allocation over time, resource by resource. A vertical bar graphically indicates the selected resource’s allocation in one time period, while a horizontal line represents the resource’s maximum units. When the vertical bar is higher than the horizontal line, as illustrated in Figure 10-16, the resource is overallocated. Project emphasizes the overallocation by coloring the portions above the line bright red.
In the Resource Graph, you don’t see the assignments for the allocated time. But you can find the problem time periods and then switch to the Resource Usage or Resource Allocation views (Viewing and leveling assignments in the Resource Allocation view) to correct the issue.
To open the Resource Graph view, choose Resource→View→Resource Graph (or to display the Resource Graph in the bottom pane of a window, choose View→Split View, turn on the Details checkbox, and then choose Resource Graph).
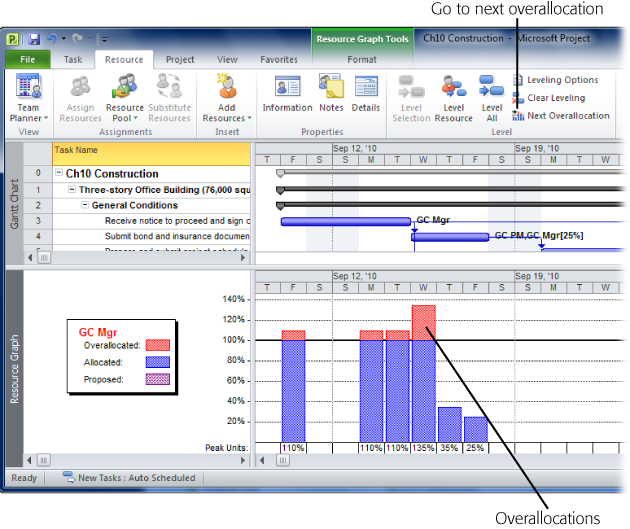
Figure 10-16. Overallocations often come in short spurts separated by long periods when all is well. Instead of scrolling through the Resource Graph timescale looking for overallocations, choose Resource→Level→Next Overallocation to jump directly to the next overallocation.
Here’s how to use the Resource Graph to find overallocations:
Choose a resource. The Resource Graph shows the allocations for just one resource at a time. The current resource appears in the Resource Graph’s left pane with a legend for the information that’s displayed in the timescale. Press Page Down to display the next resource, or Page Up to view the previous resource. You can also click to the right or left of the horizontal scroll bar.
Change the timescale. Sometimes, resources are overallocated for 1 or 2 days but have enough time for assignments over the course of a week or so. Before you start rearranging short overallocations, increase the Resource Graph time period to see whether the overallocations work themselves out. To lengthen the time period, in the status bar, drag the Zoom slider to the left to switch from days to weeks and so on. To shorten the time period, drag to the right.
Graph other values. Although percentage allocation values make overallocations stand out, the Resource Graph can show other values, such as Work (the hours of assigned work), Overallocation (only the hours beyond the resource’s maximum units), Remaining Availability, and so on. For example, after you use the Resource Graph to find an overallocation, you can switch to Remaining Availability to locate someone to take over the extra hours. Right-click the Resource Graph timescale, and then, from the shortcut menu, choose the field you want to display in the graph.
To see the assignments that contribute to allocation, turn to the Resource Usage view. For example, the Resource Graph may show that your labor crew is overallocated the week of May 20. The Resource Usage view lists all the labor crew assignments so you can see the hours assigned during that week.
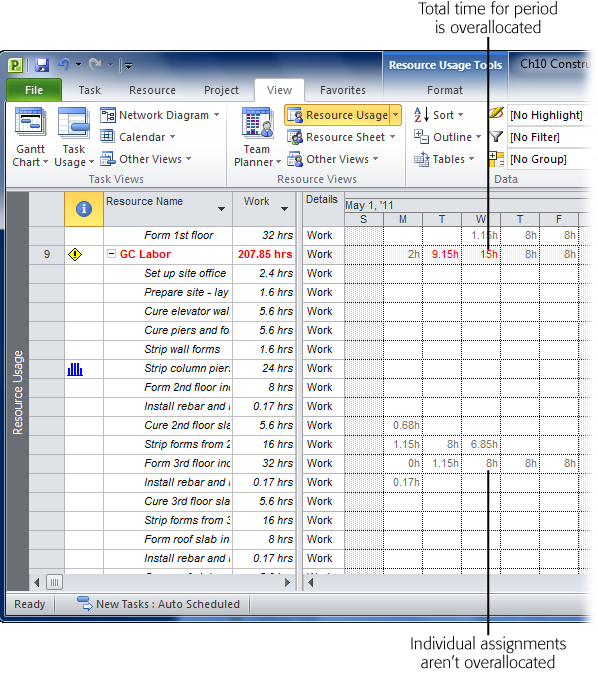
To display this view, choose Resource→View→Resource Usage. The left pane of the Resource Usage view lists each resource in your project and displays the tasks to which the resource is assigned underneath the resource’s name. The timescale on the right side of the view shows the assigned hours during each time period, as shown in Figure 10-17.
Like other views, Resource Usage highlights overallocated resources with bolded red text. In the Resource Usage view time-phased data, hours that exceed the resource’s maximum available time appear in red, too. For example, if a single task exceeds the resource’s available time in one period, the hours in the cell are red. However, if several tasks contribute to the overallocation, the individual task hours may be black, but the total hours in the resource row are red.
Note
The Next Overallocation command starts looking for overallocations from the currently selected date and assignment. If the command doesn’t find any overallocations, be sure to search from the beginning by selecting the first cell in the first row. In the Resource Usage view, press Ctrl+Home to move to the first cell in the current row. Then press Ctrl+up arrow to move to the first cell in the first row.
To see overallocations more easily, modify the Resource Usage view in the following ways:
Show only overallocated resources. To the right of the Resource Name column heading, click the Filter down arrow and then choose Filter→Overallocated Resources. Only resources with overallocations appear in the left pane. Alternatively, you can choose View→Data and then, in the Filter drop-down list, choose Overallocated Resources.
Display other fields. Other fields help you figure out how to correct overallocations. For example, the Overallocation field tells you exactly how many hours are beyond the resource’s availability. The Remaining Availability field helps you find resources who have enough time to take over the extra hours. In the time-phased data, right-click anywhere in the Details column. On the shortcut menu, choose the fields you want. You can turn on as many fields as you want at the same time. (Remember, the Assign Resources dialog box lets you look for resources with sufficient time and the right skills, as described on Assigning a Different Resource.)
The Resource Allocation view displays the Resource Usage view in the top pane so you can see the tasks that overallocate a resource. In the bottom pane, the Leveling Gantt view appears, so you can manually add a leveling delay to resolve overallocations, as shown in Figure 10-18. Choose View→Resource Views→Other Views→More Views. In the More Views dialog box, double-click Resource Allocation.
The table in the Leveling Gantt chart includes the Leveling Delay field. If you want to delay tasks to remove conflicts, type the length of delay in the Leveling Delay cell, for example, type 1 to push the task start out by 1 elapsed day (leveling delay uses elapsed time units, which means it doesn’t differentiate between working time and nonworking time).
A few built-in Project reports show assigned work, so you can spend a relaxing evening of resource management with paper and a highlighter. Reports are also helpful for hashing out assignments at team meetings.
Tip
If you prefer information the way it looks in the Resource Usage view or any other view, print the view instead of a report. To print a view, display it and then choose File→Print. In the Print page of the Backstage view, choose the printer, page range, and dates, as you would for any printout (Generating Text-Based Reports).
The Who Does What When report and the Resource Usage report both show tasks assigned to resources and assigned hours by time period. The Who Does What When report initially shows day-by-day assignment hours (for work resources only). The Resource Usage report shows week-by-week assignments (for all resources). However, you can edit the reports to use other time periods and the resources you want.
Here are the steps to create a week-by-week resource usage report for overallocated work resources:
Choose Project→Reports→Reports.
The Reports dialog box appears.
In the Reports dialog box, click Workload, and then click Select.
The Workload Reports dialog box appears.
Click Resource Usage, and then click Edit.
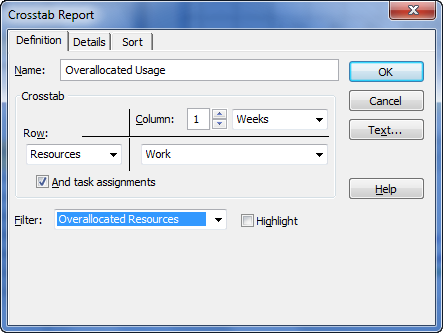
The Crosstab Report dialog box opens. For the full scoop on customizing reports, see Chapter 17.
If you want to save a customized version of the report, in the Name box, type a new name for the report, such as Overallocated Usage.
If you don’t change the name, Project saves your changes to the built-in Resource Usage report definition. If you want the original report definition back, you can copy if from your global template (Storing Project Settings and Elements).
To include only overallocated resources in the report, in the Filter drop-down list, choose Overallocated Resources, as shown in Figure 10-19.
To change the time period represented by each column, in the Column boxes, choose Weeks, Months, and so on. The report shows work hours initially. In the Row drop-down list, you can choose another field to display, such as Overallocation.
Figure 10-19. The Crosstab Report dialog box offers additional report settings on the Details and Sort tabs. For example, on the Details tab, you can specify whether to show totals for rows and columns, and where to place gridlines in the report. On the Sort tab, you can specify how the resources are sorted. Initially, the report sorts resources by ID, but you can choose Group to keep related resources together.
Click OK.
The Crosstab dialog box closes and nothing else happens. At this point, all you’ve done is edit the report definition.
To run the report, in the Workload Reports dialog box, click Select.
Project displays the report in the Print page of the Backstage view (Generating Text-Based Reports).
Project offers several ways to even out workloads. The easiest way to eliminate overallocations is to ask resources if a heavier schedule is OK with them. Pragmatically, you should consider this approach only when overallocations are small and short-lived.
Adding more resources, or replacing a resource with someone who has more time, is the next best thing. Of course, you must have another resource available with the right skills. When longer hours or more resources aren’t an option, delaying assignments may do the trick. For example, when a resource has two assignments overlapping by a day, delaying one of those assignments by 1 day solves the problem. In this section, you’ll learn all these techniques, as well as how contouring work hours can smooth out assignment conflicts.
When a resource is overallocated by a small percentage for a short period of time (for example, no more than 20 percent and 2 weeks), the simplest solution is to leave the assignment exactly as it is—as long as the person is willing to work a few long days. The schedule shows the assignment as an overallocation, but you can add a note to the task that documents your agreement with the resource, as described in the box on Writing Notes to Yourself. Be aware that scheduling longer hours during project planning is a risky move. If tasks take more time than you estimated, your resources are already maxed out and you’ll have to use other strategies to prevent delays (Eliminating overallocations with Team Planner).
Say you want to formally schedule a resource to work longer days, but you don’t want assignments to show up as overallocations. Don’t change a resource’s maximum units in the Resource Sheet. Maximum units redefine the number of hours the resource devotes for the entire project. Instead, modify the resource’s calendar to lengthen specific workdays. For example, if you ask someone to work a few weeks of longer days, you can create work weeks (Selecting a calendar to modify) to reflect that. For a few long days, creating a calendar exception is easier.
Tip
If resources cost more when they work beyond the normal workday, you can account for the extra cost by assigning work hours specifically as overtime (in the Overtime Work field). Project calculates the cost of regular work hours by multiplying those hours by the Standard Rate value. The cost of overtime is the overtime hours multiplied by the Overtime Rate value.
Working with overtime is tedious, so you should use it only if resources cost more after hours and if you find during project execution that you need more hours to finish tasks on time.
In Team Planner, you can easily reassign or reschedule tasks to eliminate overallocations. If two or more concurrent tasks eat up too much of a resource’s time, red stripes appear at the top and bottom of the overlapping task bars. Here’s how to remove overallocations in Team Planner:
Reassign a task to another resource. To reassign a task to a resource with available time, drag the task bar to the row for the new resource. or right-click the task bar and choose Reassign To on the shortcut menu..
Reschedule the task to a different date. You can reschedule a task by dragging it to a new date in the timescale. To move the task into the past or future by a period of time, choose Task→Tasks→Move. In the drop-down menu, choose a command, as shown in Figure 10-20. In Team Planner, you can drag each assignment independently. However, if more than one resource is assigned to a task, you usually want to reschedule both assignments. To select all the assignments for a task, right-click one of the task’s assignment bars and then, from the shortcut menu, choose Select All Assignments on This Task.
Tip
Dragging a task to a new date is often the easiest way to remove an overallocation when tasks are manually scheduled. However, dragging auto-scheduled tasks in the timeline creates date constraints (Manually Scheduling Task Dates), which limit Project’s ability to calculate start and finish dates. Take care not to drag auto-scheduled tasks to different dates in Team Planner or any other view.
Reschedule the task to when a resource is available. If a resource works on a hodgepodge of short assignments, finding adjacent time for a longer assignment is almost impossible. Instead, you can tell Project to chop the assignment up and slide it into a resource’s open slots. Select the assignment you want to reschedule. Then choose Task→Tasks→Move→When Resources Are Available.
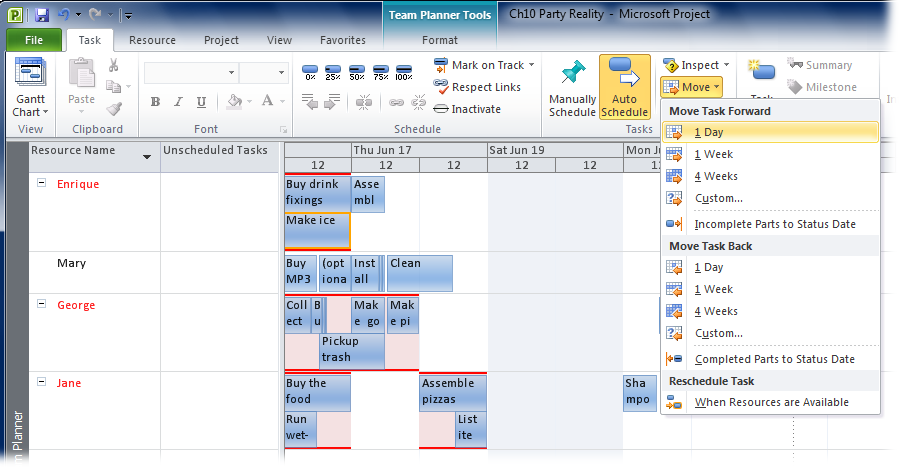
Figure 10-20. The Move drop-down menu contains commands for moving tasks by one day, one week, or four weeks. To move a task by any other time span, choose the Custom command under Move Task Forward or Move Task Back. The Move drop-down menu also includes commands for rescheduling incomplete work, which you’ll learn how to do on page 216.
If you have resources who can pinch hit, you can reassign only the overallocated hours or an entire assignment—Project doesn’t care which. Whichever hours you want to reassign, you use the Assign Resources dialog box. (Chapter 9 includes instructions for adding and removing resources to tasks.)
Here’s how you reassign a portion of work with the Assign Resources dialog box:
Choose Resource→Assignments→Assign Resources.
The Assign Resources dialog box opens.
In the Gantt Chart view (or any other task-oriented view), select the task you want to modify.
The resources already assigned to the task appear at the top of the list, preceded by a checkmark.
To switch a portion of the work to another resource, click the assigned resource’s Units cell, and then type the new percentage.
For example, if units are 20 percent too high, you can remove that by reducing the units from 80 percent to 60 percent.
Click the Units cell for the resource you want to add to the task, and then type the percentage to assign. Press Enter or click outside the Units cell.
Project updates the existing assignment. The newly assigned resource pops up to the top of the list with the other assigned resources and has a checkmark to the left of its name.
You can add as many additional resources as you want. The Assign Resources dialog box includes features to help you find resources with the right characteristics, as well as enough free time to take on the new assignment (Finding the Right Resources).
If you want to replace one resource with another, follow these steps:
With the Assign Resources dialog box open, select the task you want to modify.
The assigned resources for the selected task appear at the top of the Resources table, with checkmarks next to them.
Select the assigned resource you want to replace.
Click the resource’s name—not the checkmarked cell. You can replace only one resource at a time.
Click Replace.
The Replace Resource dialog box appears (Figure 10-21). The Replace label at the top of the dialog box shows the resource you want to replace. The With table lists all the resources in your project.
Select the replacement resource, and then click OK.
Project swaps the original resource with the replacement, and assigns the units for the original resource (or the units you typed) to the replacement.
When tasks overlap, one solution is to delay the second task so the assigned resources can work on the tasks one after the other. You can manually add delays to tasks and assignments with the help of a few Project views.
Note
Project has a leveling feature, which calculates delays and splits for you, but it can be challenging to master, as you’ll learn on Leveling Assignments.
Project offers two types of delays:
Leveling delay. This type of delay applies to tasks; it pushes out the start date for the task and all its resource assignments. It’s meant specifically for removing resource overallocations. With the Leveling Delay field, you can remove all leveling delays by choosing Resource→Level→Clear Leveling.
Assignment delay. This type of delay applies to a single assignment within a task. Suppose you have a security consultant coming in to help lock down your site. However, your employees have prep work to do before the consultant can get started. You can assign everyone to the same “Try hacking into office” task but delay the consultant’s assignment by 5 days.
To delay an entire task using leveling delay, do the following:
Choose View→Resource Views→Other Views→More Views. In the More Views dialog box, double-click Resource Allocation.
The Resource Usage view appears in the top pane, with the Leveling Gantt view in the bottom pane.
In the Resource Usage pane, select the task you want to delay.
The Resource Usage pane shows assignments, whereas the Leveling Gantt Chart shows tasks. When you select an assignment in the top pane, the task to which that assignment belongs appears in the bottom pane.
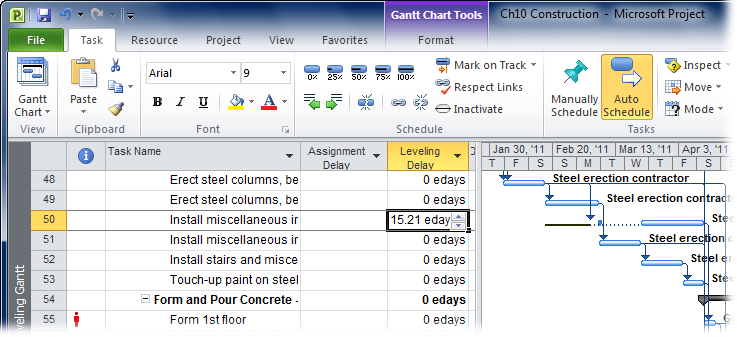
In the Leveling Gantt Chart view, in the Leveling Delay cell, type the length of time you want to delay the task.
To delay the task by 2 days, type 2d. Project replaces your entry with “2 edays,” as shown in Figure 10-22. The “e” at the beginning stands for elapsed time, because the number of resources or the percentage they’re assigned doesn’t affect the delay. You want the task to start a specific amount of time later, and elapsed time does just that.
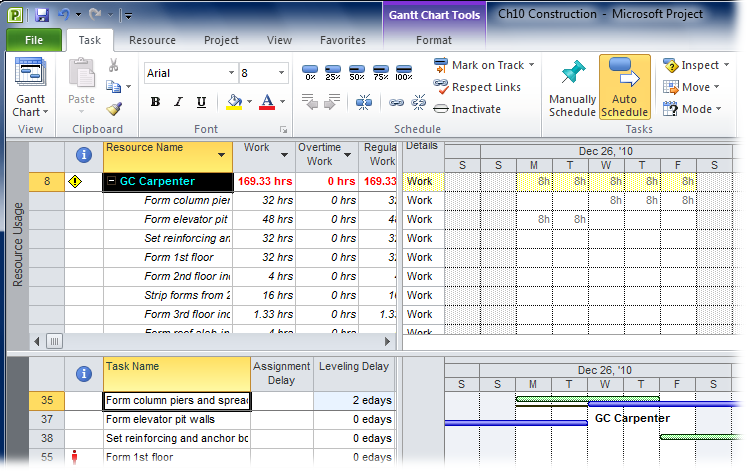
Figure 10-22. If you type 2d in the Leveling Delay cell, Project replaces your entry with “2 edays.” In the Leveling Gantt chart, Project shows leveling delays that you’ve added by a thin line at the start of a task.
To delay a single assignment within a task, add an assignment delay by doing the following:
Display the Resource Allocation view (see Viewing and leveling assignments in the Resource Allocation view).
The Resource Usage view appears in the top pane, with the Leveling Gantt view in the bottom pane.
To add the Assignment Delay column to the Resource Usage pane, right-click the column header in the table area, choose Insert Column, and then, in the field name drop-down list, choose Assignment Delay.
The new column appears to the left of the column you right-clicked.
If you use the Task Details Form to work on assignments, you can see the Assignment Delay field by right-clicking the Task Details Form table area and then choosing Schedule. The Delay column represents the Assignment Delay field.
Click the Assignment Delay cell for the assignment you want to delay, and then type the length of delay.
Unlike a leveling delay, you enter an assignment delay in regular days, not elapsed days.
Most people don’t leap out of bed in the morning raring to go. Nor do they work full speed up till the moment they close their eyes at night. Yet Project assumes that resources work full speed from the start to the finish of every task—unless you tell it otherwise. To reflect how work really gets done, you can apply work contours to reshape assignments. Work contours alter the amount of work assigned over the entire duration of assignments. Like people’s energy, tasks tend to start slowly, run at their peak in the middle, and then trail off at the end. Work contours work only for auto-scheduled tasks, not manually scheduled ones.
Because work contours reduce the hours for some time periods (for example, the hours assigned on the first and last days of an assignment), they extend assignment duration and, in turn, task duration. The Flat contour, which is what Project applies automatically, schedules the same hours of work each day during an assignment, like 8 hours if a resource works 100 percent on the task. Every other contour type has high and low points; the highs schedule the same number of hours in a day as a Flat contour. Because the lows are less than a full schedule, the task ends up taking longer. Figure 10-23 shows how the Bell contour reschedules work hours for a task.
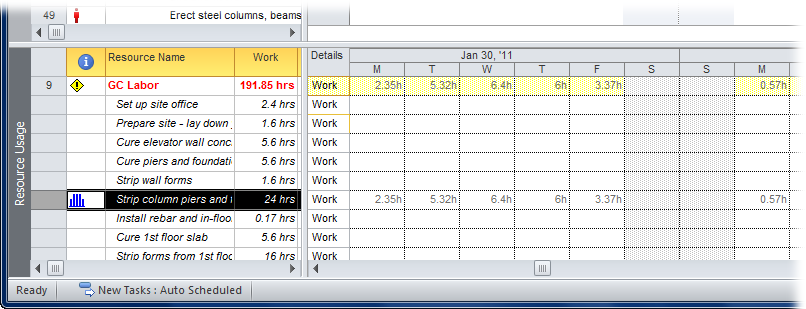
Figure 10-23. The original assignment for the GC Labor crew was 24 hours (8 hours a day for 3 days). The Bell contour extends the work to 6 days. The high level in the middle isn’t quite 8 hours because Project calculates the hours by applying a percentage to each segment of the contour.
The levels of work can take many shapes. Table 10-1 describes Project’s work contours and what they’re good for. The great thing about work contours is that you can assign resources to work on other tasks when other assignments don’t demand their full attention. Work contours may be all you need to eliminate some overallocations.
Table 10-1. Work contours and their uses.
Here are the steps for applying a work contour to a resource assignment:
Display the Task Usage or Resource Usage view by choosing View→Task Views→Task Usage or View→Resource Views→Resource Usage.
Because you must apply contours to assignments, you have to open either the Task Usage or the Resource Usage view to see assignments.
In the view, double-click the assignment you want to contour.
In the Task Usage view, double-click the row for the resource assigned to the task. In the Resource Usage view, below the resource name, double-click the task name for the assignment you want to contour. (You can also select the name and then press Shift+F2.) The Assignment Information dialog box appears.
Tip
The time-phased portion of the view doesn’t automatically show the time periods in which the assignment occurs, so you can’t see the results of the contours you pick. To see them, select the task, and then choose Task→Editing→Scroll to Task. The time-phased portion of the view jumps to the dates that have work for the selected assignment.
In the General tab, in the Work Contour list, choose the contour, as illustrated in Figure 10-24, and then click OK.
Project calculates the new work hours for each day and then applies them to the assignment. The Task Usage view shows the newly contoured hours.
Tip
Although you can’t define custom contours, you can contour an assignment any way you want by manually changing the hours in the Task Usage time-phased data. For example, click an assignment cell and then type the new hours for that period. Continue changing cells until you’ve reassigned all the work hours. The drawback to this method is that you have to ensure that the hours you type add up to the original hours. When you manually edit work hours, you see the Edited Work icon (which looks like a bar chart with a pencil), in the Indicators cell.
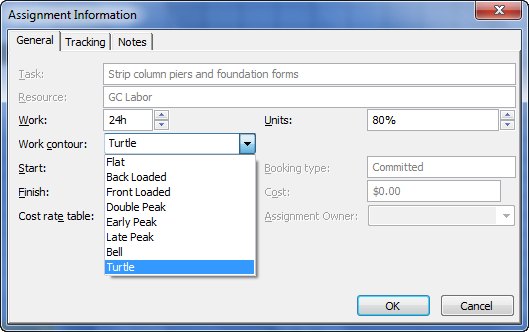
The Level Resources feature can automatically eliminate overallocations by delaying or splitting tasks. If you try to level an entire project, you may set option after option, and prioritize tasks, only to find that leveling rarely does what you’d hoped for. It seems to delay the tasks you want to stay put and ignore tasks you’d like to delay. Moreover, Level Resources often splits tasks into a bazillion short pieces, so resources can multitask, as described in the box below. The good news is that Project 2010 lets you apply leveling to specific tasks or resources, so you don’t have to level your entire project.
As you learned in Delaying assignments on page 271, you can delay tasks so a resource can work on them in sequence. Leveling resources can delay tasks in the same way, but it can also split tasks (introduce small gaps in assigned work), so resources can divide their energy among multiple tasks. Either way, tasks finish later.
Because Project’s leveling prowess leaves something to be desired, don’t assume that the leveling results are what you want. By displaying the Leveling Gantt view, shown in Figure 10-25, before you level assignments, you can see the results immediately—and undo them if they aren’t what you want. To display the Leveling Gantt view, choose View→Task Views→Other Views→More Views, and then, in the More Views dialog box, double-click Leveling Gantt.
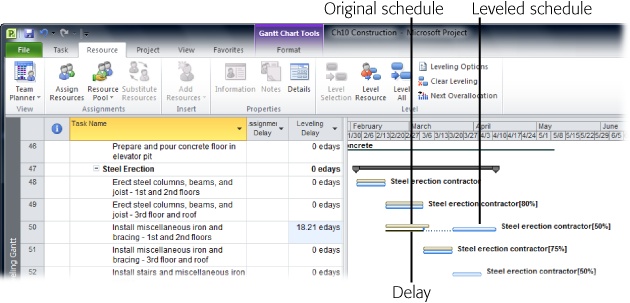
Figure 10-25. The upper set of task bars (tan in the built-in Leveling Gantt view) show your original schedule. The lower blue task bars show the leveled tasks with any added delays and splits. Leveling delays appear as thin lines at the beginning of a task bar.
During leveling, Project looks for resource overallocations. For each one it finds, Project locates the offending tasks and decides whether to delay or split them to eliminate the overallocation. Unlike the techniques in your bag of tricks (reassigning or replacing resources, adjusting resource units, or contouring work), Level Resources can only delay or split tasks.
In Project 2010, you can level the entire project, tasks you select, or a single resource. By leveling several tasks that are all vying for the resource, or alternatively, leveling only the most in-demand resources, you can focus on the problematic portions of your project. Project automatically chooses popular settings in the Resource Leveling dialog box. In most situations, you might as well run Resource Leveling with these settings. You can undo the leveling if you don’t like the results, but you can get some clues from the initial results to help you determine the settings you need. Here’s how to level different parts of your project using the leveling settings currently in place:
Level an entire project. Choose Resource→Level→Level All.
Level selected tasks. Select the tasks you want to level, and then choose Resource→Level→Level Selection.
Level a resource. Select the resource you want to level, and then choose Resource→Level→Level Resource.
If the results don’t work, the quickest way to remove the leveling is to press Ctrl+Z to undo the leveling command. However, if you’ve leveled a task here and a resource there, you can remove all delays and splits by choosing Resource→Level→Clear Leveling.
Once you’ve gotten your feet wet with leveling, try other leveling options to fine-tune the results. For example, if you’re happy to let overallocations work out over time, you can tell Project to look for overallocations over longer time periods. You can even tell Project which task characteristics to consider when choosing tasks to level, as shown in Figure 10-26.
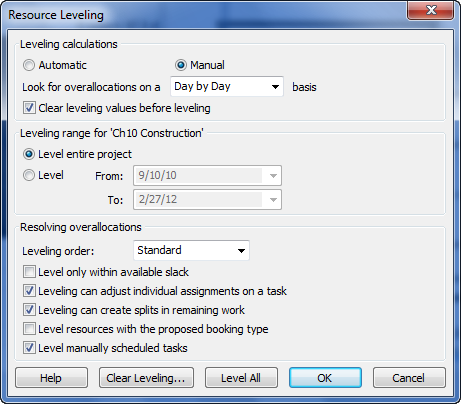
Here’s a guide to the options and settings in the Resource Leveling dialog box and how to use them:
Automatic or manual calculations. At the top of the Resource Leveling dialog box, the Automatic option sounds like you can select it and sit back while Project does the tough leveling work. The Automatic option does just that, but it also tells Project to recalculate your schedule every time you make a change. Before you know it, the program slows to a crawl for all but the smallest projects. The Manual option is the better choice, because you control when Project relevels the schedule, and Project’s performance doesn’t deteriorate. Simply choose one of the leveling commands to calculate the schedule. You can review the changes—and undo them if they aren’t what you want.
The overallocation time period. To Project, one minute beyond a person’s available time is an overallocation. But you know that an overallocation one day often balances out with available time on the next day, so longer time periods generally mean fewer overallocations to resolve. In the “Look for overallocations on a _ _ basis” box, choose the longest time period you’re comfortable with. For most projects, Week by Week or Day by Day eliminate overallocations without too much leveling.
Remove previous leveling values. Turn on the “Clear leveling values before leveling” checkbox to tell Project to remove any previous delays (added by you or Project) before starting the next round of leveling. If you level the entire project in one fell swoop, starting fresh each time is the best approach, because you can more clearly see the changes Project makes. If you’ve added leveling delays manually, turn off the “Clear leveling values before leveling” checkbox. Otherwise, Project removes your leveling delays along with any it’s added. To clear leveling delays, you can click Clear Leveling in the Resource Leveling dialog box or choose Resource→Level→Clear Leveling.
How much of the project to level. The “Leveling range” section includes the project name, which means that the option you select applies only to the current project. Project automatically selects the “Level entire project” option, which predictably looks at every task as a leveling candidate. To level only the tasks that occur during a date range, select the Level option, and then, in the From and To boxes, choose the start and end dates to level. If a phase runs from October 1 to March 1, level between those dates. (Of course, after leveling, Phase 1 will finish later than March 1.)
How Project decides which tasks to level. Initially, Project uses predecessor dependencies, slack (how long a task can delay before it affects the end of the project), task dates, task constraints, and task priority to decide which tasks to level. That order is called Standard in the “Leveling order” drop-down list. If you choose Priority, Standard, then Project weights task priorities first and then the other criteria. Setting priorities is almost a necessity if you want Project to level tasks the way you expect. If you take the time to prioritize tasks, put those priorities to use by choosing Priority, Standard.
The reasoning behind Project’s order of characteristics is that you can delay tasks that don’t have successors without affecting other tasks, so they’re the best candidates for leveling. When tasks have successors, the ones with the most slack can delay longer without delaying other tasks. Similarly, the later tasks start, the less they affect the project schedule. Task constraints make tasks less flexible schedule-wise, so Project leaves those tasks alone if possible.
The ID Only leveling order is usually not very helpful, because it levels tasks with higher ID numbers first.
Level within slack. Project initially turns off the “Level only within available slack” checkbox, which is perfect during planning. This setting removes all overallocations and pushes the project finish date out as far as necessary. When you first level the project, you can calculate the finish date based on the resources you currently have. If the project finish date must be earlier, you can use several techniques to shorten the schedule (Adjusting Resource Assignments).
Once the project is underway, you can turn on this checkbox so Project levels tasks without delaying the overall finish date. However, using only slack typically doesn’t resolve many overallocations.
Level individual assignments. Project initially turns on the "Leveling can adjust individual assignments on a task” checkbox, which levels only assignments that overallocate resources. In reality, task duration may still change because of the splits and delays Project adds. If you turn this checkbox off, Project levels entire tasks.
Split remaining work. The "Leveling can create splits in remaining work” checkbox controls whether Project splits tasks that have already started. When this checkbox is turned on, Project levels tasks that haven’t started and adds splits to the remaining work for tasks in progress. With this checkbox turned off, Project delays assignments only until the resource can complete the work without stopping, which often pushes tasks out for exceedingly long periods of time.
Level proposed resources. Proposed resources are resources you want to use but don’t yet have permission for (Filling in General Information). If you turn on the “Level resources with the proposed booking type” checkbox, Project levels both committed and proposed resources to show what the project schedule would look like if you get everyone you ask for.
Level manually scheduled tasks. Project turns this checkbox on automatically, which is exactly what you want, because manually scheduled tasks are more prone to overallocating resources than auto-scheduled ones.
Tip
Deadlines (Preventing Unwanted Date Constraints) in Project aren’t carved in stone. Leveling resources can push a task beyond its deadline, because Project’s leveling doesn’t pay any attention to task deadlines. To prevent Project from leveling a task with a deadline, change its priority to 1,000 (Changing task priority).
In the real world, finish dates for some projects and tasks are more important than others—for example, when a big bonus hangs on meeting a key date. But Project has no way of knowing these priorities unless you tell it. The Priority field tells Project which projects and tasks have to stick to their schedules, and which ones it can delay during leveling.
Note
The Priority field affects only leveling. Project doesn’t use this field during your regular scheduling activities. However, you can use Priority to focus on key tasks. For example, when you’re trying to manage a schedule, you can filter or group the task list by priority to find the tasks to fast-track or crash (the project management term for spending more money to shorten duration, described on Paying More for Faster Delivery).
Priority values go from 0 to 1,000. Project automatically assigns 500 (the middle-of-the-road value) to new tasks and projects. 1,000 is the highest priority, which means that Project doesn’t delay projects or tasks with that value. If you don’t want Project to level a task, just set its priority to 1,000. You can also change a task’s Can Level field to No, but that field doesn’t appear in any tables automatically (which often produces mystifying leveling behavior, as the box on Leveling Skips Overallocations explains).
You’re not likely to use all 1,000 priorities, no matter how many projects and tasks you want to level. Whether you need three, five, or 20 levels, keep 500 as the standard setting. For example, if you use only three levels, you can use 1,000 for high priority (tasks that don’t level), 500 for most tasks, and 0 for low priority. (You can use 499, 500, and 501 as well—or 400, 500, and 600—as long as you don’t have to reassign all the tasks with a priority of 500.)
The Priority field appears on the Task Information dialog box’s General tab, which is fine if you plan to change the priority for only the most important tasks. Select a task, and then press Shift+F2. In the Task Information dialog box, select the General tab, and then, in the Priority field, type the number. However, if you prioritize many tasks, add Priority to a Gantt Chart table so you can quickly type, copy, and paste priority values to every task, as shown in Figure 10-27.
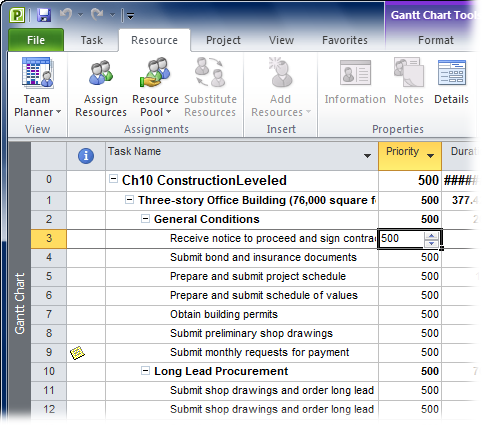
Figure 10-27. When you click a Priority cell, you can click the up and down arrows to change the value by 20 points; from 500 to 520, for example. Typing is faster if you use values like 0 and 1,000.
To change task priorities, follow these steps:
In the Gantt Chart or other task-oriented view, add the Priority field to the table.
Right-click the table heading, and then, on the shortcut menu, choose Insert Column. In the “Field name” drop-down list, choose Priority. Project inserts the Priority column into the table.
Click a Priority cell, and then type the new value.
You can copy and paste values from one cell to another using Ctrl+C and Ctrl+V. If several adjacent tasks have the same priority, drag the black square from the bottom-right corner of the cell over the other Priority cells.
If you have several subprojects in a master project, then entire projects may have a higher priority than the rest, like the presentations for a tradeshow that had better be ready when the show starts. Projects have a Priority field, too. Project priority is powerful, so use it sparingly. Project levels all tasks in lower-priority projects before the lowest-priority tasks in high-priority projects. Suppose a project has a priority of 800. Project avoids leveling a task with Priority 0 in that project before a task with a Priority of 900 in a 500-priority project.
Note
A priority of 1,000 is sacred, so tasks set to Priority 1,000 aren’t leveled regardless of any priorities the projects have.
To change the priority for a project, follow these steps:
Open the project, and then choose Project→Properties→Project Information.
The Project Information dialog box opens.
In the Priority box, type the new priority, and then click OK.
The Project Information dialog box closes.
The next time you level projects, Project’s leveling uses the new priority.