
Installing Project 2010 should be comfortingly familiar if you’ve installed other Microsoft programs. Moreover, the procedure is the same whether your computer runs Windows XP, Windows Vista, or Windows 7. If you’re installing from scratch, you barely have to tell the wizard anything.
When an earlier version of Project exists on your computer, you have the option to upgrade the previous version or keep it in addition to installing Project 2010. Installing multiple versions of Project may be the better solution. (If you already have a 32-bit version installed, the other versions you install must also be 32-bit). Not only can you use your old favorite features, but you can also open Project files created with versions prior to Project 1998. Upgrading means that the new version overwrites the earlier one, so you may lose beloved but discontinued features like the Visio WBS Chart Wizard, which disappeared in Project 2007.
In this chapter, you’ll learn how to install Project 2010 Standard or Professional from a CD or a hard drive. In the Project 2010 installation, custom options are kept out of the way unless you need them. But you’ll learn how to find and use them to choose what you want to install, and where.
After installation, you must activate Project so Microsoft can verify that your copy is legal. Unactivated, Project runs only 25 times and then only with limited features. Activation is quick and doesn’t divulge any of your personal information. The truth is, you must activate Project if you want to use it.
Over time, you may want to change what you’ve installed. And if Project begins to act strangely, repairing the installation often solves that problem. In this chapter, you’ll learn how to do both.
The Install Wizard handles a plain-Jane installation, an upgrade to an earlier version, or a custom installation. But before you get started, make sure your computer has what it takes to run the new version.
Tip
The following pages describe how to install Project 2010 on a single PC, but what if your entire team or company is going to use the program? If you need to install Project on many computers at once, see the box on Other Ways to Install Programs for suggestions on how to streamline the process.
Project 2010 comes in both 32-bit and 64-bit versions. However, for the time being, you’ll probably want to install the 32-bit software. Here’s why:
If your computer runs a 32-bit operating system, you can install only 32-bit programs.
You can’t run 32-bit and 64-bit Office programs on the same computer, and the 64-bit versions don’t play well with tons of 32-bit add-ins, controls, and Visual Basic code you might use. It’ll take time for all those add-ins and whatnot to become available in 64-bit.
Right now, installing 64-bit Office programs makes sense only if you need the horsepower and memory of 64-bit. 64-bit Office programs are great for crunching lots of numbers. For example, to create master projects that contain 500 or more subprojects, you have to use 64-bit Project. Similarly, 64-bit Excel can eat files larger than 2 GB for lunch.
If you download Office 2010, you choose whether to download the 32-bit or 64-bit version. Office DVDs contain both 32-bit and 64-bit versions. Although the folder on the DVD for the 64-bit version is named x64, the folder for 32-bit software is named x86, after the Intel chips that computers used to run.
Microsoft recommends a certain amount of computer horsepower for Project to run properly. If you’re managing multiple large projects with resource pools, Microsoft’s recommendations are likely to be your minimum requirements. These days, the performance you expect often requires double the recommended amounts. Table A-1 lists what Microsoft recommends for running Project 2010 Standard or Professional.
Table A-1. Your computer needs these resources to run Project 2010.
System component | Required horsepower |
|---|---|
Processor speed | 700 megahertz (MHz) minimum |
Memory | 512 megabytes (MB) minimum |
Available hard disk space | 2.5 gigabytes (GB) minimum |
Media | CD or DVD drive |
Operating system (earliest version) | Windows XP Service Pack 3 (SP3), Windows Server 2003 R2 with MSXML 6.0, Windows Vista SP1, or Windows 7 |
Other software (earliest version) | Outlook 2003 SP2 (for Import Outlook Tasks) Excel 2003 SP2 and Visio Professional 2007 SP1 (for visual reports) Internet Explorer 7.0 32-bit and Internet connection (for Online Help and other online features) SharePoint Foundation 2010 (for task list synchronization) |
Note
You initially need the 2.5 gigabytes of disk space to hold the installation files. You can recover some of that space by deleting the installation files after the installation is complete. (However, without the installation files on your hard drive, you must dig out your CD whenever you maintain or repair your installation.)
All you do for a typical installation is type your product key, accept the license terms, and then click Install Now. Here’s how to install Project 2010 without any bells and whistles on a computer that doesn’t contain a previous version:
Close any open programs, including your virus protection software, and then insert the Project 2010 CD into your CD or DVD drive.
If AutoRun is turned on, then the CD whirs away, the installation wizard starts, and you’re on your way. The Setup program takes a few minutes to extract the files it needs, so refill your coffee and locate your product key, which is usually a bright yellow sticker on the outside of the CD case.
Tip
If Setup doesn’t start automatically, the box on Kick-Starting an Installation tells you what to do.
On the “Enter your Product Key” page, type the 25-character product key from the label on your CD. Click Continue.
When you type in a valid key, your reward is a green checkmark to the right of the box. The product key label shows the product key in capital letters and numbers with every five characters separated by a hyphen. You can type lowercase letters and omit the hyphens without confusing the installation program.
On the “Read the Microsoft Software License Terms” page, turn on the “I accept the terms of this agreement” checkbox, and then click Continue.
If you’re like most people, you won’t bother to read the terms of the agreement. Of course, the legal eagles who read and disagree with the terms must find another project management tool to use.
On the next page, even if you just want to specify your name, initials, and organization, click Customize (and then jump to Customizing Your Installation to learn how to customize an installation). For a bare-bones installation, click Install Now to install the typical components.
A progress bar moves from left to right, which tells you there’s time to catch up on email or attain world peace. If you want to install multiple versions of Project or customize the installation in any way, then click Customize instead (described in Customizing Your Installation on page 697).
When the installation finishes, click Register for Online Services.
In some cases, you may see “Continue Online.” Clicking it lets you can take advantage of online help and other Microsoft Office Online features (Online and Offline Help). If you’re champing at the bit to use Project, click Close.
Choose Start→All Programs→Microsoft Office→Microsoft Project 2010.
Project 2010 launches and you’re ready to go. There are a few more tasks to complete now, as you’ll see in the next few steps.
When you install Project, you can specify what to install and where to install it. On the same wizard page as the big Install Now button, simply click the smaller Customize button. Then you can choose exactly the features you want to install and when you want to install them. Specifying where to install the software is crucial if your C: drive is packed tighter than a sardine can. Even if you want to specify your name, initials, and organization, you must choose a custom installation.
The beginning steps for a custom installation are the same as for a basic installation. When you click Customize, three tabs of installation options appear, as shown in Figure A-1. Here’s what you can do on each one:
Installation Options. To choose the product features you want to install and when to install them, expand the product by clicking the + to the left of its name. Right-click the feature (like Microsoft Project Templates), and then choose one of the options.
Run From My Computer installs the feature on your computer immediately. Installed on First Use may sound like a good idea, but in reality it’s more annoying. The first time you try to use the feature, Project prompts you to install it, which means you have to find your Project CD (or get to the installation files, wherever they may be). And you can’t do your work until you finish installing the feature. Not Available skips the feature during installation (but you can install it later, as described in Adding and Removing Features on page 700).
The icons you see next to products and features tell you which installation options you’ve chosen. A box containing an icon of a hard drive means the feature will be installed. A white box with a red X means the feature won’t be installed. A white box with a drive and the number 1 means the feature will be installed the first time you use it.
File Location. To install Project in a location other than the standard C: Program FilesMicrosoft Office, select the File Location tab, and then click Browse. Navigate to the folder you want, and then click OK.
User Information. This tab contains boxes for your name, initials, and organization.
When you’re done, click Install Now at the bottom right of the wizard page.
Upgrading Project follows the same steps as a fresh installation, except that you have one more decision to make. When you install Project, it protects its turf by removing previous installations of the program, which may be exactly what you want. However, you may want to keep those earlier versions around. For example, if you sometimes need to open Project files created in versions prior to Project 1998, then you need Project 2002 or earlier. As you’ve learned throughout this book, each version of Project seems to discontinue a couple of features. You can continue to use these oldies but goodies by keeping previous versions installed.
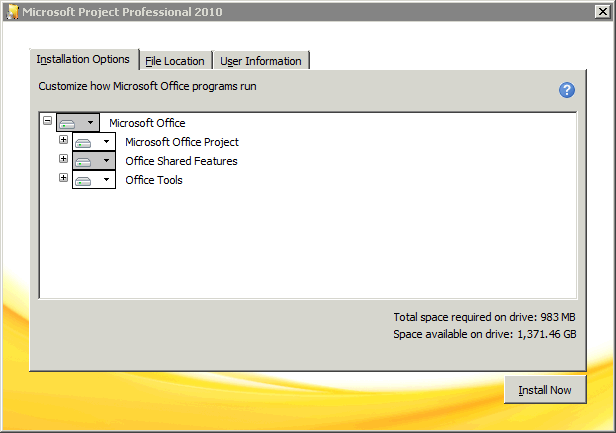
Figure A-1. On the Installation Options tab, you specify the components you want to install, and whether to install them immediately or the first time you need them. At the bottom of the tab, you can see how much disk space you need to install what you’ve selected compared to the space that’s available on your drive.
When you get to the wizard page with the Install Now and Customize buttons, click Customize. If the wizard finds any earlier versions, you see an Upgrade tab with options for upgrading.
To upgrade Project and remove earlier versions, select the “Remove previous versions of Microsoft Office Project” option. To use multiple versions, select the “Keep all previous versions” option. Then click Install Now to complete the installation as you would normally.
Activation is Microsoft’s way of verifying that you’re running a legal copy of a Microsoft program. Running Project without activating it turns the program into little more than a viewer and, even so, starts the program only 25 times. When you activate Project, Microsoft doesn’t ask for personal information, so there’s no harm in doing so.
Note
The Microsoft Office Project Activation Wizard creates a hardware identifier for your computer, which means, unfortunately, that you may have to reactivate Project if you rebuild your computer.
The Activation Wizard starts automatically when you run Project for the first time. In the Microsoft Office Activation Wizard page, the “I want to activate the software over the Internet” option is selected automatically, and that’s the easiest way to go. Click Next. When your program is activated, click Close, and you’re done.
If you have trouble activating Project, check that your Internet connection is working. You can also activate by telephone; when you select the “I want to activate the software by telephone” option, the wizard shows the phone number and instructions.
After the initial installation, Project requires occasional care and feeding. For example, you may want to add or remove features, or reinstall features that aren’t behaving correctly. You can also uninstall the software should you decide to forgo project management and start making origami instead.
If you don’t keep installation files on your computer, insert the Project CD in your CD drive, and then run Project Setup. With installation files on your computer, you can use the Add or Remove Programs feature to perform your maintenance tasks. To access the Add or Remove Programs window, do the following:
Choose Start→Control Panel.
If you use the Classic menu style in Windows, choose Start→Settings→Control Panel.
If you run Windows Vista or Windows 7, in the Control Panel window, click Programs. Then click Programs and Features. If you run Windows XP, double-click Add or Remove Programs to open the Add or Remove Programs window.
The window opens.
To start Project Setup, select Microsoft Project Professional 2010 (or Microsoft Project Standard 2010), and then click Change.
The Project Setup Wizard starts, as shown in Figure A-2. The following sections explain how to use each option.
Adding or removing features is like running a custom installation. You can change which features are installed, or change them to install on first use. In fact, the Installation Options tab you see is identical to the one that appears in a custom installation, shown in Figure A-1.
In the Setup Wizard, select the Add or Remove Features option, and then click Continue. Follow the instructions in Customizing Your Installation on page 697. After you’ve made your changes, click Continue to install or remove the features. When the installation is complete, click Close.
Sometimes Project starts misbehaving. You know this quirky behavior isn’t a bug, because the program was working fine a few seconds before. First, try closing and restarting Project. Then try rebooting your computer. If these techniques don’t do the trick, then repairing the installation is the next step.
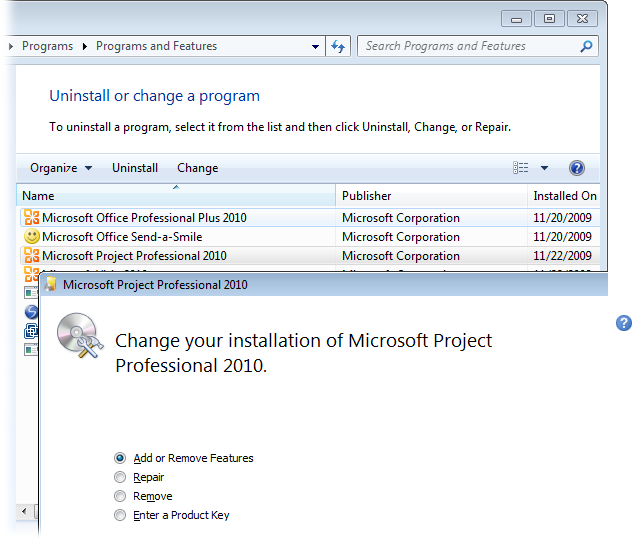
Figure A-2. Using the Project Setup Wizard, you can change the features you use in Project, repair your Project installation, remove the program entirely, or enter your Product Key if you haven’t done so already.
Repairing corrects little problems that crop up, like missing files or registry settings gone awry.
In the Setup Wizard, select the Repair option, and then click Continue. Project analyzes the installation and repairs the problems it finds. As usual, you can tell by the progress bar creeping across the screen that you have time to tackle world hunger—or your own.
In the Project Setup Wizard, select the Remove option. When the message box asks you if you want to remove Project, make sure you really want to, and then click Yes. If you run Windows XP, you can also uninstall Project directly in the Add or Remove Programs window. Simply select the Project item, and then click Remove.