
Rails controllers connect your application’s models and views. Any web requests that your application receives are routed to the appropriate controller. The controller gets data from the model and then renders the appropriate view or redirects to a different location.
In this chapter, we continue working on our blog. Along the way, you’ll learn about controllers in detail. I’ll cover resource representation with REST, routing resources, and the types of actions a controller can take.
Representational State Transfer, or REST, is a client-server software architecture introduced in 2000 by Dr. Roy Fielding, one of the authors of the HTTP specification. REST deals with the representation of resources, and in Rails, resources correspond to models. In RESTful architectures, clients initiate requests to servers. Servers process those requests and return responses to the clients. In a Rails application, the server that processes requests and returns responses is the controller. The controller interacts with the client through a collection of common URLs and HTTP verbs.
You’re probably already familiar with at least two of these HTTP verbs. A request for a web page is sometimes called a GET request. A GET request doesn’t change the state of the application; it simply returns data. When you submit form data on a web page, the result is usually a POST request. In an application using REST, a POST request is used to create a record on the server.
During our discussion of models in the last chapter, you learned about CRUD (create, read, update, and delete). REST uses the four HTTP verbs in Table 4-1, which correspond to each of those actions.
Table 4-1. Mapping Database Actions to HTTP Verbs
Database Action | HTTP Verb |
|---|---|
| POST |
| GET |
| PATCH |
| DELETE |
Your application determines how to handle a request based on the HTTP verb used. A GET request for a resource returns the data from the corresponding model; a PATCH request updates the model with new information; and a DELETE request destroys the model. All three of these actions use the same URL. Only the HTTP verb is different.
Rails applications add three more actions in addition to the four CRUD actions in
Table 4-1. The index
action displays a list of all resources; the new action displays a form
for creating a new resource; and the edit action displays a form for
editing an existing resource.
Each of these actions has a corresponding method in a Rails controller. These seven methods are summarized in Table 4-2.
Table 4-2. Default RESTful Actions
Action | Description | HTTP Verb |
|---|---|---|
| List all records | GET |
| Show one record | GET |
| Show form to create a record | GET |
| Show form to edit a record | GET |
| Create a new record | POST |
| Update an existing record | PATCH |
| Delete a record | DELETE |
We’ll cover each of these actions in this chapter, but first let’s see how URLs are generated.
Setting up all of these URLs and mapping actions to verbs might sound pretty complicated, but luckily, Rails routing handles all of this for you. Routes connect URLs to the code that comprises an application. First, let’s look at the most common type of route, the resource route.
Your application’s routes are stored in the file config/routes.rb. Open that file in your text editor.
Ignore all of the comments. Your file should only have three lines right now:
Rails.application.routes.draw do
  resources :posts
end
Rails applications use REST by default. The blog application currently has only one
resource (blog posts), and the single line resources :posts builds a
set of routes for your application. Use the rake command to display
your application’s routes:
$ bin/rake routes
Prefix Verb   URI Pattern                Controller#Action
 posts GET    /posts(.:format)           posts#index
       POST   /posts(.:format)           posts#create
--snip--
This command outputs the route helper prefix, HTTP verb, URL pattern, and controller action for each of the seven default RESTful actions.
For example, a GET request to /posts calls the
PostsController#index method. As you make changes to the routes
file, run this command again to see how your application’s routes also
change.
When one resource belongs to another resource, you can add it as a nested resource. In the blog, comments belong to posts. Here’s how you represent that in config/routes.rb:
resources :posts do
  resources :comments
end
Add a block after resources :posts with a
do, end pair. Then add resources
:comments inside that block. This tells Rails that comments are only
available inside of posts.
Adding resources :comments as you just saw creates
routes for each of the seven default RESTful actions for comments. For now,
let’s only worry about creating new comments. You can restrict the set of routes
generated for a resource by adding an only clause to that resource
in config/routes.rb:
resources :posts do
resources :comments, only: :create
endNow, only the comment create action is mapped to a URL. You
should only provide routes to actions that you plan to implement.
Some actions in your application may not correspond to any of the seven default
actions. For example, your application may include a search action
that returns a list of posts containing a specific term. In cases such as this, Rails
lets you manually configure custom routes.
Custom routes are also useful for mapping old URLs to a new Rails application or
simplifying URLs for complex actions. For example, imagine your application allows users
to log in by creating a new session and log out by destroying their session. Adding
resources :user_session creates paths like
user_session/new. If you would rather use different paths, you
can create custom routes for login and
logout.
Rails.application.routes.draw do
  resources :posts do
    resources :comments, :only => :create
  end

  get 'login' => 'user_sessions#new'
  post 'login' => 'user_session#create'
  delete 'logout' => 'user_sessions#destroy'
end
Now your application’s login page should be at the path /login. When a user visits the login page, his or her browser sends a GET request for this path. The controller displays the login form in response to that GET request. When the user submits the form, the browser sends a POST request to the same path with the contents of the form. The controller then creates a new session for the user in response to the POST request. When the user clicks the log out button, a DELETE request to the path /logout destroys the user’s session.
We aren’t adding authentication to the blog application, but you can still add these routes to config/routes.rb if you want to see the routes created. Remove them before moving on because accessing a path that doesn’t correspond to a controller action results in an error.
Finally, let’s create a root route so we
don’t have to add /posts to the browser’s address bar
every time. The root route sets the home page for your application. Add root
'posts#index' near the end of config/routes.rb:
Rails.application.routes.draw do
resources :posts do
resources :comments, :only => :create
end
root
              'posts#index'
endNow, accessing your server without a path should display the posts index page. You should always include a root route for your application.
Adding a route also automatically creates helpers for your controllers and views. You can use these helpers, shown in Table 4-3, instead of manually typing URLs in your application. That way, if you decide to change your application’s URLs in the future, you won’t have to search for and update all of the old URLs in your code.
Table 4-3. Rails Path and URL Helpers
Path Helpers | URL Helpers |
|---|---|
|
|
|
|
|
|
|
|
The path helpers include only the path, whereas the URL helpers also include the protocol, server, and port (if not standard). Rails applications generally use path helpers. The URL helpers are useful for situations in which the full URL is needed, such as to generate URLs for inclusion in emails.
The first part of each method name matches the prefix displayed by the
bin/rake routes command.
You can test these helpers in the Rails console like this:
2.1.0 :001 > app.posts_path
 => "/posts"
2.1.0 :002 > app.post_path(1)
 => "/posts/1"
2.1.0 :003 > app.new_post_path
 => "/posts/new"
2.1.0 :004 > app.root_path
 => "/"
Testing these helpers is a useful sanity check when working with Rails routes. If you forget which helper to use to create a path, you can type it in the console to see the result.
The convention in Rails is to have a controller corresponding to each resource. That controller includes methods for each action. (Remember the principle from Chapter 2: convention over configuration.) The Rails scaffold generator created a controller for posts. Open the file app/controllers/posts_controller.rb to see the Ruby code behind these methods. I recommend running the Rails server as you work your way through the rest of this chapter:
$ bin/rails serverNow, let’s look at each controller method in turn, starting with
index and working our way down to destroy.
The index action retrieves all posts from the database:
def index
  @posts = Post.all
end
You see the familiar @post = Post.all in that method. You may be
surprised that this is the only line of code in the
index method. By default, Rails renders a view file matching the
action name, in this case app/views/posts/index.html.erb.
(We’ll discuss views in the next chapter.)
Go to http://localhost:3000/posts in your browser to see the
results of the index action.
The show action retrieves a single post from the database, but the
show method contains no code at all:
def show
end
This method relies on a Rails before_action, which you should see
on line two of the controller:
before_action :set_post, only: [:show, :edit, :update, :destroy]
The before_action is a class method that automatically calls the
set_post method, shown next, before the methods
show, edit, update, and
destroy. This eliminates duplicate code in these methods. (Remember
DRY: Don’t repeat yourself.)
def set_post
  @post = Post.find(params[:id])
end
The set_post method is defined near the bottom of the
controller under the keyword private. It calls the
Post.find method to retrieve the post with an id
corresponding to a parameter passed to the controller. Parameters are covered in more
detail in the next section, so for now, let’s continue examining these controller
methods.
The new action displays a form for adding a new post:
def new
  @post = Post.new
end
The form uses data from a newly created post. Click the New Post link at the bottom of the post index page to see this form.
The edit action displays a form for editing an existing post. Like
the show method, this method contains no code:
def edit
end
This form uses data retrieved by the set_post method discussed
previously.
Before discussing create, update, and
destroy, let’s talk about a few key Rails topics that you
need to know to understand those methods. In this section, we’ll explore
parameters, render/redirect, response formats, and the flash.
Parameters generally represent part of the URL used to
request a page or values from a form, and they’re accessible in the controller
as a hash named params. For example, the
set_post method you saw earlier retrieved the
id of the requested post from the params hash,
like this:
@post = Post.find(params[:id])
You can see the parameters passed with each request in the output from the
rails server command in your terminal. For example, go to
http://localhost:3000/posts/1 and then look at the Rails server
output in your terminal:
  Started GET "/posts/1" for 127.0.0.1 at 2014-03-31 20:30:03 -0500
  Processing by PostsController#show as HTML
➊   Parameters: {"id"=>"1"}
    Post Load (0.3ms) SELECT "posts".* FROM "posts"
      WHERE "posts"."id" = ? LIMIT 1 [["id", "1"]]
    Rendered posts/show.html.erb within layouts/application (233.9ms)
  Completed 200 OK in 274ms (Views: 245.5ms | ActiveRecord: 26.2ms)
In this case, the 1 in the URL represents the
id of the requested post ➊. Because we requested a single
post, the show method is called, and this id is
used to find the post in set_post.
Form data is represented by a nested hash with values. For example, editing this
post results in a params hash more like this:
  {
    "utf8"=>"✓",
    "authenticity_token"=>"...",
➊   "post"=>{"title"=>"First Post", "body"=>""},
    "commit"=>"Update Post",
➋   "id"=>"1"
  }
You still access params[:id] ➋ to find the correct post,
and you can also access params[:post] ➊ to see the new
values submitted by the user. Because these are user-submitted values, you should
ensure that your application only accepts data for the appropriate attributes.
Malicious users could send requests with invalid parameters in an attempt to attack
your application.
For blog posts, you only want users to be able to edit the
title and body attributes. Rails includes a
feature called Strong Parameters, which makes specifying which
attributes your application accepts easy. You can see the feature in action in the
post_params method:
def post_params
  params.require(:post).permit(:title, :body)
end
This method first requires the params hash to contain a nested
hash with the key :post. It then returns only the permitted values
(:title and :body) from this nested hash.
Using the earlier example params hash,
post_params returns a hash like this:
{"title" => "First Post", "body" => ""}Other values in the params[:post] hash are silently ignored.
Remember, always use the post_params method when accessing the
parameters for a newly created or updated post.
Every action must either render a view or
redirect to another action. By default, an action renders a
file matching the action name. For example, the show method in the
posts controller looks for a file named
app/views/posts/show.html.erb and uses that file to build the
HTML response that is sent back to the user.
You can tell Rails to render the response for a different action with the
render method like this:
render action: "edit"
The ability to specify actions is helpful if you need to render a different view
based on user input. This example is from the update method. If the
post could not be updated with the data provided by the user, this method renders the
edit view again, giving the user a chance to correct the
data.
Sometimes you need to send the user to a page other than the one he or she
requested. Use the redirect_to method to take care of this. For
example, if the user enters valid data while creating or updating a post, the
controller action redirects the user to that post:
redirect_to @post
When you call redirect_to, the address in the user’s
browser changes to reflect the new page, and another request is made. You can see this
by watching the address bar as you submit form data and by looking at the output from
rails server in your terminal.
To see this in action, first go to http://localhost:3000/posts/new in your browser. This is the new post form. Enter a title for the new post, and then click the Create Post button. Watch the address bar closely after clicking the button.
The form makes a POST request to http://localhost:3000/posts.
This request is routed to the create method. After creating the
post, you are redirected to http://localhost:3000/posts/3,
assuming that your new post has an id of 3. The address is changed
automatically by the redirect_to method.
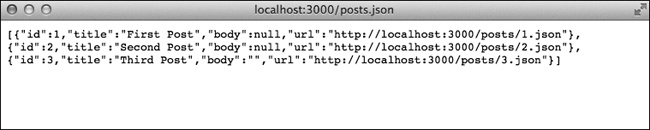
Rails can generate responses in several formats, though all I’ve discussed so far is HTML. Scaffold-generated controllers can also include JavaScript Object Notation (JSON) responses, which are useful for creating application programming interfaces (APIs). Other formats include XML and even PDF.
You can try another response type in your web browser by visiting this URL: http://localhost:3000/posts.json. This URL is the same as the posts index URL used earlier, except it has .json added to the end. Rails recognizes this as a JSON request and renders the collection of posts as JSON, as in Figure 4-1.
You specify the formats an action accepts and the responses to each format
with a call to the respond_to method. This method accepts a block
with a single parameter representing the requested format. Here is an example from the
destroy method:
respond_to do |format|
 format.html { redirect_to posts_url }
 format.json { head :no_content }
end
This method is called right after a post is destroyed. If the client requests HTML
data, this block redirects to posts_url, the index page. If the
client requests JSON data, by adding .json to the end of the URL,
this block responds with an empty header to indicate the post no longer exists.
Flash messages are alerts to the user that are only valid for a single request. Flash messages are stored in the user’s session, typically in a cookie. They are usually styled differently to stand out. For example, the stylesheet included with Rails scaffolding uses green text for flash messages.
Flash messages are helpful for sending error messages or other notifications to
the user. They are generally set on a redirect. Here’s an example from the
create method in the posts controller:
redirect_to @post, notice: 'Post was successfully created.'
When a post is successfully created, the user is redirected to the new post and a flash message like the one in Figure 4-2 is shown.
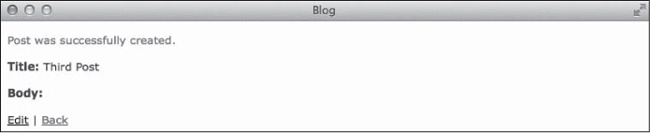
The create flash message is the green text, and it matches the
message added earlier.
Now you should know everything you need to understand the create,
update, and destroy actions. The methods written
by the scaffold generator respond to requests for both HTML and JSON data with messages
indicating success or errors, but let’s focus on the HTML responses for now.
I’ll cover JSON responses in depth when I talk about building your own
APIs.
The create method is responsible for creating a post using the
params from the new post form:
def create
  @post = Post.new(post_params)

  respond_to do |format|
    if @post.save
      format.html { redirect_to @post,
                    notice: 'Post was successfully created.' }
      format.json { render action: 'show',
                    status: :created, location: @post }
    else
      format.html { render action: 'new' }
      format.json { render json: @post.errors,
                    status: :unprocessable_entity }

    end
  end
end
The first line of the method @post = Post.new(post_params) uses
Strong Parameters to ensure only the accepted parameters are allowed into the call to
new. Inside the respond_to block, the return
value of @post.save is checked. If it’s
true, then the user is redirected to the newly created post. If it is
false, then the new action is rendered again so
the user can correct any errors.
The update method is similar to the create
method. The main difference is that the code checks the return value of
@post.update instead of @post.save.
def update
  respond_to do |format|
    if @post.update(post_params)
      format.html { redirect_to @post,
                    notice: 'Post was successfully updated.' }
      format.json { render action: 'show',
                    status: :ok, location: @post }

    else
      format.html { render action: 'edit' }
      format.json { render json: @post.errors,
                    status: :unprocessable_entity }
    end
  end
end
If @post.update returns true, the code
redirects the user to the updated post; otherwise, it renders the edit form so the user
can correct the errors.
The destroy method is simpler than the create
and update methods because it doesn’t check the return value of
@post.destroy.
def destroy
  @post.destroy
  respond_to do |format|
    format.html { redirect_to posts_url }
    format.json { head :no_content }
  end
end
After the post is destroyed, the code redirects the user back to the index
page, posts_url.
You added a route to the create comment action earlier, so now
let’s add a simple controller for that action. You’ll add the form for
entering new comments in the next chapter.
Generate a new controller for comments using the Rails generator:
  $ bin/rails generate controller comments
➊    create  app/controllers/comments_controller.rb
     invoke  erb
➋    create    app/views/comments
     invoke  test_unit
     create    test/controllers/comments_controller_test.rb
     invoke  helper
     create    app/helpers/comments_helper.rb
     invoke    test_unit
     create      test/helpers/comments_helper_test.rb
     invoke  assets
     invoke    coffee
     create      app/assets/javascripts/comments.js.coffee
     invoke    scss
     create      app/assets/stylesheets/comments.css.scss
Note that I specified only a controller, not scaffolding. This code generates an empty controller ➊ and an empty views directory ➋, as well as files for helpers, tests, and assets. We’ll have to fill in the details ourselves. Start by opening the file app/controllers/comments_controller.rb in your editor:
class CommentsController < ApplicationController
end
Because you’re implementing the create action, the first
thing you need is a create method. You can model it after the
create method in the posts controller. Assume that users won’t
be adding comments via an API, so it isn’t necessary to generate JSON
responses.
  class CommentsController < ApplicationController
    def create
1     @post = Post.find(params[:post_id])

2     if @post.comments.create(comment_params)
3       redirect_to @post,
                    notice: 'Comment was successfully created.'
      else
        redirect_to @post,
                    alert: 'Error creating comment.'
      end
    end
  end
This code first finds the correct post ➊ using the
post_id in the params hash. It then uses the
comments association to create a new comment ➋ and redirects
back to the post ➌. Each call to redirect_to sets a flash
message to indicate success or failure.
Because you’re using Strong Parameters in your application, you also need to add
the comment_params method to specify the parameters you want to
accept.
class CommentsController < ApplicationController
  --snip--

  private

  def comment_params
    params.require(:comment).permit(:author, :body)
  end
end
In the case of comments, you only accept an author and a
body. Any other parameters are ignored. In the next chapter,
you’ll update the post show view to display existing comments and
include a form for creating new comments.
This chapter introduced many important Rails concepts—REST, routing, and controllers. I also discussed parameters, render versus redirect, response formats, and the flash.
We started at the database in the last chapter and worked our way forward in this chapter. In the next chapter, we’ll get all the way to the user and cover the last piece of the MVC puzzle: views.
Q: | 1. Good error messages are important for any application. If something goes
wrong, your users need to know what the problem is and how to correct it. Currently,
if a comment can’t be created, users see the message “Error creating
comment.” Update the |
Q: | 2. In Exercise 1 at the end of Chapter 3, you added an
|