
When building a new application, work out the data model first. A data model is a description of the models in your program, along with their attributes and associations. First, identify the models needed and the relationships between them, and then create tables for these models and test them in the Rails console. Once the data models are working properly, building the rest of the application is much easier.
Some people think of diagrams with boxes and arrows when they hear the words data model. These diagrams are unnecessary if you understand how the models relate without them. This chapter does include some basic diagrams, however, to illustrate different associations. In each diagram, the arrows point from the foreign key in a child model to the primary key in the parent model.
In this chapter, you’re going to start building a new application from scratch. The application is a social network in the style of Tumblr. Users create accounts and then post text and images for other users to see. A user can follow other users so their friends’ posts appear on the timeline on their home page.
First, I’ll discuss several advanced data-modeling techniques. Then we’ll work our way through the models needed for your new social networking site.
When building the blog, you worked with has_many and
belongs_to associations. Real-world applications often require more
complex associations.
For example, you sometimes need to model an association between two models of the same type, or you might need to model a many-to-many relationship between models. You also might need to store an object hierarchy in the database, but relational databases don’t really support inheritance. Finally, you might need to model a class that can associate with multiple different types of models.
I’ll discuss these four situations in this section, starting with modeling a relationship between two models of the same type using a self join association.
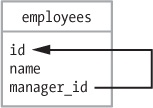
Imagine an application for managing employees at a company. In addition to data such
as each employee’s name, job title, and salary, you need to store each
employee’s manager’s name. Each employee belongs_to a
manager, and a manager has_many subordinates. A manager is also an
employee, so you need to set up an association between two different models of the same
type.
Recall that a belongs_to association means the model needs a
foreign key to link it to another model. A foreign key is a field that identifies the
model on the other side of an association. So the employees table
needs a field called manager_id to link each employee to a manager.
The diagram in Figure 8-1 shows how this relationship
works.
A self join association allows you to model an organizational
chart or other tree structure using a single table. The manager_id
foreign key points to the id of the employee’s manager. This same type of
association is also used to model other tree structures such as nested comments, where
replies include a parent_id that points to the parent comment.
Once the manager_id field has been added to the
employees table, you can define the associations in the
Employee model:
  class Employee < ActiveRecord::Base
➊   has_many :subordinates, class_name: 'Employee',
➋                           foreign_key: 'manager_id'
➌   belongs_to :manager, class_name: 'Employee'
  end
First, you add a has_many association for subordinates. Because
this association refers to the Employee model, and not a model named
Subordinate, you must specify class_name:
'Employee' ➊. You must also specify the foreign key name, in this
case, manager_id ➋. Finally, add the
belongs_to association for the manager. Again,
you must explicitly state the model’s class name because Rails can’t figure
it out based on the association name ➌.
With these associations in place, you can call the subordinates
method to get a list of a manager’s subordinates. You can also use the methods
manager and manager= to get and set an
employee’s manager. Almost every employee should have a
manager_id, as shown in Table 8-1. If your
manager_id is nil, then you must be the
boss!
Notice that the manager_id for Bob is 1. That means Alice is
Bob’s manager. Alice’s manager_id is NULL, which is
nil in Ruby. She’s the CEO of this two-person company.
Whereas a one-to-many association only involves two tables, a many-to-many
association always involves a third table known as a join table.
The join table stores foreign keys for each side of the association. It
belongs_to each of the models in the association.
Rails provides two different ways to set up a many-to-many association.
If you’re using a join table strictly for the association and need no
additional data, then use a has_and_belongs_to_many association.
You still need to create the join table, but you don’t need to define a model
for it. The join table must be named after the two models it joins.
For example, authors write many books, and some books have multiple
authors. All of the data you need is stored in either the author or book model, so you
can create a has_and_belongs_to_many association between authors
and books, as in Figure 8-2.
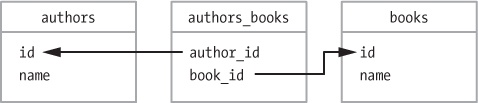
Figure 8-2 shows the
Author and Book models with the join table
between them. Define the association between these models as shown here:
class Author < ActiveRecord::Base
  has_and_belongs_to_many :books
end
An author might write many books, but a book can also have many authors:
class Book < ActiveRecord::Base
  has_and_belongs_to_many :authors
end
For this association to work, the join table between authors
and books must be named authors_books and must
contain fields author_id and book_id. Use the
rails generate command to create an empty migration file:
$ bin/rails g migration CreateAuthorsBooks
  invoke   active_record
  create     db/migrate/..._create_authors_books.rb
Then edit the migration file to remove the primary key and create the two foreign keys:
  class CreateAuthorsBooks < ActiveRecord::Migration
    def change
      create_table :authors_books, id: false do |t|
➊       t.references :author, null: false, index: true

        t.references :book, null: false, index: true
      end
    end
  end
The t.references :author statement ➊ indicates
this field is a foreign key that references an Author model. The
field is named author_id. The null: false option
adds a constraint so NULL values are not allowed, and the index:
true option creates a database index to speed up queries on this field.
The next line creates the book_id field, also with a NULL
constraint and database index.
You can also use the create_join_table method inside the
migration to create the join table. This method takes the names of the associations
and creates the correct table with no primary key and a foreign key for each
association with a NULL constraint. This method does not automatically create indices
for the foreign keys. You can add indices as shown here:
class CreateAuthorsBooks < ActiveRecord::Migration
  def change
    create_join_table :authors, :books do |t|
      t.index :author_id
      t.index :book_id
    end
  end
end
After creating the join table, you don’t need to do anything to make the
association work. There is no model associated with the join table. With a
has_and_belongs_to_many association, Rails manages the join table
for you.
If you would like to store additional information in the join table besides the
foreign keys of the associated models, use a has_many :through
association. For example, you could model the association between bands and venues
using a join table named performances.
Figure 8-3 shows the relationship among
bands, performances, and venues.
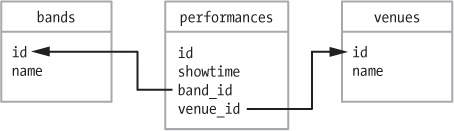
Each performance belongs to a band and a venue. It also has a show-time. The models look like this:
class Band < ActiveRecord::Base
  has_many :performances
  has_many :venues, through: :performances
end
A band performs many times, and so the band is associated with many different venues through its performances:
class Venue < ActiveRecord::Base
  has_many :performances
  has_many :bands, through: :performances
end
A venue hosts many performances. The venue is associated with many different bands through the performances it hosts:
class Performance < ActiveRecord::Base
  belongs_to :band
  belongs_to :venue
end
Performances associate a band with a venue. A venue can also store additional
data, such as the showtime of the performance, in the performances
table.
Sometimes you need to store a hierarchy of classes in the database. Most relational databases don’t support inheritance, but you can use single-table inheritance to create these models and store the inheritance structure in the database.
For example, imagine you are writing an application to manage a pet store. You need
a way to model different types of pets such as dogs and fish. Pet dogs and pet fish
share many of the same attributes and methods, so it makes sense for both of them to
inherit from a parent class named Pet.
In Rails, you can create a single table for pets and then store records for the two
child classes Dog and Fish in the same table.
Rails uses a column named type to keep track of the type of object
stored in each row. In addition to the columns needed by the parent model, you also need
to add all columns needed by the child models to the table. You need this because all
models are stored in the same table.
The parent model Pet is a normal Active Record model. The
Pet model inherits from
ActiveRecord::Base:
class Pet < ActiveRecord::Base
end
The Dog model inherits from Pet:
class Dog < Pet
end
The Fish model also inherits from
Pet:
class Fish < Pet
end
With these models in place, you can store records of all three types in a single
table named pets, shown in Table 8-2.
These three rows from the pets table hold data for the
Dog and Fish models. You can now make calls like
Pet.count to count the pets in the table. Calling
Dog.count returns 2 and Fish.count returns 1.
Because Rails knows teach record type, pet = Pet.find(2) returns an
object of type Fish.
You’ll look at another example of single-table inheritance in the next section, when you create the post models for your new application.
With polymorphic associations, a model can belong to more than one other model using a single association. The classic example of a polymorphic association is allowing comments on multiple types of objects. For example, you might want to let people comment on both posts and images. Here is what your comment model might look like using a polymorphic association:
class Comment < ActiveRecord::Base
  belongs_to :commentable, polymorphic: true
end
Instead of using belongs_to :post or belongs_to
:image, you specify that a comment belongs_to something
called :commentable. This name can be anything you like, but the
convention is to make it an adjective form of the model name.
The comments table will need two fields for this association to
work, an integer field named commentable_id and a string field named
commentable_type. The commentable_type field
holds the class name of the object that owns this comment. This setup is similar to the
type column in the single-table inheritance example you saw in the
previous section. The commentable_id is a foreign key referring to
the id of the object that owns this comment.
Include as: :commentable on the has_many
:comments associations in models that can have comments:
class Post < ActiveRecord::Base
  has_many :comments, as: :commentable
end

class Image < ActiveRecord::Base
  has_many :comments, as: :commentable
end
The has_many association works the same as always. A method call
like @post.comments returns a list of comments associated with the
post. It works by looking for comments that match both the id of the
@post object and the class name Post.
If your application grows and you need comments on other models, you can add the
same has_many association to the new model without changing anything
in the Comment model.
That’s enough theory for now. Let’s put some of this knowledge to work.
In this section, you’ll build the data model for a social networking service similar to Tumblr. You need models for users and posts. You also need to represent a user following another user as well as several different types of posts, and users should be able to comment on posts.
Start by creating a new, empty Rails application in your code directory:
$ cd code
$ rails new social
$ cd social
I’m calling my application social, but call yours whatever you like. Who knows, you may launch this app and sell it for a billion dollars someday!
Now let’s work through the models needed for this application.
If this is to be a social site, the first thing you need is a model for users and the relationships between them. Tumblr, like Twitter, doesn’t use the idea of friendship between users. Instead, you subscribe to another user’s updates by “following” that user.
Start by creating a new resource named User. For now, add string
fields for name and email. You can always add more
fields later by creating another database migration. The following command creates a
controller, model, database migration, and other files for users:
$ bin/rails generate resource User name emailCreate the users table by running this new database
migration:
$ bin/rake db:migrateNext, you need to create a model to represent the idea of subscriptions. A
subscription is a type of self join, but it is a many-to-many association, so you need a
join table. What should this model contain? You subscribe to another user’s posts
by following them. You can call the user you are following a leader. So you need to
store a leader_id and a follower_id in the
subscriptions table.
When one user follows another user, the following user’s id
is stored in the follower_id field and the other user’s
id is stored in the leader_id field. This setup
allows you to find a list of a user’s followers and leaders easily.
$ bin/rails g model Subscription leader:references follower:references
  invoke  active_record
  create    db/migrate/..._create_subscriptions.rb
  create    app/models/subscription.rb
  invoke    test_unit
  create      test/models/subscription_test.rb
  create      test/fixtures/subscriptions.yml
Because this is a join table, use the model generator to create a database migration and model for subscriptions. Don’t forget to update your database:
$ bin/rake db:migrateNow that you’ve created the tables, you need to update the model files to define the associations. First, open the file app/models/subscription.rb in your editor:
class Subscription < ActiveRecord::Base
  belongs_to :leader, class_name: 'User'
  belongs_to :follower, class_name: 'User'
end
You used leader:references and
follower:references when creating the model, so the Rails model
generator added two belongs_to associations to the
Subscription model for you. Both :leader and
:follower actually refer to a User, so you need
to add the class name User. By default, Rails looks for model names
that match association names. If you don’t specify a class name, Rails looks for
models named Leader and Follower. Figure 8-4 shows the tables for users
and subscriptions.
Note
In reality, these tables also include created_at and
updated_at timestamps, but I left these out of the diagrams in
this chapter for brevity.
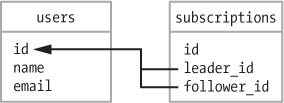
In the subscriptions table, both
leader_id and follower_id are foreign keys
referring to a user. Now that the Subscription associations are done,
let’s add the User associations. Open the file
app/models/user.rb in your editor:
  class User < ActiveRecord::Base
➊   has_many :subscriptions, foreign_key: :follower_id,
➋                            dependent: :destroy
➌   has_many :leaders, through: :subscriptions
  end
Start with the fact that a user has many subscriptions. In this case, you need to
specify the foreign key to use. Normally, you would call this
user_id, but you’re modeling leaders and followers, so call it
follower_id instead ➊. Also specify what happens if this
user is deleted with dependent: :destroy ➋. This tells Rails
to destroy any associated subscriptions if this user is ever destroyed. Finally, add the
has_many:through association to leaders ➌.
Next, add a few methods to the model to make working with the associations easier. You can also use these methods to test the associations in the Rails console:
  class User < ActiveRecord::Base
    has_many :subscriptions, foreign_key: :follower_id,
                             dependent: :destroy
    has_many :leaders, through: :subscriptions

➊   def following?(leader)
        leaders.include? leader
    end

➋   def follow!(leader)
➌     if leader != self && !following?(leader)
        leaders << leader
      end
    end
  end
First, add a predicate method, a method returning a
true or false value, called
following? ➊ to see if the current user is following another
user. This method checks to see if the current user’s leaders
collection includes the leader passed as an argument to the
method.
Then, add the follow! method ➋ to indicate that
the current user is following another user. This method ensures the current user
isn’t trying to follow himself or herself and isn’t already following the
other user ➌. If neither case is true, the leader passed to
this method is inserted into the current user’s leaders
collection with <<, the insertion operator.
With these methods in place, you can now launch a Rails console and test your associations:
$ bin/rails consoleStart by creating two users:
irb(main):001:0> alice = User.create name: "Alice"
   (0.1ms) begin transaction
  SQL (0.6ms) INSERT INTO "users" ...
   (0.8ms) commit transaction
 => #<User id: 1, name: "Alice", ...>
irb(main):002:0> bob = User.create name: "Bob"
   (0.1ms) begin transaction
  SQL (0.6ms) INSERT INTO "users" ...
   (0.8ms) commit transaction
 => #<User id: 2, name: "Bob", ...>
Now, call the follow! method on alice and pass
in bob. Then call the following? method on
alice to confirm that follow worked correctly.
Finally, call following? again to see if bob is
following alice:
irb(main):003:0> alice.follow! bob
  User Exists (0.2ms) SELECT ...
   (0.1ms) begin transaction
  SQL (16.1ms) INSERT INTO ...
   (20.4ms) commit transaction
  User Load (0.3ms) SELECT ...
 => #<ActiveRecord::Associations::CollectionProxy ...>
irb(main):004:0> alice.following? bob
 => true
irb(main):005:0> bob.following? alice
User Exists (0.2ms) SELECT ...
 => false
The call to alice.follow! bob adds bob to
collection of leaders for alice. Next, the call to
alice.following? bob checks to see if the
alice.leaders collection includes bob. It does,
so the method returns true. Of course, it doesn’t actually look
for bob, but the id of the User
referred to as bob. The call to bob.following?
alice returns false. The bob.leaders
collection is empty, so bob is not following
alice. Table 8-3 and Table 8-4 show the users and
subscriptions tables after Alice follows Bob, again with the
timestamp fields omitted.
The users table holds records for alice and
bob.
The subscriptions table holds a single record representing the
association between alice and bob. The
leader_id is 2, the id of
bob; and the
follower_id is 1, the id of
alice. This means alice is following
bob.
At this point, you can get a list of every user that alice is
following by calling the leaders method. Having this list is helpful,
but it’s only half of what you need. You also want to be able to list a
user’s followers. To do this, use the subscriptions table
again, only this time going in the opposite direction.
You need another has_many association on the
Subscription model that is the reverse of the existing association.
You can then use that association to find followers.
  class User < ActiveRecord::Base
    has_many :subscriptions, foreign_key: :follower_id,
                             dependent: :destroy
    has_many :leaders, through: :subscriptions

➊   has_many :reverse_subscriptions, foreign_key: :leader_id,
➋                                    class_name: 'Subscription',
                                     dependent: :destroy
➌   has_many :followers, through: :reverse_subscriptions

    def following?(leader)
      leaders.include? leader
    end

    def follow!(leader)
      if leader != self && !following?(leader)
        leaders << leader
      end
    end
  end
This association is the reverse of the existing :subscriptions
association. There’s no clever word for the reverse of a subscription, so name the
association :reverse_subscriptions. This association uses the
leader_id field as the foreign key ➊. Because the
association name doesn’t match the name of the model, you also need to specify a class name ➋. As with the
subscription association, also specify dependent: :destroy so you
aren’t left with orphan records in the subscriptions table if a
user is destroyed. After adding the :reverse_subscriptions
association, you can use it to add another has_many :through
association for :followers ➌.
Restart the Rails console for these changes to take effect, and then try the new association:
➊ irb(main):001:0> alice = User.find(1)
    User Load (0.3ms) SELECT ...
  => #<User id: 1, name: "Alice", ...>
  irb(main):002:0> bob = User.find(2)
    User Load (0.3ms) SELECT ...
  => #<User id: 2, name: "Bob", ...>
➋ irb(main):003:0> alice.followers
    User Load (0.2ms) SELECT ...
  => #<ActiveRecord::Associations::CollectionProxy []>
➌ irb(main):004:0> alice.followers.to_a
  => []
  irb(main):005:0> bob.followers.to_a
    User Load (0.2ms) SELECT ...
  => [#<User id: 1, name: "Alice", ...>]
Because you restarted the console, you first need to find your users in the database
➊. Call the followers method on alice to
see if she has any followers ➋. This method returns a type of relation called an
ActiveRecord::Associations::CollectionProxy. I made the output a
little easier to read by chaining to_a after
followers, which converts the output to an array ➌.
The output shows that alice has no followers and
bob has a single follower—alice. The
User associations and methods are working correctly so far. Now
that users can follow each other, let’s move on to posts.
People don’t just want to share plain text on a social network—they also want to share images, links, and videos. We should allow our users to create a different kind of post for each type of content, though the post types will share some common functionality. This sounds like a perfect use for inheritance.
First, create a base model called Post, and then inherit from
that class to create models for TextPost,
ImagePost, and so on. You can use singletable inheritance to create
these models and store the inheritance structure in the database. Because the
posts table holds records for all types of posts, you must add
columns needed by the other models to the posts table. In addition to
the usual title and body fields, add a
url field to store the address of an image for image posts and a
type field for single-table inheritance.
With those requirements in mind, generate the post resource and update your application’s database:
$ bin/rails g resource Post title body:text url type user:references
$ bin/rake db:migrate
The user:references option adds a user_id
field so you can associate posts with users. Don’t forget to update your
application’s database.
Now you’re ready to create resources for the different types of posts.
$ bin/rails g resource TextPost --parent=Post --migration=false
$ bin/rails g resource ImagePost --parent=Post --migration=false
Here, I’ve passed two options to the resource generator. The
--parent=Post option indicates that these models inherit from
Post and the --migration=false option tells the
generator to not create a database migration for this resource. A database migration is
not needed because these resources are stored in the posts table you
created earlier.
First, let’s update the newly created Post model in
app/models/post.rb to make sure all posts have an associated user
and type:
  class Post < ActiveRecord::Base
    belongs_to :user
➊   validates :user_id, presence: true
➋   validates :type, presence: true
  end
All posts in our social application belong to an individual user. This validation
ensures that a Post can’t be created without an associated
user_id ➊. The type validation ➋ validates that all
records are identified as either a TextPost or an
ImagePost.
Now add validations to the TextPost and
ImagePost models. First, edit
app/models/image_post.rb and add a URL validation to the
ImagePost model:
class ImagePost < Post
  validates :url, presence: true
end
The url field holds the address of the image for an
ImagePost. Users can copy a URL from an image sharing site such as
Flickr or Imgur. The application shouldn’t allow an ImagePost
to be saved without an image url.
Then update the TextPost model in
app/models/text_post.rb to check for a post body:
class TextPost < Post
  validates :body, presence: true
end
The application also shouldn’t allow a TextPost to
be saved without body text.
While you’re editing models, also add the associations for the new post models
under the rest of the has_many associations to the
User model at app/models/user.rb:
class User < ActiveRecord::Base
  has_many :subscriptions, foreign_key: :follower_id,
                           dependent: :destroy
  has_many :leaders, :through => :subscriptions

  has_many :reverse_subscriptions, foreign_key: :leader_id,
                                   class_name: 'Subscription',
                                   dependent: :destroy
  has_many :followers, through: :reverse_subscriptions

  has_many :posts, dependent: :destroy
  has_many :text_posts, dependent: :destroy
  has_many :image_posts, dependent: :destroy

  --snip--
Now you can restart the Rails console and use these new models:
➊ irb(main):001:0> alice = User.find(1)
    User Load (42.0ms) SELECT ...
   => #<User id: 1, ...>
  irb(main):002:0> post1 = alice.text_posts.create(body: "First Post")
     (0.1ms) begin transaction
    SQL (0.7ms) INSERT INTO ...
     (1.9ms) commit transaction
   => #<TextPost id: 1, ...>
  irb(main):003:0> post2 = alice.image_posts.create(
                                   url: "http://i.imgur.com/Y7syDEa.jpg")
     (0.1ms) begin transaction
    SQL (0.7ms) INSERT INTO ...
     (1.9ms) commit transaction
   => #<ImagePost id: 2, ...>
➋ irb(main):004:0> alice.posts.to_a
    Post Load (32.3ms) SELECT ...
   => [#<TextPost id: 1, ...>, #<ImagePost id: 2, ...>]
➌ irb(main):005:0> alice.text_posts.to_a
    TextPost Load (0.4ms) SELECT ...
   => [#<TextPost id: 1, ...>]
Because you restarted the console, first find the User
representing alice ➊. Then create a
TextPost and an ImagePost belonging to
alice. The posts method on the
User model returns all posts associated with that user regardless
of type ➋. Note that the TextPost and
ImagePost you just created are both returned in the same
collection. The text_posts method returns only
TextPost objects ➌.
Now that the models for users and posts are in place, create the comments
model for the application. Add a text field to hold the body of the
comment, a post_id to reference the post that owns this comment, and
a user_id to reference the user who left the comment.
Note that I am not using a polymorphic association with these comments. Because my
different post types all inherit from the base class Post, I can
simply associate Comment with Post, allowing
comments on any type of post.
$ bin/rails g resource Comment body:text post:references user:references
$ bin/rake db:migrate
Also add has_many :comments to the User and
Post model to complete the associations among users, posts, and
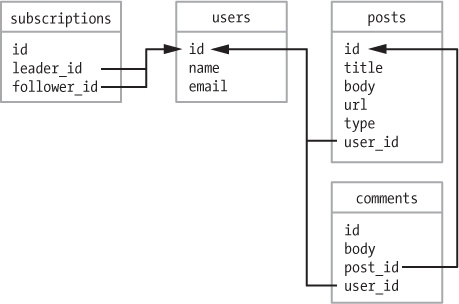
comments. Figure 8-5 shows the tables you
created in this chapter and their associations.
With this, you have all of your models and are well on your way to building your new social network.
I covered some pretty advanced database modeling techniques in this chapter. The
User model has several complex associations. The different types of
posts demonstrate single-table inheritance. Luckily, the Comment model
didn’t contain any surprises.
In the next chapter, I’ll talk about authentication, and you’ll start adding controller actions and views so users can sign up and log in to your social network.