
You now know how to trim unused space around your sample so that it triggers more surgically. You also know how to have Audacity position the digital audio editing insertion point for you and how you can move portions of your sample around with the cut, copy, and paste functions. Now let’s look at how to edit and affect the sample data itself by removing those high-pitched “chirping” artifacts that were introduced from using the noise reduction algorithm in Chapter 5.
This chapter explores how to find isolated chirps
using tools such as zoom, select, and preview, and how to replace these chirps using the silence audio function. You will see how to algorithmically remove several chirps (artifacts) that exist in the second half of the sample. These sample artifacts are fused together with, or are a part of, the vocal sound wave itself.
Audio Data Editing: Changing the Sample
In this chapter, you are going to change the digital audio sample data so that it actually sounds different. Don’t worry, you are going to make it sound better by removing the chirps caused by applying the noise reduction algorithm. I call these artifacts, as they are a side effect of algorithmic processing.
One example of a visual artifact is image data degradation, initiated by JPEG (image) or MPEG (video) compression algorithms and causing a discolored area (usually green, purple, or yellow) of pixels to appear in parts of the image or video. Chirps are the aural equivalent of this, and they are especially noticeable, so I am going to tell you how to remove these. Doing this also gives you more practice with the fundamental editing tools in Audacity, and introduces you to another Effect menu tool because some of these artifacts (chirps) are isolated and some are integrated within the audio sample waveforms.
Cleaning the Sample: Removing Isolated Artifacts
You can find isolated chirp artifacts either by
scrubbing
(a feature you learned about in Chapter 6) or by playing the entire sample by clicking the play button and watching the position of the vertical line that shows where in the sample Audacity is playing that audio from, which is how I did it. Once you think you see the artifact, select the area of the sample containing the artifact, and again use the play button to preview just the selected area to see if this in indeed the artifact that you’ve selected. Figure 7-1 shows this along with the silence audio icon, which I circled in red. Clicking the silence audio icon removes the first of the chirping artifacts.
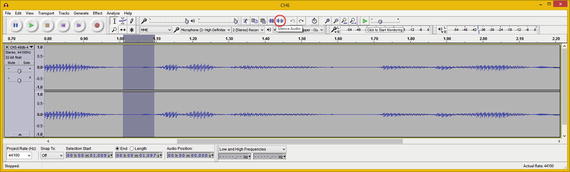
Figure 7-1.
Select the first artifact and preview it
Find the next isolated chirp artifact, and again, select it and click the play button to preview only the artifact, as shown in Figure 7-2. You can tell I am previewing sample audio by the level meters on the right side of the screenshot. Notice in Figures 7-1 and 7-2 that this artifact looks more like a rectangle than a sound waveform, which is a clue that it is a tone, chirp, or pulse of some sort.
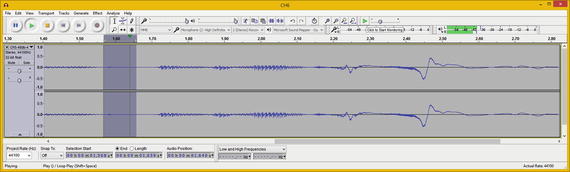
Figure 7-2.
Select a second artifact, and preview it
If you also want to see the artifact visually, there’s a View ➤ Fit in Window menu sequence as well as the Fit Selection icon, shown circled in red at the top of Figure 7-3. Notice that I removed the artifact in the selected area shown in Figure 7-2 (when the chirp artifact was still intact).
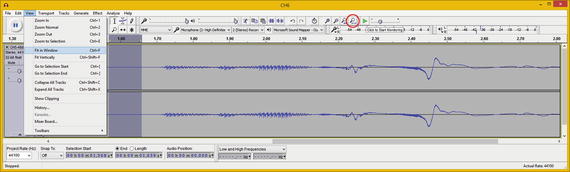
Figure 7-3.
You can zoom into a selection, using Fit in Window
Now that you have removed your isolated chirp artifacts, which are the easiest to locate, the next level of complexity is to remove the chirps that are actually attached to these sample waveforms. Let’s take a look at how this is done.
Sample Data Surgery: Removing Attached Artifacts
As you were previewing the entire data sample, you probably noticed that there was a chirp artifact on the front part of the word “audio.” This subsample is shown selected in Figure 7-4, along with the Fit Selection icon, shown circled in red. I clicked the icon to fit the selection into the Audacity editor area so that I could see what I was doing while I extracted the artifact, which again has no waveform variation and seems to have the same rectangular shape as the other artifacts. I did this using 100% zooming of the data sample.
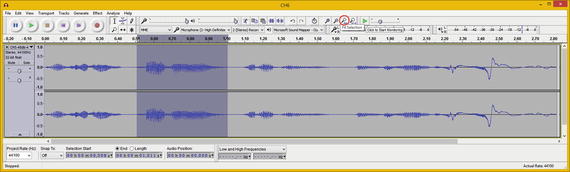
Figure 7-4.
Select only your vocal sample for the word “audio”
Select the data that represents the chirp artifact. This is the first part of the waveform, shown zoomed in on the left side of Figure 7-5. Use the play button to preview it, make sure that this is the chirp, and then use the Silence Audio icon to remove it. You can see by the selection area that I ascertained where the vocal waveform should start by looking at the pattern of the wave (seen to the right of the selection area). I made the end point of the selection area match up with this waveform so that the pattern was consistent through the subsample.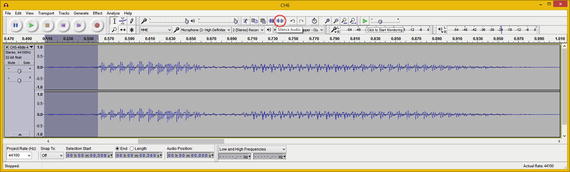
Figure 7-5.
Zoom into subsample and select the chirp artifact
As you can see in Figure 7-6, the Silence Audio function removed the chirp artifact and the “audio” subsample looks much cleaner. It now sounds absolutely clear. It is perfect.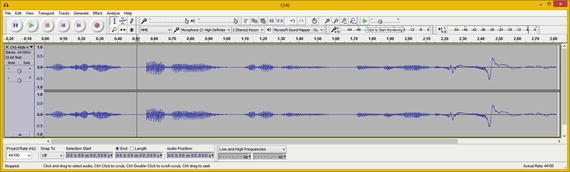
Figure 7-6.
A rectangular chirp artifact is surgically removed
If you play the entire data sample back, the first half of this voice-over sounds clean and intelligible. However, the second half of the sample still has that chirping artifact.
The problem now is that the remaining chirping tones are actually an integrated part of the waveform, not isolated areas or segments of the sound wave that can be selected and removed.
For this reason, to finish the artifact removal process, you need to use an algorithm.
Algorithmic Sample Surgery: Integrated Artifacts
To remove the rest of the chirp artifacts, you need something that can analyze the components of your sample waveform and that can extract these higher frequency chirps algorithmically. Fortunately, Audacity has something called
Vocal Reduction and Isolation
in the Effect menu. Sometimes the best approach is to do the opposite of what you want to achieve in an editing move; instead of trying to isolate the chirp, let’s isolate the voice!
Figure 7-7 shows the
Effect menu
and the Vocal Reduction and Isolation option and dialog. I cut the menu in half to fit it into one screenshot because Audacity currently has a problem (they are working on it) with the Effect menu being too long due to so many cool Audacity effects. It’s a great problem to have, if you ask me!
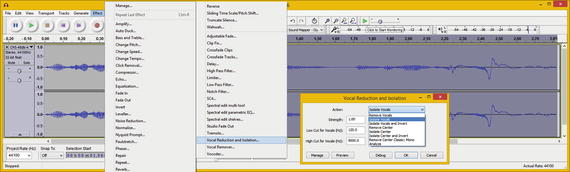
Figure 7-7.
Use the Effect ➤ Vocal Reduction and Isolation menu
I tried the default settings in the Vocal Reduction and Isolation dialog, as I always do, but the High Cut (which controls the high pitch you are trying to eliminate) setting of 9000 Hz (9 kHz) is too high to eliminate this chirping artifact.
My process was to reduce this number by 1000, and I therefore tried 8000, and then 7000, and then 6000, and finally 5000, but I still heard evidence of the chirping artifact.
Next, I tried 4000. This eliminated the chirp artifact but also affected (muddied) the vocal tones, so I added 100 back on the 4000 value at that point; ultimately, 4500 (half the suggested value) was the value that eliminated the chirping artifact and it didn’t affect the vocals too perceptibly.
I did try 4600 just to make sure, but heard the chirping artifact at that setting, so I decided to stay with a High Cut setting of 4500 Hz (4.5 kHz) as my final setting. I left a full-strength algorithm application (default) setting of 100% and a Low Cut setting
of 120 Hz, as I was not trying to remove a lower pitch artifact. You could also set the Low Cut setting to 0.
Figure 7-8 shows the selected portion of this waveform, as well as the Vocal Reduction and Isolation dialog and final settings.
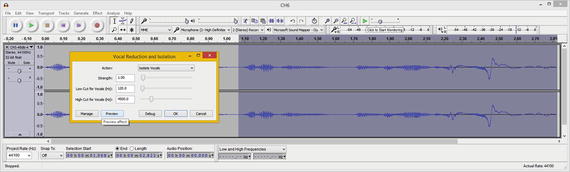
Figure 7-8.
Set the High Cut data field to 4500 Hz and click OK
Also notice that the Vocal Reduction and Isolation dialog has a Preview button so that you can preview your settings in real time. If you enter a number into one of the three data fields, and then click Preview, this has the same effect as hitting your Enter key, which “enters” the data value in the data field.
As you can see in Figure 7-9, the data sample waveforms
look vastly different after the significant waveform editing “moves” were implemented over the course of the chapter.
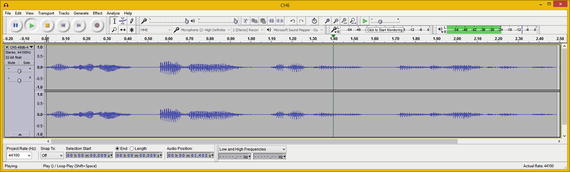
Figure 7-9.
The algorithm processed sub-sample looks far better
Clearly, those sci-fi-sounding
, high-pitch chirp artifacts were contained in that wild-looking tail at the end of the data sample (see Figure 7-8) and that have now been eliminated by using the Audacity Vocal Reduction and Isolation filter (effect) algorithmic processor (see Figure 7-9). As you might suspect, this data sample probably is a lot less to compress.
Let’s take a look at just how much less data the cleaned-up sample takes than the original 316 KB data sample. This will be the primary focus of the data footprint optimization chapter, as you may have guessed. This is because noise and artifacts are difficult to compress.
Removing noise and artifacts may significantly reduce the data footprint a; in this case, it was approximately 300%, which is amazing if you ask me.
If something is accomplished in this book that has a significant effect on the data footprint, I would be remiss not to point it out or to explain the reasons why it happened.
As you can see in Figure 7-10, when I utilized the File ➤ Export Audio menu sequence and dialog, I got a 112 KB FLAC file, which is about three times, or 300% smaller than the 316 KB baseline file that I saved after I recorded the original data sample back in Chapter 5. You can refer to Figure 5-5 if you need to.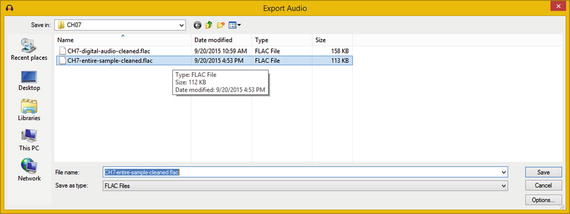
Figure 7-10.
Exporting the cleaned sample using the FLAC format
You’ve now cleaned up and greatly reduced the data for this vocal sample, using manual editing tools and the noise reduction and the vocal reduction and isolation algorithms.
Summary
In this chapter, you explored the process of editing the data sample to change how it sounds. In this case, the objective was to remove the chirping artifacts from Chapter 5, where you learned how to remove background noise. Since then you have learned how to use the silence audio tool, which is an alternate work process to using the noise reduction algorithm. You looked at how to select and preview audio to find artifacts, how to have Audacity align the insertion (position) indicator using the silence audio tool, and how to remove artifacts algorithmically using the Vocal Reduction and Isolation tool.
In the next chapter, you learn about algorithmic digital audio data processing concepts, tools, and techniques.