
Now that we have covered the advanced concept of animated mask creation, let’s cover another advanced VFX concept and technique called either chroma keying or luma keying in the VFX industry. Since VFX are frequently shot in front of a bluescreen or greenscreen , this is a common feature in VFX software packages, and one that you really need to understand. The technology behind keying algorithms is complex and provides powerful tools for you to integrate into your VFX project pipeline.
We will look at how chroma keying is done with Primatte V and Fusion’s internal legacy keying algorithms. We will look at the chroma key tool, the ultra key tool , and the Primatte tool , which has partial support in Fusion and full support in Fusion Studio.
Fusion 8 Keying: Concepts and Tools
Bluescreen keying, and more recently greenscreen keying, has become a mainstream compositing approach for working with both VFX and 3D software packages. This is because it automates the often tedious masking process, although it requires that you shoot in front of special blue or green cloth, paint, or sets. The keyertool has algorithms that then extract these colors, leaving only the subject matter on transparency, creating the alpha channel algorithmically for the VFX artisan. I will be using an image sequence provided to me by my friend Scott Gross, who has worked at Photron (the creator of Primatte) since day one. This professional chroma-keyingsoftware package is available for Autodesk (Smoke, Flint, Flame, Burn, Inferno), Adobe, Quantel, and Apple, and is integrated into both Fusion Studio 8 and its primary competitor, Nuke. There is a basic functionality for Primattein Fusion (free) as well. Therefore, I will start with this Fusion 8 keyer tool. There are a significant number of different keyer tools available in Fusion 8; we will cover the ones used the most frequently during this chapter.
Professional Keyer: Using Basic Primatte V Keyer
Open Fusion and right-click Add Tool ➤ I/O ➤ Loader import Niki.png to use as your backplate (background), and then use Add Tool ➤ Matte➤ Primatte to add the Primatte keyer , as shown in Figure 12-1.
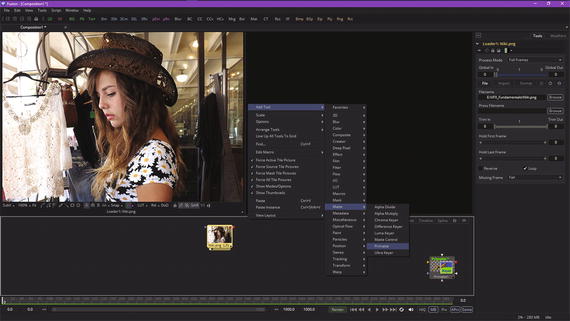
Figure 12-1. Add loader and Primatte nodes to a new VFX project
Right-click again in your flow node editor, then use the Add Tool ➤ I/O ➤ Loader context-menu sequence to get to the loader tool’s Open Filedialog. Add a sequence of bluescreen images, numbered Alex1.tif through Alex20.tif, as shown in Figure 12-2.

Figure 12-2. Import the series of twenty Alex.tif images
Wire Niki.png into a Primatte1.Background input triangle, and wire alex##.tif into a Primatte1.Foreground input triangle. Select the Primatte1 node (tile), and click the View2 dot at the bottom, to show your Primatte keyer in the view on the right, with Niki in the left view. Notice Fusion will label the views if it has room. This is shown in Figure 12-3, along with the Auto Computebutton, which you are going to click next, to invoke the proprietary keying algorithm in Primatte. This will automatically remove green or blue background color from the bluescreen or greenscreen asset.
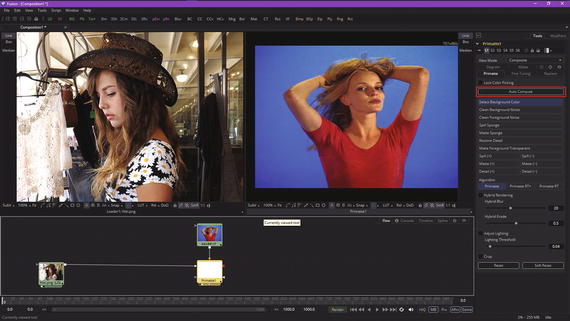
Figure 12-3. Connect the background image and foreground series
When you click the Auto Compute button and trigger those auto compute algorithms the Primatte keyer is world famous for, Primatte can “pull a perfect key” for you, without your having to set any parameters at all.
The results of this can be seen in Figure 12-4 in View2, along with some advanced Primatte algorithms and settings that are available in the Fusion Studio version of the software, but which have been disabled in Fusion’s free version, at least for now. If you do a lot of bluescreen and/or greenscreen work, you may find it worthwhile to pay the $995 for Fusion Studio 8. You would have to pay between two and four thousand for Primatte on other platforms, so this tool alone is worth the Fusion Studio $995 upgrade price.
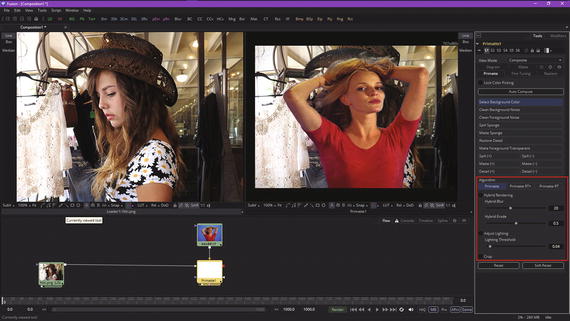
Figure 12-4. There are some Primatte V Keyer settings that require Fusion Studio
If you click on any of the controls or options shown in the area circled in red on the right-hand side of Figure 12-4, you will get the dialog shown in Figure 12-5, which advises you that you can upgrade to Fusion Studio to unlock a full set of advanced options for professional Primatte V (5.1) use.
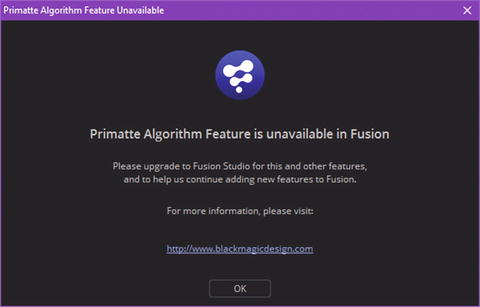
Figure 12-5. Upgrade to Fusion Studio dialog
The Primatte Algorithm Feature Unavailable dialog can be seen in Figure 12-5 and has a link to Blackmagic Design’s website.
Chroma Keying: Using the Fusion 8 Chroma Keyer
Since we can’t get into Primatte’s advanced options, let’s take a look at the other keyer algorithms in Fusion, which are nothing to sneeze at, as these can produce professional results as well. The most basic is the chroma (color) keyer, which keys based on color. There is also a luma keyer, which keys based on light. If you wanted to shoot against a red screen background, you would use the Chrome Keyer.
We will look at other Fusion keyer types later on in this chapter. Start a new Fusion project, and again add loaders for Niki.png and alex##.tif image resources. This time, right-click and Add Tool ➤ Matte ➤ Chroma Keyer to add a chrome-keying tool (algorithm), as can be seen in the middle of Figure 12-6.
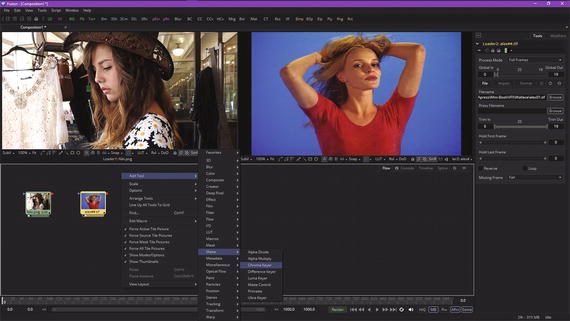
Figure 12-6. Start a new project, and add a chroma-keyer tool node
Next, wire the alex##.tif image series loader node into the chroma keyer node so as to provide the chroma-keyer algorithm the data (pixel arrays) that it will process. Using Fusion shorthand, the way this is written is Loader2:alex##.tif.Output -> ChromaKeyer1.Input, and it is shown in Figure 12-7.

Figure 12-7. Wire an image series Image Loader node into the chrome-keyer tool node
Select your chroma-keyer node and set its viewer dot to View2, which is also shown in Figure 12-7, along with the main control panel, highlighted in red on the right side.
Make sure the (default) Chroma button is still selected, then drag a selection marquee around as much of the bluescreen as you can, without including any other color, as can be seen on the right side of the View2 (right) viewport.
This will add these bluescreen color values to the keyer node’s algorithm for processing later. You can do the selection operation more than one time, if you see that the algorithm has not removed all of the blue values from your result, which will be shown to you in the ChromaKeyer1 viewport (View2) as long as you have selected the right-hand dot at the bottom of the node. As you will see in Figure 12-8, there are some blue values left at the top-middle and lower-left part of the image; be sure to marquee select these as well, as seen in Figure 12-8, and these will be added to the algorithm.
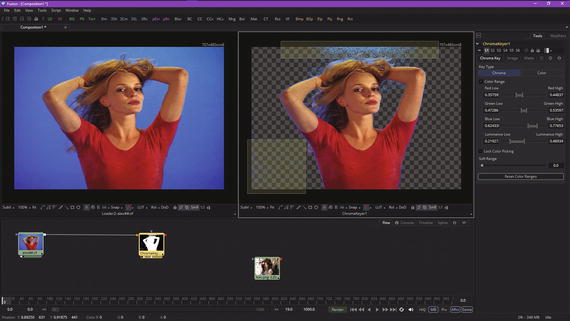
Figure 12-8. Continue marquee selecting blue values to add to your key mask
As you can see in Figure 12-8 and Figure 12-9, whenever you select an area of blue color values, they are removed from the image mask result. This allows you to see what an algorithm is doing in real-time, so that you can achieve a progressively better result with this tool by using this marquee selection work process.
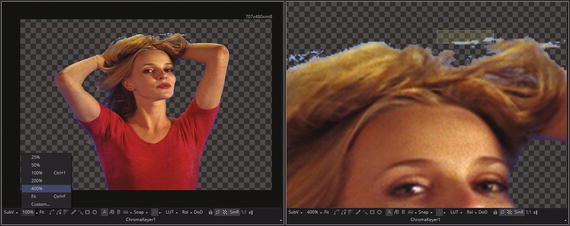
Figure 12-9. Zoom in 400% by using zoom widget at bottom of View2
As you can see in Figure 12-9, there are some light blue pixels still remaining near the model’s hair. To make selection of these pixels easier and more precise, use the zoom widget at the bottom of your View2 viewport, which should be set to 100%, also known as View Actual Pixels , and use your drop-down arrow—or, in this case, it’s a pop-up arrow—to set the zoom to four-times magnification, or 400%, as seen in Figure 12-9. Select an area of light blue pixels that does not overlap with the model’s hair, as seen at the top of the right-hand pane in Figure 12-9.
Once you have selected all of the blue values available for selection in your transparent (masked) areas, which will be done on the pixel level, you can click the Image tab , seen on the right in Figure 12-10, and use the spill method algorithm setting to remove the bluish halo around the image subject.
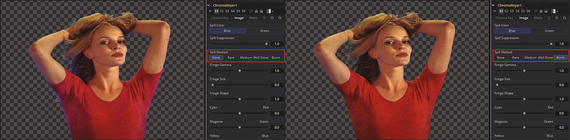
Figure 12-10. Adjust the spill method algorithm settings under the Image tab
To composite this result over another image, use a merge(composite) tool using the Add Tool ➤ Composite ➤ Merge context-menu sequence to add a merge node, as is shown in Figure 12-11.
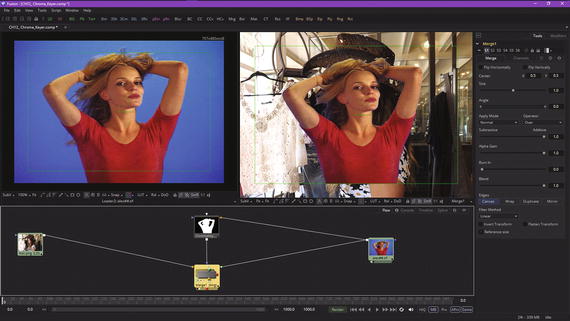
Figure 12-11. Add a Merge node to composite the matte over the Niki model image
In the flow node editor, wire Niki.png as the background plate and the image series as the foreground image , and then wire the chroma-keyer output into the mask input, as shown at the bottom of Figure 12-11. Notice that you’re giving the data (pixels) in the image series to the chroma-keyer node algorithm, as well as giving it the masked foreground image for your composite merge operation. Since Fusion is chroma-keying imagery algorithmically, the algorithm will work for every image in the series in the exactly same way.
Bluescreen and Greenscreen Keying: Ultra Keyer
Whereas the chroma keyer will work with any color you wish, in case you want to shoot on a redscreen, for instance, there is a keyer called the ultra keyer that is even more optimized for use with green or blue in Fusion. If you do not upgrade to Studio and unlock Primatte for your greenscreen work, this is what you would want to use instead. Launch Fusion again (or start a new project) and use Add Tool ➤ I/O ➤ Loader to add the series of 20 TIFF images so that we can look at this algorithm next. I will forgo the backplate image and merge composite steps, as the work process will be the same as in the previous section. Figure 12-12 shows the image series loader node and the context-menu sequence (Add Tool ➤ Matte ➤ Ultra Keyer) to add the ultra-keyer node tile, which I show selected on the right side of this figure. Notice that your control panel options are much simpler, as this algorithm is already tuned for blue and green.

Figure 12-12. Add image loader and ultra-keyer nodes in Fusion
As you can see in Figure 12-13, once you wire your nodes together the algorithm is already removing the blue values. It does this all at once, and some of the transparency checkerboard pattern is visible. To control the result, use the two sliders highlighted in red in the ultra keyer control panel.
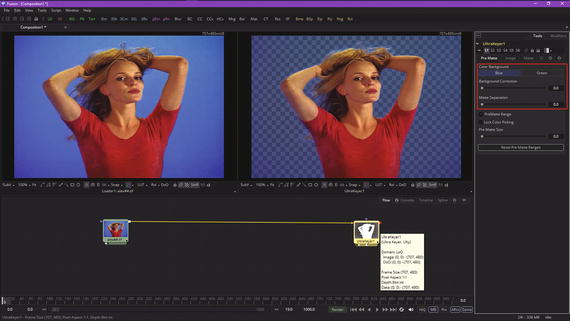
Figure 12-13. Use the ultra keyer control panel to adjust the bluescreen removal effect
Drag your background correctionslider to the right as much as is needed to remove the rest of these blue values. This was a value of 0.9750 on my system, which allowed me to achieve complete transparency, as can be seen in Figure 12-14 in View2.
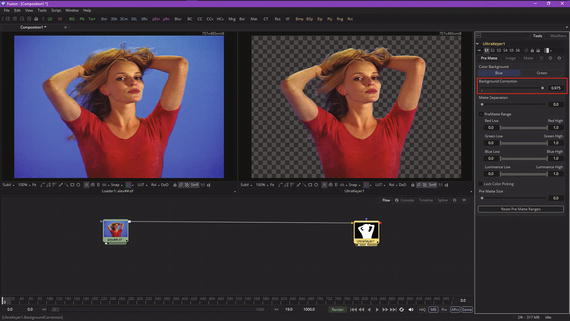
Figure 12-14. Remove all blue values with a 0.975 setting
Note that the result is superior to the previous chroma key algorithm, as there is no blue fringe that will need to be removed! This is because the ultra keyer’s algorithm is specifically optimized for bluescreen and greenscreen, which both use a very carefully pre-defined color value, which the ultra keyer was looking for. Also notice in Figure 12-14 that I have expanded a section called PreMatte Rangeunderneath the two primary sliders for ultra keyer. This contains RGB color sliders that allow you to select colors that you want to also be transparent in addition to the blue (or green) values used in the bluescreen (or greenscreen) assets.
Figure 12-15 shows how this works using red color value slider settings. You can use this to remove other colors in the mask that you are creating. Here, we use the red high value, between 0.65 and 0.67, to attempt to remove everything except for the red shirt.
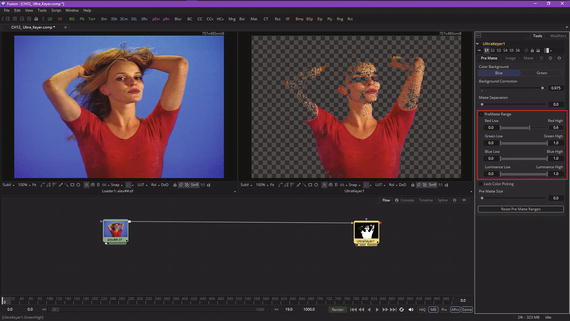
Figure 12-15. Use a red high slider value to isolate red pixels
The PreMatte tab is the most important ultra-keyer tab, with settings for blue (bluescreen) or green (greenscreen). Based upon that background color selection, the ultra keyer will iteratively merge the pre-keyed image over a blue or green background before further processing, guided by your background correction slider setting. In certain use cases this could help to improve edge quality results. Matte separation helps separate the foreground from the background before color selection.
You can increase the matte separationwhile viewing your alpha, as shown in Figure 12-16, to eliminate a majority of the background. Stop increasing this slider if you see holes in the subject or loss of detail on the edge of the matte. You can set the view to show the alpha data using the viewport RGBA widget, as can be seen in the pop-up menu at the bottom of View1 in Figure 12-16.
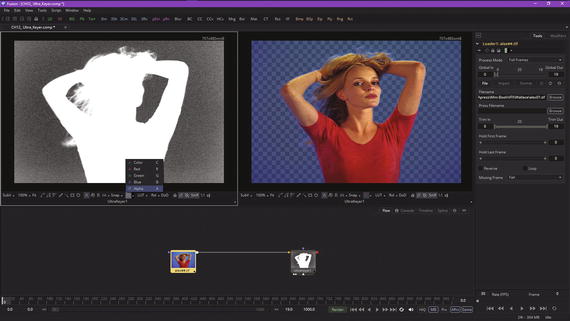
Figure 12-16. Set both views to ultra keyer and set one to display only alpha channel data
I went back and used the new alpha channel view to reset my primary two sliders, finding that I only needed to use 0.55 for the background correction and 0.3 for the matte separation, as I could now better see the result using the Alpha black and white view, as shown on the left side in Figure 12-17. The optimal mask has only black or white pixels, with gray anti-aliasing pixels along the edges. Next, let’s take a look at your Image tab controls.
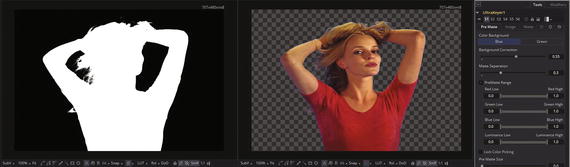
Figure 12-17. Use the alpha view to set a more precise setting value for matte separation and background correction
As you can see in Figure 12-18, I left spill suppressionat the maximum 100% (1.0) setting. Spill is the blue fringe you saw back in Figure 12-9, and is caused by the background screen color coming through anti-aliased or semi-transparent grayscale areas of the alpha channel. In blue- or greenscreen keying, this can cause the color of the background to become apparent on the “fringe ” of that foreground object that you are pulling a mask for. A spill suppression algorithm will attempt to remove color from this fringe area. The process used is optimized for either blue- or greenscreen based on the color you selected in the PreMatte control panel.
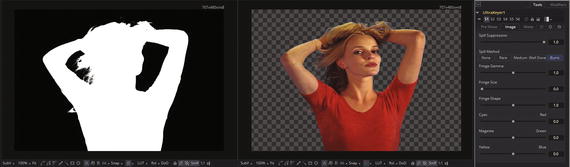
Figure 12-18. Select Burnt spill-suppression method, remove blue fringe pixels
The spill methodselects your spill suppression algorithm strength. The Nonebutton is selected when no spill suppression is needed. The Rarebutton removes a little of the spill color, and is the lightest spill suppression method.
The Mediumbutton is recommended by Fusion for use with greenscreen, and the Well Donebutton is recommended for use by Fusion in bluescreen. Finally, the Burntbutton works best with bluescreens, and is primarily used for troublesome shots.
A fringe gammacontrol will be used to adjust the brightness of any fringe (also sometimes referred to as a “halo”) that may surround your masked (ultra-keyed) image subject matter. Fringe size, on the other hand, expands or contracts the width of the fringe that is around the subject matter. The fringe shapewill force the fringe to be pressed toward the external edge of the image or pulled toward the inner edge of the fringe. Its effect is most noticeable when the fringe size slider value is large.
You can also use your Cyan to Red, Magenta to Green, and Yellow/Blue color sliders to color-correct the semi-transparent pixels around the fringe of the subject matter. This allows you to color-correct your fringe (instead of removing it) to match the new background color (if that color is uniform, that is). I used the Burnt setting, seen in Figure 12-18, to remove a blue spill color along the fringe of the masked subject.
The third tab is the Matte tab , which allows you to post-process your matte (mask or alpha channel) result once you have fine-tuned your bluescreen removal using the first two tabs.
The matte blurwill essentially anti-alias a jagged edge on a matte (mask) by applying a small amount of blur along the edge of the matte using a Gaussian blur, just as you would do in GIMP or Photoshop using a 0.15 to 0.2 blur value. In Fusion, to apply a 0.2 Gaussian blur uses a 1.2 setting, as seen on the right side of Figure 12-19. Notice in your left alpha view that the edges of the mask are no longer jagged and are instead nice and smooth, using the gray value to anti-alias the jagged edges away. You can drag a slider to see the amount of blur applied.
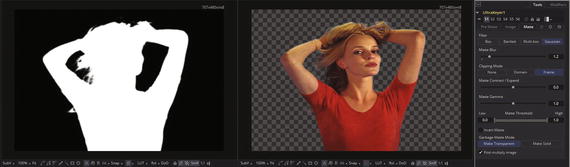
Figure 12-19. Apply a Gaussian blur to anti-alias the mask edges
Other matte (mask) fine-tuning controls include a matte contract/expandslider, which will shrink (contract) or grow (expand) the semi-transparent (anti-aliasing) areas of the matte. Values above 0.0 will expand the anti-aliasing area, and values below 0.0 will contract the grayscale areas in the mask. Your contract/expand control should be utilized with your matte blur to take away any hard edges on a matte (mask) and to reduce any color fringe. Since this control only affects the grayscale (semi-transparent) areas for the mask, it has no effect on black and white areas (the matte or mask of the subject itself).
The matte gammaslider will raise or lower the values of the matte in semi-transparent areas. Higher values should cause the gray area to become more opaque, and lower values cause the gray area to become more translucent. Again, any black or white region of a subject matter matte will remain unaffected.
The matte thresholdcontrol has two slider settings, one for each end of a spectrum, allowing you to set a range rather than define single data values. Any data value below the low threshold becomes black (transparent) in the matte. Any values above the upper threshold will become white (opaque) in the matte, whereas all data values contained within this range should keep their defined transparency values, relative to the magnitude of the defined range. This control can be used to mitigate a “salt and pepper” noise effect in the matte. To show this and the “Invert Matte” checkbox seen in Figure 12-20, I went back to the original zero settings for the first two control panel tabs so that we can use the matte threshold setting to remove the background noise in the original matte. I used a 0.45 Low setting and 0.6 High setting to remove 95 percent of the noise, and I also selected the “Invert Matte” option to show you what that can do for a mask.
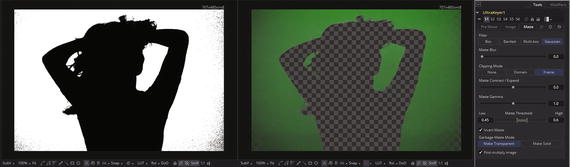
Figure 12-20. Use matte threshold to remove noise; invert mask
When your “Invert Matte ” checkbox has been selected, alpha channel data that has been created by a keyer will be inverted, causing the transparent areas to be opaque and the opaque areas to be transparent. This is useful to “flip” or reverse a mask. Sometime it is easier to mask what is not the subject and then invert the mask, so use of mask inversion is very common in the VFX industry.
There is also a garbage matte modepair of buttons that allow you to define how garbage mattes (selection of areas in a mask that are “garbage” and can be quickly removed in bulk) are applied to (summed with or subtracted from) the detail sections of the matte.
Garbage mattes are mask tools or custom images connected to your garbage matte input on your keyer tool (node) tile. The garbage matte input data will then be applied directly to alpha channel data of the matte. Garbage mattes can be used to remove unwanted elements on your greenscreen set that you do not want to be keyed, such as reference props for actors, microphones, or booms used for camera or audio equipment.
The Make Transparentbutton should be used to make your garbage matte transparent (black), whereas the Make Solidbutton should be used to make the garbage matte solid (white).
The “Post Multiply Image” checkbox will instruct the keyer to multiply the color channels for your image against the alpha channel created for your image. This option is usually enabled, and therefore will be on by default. If you deselect this, your image can no longer be considered “pre-multiplied ” for purposes of merging it with other images.
As you have seen in this chapter, keying, along with the masking covered in the previous chapter, is an advanced VFX topic that really deserves its own book in order to cover it saliently. For this reason, make sure to check out the other algorithms on the Add Tool ➤ Matte submenu, as they allow you to do even more with your alpha-channel creation and matte pulling than what we have had the time to cover within this chapter.
Summary
In this twelfth chapter we took a look at how to work with bluescreen and greenscreen still image and motion image assets in Fusion. This is called keying in the VFX industry. We looked at the professional keyer in Fusion, called Primatte V, and then we looked at the Fusion chroma keyer, which allows keying using any background color value. The more advanced ultra keyer is optimized for bluescreen and greenscreen usage specifically. If you are not upgrading to Fusion Studio, these are the primary matte keyer algorithms that you will be using in the Fusion 8 free software version, which is why I covered these specifically during this chapter. Thanks again to Scott Gross of Primatte for providing me with the bluescreen Alex model image sequence that I used to show off these keyer tools. Make sure to get your own greenscreen dropcloth or paint soon!
In Chapter 13, you’ll learn about Fusion motion tracking concepts and techniques.