Now that you have a basic understanding of the flow node editor, which we will also be using in this chapter so you get some practice, let’s switch gears from 2D compositing space to the 4D time dimension. We will take a look at the timeline editor in Fusion, as well as the closely related time rulerarea, which is located at the bottom of the Fusion user interface. We will cover all of the 4D aspects of Fusion in this chapter and then learn how to expand our control even further in the next chapter, which will cover drawing motion curves using the Fusion 8 spline editor.
For now, we will look at how to animate digital still imagery, as this is the best way to allow you to learn the timeline editor features without having full-blown video assets.
Timeline Editor: Creating Animated VFX
Let’s create a project from scratch to see how the flow node editor and timeline editor work together. Start Fusion 8 and then right-click, selecting Add Tool ➤ I/O ➤ Image Loader. Select the Niki.png image and then right-click in the flow node editor again. Select Add Tool ➤ Blur ➤ Blur. Rename the node (tile) NikiBlur and wire to it from the image loader tile. Set the Blur Sizeto 100% and the Blur Blendto 1.0 (100%) for the Blur node tile. You are going to animate the model into clarity from a fog, so we are going to start with these maximum blur and blend settings.
Notice in Figure 9-1 that you do not have to insert your image saver node in order to start working with the time ruler or the timeline editor portions of your Fusion 8 VFX software.

Figure 9-1. Right-click the Blur Blend node and enable the Animate function
As you can see in the time ruler, found in the bottom left part of Figure 9-1, you are at keyframe zero, so these maximum blur settings will be set as your starting values. To start keyframe operations, right-click the Blend setting of 100% (1.0 is 100%) and select the Animate option from the context-sensitive menu.
To enter the timeline editor, click the Timeline tab seen circled in red in Figure 9-1. As you can see in Figure 9-2, you have timeline “tracks ” for both of these nodes ready to go! Move the playheadvertical time-position bar to 30, by dragging it with your mouse to the right, as can be seen in Figure 9-2.

Figure 9-2. Move playhead to 30, and set the Blend value back to 0.0
Also notice that the time ruler shows your current frame position at 30 with a white tick, seen circled in red in Figure 9-2. I have also highlighted the timeline utility icons for fit, zoom out, zoom in, zoom selection(marquee), time stretch, and the show/hide spreadsheet mode toggle. These icons are located at the top-left of your timeline editor pane.
Next, drag the Blend slider back to zero, or type 0.0 in your number field, at the right of your user interface control. Notice that this automatically sets a keyframe for the value at frame 30; you do not have to right-click and select Animate, as the animation feature was enabled by doing this the first time for this node. By doing this, your blur will animate the next time that you drag the playhead back toward frame 0.
Fusion highlights the control and numeric entry field in green when a keyframed range has been put in place. If you drag the playhead vertical bar back toward zero, you will observe a change in the numeric Blend settings and in the blur preview as well. Also seen in Figure 9-3 are the keyframe left for the node at frame 30 and the “reset to Frame Zero” shuttle control that allows you to go immediately back to the start of the animation timeline. It also shows how to set a working rangefor a timeline animation, which I have set to 120 frames, or 4 seconds. I circled in red the set range endfield and working range green tickmark on the time ruler, to highlight where they are in Fusion.

Figure 9-3. Drag the playhead back toward zero to animate the blur
I also show how you select a node in the timeline editor using the timeline header, which is the area to the left of the timeline editor. When selected, a node will turn a blue color.
Next, let’s take a look at how to animate multiple nodes in more complex compositing pipelines, and also at some more timeline editor features.
Animating Multiple Nodes: Asynchronous Motion
Let’s add another node with a dripeffect after the blur effect, as you want the blur to be processed first. Right-click and select Add Tool ➤ Warp ➤ Drip and wire a pipe from the blur node output square to the drip node input triangle, as is shown in Figure 9-4, which shows only your flow node editor project area. Notice that the drip node tile preview shows the output of your blur node tile at keyframe zero, since that’s where the playhead is.

Figure 9-4. Add a drip effect node, and pipe the blur node into it
Click the Timeline tab to switch over into your timeline editor. Click the minus (-) icon to zoom out, as seen in Figure 9-5. Notice that you can have negative time values, and that if you click and drag using your middle mouse button, you can pan the timeline itself to any time value range, even a range prior to frame 0! We will see why this is important in the chapter covering spline (curves) editing, as you may want some settings for the effects algorithms to start numeric processing prior to frame 0 in order to achieve a smoother interpolation result.

Figure 9-5. Drag playhead to Frame 1 and right-click Amplitude, then select the Animate option
Position the playhead at frame 1 and leave the drip tool settings at the default (no effect) setting. Right-click on the Amplitudeslider and select Animateto enable the keyframing capability. You can use the drip center widget, seen circled in red in Figure 9-5, to position the center of a drip.
If you want to animate your drip center widget, you simply move it to another location when you set the destination keyframe, and Fusion will move it for you over time using the X and Y values, shown at the top-right in the Control Panel area in Figure 9-5. The only way to get a feel for what the settings do for Fusion visual effects is to experiment with their settings!
Now drag the playback head to frame 32 and type 0.16 in the Amplitude data field, as seen in Figure 9-6. As you can see in the preview area, this gives you a professional drip effect. Your amplitude keyframes are now visible in a Spreadsheet view.

Figure 9-6. Drag playhead to frame 32, and set Amplitude to 0.16
Next, zoom out some more using the minus (-) icon, then drag the playhead to frame 60 and set the Amplitude back to 0.0 to remove the drip effect. Now, when you drag your playhead from 0 to 60, as you can see in Figure 9-7, the blur and drip VFX are combined, using the flow node editor (algorithmic) to define 2D compositing, and in 4D (time) using your timeline. As you can see, the number value field in the control will also animate, so you can see the value used on every single frame. I also opened up the spreadsheet views for both nodes, shown in a timeline header area on the far left. The timeline playhead position will also show in your time ruler, indicated by a white block, and a number at the bottom of the Fusion software. These, along with the keyframe you set at frame 60, are all shown in red.

Figure 9-7. Set an ending keyframe at frame 60, and then preview by dragging playhead
Finally, notice in the spreadsheet keyframe (and curves) view, that there are linear (straight-line) motion curves, which control a rate of change for the motion between your keyframes.
Motion Paths: Keyframing 2D Spatial Animation
You can also keyframe elements moving in 2D space on a screen, in addition to visual effects timing. When you do this, you get a motion path, a spline path on your composite, that allows you to control the movement of the elements on one of the layers—or, in the case of Fusion, one of the nodes—in your VFX compositions. Add an image loader, and go into the Open File dialog, as shown in Figure 9-8.

Figure 9-8. Load image loader node, and select a PNG32 image sequence
Find the PNG32 four-image jellyfish animation series, so we can learn how to work with animated image elements in Fusion. Select the image series, delineated automatically by Fusion as filename(number...series), by selecting the series in blue, and clicking on the Open button. Set the Loader2 Control to Loop in the File tab, and to Post-Multiply by Alphain your Import tab. The result can be seen in Figure 9-9 in the far right (green) node.

Figure 9-9. Add a merge composite node, and connect Niki.png to the background input, and the jellyfish sequence to the foreground input
To composite one image (or series) with another, right-click in the flow node editor and choose Add Tool ➤ Composite➤ Merge, which is shown selected in yellow in Figure 9-9.
Next, wire the drip output into the background input for the merge, and then wire the jellyfish image loader series into your merge node foreground input, as seen in Figure 9-9. You can put the mouse over any input, and Fusion will tell you what that particular input does.
You can drag your jellyfish using the center control, as seen in Figure 9-9, or position it using the X and Y data entry controls, as I have done in Figure 9-10, by setting Y to zero. The jellyfish is now seen emerging onto the composite, and due to how we have set up the flow node editor, it will swim on top of the blur-plus-drip composite effect that we created earlier.
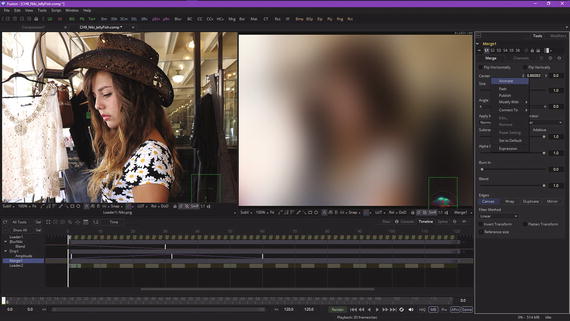
Figure 9-10. Set Jellyfish Y=0, right-click Center, and Animate
Also seen in Figure 9-10 is the fact that the merge node is selected (because it was selected in your flow node editor), the fact that the playhead bar is set at frame 0, and the fact that I right-clicked on the Centercontrol and enabled it to Animate.
Now we are ready to create the motion path by animating the jellyfish. This involves setting a target keyframe. I chose frame 90, as you can see in Figure 9-11. Then set the Y location for the center of the jellyfish to 1 (or 100%, or top).

Figure 9-11. Set keyframe to 90 and set the Y location for the jellyfish to 1
As you can see in Figure 9-11, Fusion now shows you your motion path, as well as a new toolbar to use to edit the motion path, which is shown highlighted in red on the right-top of the right view pane. We will be covering these spline editing tools in Chapter 10, when we cover your Fusion spline editor. Also seen in red is the fact that the Center Y control data field is highlighted in green (animated).
Now, when you drag the playhead position bar to the right, you will see your jellyfish swimming upward, and the VFX on the Niki model image will play as designed behind it. You have a perfect compositing pipeline that is now animated using still imagery on frame 18 of the animated composite, as shown in Figure 9-12.

Figure 9-12. Test project by dragging the playhead to the right
Also highlighted in red in Figure 9-12 are your collapse(-) and expand(+) icons on the far left, your spreadsheet show (or hide) option at the top, and the VAL(show data value) icon on the right. Play with these so that you become familiar with all the timeline editor tools, options, and settings. Figure 9-13 shows the result of using the VAL icon toggle, which lets you see the numeric data values that you entered in the Control Panel area.

Figure 9-13. Use a VAL UI button to toggle the data values to show
We will look at the time stretchtool (icon) in the next chapter on spline editing. Figure 9-14 shows how I use the time zoom marqueetool to allow my project timeline keyframes to fill my timeline editor viewport.

Figure 9-14. Using the zoom marquee tool (top) to fill viewport
Summary
In this ninth chapter, we took a look at the Fusion 8 timeline editor. We looked at how to enable animation (keyframing) for a flow node control, how to position your playhead to show Fusion where you want a keyframe, how to switch back and forth between the flow node editor and timeline editor for your workflow, how to import a 32-bit alpha channel compositing image series for use in animation, how to create motion path animation in a flow node editor preview, and how to practice using the various tools in the time ruler utility at the bottom of the Fusion UI as well as in your timeline editor, where you can work in the fourth dimension!
In Chapter 10, you will learn about the Fusion spline editor and how to algorithmically control the change in the rate of movement over time using complex mathematical curves, such as cubic and quadratic Bézier curves or natural B-splines.