Now that you have seen how to model 3D titling assets using the Fusion 8 text 3D node tool, the logical next step is to see how to use Fusion to create 3D titling animation sequences, as you will likely be asked to do this by a client at some point in time. We’ll continue to work on that titling project started in Chapter 16, including refining and texturing the 3D titling assets that you created using an extrusion profile editor.
We will look at how to space out 3D text titles in 3D space in different ways, how to apply textures to different parts of the 3D titles using images and color values, and how to animate 3D logos out of the distance into place on the screen by using powerful Fusion algorithms called modifiers. In Fusion you can instruct one tool’s output to modify another, and Fusion 8 also comes with a collection of modifiers to use with your VFX projects. These replace the need to keyframe a data value, or a collection of data values, by doing it with an algorithm. The result, either way, is 3D animation, and we will be creating 3D animation in this chapter using both approaches.
3D Titles: Spacing, Texture, and Animation
Impressive 3D text titling assets can be made even more impressive in Fusion 8 by texturing them using your own custom imagery, and by animating them onto the screen in one fashion or another. You’ll also need to make sure they are pleasing to the eye, which means they are spaced apart so that they can be read, and so that your 3D text characters can animate independently of each other, without crashing into each other (unless that is part of your intended visual effect).
Character Spacing: Give Your Logo Some Space
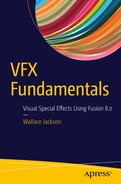
The first thing we want to do is to space the VFX part of the logo out, as it had become too crowded, and even overlapped, due to an extrusion profile 3D modeling process in the previous chapter. Spacing out can be done in the Transform tab , seen in Figure 17-1 circled in red, by increasing the character spacing by 16 percent, to a value of 1.16.
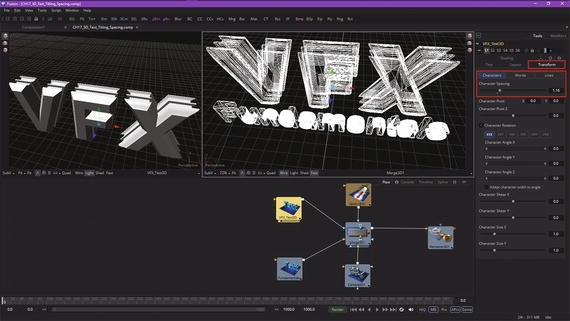
Figure 17-1. Expand character spacing by 16 percent on the VFX portion of the logo
As you can see, this makes the VFX portion of this logo easier to read, and closer to the width of the Fundamentals logo text, which, as you can see in View2, looks more professional than the original from Chapter 16.
Next, let’s take a look at how to texture map your logo’s components (faces and bevels ) using images, which you can supply to the 3D text node .
Texture Mapping: Skin Your Logo Using 2D Images
The next thing that I want to show you before we get into 3D animation and using modifiers is how to give the 3D text tool a custom texture map image using the Shading tab ’s Material section , which has an image source Clip button and Color file selection widget, which are all shown, highlighted in red, on the right side of Figure 17-2. Notice I have selected Material as the type of image, and I have left the “Use One Material” option selected for now. Later, we’ll deselect this option and specify different texture map imagery.
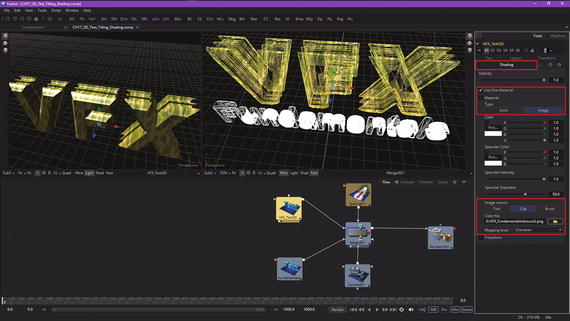
Figure 17-2. Use Shading tab’s Material section option: Clip texture map
As you can see, the 3D merge and 3D text tool views also reflect this texture map. Deselect the “Use One Material” option, which will reveal the Bevel Materialsection of the Shader tab. I selected a blue aquatic image for the bevel texture map , seen in Figure 17-3, and now the bevel for the VFX logo looks blue.
Figure 17-3. Add a blue image texture map to the Bevel Material section
Notice the name for my second texture map is textur2.png and not texture2.png. My reason for doing this is that Fusion won’t see texture2.png, as it sees it as the second image in a series, and so I renamed it, to remove the e, at which time the second texture loaded and mapped correctly.
Let’s use the Fundamentals portion of this logo to look at the other type of texture mapping, which uses color values instead of image (texture) maps to define diffuse and specular color . I used pink for the faces and yellow for the bevels, and I left the specular highlights as white, since the spot light is also white in color value. I have highlighted these color value settings as well as the deselected “Use One Material” option in Figure 17-4, using red.
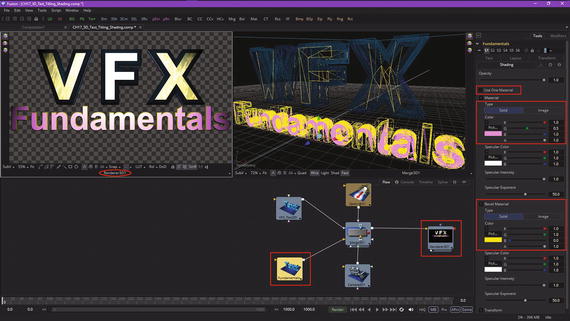
Figure 17-4. Set a pink diffuse color and yellow specular color
Next, let’s take a look at animating this text titling.
3D Title Animation: Using Keyframes and Modifiers
Fusion 8 seems to have made a slight change in accessing modifiers, which used to be accessed by right-clicking in the Styled Text dialog itself. As you can see in Figure 17-5, doing this now will give you the correct Cut-Copy-Paste-Delete-Select context menu, and so you now need to right-click on the Styled Text GUI label itself, in order to access this modifiers context menu, as is shown in the far left and center sections of Figure 17-5. I also show the Layout tab and Frame button I selected on the far right side in Figure 17-5.
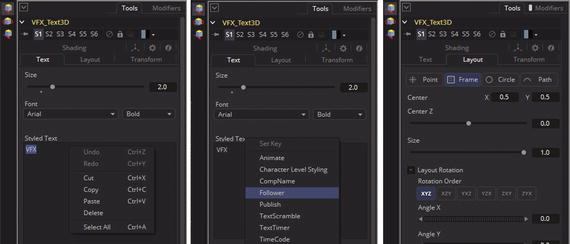
Figure 17-5. Right-click on your Styled Text label to open menu
The “Frame” option allows you to treat each character as a framed 3D object. If you select the “Point” option, one of the vertices (points) used in a 3D text will be used as a keyframing reference. You can also use the “Circle” or “Path” options to reference 3D text.
The Follower modifier only works for the Text and Text 3D tools. Select the “V” character, shown in View2 in Figure 17-6, and then the Timeline tab so you can start keyframing. Then, right-click on the Styled Text GUI label and select the Follower modifier .
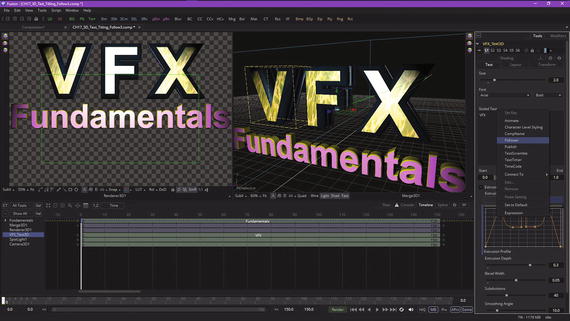
Figure 17-6. Select the Follower modifier for your 3D titling
The Fusion Follower modifier contains algorithms that allow you to implement motion graphics effects, which is why you will be using it during this chapter on 3D text titling effects and animation. A Follower works on the premise that you can animate just one character and its parameters, and the other characters in that 3D text object (or a 2D text object) will then mimic or follow those animation characteristics, usually with some delay applied using, you guessed it, a Delay parameter.
As you have seen in Figure 17-6, the modifier is applied by right-clicking on the Styled Text field’s label for the 3D text tool (or text tool) and then selecting the “Follower” option. You will access the Follower modifier algorithm settings using the Modifiers tab , and its Timing, Text, Layout, Transform, and Shading Tabs. Click on the Modifiers tab, shown circled in red at the top right of Figure 17-7, and go to the Shading tab, then open the Transform section , as is also seen in Figure 17-7. Right-click on the Offset Zcontrol and select Animateso that we can make the VFX part of the logo zoom in from the horizon. Make sure to set the timeline’s playhead to 0, as is shown in Figure 17-7.
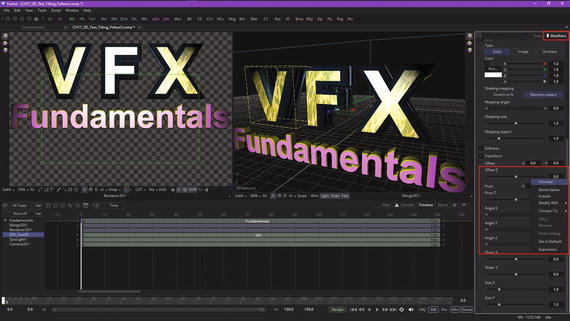
Figure 17-7. In the Shading tab within the Modifier tab, go to the Transform section, and animate Offset Z
The animation for the characters in your 3D text object is done using controls in these Timing, Text, Layout, Transform, and Shading tabs. Note that changing a value in these tabs will have no result at all unless you have enabled Fusion’s Animate function. The data value needs to be animated in order for these effects to produce the animated 3D text titling effects we’re creating.
Pull the Offset Z slider to the left, and watch your VFX logo disappear into the distance. Leave a keyframe value of 50, or greater if you like, on frame 0, as shown in Figure 17-8.
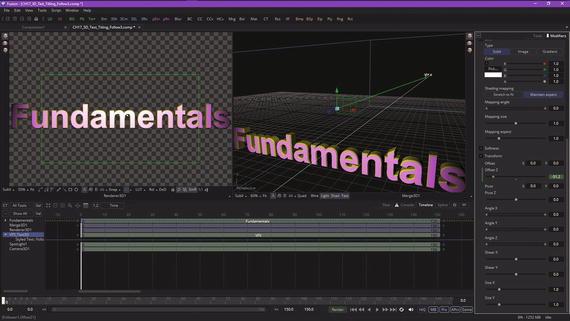
Figure 17-8. Drag Offset Z slider to the left, to a value of 50
Next, set the playhead at frame 150, as shown in Figure 17-9, and set the Offset Z back to 0, bringing your logo in.
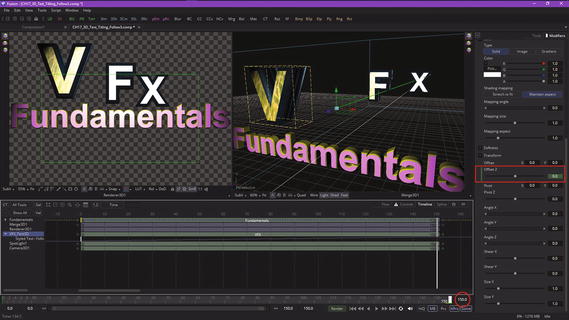
Figure 17-9. Set the playhead to frame 150; set Offset Z to 0
Notice that the V is now animating in, and the F and the X are now following 12 frames behind (each character), which—as you can see in each of the views in Figure 17-9—looks great.
This is because I set my initial timing delay to a value of 12, which equates to 12 frames. To space your follow closer, use a lower data value for the Delay slider .
A Follower modifier’s Timing tab contains all of the timing-related parameters, including the Rangeparameter, which specifies whether characters should all be influenced, or if only a selected character range should be influenced. You can even marquee (drag to select) any range of characters directly on the screen and specify a range.
An Orderparameter will determine the order in which the characters will be influenced. Notice that empty spaces are all counted as if they’re visible characters. Available options are left to right, which we’re using, and which causes a procedural animation to progress from left to right relative to included characters. Right to left does the opposite of this. Inside out will animate symmetrically from a character’s center point toward the outside. Outside in animates symmetrically toward a center point. Random but one by one will be applied to randomly selected characters, only influencing one character at a time.
Completely random animates randomly selected characters and influences multiple characters at a time. Manual curve allows a character’s behavior to be specified with sliders.
The Delay Typeparameter should determine what type of a delay will be applied to the animation. The two options include “Between Each Character,” where the more characters there are for your text string the longer the animation will take to the end, and a “Between First and Last Character” option, where, no matter how many characters are in your text, the animation will always be completed in your specified time duration.
Finally, Figure 17-10 shows a visual effect of different settings of the Delay slider, which spaces the character follow effect closer or father apart based on a numeric value. If you want to use even numbers, click on either side of a slider dot.
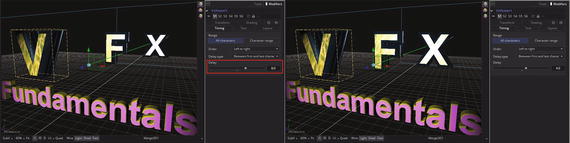
Figure 17-10. Use the Delay slider to control Follower spacing
I tried settings of 4, 8, and 12, all of which worked fine for this visual effect. Figure 17-11 shows that I had to set the end range, which I had set previously to 150, to 154 due to the fact that the Follower modifier slowed the arrival of some of my characters, which didn’t fully come to rest until frame 154, so I had to extend the 3D animation range for the renderer 3D node.
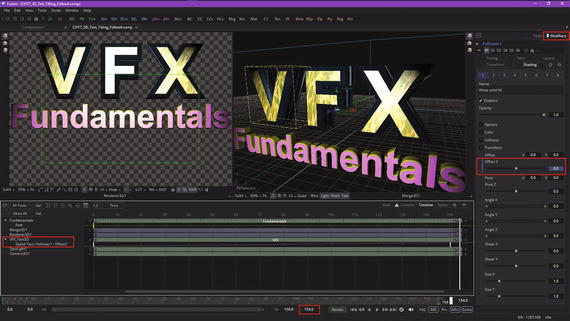
Figure 17-11. Extend the timeline animation range to frame 154
I also showed the timeline legend on the left, which will show the “path” to your animated element, which is VFX_Text3D ➤ Styled Text ➤ Follower1 ➤ Offset Z.
Next, let’s take a look at how to create complex compound animation by adding other animation channels to your timeline.
Complex Animation: Animating Multiple Attributes
Since we are looking at 3D text titling animation in this chapter, let’s add some more channels, or tracks, to our timeline editor view, and have our V letter spin around three times as it comes in from the horizon, for an even more impressive visual effect. This would be done by using the Shading > Transform > AngleYtrack, as you can see, highlighted in red, on the left side of Figure 17-12. As you know from the previous section, this is done by right-clicking an AngleY parameter in the Shading tab’s Transform section and selecting Animate, with your timeline set to frame 0. Enter -1080. to set your keyframe, then drag your playback head to frame 150, and set the AngleY data value to 0. When you drag the playback head back and forth, your V will now rotate!
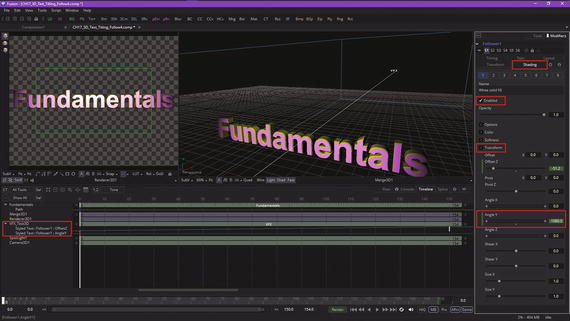
Figure 17-12. Animate the AngleY parameter, from -1080° to 0°
As you can see in Figure 17-13, the Follower modifier is also following this Y rotation, lagging four frames, using the other two characters. The 3D text titling sequence is far more impressive than it was before due to this Y rotation.
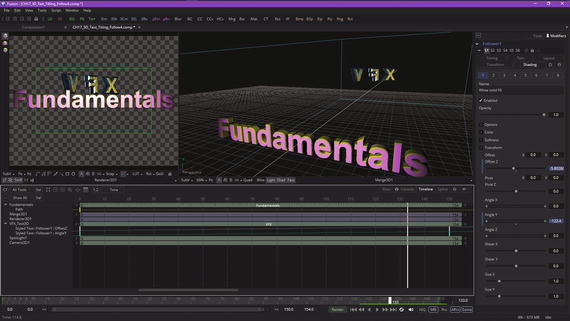
Figure 17-13. Drag the playback head to frame 133 to see a rotation
As you can see in Figure 17-14, the V lands on frame 150, in the correct position and rotational declination , while the F and X characters continue to rotate in until Frame 154.
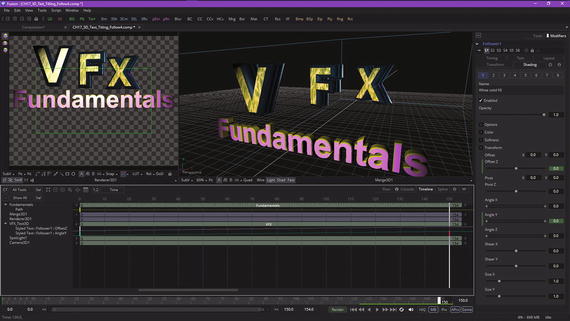
Figure 17-14. The V character finishes animating at frame 150
Let’s make this even more realistic by fading in the VFX, by animating the Opacity parameter, as is seen in Figure 17-15.
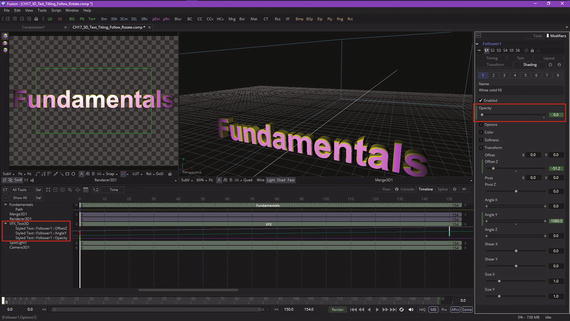
Figure 17-15. Animate the VFX Opacity parameter, from 0% to 100%
As you know by now, the work process seen in Figure 17-15 is to set the timeline to frame 0, right click on Opacity and select Animate, and set Opacity to 0.0. Next, drag the playhead to frame 150 and set Opacity to 1.0. Drag the playhead back to frame 0, and watch the translate, rotate, and fade-in effects happen all at the same time. Whereas the move and rotate effect works well using linear animation curves , or splines, the fade in needs to happen more slowlý in the distance, and faster in the foreground, so that the fade can actually be seen happening when the 3D text is visible, as shown in Figure 17-16, after the animation curve has been adjusted using Bezier splines in Fusion’s spline editor.
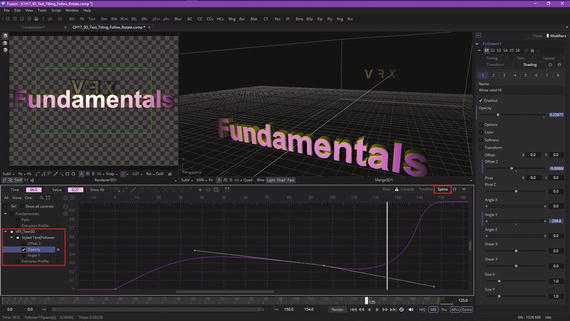
Figure 17-16. Use a spline editor to make the fade in more visible
You can add even more Follower animation to this 3D text titling, if you want more practice using the Fusion Follower modifier.
Summary
In this seventeenth chapter, we took a look at 3D text titling animation, modifiers, and texture mapping. We spaced out the VFX logo to fit the titling project better and prevent overlap, and texture mapped it using both imagery and color values. We added a Follower modifier and keyframe values to create basic titling animation, using two keyframes to create a robust result. I then created complex animation by keyframing rotation and opacity. In Chapter 18, you’ll learn about Fusion’s powerful 3D particle systems.