SharePoint 2016 contains a comprehensive set of personalization features that enhance personal productivity and contains a set of social features that facilitate team development, communication, and collaboration. The personalization features streamline personal productivity and enhance awareness of relevant activities. Combining these features allows individuals to come together into teams that focus on similar activities, which enable peer knowledge sharing, support, and idea capture and development.
In this chapter, we review the personal productivity and social capabilities that make up SharePoint 2016 and discuss how to take advantage of these resources. These capabilities do the following:
Enhance Personal Productivity: By providing capabilities that help individuals keep current on information important to them, easily manage activities related to them, and find information and people they need based on skill sets and knowledge.
Share and Extend Content: By allowing information to be shared and commented on and tracking its value and use.
Build Communities: By facilitating the development of communities that bring people together around common topics of interest, promoting discussions, and fostering collaboration.
Enhancing Personal Productivity
SharePoint includes several capabilities designed to help make individuals more productive by reducing the amount of time needed to locate information and by allowing them to be kept aware of changes to relevant information and activities. Previous chapters discussed how processes can be automated through workflow to enhance efficiencies and how searches can be used to locate needed materials. Personal productivity tools in SharePoint augment these other capabilities and enable the following:
Identifying materials relevant to you and allowing you to stay aware of changes to this information.
Monitoring activities performed by individuals involved in related tasks and keeping you aware of any impactful events.
Locating people you need based on their skills, relationships, or knowledge.
In this section, the personalization and social features that enhance personal productivity in SharePoint are discussed.
About Me and the Profile
SharePoint users’ profiles are used as the foundation on which the SharePoint personal productivity and social capabilities are based. The profiles contain details about users that support communicating relevant information and representing users in the environment. Details include contact information, profile pictures, notification preferences, and more.
Many details included in the profile are centrally managed and typically populated from Active Directory or other sources of people demographic data, such as HRIS systems. Examples of the demographic details pulled from these systems include e-mail addresses, names, and titles. Other details are available for users to edit themselves in the profile management tools, including a profile picture and About Me details. Information available in the profile and edit settings are configured and managed by SharePoint technical administrators in the SharePoint Central Administration tools.
About Me Page Shared View
The About Me page in SharePoint has a dual purpose. When other people access someone’s About Me page, they see its public view. This view (see Figure 12-1) lists key details about the person, including the following:
About Me: Lists the self-descriptive About Me text created by the individual.
Ask Me About: Lists topics the person has identified themselves as being knowledgeable about. A visitor can click on a topic and create a post for the person related to the topic.
Activities: Summarizes the individual’s recent activities in the environment.
Contact Information: Lists basic contact details for the person, including title, department, e-mail, phone, and office location.
In Common: Identifies people the viewer has in common with the individual, such as shared managers, people both users follow, and so on.
Org Chart: Displays where the individual fits in to the organization’s structure.
Figure 12-1. About Me shared view page
About Me Private View
The second About Me page view is the private view , displayed when you view your own About Me page (see Figure 12-2). To navigate to this page, select the About Me option from the user menu at the top of the SharePoint pages.
Figure 12-2. About Me private view page
This view provides some of the same details as the public view of the page, including the Ask Me About details and the user’s activities and contact information. However, your private view also has a link to the Edit Your Profile page. It brings you to the Edit Details page, where you can update your profile. The Edit Details page has five separate tabs to organize and manage profile information:
Basic Information: This tab lists general contact details, including a combination of items that are typically pulled from the Active Directory and other items that can be manually entered. Initially the following details can be managed:
About Me: Text describing the person and display on the About Me page.
Picture: An image that can be uploaded and used to represent the person profiled both here and in other areas of SharePoint, such as newsfeeds and search results, containing references to the person.
Ask Me About: Identifies topics in which the user has expertise. Viewers can request assistance from the person on these topics.
Contact Information: This tab lists the following details by default:
Work E-Mail
Mobile Phone
Fax
Home Phone
Office
Office Location
Assistant
Details: This lists these general demographics about the person:
Past Projects
Skills
Schools
Birthday
Interests
Newsfeed Settings: This tab lists information notifications and shares detail preferences for the individual, including these:
Followed #Tags: Identifies hash tags the person currently follows and allows these tags to be added and removed.
Email Notifications: Identifies activities in the environment that cause an e-mail notification to be sent.
People I Follow: Specifies whether to let other users see the people the individual is following.
Activities I Want to Share in My Newsfeed: Identifies the types of activities to be listed in the person’s newsfeed when they occur.
Language and Region: Allows management of language, time zone, and region preferences. By default, all details are inherited from the server, but they can be overridden as needed. Options managed in this section include these:
Language Preferences: Identifies the individual’s language choices in order of preference. Display language preferences and content and search language preferences can be configured.
Time Zone: Identifies the individual’s default time zone.
Region: Lists regional settings for the person, including local time and calendar format as well as workweek details.
Alerts
Previous chapters discuss how SharePoint is used to store and manage documents and lists of information and how workflows and content organizer can act on this information to route content to other locations. We also discussed how search is used to locate content stored throughout the environment. All these capabilities enable SharePoint to host a wide variety of business resources. As the amount of information in the environment grows, it can become difficult to keep track of relevant information as it matures.
Alerts in SharePoint let you identify content that you want to be made aware of when it is added, changed, or deleting. Alerts are used to create e-mail or text message notifications for users when such identified actions occur. You can specify the type of changes an alert is to track and the frequency of notifications. You can create alerts for the following items in SharePoint:
List Items or Documents: Enables notifications to be sent to identified individuals when changes are made to a specific document or list item.
Lists or Libraries: Used to notify identified individuals of relevant changes to content in a specific list or library.
Pages: Notifications are sent when the page content is changed.
Search: Notifications are sent when items that satisfy a defined search query are changed.
Creating Alerts
When you create an alert, you define its characteristics, including the types of changes that will trigger the alert and its frequency of notification. Several types of changes can be identified that can trigger an alert to be sent. They are dependent on the type of object the alert is created for. When the alerts are configured, the frequency for receiving the alerts are also identified. There are several options available for determining when notifications are sent to the individuals the alert is configured for. The following frequencies can be defined for the various types of alerts.
Send Notification Immediately: Specifies that the alert notification is to be sent when the alert is triggered. This option is available for all types of alerts except search alerts.
Send a Daily Summary: Specifies that all activities that trigger the alert are compiled into a daily summary report and sent to the identified individuals once a day at the time specified when the alert was created.
Send Weekly Summary: Identifies that activities triggering the alert are compiled into a weekly summary report sent to the identified individuals once a week on a day and at a time specified when the alert was created.
You can create alerts anywhere in SharePoint where you have the Create Alerts right, which is available to users with at least Read rights to the materials.
Note
Alerts can be created only in environments where a SharePoint technical administrator has configured outbound e-mail settings.
Creating List Item and Document Alerts
Alerts created for a specific list item or document send notifications for changes to that item. To create an alert for a specific list item or document, do the following:
Navigate to the list or library containing the item for which you want to create the alert.
On the list or library view page, check the check box next to the list item or document to create the alert against, and choose the Set Alert on This Item/Document option from the Alert Me drop-down menu on the Items/Files ribbon tab (see Figure 12-3).

Figure 12-3. Files ribbon tab
In the New Alert window, do the following:
In the Alert Title section, optionally change the default title given to the new alert. The default title is listed as a colon-separated combination of the list or library name followed by the item name.
In the Send Alert To section, site managers can update the list of individuals to be alerted allowing them to include others. Other individuals can create alerts only for themselves in the site.
In the Delivery Method section, specify whether to send the alert via e-mail or text message. The text message option is only selectable if a SharePoint technical administrator configures the environment for SMS (text messages). To send an alert via text message, specify the SMS number and whether to send the item’s URL as part of the message.
In the Send Alerts for These Changes section, identify what changes to the item will trigger the alert. Options are as follows:
Anything Changes: Triggers the alert when any change is made to the item.
Someone Else Changes a Document: Triggers the alert when someone other than the alerted user makes a change to the item.
Someone Else Changes a Document Created by Me: Triggers the alert only if the item was created by the alerted user and only when someone other than that user changes it.
Someone Else Changes a Document Last Modified by Me: Triggers the alert only if the item was last modified by the alerted user and only when someone other than that user changes the item.
In the When to Send Alerts section, identify how frequently to send the alert notifications. Select from these options (discussed earlier in this section):
Send Notification Immediately
Send a Daily Summary
Send a Weekly Summary
Click the OK button .
The alert is created, and you are returned to the list or library view. You can also create list item and document alerts when viewing the item’s properties. Select the Alert Me option from the list item or document properties view page, and follow the steps listed here.
Creating List and Library Alerts
There are many times when you might want to be alerted to changes to content in a specific list or library . For example, if you are working on a project and all of the documents related to the project are in a single library, you can stay aware of items added to the library and changes made to the existing materials. To do this, use the list and library alerts notify you of changes to the content in an identified list or library. To create a list or library alert, do the following:
Navigate to the list or library where you want to create the alert.
On the list or library view page, select the Set Alert on This List or Library option from the Alert Me drop-down menu on the List or Library ribbon tab.
On the New Alert page, do the following:
In the Alert Title section, optionally change the default alert title, initially set to the name of the list or library.
In the Send Alerts To section, site managers can update the list of individuals to be alerted. Individuals other than site managers can only create alerts only for themselves in the site.
In the Delivery Method section, specify whether to send the alert via e-mail or text message. The text message option can only be selected if a SharePoint technical administrator has previously configured the environment for SMS (text messages). To send an alert via text message, specify the SMS number and whether to send the item’s URL as part of the message.
In the Change Type section, identify what changes to content in the list or library will trigger the alert. Options are as follows:
All Changes: Triggers the alert in the list or library when any types of updates are made to content, when new items are added, and when items are deleted.
New Items Are Added: Triggers the alert only when a new item is added to the list or library.
Existing Items Are Modified: Triggers the alert when an existing item in the list or library is edited.
Items Are Deleted: Triggers the alert when an item in the list or library is deleted.
In the Send Alerts for These Changes section, identify what types of changes to the item will trigger the alert. Options are as follows :
Anything Changes: Triggers the alert when any change is made to an item.
Someone Else Changes an Item: Triggers the alert when someone other than the alerted user makes any change to an item.
Someone Else Changes an Item Created by Me: Triggers the alert only for an item created by the alerted user and only when someone other than the creator makes a change to the item.
Someone Else Changes an Item Last Modified by Me: Triggers the alert only for an item last modified by the alerted user and only when someone other than that user makes a change to the item.
In the When to Send Alerts section, specify how frequently to send the alert notifications. Select from these options (discussed earlier in this section):
Send Notification Immediately
Send a Daily Summary
Send a Weekly Summary
Click the OK button.
The new alert is created, and you are returned to the list or library view page.
Creating Page Alerts
To create a page alert in SharePoint to notify users of changes made to wiki, web part and publishing page content, do the following:
Navigate to the page in which you want to create the alert.
On the page, select the Set an Alert on this Page option from the Alert Me drop-down menu on the Page ribbon tab (see Figure 12-4).
Figure 12-4. Page ribbon tab
In the New Alert window, do the following:
In the Alert Title section, optionally change the default alert title, initially set to a combination of the colon-separated library name followed by the page name.
In the Send Alerts To section, site managers can update the default set of individuals to be alerted. Individuals other than site managers can only create alerts for themselves in the site.
In the Delivery Method section, specify whether to send the alert via e-mail or text message. The text message option can only e selected if a SharePoint technical administrator has configured the environment for SMS (text messages). To send an alert via text message, specify the SMS number and whether to send the item’s URL as part of the message .
In the Send Alerts for These Changes section, identify what types of changes to the item will trigger the alert. Options are as follows:
Anything Changes: Triggers the alert when any change is made to the page.
Someone Else Changes a Wiki Page: Triggers the alert when someone other than the alerted user makes a change to the page.
Someone Else Changes a Wiki Page Created by Me: Triggers the alert only for a page created by the alerted user and only when someone other than the creator makes a change to the page.
Someone Else Changes a Wiki Page Last Modified by Me: Triggers the alert only for a page last modified by the alerted user and only when someone other than that user makes a change to it.
Someone Changes an Item that Appears in the Following View: Triggers the alert when a change is made to a page included in a specifically identified view.
In the When to Send Alerts section, specify how frequently to send the alert notifications. Select from these options (discussed earlier in this section):
Send Notification Immediately
Send a Daily Summary
Send a Weekly Summary
Click the OK button.
The alert is created for the page, and you are returned to the page.
Creating Search Alerts
The discussion so far assumes you know the location of the content for which you want to configure alerts. Use a search alert when you are interested in creating an alert that spans several locations. You configure a search alert with a search query, so that you learn of changes to any content meeting the query, regardless of the content’s location. For example, if you are responsible for a certain client and need to learn of any activity related to materials referencing that client, create a search alert for a query of the client’s name. To create a new search alert, do the following:
Perform a search from the SharePoint search box or within a search page (searches are discussed in Chapter 11).
On the search results page, select the Alert Me option at the bottom of the search results.
On the New Alert page, do the following:
In the Alert Title section, optionally update the default alert title (initially set to Search: followed by the query text entered).
In the Delivery Method section, the e-mail option is selected. You cannot choose to send text message notifications for search alerts .
In the Change Type section, specify what type of change will trigger the alert. Options are as follows:
New Items in Search Result: Triggers the alert when an item not previously included in the result set for the query is added.
Existing Items Are Changed: Triggers the alert when an item already part of the result set for the query is edited.
All Changes: Triggers the alert when a new item is added to the result set for the query or when items already part of the result set are edited.
In the When to Send Alerts section, schedule when alert notifications are to be sent. Schedule options for search alerts include:
Send a Daily Summary
Send a Weekly Summary
Click the OK button.
The search alert is created, and you are returned to the search results page.
Working with Alerts
After you configure an alert or a site owner configures one for you, the changes associated with the alert will trigger it. Alert e-mails list changes to con tent that caused the alert notification to be sent (see Figure 12-5).
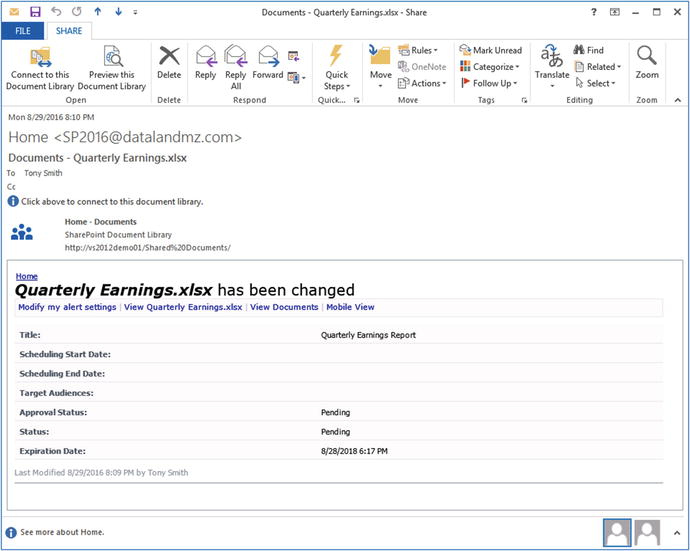
Figure 12-5. Send an alert immediately e-mail
Alert notifications include the following details:
Title identifying the item and type of change causing the alert.
A link to navigate to the My Alert Settings page to manage alerts.
A link to navigate to the item the alert was sent about.
A link to navigate to the list or library containing the item.
A link to the mobile view of the list or library containing the item.
The list of the item’s properties, with changes to the properties indicated.
Managing Alerts
Alerts you create in a site (regardless of whether you create them for list items, documents, lists, libraries, pages, or searches) are all consolidated into a single management screen for that site, called the My Alerts on This Site page (see Figure 12-6).
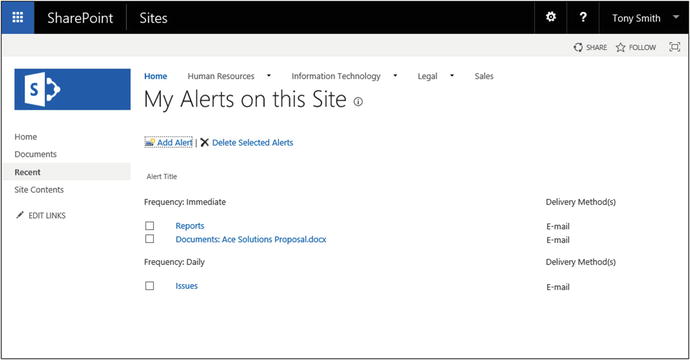
Figure 12-6. My Alerts on This Site page
To access the My Alerts on This Site page, select the Manage My Alerts option from the Alert Me drop-down menu in the following locations :
Items ribbon tab in lists
Files ribbon tab in libraries
List ribbon tab in lists
Library ribbon tab in libraries
Page ribbon tab on site pages
The My Alerts on This Site page lists any alerts created in the current site. This page lets you add, edit, and delete alerts in the site. Search alerts are listed in the site collection’s root site when the default search results page is in use and in the search center site when a search center is in use.
Editing Existing Alerts
To edit an alert on the My Alerts on This Site page, do the following:
On the My Alerts on This Site page, click on the name of the alert to edit.
On the Edit Alert page, update the details about the alert and click the OK button to save the changes.
Deleting Existing Alerts
To delete an alert on the My Alerts on This Site page, do the following:
On the My Alerts on This Site page. click the check box next to the alert to be deleted, and click the Delete Selected Alerts link.
In the deletion confirmation window, click the OK button .
The alert is deleted, and you are returned to the My Alerts on This Site page.
Adding Alerts from the My Alerts on This Site Page
While viewing the My Alerts on This Site page, you can create new list and library alerts. To create an alert from this page, identify the list or library for which to create the alert, then configure the alert itself. To create a new alert from the My Alerts on This Site page, do the following:
On the My Alerts on This Site page, click the Add Alert link.
On the New Alert page, select the list or library for which to create the new alert. Then click the Next button.
On the second New Alert page, do the following:
In the Alert Title section, optionally change the default alert title, which defaults to the name of the list or library.
In the Send Alerts To section, site managers can update the default set of individuals to be alerted. Other individuals can create alerts only for themselves in the site.
In the Delivery Method section, specify whether to send the alert via e-mail or text message. The text message option can only be selected if a SharePoint technical administrator has configured the environment for SMS (text messages). To send an alert via text message, specify the SMS number and whether to send the item’s URL as part of the message.
In the Change Type section, specify what type of change to content in the list or library will trigger the alert. Options are as follows:
All Changes: Triggers the alert when existing content is updated in any way and when new items are added to the list or library.
New Items Are Added: Triggers the alert only when a new item is added to the list or library.
Existing Items Are Modified: Triggers the alert when an existing item in the list or library is edited.
Items Are Deleted: Triggers the alert when an item in the list or library is deleted.
In the Send Alerts for These Changes section, identify what types of changes to the item will trigger the alert. Options are as follows:
Anything Changes: Triggers the alert when any change is made to an item.
Someone Else Changes an Item: Triggers the alert when someone other than the alerted user makes a change to an item.
Someone Else Changes an Item Created by Me: Triggers the alert only for an item created by the alerted user and only when someone other than the alerted user makes a change to the item.
Someone Else Changes an Item Last Modified by Me: Triggers the alert only for an item last modified by the alerted user and only when someone other than that user makes a change to the item.
In the When to Send Alerts section, identify how frequently to send the alert notifications. Select from these options (discussed earlier in this section):
Send Notification Immediately
Send a Daily Summary
Send a Weekly Summary
Click the OK button .
The new alert is created, and you are returned to the My Alerts on This Site page.
Following and Newsfeeds
You have seen how to use alerts to be notified via e-mail to changes made to items in lists and libraries. An alert works well when you want e-mail notifications for changes to content. However, as the volume of content requiring alerts grows, e-mail notifications can become difficult to track. Another way to stay abreast of activities is to follow resources in the environment. When you follow resources, changes to them and to activities related to them are posted to your newsfeed, where they are listed for review in chronological order. You can follow these items in SharePoint:
People: When you follow people in SharePoint, activities related to them are listed in your newsfeed.
Documents: Changes to documents you follow are listed.
Sites: When you follow a site, activity in the site feed is listed.
Tags: Conversation items that reference followed tags are listed.
Following People
You can track the activities of people you follow, such as those you work with, in your newsfeed. Here is how to start following someone:
Click on the name of the person you want to follow from any reference to the person in the site, such as from a list view of a document he or she created or last modified, from a discussion post, or from a reference in search results.
On the About page for the person, click the Follow This Person link.
Your profile is updated to let you follow the person. If later you want to stop following the person,
Navigate to the person’s About page through any reference in a site.
On the About page, select the Stop Following This Person link.
Your profile is updated so that you no longer follow the person .
You can also view and manage items you follow from your newsfeed (newsfeeds are discussed in detail later in this chapter).
Following Documents
You can choose to follow a document in your SharePoint environment and track changes made to it in your newsfeed. To follow a document, do the following:
Navigate to the library containing the document to be followed.
On the library view page, click the check box next to the document to be followed, and select the Follow option from the Files ribbon tab.
The document is added to your followed content, and changes to it are tracked in your newsfeed. You can also follow a document in a library by selecting the Follow option from the document’s hover panel in either library view or a search results list (see Figure 12-7).
Figure 12-7. Document hover panel
As a later section explains, you can also stop following a document in the newsfeed.
Following Sites
In your environment you can follow sites and conversations taking place within them. When you follow a site, its newsfeed is rolled into your newsfeed for review. By default, sites you create are automatically added to the sites you follow. To follow other sites in SharePoint, click the Follow option at the top of the site’s page.
Followed Sites Page
SharePoint includes a page that lists all the sites you are following and provides suggestions for other sites to follow, as Figure 12-8 shows.
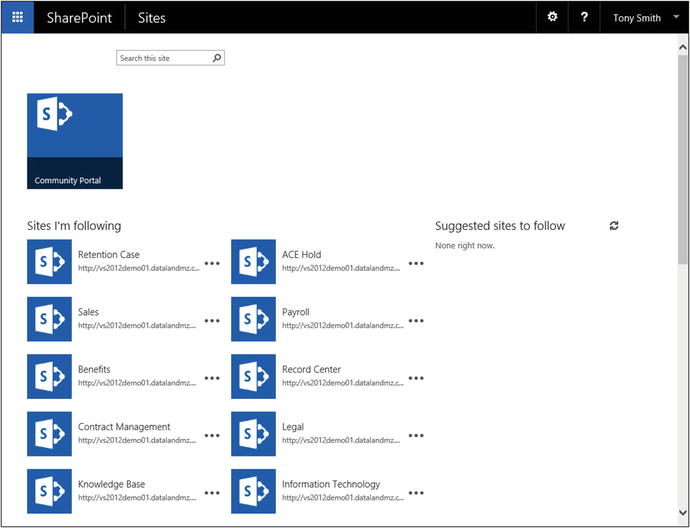
Figure 12-8. Sites page
The Sites page provides easy access to any sites you are following throughout your SharePoint environment. From here you can navigate to any followed site by clicking on the site name or its URL. You can also stop following sites from the Sites page. Just click the Stop Following option associated with the listed site.
The Sites page also recommends sites for you to follow. This list is based on details about the site and its active participants. To follow a site in the Suggested Sites to Follow list, select the site’s Follow option.
Following Tags
Hash tags are used to categorize related content (overall management of hash tags is discussed in a later section). Here is how to follow a hash tag:
Click on a reference to the hash tag from a newsfeed.
On the About page for the hash tag, click the Follow This #Tag link.
The hash tag is added to the items you are following. If later you want to stop following a tag, choose the Stop Following This #Tag link from the hash tag’s About page.
Newsfeed
So far our discussion has centered on how to follow people, documents, sites, and hash tags to track activities related to them. Once you have selected items to follow in your environment, you can use the Newsfeed page to view tracked activities. Navigate to the Newsfeed page (see Figure 12-9) by clicking the Newsfeed link from the App Launcher.
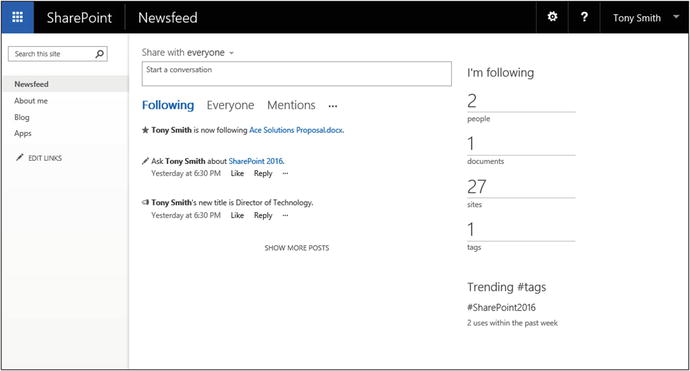
Figure 12-9. Newsfeed page
The Newsfeed page initially lists all activities for followed items, with the most recent activities at the top. Each activity has a link to the items and people the activity is associated with. This page also summarizes the number of people, documents, sites, and tags you are following in the environment. Click on any of the listed totals to see items of that type you are following. From this details view page, you can navigate to any listed item.
People I’m Following
Available from the Newsfeed page by clicking on the count of people you follow, the People I’m Following page (see Figure 12-10) lists all of them.
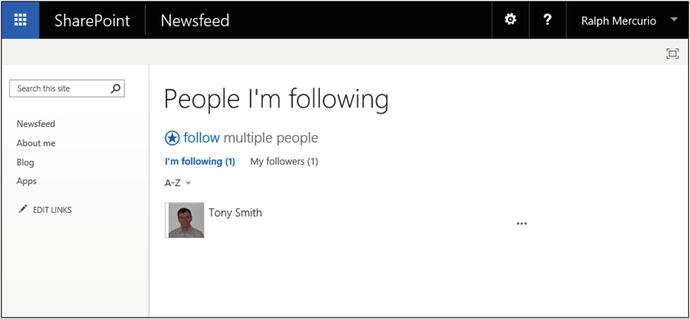
Figure 12-10. People I’m Following page
Click on the name of anyone listed on the page to navigate to his or her About page. If you open the hover menu for a listed individual, you can view all mentions of the person or all of his or her recent posts or you can choose to stop following the person.
Docs I’m Following
The Docs I’m Following page lists all documents you are currently following, as Figure 12-11 shows.

Figure 12-11. Docs I’m Following page
Click on the name of any listed item to open the associated file. You can also choose to stop following the item by clicking the Stop Following link listed with the item. The Docs I’m Following page also provides a list of suggestions for other documents you might want to follow. This list is based on your activities and how they relate to the materials in the environment. You can navigate to or follow any of these listed suggestions.
Sites I’m Following
Clicking on the followed sites count in the Newsfeed page takes you to the Sites page. You can also get there by clicking on the Sites link at the top of any SharePoint page or from the App Launcher. (The Sites page is discussed earlier in this chapter.)
Tags I’m Following
Clicking on the count for hash tags you follow on the Newsfeed page takes you to the #tags I’m Following page, as shown in Figure 12-12. On the #tags I’m Following page, you can choose to stop following a listed tag by choosing the Stop Following link listed with the tag. You can also choose to follow additional tags by clicking the Follow More #tags link and then identifying the additional tags to follow.
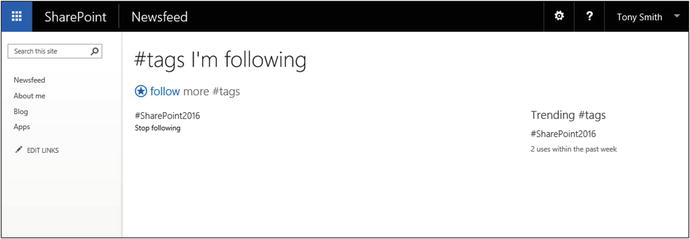
Figure 12-12. #tags I’m Following page
Newsfeed Search
The Newsfeed page also includes a search that lets you view activities other than those you are following. This page enables you to view these additional sets of activities:
Everyone: Shows all recent activities available for you to review.
Mentions: Lists activities in which you are mentioned.
Activities: Shows all recent site activities.
Likes: Shows recent activities related to items you have liked.
This page also allows you to create new posts to be listed in your activities.
Targeting
SharePoint includes a mechanism, called targeting , used to restrict display of certain items, such as web parts and navigation links, to identified users or groups. Targeting, which is not the same as setting permissions, does not make content or pages unavailable. It simply hides web parts in pages and links within the navigation. When you target an element, you identify the users or groups to make the item visible for and thus surface details to specific users. For example, if you have a web part that lists sales by region, you may decide to list it on the home page of your portal but display it only to your sales teams. To do this, target the web part to the team so that it appears only when the group’s members visit the page.
To target a web part or navigation item, do the following :
Navigate to the Web Part Properties window to target the web part or to the item’s Edit window to target a navigation item. (Managing navigation and the properties of web parts are discussed in Chapters 3 and 4, respectively.)
On the Properties or Edit page, update details for the Audience option. Enter the targeted user or group, and then click the OK button.
Other items in SharePoint support targeting beyond web parts and navigation links, such as links in the Summary Links web part. Managing targeting for these other items is handled in the same way as managing targeting for web parts and navigation links in that you add the targeted users or groups in a Target Audiences selection area.
Sharing and Extending Content
SharePoint 2016 has several capabilities that provide the ability to easily share relevant information with others and add context to content in the environment by tagging, rating, and liking materials.
E-Mail a Link
One of the most basic ways to share information is to e-mail references to the information. Sending a reference to a list or library instead of attaching a copy of an item helps ensure that when the referenced materials are opened, the most recent version is viewed and edited. E-mailing someone a link instead of the file itself also helps protect documents from being accidentally shared with others if the e-mail is forwarded. You have the ability to e-mail a link to a list or library to reference details you want to share. To e-mail a link to a list or library, do the following:
Navigate to the list or library that you want to e-mail a link for.
On the list or library view page, select the E-mail a Link option from the List or Library ribbon tab.
In the opened e-mail message, identify the desired recipient and subject details, and then send the e-mail.
RSS Feeds
Another way people can share and consume content in SharePoint is through list and library RSS feeds. An RSS (Real Simple Syndication) feed enables access to a list’s or library’s contents from any RSS-enabled application, such as Outlook. Each list and library has an RSS feed that can be accessed by doing the following:
Navigate to the list or library.
On the list or library view page, select the RSS Feed option from the List or Library ribbon tab.
On the RSS Feed page, click the Subscribe to This Feed link to subscribe to the feed using your default RSS feed application.
The RSS feed is connected to your RSS feed reader application.
OneDrive
OneDrive can refer to different capabilities and services depending on the context. First, Microsoft hosts a cloud storage service called OneDrive, which is not directly related to our discussion. A second OneDrive is OneDrive for Business, which is a client tool installed as part of Microsoft Office that is used to synchronize content in SharePoint to local directories to support offline access. A third OneDrive is the OneDrive for Business available in Office 365 environments that can be linked to your SharePoint environment to use as the SharePoint OneDrive solution. The last OneDrive option, which is the one we are focusing on in this section, is the OneDrive for Business that is part of the SharePoint personal space. This OneDrive is a personal document library for storing private files in SharePoint and files you want to share with only select people. To access OneDrive for Business, click the OneDrive option from the App Launcher. This link takes you to the OneDrive for Business Documents library (see Figure 12-13).
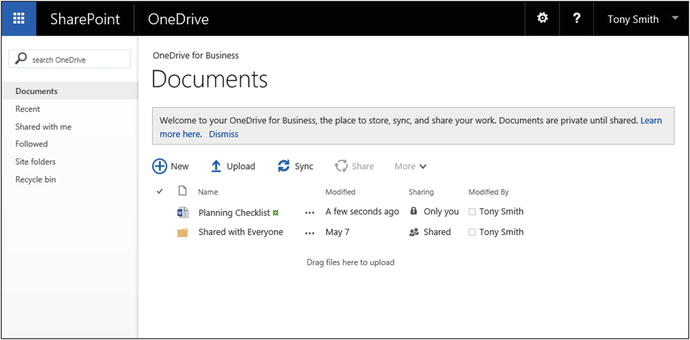
Figure 12-13. OneDrive for Business Documents page
The OneDrive for Business Documents library offers the same capabilities of other document libraries (described in Chapters 5 and 7), as well as some additional capabilities to make sharing files with others easier. The library has an integrated Sharing option listed next to each file and folder that lists the current shared states of the items. This option allows you to select individuals to share the file with and identify the level of access they have to the item. To share a listed file or folder, do the following:
From any page in the site, navigate to the OneDrive for Business Documents library by clicking the OneDrive option from the App Launcher.
On the OneDrive for Business Documents page, click the Sharing option for the item to be shared.
In the Share window, click the Invite People option.
In the Share window, do the following:
Select the individuals to share the item with.
Select whether to give identified individuals Edit or View rights.
Optionally include a message in the invitation going to the person.
Optionally click the Show Options link to show the Send an Email Invitation option. Uncheck the option if you do not want to send an automated e-mail notification to individuals being given rights to the item.
Click the Share button .
The item’s security is updated to add the identified rights to the selected user. If you left the invitation option checked, an e-mail message is sent to the individuals notifying them of the resource’s availability. You are then returned to the Documents list view.
To manage permissions for items in the Documents library more granularly, select the Advanced option in the Shared With window. You are taken to the standard Permissions page for the library, where you can manage the item’s permissions (discussed in detail in Chapter 7).
Note
Consider instituting a governance plan for the OneDrive for Business Documents libraries to keep these locations from becoming an overly used general storage tool. Your plan should address storage limits, usage guidelines, and retention management.
Enterprise Wikis
An Enterprise Wiki is a knowledge repository designed to let large audiences collectively mature information related to a topic. Its pages support the inclusion of references to other wiki pages to allow easy navigation between related pages. An Enterprise Wiki site is configured to categorize pages into logical groupings and rate a page while it is being viewed (see Figure 12-14). A wiki site is used to collect team or community knowledge and make it more broadly available to those who need it. Collecting this knowledge captures information that typically resides only in people’s heads or in scattered notes and e-mails.
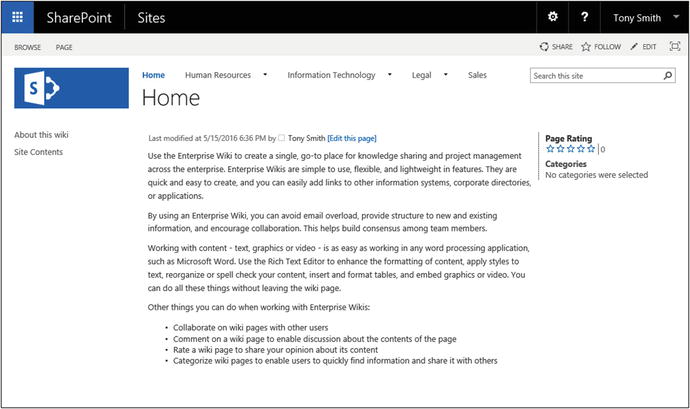
Figure 12-14. Enterprise wiki
As wiki pages support entry of full rich text, you can develop pages containing text, images, and videos. You can also enter references to other pages directly into the page text by entering two pairs of brackets ([[). When this is done, a list of available wiki pages appears in a context menu for the selection. You can reference a page in the listed context menu or make a reference to a page that has not yet been created. Do this by entering a title for a new page within double brackets; for example, [[My Page]]. After a page is saved that contains a reference to a page that does not exist, the first person to click on the page reference link is prompted to create a new page. If he or she accepts the prompt, the page is created, and the person is taken to it, where he or she can enter appropriate content.
Tags and Notes
Tags and notes provide context to content within SharePoint. Unlike hash tags, content tags allow categorization of content, and notes allow creation of commentary related to the content. Together they are used to add context to materials to support business efforts.
Creating Tags and Notes
Tags and notes can be created for lists, libraries, pages, list items, and documents. To create one or more tags or notes, do the following;
Navigate to the item for which you want to create tags and notes. Then do one of the following:
For a list or library, navigate to the list or library and then select the Tags & Notes option from the List or Library ribbon tab.
For a list item or document, navigate to the list or library containing the item, click the check box next to the item, and then select the Tags & Notes option from the Items/Files ribbon tab.
For a page, navigate to the page and then select the Tags & Notes option from the Page ribbon tab.
In the Tags and Notes window, do the following:
On the Tags tab:
In the My Tags section, enter the tag name to be created for the item.
In the Suggested Tags section, optionally select any existing tags to associate with the item.
Click the Save button to save the new tags.
On the Note Board tab, enter the note to be placed on the item and click the Post button.
Close the Tags and Notes window once all tags and notes have been entered and saved .
The Tags and Notes window is closed, and you are returned to the page from which you selected the Tags and Notes option.
Viewing Tags Through Tag Clouds
You can use the Tag Cloud web part to view tags associated with items in SharePoint. The listed tags are sized based on the number of items associated with the tag. The more items associated with the tag, the larger the tag text in the tag cloud will be. Click on any tag to get to the Tag Profile page, where all its associated items are listed (see Figure 12-15).
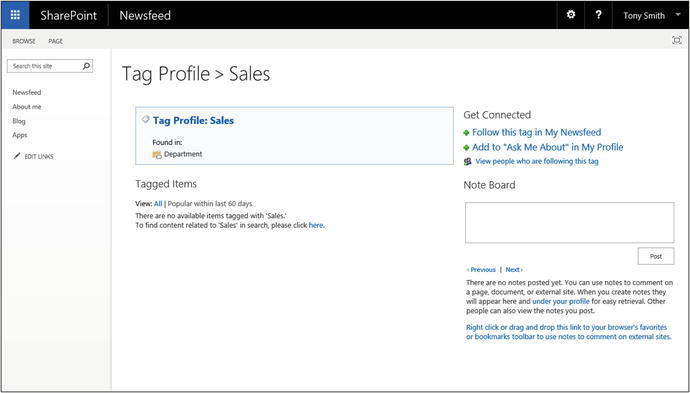
Figure 12-15. Tag Profile page
The Tag Profile page lists items associated with the tag, along with a note board that can be used to create additional notes to be associated with the tag.
Rating Content
Content can be rated in SharePoint to allow users to identify the value or effectiveness of listed items. Ratings include presenting the average rating and the number of ratings made for the items listed (see Figure 12-16).
Figure 12-16. Ratings
Enabling Ratings for a List or Library
To enable content rating in a list or library, do the following:
Navigate to the list or library where you want to enable ratings.
On the list or library view page, select the List or Library Settings option from the List or Library ribbon tab.
On the Settings page, select the Rating Settings option from the General Settings section.
On the Rating Settings page, do the following:
Select Yes for the Allow Items in This List to Be Rated? option.
Select Star Ratings for the Which Voting/Rating Experience You Would Like to Enable for This List? option.
Click the OK button.
Ratings are added to the list or library.
Rating Content in a List or Library
To add a rating to an item in a list or library where ratings are enabled, click on the star representing the rating you want to apply to the item. This updates listed ratings by adding yours to the average and raises the number of ratings applied by one. If you rate an item a second time, the previous rating you gave it is updated instead of a new rating being added.
Liking Content
“Liking” content is another way to rate it. You can indicate that you like list items, documents, comments, and posts. Liking content is an activity that is listed in newsfeeds for persons indicating they like the item, as well as in newsfeeds of those who follow the persons doing the liking.
Enabling Like for a List or Library
Liking is available by default for newsfeeds, but you must activate it for lists and libraries. To enable liking in a list or library, do as follows:
Navigate to the list or library where you want to enable liking.
On the list or library view page, select the List or Library Settings option from the List or Library ribbon tab.
On the Settings page, select the Rating Settings option from the General Settings section.
On the Rating Settings page, do the following:
Select Yes for the Allow Items in This List to Be Rated? option.
Select Likes for the Which Voting/Rating Experience You Would Like to Enable for This List? option.
Click the OK button.
The ability to like content is added to the list or library.
Liking/Unliking Content
When the ability to like content is available, you can like an item by clicking the Like link associated with it. This increases the item’s number of likes and adds the activity to your newsfeed. To remove a previously applied like for an item, click the item’s Unlike option.
Building Communities
Communities are built by people who come together to address topics of common interest. Communities allow sharing and development of ideas and promote common objectives. SharePoint 2016 has many capabilities that support and foster community building. This section discusses these capabilities and how they are applied.
Site Newsfeeds
Newsfeeds in SharePoint sites give users a simple way to share information. Site newsfeeds are available by default in team sites. Site newsfeeds can be added to any other site by enabling the Site Feed site feature in that site. Site newsfeeds support many features found within standard microblogs.
The ability to share informational posts with other site users.
The ability to reply to posts.
The ability to target posts to individuals using @ references. To create an @ reference, enter an @ and then the user you want to target. Targeting a post to a specific individual adds the post to the person’s newsfeed.
The hash tagging option make topics followable and shareable throughout the environment. Hash tags are discussed in detail in the next section.
The inclusion of pictures that can be made part of the post.
The ability to like posts.
Following items so that activities in the site newsfeed can be surfaced within your personal newsfeed.
To add a post to a site newsfeed, enter its details into the Start a Conversation box to create a new main post in the newsfeed. To reply to an existing post, select the Reply option from the post and then enter the reply into the displayed Reply box. Finally, to add a picture to a post, click the camera icon displayed in a conversation or reply box, then select the image to be inserted.
Hash Tags
SharePoint 2016 supports the use of hash tags in newsfeeds and discussions. Hash tags, used to reference topics, posts or discussions, are objects that can be followed to track the topic’s activity. A hash tag also has its own About page (see Figure 12-17) that lists conversations where the tag is referenced and allows identification of related tags.
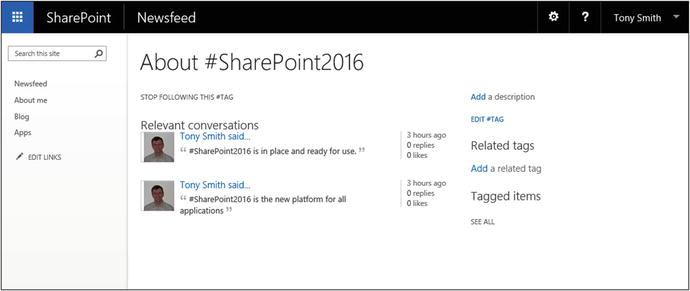
Figure 12-17. Hash Tag About page
To create a hash tag reference in a conversation or discussion in SharePoint 2016, enter the hash (#) and start typing. A context menu listing tags matching the entered text appears. Either select one of the listed tags or continue typing to create a new one.
Note
A hash tag does not have spaces in its name. If you enter a space when referencing a hash tag in a post or discussion, the text typed after the space will not be part of the tag.
Blogs
SharePoint blogs allow for the creation and management of posts and allow those posts to be commented on. A blog is best described as a virtual press conference where a presenter publishes news, a discussion, or an article that can be reviewed. Consumers of the blog post can enter comments or questions, which in turn prompt additional comments or questions. Because blogs allow interaction on topics, many organizations use them as a tool to share news and announcements.
You can create blogs in SharePoint 2016 by creating a site based on the Blog site template. This template creates a new SharePoint blog site (see Figure 12-18).
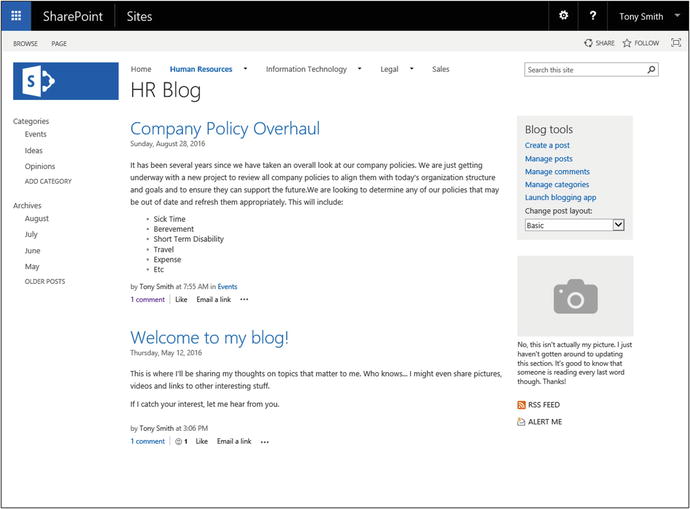
Figure 12-18. Blog site
Blogs consist of posts and comments. Unlike newsfeeds, which are designed for short comments and statements, blogs support full enhanced rich text, allowing inclusion of videos, images, and links. Blog posts can be short statements, like simple announcements, or lengthy articles full of details on an important topic.
Blog comments are short statements entered to provide context or clarity on the details in the blog or to question blog content. While blog comments cannot be replied to, follow-ups can be posted to listed comments and questions as new blog comments. Blog comments are organized chronologically and therefore appear in a discussion-like layout.
Blog posts can be organized into categories that structure and filter the posts in order to establish interrelationships and make locating relevant items easy.
Managing Blog Posts
A Blog Tools web part, listed on a blog’s home page, provides references to manage the main blog site capabilities. To create a blog post on a blog site, do the following:
Navigate to the blog site, where you want to create a post.
On the blog site home page, select the Create a Post option from the Blog Tools.
On the New Post page, do the following:
Enter a title for the new post.
Optionally enter body text for the post. The body of the blog can include rich text details, including images and videos.
Optionally identify categories the blog is to be associated with. Use of categories allows grouping of related posts.
Identify the published date. The default is the current date and time, but this can be updated as necessary.
Select the Publish button to publish the blog.
The new blog post is added to the blog. When a blog post is added to a blog site, the post includes options to do the following:
Comment on the post.
Like the post.
E-mail a link to the post to others .
Edit the post—that is, alter any of the details of the post you created.
Commenting on Posts
Comments can be added to published blog posts by clicking on the Comment link on the blog site home page or by clicking on the title of a post to navigate to the blog post page and then entering a comment in the Add a Comment box. Once a comment is posted, it becomes associated with the blog and listed below the post in chronological order. You can later edit your comment by clicking on the Edit link next to the comment and then editing the details presented on the Comment Edit page.
Managing Categories
Blog post categories are used to organize posts into related groupings. A single blog post can be associated with multiple categories. Blog posts are assigned to categories when the posts are added or edited. To manage blog categories, select the Manage Categories option from the Blog Tools. You are taken to the Categories list, where you can add, edit, and delete items (this is a standard SharePoint list; manage it as you would any other). Managing lists and list items is discussed in detail in Chapters 5 and 6.
Using the Blogging App
The blog site lets you link it with Microsoft Word’s blog post capabilities to allow creation of posts in Word. Clicking the Launch Blogging App link in the blog site’s Blog Tools opens Word and prompts you to configure the connection to the blog site (you must confirm the URL and verify your credentials). As Figure 12-19 shows, Word’s blog posting tool is opened.
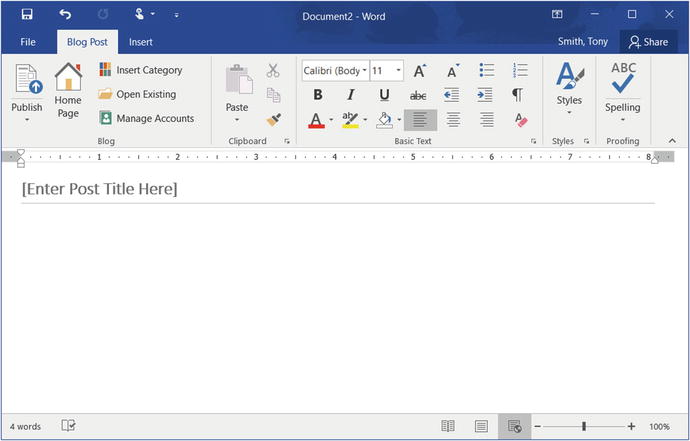
Figure 12-19. Microsoft Word blog posting tools
This tool allows you to create blog posts in Word and then publish the posts on the blog site. You can connect to multiple blog sites from the Word blog posting tool and so can manage content on all of your blog sites.
Community Sites
Community sites let you organize discussions and other materials on specific topics. These sites are designed to consolidate knowledge and foster communication. To create a community site (see Figure 12-20), select the Community Site template when you create a new site.
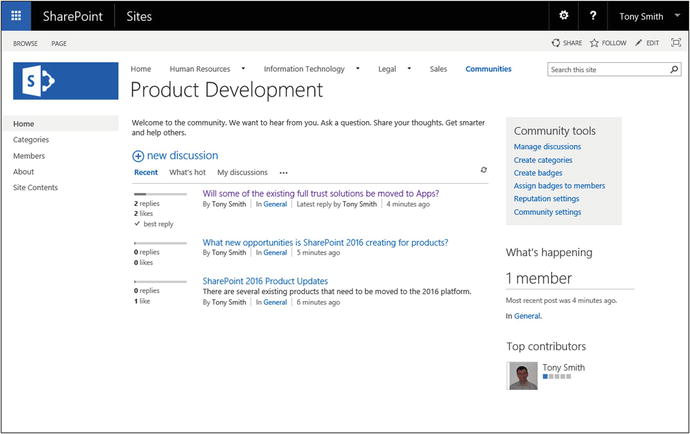
Figure 12-20. Community Site
Community sites combine several SharePoint social capabilities designed to support and manage collaborative efforts.
Discussions
Community sites include a discussion list used to store and manage discussions in the community. Discussions are similar to newsfeeds in that items posted can be replied to and can be liked. Discussions are also similar to blog posts in that the body of a discussion post can utilize full rich text, including images and videos. However, unlike both newsfeeds and blog posts, discussions have additional capabilities to facilitate the development of a dialogue, including the following:
Identifying Best Replies: Specific replies can be recognized as being the best answers or comments related to the discussion.
Questions: Discussion posts can be flagged as questions. Items identified as questions do not simply comment or provide details on a topic but indicate to the community that an answer is being sought.
Marked as Featured: A discussion marked featured is elevated in the community to a key position.
While discussion lists are by default found only in community sites, they can be added to other SharePoint site by adding a discussion list to the site and configuring it for use there. (Working with lists is discussed in detail in Chapters 5 and 6.)
The discussion list in the community site includes several views to help organize community discussions. These views include the following:
Recent: Discussions having the most recent activity are placed at the top.
What’s Hot: The discussion order is based on popularity.
My Discussions: Shows discussions started by the person viewing the list.
Unanswered Questions: Lists discussions marked as questions but with no best reply selected.
Answered Questions: Lists discussions marked as questions with a best reply selected.
Featured: Identifies items or discussions flagged as featured.
Creating New Discussions
To create a new discussion in a discussion list, do the following:
Navigate to the discussion list. For community sites, navigate to the community site’s home page, where the discussion is displayed.
At the top of the discussion’s list view, click the New Discussion option.
On the New Discussion page, do the following:
Enter a subject for the new discussion.
Optionally enter the body details for the new discussion. The discussion body can include rich text, images, and videos.
Identify whether the new discussion is a question.
Identify the categories to associate with the new discussion.
Click the Save button.
The new discussion is added to the discussion list.
Editing Discussions
To edit existing discussions to change their details, do as follows:
Navigate to the discussion list management view. This is done by navigating to the discussion list and then choosing the Management View or in a community site by selecting the Manage Discussions option from the Community Tools.
In the discussion view, choose the Edit Item option from the item’s context menu.
On the Edit Item page, make any necessary updates to the discussion and click the Save button.
The discussion is updated, and you are returned to the discussion list view.
Replying in a Discussion
By replying to discussions and to existing discussion replies, you create a hierarchy of communication. To reply to a post or an existing reply, click the Reply link for the item you want to reply to, enter the reply’s details, and click the Reply button. The reply is added to the discussion thread.
Marking a Best Reply
Identifying a reply in a discussion thread as the best reply not only flags the item as the best answer or comment but also lists it, together with the original post, at the top of the discussion and labels it best. There can be only one best reply for a discussion, so if you have already identified a best reply and then identify another, the new item will override the previous selection. You identify a best reply by selecting the Best Reply option from the associated reply’s context menu.
Deleting Posts and Replies
You can delete posts and replies from a discussion list. Deleting an item deletes all items associated with that item. If you delete the discussion’s main post, that post and all of its associated replies are deleted. If you delete a reply, the selected reply and any replies to the deleted reply are removed. To delete a post or a reply from a discussion list, select the Delete option from the item’s context menu, and then confirm that the item is to be deleted.
Managing Discussion Categories
Selecting categories for discussions allow discussions to be grouped and organized by topic. You create and manage categories through the Categories list in the community site. To access this list, select the Create Categories option from the Community Tools.
Reputation
Community sites let you manage reputations of community members. Reputation is calculated based on individuals’ activities in the site. Different activities (such as creating posts, replying to posts, having post or replies liked, having a reply marked the best) generate reputation points used to calculate reputations in the community site.
Managing Reputation Settings
Reputation is configured in the Reputation Settings page in a community site. These settings allow management of points received for various community activities and of thresholds and levels of reputation available. Reputation is managed as follows:
Navigate to the community site where you want to manage reputation.
On the community site home page, select the Reputation Settings option from the Community Tools.
On the Community Reputation Settings page, do the following:
In the Rating Settings section, identify whether items in the community discussion are to be rated and, if they are, whether to use likes or star ratings.
In the Member Achievements Point System section, identify whether achievement points are to be managed and, if they are, how many points to grant for each of the following activities:
Creating a new post
Replying to a post
Member’s post or reply gets liked or receives a rating of 4 or 5 stars
Member’s reply gets marked as “Best Reply”
In the Achievement Level Points section, identify the number of points needed to reach each of the listed five achievement levels.
In the Achievement Level Representation section, identify whether achievement levels are to be represented by a level image or by text-based titles. If by titles, then identify the titles for the levels.
Click the OK button.
Once reputation settings are configured, site members’ reputations are subject to the thresholds.
Badges
Badges , like reputation, can be used to identify experts in a community. However, where reputation is calculated, community members are awarded badges by community managers. Before you award badges, you must create them. To create a badge in a community site, do the following:
Navigate to the community site.
On the community site home page, select the Create Badges option.
On the Badges list page, add, edit, or delete badges as appropriate by direct list management (editing lists and list items is discussed in Chapters 5 and 6).
The badges are created. Once the badges are available, they can be assigned to community members as follows:
Navigate to the community site where you want to assign badges.
On the site’s home page, select the Assign Badges to Members option from the Community Tools.
On the Community Members page, click the check box next to a listed member, and then select the Give Badge option from the Moderation ribbon tab.
On the Gifted Badges page, select the badge to give the user and click the Save button.
The badge is assigned to the member.
Top Contributors
Community sites track activities in them and track the top contributors . Members listed in the top contributors are based on the reputation users have developed in the community.
Managing Offensive Content
SharePoint community sites can be configured to allow site members to identify whether there is content that can be considered offensive in the site. To turn on offensive content monitoring, do as follows:
Navigate to the community site.
On the community site home page, select the Community Settings option from the Community Tools.
On the Community Settings page, check the Enable Reporting of Offensive Content option from the Reporting of Offensive Content section and click the OK button.
The ability to report offensive content is added to the site. To identify a post or reply as offensive, select the Report to Moderator option from the item’s context menu. Then identify what the problem is with the item. Site managers can then view the items identified as offensive by selecting the Review Reported Posts option from the Community Tools.
Community Portals
The Community Portal is a site collection that lists all community sites in your SharePoint farm to which you have rights (see Figure 12-21).
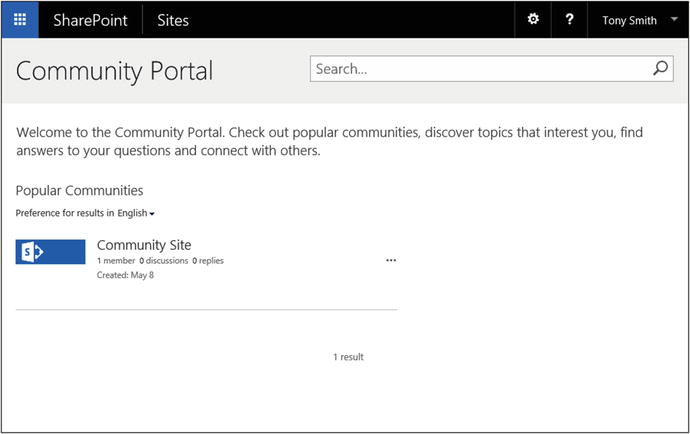
Figure 12-21. Community Portal
The Community Portal helps people identify communities that they would like to join. In a Community Portal, you can view the list of communities organized by their popularity and search for communities to locate those of interest to you. Communities are listed in the portal with these details, which help you identify whether you want to join the community:
Member, discussion, and reply counts
The most popular discussions in the list
When you identify a community you want to join, click on its name to navigate directly to it. The Community Portal also enables you to follow listed communities by selecting the Follow option from the hover panel for the communities.
Summary
In this chapter, we discussed the personalization and social features available in SharePoint 2016. We reviewed the SharePoint profile and About Me pages and how they are used to maintain details about site users. We discussed alerts and following capabilities that help keep people aware of activities occurring in the environment. We then reviewed how to share links to information and store and manage personal content. Lastly, we discussed social sites, including wiki sites, blog sites, and community sites.
In the next chapter, we will review metrics and analytics available in SharePoint to help understand how resources are being used.