
In the Introduction, I asked how close you could come to the root cause of a performance problem in just 30 minutes. That is about how long it should take to capture and review data from the four items in the P.A.t.h. Checklist.
But before getting into the technical details of the Checklist, this chapter provides a quick review of previous chapters. Then it describes how to use the Checklist when troubleshooting, and finally it provides a brief introduction to the two sets of code examples.
The objectives of this chapter are:
- Understand the basic principles of using the P.A.t.h. Checklist to identify and fix performance problems.
- Understand how to run the javaPerformanceTroubleshooting and littleMock code examples.
- Understand the architecture of the javaPerformanceTroubleshooting and littleMock code examples.
The first two items in the P.A.t.h. Checklist, database persistence (P) and network connections
to other (Alien=A) systems, are common integration points that historically have caused performance problems. JDBC is the focus of the Persistence work, but the concepts apply to almost any database. The last two, t. and h., examine the threads (t) that execute code and memory consumption
(h., the heap), along with its memory recycling process—the Garbage Collector. So, the P.A.t.h. checklist takes a closer look at the performance health of a few key integration points and the thread and memory management that underpins all processing. Yes, the focus of this book is the most common problems, but the toolset is capable of finding virtually any problem.
With real-world systems, you look at the data from all four of the items in the P.A.t.h. checklist. You decide which one looks the least healthy and then focus on tuning that part. But in the four P.A.t.h. chapters, I will make it easier on you by telling you straight up which Checklist item (hint: look at the chapter title) is causing the main, single performance problem that is dragging down the performance.
Quick Review
The first three chapters set the stage for what to expect when performance tuning.
- Chapter 1: I presented the Main Performance Anti-Patterns early on so you have a rough idea what to look for when hunting for performance defects. Start with the first anti-pattern, and ask whether it matches the problem that you’re seeing. If you find a match, generally you can stop; otherwise check out the second, third, and fourth ones in order.
- 1.Unnecessary Initialization : Small processing challenges that mostly happen prior to and during the initialization for the main (larger) processing event in your request, they often have a small amount of I/O but are repeated many times.
- 2.Strategy / Algorithm Inefficiency : A misconfigured or poorly chosen algorithm or coding strategy is causing performance problems. A strategy is a technique used throughout a code base, and an algorithm is a plan used to implement a single component.
- 3.Overprocessing : The system is doing unnecessary work. Removing that work provides measurable performance benefit. One example is retrieving too much data, where most of the data is discarded. Another example is including in your load test the wrong resource-hungry use case—one that is seldom used in production.
- 4.Large Processing Challenge : Attempting to process and conquer a massive amount of data. Very few applications legitimately have such a need, but these do exist. Other examples would be querying 4 billion rows of data, transferring 10MB of data repeatedly over a slow network, and the like.
- 1.
- Chapter 2: A Modest Tuning Environment : This chapter showed how most performance defects can be found in both large and small environments. It showed a few techniques (stub servers, graphing CPU by PID) that are very helpful for tuning in a smaller environment, where tuning can be especially productive, with as many as 10 fix-test cycles in a single day.
- Chapter 3 on metrics is a life preserver to keep you from drowning in a vast sea of confusion deciding which performance metrics to use:
- Load generator metrics , for the most part, assess whether performance requirements have been met. Enough throughput? Fast enough response time?
- Resource consumption metrics show when you have run out of hardware, CPU or RAM, meaning you’ll either need more hardware or you need to tune the system to consume less.
- Lastly, “Blame metrics” point to which component in the SUT is causing the slowdown or high CPU consumption; this is the part we are about to get to. The P.A.t.h. Checklist in the next four chapters provides these ‘blame’ metrics.
But before you can reproduce and solve performance troubleshooting problems, you must first master the basics of load generation, as I have detailed in the load generation Chapters 4, 5, 6 and 7. Let’s cement those basics in your head with a quick overview before moving on to the part where we cast blame upon slow or otherwise problematic SUT components.
- Chapter 4 on load scripting priorities discussed how load scripts must be recorded and enhanced to produce a realistic load. Don’t forget how we broke down the various script enhancements into First Priority and Second Priority. The First Priority script enhancements are enough to stress out the SUT’s basic architecture, where fixing a single performance defect can improve performance for many business processes across the entire architecture. The Second Priority script enhancements aim for that added touch of “system realism” on individual business processes. Fixing these kinds of defects might be critical, but their impact is limited to individual business process.
- Chapter 5 on Invalid Load Tests details a few circumstances (seen all too frequently) that make a given load test so unlike production that the results should be discarded. This is your chance to learn from the many mistakes that I and others have made. Don’t generate load over a WAN. Raise resource caps before tuning and lower them before deploying into production. Triple check that the business processes (and the data) in your load script pretty much match those used in production. Enhance your load script to make sure there are no errors and the right data is getting returned. Be vigilant in using Brendan Gregg’s USE method:http://www.brendangregg.com/usemethod.html to always watch resource consumption. Don’t waste time tuning edge cases.
- Chapter 6 on the Scalability Yardstick provides marching orders for what tests to run and how much load to apply on a day-to-day basis. A doctor will assess the health of your sprained ankle by manipulating it and increasing pressure on it until you show signs of pain. Likewise, the Scalability Yardstick load test directs you to increase the load until the SUT shows signs, from load generator metrics, of “bad performance.” Remember the clean, squared, leaps of throughput? You start by putting your SUT (and its performance problem) under the microscope. You do this by reproducing the performance problems using the Scalability Yardstick load test. Do you remember how this works? You run an incremental load test with four steps of load, the first of which pushes the app server CPU to 25%. Then you see at which of the four steps the nice, squared steps of throughput disintegrate into jagged and jumpy chaos—and you have reproduced the problem.
- Chapter 7 showed how anything in JMete r can be tested out in a small sandbox environment before live HTTP requests are sent across the wire. It showed the high-level tree structure of a load test, as well as how to capture and display extra metrics like CPU consumption from your SUT. Calibrating the Scalability Yardstick test was a lot easier because we saw on a single JMeter graph exactly how many threads it took to push the app server CPU to 25%.
Working the P.A.t.h. Checklist
With all of this slightly mundane groundwork behind us, the stage is set, and let the drum roll begin. The next four chapters finally show how to identify and blame and ultimately fix specific components of the SUT for performance problems.
To give yourself time to inspect the problem using the four different lenses, you need to manually reconfigure your load plan from four steps of incremental load to be a single steady-state test at the first level after the clean, squared throughput step disappeared. Perhaps set the duration to 20-30 minutes, knowing that you’ll stop the test as soon as these performance lenses show you some actionable intelligence.
For example, say your Scalability Yardstick test
ran with two threads at each level of load, and each level lasted for 2 minutes. If you got clean, chiseled steps at about 25% CPU (two threads) and 50% CPU (four threads) but no chiseled leaps after that, then the steady state “let’s reproduce the bug” test needs to run at six threads for the duration (20-30 minutes).
While the load test with the performance problems is running at steady state, you will look at the SUT using each of the four items in the checklist. The problem (or problems) you are experiencing will show up in one or more of the lenses. So what does this mean, to look through a lens?
As you will see in the coming chapters, each of the four checklist items has its own set of monitoring and tracing tools (freely available), and I will describe how to capture and interpret the data from each, giving a “problem” or “no problem” assessment for each checklist item. The goal, of course is blame. To blame one particular component of the system for the performance problem(s) and then dream up a fix.
As the chapters ahead will show you, the four checklist items will point out a few problems. Somewhat subjectively, you need to pick one of these issues to attack first—whichever issue provides the most bang for the buck. In other words, you generally want to attack the defect that provides the biggest performance boost with the smallest effort, which may be a code change, configuration change, data change, or even a load script change.
Here are the four items in the P.A.t.h. checklist:
- P Persistence : slow JDBC invocations and calling any one SQL too much.
- A Alien systems (network calls to a system outside your main JVM)
- t Threads (CPU overconsumption and blocked threads)
- h Heap (garbage collection inefficiencies and memory leaks)
But what is so special about these four particular areas? For starters, this is simply a convenient way to categorize the locations of today’s most common server side performance problems, but also to pair up those locations with their own set of observability tools. But more practically, the P for persistence represents the database, and there is wide agreement that database has more performance problems than any other area. We will focus on JDBC systems, but the same issues with JDBC performance in the P chapter also apply to NoSQL databases, as well; all this is covered in Chapter 9. I made up the term “Alien systems
”—it is kind of a placeholder for performance issues with any system our JVMs talks to over a network. That is Chapter 10.
So the P and the A are systems we integrate with. The t and the h are different. Every bit of our Java code is run in by an operating system thread, so the t for Threads explores thread efficiency. Are there blocked threads? (More on this later.) Are there small processing challenges that are unnecessarily eating a lot of CPU? Lastly, the h in PATH stands for the health of the Heap. Poor garbage collection efficiency can really hurt performance, as well as stability. I was always hesitant to wade into the complex waters of understanding GC algorithms
. Among other things, this h chapter goes out of its way to show how surprisingly little you have to know about GC to improve performance. The t and the h are in Chapters 11 and 12, respectively.
I mentioned earlier that the P and the A in P.A.t.h. are spelled out with capital letters because they are special: most of the time, you can detect problems in those areas with just a single user’s traffic. One of the reasons this is true is because a single, lonely query to a large, unindexed table is often real slow, like slower than 1 second. Likewise, executing 100 SQL/NoSQL requests will likely be slow (more than 1 second) with any number of users, including just one.
Since no load required is required and it’s easier to capture a one-time sample of P and A activity, you get the great benefit of being able to detect and fix performance problems without a load script (like a JMeter one) and without a load environment—any environment will suffice with P and A. An unindexed query to a large table is a good example of this, where lowering response time will yield higher throughput.
Unfortunately, the same thing does not work with the t. and the h. in P.A.t.h. Why? Because it takes more than one thread to cause a performance problem with the synchronized keyword. Likewise, it takes a good deal of traffic to exacerbate a memory leak or misconfigured Garbage Collection
.
While you are running a Scalability Yardstick test
to reproduce a performance problem, the four items in the checklist will show you what components are to blame for the performance problems. Of course, you might find problems in more than one of the checklist items while you are running a single test. If so, you will have to triage the problems and decide which one(s) to fix first.
In this triage process, you will have to make decisions like, “Which should we tune first, the slowest query in the system that is taking 1.5 seconds, or repeated BLOCKED threads in our XML processing?”
Remember the P.A.t.h. acronym. Persistence, Alien systems
, Threads, and Heap. I mentioned this first in the chapter on load scripting priorities, but keep in mind that the first two checklist items, persistence and alien systems, highlight many tuning opportunities without load generation—in other words, when a single user traverses the system. If your performance environment is not yet built or if your load scripts are not yet created, you can still get started on improving performance.
Running the Examples
Because performance can go wrong in so many ways, the P.A.t.h system breaks problems down into four easier-to-understand categories. Its organization helps to grasp this large universe of performance problems. Most of the online examples that come with this book highlight just one performance problem in one of the four areas. The simplicity of looking at just a single problem at a time is really helpful to zero in and focus on performance problems that regularly go undetected, and the tools used to detect them.
There are two different github.com projects that come with this book. The first one I’ll refer to as jpt, which stands for Java Performance Troubleshooting. It comes with about 12 pairs of examples. In each pair, one of the two has a performance problem, and the other one does not—I’ve already fixed it for you. The two tests are labeled as the a test and the b test. Table 2-1 in Chapter 2 has a full listing of the 12 pairs of tests.
However, the fact that I’m fixing these problems for you, and that I am training your eyes on just a single problem at a time—this is a bit unrealistic. It is even more unrealistic that I tell you in advance whether the problem is a P., A., t. or h. problem. If I tell you that a particular test is a P problem, then you know to hook up the monitoring/observability tools I have prescribed for P-like problems. This is very straightforward, but it is unrealistic. In the real world, problems generally just start out as bad/slow, and it’s your burden to discover in which of the four areas the problem lurks.
This means that you generally must use the tools from all four items in the P.A.t.h. Checklist to fully understand the situation, a situation I have tried to model in the test 09a. This is an example of many problems all mixed together. There is no test 09b.
Java Performance Troubleshooting (jpt ) Sample App
There are small scripts to launch various parts of the application. As a convention, any time I mention a Bash script that ends in .sh, you will find a corresponding MS-Windows script (in the same folder) that ends in .cmd.
Figure 8-1 shows the rough architecture
of the jpt application.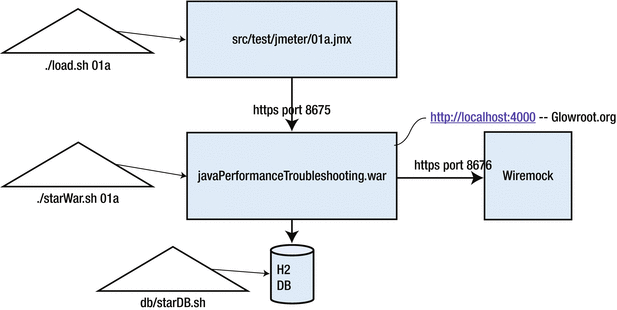
Figure 8-1.
Architecture
of the jpt examples. The triangles indicate the three scripts that must be launched from three separate terminal windows. The parameters after the first two scripts indicate that this is test 01a.
The download and instructions are available here:
An overview of the installation
and running of the examples is included below. If you run into any issues, be sure to consult the online version of the doc.
Table 8-1 shows
that it takes three scripts to run one of the jpt tests. Prior to running any of the tests, the init.sh script must be executed. It creates and populates an H2 database with more than 2 million rows of data. On my 2012 MacBook, the init.sh script takes 10 to 15 minutes to run. You can re-run the init.sh script and it will recreate the db from scratch.
Table 8-1.
Three Terminal Windows
(Aka Command Prompts) Are Required to Run Each Jpt Example.
1 |
# cd db
# db/startDb.sh
| Launches the H2 Database |
2 |
# ./startWar.sh 01a
| Launches the web application. Note the 01a parameter to run web server configuration for test 01a. Note that both glowroot and wiremock, depicted above, launch with this script. |
3 |
# ./load.sh
01a
| Launches JMeter from the command line. Note the 01a parameter to run the load test 01a. |
Here are a few notes for launching the tests.
Note that after running .startWar.sh, you should wait to start ./load.sh until you see this startWar.sh message:
Started PerformanceSandboxApp in 11.692 seconds (JVM running for 19.683)
To stop running one test and start running a different one, use Ctrl+C to stop both the ./startWar.sh and the load.sh scripts. Then restart the same scripts with the desired test ID. The startDb.sh script can stay running for as long as you like.
You will use the port numbers in Table 8-2 to help with your performance troubleshooting in the jpt examples.
Table 8-2.
TCP ports
Used by the jpt Examples
Description | Value |
|---|---|
Using JMeter, HTTPS load is applied on this TCP port | 8675 |
javaPerformanceTroubleshooting.war runs under Spring Boot (
https://projects.spring.io/spring-boot/
). It connects over HTTP to a backend system that listens on this TCP port. | 8676 |
http://localhost:4000
| |
h2 (
http://h2database.com/html/main.html
) TCP Server |
tcp://localhost:9092 (only local connections) |
h2 PGServer |
pg://localhost:5435 (only local connections) |
h2 Web/Console Server
. You can execute ad-hoc SQL on this web page. |
http://localhost:8082 (only local connections). There is no username and no password. |
littleMock Sample Application
For the jpt github.com project above, to decide what kind of test you want to run, you need to pass the test ID (01a, 01b, 02a, 02b, and so on) into both the startWar.sh and the load.sh scripts
. If you pass in a different test ID, you get different behavior, based on Table 2-1 in Chapter 2.
The littleMock github.com project is different. There are no parameters for the startup scripts to determine configuration. Instead, the configuration is done via a small web page that is available via http://localhost:8080/ui. If you’re ever in the mood stir up a little trouble, littleMock’s web page is just for you. Would you like to overrun the heap with large RAM allocations, just to see GC response time suffer? Perhaps you’d like to iterate endlessly (almost) through meanlingless loops? With littleMock, you can even grind the system to a halt with pathetically slow (but very commnly used) XPath and XSLT idoms. The littleMock web page puts the power in your hands.
Just click a few buttons and the performance change is implemented immediately. Toggle the change off, if you’d like. No, don’t do that. Instead, brew up a perfect storm by configuring half a dozen nightmares simultaneously using a “Performance Key”, a comma-separated list of multiple configurations that can be applied at the same time. Athena and Ares, look out.
Just enter a Performance Key as shown in Figure 8-2
and click ‘Update.’ Subsequent chapters will provide various Performance Keys so you can learn how to troubleshoot certain performance problems. Alternatively, you can click on the individual settings below the Key (not shown) to see how they impact performance. Every individual change you make is immediately reflected in the Performance Key, and vice versa.
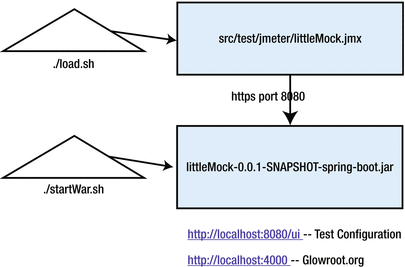
Figure 8-2.
littleMock’s web page and the command-separate Performance Key that enables you to dial in multiple performance settings at a single time. Individual settings (between the commas) are described further down the page, below the Key.
The littleMock web page lets you make on-the-fly tuning changes whose impact can be immediately seen in the glowroot monitoring
, which is available at http://localhost:4000, just as it is in jpt. Figure 8-3 shows the architecture.
Figure 8-3.
Architecture
of the littleMock application. Note that the load.sh and the startWar.sh do not accept any parameters. To alter performance of littleMock, use the small UI web page: http:/localhost:8080/ui
Don’t Forget
Running the jpt and littleMock applications on your own machines will provide a hands-on-experience that you can’t get from just reading along, so I encourage you to download the applications now. Here are the URLs
, one more time:
Once these examples are up and running, you will be able to demonstrate write-once-run-anywhere performance defects that can be reproduced in small and large environments, alike.
What’s Next
After you run the init.sh script with the jpt project, you will have a database on your machine with more than 2 million rows—and it takes just 10-15 minutes to create all that data. The next chapter on P for Persistence, will help you diagnose garden-variety problems with individual queries, but also it will show how to detect inefficient strategies around multiple queries that execute as part of a single server-side request.