Google Places provides a rich database of locations and photos to iOS apps through the Google Places SDK. With the SDK, your mobile app can augment its location abilities with additional details and photos or even provide a places search with autocomplete.
We are going to build on the discussion in Chapter 7 about CocoaPods and using Google APIs in your mobile app. In particular, getting a Google Places API key is similar to getting an API key for the Google Directions API or the Google Maps API.
Google Places is on a pay-per-use billing model, with billing credits that should cover usage in development and testing. Please check the Google Maps Platform billing website (https://developers.google.com/maps/billing/gmp-billing) for the latest information. Also, you will find more details there about what usage costs and how changing the fields in a place request affects pricing.
Building a places finder with a map
Our project in this chapter will be to create a search interface for businesses in the Google Places database, based on the currently visible region in a Google Maps map view. We are going to start with the Google Places autocomplete view controller first and then add the Google Maps marker at the end of the chapter.
This project demonstrates how to search for places by name in Google Places with autocomplete, as well as how to integrate the Google Places SDK for iOS into your project. We will use the full-screen autocomplete search view controller for Google Places, which makes adding this functionality pretty simple.
Creating the project
Create a new Single View Application in Xcode, using Swift. Choose storyboard as the user interface framework. Name the app PlacesApp . The example project for this chapter uses com.buildingmobileapps as the organization identifier, making the app’s bundle identifier com.buildingmobileapps.PlacesApp. We’ll use this bundle identifier in the next section of this chapter, when we create an API key and restrict it for use.
Getting a Google Places API key
Similar to the previous chapter with the Google Directions API, or Chapter 7 with the Google Maps API, you will need to get a Google Places API key. You need to go to the Google Cloud Console, which can be found at this URL, https://console.cloud.google.com, and then enable the Google Places API for your project.

Credentials location in APIs & Services menu

Create an API key
When the dialog box appears with your API key, copy the API key to your clipboard, or retrieve it later from the console. Click the Restrict button on the dialog box, which will open up a page that lets you set which APIs and applications this API key works with.

Naming the API key and restricting to iOS apps

Restricting API key use to a single bundle identifier
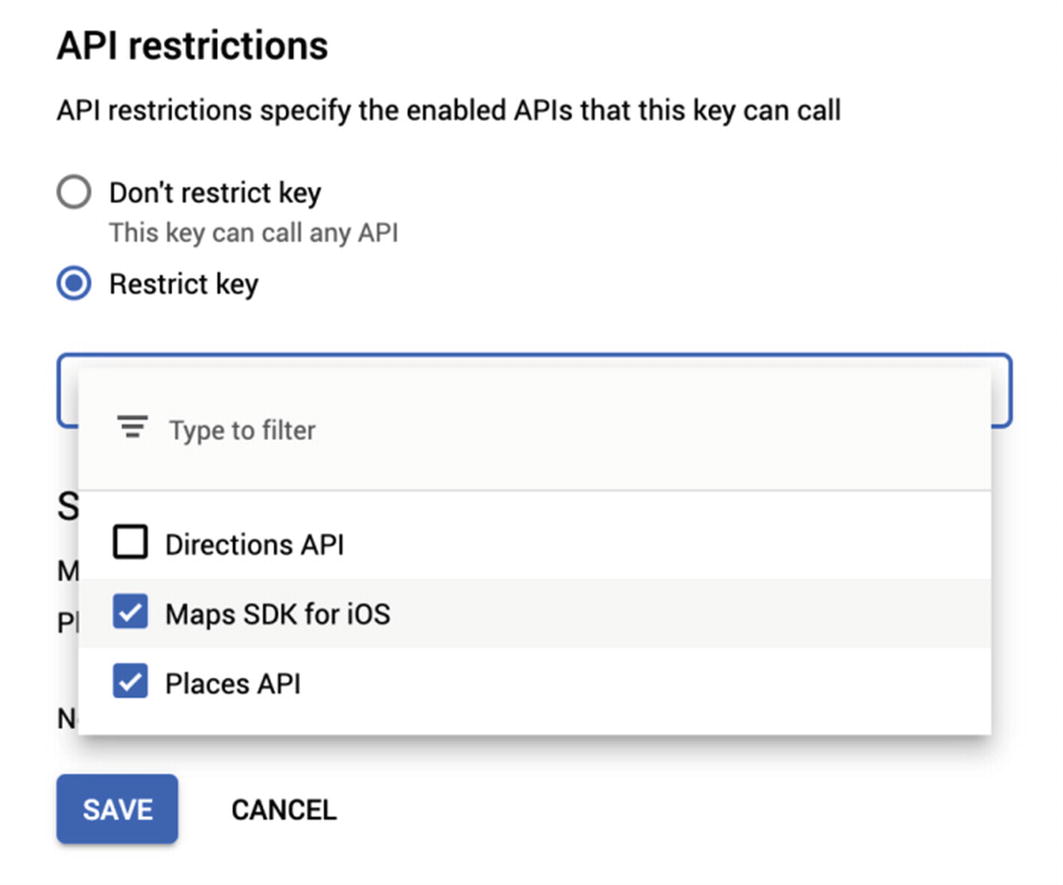
Restricting API key use to two APIs
Save those changes, and then the console will return to the API keys screen. We will use the API key in the app shortly, so leave the page open. You can always go back into the console and retrieve your API keys, however, unlike some vendors that only provide a secret authorization token once.
Our next step is to include the Google Places SDK and the Google Maps SDK in our app project with CocoaPods.
Setting up CocoaPods
Podfile for Google Places and Google Maps SDKs
Now, only use the PlacesApp.xcworkspace file with Xcode, not the PlacesApp.xcodeproj file, or the CocoaPods dependencies won’t be included in the build.
Open the PlacesApp.xcworkspace file in Xcode, and we can get started building the app!
Providing an API key for Google Places and Google Maps
The next step to building our project is to specify API keys for the Google Places SDK for iOS, as well as the Google Maps SDK for iOS. We can use the same API key for each, as we enabled support for both APIs in the first part of this chapter. For Google Places, the GMSPlacesClient class has a static method named provideAPIKey() that you use before calling anything else in the Google Places SDK. Similarly, we will call the provideAPIKey() method on the GMSServices class for Google Maps. Add the GooglePlaces framework and the GoogleMaps frameworks as import statements in the AppDelegate class. We will provide the API keys for both of the Google SDKs in the app delegate’s application(_:didFinishLaunchingWithOptions:) method .
Selection from the AppDelegate class
Now that you have the Google Places and Maps SDKs set up, let’s use it to add some functionality to our project!
Creating the user interface

Storyboard showing map view and button
One thing to note: the button can’t be a child view of the map view; it has to be a child view of the main UIView for the ViewController screen .

User interface for the application
You could also create the map view and the button programmatically, if you wish.
That concludes our work with the storyboard. The next part of the project will be to display the Google Places autocomplete view controller when a user taps on the button.
Understanding the autocomplete search
When you add some kind of places search to your project, you will want to include autocomplete – forcing users to type in the exact name as specified in the database won’t be successful. The Places SDK for iOS includes user interface elements for autocomplete, as well as a way to make autocomplete queries programmatically, so that you can implement your own user interface.
Two modern user interface elements are included in the Places SDK. The first is a stand-alone full-screen view controller that handles text search as well as displaying results. The other user interface element is a search results view controller that works with a search bar that you implement. For this chapter, we will work with the stand-alone view controller, but the concepts for the search are similar between the two different user interfaces.
Create an instance of the GMSAutocompleteViewController class.
Give geographic boundaries for the place search.
Decide which data fields you need back from the query.
Filter the results by type of place (city, street address, establishment).
Display the view controller.
Implement the delegate for callbacks when search is completed or canceled by user.
Let’s go through each of these steps in more detail, as we build out the places search functionality in our project.
Creating the autocomplete view controller
All of the code snippets in this and the following sections will go into the action named findBusinesses() we created earlier. This function can be found printed out in full in Listing 10-3, which is after the discussion of each individual step.
Setting geographic boundaries for the search
We can tell Google Places what geographic area to search for places using the autocomplete search. You can either use this area as a preference, so that results within this geographic space get boosted up toward the top of the list, or as a restriction, where places outside of this geographic area won’t be shown at all, even if they are nearby.
You do not have to be this restrictive – instead you can bias results toward those found in the map, but if a user is looking for something specific, and it happens to be close to the map but not in it, it will still return as a result. This is the default behavior for the autocomplete search. If you would like to use it, do not set the autocompleteBoundsMode parameter, or set it to the .bias value.
You also do not have to use any geographic bounds, in which case you would simply omit setting the autocompleteBounds property . You could also construct the geographic bounds yourself, for instance, if you were building a place search for a given region or city.
The next step is to determine which data fields your view controller needs to fetch from the Google Places API.
Requesting a subset of data fields
The Google Places API will return all data fields by default for autocomplete, including premium ones such as reviews that cost extra. As you probably do not need all fields, you can set a specific set of fields that you do need in your result.
coordinate
formattedAddress
name
openingHours
phoneNumber
photos
placeID
rating
website
For our purposes, we are going to stick to the basic place details and simply request the name, place ID, and coordinate. We will use these later to create a marker on the map.
Not to be confused with the fields, we now need to tell Google Places what type of search results we want.
Filtering results by type
noFilter
address
city
establishment
geocode
region
city
We used the establishment type, but you could certainly use one of the other filters. Try them out to see what type of results they give back in your area.
Displaying the view controller

Displaying the autocomplete view controller for Google Places
If you like, you could create the autocomplete view controller in one method and then display it from another method. For this project, we combined these two into one method for simplicity.
Displaying autocomplete view controller for Google Places search
When the user chooses a place from the list or they decide to cancel, your view controller will need to dismiss the autocomplete view controller. We will discuss that in the next section about implementing the delegate methods for the autocomplete search.
Implementing the delegate for autocomplete
With the GMSAutocompleteResultsViewControllerDelegate protocol , your application will get notified when certain events happen with the autocomplete view controller. We are going to implement several methods from this delegate as an extension to our ViewController class.
In particular, the functions called when a user selects a place, when a user cancels the search request, or when an unrecoverable error occurs are required. The optional methods inform the delegate that an autocomplete request has been made, an autocomplete request has been updated, and a user has chosen a value from the list (but the API has not been called to get the place details yet).
If you try to compile your project at this point, Xcode will inform you that the protocol has required methods and will offer to create stubs for the three required methods. You can let Xcode do that or copy the definitions from Listing 10-4.
Implementing methods in the autocomplete view controller delegate
Next, let’s add some functionality to the first method, when a user selects a place. We will print out the place details, with the fields we requested from the Google Places API. If there are any required third-party attributions, we will also print those.
When you work with places returned from the Google Places API, some of those places may have attributions that you are required to display. Those come back on the GMSPlace object as the attributions property. For more on Google’s current policy for attributions, see this web page: https://developers.google.com/places/ios-sdk/attributions.
Displaying the place on the map
If you are going to display Google Places data on a map, it must be a Google map, not an iOS MapKit map or a map from another provider. You can display places data outside of a map, but you need to display the Powered by Google image found at the attributions web page: https://developers.google.com/places/ios-sdk/attributions.
Displaying a place from the Google Places SDK on a Google map

Showing a map marker in Google maps for a Google Places place
We put the GMSPlace object into the userData property on the map marker so that we could have access to the data in the place later. For instance, you could extend this application to retrieve photos for the place when a user taps on the marker.
Additional functionality in Places SDK
There is a lot of additional functionality in the Google Places SDK for iOS that we did not cover in this chapter. We only discussed the full-screen view controller for autocomplete search and not how to implement a custom user interface for search. We also did not cover how to request place details for a given place id, which we could use to get more data fields from the API.
In addition, you can also translate the user’s current location into a place, letting you tell the user where they are. With the information in the photos data field for a place, you can retrieve photos, if there are any in Google Places.
This chapter concludes our discussion of Google’s Map Platform and its components for iOS. In the next chapter, we will learn how to get started with Mapbox, another mapping provider.