String Handling and Manipulation
In the previous chapter, we gained knowledge of interfaces and abstract classes and their relationship with classes and objects. We saw that interfaces and abstract classes can be used to make classes have a consistency when they inherit from the interface or abstract class. We also read that many developers will program to an interface, showing that interfaces form an integral part of developing C# applications in a commercial environment.
In this chapter we will study in more detail the use of Strings and see how we can use and manipulate them within our C# code. Throughout our chapters we used Strings, and in many of our coding examples, we have seen how we can concatenate a string to another string or to a non-string data type , which has been converted to a string. When we look back to Chapter 6, we can see that string is not one of the primitive data types, whereas char is. So we know that String as a data type is special. Just look at the fact that we have used a capital S when writing it here. Having studied classes and objects in Chapter 13, we might also think that the capital S might suggest that it is a class, as classes by convention start with a capital letter. Indeed, we are correct in this assumption, and we would say that String is a class within .NET in the System namespace . The fully qualified name of the String class is System.String, and string in C# is a shortcut for System.String.
A customer may need to enter their personal details into an online form and submit the form so the data can be stored in a company database. However, the customer, like myself, might not be the best “typist ” and may enter uppercase or lowercase or a mixture of cases when entering their details. Does the company really want to store this poorly formed string of data in its database? Probably not. In developing the code, we could convert the data to upper, to lower, or to proper case through our C# code, thereby standardizing the stored format.
A customer may need to complete an online form and include their account number. As they enter their account number, they add an extra space at the start or end. In developing the code, we need to read this account number and check if it exists, before we let the customer see their account details. As the extra space is included, our code will not be able to match the account number. Our code must check for extra spaces at the start or end of a string and take appropriate action to correct the string.
A customer may need to enter their credit card number, and it is known that this should be 16 digits with no spaces and in the correct format. As developers we need to check that there are 16 digits, not less or more, and in our code we will need to check that there is not a mixture of numbers and characters or even all characters.
Data read from a text file might need to be dissected and parsed for various reasons such as getting the customer postcode or date of birth.
Data being written to a database from our application needs to be validated, manipulated, and then written, to reduce the possibility of errors happening during the writing process.
Example string replacement
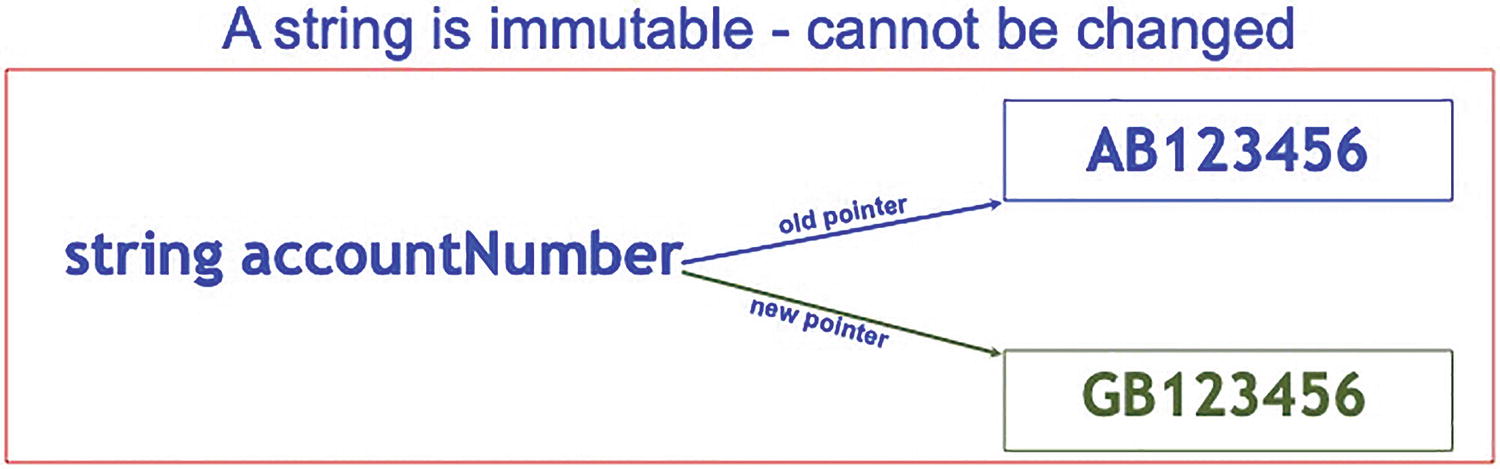
A diagram depicts the string account numbers, for the older pointer is A B 1 2 3 4 5 6 and the new pointer is G B 1 2 3 4 5 6.
Immutable string – new object is created
String Literals
Verbatim string
The first type of string literal is the verbatim string . When we create a verbatim string, there will be an @ symbol at the start of the string, informing the string constructor to ignore any escape characters and line breaks. Verbatim means exact, so when we use the @ symbol, we are saying, “Use the string exactly as it is written.” We will see as we code examples in this chapter that escape characters are special characters, for example, represents a new line and represents a tab.
Example verbatim string

A diagram depicts the string message including backslash n and backslash t as escape sequences. They do not mean a new line and tab because of the at symbol.
Verbatim displays the line exactly as it is written
Example verbatim string using double backslash

A diagram depicts the string message, including the double backslash n and double backslash t escape sequences, respectively.
Trying a double slash \ does not work with verbatim
Regular string
The second type of string literal is the regular string . When we create a regular string literal, it means the string will be read and special characters will need to be “escaped” with a .
Example regular string

A diagram depicts the string message for a newline as well as a tab for the regular string.
Regular string
Example regular string with double backslash

A diagram depicts the string message for backlash n and backlash t for the regular string.
Regular string with \, a double backslash
Let's code some C# and build our programming muscle.
- 1.
Right-click the solution CoreCSharp.
- 2.
Choose Add.
- 3.
Choose New Project.
- 4.
Choose Console App from the listed templates that appear.
- 5.
Click the Next button.
- 6.
Name the project Chapter15 and leave it in the same location.
- 7.
Click the Next button.
- 8.
Choose the framework to be used, which in our projects will be .NET 6.0 or higher.
- 9.
Click the Create button.
Now we should see the Chapter15 project within the solution called CoreCSharp.
- 10.
Right-click the project Chapter15 in the Solution Explorer panel.
- 11.
Click the Set as Startup Project option.
Notice how the Chapter15 project name has been made to have bold text, indicating that it is the new startup project and that it is the Program.cs file within it that will be executed when we run the debugging .
- 12.
Right-click the Program.cs file in the Solution Explorer window.
- 13.
Choose Rename.
- 14.
Change the name to Strings.cs.
- 15.
Press the Enter key.
- 16.
Double-click the Strings.cs file to open it in the editor window.
- 17.
Amend the code, as in Listing 15-6, with the namespace, the class, and Main().
Class with the Main() method
We will now create code that uses String class methods and properties and demonstrates their use in practical examples. We will start with the Substring method.
Substring
Substring(Int32 startposition)
In this format the Substring method will retrieve a substring of the full string starting at the specified character position and continuing to the end of the string.
Substring(Int32 startposition, Int32 length)
In this format the Substring method will retrieve a substring starting at the specified character position and continuing for the specified number of characters as indicated by the length.
- 1.
Amend the code, as in Listing 15-7.
Set up a string and assign it a value
- 2.
Amend the code as in Listing 15-8.
Characters of the string starting at position 4
- 3.
Click the File menu.
- 4.
Choose Save All.
- 5.
Click the Debug menu.
- 6.
Choose Start Without Debugging.
Figure 15-6 shows the console window displaying the characters of the zero-indexed string from position 4, the fifth element.
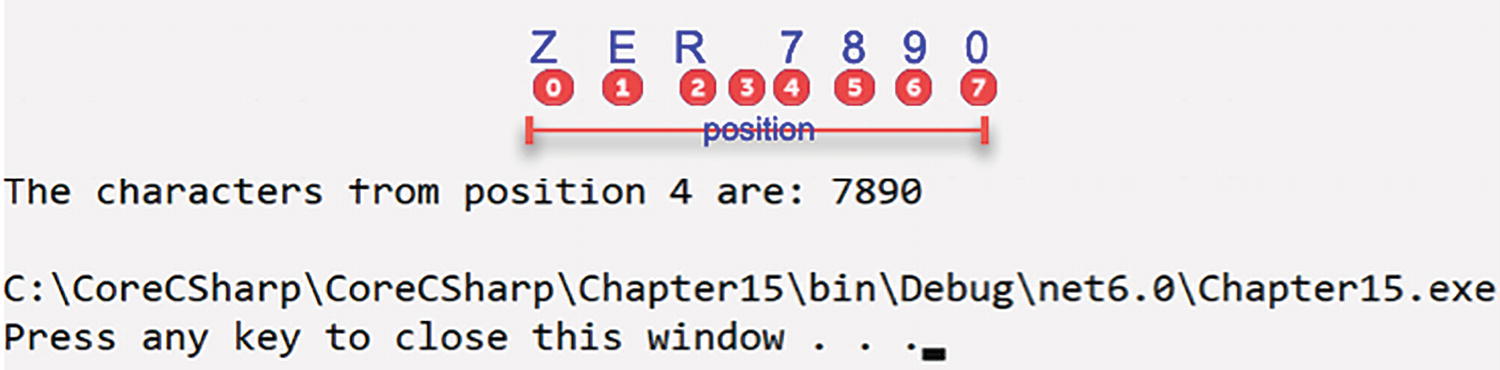
A console window indicates the zero-indexed string starting at position 4, which are 7, 8, 9, and 0.
Position 4 to the end of the string
- 7.
Press the Enter key to close the console window.
Continuing with this code, we will add new code to demonstrate different string handling methods and features. We will add the code after the existing code, just above the end curly brace of the Main() method . We will continue now by coding the statements to find the characters from position 0 to position 2, the first three characters, of the myVehicleRegistration String object.
- 8.
Amend the code, as in Listing 15-9.
First three characters using Substring
- 9.
Click the File menu.
- 10.
Choose Save All.
- 11.
Click the Debug menu.
- 12.
Choose Start Without Debugging.
Figure 15-7 shows the console window displaying the first three characters.

A console window indicates the first three characters, Z, E, and R.
First three characters of the string
- 13.
Press the Enter key to close the console window.
Length
- 1.
Amend the code to find the number of characters in the string called myVehicleRegistration, as in Listing 15-10.
Find the length of a string
- 2.
Click the File menu.
- 3.
Choose Save All.
- 4.
Click the Debug menu.
- 5.
Choose Start Without Debugging.
Figure 15-8 shows the console window displaying the number of characters in the string as 8.

A console window indicates the string contains eight characters.
The length of a string
- 6.
Press the Enter key to close the console window.
StartsWith( )
In coding our insurance application, we might need to find a specific character or characters in a vehicle registration number since an accident involved a vehicle with the specific character(s). For this situation we could use the StartsWith() method. There are two forms of this method, method overloading, that we will use.
The StartsWith() method has two forms:
StartsWith(Char)
In this format the StartsWith() method will return a Boolean value of true or false, depending on whether the String object begins with the specific char or chars. The method starts at character 0.
StartsWith(String)
In this format the StartsWith() method will return a Boolean value of true or false, depending on whether the String object begins with the specific string. The method starts at character 0.
- 1.
Amend the code, as in Listing 15-11, to add an array of strings.
Declare and create an array of strings
- 2.
Amend the code, as in Listing 15-12, to iterate the array and display those strings that start with (StartsWith()) the character Z.
Find strings that start with the character Z and display them
- 3.
Click the File menu.
- 4.
Choose Save All.
- 5.
Click the Debug menu.
- 6.
Choose Start Without Debugging.
Figure 15-9 shows the console window displaying each array member and stating if it begins with the character Z.

A console window indicates each component of the array and indicates whether or not it starts with the character Z.
Strings starting with Z
- 7.
Press the Enter key to close the console window.
Split( )
- 1.
Amend the code, as in Listing 15-13.
Split the strings at the spaces
- 2.
Click the File menu.
- 3.
Choose Save All.
- 4.
Click the Debug menu.
- 5.
Choose Start Without Debugging.
Figure 15-10 shows the console window displaying each of the array members in their two parts, split at the space character .

A console window indicates every single member of the array broken down into its two components, separated by the space character.
New strings created from original strings split at spaces
- 6.
Press the Enter key to close the console window.
We can also split on multiple characters, delimiters, or regular expressions.
- 7.
Amend the code, as in Listing 15-14, to add a new array, called myMixedVehicleRegistrations .
Add a new array called myMixedVehicleRegistrations
- 8.
Amend the code, as in Listing 15-15.
Split the strings at the required delimiters
- 9.
Click the File menu.
- 10.
Choose Save All.
- 11.
Click the Debug menu.
- 12.
Choose Start Without Debugging.
Figure 15-11 shows the console window displaying new strings.

A console window indicates three new strings that are generated by splitting the original strings at their respective delimiters.
New strings created from original strings split at the delimiters
- 13.
Press the Enter key to close the console window.
CompareTo( )
In coding our insurance application , we might need to compare two strings. We could be asking a customer to enter their account reference and then comparing it with account references read from a file so we can display data related to this specific customer. To undertake the comparison, we could use the CompareTo() method of the String class. Interestingly, the CompareTo() method is an implementation of the interface method CompareTo() that exists in the interface IComparable. We have just completed a chapter on interfaces where we talked about interfaces and interface methods, and this is a great example of an implementation of an interface method.
If the string being compared precedes the other string, it returns an integer less than zero.
If the string being compared is in the same position as the other string, it returns a 0, zero.
If the string being compared follows the other string, it returns an integer greater than zero.
- 1.
Amend the code, as in Listing 15-16, to add a new array called myDuplicateVehicleRegistrations with additional String objects.
New array
Finding Matching Strings
- 2.
Amend the code, as in Listing 15-17.
Iterate the array and find strings that are the same
- 3.
Click the File menu.
- 4.
Choose Save All.
- 5.
Click the Debug menu.
- 6.
Choose Start Without Debugging.
Figure 15-12 shows the console window displaying strings that have been compared as the same. This means a value less than zero was returned when the two strings were compared.

A console window indicates similar strings that are compared to strings that return a value smaller than zero.
Equal strings
- 7.
Press the Enter key to close the console window.
Finding Which Strings Precede Other Strings
We will add code at the end of the Main() method to iterate the new array and compare each String object with each of the other String objects, displaying a message when a string comes before, precedes, another string.
- 8.
Amend the code, as in Listing 15-18.
Iterate the array and find strings that precede other strings
- 9.
Click the File menu.
- 10.
Choose Save All.
- 11.
Click the Debug menu.
- 12.
Choose Start Without Debugging.
Figure 15-13 shows the console window displaying the strings that come before other strings in the array.

A console window depicts the strings that are indicated in the array's order of appearance before any other strings.
Strings in the array that precede other strings
- 13.
Press the Enter key to close the console window.
ToUpper( ) and ToLower( )
In coding our insurance application , we might need to compare two strings, but we need to be sure the strings are in the correct case. There is no point in having the customer enter their account reference in mixed-case lettering and then trying to compare it for equality with our data, which is in uppercase. To solve this issue, we could use the ToUpper() method of the String class to convert the user input to match our uppercase data. We could equally apply the same principle to a scenario where we need to use lowercase.
In string handling the ToUpper() method will convert the characters of the string into uppercase characters, when there is an equivalent uppercase character.
In string handling the ToLower() method will convert the characters of the string into lowercase characters, when there is an equivalent lowercase character.
- 1.
Add the code in Listing 15-19.
Convert both strings to uppercase using the ToUpper() method
- 2.
Click the File menu.
- 3.
Choose Save All.
- 4.
Click the Debug menu.
- 5.
Choose Start Without Debugging.
Figure 15-14 shows the console window displaying the matching strings when conversion to uppercase has occurred.

A console window depicts the matched strings after the top upper open and close parentheses function has converted them to uppercase.
Using ToUpper() before comparing strings
- 6.
Press the Enter key to close the console window.
We could amend the program code if we wished to test the ToLower() method.
Concat( )
In many of the applications we have coded, we have concatenated a string and a non-string value using the + symbol. Another way to concatenate when we have only string values is to use the String.Concat() static method of the String class.
Concat() will concatenate multiple strings by appending the specified Strings. The String.Concat() method returns the newly combined String of characters.
- 1.
Add the code in Listing 15-20.
Using the Concat() method to join strings
- 2.
Click the File menu.
- 3.
Choose Save All.
- 4.
Click the Debug menu.
- 5.
Choose Start Without Debugging.
Figure 15-15 shows the console window displaying the concatenated strings.

A console window depicts four strings joined together to form one long string.
Concatenating strings
- 6.
Press the Enter key to close the console window.
Trim ( )
We read at the start of the chapter about an example where a customer might enter their account number and accidentally add an extra space at the start or end. We said that our code would need to check for spaces at the start and end of the string input, and this is what the Trim() method can do for us. The Trim() method will remove any leading spaces, at the start, and any trailing spaces, at the end, from the string object. The method will leave spaces that exist inside the string. There is also a TrimStart() method, which is used to remove the occurrences of a set of characters from the start of the String object, while the TrimEnd() method is used to remove the occurrences of a set of characters from the end of a String object.
- 1.
Add the code in Listing 15-21, to apply the Trim() method to the myOfferDetails variable.
Remove the leading and trailing spaces using the Trim() method
- 2.
Click the File menu.
- 3.
Choose Save All.
- 4.
Click the Debug menu.
- 5.
Choose Start Without Debugging.
Figure 15-16 shows the console window displaying the concatenated strings, but the leading space has been removed.
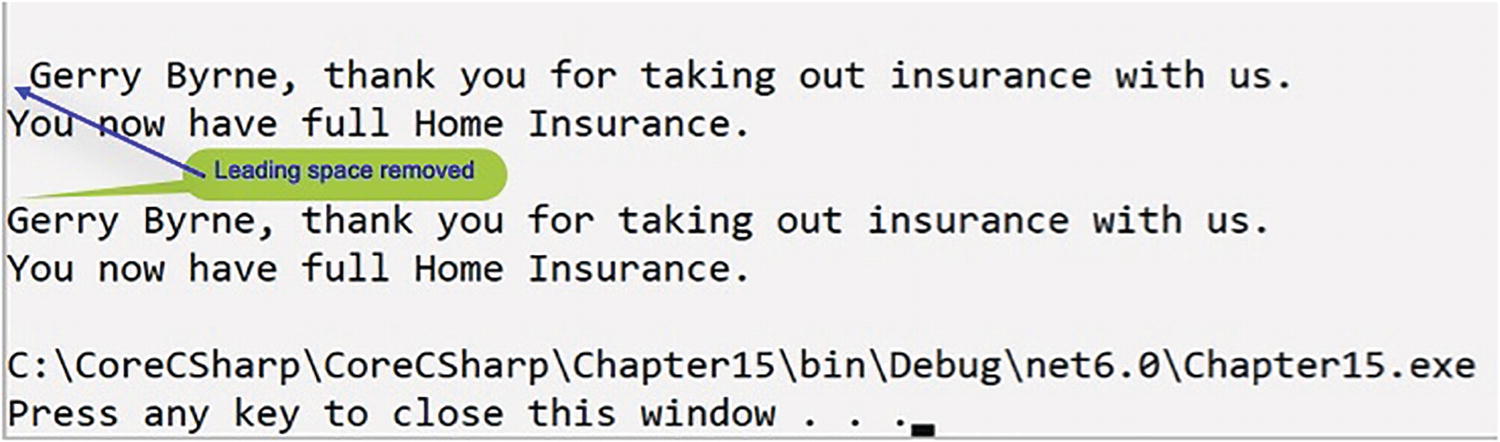
A console window depicts the gap at the beginning of the string has been eliminated.
Extra space at the front of the string trimmed
- 6.
Press the Enter key to close the console window.
Replace( )
In an application we may need to replace a character or characters with different characters, and this can be achieved using the Replace() method. We may need to replace 2023 with 2024 in a date string or replace Au with AU in all auto policies.
Replace(old char, new char)
In this format the method will replace all occurrences of the old character with the new character.
Replace(old string, new string)
In this format the method will replace all occurrences of the old string of characters with the new string of characters.
- 1.
Amend the code, as in Listing 15-22.
Replace characters in a string; new string object is formed
- 2.
Click the File menu.
- 3.
Choose Save All.
- 4.
Click the Debug menu.
- 5.
Choose Start Without Debugging.
Figure 15-17 shows the console window displaying the string with the two lowercase e characters replaced with uppercase E characters.

A console window depicts that in the string Gerry Byrne, the letter e has been capitalized and substituted with an uppercase E.
Lowercase e replaced with uppercase E
- 6.
Press the Enter key to close the console window.
We will amend the code to use the Replace() method to replace a string of characters in a string and then display the new String.
- 7.
Amend the code as in Listing 15-23.
Replace Gerry with GERARD
- 8.
Click the File menu.
- 9.
Choose Save All.
- 10.
Click the Debug menu.
- 11.
Choose Start Without Debugging.
Figure 15-18 shows the console window displaying the string Gerry replaced by the string GERARD.

A console window depicts that in the string Gerry Byrne, the string Gerry was substituted with the string G E R A R D.
Gerry replaced with GERARD
- 12.
Press the Enter key to close the console window.
Contains( )
In an application we may need to check if a string contains a char or a number of chars, and this can be achieved using the Contains() method. We may need to check if a policy id contains AU and then amend the monthly premium because auto insurance policies are due to be increased by 10%.
The Contains() method has two forms:
Contains(char)
In this format the method will return a value indicating if a specified character occurs within a string.
Contains(string)
In this format the method will return a value indicating if a specified string occurs within a string.
- 1.
Amend the code, as in Listing 15-24, to use the Contains() method to see if the user has input the string Home in an answer to a question.
Checking if a string input contains the string Home
- 2.
Click the File menu.
- 3.
Choose Save All.
- 4.
Click the Debug menu.
- 5.
Choose Start Without Debugging.
Figure 15-19 shows the console window displaying the question.
- 6.
Type Home in the console window and press the Enter key.

A console window depicts the user input string including home, and the menu is suggested to the user.
Home insurance types displayed
- 7.
Press the Enter key to close the console window.
Figure 15-19 shows the types of home insurance because our input contained the string Home.
IndexOf( )
In our application we may wish to see if a string contains a specific character and at what position the character is located, and for this we use the IndexOf() method to check if a character is inside a string. An example might be when we are verifying a customer email address. We might want to check that it contains an @ symbol. If it does, we might be happy that the entry is a valid email address; otherwise, it is not. But we might also wish to verify that the @ is located at a specific position or index.
IndexOf(char)
In this format the method will return the zero-based index of the first occurrence of the specified char in the string object.
IndexOf(string)
In this format the method will return the zero-based index of the first occurrence of the specified string in the string object.
- 1.
Amend the code, as in Listing 15-25, to use the IndexOf() method to find the position of the @ char.
Check if IndexOf() returns –1
- 2.
Click the File menu.
- 3.
Choose Save All.
- 4.
Click the Debug menu.
- 5.
Choose Start Without Debugging.
Figure 15-20 shows the console window asking for the email address .
- 6.
Type an email address containing an @, for example, [email protected], and press the Enter key.

A console window depicts that there is an at symbol in the string that was input by the user.
Index of the character @
- 7.
Press the Enter key to close the console window.
The text is checked only for an @ symbol, so this is not a very efficient email checker, but we receive a message that the email address is valid, as in Figure 15-20, because the @ symbol was located.
Insert( )
In our application we may wish to see if a string contains a specific character or string of characters, and if it does not, then we might wish to insert the character or string of characters. .NET offers us the Insert() method to place characters inside a string. As an example, we might need to verify a customer account number by checking that it contains two letters at the start. If it does, the entry can be seen as a valid account number. If it does not, then we may wish to put the two letters in front of the number based on other information the user has also entered.
- 1.
Amend the code, as in Listing 15-26.
Use the Insert method to insert the characters GB at index 0
The code finds the position of the letter G in the string and assigns it to the variable intPositionG.
The code finds the position of the letter B in the string and assigns it to the variable intPositionB.
The next part uses the if statement to see if the letters G and B have been located at the start of the string in the positions 0 and 1.
If they have been found, then a message is displayed saying that the account number is valid and telling us the position of the two letters.
If the two letters are not found, then a message is displayed saying that the account number is invalid.
The letters GB are then inserted into the string starting at position 0. Remember that we are using the Insert() method, not the Replace() method.
The console will show the string with the GB added at the start.
- 2.
Click the File menu.
- 3.
Choose Save All.
- 4.
Click the Debug menu.
- 5.
Choose Start Without Debugging.
The console window will appear and ask the user to input their account number. We know it should begin with the string GB or, put another way, G should be the first character and B should be the second character. If this is not what is entered, the code will insert GB at the start of the entered string. Obviously, we could have used the Replace() method, but we are trying to understand the Insert() method.
- 6.
Type AB123456, an invalid input, and press the Enter key.
Figure 15-21 shows the console window with GB prefixed to the string.

A console window depicts that if the first two characters are not G B, they are modified to reflect the prefix.
Insert GB as the first two characters if they are not already GB
- 7.
Press the Enter key to close the console window.
- 8.
Click the File menu.
- 9.
Choose Save All.
- 10.
Click the Debug menu.
- 11.
Choose Start Without Debugging.
- 12.
Type GB123456, a valid input, and press the Enter key.
Figure 15-22 shows the console window with the indexes of G and B shown, after we have entered the input required.

A console window depicts a G as the very first character in the user input string and a B as the very second character.
No replacement needed
- 13.
Press the Enter key to close the console window.
String.Format( )
We will continue the use of the String class , but we will now look at how we have already used the Format() method of the String class to contain a string and placeholders for variables or objects.
The first format has been to use the Console.WriteLine() method where we have concatenated a string literal with a variable. In this case the variable becomes a string and is joined onto the string literal, and then the whole string is displayed. Listing 15-27 shows an example that we have already coded.
Using Console.WriteLine()
The second format has been to use the Console.WriteLine() method where we have included the String.Format() method to format the string. We use String.Format() when we wish to insert a variable, object, or expression within our string. Listing 15-28 shows an example that we have already coded.
Using String.Format()
The {0} is a placeholder within the format string. The 0 refers to the index of the object whose string value will be inserted at that position, and in Listing 15-28 this is the variable called registration. If the placeholder refers to an object that is not a string, then the ToString() method of the object will be called, and the object will be converted to a string, which is placed at the position of the placeholder.
We can have as many placeholders as we require so long as there is a matching object after the comma (,) following the end double quote. We say that there is an object list after the comma following the end double quote.
Formatting the Items in the String
- 1.
Amend the code, as in Listing 15-29, to use some String.Format() methods.
Using String.Format() with formatting
- 2.
Click the File menu.
- 3.
Choose Save All.
- 4.
Click the Debug menu.
- 5.
Choose Start Without Debugging.
Figure 15-23 shows the console window after we have entered the inputs required.

A console window depicts the required entered inputs that have been completed by utilizing the string dot format open and close parentheses.
Output when using String.Format()
- 6.
Press the Enter key to close the console window.
String Interpolation
We will continue the use of the String class , but we will now look at how we can use string interpolation to format a string to be used in the WriteLine() method.
The insertion of something of a different
nature into something else
The start as a $
Next, open and close "" double quotes
Then, inside the double quotes, our string
Next to the string, open and close curly braces {} to hold an object
Then, inside the open and close curly braces {}, the object and any formatting
All this will be within the () of the WriteLine().
- 1.
Amend the code, as in Listing 15-30.
Using string interpolation
- 2.
Click the File menu.
- 3.
Choose Save All.
- 4.
Click the Debug menu.
- 5.
Choose Start Without Debugging.
Figure 15-24 shows the console and confirms that we get the same output as Figure 15-23, which uses the code shown in Listing 15-29, but we should be thinking that our code is easier to read and therefore will be easier to maintain.

A console window depicts a single object in the display line and is used to confirm the interpolation.
Interpolation with a single object in the display line
Using string interpolation with more than one object
- 8.
Click the File menu.
- 9.
Choose Save All.
- 10.
Click the Debug menu.
- 11.
Choose Start Without Debugging.
Figure 15-25 shows the console window displaying the formatted objects in each of the two display lines.

A console window depicts that each of the two display lines' formatted objects was interpolated to fit more elements.
Interpolation with multiple objects in the display line
- 12.
Press the Enter key to close the console window.
String Interpolation: Spacing
A negative means align left.
A positive means align right.
- 1.
Amend the code, as in Listing 15-32, to use spacing in string interpolation.
Using string interpolation with control of spacing
- 2.
Click the File menu.
- 3.
Choose Save All.
- 4.
Click the Debug menu.
- 5.
Choose Start Without Debugging.
Figure 15-26 shows the console window displaying, in the second line, the right- and left-aligned formatted objects.

A console window depicts the second line, the formatted objects with a right alignment of 20 and a left alignment of 25.
Second line is controlled using left and right alignment
- 6.
Press the Enter key to close the console window.
@ Verbatim
Sometimes in our strings , we will want to use characters such as a backslash, , and double quotes, " , but the compiler thinks they are code sequences and tries to “interpret” them. There will be other times when we want to use escape sequences such as for a new line and for a tab, and in order to achieve this we can use another backslash, , in front of the escape sequence . Often, we will see the in code that uses a path name for a file, for example:
"C:DesktopGerryCode est.cs"
- 1.
Amend the code, as in Listing 15-33, to use the double backslash in string interpolation.
Using \ to make the compiler read the sequence literally
- 2.
Click the File menu.
- 3.
Choose Save All.
- 4.
Click the Debug menu.
- 5.
Choose Start Without Debugging.
Figure 15-27 shows the console window displaying the in the first display line and the double quotes and in the second line.

A console window depicts the second display line's double quotes and backslash n. The first display line is backslash n.
Output from \, double backslash sequence
- 6.
Press the Enter key to close the console window.
Unfortunately we may have a number of these backslashes in our strings, and it can be tedious to type the string and it also makes the code hard to read, for example:
"C:\Desktop\Gerry\Code\test.cs"
So another way to do the same thing is to use verbatim, the @ symbol. Using the verbatim @ symbol means backslashes are not interpreted as escape characters. However, the downside is that we cannot have special characters in our string when using verbatim. Another idiosyncrasy is when we want to display a double quote. We need to precede the double quote with another double quote. Listing 15-34 shows the same code examples as Listing 15-33, with comments, and their output.
Using verbatim, @
- 7.
Click the File menu.
- 8.
Choose Save All.
- 9.
Click the Debug menu.
- 10.
Choose Start Without Debugging.
Figure 15-28 shows the console window displaying the in the first display line and the double quotes and in the second line, but this time we have used the verbatim style.

A console window depicts the utilized verbatim style for the backslash n in the first display line and double quotes and backslash n in the second.
Output from using verbatim, @
- 11.
Press the Enter key to close the console window.
Now we will look at using the verbatim, @, symbol alongside the string interpolation, $, symbol. We will see how C# 8, C# 10, and above handle the use and mixing of these symbols .
Wh at About $@ or @$?
Compile error when using "" within a verbatim string

A console window depicts the compile error where the problem occurs when it reaches the first double quote after the word is.
Compile error
In C# 7 we use $@
In C# 8 onward we can also use @$

A console window depicts the coding of the statement using either a dollar symbol and an at sign or an at sign and a dollar symbol.
$@ or @$ gives the same output
From all the different ways we have looked at to display to the console, we can choose which “format” to use. What we need to consider is which format suits our coding style while at the same time making the code easy to read and therefore easier to maintain. Having personal choice also comes with responsibility.
Const String Interpolation
Prior to C# 10 we could have constant strings , where a const string is a string that cannot be modified. Prior to C# 10 we had to concatenate const strings using the +, and we could not use const strings in string interpolation, with the $. However, from C# 10 this has changed, and we can now make use of const strings within a string interpolation.
- 1.
Right-click the Chapter15 project.
- 2.
Choose Add.
- 3.
Choose Class.
- 4.
Name the class ConstantStrings.cs.
- 5.
Amend the code, as in Listing 15-38, to create a Main() method within the class, as this was not produced automatically, and delete the unwanted imports.
Using const strings
- 6.
Create a series of four const strings, as in Listing 15-39.
Adding the four const strings
- 7.
Amend the code as in Listing 15-40.
Concatenating strings for a home message using the +
- 8.
Amend the code as in Listing 15-41.
Concatenating strings for a building message using the +
- 9.
Right-click the Chapter15 project in the Solution Explorer panel.
- 10.
Choose Properties from the pop-up menu.
- 11.
Choose the Chapter15.ConstantStrings class in the Startup object drop-down list, as shown in Figure 15-31.

A startup object drop-down list indicates the function of the chapter 15 dot constant strings class.
Changing the startup class in the C# project
- 12.
Close the Properties window.
- 13.
Click the File menu.
- 14.
Choose Save All.
- 15.
Click the Debug menu.
- 16.
Choose Start Without Debugging.
Figure 15-32 shows the console output displaying the concatenated const strings.

A console output depicts the concatenated const strings by employing the conventional plus sign in conjunction with the concatenating strings.
Concatenating strings using the traditional +
- 17.
Press the Enter key to close the console window.
Now we will use the const strings, but in an interpolated string. We will create a new home message const string and assign it the $ string interpolation, which uses the const strings. We will then display the new string to the console.
- 18.
Amend the code, as in Listing 15-42.
Interpolated string using const strings – home message
- 19.
Amend the code, as in Listing 15-43.
Interpolated string using const strings – building message

A console window indicates that parentheses can be removed.
Warning that parentheses are not required

A console window indicates that version 10.0 or higher is required for Error const strings not supported in this language.
Error – const strings not available in this language version
- 20.
Click the File menu.
- 21.
Choose Save All.
- 22.
Click the Debug menu.
- 23.
Choose Start Without Debugging.
Figure 15-35 shows the console output displaying the interpolated string, which uses the const strings.

A console output indicates the utilization of conventional string concatenation through the plus and interpolated string through the const strings.
Interpolated string using const strings displayed
- 24.
Press the Enter key to close the console window.
Chapter Summary
So, finishing this long chapter on string handling, we should remember that a string or String is one of the built-in reference value types. String is a class, and therefore it has methods and properties just like any other class. We have completed a chapter on classes and objects where we saw that when we typed the name of the instantiated class into our editor and then typed the . (period), the name of the methods and properties appeared. In this chapter we saw some of the methods of the String class, for example, Trim(), ToUpper(), Split(), and Replace(). While we have covered some of the methods, we have not covered them all, and we could investigate many more of the methods and their use. We have also covered different ways to write code in the WriteLine() method, and we have also looked at the newer features of C#, including constant interpolated strings and then constant strings within interpolated strings available from C# 10.
We are making fantastic progress in our programming of C# applications and we should be very proud of our achievements. In finishing this chapter, we have increased our knowledge further and we are advancing to our target.

An illustration of concentric circles with a text below that reads, our target is getting closer. The circles at the center are shaded in green.