Interfaces and Abstract Classes
The methods we have not created but have used, they all have one thing in common.
They all live inside a class; they are part of a class.
The crucial takeaway from the last chapter and a vital thing to remember in this chapter is that a class contains methods and variables.
So, in the last chapter, we saw that methods form a large part of the classes we created or that exist in the C# language. This is great as it helped us modularize our code. But let us think more on a larger scale than one or two classes. Let us use two examples, so we can think about different developers creating separate classes and methods around the same “topic” or “idea.”
Example 1
Developer 1 is writing for country 1, so they develop their class called Billing and they create a method called VatCalculation() , where the business logic is to multiply the item price by 20% (0.2) and return the amount.
Developer 2 is writing for country 2, so they develop their class called Billing and they create a method called TaxCalculation() , where the business logic is to multiply the item price by 15% (0.15) and return the amount.
Developer 3 is writing for country 3, so they develop their class called Billing and they create a method called CalculateTax() , where the business logic is to multiply the item price by 10% (0.10) and return the amount.
Now we should ask, "Why do we have three Billing classes all doing the same thing, which have a common method that calculates the VAT amount, but the method names are not the same?" Well, the answer is because we can! But is this a good example of standardization or clean code? Maybe not.
Now think about the same problem but where the three developers collaborate and discuss what they are about to do. They might suggest the methods they will use and the naming conventions. Sound like a plan? Well, this is where an abstract class or an interface could help. By using an abstract class or an interface, we can declare the method signatures and return types to be used, but not the code to be used, as the code will be decided by the individual developers and be appropriate to their situation.
Method signature examples
Method signature | Description |
|---|---|
CalculateTax(double itemPrice) | Method name is CalculateTax. Parameter is of type double. |
CalculateTax(double itemPrice, int quantity) | Method name is CalculateTax. First parameter is of type double. Second parameter is of type int. |
When we talk about a method signature, we are not including the return type of the method. We cannot have the same method signature with different return types.
When we discussed overloaded methods, we said they were methods with the same name but different parameters. There was no mention of the return type. Our two CalculateTax() methods, in Table 14-1, show an example of method overloading.
Example 2
Developer 1 is writing for region A, so they develop their class called Quote and they create a method called RegionalRateCalculation() , where the business logic is to look up a struct and return the rate as a double for this region, for example, 0.05.
Developer 2 is writing for region B, so they develop their class called Quote and they create a method called RegionBRate() , where the business logic is to look up the same struct and return the rate as a double for this region, for example, 0.10.
Developer 3 is writing for region C, so they develop their class called Quote and they create a method called CRate() , where the business logic is to look up the same struct and return the rate as a double for this region, for example, 0.20.
There are therefore three classes called Quote all doing the same thing and having a common method that looks up the regional rate amount, but the method names are not the same. Surely, we can do better than this!
Well, this is where an abstract class or an interface could help.
The Interface or Abstract Class as a Manager
Example 3
Gerry orders ten margherita pizzas of size 10 inches.
May orders five margherita and five pepperoni pizzas of size 16 inches.
June orders four pepperoni, two BBQ chicken, and four vegetable pizzas of size 16 inches.
Brilliant! All three employees have fulfilled the manager request, so they all have one thing in common: they have ten pizzas. However, the implementation of the request for ten pizzas was very different as can be seen from the different selection of pizzas each employee has chosen. This is perfectly acceptable as the manager request has been fulfilled.

A flowchart depicts the extension of the abstract class divided into country one class, country two class, and country three which has a concrete class and concrete method.
Hierarchy for the abstract and concrete classes
Now let us look at the example code that could be used to satisfy the structure shown in Figure 14-1. In looking at the application code, we will relate it to the manager scenario. The manager gives three of their staff the same instructions in following a task: "Use this abstract class when you write your class."
Now that the three developers have been given the abstract class, what might they do with it when they write their code?
Sealed Class
We can make a class sealed so that it cannot be inherited by another class but it can still be instantiated. When designing a class, we may wish to indicate that the class is specialized and should not therefore need to be extended. In our example we will create sealed classes for each of the three countries as they will not be extended.
All three classes have been developed by inheriting the EcommerceBilling abstract class, and therefore they are contracted to use the method called TaxCalculation() , which has a parameter of type double. Here, all three developers have written their classes and implemented the method as contracted to do so, but they have different business logic appropriate for their country, that is, 20%, 15%, or 10%. This is like the “manager” giving the instructions and the employees implementing them but with different business logic.
Brilliant! We have now seen, in theory, that an abstract class can be developed to have method signatures with a return type stated. What we should also see from the example code is that we are using an abstract class, not a full class. It is not a full class because it is not complete; it has abstract methods, and these have no code. An abstract class can also have concrete methods, methods with code. We refer to the incomplete class as an abstract class, whereas a full class is referred to as a concrete class . The preceding classes, CountryOne, CountryTwo, and CountryThree, are all concrete classes as they are complete.
As we have seen, the information in the base class, the abstract class, has only general methods, methods with a return type and a signature. It is incumbent on each implementing class, the derived class, to add its own details. The abstract class therefore decides the nature of the methods that any derived classes must implement, but it will not provide an implementation of any of the defined methods.
The class is marked with the abstract keyword.
They contain one or more incomplete methods called abstract methods.
They provide the signature or declaration of the abstract methods; they leave the implementation of these methods to derived or subclasses.
They cannot be instantiated as they are incomplete.
They cannot be static.
They can contain a constructor.
Their methods are marked with the abstract keyword, as they are abstract methods.
They can have concrete methods, that is, methods with a body of code.
A class inheriting an abstract class must implement all the abstract methods in the abstract class, or it too must be declared as an abstract class.
A class inheriting an abstract class and implementing all its abstract methods is called the concrete class of the abstract class.
Methods in the inheriting class, the derived class, must include the keyword override before the method name when they are using the abstract methods.
They cannot be used for multiple inheritance. In other words, if we have an EcommerceBilling abstract class and an EcommercePayment abstract class, then a derived class such as CountryOne could not implement both of these abstract classes:
This line or any format does not work. There is no multiple inheritance.
Let's code some C# and build our programming muscle.
- 1.
Right-click the solution CoreCSharp.
- 2.
Choose Add.
- 3.
Choose New Project.
- 4.
Choose Console App from the listed templates that appear.
- 5.
Click the Next button.
- 6.
Name the project Chapter14 and leave it in the same location.
- 7.
Click the Next button.
- 8.
Choose the framework to be used, which in our projects will be .NET 6.0 or higher.
- 9.
Click the Create button.
- 10.
Right-click the Chapter14 project in the Solution Explorer panel.
- 11.
Click the Set as Startup Project option.
Notice how the Chapter14 project name has been made to have bold text, indicating that it is the new startup project and that it is the Program.cs file within it that will be executed when we run the debugging.
Amend the name of the Program.cs file.
- 12.
Right-click the Program.cs file in the Solution Explorer window.
- 13.
Choose Rename.
- 14.
Change the name to VATCalculator.cs.
- 15.
Press the Enter key.
- 16.
Amend the VATCalculator class, as in Listing 14-1, to have a namespace, class, and Main() method.
Class template with a Main() method
- 17.
Right-click the Chapter14 project in the Solution Explorer panel.
- 18.
Choose Add.
- 19.
Choose Class.
- 20.
Name the class as AbstractVATCalculations.cs.
- 21.
The AbstractVATCalculations.cs class code will appear in the editor window and will be similar to Listing 14-2.
Class – no methods, not yet an abstract class
- 22.
Amend the code, as in Listing 14-3, to make it an abstract class using the keyword abstract.
Abstract class – no methods
- 23.
Amend the code, as in Listing 14-4, to add two abstract methods to the abstract class.
Abstract methods in the abstract class
Code Analysis
The AbstractVATCalculations class contains an abstract method CalculateVAT(), which could be used later to calculate the amount of VAT to be added to an item. The “body” of the method will be decided by the actual class that inherits the abstract class.
The CalculateVAT() method has therefore been declared as abstract so that any subclasses will need to provide their own criteria for calculating the VAT. We also have a CalculateTotalPrice() abstract method declared, and this will also need to be made into a concrete method that returns a value of type double.
Instantiate the Abstract Class?
- 24.
Open the VATCalculator class and amend the code, as in Listing 14-5, to try and instantiate the AbstractVATCalculations abstract class.
Instantiate an abstract class
- 25.
Hover over the red underline under the AbstractVATCalculations(), as shown in Figure 14-2, to reveal the error message that tells us we cannot create an instance of the abstract type or interface.

A screenshot depicts an error message. The text reads cannot instantiate an abstract class.
Error message – cannot create an instance of an abstract class
- 26.
Remove the two lines of code we added in Listing 14-5, so that there is no code within the Main() method.
- 27.
Right-click the Chapter14 project in the Solution Explorer panel .
- 28.
Choose Add.
- 29.
Choose Class.
- 30.
Name the class as VATCalculations.cs.
- 31.
The VATCalculations class code will appear and be similar to the code shown in Listing 14-6.
Concrete class template
- 32.
Amend the VATCalculations class code , as in Listing 14-7, to add a member.
Add a member, field
- 33.
Amend the VATCalculations class code , as in Listing 14-8, to add a constructor that will set the value of the member.
Add a constructor that overrides the default constructor
- 34.
Amend the VATCalculations code to inherit the AbstractVATCalculations class , as in Listing 14-9.
Make the class inherit the abstract class
- 35.
Amend the VATCalculations class code to implement the CalculateVAT() abstract method, as in Listing 14-10.
Add the code to implement the method CalculateVAT()
- 36.
Amend the VATCalculations class code to implement the CalculateTotalPrice() abstract method, as in Listing 14-11.
Add the code to implement the method CalculateTotalPrice()
- 37.
Open the VATCalculator class and amend the code, as in Listing 14-12.
Instantiate the VATCalculations class
- 38.
Click the File menu.
- 39.
Choose Save All.
- 40.
Click the Debug menu.
- 41.
Choose Start Without Debugging.

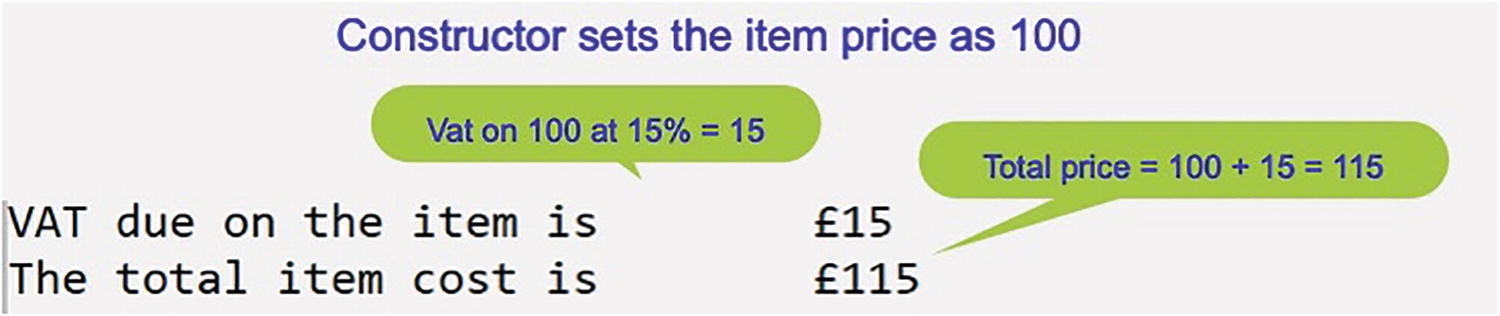
A screenshot of the console window depicts the implementation of the two methods for the item price as 100 and Vat on 100 equals 20.
Two methods have been implemented
- 42.
Press the Enter key to close the console window.
- 43.
Right-click the Chapter14 project in the Solution Explorer panel.
- 44.
Choose Add.
- 45.
Choose Class.
- 46.
Name the class as VATCalculationsFifteenPercent.cs.
- 47.
Amend the code as in Listing 14-13.
Add the code and use 15%, which is 0.15
- 48.
Open the VATCalculator class that has the Main() method and add the code to instantiate the newly created VATCalculationsFifteenPercent and comment the first instantiation, as in Listing 14-14.
Change the class being instantiated
- 49.
Click the File menu.
- 50.
Choose Save All.
- 51.
Click the Debug menu.
- 52.
Choose Start Without Debugging.
A screenshot of the console window depicts the implementation of the two methods for the item price as 100 and Vat on 100 at 15 percent.
Two methods have been implemented
- 53.
Press the Enter key to close the console window.
Static Members of the Abstract Class
The static keyword in the Main() method
The static keyword with variables in program MethodsValue
So static, when related to the field, means that the field is part of the class; it does not belong to the instance that we make of the class. Yes, we did read earlier that an abstract class cannot be instantiated, but for now let us just deal with the concept of static.
The manager characteristic and the instance characteristics
Manager | myManagerInstance1 | myManagerInstance2 |
|---|---|---|
Approve leave | Approve leave | Approve leave |
Attend meeting | Attend meeting | Attend meeting |
Answer calls |
Approve leave is an instance variable; it belongs to, or is only associated with, the instance of the class, not the actual class.
Attend meeting is an instance variable; it belongs to, or is only associated with, the instance of the class, not the actual class.
Answer calls is a static variable; it belongs to the class and not to any of the two instances of the class.
This is very useful for the manager, the manager class, as it can now keep a record of the number of calls directly. Now, as an employee who wants to have leave approved, we might go to manager instance 1 or manager instance 2. And in terms of writing C# code, we would say something like this:
myManagerInstance1.approveLeave
or
myManagerInstance1.approveLeave
But if we wanted to phone the manager, we would have to do this directly, and in terms of writing C# code, we would say something like this:
Manager.answerCall
- 54.
Amend the AbstractVATCalculations class code, as in Listing 14-17, to add a discount rate.
Add the variable discountRate
- 55.
In the AbstractVATCalculations class, add the method, as in Listing 14-18.
Add the code for the method CalculateDiscountedAmount()
- 56.
In the VATCalculator class , amend the code, as in Listing 14-19, to call the method from within a WriteLine() method and set the instantiated class back to the original VATCalculations rather than VATCalculationsFifteenPercent.
Add the code to call the method in the abstract class
- 57.
Click the File menu.
- 58.
Choose Save All.
- 59.
Click the Debug menu.
- 60.
Choose Start Without Debugging.
The total cost as 100 plus the 20% of 100, which is 20, giving the total item cost of 120.
A discount of 10%, as per the static variable, of the 120, which is 12.

A screenshot of the console window depicts the approach of the static variable for the item price as 100 and Vat on 100 equals 20.
The static variable has been accessed and worked correctly.
- 61.
Press the Enter key to close the console window.
Let's code another abstract class using the countries example.
A number of developers are writing an application for an online insurance company who insure computer hardware in a country with different regions. Each developer is assigned to a different region, and they must have methods that calculate the regional rate and the hardware rate, before calculating the quote.
- 1.
Right-click the Chapter14 project name.
- 2.
Choose Add.
- 3.
Choose New Folder.
- 4.
Name the folder Example2.
- 5.
Right-click the Example2 folder.
- 6.
Choose Add.
- 7.
Choose Class.
- 8.
Click the Add button.
- 9.
Name the class EcommerceBilling.cs.
- 10.
Click the Create button.
New class template code
- 11.
Amend the code, as in Listing 14-21, to make the class abstract and add an abstract method.
Make class abstract and add an abstract method
This will mean that any class that uses this abstract class as its base class will have to implement the TaxCalculation() method by adding code to it, making it a concrete method in a concrete class.
- 12.
Right-click the Example2 folder in the Solution Explorer panel.
- 13.
Choose Add.
- 14.
Choose Class.
- 15.
Name the class as CountryOne.cs.
- 16.
Amend the CountryOne class code to have it inherit the EcommerceBilling class, and then implement the method with some code specific to this country’s tax rate for the item, as in Listing 14-22.
Country 1 class inherits the abstract class and implements the method
- 17.
Right-click the Example2 folder in the Solution Explorer panel.
- 18.
Choose Add.
- 19.
Choose Class.
- 20.
Name the class as CountryTwo.cs.
- 21.
Amend the CountryTwo class code to have it inherit the EcommerceBilling class, and then implement the method with some code specific to this country’s tax rate for the item, as in Listing 14-23.
Country 2 class inherits the abstract class and implements the method
- 22.
Right-click the project Example2 folder in the Solution Explorer panel.
- 23.
Choose Add.
- 24.
Choose Class.
- 25.
Name the class as CountryThree.cs.
- 26.
Amend the CountryThree class code to have it inherit the EcommerceBilling class, and then implement the method with some code specific to this country’s tax rate for the item, as in Listing 14-24.
Country 3 class inherits the abstract class and implements the method
- 27.
Right-click the project Example2 folder in the Solution Explorer panel.
- 28.
Choose Add.
- 29.
Choose Class.
- 30.
Name the class as EcommerceApplication.cs.
- 31.
Amend the EcommerceApplication class code to have it contain a Main() method and one member of type double that will hold a price for an item, as in Listing 14-25.
Class with a Main() method and one member
- 32.
Right-click the Chapter14 project in the Solution Explorer panel.
- 33.
Choose Properties from the pop-up menu.
- 34.
Choose the Chapter14.Example2.EcommerceApplication class in the Startup object drop-down list, as shown in Figure 14-6.

A screenshot depicts a startup object drop-down menu to change the class.
Changing the startup class in the C# project
- 35.
Amend the EcommerceApplication class code to have it instantiate the CountryOne class, as in Listing 14-26.
Instantiate the CountryOne class using the default constructor
- 36.
Amend the EcommerceApplication class code to have it display a message that includes a call to the method in the CountryOne class , as in Listing 14-27.
Display details of the item for CountryOne class
- 37.
Click the File menu.
- 38.
Choose Save All.
- 39.
Click the Debug menu.
- 40.
Choose Start Without Debugging.

A screenshot of a console window depicts the Country One output method. The text reads the tax on an item of price 100 euros is 20 euros whereas country one tax rate is 20% and 20% of 100 = 20.
CountryOne output from the method
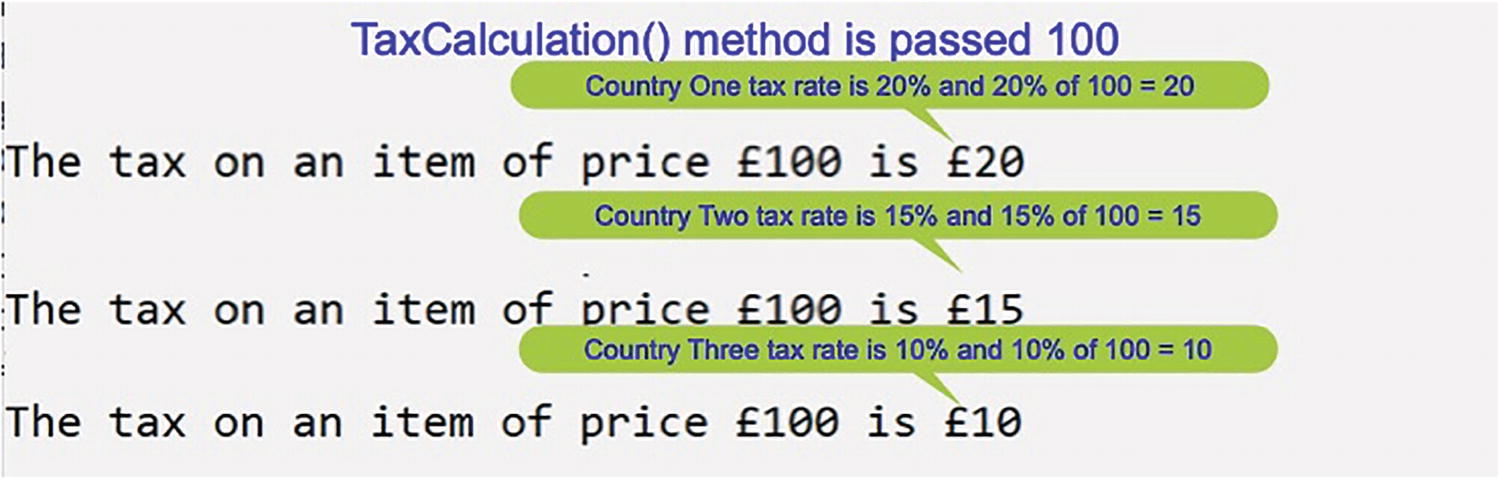
A screenshot of the console window depicts the implementation of three methods. Country 1 tax rate is 20% = 20, country 2 is 15% = 15, and country 3 is 10% = 10.
All three methods, one from each class, have run.
- 41.
Press the Enter key to close the console window.
- 42.
Amend the EcommerceApplication class code to have it instantiate the CountryTwo and CountryThree classes, as in Listing 14-28.
Instantiate the CountryTwo and CountryThree classes
- 43.
Amend the EcommerceApplication class code to have it display messages that include calls to the methods in the CountryTwo and CountryThree classes, as in Listing 14-29.
Display details of the item for CountryTwo and CountryThree
- 44.
Click the File menu.
- 45.
Choose Save All.
- 46.
Click the Debug menu.
- 47.
Choose Start Without Debugging.
The console window will appear, as Figure 14-8, and show the item price and the tax amount for each of the three countries.
- 48.
Press the Enter key to close the console window.
Concept of an Interface
They are marked with the interface keyword.
They contain one or more incomplete methods called interface methods, but we do not use the keyword abstract as the compiler would complain.
They provide the signature or declaration of the abstract methods; they leave the implementation of these methods to the class that implements the interface.
They cannot be instantiated as they are incomplete and they are interfaces.
From C# 8 an interface can have static members, for example, vatRate = 0.25. This means that the vatRate member can be called directly from the interface without having an instantiation.
They cannot have concrete methods, that is, methods with a body.
A class implementing the interface must implement all the interface methods in the interface class.
They can be used for multiple inheritance. In other words, if we have an EcommerceBilling interface class and an EcommercePayment interface class, then a derived class such as CountryOne could implement both of these interfaces:
This line works as we can implement more than one interface. Looking back at the example we had earlier in the abstract class, we can now show how we could do the same thing using an interface.
Example
The manager gives three of their staff the same instructions in following a task: "Use this interface when you write your class."
Sample interface from manager
Now that the three developers have been given the interface, what might they do with it when they write their code?
Developer 1's implementation of the interface
Developer 2's implementation of the interface
Developer 3's implementation of the interface
All three classes have been developed by implementing the IEcommerceBilling interface , and therefore they are contracted to use the method called TaxCalculation(), which has a parameter of type double. Here, all three developers have written their classes and implemented the method as contracted to do so, but they have different business logic appropriate for their country, that is, 20%, 15%, or 10% is used depending on the developer and their country. This is like the “manager” giving the instructions and the employees implementing them, but with different business logic.
Brilliant! We have now seen that an interface or an abstract class can be developed to have method signatures with a return type stated. What we should also see from the example code is that we are using an interface. The preceding classes, CountryOne, CountryTwo, and CountryThree, are all concrete classes.
- 1.
Right-click the Chapter14 project name.
- 2.
Choose Add.
- 3.
Choose New Folder.
- 4.
Name the folder Example3Interfaces.
- 5.
Right-click the Example3Interfaces folder.
- 6.
Choose Add.
- 7.
Choose New Item.
- 8.
Choose Interface.
- 9.
Name the class IEcommerceBilling.cs.
- 10.
Click the Add button.
In the TextWriter class documentation, we are told that it represents a writer that can write a sequential series of characters, that it is abstract, and that it implements IDisposable and IAsyncDisposable.
In the String class documentation, we are told that the String represents text as a sequence of UTF-16 code units and that it implements IEnumerable<Char>, IEnumerable, IComparable, IComparable<String>, IConvertible, IEquatable<String>, and ICloneable.
New interface template code
- 11.
Amend the code , as in Listing 14-35, to add an “abstract method,” which means a return type and a signature.
New interface with an interface method
This will mean that any class using this interface will have to implement the TaxCalculation() method by adding code to it.
- 12.
Right-click the project Example3Interfaces folder in the Solution Explorer panel.
- 13.
Choose Add.
- 14.
Choose Class.
- 15.
Name the class as CountryOne.cs.
- 16.
Click the Add button.
- 17.
Amend the CountryOne class code, as in Listing 14-36, to have it inherit the IEcommerceBilling class and then implement the method with some code specific to this country’s tax rate for the item.
Country 1 class inherits the interface and implements the method
- 18.
Right-click the project Example3Interfaces folder in the Solution Explorer panel.
- 19.
Choose Add.
- 20.
Choose Class.
- 21.
Name the class as CountryTwo.cs.
- 22.
Amend the CountryTwo class code, as in Listing 14-37, to have it inherit the IEcommerceBilling class and then implement the method with some code specific to this country’s tax rate for the item.
Country 2 class inherits the interface and implements the method
- 23.
Right-click the Example3Interfaces folder in the Solution Explorer panel.
- 24.
Choose Add.
- 25.
Choose Class.
- 26.
Name the class as CountryThree.cs.
- 27.
Amend the CountryThree class code, as in Listing 14-38, to have it inherit the IEcommerceBilling class and then implement the method with some code specific to this country’s tax rate for the item.
Country 3 class inherits the interface and implements the method
- 28.
Right-click the Example3Interfaces folder in the Solution Explorer panel.
- 29.
Choose Add.
- 30.
Choose Class.
- 31.
Name the class as EcommerceApplication.cs.
- 32.
Amend the EcommerceApplication class code to have it contain a Main() method and one member of type double, which will hold a price for an item, as in Listing 14-39.
Class with a Main() method and one member
- 33.
Right-click the Chapter14 project in the Solution Explorer panel.
- 34.
Choose Properties from the pop-up menu.
- 35.
Choose the Chapter14.Example3Interfaces.EcommerceApplication class in the Startup object drop-down list, as shown in Figure 14-9.

A screenshot of the console window depicts a startup object dropdown menu to change the startup class.
Changing the startup class in the C# project
- 36.
Amend the EcommerceApplication class code to have it instantiate the CountryOne class, as in Listing 14-40.
Instantiate the CountryOne class
- 37.
Amend the EcommerceApplication class code to have it display a message that includes a call to the method in the CountryOne class , as in Listing 14-41.
Display details of the item for CountryOne class
- 38.
Click the File menu.
- 39.
Choose Save All.
- 40.
Click the Debug menu.
- 41.
Choose Start Without Debugging.

A screenshot of the console window depicts the CountryOne output. The text reads the tax on an item of price 100 euros is 20, whereas country one tax rate is 20%.
CountryOne output from the method

A screenshot of the console window depicts the three methods. Country 1 tax rate is 20% = 20, country 2 is 15% = 15, and country 3 is 10% = 10.
All three methods, one from each class, have run
- 42.
Press the Enter key to close the console window.
- 43.
Amend the EcommerceApplication class code to have it instantiate the CountryTwo and CountryThree classes, as in Listing 14-42.
Instantiate the CountryTwo and CountryThree classes
- 44.
Amend the EcommerceApplication class code to have it display messages that include calls to the methods in the CountryTwo and CountryThree classes, as in Listing 14-43.
Display details of the item for CountryTwo and CountryThree
- 45.
Click the File menu.
- 46.
Choose Save All.
- 47.
Click the Debug menu.
- 48.
Choose Start Without Debugging.
The console window will appear, as Figure 14-11, and show the item price and the tax amount for each of the three countries.
- 49.
Press the Enter key to close the console window.
Implementing Multiple Interfaces
The first method will accept the card type and the transaction amount and pass the transaction amount to either the credit card payment method or the debit card payment method and return the additional fee value to the calling method.
The second method will be for the debit card payment fee, which will calculate 1%, 0.01, of the transaction amount and return the value to the calling method.
The third method will be for the credit card payment fee, which will calculate 2%, 0.02, of the transaction amount and return the value to the calling method.
- 1.
Right-click the Example3Interfaces folder.
- 2.
Choose Add.
- 3.
Choose New Item.
- 4.
Choose Interface.
- 5.
Name the interface IEcommercePayment.cs.
- 6.
Click the Add button.
Interface template code
- 7.
Amend the code , as in Listing 14-45, to add the “abstract methods,” which means a return type and a signature.
New interface with interface methods
This will mean that any class implementing this interface will have to implement all three of the interface methods by adding code to them.
- 8.
Open the CountryOne class , which is in the Example3Interfaces folder.
- 9.
Amend the CountryOne class code to have it inherit this new interface IEcommercePayment, as well as the original IEcommerceBilling interface, and then implement the methods with some code specific to this country, as in Listing 14-46.
Multiple inheritance and implementing all abstract methods
- 10.
Open the EcommerceApplication class, which is in the Example3Interfaces folder.
In the EcommerceApplication class , we will now
Add a variable of type double called feeForUsingACard, which will hold the value passed back from the payment method in the CountryOne class.
Call the PaymentMethod() method in the CountryOne concrete class, passing to it a credit card and an amount of 200.
Display the returned fee amount from the method call. In this example for a credit card in this country, there is a 2% fee, so we should expect to get back 2% of 100, which is 2.
- 11.
Amend the code, as in Listing 14-47.
Add a variable, calling the payment method from the class
- 12.
Click the File menu.
- 13.
Choose Save All.
- 14.
Click the Debug menu.
- 15.
Choose Start Without Debugging.

A screenshot of a console window in which the calculated credit card transaction fee is displayed. The text reads, credit card transaction fee equals 2 percent of 100 equals 2.
Card fee for CountryOne calculated
- 16.
Press the Enter key to close the console window.
This is great. We have coded a nice example that has allowed us to use implementation of more than one interface.
As an extension to this example, we will code for the CountryTwo and CountryThree classes, so they inherit the IEcommercePayment interface, as in Listings 14-46 and 14-47. This is really the same process we used when CountryOne inherited the interface. The main difference would be using different percentage rates in each class if that was required :
- For CountryTwo , the rates might be as follows:
Debit card payment fee of 1.5%, 0.015, of the transaction amount
Credit card payment fee of 2.5%, 0.025, of the transaction amount
- For CountryThree , the rates might be as follows:
Debit card payment fee of 2.0%, 0.02, of the transaction amount
Credit card payment fee of 3.0%, 0.03, of the transaction amount
- 17.
Amend the code for the CountryTwo class, which is in the Example3Interfaces folder, as shown in Listing 14-48.
CountryTwo inheriting the interfaces and implementing methods
- 18.
Amend the code for the CountryThree class, which is in the Example3Interfaces folder, as shown in Listing 14-49.
CountryThree inheriting the interfaces and implementing methods
- 19.
Open the EcommerceApplication class, which is in the Example3Interfaces folder.
- 20.
Amend the code, as in Listing 14-50, to call the PaymentMethod() methods from the CountryTwo and CountryThree concrete classes, passing to them a credit card and an amount of 200, and have it display the returned fee amounts from each call.
For a credit card for CountryTwo, there is a 2.5% fee, so we should expect to get back 2.5% of 100, which is 2.5.
EcommerceApplication card fee calls
- 21.
Click the File menu.
- 22.
Choose Save All.
- 23.
Click the Debug menu.
- 24.
Choose Start Without Debugging.

A screenshot of the console window depicts the card fee for each country. The credit card transaction fees equals 2% of 100 = 2.00, 2.5% of 100 = 2.50, and 3% of 100 = 3.00.
Card fee for all countries calculated
- 25.
Press the Enter key to close the console window.
This is fantastic! We have coded a nice example with two interfaces containing interface methods, and we have three different classes that implemented the interfaces and their interface methods.
As we conclude this chapter on abstract classes and interfaces, let us think about the manager concept again. The manager, the abstract class or interface, dictates what they require through their abstract methods; and the employees, the concrete classes, implement all the abstract methods by making them concrete. Brilliant!
CountryTwo class with no if construct
So the real issue is that because the “manager,” the interface, has three methods and developer 2 is told to inherit the IEcommercePayment interface, they must implement all three methods, even though they will not be using one or more of the methods. It's a contract that cannot be broken.
There is a programming concept known as YAGNI, which stands for You Ain't Going To Need It.
Yes, we did read this. So how does the interface and class design we have just suggested for CountryTwo fit with this concept? It doesn't is the simple answer. Now, how can we get around the YAGNI for developer 2 and their country 2 class? It is a strange but simplistic solution in which we develop interfaces with only one interface method and the implementing classes can then choose which interfaces they wish to implement. For developer 2 and their CountryTwo 2, they might follow a process similar to the following example.
- 1.
Right-click the solution Chapter14 project name.
- 2.
Choose Add.
- 3.
Choose New Folder.
- 4.
Name the folder Example4Interfaces.
IEcommerceBilling Interface
- 5.
Right-click the Example4Interfaces folder.
- 6.
Choose Add.
- 7.
Choose New Item.
- 8.
Choose Interface.
- 9.
Name the interface IEcommerceBilling.cs .
- 10.
Click the Add button.
- 11.
Amend the code to have the one interface method, as in Listing 14-52.
Interface with only one interface method
IPaymentMethod Interface
- 1.
Right-click the Example4Interfaces folder.
- 2.
Choose Add.
- 3.
Choose New Item.
- 4.
Choose Interface.
- 5.
Name the interface IPaymentMethod.cs .
- 6.
Click the Add button.
- 7.
Amend the code to have the one interface method, as in Listing 14-53.
Interface with only one interface method
IDebitCardPayment Interface
- 8.
Right-click the Example4Interfaces folder.
- 9.
Choose Add.
- 10.
Choose New Item.
- 11.
Choose Interface.
- 12.
Name the interface IDebitCardPayment.cs .
- 13.
Click the Add button.
- 14.
Amend the code to have the one interface method, as in Listing 14-54.
Interface with only one interface method
ICreditCardPayment Interface
- 15.
Right-click the Example4Interfaces folder.
- 16.
Choose Add.
- 17.
Choose New Item.
- 18.
Choose Interface.
- 19.
Name the interface ICreditCardPayment.cs .
- 20.
Click the Add button.
- 21.
Amend the code to have the one interface method, as in Listing 14-55.
Interface with only one interface method
Now we have four interfaces, each with only one abstract method, and our concrete classes can now select which of the interfaces they wish to use. This will mean there is no need for a concrete class to have methods that it will not use. No more YAGNI.
- 22.
Right-click the Example4Interfaces folder.
- 23.
Choose Add.
- 24.
Choose Class.
- 25.
Name the class CountryTwo.cs .
- 26.
Click the Add button.
- 27.
Amend the code to implement the interface methods for the three interfaces that this class inherits from, as in Listing 14-56.
Implement the methods
- 28.
Right-click the Example4Interfaces folder.
- 29.
Choose Add.
- 30.
Choose Class.
- 31.
Name the class as EcommerceApplication.cs.
- 32.
Amend the EcommerceApplication class code, as in Listing 14-57.
Display the card fee
- 33.
Right-click the Chapter14 project in the Solution Explorer panel.
- 34.
Choose Properties from the pop-up menu.
- 35.
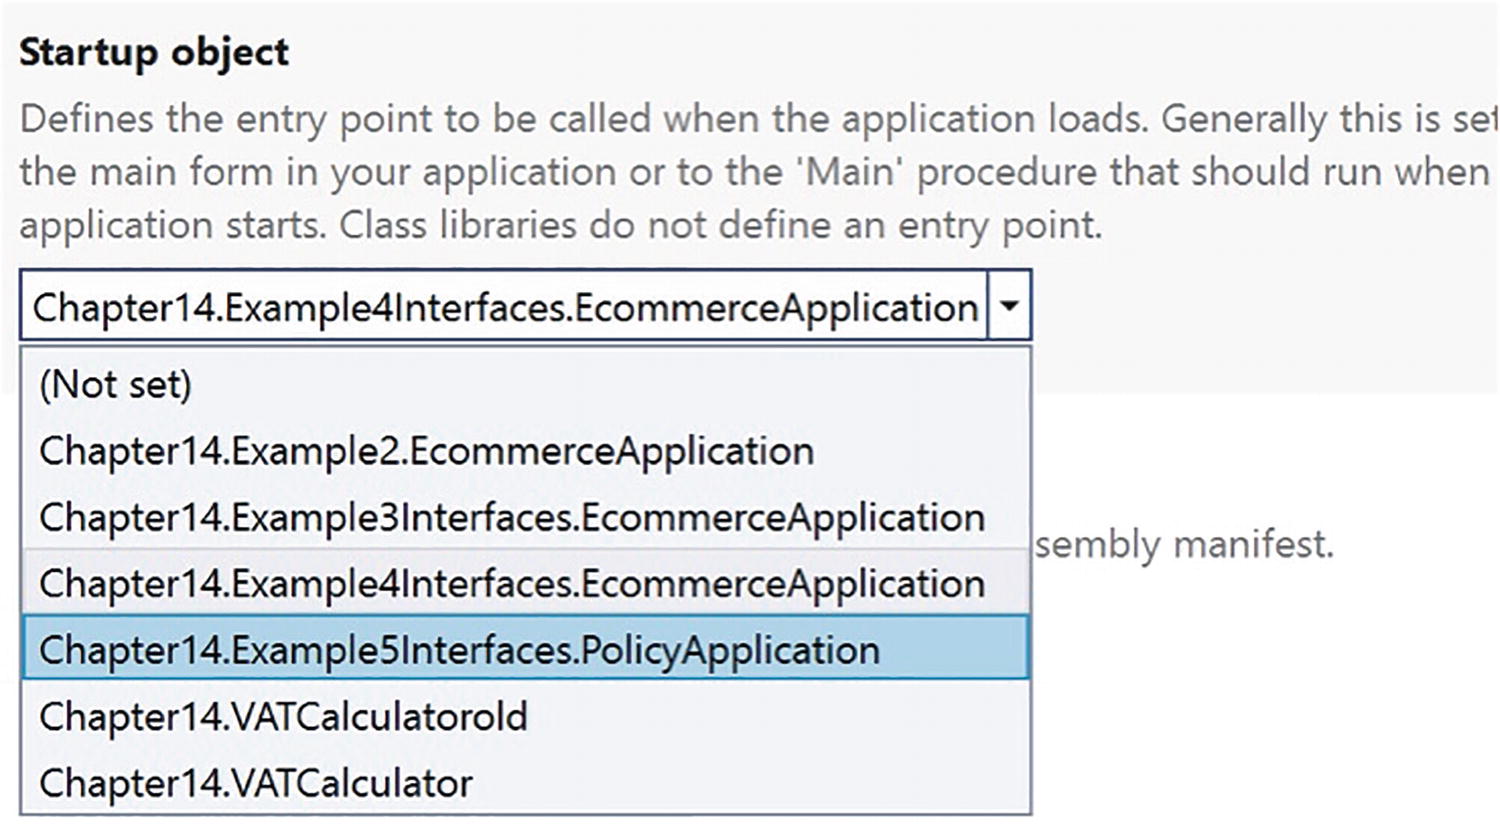
Choose the Chapter14.Example4Interfaces.EcommerceApplication class in the Startup object drop-down list, as shown in Figure 14-14.

A window depicts a startup object dropdown menu to change the startup class.
Changing the startup class in the C# project

A screenshot of a console window in which the calculated credit card transaction fee for country 2 is displayed. The text reads, credit card transaction fee equals 2 percent of 100 equals 2.
Card fee for country 2 calculated
- 36.
Click the File menu.
- 37.
Choose Save All.
- 38.
Click the Debug menu.
- 39.
Choose Start Without Debugging.
The console window will appear as Figure 14-15, and show the card fee of 2.00, which we know is correct, because we did the calculation before we ran the code and knew what the expected outcome should be. This 2.00 result is the same result as we got from the previous code when we had not separated the abstract methods, as shown in Figure 14-13, but now we have segregated our abstract methods in different interfaces.
- 40.
Press the Enter key to close the console window.
- 41.
Right-click the CountryTwo.cs file in the Example4Interfaces folder and choose Copy.
- 42.
Right-click the Example4Interfaces folder and choose paste.
- 43.
Rename the CountryTwo – Copy.cs file to CountryTwoDebit.cs.
- 44.
Amend the CountryTwoDebit.cs to remove the implementation of the IPaymentMethod as in Listing 14-58.
New CountryTwo class not implementing IPaymentMethod
- 45.
Amend the EcommerceApplication.cs code to add an additional variable called feeForUsingADebitCard, instantiate the new class, and call the method that calculates the fee, assigning the returned value to the variable we have created, as in Listing 14-59.
Instantiate the CountryTwoDebit class and find card fee
- 46.
Click the File menu.
- 47.
Choose Save All.
- 48.
Click the Debug menu.
- 49.
Choose Start Without Debugging.

A screenshot of a console window in which a debit card transaction fee is displayed. The text reads, debit card transaction fee equals 2 percent of 100 equals 2. The same result can also be obtained from the I debit card payment implementation.
Card fee for CountryTwo calculated
- 50.
Press the Enter key to close the console window.
We can now see that using segregation in our interfaces follows the same principle we read about when we dealt with methods and classes. In following this principle of segregation, we are writing clean code, avoiding issues around YAGNI, using the SOLID principles of interface segregation and single responsibility, and using another industry principle of programming to an interface.
Should we use an abstract class or an interface?
- An “abstract class” can have abstract methods and concrete methods.
We have seen that an abstract class contains abstract methods, but it can also contain concrete methods, therefore allowing classes that inherit from the abstract class to override or implement the methods.
On the other hand, we saw that an interface cannot contain concrete methods.
Do we want our class to implement from more than one “abstract class”?We have seen that a class can inherit only one abstract class.
On the other hand, a class can inherit more than one interface – multiple inheritance.
With C# 8 we can now add concrete methods, methods with code. They are called default methods.
Eve though we have a default method in the interface any class that inherits from the interface can choose to use the default method, amend the method, or ignore it. We will now verify that it is possible to add a default method and see how this is implemented, or not, in a class.
Concept of Default Method in an Interface
- 1.
Right-click the solution Chapter14 project name.
- 2.
Choose Add.
- 3.
Choose New Folder.
- 4.
Name the folder Example5Interfaces.
IPolicy Interface
- 5.
Right-click the Example5Interfaces folder.
- 6.
Choose Add.
- 7.
Choose New Item.
- 8.
Choose Interface.
- 9.
Name the interface IPolicy.cs.
- 10.
Click the Add button.
- 11.
Amend the code to add the abstract methods and a default method, as in Listing 14-60.
Interface with abstract methods and a default method
- 12.
Right-click the Example5Interfaces folder.
- 13.
Choose Add.
- 14.
Choose Class.
- 15.
Name the class PolicyManager.cs.
- 16.
Click the Add button.
- 17.
Amend the code, as in Listing 14-61.
Concrete class implementing the abstract methods
- 18.
Right-click the Example5Interfaces folder.
- 19.
Choose Add.
- 20.
Choose Class.
- 21.
Name the class PolicyApplication.cs .
- 22.
Click the Add button.
- 23.
Amend the code to instantiate the PolicyManager class and call the concrete methods that we created in it as in Listing 14-62.
Main class , which uses the default method of the interface
- 24.
Right-click the Chapter14 project in the Solution Explorer panel.
- 25.
Choose Properties from the pop-up menu.
- 26.
Choose the Chapter14.Example5Interfaces.PolicyApplication class in the Startup object drop-down list, as shown in Figure 14-17.
A screenshot of the console window depicts the startup object dropdown menu to set the startup project.
Set the startup project
- 27.
Click the File menu.
- 28.
Choose Save All.
- 29.
Click the Debug menu.
- 30.
Choose Start Without Debugging.
A screenshot of the console window depicts the execution of the default method of the interface.
Default method of the interface has been executed
- 31.
Press the Enter key to close the console window.
The code has worked, and in the code line
IPolicy myPolicyManager = new PolicyManager();
we have used the interface IPolicy when instantiating, but what would happen if we were to use the PolicyManager class , which inherits from the IPolicy interface, and our code line would be
PolicyManager myPolicyManager = new PolicyManager
- 32.
Amend the code to use PolicyManager rather than IPolicy, as shown in in Listing 14-63.
Instantiate using the class rather than the interface
- 33.
Hover over the red underline of the Print("Auto") in the line of code myPolicyManager.Print() as shown in Figure 14-19.

A screenshot highlights the error message. The print method is not available.
Error, method not available
We can go back to using the IPolicy in the instantiation:
We can upcast the myPolicyManager to an interface:
In C#, casting is a method used to convert one data type to another. Casting is used as an explicit conversion and tells the compiler what to do.
- 34.
Amend the code within the Main() method to use the upcasting, as shown in Listing 14-64.
Upcast the class to an interface
- 35.
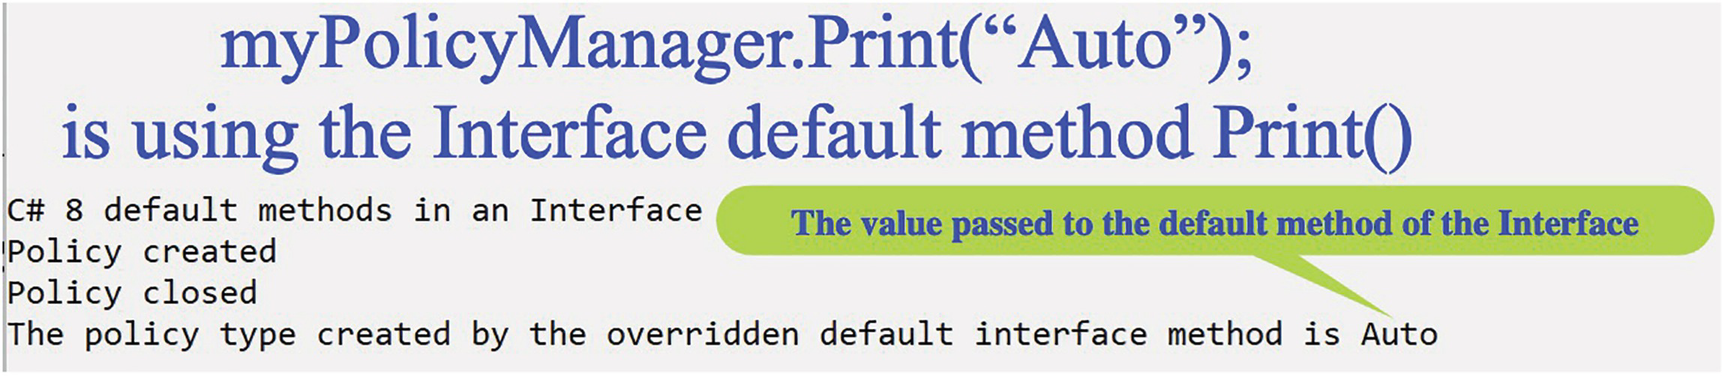
Amend the code in the PolicyManager class to add an “overridden” version of the interface default method, as in Listing 14-65.
Override the default method of the interface
- 36.
Click the File menu.
- 37.
Choose Save All.
- 38.
Click the Debug menu.
- 39.
Choose Start Without Debugging.

A screenshot of the console window depicts the overridden version of the default method.
Default method has been overridden
- 40.
Press the Enter key to close the console window.
We have seen that we can have a default implementation in our interface, but the class that implements the interface does not have to implement the default method – it is optional. When we talk about “program to an interface” as a design approach, we use the interface as our starting point. In using such a design approach, we will then have many classes that are dependent on the interface, and if we then decide to go back and amend the interface, we will impact all the dependent classes. So we would say that once the interface is designed, it is not open for amendments. However, as we have seen, C# 8 allows us to add default implementations to the interface, and this does not break any of the existing classes that implement the interface, since the default methods are optional. We therefore say that with C# 8 and above, the interface is expandable in terms of adding default methods.
Concept of Static Methods and Fields in an Interface
Remember that static means belonging to the class or Interface.
- 41.
Amend the code, as in Listing 14-66, to declare a static field to the IPolicy interface that will be used to record the number of current policies.
Static field in an interface
- 42.
Amend the PolicyApplication.cs class code, as in Listing 14-67.
Call the static field in an interface
- 43.
Click the File menu.
- 44.
Choose Save All.
- 45.
Click the Debug menu.
- 46.
Choose Start Without Debugging.

A screenshot of the console window depicts the static field of the interface.
Static field of the interface has been called.
Chapter Summary
In this chapter we have tackled two large concepts, abstract classes and interfaces, and we have looked at the differences and similarities between them. We have also seen that since C# 8 the concept of an interface changed from being a template that could only have abstract methods to being capable of having default implementations with business logic. When creating a class that inherits from the interface with the default implementation, we do not have to use the default implementation, but if we do use it, we call it directly from the interface. In the previous chapter, we looked at classes and objects, and now we should appreciate that abstract classes and interfaces sit alongside classes. A class can decide to form a contract with an abstract class or interface, and then it will have to implement the abstract methods that are part of the contract. This has been a “big chapter” in terms of learning, but we are now really moving to coding at a higher level and seeing how applications are coded in the commercial world.
We are making fantastic progress in our programming of C# applications and we should be very proud of our achievements. In finishing this very important chapter, we have increased our knowledge further and we are advancing to our target.

An illustration of a concentric circle depicts the advancement of the target. The text at the bottom reads our target is getting closer.