Data Types, Variables, and Conversion
We learned in Chapter 5 that while we can use single- and multiple-line comments, they should not be a replacement for self-documenting code. Comments are added to help the reader of the code, but when the code is written expressively with proper namespace names, class names, variable names, etc., there is a limited need for comments. We should set an objective of zero need for comments.
In this chapter we will use code that is well documented for the purposes of helping us understand and read the code. It is not how we would do it in a real application, and if it was commercial code, we would be breaking the objective of zero need for comments.
We will learn from this chapter about the very important concepts of data types and variables. We will use data types and variables in all the C# programs in this book. That is how crucial they are to C# programming. We should also be aware that data types and variables exist in all programming languages and are a core building block for the code we will write.
Data Types
Value types in C#
Bool | byte | char | decimal |
float | double | int | long |
short | uint | ushort |
When we declare a data type, we are reserving memory to store a value. Each data type will have a particular size of memory that needs to be set aside. In C#, and indeed in other languages, these value types are referred to as primitive types. The primitive types are therefore predefined by the C# language and their names are reserved keywords.
When we use C# as our programming language, we will inherently be using .NET. .NET also allows us to use other programming languages such as Visual Basic .NET and F#, each of which has its own data types. This might seem strange that we can have an int data type in C#, an int data type in F#, and an int data type in Visual Basic .NET. So how do we ensure that the data types for each .NET programming language have the same meaning? Well, this is where the Common Type System (CTS) comes into play. The Common Type System has the overarching data types that all language data types are tied to. The concept is called interoperability , the ability to exchange and make use of information.
C# and VB data types and correlation with the .NET framework types
C# type | VB type | .NET type | Bytes | Description |
|---|---|---|---|---|
bool | Boolean | Boolean | 1 | Contains either true or false |
char | Char | Char | 2 | Contains any single Unicode character enclosed in single quotation marks such as 'c' |
Integral types | ||||
byte | Byte | Byte | 1 | May contain integers from 0 to 255 |
sbyte | SByte | SByte | 1 | Signed byte from –128 to 127 |
short | Short | Int16 | 2 | Ranges from –32,768 to 32,767 |
ushort | UShort | UInt16 | 2 | Unsigned, ranges from 0 to 65,535 |
int | Integer | Int32 | 4 | Ranges from –2,147,483,648 to 2,147,483,647 |
uint | UInteger | UInt32 | 4 | Unsigned, ranges from 0 to 4,294,967,295 |
long | Long | Int64 | 8 | Ranges from –9,223,372,036,854,775,808 to 9,223,372,036,854,775,807 |
ulong | ULong | UInt64 | 8 | Unsigned, ranges from 0 to 18,446,744,073,709,551,615 |
Floating-point types | ||||
float | Single | Single | 4 | Ranges from ±1.5 × 10-45 to ±3.4 × 1038 with 7 digits of precision Requires the suffix “f” or “F” |
double | Double | Double | 8 | Ranges from ±5.0 × 10-324 to ±1.7 × 10308 with 15–16 digits of precision |
decimal | Decimal | Decimal | 12 16 in VB | Ranges from 1.0 × 10⁻²⁸ to 7.9 × 1028 with 28–29 digits of precision. Requires the suffix “m” or “M” |
Data types are represented in the C# language using keywords, so each of the preceding data types – float, double, etc. – is a keyword in C#.
Keywords are defined by the language and cannot be used as identifiers.
string is also an acceptable data type in C#, so string is also a keyword, but string is not a value type – it is a reference type. Unlike value types, a reference type does not store its value directly; rather, it stores the address where the value is being stored. Reference types therefore contain a pointer to a memory location where the data is held.
Conversion from One Data Type to Another
Implicit conversion
This means that in our code we do not need to do anything, as the conversion is automatically handled by the compiler.
Explicit conversion
This means that we will need to code the data type conversion as the conversion cannot be done automatically. The compiler will complain, through an error message, if it cannot handle the conversion.

Two diagrams depict the process involved in the implicit conversion from byte to double and double to the byte in explicit conversion.
Implicit and explicit or widening and narrowing conversions
Converting
Widening conversions
Widening occurs when a small primitive data type value is automatically accommodated in a bigger, wider, primitive data type.
If we convert from an int to a decimal, this is an example of a widening conversion.
Widening conversions that are acceptable includebyte – Which is convertible to short, int, long, float, or double
short – Which is convertible to int, long, float, or double
int – Which is convertible to long, float, or double
long – Which is convertible to float or double
float – Which is convertible to double
Automatic conversion will take place if the two data types are compatible and the destination data type is larger than the data type being converted. Automatic conversion is therefore essentially a widening conversion.
Narrowing conversions
Narrowing occurs when a larger primitive data type value is accommodated in a smaller, narrower, primitive data type.
If we convert from a value that includes a fraction, decimal, float, etc. to an integer data type, the fractional part will be lost, and narrowing will occur.
Narrowing conversions that are acceptable includeshort – Is convertible to byte or char
int – Is convertible to byte or short
long – Is convertible to byte or short
float – Is convertible to byte, short, int, or long
double – Is convertible to byte, short, int, long, or float
Conversion using (byte)
Now we will look at creating code to build an application that will simulate a car insurance quotation application. Firstly, we will create a string variable called vehicleManufacturer that will hold the value input by a user. Remember to read the comments carefully as they fully explain what we are doing.
- 1.
Right-click the solution CoreCSharp.
- 2.
Choose Add.
- 3.
Choose New Project, as shown in Figure 6-2.

A project window has two context menus with the new project and add options selected.
Add a new project
- 4.
Choose Console App from the listed templates that appear, as shown in Figure 6-3.

A console app window with details and labels C number sign, Linux, mac O S, windows, and console.
Console App for .NET
- 5.
Click the Next button.
- 6.
Name the project Chapter6 and leave it in the same location.
- 7.
Click the Next button.
- 8.
Choose the framework to be used, which in our projects will be .NET 6.0 or higher, as shown in Figure 6-4.

A window of a dropdown menu has dot NET 6.0, the long-term support option selected.
Choosing the project framework
- 9.
Click the Create button.
Now we should see the Chapter6 project within the solution called CoreCSharp, as shown in Figure 6-5.
Figure 6-5 shows that Chapter5 is in bold text and Chapter6 is not. But what does this mean? Well, it means that Chapter5 is the active project, the startup project.
- 10.
Right-click the project Chapter6 in the Solution Explorer panel.
- 11.
Click the Set as Startup Project option, as shown in Figure 6-6.
Copy the code from the Program.cs file in Chapter5 to the Program.cs file in Chapter6.
- 12.
Double-click the Program.cs file in the Chapter5 project.
- 13.
Highlight ALL the code within the program, yes, including the namespace and Main() method.
- 14.
Choose Copy.
- 15.
Double-click the Program.cs file in the Chapter6 folder.
- 16.
Highlight the existing code and delete it.
- 17.
Right-click inside the blank editor window where we have just removed the code.
- 18.
Choose Paste.
Now, the namespace is called Chapter5 so we will rename it to Chapter6. We have a choice in how to rename the namespace to Chapter6, so select one of the following approaches to rename the namespace.
We could
- 19.
Right-click the word Chapter5.
- 20.
Choose Quick Actions and Refactorings, as shown in Figure 6-7.

A solution explorer window has three chapters of projects, where chapter 5 is selected.
Solution folder with project folders

A solution explorer window depicts the context menu of chapter 6, where the option set as startup project is selected.
Setting the startup project in the Solution Explorer panel

A window depicts a context menu with quick actions and refactorings option selected.
Refactoring using Quick Actions and Refactorings
- 21.
Click the Change namespace to match folder structure, as shown in Figure 6-8.

A window depicts change the namespace to match the folder structure option selected, with namespace chapter 5 and 6 labels on the right side.
Choosing a possible refactoring option
- 22.
Press the Enter key.
The namespace will be renamed as Chapter6.
Or we couldRight-click the word Chapter5.
Choose Change namespace to Chapter6, as shown in Figure 6-9.
Type Chapter6, overwriting the word Chapter5.
Press the Enter key.

A window depicts change namespace to Chapter 6 selected, with namespace chapter 5 and 6 labels on the right side.
Using rename to refactor
The namespace will be renamed as Chapter6.
- 23.
Highlight the code inside the Main() method and delete the existing code.
- 24.
Amend the existing code by adding the String variable called vehicleManufacturer , as in Listing 6-2.
Adding a String variable for the vehicle manufacturer
- 25.
Amend the existing code, as in Listing 6-3, to display a different heading and message.
Displaying a heading and message for the user
- 26.
Amend the existing code, as in Listing 6-4, to read the user input and assign it to the vehicleManufacturer variable.
Reading user input and assigning it to a variable
- 27.
Amend the existing code, as in Listing 6-5, to display a blank line.
Displaying a blank line
- 28.
Amend the existing code, as in Listing 6-6.
Displaying a message for the user
- 29.
Click the File menu.
- 30.
Choose Save All.
- 31.
Click the Debug menu.
- 32.
Choose Start Debugging.
The console window will appear and display the message asking the user to enter the vehicle manufacturer. The cursor will be flashing, waiting for user input.
- 33.
Click in the console window.
- 34.
Type Ford as the manufacturer name.
- 35.
Press the Enter key on the keyboard.
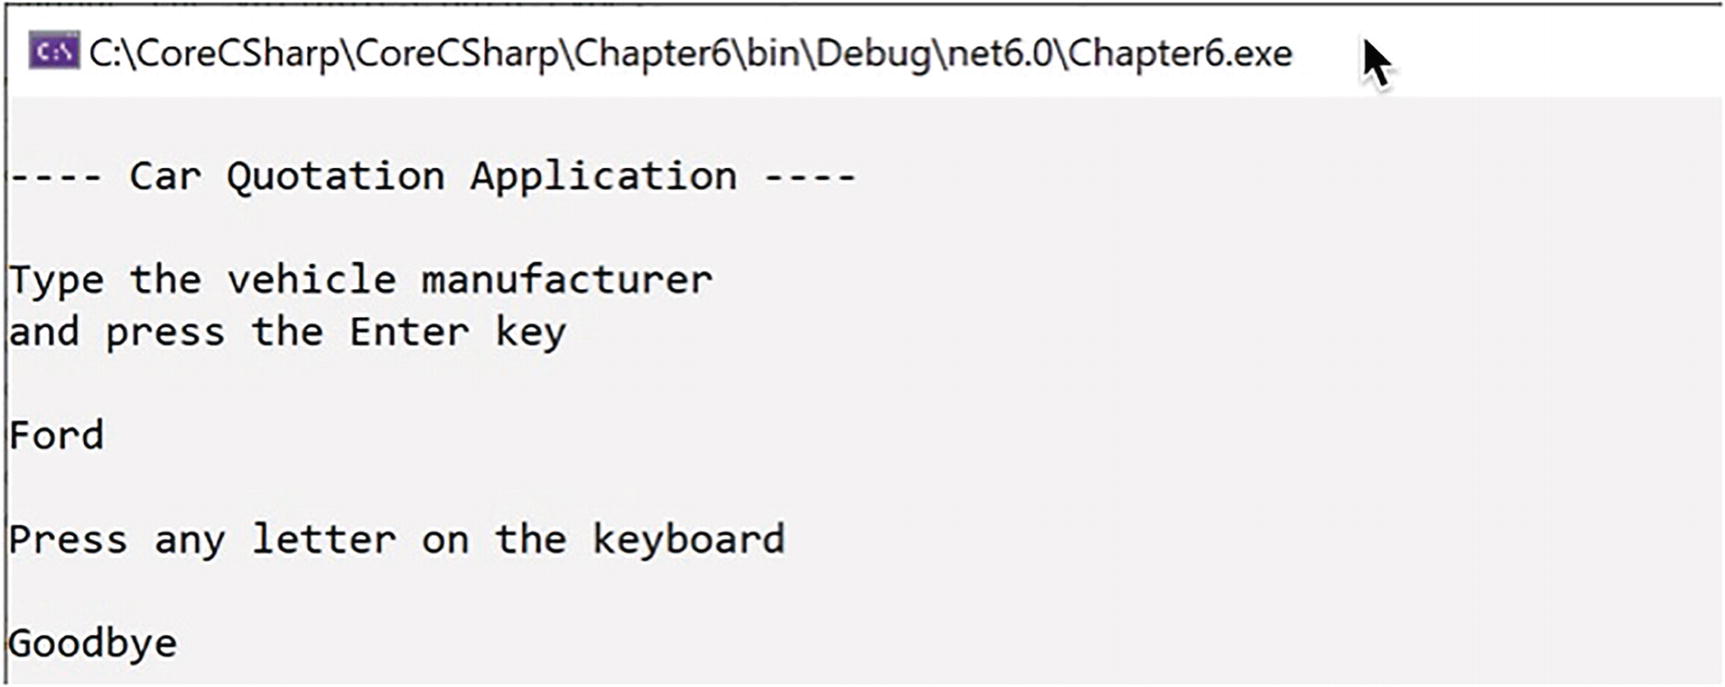
The cursor moves to the next line and displays the message asking the user to press any letter on the keyboard.
- 36.
Press any key on the keyboard.
The Goodbye message appears, and the cursor will be flashing waiting for user input, as shown in Figure 6-10.
- 37.
Press the Enter key on the keyboard.
- 38.
Press the Enter key again.
A window has a six-line code for a car quotation application.
Console output and user input
Display the vehicle manufacturer .
- 39.
Amend the code, as in Listing 6-7, to display the vehicleManufacturer value, which has been read from the console.
Displaying the vehicle manufacturer
- 40.
Click the File menu.
- 41.
Choose Save All.
- 42.
Click the Debug menu.
- 43.
Choose Start Debugging.
- 44.
Type Ford as the manufacturer name.
- 45.
Press the Enter key on the keyboard.
- 46.
Press the Enter key on the keyboard.
The message will appear showing us that the vehicle manufacturer is what we typed at the console, the Goodbye message appears, and the cursor will be flashing waiting for user input, as shown in Figure 6-11.

A seven-line code for a car quotation application.
Console output and user input
- 47.
Press the Enter key on the keyboard twice.
Using the escape sequence to tab items.
Now we will display an additional line for a “header.” The C# code for this line will use the escape sequence to tab the text on the line. The is an escape sequence that we might use to tab the output – in other words, leave a fixed amount of space, usually eight spaces at this position in the text.
- 48.
Amend the code, as in Listing 6-8, to add the additional “header” line.
Using escape sequences when displaying to the console
- 49.
Click the File menu.
- 50.
Choose Save All.
- 51.
Click the Debug menu.
- 52.
Choose Start Debugging.
- 53.
Type Ford as the manufacturer name.
- 54.
Press the Enter key on the keyboard.
- 55.
Press the Enter key again.
The Goodbye message appears, as shown in Figure 6-12, and the cursor will be flashing, waiting for user input.
- 56.
Press the Enter key on the keyboard.
- 57.
Press the Enter key again.

An eight-line code for car quotation application has arrow labels pointing upward below the words car, insurance, and application.
Tab indentation and new line using escape sequences
Figure 6-12 shows the tabbed space before the word Car and between the words Car and Insurance. Note how the space before the word Car is eight characters, and this is the space each tab takes up. We can then see that Car and five spaces take up the next eight tab spaces. As the word Insurance is nine characters, it uses the full eight spaces of a tab slot, and then it takes up one space in the next tab, so there are now seven spaces before the A of application.
Using the escape sequence to move to a new line.
In the Console.WriteLine(" Car Insurance Application "); statement, which displays what is between the double quotes "", we have used another “strange” ending, . This is another escape sequence, and it means add a new line. So has a similar action to Console.WriteLine(), which also moves to a new line after writing its text.
Code Analysis
We have added a section within the Main() method where we declare the variables to be used in this Main() method of the program.
In this section we have declared a variable called vehicleManufacturer, which will hold data of type string.
Read this line string vehicleManufacturer; as
a variable called vehicleManufacturer of data type string.
The vehicleManufacturer variable has been declared in the Main() method and will only be visible to code that is inside the open and close curly braces of the Main() method. This means that the scope of the variable is the Main() method, between the curly braces, as shown in Listing 6-9.

A code has 2 chat bubbles that point to a manufacturer labeled an object called vehicle manufacturer, and to a string labeled of data type string.
Reading a type declaration
Variable scope
We have entered the statement Console.ReadLine() and it is included as part of the line vehicleManufacturer = Console.ReadLine();, which says that we want the variable vehicleManufacturer to be made equal to Console.ReadLine(). This is known as an assignment , where we assign a value to a variable. The variable is vehicleManufacturer and the value is whatever the user inputs at the console.
Read the line vehicleManufacturer = Console.ReadLine(); like this:
The variable called vehicleManufacturer is assigned
- In the code we entered this statement:Console.WriteLine("Your car manufacturer is recorded as " + vehicleManufacturer);
The first part is what we have used before; it is simply text, a string between double quotes “”, and as we know this tells the program to display this exact text in the console.
The second part is a plus sign (+) and we might be thinking this means add. Well, we are indeed correct, as the plus sign is being used here to say we want to add whatever comes after the plus sign to the text we have just written. This is called concatenation and we mentioned it earlier.
The third part is the name of the variable, so the value that is entered at the console by the user, for example, Ford, is added to the end of the text "Your car manufacturer is recorded as "

A six-line code has a chat bubble that points to Ford labeled concatenated string with input value at the end.
Example of string concatenation
The plus sign (+) or plus symbol is used to add string parts together. We can also use the more widely used term concatenate to refer to what the plus sign (+) does in this context. As we progress through the chapters, we will see that concatenation can be replaced with a more modern approach called string interpolation , and we will also see the plus sign (+) used as the mathematical plus where it will add two numerical values.
Write to the console.
Read from the console.
Set up a variable.
Assign a value that has been read in from the console to a variable.
Display text to the console, which is a concatenation of text and variables.
We will now amend the code to ask the user to input other details about the vehicle being insured. In this case it will be the model of the vehicle. This is the same process as we have already completed, and coding this will help reinforce our learning.
Set up a variable that will hold the data requested from the user. The variable will be of a particular data type, in this case string.
Display a message to ask the user to input some data.
Use the Console.ReadLine() method to get the data entered.
Note
In the preceding first bullet point, we have said that the data type will be string, but the data type for the vehicleManufacturer was String with a capital S, so what is the difference?
- 58.
Amend the code, as in Listing 6-10, by changing the vehicleManufacturer data type from String to string.
Using String or string
- 59.
Amend the code, as in Listing 6-11, by adding the string variable called vehicleModel.
Variable of data type string for the vehicle model
- 60.
Amend the code, as in Listing 6-12, to ask for user input, read the user input, and assign it to the vehicleModel variable .
Read console input and assign it to a variable
- 61.
Amend the code, as in Listing 6-13, to display the vehicleModel, which has been read from the console.
Displaying the vehicle model
- 62.
Click the File menu.
- 63.
Choose Save All.
- 64.
Click the Debug menu.
- 65.
Choose Start Without Debugging.
- 66.
Type Ford as the manufacturer name.
- 67.
Press the Enter key on the keyboard.
- 68.
Type Fiesta as the model name.
- 69.
Press the Enter key on the keyboard.
- 70.
Press the Enter key on the keyboard.
- 71.
Press the Enter key on the keyboard.
We will see that the console window now displays the concatenated text for the model, as shown in Figure 6-15.

A six-line code has a chat bubble pointed to the word Fiesta in the fourth line, labeled concatenated string with input value at the end.
Example of string concatenation
Note

A three-line code, from top to bottom, includes the word goodbye, a file path, and a text that reads press any key to close this window.
Automatic waiting for a key press in debugging mode
This is great, because in our code we now do not need to put the last line that is used to stop the console closing when we run the program. In the next programs, we will remove the additional line.
Read and write the vehicle color.
We will now amend the code to ask the user to input other details about the vehicle being insured. In this case it will be the color of the vehicle. Once again this is the same process as we have already completed, and coding this should help reinforce our learning.
The steps are as follows:
Set up a variable that will hold the data requested from the user. The variable will be of a particular data type, in this case string.
Display a message asking the user to input some data.
Use the Console.ReadLine() method to get the data entered.
- 72.
Amend the code, as in Listing 6-14, by adding the string variable called vehicleColour.
Variable of data type string for the vehicle color
- 73.
Amend the code, as in Listing 6-15, to ask for user input, read the user input, and assign it to the vehicleColour variable.
Read console input and assign it to a variable
- 74.
Amend the code, as in Listing 6-16, to display the vehicleColour value, which has been read from the console.
Displaying the vehicle color
- 75.
Amend the code, as in Listing 6-17, to remove the code lines.
Console.ReadLine() removed
- 76.
Click the File menu.
- 77.
Choose Save All.
- 78.
Click the Debug menu.
- 79.
Choose Start Without Debugging.
- 80.
Type Ford as the manufacturer name.
- 81.
Press the Enter key on the keyboard.
- 82.
Type Fiesta as the model name.
- 83.
Press the Enter key on the keyboard.
- 84.
Type Blue as the vehicle color.
- 85.
Press the Enter key on the keyboard.
Figure 6-17 shows the console window displaying the concatenated text for the color and the message to press any key to close this window.

A code has 2 chat bubbles that point to a blue, labeled concatenated string with input value at the end, and to a space labeled of waits for key press.
Example of string concatenation and waiting for a key press
- 86.
Press the Enter key again to close the console window.
Something a Little Different with Our Variables
We will now amend the code to ask the user to input details about the age, in years, of the vehicle. We might use the age of the vehicle in a mathematical formula that will calculate the insurance premium to be charged. Once again this is the same process as we have already completed, with one difference : the variable is not of data type string – it will be of data type int.
Set up a variable that will hold the data requested from the user. The variable will be of a particular data type – in this case it will be an int.
Display a message asking the user to input some data.
Use the Console.ReadLine() method to get the data entered.
This will be interesting as we will be accepting input from the console, and we have seen from the previous examples that console input is accepted as a string or String. So how can we now assign the string that the user enters for the age of the vehicle to the variable of data type int that we create to hold the data? We will see how to handle this shortly.
- 1.
Amend the code, as in Listing 6-18, to add the variable we require.
Variable of data type int for the vehicle age
- 2.
Amend the code, as in Listing 6-19, to ask for user input, read the user input, and assign it to the vehicleAgeInYears variable.
Read console input and assign it to a variable
- 3.
Click the File menu.
- 4.
Choose Save All.
All is not well in our code, as we can see from the red line under the Console.ReadLine. The red line indicates an error. The compiler is complaining.
- 5.
Move the mouse over the red line and a pop-up message box appears, as shown in Figure 6-18.

A window has a chat bubble labeled implicit conversion not possible pointed to console dot read line from a code and int in a text box.
Compiler error due to incorrect assignment
The pop-up message box tries to tell us what the error is, so read the message carefully.

A window has a context menu with two options labeled with numbers 1 and 2, which are view menu and choose error list.
Error List window
As we program, we will make mistakes and the compiler will help us as much as it can to correct them. We will get used to the error messages and become familiar with their meaning and how to resolve the issues in our code. In this case the error message says
Cannot implicitly convert type ‘string’ to ‘int’
Before we wrote the code for the vehicle age, we read the following:
So how can we now assign the string that the user enters for the age of the vehicle to the variable of data type int that we create to hold the data?
Now, that is exactly what the error message is saying to us. We now need to do something to the string we have read from the console and convert it to data type int. The compiler is telling us that it cannot do this conversion for us; it is not implicit. We must tell the compiler how to do it; we must be explicit .
Implicit conversion
This means that we do not need to do anything as the conversion is automatically handled by our code. The compiler handles the conversion.
Explicit conversion
This means that we will need to code the data type conversion. It is not an automatic thing. The compiler will complain, through an error message, that it cannot handle the conversion.
- 6.
Amend the code, as in Listing 6-20, to perform the variable conversion from data type string to data type int using the ToInt32() method.
Convert string input to an int using the Int32() method
Do we see any error message? No, we should not see an error.
We have just used another method, as we can see from the () in the code.
The method is called ToInt32.
As it is a method, it is written as ToInt32().
The ToInt32() method has the keyword Convert in front of it followed by a full stop. As we have already learned, the full stop is dot notation in C# code and means that we want to use a variable or method of the object that appears to the left of the full stop, in our case the Convert object. We also know that Convert must be a class, which has variables and methods that we have access to .
The Convert class methods will do conversions from one data type to another data type for us. We do not need to write our own code to do the conversions. This is a great example of reusable code, where code is written once and can be reused as often as required. Some of the methods that are accessible to us from the Convert class are shown in Figure 6-20.

A window has dropdown options, with To i n t 32 selected, and with 2 chat bubbles labeled cube symbol means method and methods used in the conversion.
Methods that are part of the Convert class
The ToInt32() method is used to convert from one data type to another data type, in our example from string to int, but we have to tell the method what is to be converted. We can clearly see this when, after typing the full stop, we click ToInt32 in the pop-up window, as shown in Figure 6-21.

A window with a text box has 2 chat bubbles labeled why, pointed to the question mark, and what value is to be converted pointed to value.
ToInt32() method of the Convert class takes in a value
In Figure 6-21 we can see that between the brackets () it says string? Value. Later in this chapter we will see the meaning of the ?.
The method ToInt32() needs to be given a value. In other words the method accepts a value, an object, so it is a parameter method.
The value given to the ToInt32() method is whatever line is read from the console. Hence, we have Console.ReadLine() between the brackets in the code ToInt32(Console.ReadLine());.
Whatever is between the brackets of the ToInt32() method is converted to an integer, a 32-bit integer.
Great, we can now see that the method ToInt32() does the conversion for us. How? We do not need to know; we simply accept that this method, which is part of the C# language, has been written, is thoroughly tested, and is used by all developers when they wish to do a similar conversion. Remember, we did talk about this when we read about what the .NET is and what it offers us as developers. This is the power of using existing code, and as developers we have access to many pieces of existing code. Using existing code methods from .NET, the C# language, other developers in our organization, or other developers elsewhere forms an integral part of modern-day programming.
Note
Using the .Parse() method for any data type will throw a null exception, error, if the string value to be parsed is null.
Using the Convert. will not cause an exception for a null value.
The ToInt32() method is slower than the Parse() method.
C# 8 Nullable Reference Types
From the introduction of C# 8, every reference type is by default nullable in code that has opted into a nullable aware context. The nullable aware context has to be set up within the project.
Within a nullable aware context, any reference type variable of type Type must be initialized with a non-null value. Type is just a generic name for any data type. Listing 6-21 and Figure 6-22 show the code and error.

A multiple-line code has a chat bubble labeled with the details of nullable aware context, pointed to the text null.
Non-nullable type
Nullable reference type will cause a warning
Any reference type variable of type Type cannot be assigned a value that may be null.
If we make the reference type of type Type?, then the variable can be initialized with a null value, or it can be assigned a null value.
The example shown in Listing 6-22 will be fine because we have used the question mark, ?, which is the C# nullable allowed symbol.
Using the ?, C# nullable allowed, on a reference type
Earlier in Listing 6-4, we had the line of code vehicleManufacturer = Console.ReadLine(); and it was underlined indicating a warning in the non-aware context. We will see more of nullable reference types in Chapter 19.
- 1.
Amend the code, as in Listing 6-23, to display the age of vehicle message.
Displaying the vehicle age
- 2.
Click the File menu.
- 3.
Choose Save All.
- 4.
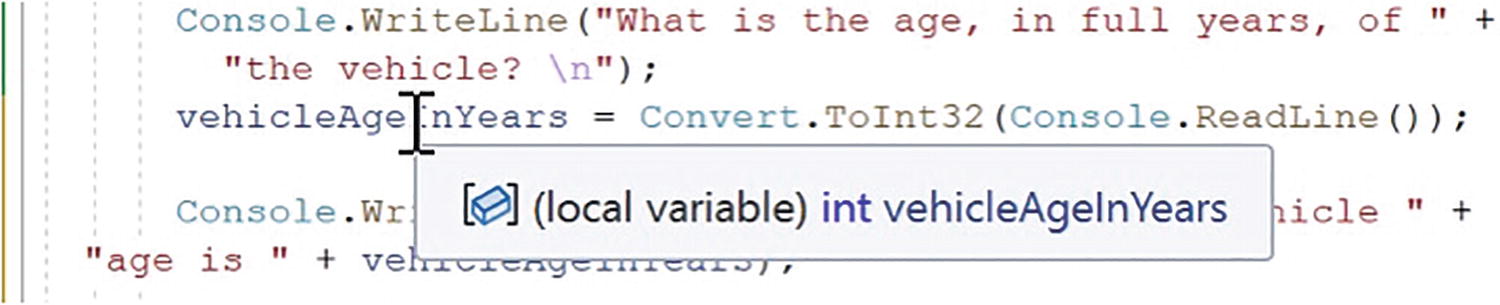
Hover over the vehicleAgeInYears in the WriteLine() method and look at the message in the pop-up telling us it is an int, as shown in Figure 6-23.
A five-line code has a text box atop that reads local variable, i n t, vehicle age in years.
ToInt32() -converted input assigned to an int variable
- 5.
Click the File menu.
- 6.
Choose Save All.
- 7.
Click the Debug menu.
- 8.
Choose Start Without Debugging.
- 9.
Type Ford as the manufacturer name.
- 10.
Press the Enter key on the keyboard.
- 11.
Type Fiesta as the model name.
- 12.
Press the Enter key on the keyboard.
- 13.
Type Blue as the vehicle color.
- 14.
Press the Enter key on the keyboard.
- 15.
Type 5 as the vehicle age.
- 16.
Press the Enter key on the keyboard.

A five-line code has a chat bubble labeled concatenated string with the conversion of i n t to string, pointed to number 5.
Implicit conversion in the Console.WriteLine()
- 17.
Press the Enter key again.
Code AnalysisWe have just concatenated a string data type and an int data type using the + concatenator.
This works because the compiler does the conversion of the int data type to a string data type for us.
Amazing, we are now able to convert from one data type to another data type using the Convert class. We are able to use the ToInt32() method to convert a string to an int, and we should now be able to use the same concept for converting a string to another data type. We are also more familiar with the meaning of implicit and explicit conversions.
We will now amend the code to ask the user to input details about the value of the vehicle. This is the same process as we have already completed, so we will follow the same steps as before. Our main decision in this process will be what data type to use for the value of the vehicle that is input by the user. Three options could be considered:float
The float data type is a single-precision 32-bit floating point. A float should not be used for precise values, such as currency. It would probably be more applicable to use the decimal data type. To initialize a float variable, we must use the suffix f or F, for example:
double
The double data type is a single-precision 64-bit floating point. A double should not be used for precise values, such as currency. It would probably be more applicable to use the decimal data type. To initialize a double variable, we can use the suffix d or D, for example:
decimal
The decimal type is a 128-bit data type. The decimal data type is suitable for precise values such as currency. To initialize a decimal variable, we must use the suffix m or M, for example:
If the suffix m or M is not declared, then the value will be treated as a double and the data type decimal will need to be changed to double.
This can be summarized to say that, when choosing a data type for the value of the vehicle, it is our choice and depends on the accuracy we need for the value. Float is the least accurate, double is the next most accurate, and decimal is the most accurate. Here we can use any of the three, but for this example we will use decimal.
- 18.
Amend the code, as in Listing 6-24, by adding the variable called vehicleEstimatedCurrentPrice, which is of data type decimal.
Variable of data type decimal for the vehicle value
- 19.
Amend the code, as in Listing 6-25, to ask for user input, read the user input, and assign it to the vehicleEstimatedCurrentPrice variable.
Read console input and assign it to a variable
- 20.
Amend the code, as in Listing 6-26, to display the vehicleEstimatedCurrentPrice value, which is read from the console.
Displaying the vehicle price
- 21.
Click the File menu.
- 22.
Choose Save All.
- 23.
Click the Debug menu.
- 24.
Choose Start Without Debugging.
- 25.
Type Ford as the manufacturer name.
- 26.
Press the Enter key on the keyboard.
- 27.
Type Fiesta as the model name.
- 28.
Press the Enter key on the keyboard.
- 29.
Type Blue as the vehicle color.
- 30.
Press the Enter key on the keyboard.
- 31.
Type 5 as the vehicle age.
- 32.
Press the Enter key on the keyboard.
- 33.
Type 6999.99 as the estimated vehicle value.
- 34.
Press the Enter key on the keyboard.
Figure 6-25 shows the console with the output string, and the decimal value has been concatenated even though it is a decimal – this is an implicit conversion.

A five-line code has a chat bubble labeled concatenated string with the conversion of double to string, pointed to the text 6999.99 Euros.
Implicit conversion in the Console.WriteLine()
- 35.
Press the Enter key again.
Read and write the vehicle mileage.
We will now amend the code to ask the user to input details about the number of kilometers recorded on the odometer of the vehicle.
- 36.
Amend the code, as in Listing 6-27, to add the variable to hold the mileage.
Variable of data type int for the vehicle mileage (km)
- 37.
Amend the code, as in Listing 6-28, to read the vehicleCurrentMileage value, which has been entered in the console.
Read console input and assign it to a variable
- 38.
Amend the code, as in Listing 6-29, to display the vehicleCurrentMileage value, which has been read in.
Displaying the vehicle mileage
Read and write the driver date of birth as a string.
- 39.
Amend the existing code, as in Listing 6-30, by adding the DateTime variable called dateOfBirthOfMainDriver, which is of type DateTime.
Variable of data type DateTime for the driver date of birth

A window has a text box, read only struct system dot date time, represents an instant in time, typically expressed as a date and time of day.
DateTime type
- 40.
Amend the code, as in Listing 6-31, to ask the user to input the date, read the user input, and assign it to the dateOfBirthOfMainDriver variable.
Read console input and assign it to a variable
- 41.
Amend the code, as in Listing 6-32, to display the main driver date of birth, which has been read in.
Displaying the driver date of birth as type DateTime
- 42.
Click the File menu.
- 43.
Choose Save All.
- 44.
Click the Debug menu.
- 45.
Choose Start Debugging.
- 46.
Type Ford as the manufacturer name.
- 47.
Press the Enter key on the keyboard.
- 48.
Type Fiesta as the model name.
- 49.
Press the Enter key on the keyboard.
- 50.
Type Blue as the vehicle color.
- 51.
Press the Enter key on the keyboard.
- 52.
Type 5 as the vehicle age.
- 53.
Press the Enter key on the keyboard.
- 54.
Type 6999.99 as the estimated vehicle value.
- 55.
Press the Enter key on the keyboard.
- 56.
Type 50000 as the number of kilometers on the odometer of the vehicle.
- 57.
Press the Enter key on the keyboard.
- 58.
Type 1998-01-01 as the date of birth for the main driver of the vehicle.
- 59.
Press the Enter key on the keyboard.
Figure 6-27 shows the console with the output string, and the date value has been concatenated even though it is a date – this is an implicit conversion.

A three-line code about date format has a chat bubble pointed to date, labeled date of birth with date and time concatenated to the string.
DateTime type converted from type string
- 60.
Press the Enter key again.
Code AnalysisWe have used the data types int, decimal, and string, but now we have just used the data type of DateTime. This represents an instant in time, typically expressed as a date and time of day.
When we read the console input, we have used the Convert class and selected the ToDateTime() method to perform the conversion.
This works exactly the same way as our other explicit conversions.
We have displayed the DateTime entered but it includes the time.
If we do not want the time and simply want to display the date, then this will be possible since there is a method to do this.
The method used to perform this “shortening” is ToShortDateString().
This method belongs to the object called DateTime.
As we know, the variable dateOfBirthOfMainDriver is a DateTime variable; it is an object. If we add the full stop after the variable name in the WriteLine() method, we will see the variables and methods belonging to the DateTime object. Figure 6-28 shows this in action.

A window has dropdown options, with a chat bubble pointed to the options, labeled methods, open and close parentheses, used in date conversion.
Methods of the DateTime type struct
We can see that there are a number of methods available to us when we use the DateTime object. We can also see that there are a number of variables, the spanners, that are also available to us, for example, Minute, Month, and Ticks, as shown in Figure 6-29.

A window has dropdown options, with minute selected, a chat bubble pointed to options, labeled properties used with dates.
Properties of the DateTime type struct
- 61.
Amend the code, as in Listing 6-33, to display the short date of birth.
Displaying the driver date of birth as a short date
- 62.
Click the File menu.
- 63.
Choose Save All.
- 64.
Click the Debug menu.
- 65.
Choose Start Without Debugging.
- 66.
Type Ford as the manufacturer name.
- 67.
Press the Enter key on the keyboard.
- 68.
Type Fiesta as the model name.
- 69.
Press the Enter key on the keyboard.
- 70.
Type Blue as the vehicle color.
- 71.
Press the Enter key on the keyboard.
- 72.
Type 5 as the vehicle age.
- 73.
Press the Enter key on the keyboard.
- 74.
Type 6999.99 as the estimated vehicle value.
- 75.
Press the Enter key on the keyboard.
- 76.
Type 50000 as the number of kilometers on the odometer of the vehicle.
- 77.
Press the Enter key on the keyboard.
- 78.
Type 1998-01-01 as the date of birth for the main driver of the vehicle.
- 79.
Press the Enter key on the keyboard.
Figure 6-30 shows the console output with the short date format.

A four-line code about date format has a chat bubble pointed to date, labeled date of birth in short date format, no time.
DateTime type in short format converted from type string
- 80.
Press the Enter key again.
Chapter Summary
There are value types in C# that include bool , byte , char , decimal , double , float , int , long , short , uint , and ushort.
The value types in C# are referred to as primitive types. They are part of the language, they are built into the language, and we do not need to create them.
C# is a programming language that is part of .NET, which also has other programming languages like F# and Visual Basic.
There is a Common Type System (CTS) that exists in .NET and this means that we can use the programming language data types or those data types that belong to the Common Type System. We learned that string and String are the same as are double and Double and so on.
Sometimes variables need to be converted from one data type to another data type and this is either done explicitly or implicitly.
There are conversions called widening conversions where the converted data changes from a smaller data type to a larger data type.
There are conversions called narrowing conversions where the converted data changes from a larger data type to a smaller data type and data can be lost.
The Convert class has methods such as ToInt32() to help us convert between data types.
Using a dot, a period, after a class name will display the accessible variables and methods that exist in the class.
Variables in our code have a scope.
Use of comments is important.
Escape sequences such as and are useful for presentation of data in the console.
Data can be read from and written to the console.
There is a C# DateTime data type, object, that allows us to do things like using a method such as ToShortDateString() to convert a DateTime to a shortened version of the date, where only the date part is displayed and no time is shown.
We should also be aware that C# has other data types and we will use them as required by our code.
We have made great progress in such a short period of study, and in finishing this chapter and increasing our knowledge, we are advancing to our target.

An illustration of two-colored concentric circles with a text below that reads, our target is getting closer.