© The Author(s), under exclusive license to APress Media, LLC, part of Springer Nature 2022
G. ByrneTarget C#https://doi.org/10.1007/978-1-4842-8619-7_11

11. Arrays

Gerard Byrne1  
(1)
Belfast, Ireland
 

Arrays: A Data Structure

We learned in Chapter 10 that iteration is a very important programming concept in all programming languages. To use iteration in our C# code, we have a number of construct options, and the best construct option to choose will depend on the particular task the code has to perform. The different constructs for iteration are the for construct, the while construct, the do while construct, and the foreach construct. Within the constructs, there are options to break out of the iterations completely or to break out of a particular iteration using the continue keyword. In terms of the project structure, we once again used the ability to have multiple classes within a package where each class must have a unique name.

We read earlier that when data was entered into our applications, it was stored temporarily. Now we will look at storing data in a structured and more “permanent” way using an array. An array is a list of data items, all of which must have the same type. We could also describe it as a collection of data items, each of the same type. We could have an array that contains a
  • List of integers

  • List of real numbers

  • List of characters

  • List of strings

If we think about a C# application that is applicable to a business that sells household products , it may contain arrays for

Surface cleaners

This could be a list of strings.

Hand soaps

This could be a list of strings.

Product codes

This could be a list of integers.

If we think about a C# application that is applicable to a business that sells insurance, it may contain arrays for

Insurance types

This could be a list of strings.

Account numbers

This could be a list of integers.

Insurance premiums

This could be a list of doubles.

Vehicle manufacturers

This could be a list of strings.

Vehicle models

This could be a list of strings.

An array is therefore a list of related items that can be treated by C# as one object. For now, we could say that an array is a number of variables that can be treated as one object. So, when we think of an array, we should understand that we are dealing with individual variables or objects, but with the added advantage of them being organized for us in one object.

If we have the array object with the data items “lumped” together into one object, we are said to have what is called a data structure . In programming, data structures may be very complex or more simplistic and will be in the form of a sequence of data items such as a data record or array. In a program for a playing card game, like solitaire, we might want to keep a record that holds information about a card, that is, the suit and the value. This means we will have two fields in the record. With the C# programming language, we have access to data structures that we can use to accommodate this type of record. Such structures in C# include an array and a data structure called a struct.

When declaring an array in C#, we must abide by some basic rules:
  • The array must be assigned a data type.

  • After the data type will be an open square bracket followed by a closing square bracket.

  • The square brackets can come immediately after the data type, or there can be a space after the data type, just before the opening square bracket.

  • The array will have a single name, which is called its identifier.

  • The array is of fixed size and cannot be made bigger or smaller, so it is not a dynamic structure.

When we initialize or populate the array, we must ensure that each item in the array is of the same data type, as identified by the data type assigned to the array. We therefore say that an array is homogenous , having similarity in structure.

When we wish to access an item in the array, we must refer to the item by a subscript or index , which gives its position within the array. In C#, arrays are zero indexed, which means that the first element of the array has an index of zero. Arrays are common across nearly all programming languages and in each language they are used in a similar manner. However, C# has a few things that are different and are worth noting at the outset:
  • The square brackets come after the data type, for example, string[], and not after the identifier.

  • Putting the brackets after the identifier, for example, string claimAmounts[],is not permitted.

  • The size of the array is not part of its type, and this means we can declare an array using initial values, for example, string[] claimAmounts = { "Home", "Auto", "Life" };.

In C# there is support for the following array types :
  • Single-dimensional arrays

  • Multidimensional arrays

  • Jagged arrays (also known as an array of arrays)

We will look at single-dimensional arrays in more detail and will see how to
  • Declare the array.

  • Initialize the array.

  • Reference the members of the array.

We will see that there are different ways to declare and create arrays and different ways to initialize arrays, so it is important at the outset to understand that we will find our own preferred option from the various approaches. Each approach will have its advantages and disadvantages, but as a developer we will usually have a preferred option. On the other hand, as a developer we will spend much of our time maintaining code rather than writing new code, and often the code we maintain has not been written by us, so we need to understand all the approaches.

Single-Dimensional Arrays

A single-dimensional or one-dimensional array is a list of data items all of the same data type. It can be thought of as a type of linear array. At the start of this chapter, we read that a C# application for a business that sells insurance could contain arrays for

Insurance types

This could be a list of strings.

Account numbers

This could be a list of integers.

Insurance premiums

This could be a list of doubles.

Vehicle manufacturers

This could be a list of strings.

Vehicle models

This could be a list of strings.

Taking this theme a little further, we could see that the arrays could contain
  • A list of insurance types of data type string, for example:

{ "Auto", "SUV 4x4", "Motorcycle", "Motorhome", "Snowmobile", "Boat"};

Another way to think of the single-dimensional array is as a table with rows and columns. In the case of a single-dimensional array, there will only be a single row with the required number of columns as shown in Table 11-1.
Table 11-1

Representation of the insuranceTypes single-dimensional array

Array name

[0]

[1]

[2]

[3]

[4]

[5]

insuranceTypes

Auto

SUV 4x4

Motorcycle

Motorhome

Snowmobile

Boat

Now, based on what was stated earlier about the basic rules to be abided by when declaring an array, we could write the code to declare, create, and populate the array for this example as

String[] insuranceTypes = new String[6];

insuranceTypes[0]

=

"Auto";

insuranceTypes[1]

=

"SUV 4x4";

insuranceTypes[2]

=

"Motorcycle";

insuranceTypes[3]

=

"Motorhome";

insuranceTypes[4]

=

"Snowmobile";

insuranceTypes[5]

=

"Boat";

  • A list of account numbers (integers):

{ 000001, 001122, 002233, 003344, 004455, 005566};

Thinking of this single-dimensional array as a row with columns, it could be represented as shown in Table 11-2.
Table 11-2

Representation of the accountNumber single-dimensional array

Array name

[0]

[1]

[2]

[3]

[4]

[5]

accountNumber

000001

001122

002233

003344

004455

005566

Now, based on what was stated earlier about the basic rules to be abided by when declaring an array, we could write the code to declare, create, and populate the array for this example as

int[] accountNumber = new int[6];

accountNumber [0]

=

000011;

accountNumber [1]

=

001122;

accountNumber [2]

=

002233;

accountNumber [3]

=

003344;

accountNumber [4]

=

004455;

accountNumber [5]

=

005566;

  • A list of insurance costs (doubles):

{ 104.99, 105.99, 106.99, 107.99, 108.99, 109.99};

Thinking of this single-dimensional array as a row with columns, it could be represented as shown in Table 11-3.
Table 11-3

Representation of the insurancePremiums single-dimensional array

Array name

[0]

[1]

[2]

[3]

[4]

[5]

insurancePremiums

104.99

105.99

106.99

107.99

108.99

109.99

Now, based on what was stated earlier about the basic rules to be abided by when declaring an array, we could write the code to declare, create, and populate the array for this example as

double[] insurancePremiums = new double[6];

insurancePremiums [0]

=

104.99;

insurancePremiums [1]

=

105.99;

insurancePremiums [2]

=

106.99;

insurancePremiums [3]

=

107.99;

insurancePremiums [4]

=

108.99;

insurancePremiums [5]

=

109.99;

Now that we have the concept of an array being a collection, a container, or a store for items of the same data type, we can look at how to code the implementation of an array. Like many things in life, we have choices. So C# gives us choices, different techniques, that allow us to set up and use arrays.

Choice 1: Declaring and Creating an Array in Two Stages

Stage 1: Declare

In C#, the single-dimensional arrays we have just considered can be declared as
string[] insuranceTypes;
int[] accountNumber;
double[] insurancePremiums;

When we say that we are declaring an array in C#, we are actually saying that we want to use an array that will consist of items of the data type stated, but it will not exist yet.

Stage 2: Create

Now, when an array has been declared, it needs to be created. To create the array, it must be instantiated, and this can be achieved by using the new keyword syntax.

The single-dimensional arrays we have just considered can be created as shown:

string[]  insuranceTypes;


declaration

insuranceTypes                        =

new string[6];

creation

int[]  accountNumber;


declaration

accountNumber                      =

new int[6];

creation

double[]  insurancePremiums;


declaration

insurancePremiums                 =

new double[6];

creation

In instantiating the array, we are setting aside the required memory resources for the array of the specified size and data type.

Choice 2: Declaring and Creating an Array in One Stage

In C#, the single-dimensional arrays we have just considered can be declared and created in one stage as

Declaration


Creation

string[]  insuranceTypes

=

new string[6];

int[]  accountNumber

=

new int[6];

double[]  insurancePremiums

=

new double[6];

In each line of code, we are
  • Declaring the data type of the array string, int, or double

  • Stating that the array is single dimensional – this is the [ ] part

  • Giving the array its name insuranceTypes, accountNumber, or insurancePremiums

  • Instantiating the array with the new keyword

  • Stating that it will contain six elements

The statement
string[] insuranceTypes = new string[6];
creates an array that can hold six strings and sets the array name as insuranceTypes. The newly created array is automatically filled with nulls. In C#, a newly created array is always filled with the default value as shown in Table 11-4.
Table 11-4

Default values for the types used with arrays

Value type

Default value

bool

false

byte

0

short

0

int

0

long

0L

float

0.0F

double

0.0D

char

''

decimal

0.0M

sbyte

0

uint

0

ulong

0

ushort

0

String

null

The statement
int[] accountNumber = new int[6];
creates an array that can hold six integer values and sets the array name as accountNumber. The newly created array is automatically filled with zeros, as shown in Figure 11-1.

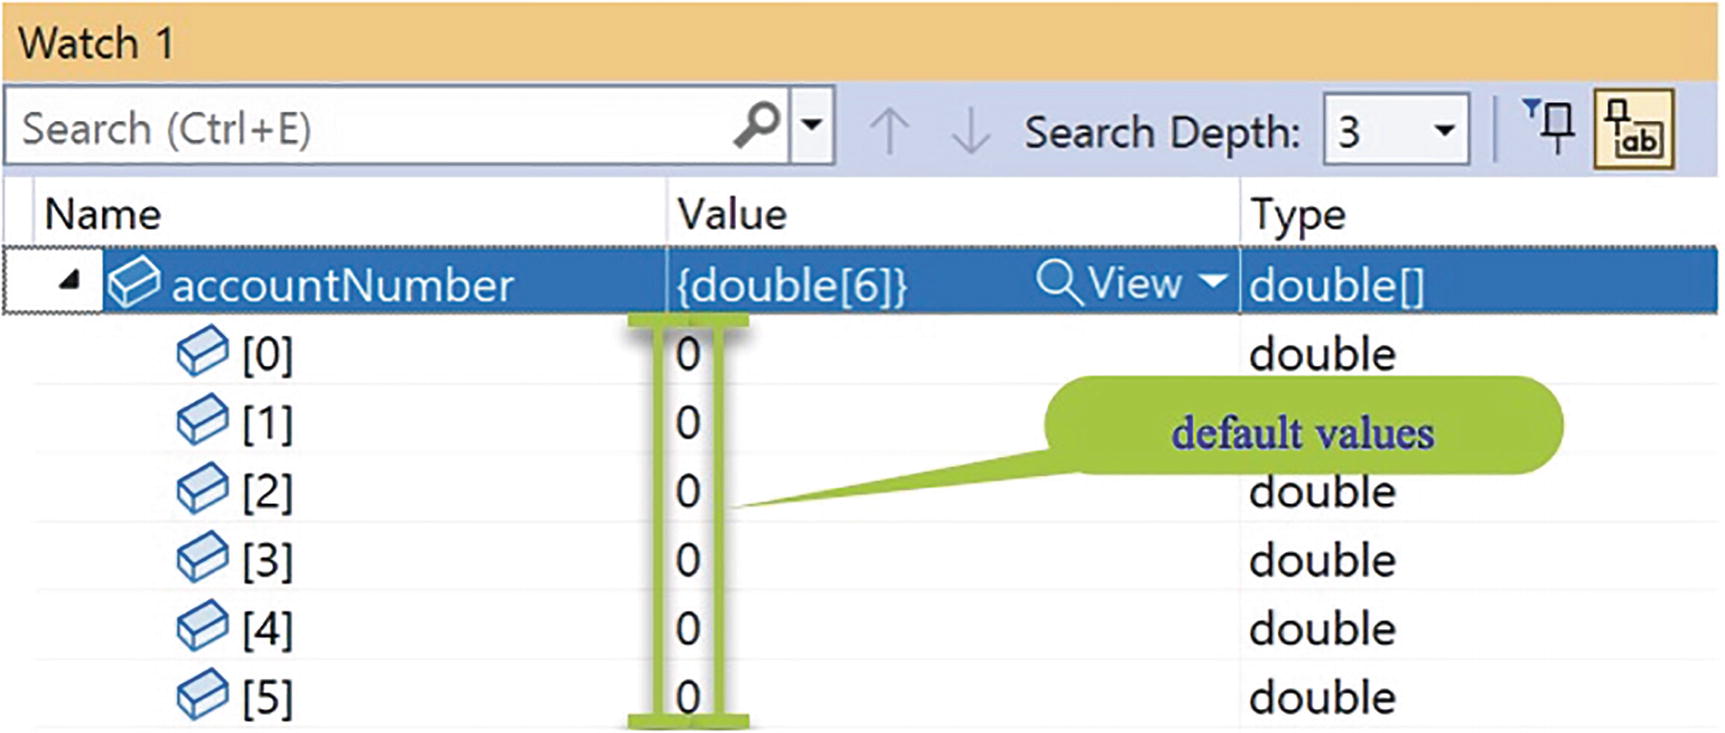
A screenshot depicts an array named account Number with 6 values for the data type 'int'. The default value for the data type int is 0.

Figure 11-1

Array filled with default values for the int type

The statement
double[] accountNumber = new double[6];
creates an array that can hold six double values and sets the array name as accountNumber. The newly created array is automatically filled with 0 values as shown in Figure 11-2.

A screenshot depicts an array named account Number with 6 values for the data type 'double'. The default value for the data type double is 0.

Figure 11-2

Array filled with default values for the double type

Referencing the Array Elements

Now that we have declared, created, and instantiated arrays, we need to have a way to access the elements of the arrays so we can use them in our code as required. C# allows us to access array elements if two things are known:
  • The array name

  • The numeric position of the element we wish to access, remembering what was said earlier about C# using zero-based referencing

The syntax is arrayname[position in array 1]

Example: insuranceTypes[2]

So what are the names of the elements in the array? Or, put another way, what are the names of the variables in the array? We will look at the examples we used in Tables 11-1, 11-2, and 11-3.

Insurance type single-dimensional array as shown in Table 11-1:

insuranceTypes [0] = "Auto";

First item is indexed as 0.

insuranceTypes [1] = "SUV 4x4";

Second item is indexed as 1.

insuranceTypes [2] = "Motorcycle";

Third item is indexed as 2.

insuranceTypes [3] = "Motorhome";

Fourth item is indexed as 3.

insuranceTypes [4] = "Snowmobile";

Fifth item is indexed as 4.

insuranceTypes [5] = "Boat";

Sixth item is indexed as 5.

Account number single-dimensional array as shown in Table 11-2:

accountNumber [0] = 000011;

First item is indexed as 0.

accountNumber [1] = 001122;

Second item is indexed as 1.

accountNumber [2] = 002233;

Third item is indexed as 2.

accountNumber [3] = 003344;

Fourth item is indexed as 3.

accountNumber [4] = 004455;

Fifth item is indexed as 4.

accountNumber [4] = 004455;

Sixth item is indexed as 5.

Insurance cost single-dimensional array as shown in Table 11-3:

insurancePremium [0] = 104.99;

First item is indexed as 0.

insurancePremium [1] = 105.99;

Second item is indexed as 1.

insurancePremium [2] = 106.99;

Third item is indexed as 2.

insurancePremium [3] = 107.99;

Fourth item is indexed as 3.

insurancePremium [4] = 108.99;

Fifth item is indexed as 4.

insurancePremium [4] = 109.99;

Sixth item is indexed as 5.

Add a new project to hold the code for this chapter.
  1. 1.

    Right-click the solution CoreCSharp.

     
  2. 2.

    Choose Add.

     
  3. 3.

    Choose New Project.

     
  4. 4.

    Choose Console App from the listed templates that appear.

     
  5. 5.

    Click the Next button.

     
  6. 6.

    Name the project Chapter11 and leave it in the same location.

     
  7. 7.

    Click the Next button.

     
  8. 8.

    Choose the framework to be used, which in our projects will be .NET 6.0 or higher.

     
  9. 9.

    Click the Create button.

     
Now we should see the Chapter11 project within the solution called CoreCSharp .
  1. 10.

    Right-click the project Chapter11 in the Solution Explorer panel.

     
  2. 11.

    Click the Set as Startup Project option.

     
Notice how the Chapter11 project name has been made to have bold text, indicating that it is the new startup project and that it is the Program.cs file within it that will be executed when we run the debugging.
  1. 12.

    Right-click the Program.cs file in the Solution Explorer window.

     
  2. 13.

    Choose Rename.

     
  3. 14.

    Change the name to Arrays.cs.

     
  4. 15.

    Press the Enter key.

     
  5. 16.

    Double-click the Arrays.cs file to open it in the editor window.

     
Now we can set up the code structure with a namespace, and inside it will be the Arrays class, and inside the class will be the Main() method. The shortcut for creating the Main() method is to type svm and press the Tab key twice.
  1. 17.

    In the editor window, add the code in Listing 11-1.

     
namespace Chapter11
{
  internal class Arrays
  {
    static void Main(string[] args)
    {
    } // End of Main() method
  } // End of Arrays class
} // End of Chapter11 namespace
Listing 11-1

Class template with the Main() method

Note that the class name matches the filename, Arrays.

As we have seen earlier and have coded as an example, when a vehicle is involved in an accident and has to be repaired, the repair shop is required to supply specific details to the insurance company so they can be reimbursed for the costs. The details required are
  • The repair shop unique id, data type string

  • The vehicle insurance policy number, data type string

  • The claim amount, data type double

  • The date of the claim, data type Date

When we coded this program as part of the last chapter on iteration, we were aware that any data entered was not stored by the program code. We were made aware that this “flaw” would be rectified using an array. So now the time has come to amend the last program so that the data entered by the repair shop will be stored, for the duration that the program runs. It will not be available after the program is closed; that is why we marked the word permanent as “permanent” at the start of the chapter, indicating that permanent relates to the duration of the application run rather than forever. If we require the data after the application is exited, we could store the data in a text file or database, and later in Chapter 16, we will see how to store data permanently in a file.

To store the data in an array, we will
  • Declare an array, having decided what data type the array will hold.

    Remember the information at the start of this chapter when we read that an array can only hold variables of the same data type – an array is homogenous. We have strings, a double, and a Date, so what data type will we use? Well, one answer is the string data type. This will mean that the Date will have to be converted to a string value. We could even have a separate array for each data type, but for simplicity we are just going to use data type string.

  • Use a name for the array. Here we will use the name repairShopClaims.

  • Create the array using the new keyword and stating the size of the array.

  • Add the values to the array in the correct position.

Let's code some C# and build our programming muscle.
  1. 18.

    Amend the code, as in Listing 11-2, to declare and create the array that will hold the eight items of data input by the user.

     
    static void Main(string[] args)
    {
      /*
      The array is going to hold the data for 2 claims.
      Each claim has four pieces of information. The number
      of data items is therefore 2 multiplied by 4 = 8.
      So, we will make the array for this example of size 8.
      Not the best way to do things, but fine for now.
      */
      string[] repairShopClaims = new String[8];
    } // End of Main() method
Listing 11-2

Declare and create the array with eight values

  1. 19.

    Amend the code, as in Listing 11-3, to add the variables to be used.

     
      string[] repairShopClaims = new String[8];
      /*
      We will setup our variables that will be used in the
      quote application. The details will be:
      •    the repair shop unique id (string)
      •    the vehicle insurance policy number (string)
      •    the claim amount (string)
      •    the date of the claim (string)
      */
      string repairShopID;
      string vehiclePolicyNumber;
      string claimAmount;
      DateTime claimDate;
      int numberOfClaimsBeingMade;
      int numberOfClaimsEntered = 0;
      int arrayPositionCounter = 0;
    } // End of Main() method
Listing 11-3

Add the variables

Now we will ask the user to input the number of claims being made, read the user input, convert it to an int, and assign it to the numberOfClaimsBeingMade variable.
  1. 20.

    Amend the code, as in Listing 11-4.

     
  int numberOfClaimsEntered = 0;
  int arrayPositionCounter = 0;
  /*
  Read the user input for the number of claims being made
  and convert the string value to an integer data type
  */
  Console.WriteLine("How many claims are being made? ");
  numberOfClaimsBeingMade = Convert.ToInt32(Console.ReadLine());
  } // End of Main() method
Listing 11-4

Ask user for number of claims and convert it to an integer

Now we will include the start of a do while loop, which will iterate as many times as the user requested and display the current value of the counter for reference.
  1. 21.

    Amend the code, as in Listing 11-5.

     
   numberOfClaimsBeingMade = Convert.ToInt32(Console.ReadLine());
    /*
    As we are using a variable in the loop our code is
    flexible and can be used for any number of claims.
    An ideal situation and good code.
    */
    do
    {
      Console.WriteLine("The current value of the " +
        "counter is :" +numberOfClaimsEntered + " ");
    } // End of Main() method
Listing 11-5

Adding the start of a do while loop

Now we will ask the user to input the repair shop id, read the user input, and assign the input to the variable repairShopID.
  1. 22.

    Amend the code , as in Listing 11-6.

     
      do
      {
        Console.WriteLine("The current value of the " +
          "counter is :" +numberOfClaimsEntered + " ");
        /*
        Read the user input for the repair shop id and keep
        it as a string
        */
        Console.WriteLine("What is your repair shop id? ");
        repairShopID = Console.ReadLine();
      } // End of Main() method
Listing 11-6

Ask user for repair shop id and read the value

When the code is executed and the user has entered the details, we need to store these details in the array at position 0. We will now add the user input to the array in position 0 and then increment the arrayPositionCounter that is being used to track the positions at which the items go in the array.
  1. 23.

    Amend the code, as in Listing 11-7.

     
        Console.WriteLine("What is your repair shop id? ");
        repairShopID = Console.ReadLine();
        /*
        Write the first input value to the array and then
        increment the value of the arrayPositionCounter by 1.
        */
        repairShopClaims[arrayPositionCounter] = repairShopID;
        arrayPositionCounter++;
      } // End of Main() method
Listing 11-7

Add input to the array and increment the counter

Now we will ask the user to input the vehicle policy number, read the user input, and assign the input to the variable vehiclePolicyNumber .
  1. 24.

    Amend the code, as in Listing 11-8.

     
      repairShopClaims[arrayPositionCounter] = repairShopID;
      arrayPositionCounter++;
      /*
      Read the user input for the vehicle policy number
      and keep it as a string
      */
      Console.WriteLine("What is the vehicle policy number? ");
      vehiclePolicyNumber = Console.ReadLine();
     } // End of Main() method
Listing 11-8

Ask user for policy number and read the value

When the code is executed and the user has entered the details, we need to store these details in the array at position 1. We will now add the user input to the array in position 1 and then increment the arrayPositionCounter that is being used to track the positions at which the items go into the array.
  1. 25.

    Amend the code, as in Listing 11-9.

     
    Console.WriteLine("What is the vehicle policy number? ");
    vehiclePolicyNumber = Console.ReadLine();
    /*
    Write the second input value to the array and then
    increment the value of the arrayPositionCounter by 1
    */
    repairShopClaims[arrayPositionCounter] = vehiclePolicyNumber;
        arrayPositionCounter++;
      } // End of Main() method
Listing 11-9

Add input to the array and increment the counter

Now we will ask the user to input the claim amount, read the user input, and assign the input to the variable claimAmount .
  1. 26.

    Amend the code, as in Listing 11-10.

     
    repairShopClaims[arrayPositionCounter] = vehiclePolicyNumber;
    arrayPositionCounter++;
    /*
    Read the user input for the repair amount and assign
    it the variable claimAmount
    */
    Console.WriteLine("What is the amount being claimed " +
      "for the repair? ");
    claimAmount = Console.ReadLine();
      } // End of Main() method
Listing 11-10

Ask user for claim amount and read the value

When the code is executed and the user has entered the details, we need to store these details in the array we have set up at position 2. We will now add the user input to the array in position 2 and then increment the arrayPositionCounter that is being used to track the positions at which the items go into the array.
  1. 27.

    Amend the code, as in Listing 11-11.

     
        Console.WriteLine("What is the amount being claimed " +
          "for the repair? ");
        claimAmount = Console.ReadLine());
        /*
        Write the third input value to the array and then
        increment the value of the arrayPositionCounter by 1
        */
        repairShopClaims[arrayPositionCounter] = claimAmount;
        arrayPositionCounter++;
      } // End of Main() method
Listing 11-11

Add input to the array and increment the counter

  1. 28.

    Amend the code, as in Listing 11-12, to ask the user to input the date of the claim and then read the user input .

     
        repairShopClaims[arrayPositionCounter] = claimAmount;
        arrayPositionCounter++;
        /*
        Read the user input for the repair date and assign
        it to the claimDate variable
        */
        Console.WriteLine("What was the date of the repair? ");
        claimDate = Convert.ToDateTime(Console.ReadLine());
      } // End of Main() method
Listing 11-12

Ask user for claim date, read the value, and convert it to a Date

When the code is executed and the user has entered the details, we need to store these details in the array we have set up at position 3. Now we will add the user input, converted to a string, to the array in position 3 and then increment the arrayPositionCounter that is being used to track the positions at which the items go into the array
  1. 29.

    Amend the code , as in Listing 11-13.

     
        Console.WriteLine("What was the date of the repair? ");
        claimDate = Convert.ToDateTime(Console.ReadLine());
        /*
        Write the fourth input value to the array and then
        increment the value of the arrayPositionCounter by 1
        */
        repairShopClaims[arrayPositionCounter] = claimDate.ToString();
        arrayPositionCounter++;
      } // End of Main() method
Listing 11-13

Add input to the array and increment the counter

Now we have accepted all the data required for the first claim. But before getting details for the second claim, we need to increment the numberOfClaimsEntered counter that is being used to hold the value of the number of claims that have been entered.
  1. 30.

    Amend the code, as in Listing 11-14.

     
        repairShopClaims[arrayPositionCounter] = claimDate.ToString();
        arrayPositionCounter++;
        /* Increment the loop counter by 1 */
        numberOfClaimsEntered++;
      } // End of Main() method
Listing 11-14

Increment the numberOfClaimsEntered counter

  1. 31.

    Amend the code, as in Listing 11-15, to finish the do while loop by adding the Boolean condition to be tested.

     
        /* Increment the loop counter by 1 */
        numberOfClaimsEntered++;
      } while (numberOfClaimsEntered < numberOfClaimsBeingMade);
    } // End of Main() method
  } // End of Arrays class
} // End of Chapter11 namespace
Listing 11-15

Complete the do while iteration construct

Depending on the number of claims the user wishes to make, the do while loop will be executed again the required number of times. This is great, but our only problem will be verifying that the details have been stored in the array. This now offers us a great opportunity to use the last type of iteration, foreach, that was mentioned in the last chapter.

foreach Loop

We can use a foreach loop as an efficient way to iterate through an array or any collection. Unlike the other iteration constructs we looked at in the previous chapter – for, while, and do – there is no need for an index counter, as the foreach statement takes control and manages the required number of iterations. The foreach loop helps us as developers by reducing the amount of code we need to write. On the other hand, we do not actually have a counter variable to work with if we wish to use it in a display line or for some other reason. The format of the foreach loop is
    foreach (var item in collection)
    {
          <statements>
     }
In this generic example code
  • var represents the data type of the array or collection items but we can use any data type from the C# language.

  • item is a variable representing the member of the array. The item in the array at the current position.

  • The name item is a variable name, and we can call it whatever we like, for example, thememberofthearray.

  • in is a keyword and must be used in this position.

  • collection represents the name of the array or collection we wish to iterate.

Applying this to the preceding program we have coded, we would have the code for the iteration statement as shown in Listing 11-16.
      foreach (var itemInTheClaimsArray in repairShopClaims)
      {
        Console.WriteLine("The item in the array is:" +
          " " + itemInTheClaimsArray + " ");
      }
Listing 11-16

foreach loop

Looking at this specific example
  • var represents the data type of the array or collection items.

  • item has been replaced with the variable name itemInTheClaimsArray.

  • in is the keyword.

  • repairShopClaims represents the collection.

  • In the write line statement, the variable itemInTheClaimsArray has been displayed.

We will now amend our code to iterate the array and display the items in the array as a way of confirming that the data entered by the user has been stored in the array.
  1. 32.

    Amend the code, as in Listing 11-17, to add the foreach iteration .

     
      } while (numberOfClaimsEntered < numberOfClaimsBeingMade);
      foreach (var itemInTheClaimsArray in repairShopClaims)
      {
        Console.WriteLine("The item in the array is:" +
          " " + itemInTheClaimsArray + " ");
      }
    } // End of Main() method
Listing 11-17

foreach iteration

  1. 33.

    Click the File menu.

     
  2. 34.

    Choose Save All.

     
  3. 35.

    Click the Debug menu.

     
  4. 36.

    Choose Start Without Debugging.

     
The console window will appear and ask the user to input the number of claims to be made.
  1. 37.

    Type 2 and press the Enter key.

     
  2. 38.

    Type RS000001 for the repair shop id and press the Enter key.

     
The console will now ask the user to input the vehicle policy number.
  1. 39.

    Type VP000001 and press the Enter key.

     
The console will now ask the user to input the claim amount.
  1. 40.

    Type 1999.99 and press the Enter key.

     
The console will now ask the user to input the date of the repair.
  1. 41.

    Type 2021/10/01 and press the Enter key.


A screenshot depicts a console screen with questions and inputs for iteration 1. The questions are about the number of claims, repair shop i d, vehicle policy number, claim amount, and repair date.

Figure 11-3

Iteration 1

Iteration 1 is now completed; the block of code has been executed. The counter will now be incremented by 1 and become a 1. The questions are asked again for the second claim, as shown in Figure 11-3.
  1. 42.

    Type RS000001 for the repair shop id and press the Enter key.

     
The console will now ask the user to input the vehicle policy number .
  1. 43.

    Type VP000002 and press the Enter key.

     
The console will now ask the user to input the claim amount.
  1. 44.

    Type 2999.99 and press the Enter key.

     
The console will now ask the user to input the date of the repair.
  1. 45.

    Type 2021/10/01 and press the Enter key.


A screenshot depicts a console screen with questions and input for iteration 2. The questions are about repair shop i d, vehicle policy number, claim amount, and repair date.

Figure 11-4

Iteration 2

The number of claims entered is 2, and this is all that the user requested, so the do while loop is complete, as shown in Figure 11-4, and the next lines of code are the foreach iteration. As a result of the foreach iteration, the console will display all the items in the array as shown in Figure 11-5.

A screenshot depicts a console screen with 8 array items fetched from the 2 iterations.

Figure 11-5

Foreach iteration shows the eight array items

Figure 11-5 confirms that the array holds the data entered by the user since the foreach iteration has been used to display the array items. Our array is a single-dimensional array holding items of data type string.
  1. 46.

    Press any key to close the console window.


Now that we have the basics of an array, we can now explore arrays further and see some of the possible errors associated with them.

Add a new class to hold the code for this example.
  1. 1.

    Right-click the Chapter11 project in the Solution Explorer panel.

     
  2. 2.

    Choose Add.

     
  3. 3.

    Choose Class.

     
  4. 4.

    Name the class ArrayErrors.cs.

     
  5. 5.

    Click the Add button.

     
  6. 6.

    Create a Main() method within the class, as this was not produced automatically, and delete the unwanted imports.

     
The shortcut to create the Main() method is to type svm and then press the Tab key twice. Now we need to set this class as the startup class.
  1. 7.

    Right-click the Chapter11 project in the Solution Explorer panel.

     
  2. 8.

    Choose Properties from the pop-up menu.

     
  3. 9.

    Choose the ArrayErrors.cs class in the Startup object drop-down list.

     
  4. 10.

    Close the Properties window.

     
We will now create a program that will declare and create an array whose size will be determined by the number of entries the user is making. Remember that the array size has to be known at compile time; otherwise, we will get an error. In this program we will keep the code straightforward and only ask the user for the vehicle policy number and the odometer reading.
  1. 11.

    Amend the code, as in Listing 11-18, to declare and create the array using a variable for the size of the array.

     
    static void Main(string[] args)
    {
      /*
      We will setup our variables that will be used in the
      application. The number of entries being made will
      determine the size of the array
      */
      int numberOfEntriesBeingMade;
      /*
      The array is going to hold the data for a number of
      vehicles and their corresponding odometer readings.
      Each entry will be a vehicle policy number and the
      number of kilometres shown on the odometer. This means
      that the size of the array will be twice the number of
      entries being made by the repair shop.
      */
      string[] odometerReadings = new string[numberOfEntriesBeingMade * 2];
    } // End of Main() method
Listing 11-18

Create a variable and use it for the array size

We should note that as we have not initialized the numberOfEntriesBeingMade variable, we get an error as shown in Figure 11-6.

A screenshot depicts an error that a variable name, 'number of entries being made', is not initialized.

Figure 11-6

Error when variable not initialized

The error message shown in Figure 11-6 is saying that we cannot use an unassigned variable for the array size. So we will simply add a line of code that will ask the user to input the number of entries they are going to make and assign this value to the variable. Now the program will be happy as it will have a value for the variable – the variable is not unassigned. What we can see is that even though the actual value of the variable is not known, the program is happy as it will know the value before the array is created.

We will now ask the user to input the number of entries being made, read this value from the console, convert it to data type int, and assign the value to the variable called numberOfEntriesBeingMade. We will insert this code after the declaration of the array.
  1. 12.

    Amend the code, as in Listing 11-19.

     
      string[] odometerReadings =
                    new string[numberOfEntriesBeingMade * 2];
      /*
      Read the user input for the number of entries being
      made and convert the string value to an integer data type
      */
      Console.WriteLine("How many entries are you wishing to make? ");
      numberOfEntriesBeingMade = Convert.ToInt32(Console.ReadLine());
    } // End of Main() method
Listing 11-19

Read the user input – after array declaration

We still see a red underline under the variable numberOfEntriesBeingMade, and this is understandable as the value read from the console is only known after the line of code that tries to declare and create the array. This is an error as the size needs to be known at compile time, now, not at runtime.
  1. 13.

    Amend the code, as in Listing 11-20, to move the block of code we have just entered to above the array declaration statement .

     
      int numberOfEntriesBeingMade;
      /*
      Read the user input for the number of entries being
      made and convert the string value to an integer data type
      */
      Console.WriteLine("How many entries are you wishing to make? ");
      numberOfEntriesBeingMade = Convert.ToInt32(Console.ReadLine());
      /*
      The array is going to hold the data for a number of
      vehicles and their corresponding odometer readings.
      Each entry will be a vehicle policy number and the
      number of kilometres shown on the odometer. This means
      that the size of the array will be twice the number of
      entries being made by the repair shop.
      */
      string[] odometerReadings = new string[numberOfEntriesBeingMade * 2];
Listing 11-20

Read the user input – before array declaration

Great, the red underline has disappeared, and the compiler is happy. So now we know that we must tell the compiler the size of the array to make it happy. We can use a variable, but this must be known when the array is declared and created.

Now we will ask the user to input the value for the vehicle policy number followed by the odometer reading and this will be repeated the number of times requested by the user. For this we will use a do while loop. This code will be very similar to the code from the last code example.
  1. 14.

    Amend the code, as in Listing 11-21, to add the other variables we will use.

     
    static void Main(string[] args)
    {
      /*
           We will setup our variables that will be used in the
           application. The number of entries being made will
           determine the size of the array
           */
      int numberOfEntriesBeingMade;
      int numberOfEntriesEntered = 0;
      int arrayPositionCounter = 0;
      int odometerReadingForVehicle;
      string vehiclePolicyNumber;
Listing 11-21

Adding the extra variables we require

  1. 15.

    Amend the code, as in Listing 11-22, to add the loop and the questions.

     
    string[] odometerReadings =
                  new string[numberOfEntriesBeingMade * 2];
  /*
  As we are using a variable in the loop our code is
  flexible and can be used for any number of claims.
  An ideal situation and good code.
  */
  do
  {
    Console.WriteLine("The current value of the counter is :" + numberOfEntriesEntered + " ");
    /*
    Read the user input for the vehicle policy number
    and keep it as a string
    */
    Console.WriteLine("What is the vehicle policy number? ");
    vehiclePolicyNumber = Console.ReadLine();
    /*
    Write this first input value to the array and then
    increment the value of the arrayPositionCounter by 1
    */
    odometerReadings[arrayPositionCounter] = vehiclePolicyNumber;
    arrayPositionCounter++;
    /* Read the user input for the odometer reading */
    Console.WriteLine("What is the odometer reading? ");
    odometerReadingForVehicle = Convert.ToInt32(Console.ReadLine());
    /*
    Write the second input value to the array and then
    increment the value of the arrayPositionCounter by 1
    */
    odometerReadings[arrayPositionCounter] = odometerReadingForVehicle.ToString();
    arrayPositionCounter++;
    /* Increment the loop counter by 1 */
    numberOfEntriesEntered++;
  } while (numberOfEntriesEntered < numberOfEntriesBeingMade);
  } // End of Main() method
Listing 11-22

Adding the do while loop and the user questions

  1. 16.

    Amend the code, as in Listing 11-23, to add the iteration construct and display the array values.

     
  /* Increment the loop counter by 1 */
   numberOfEntriesEntered++;
 } while(numberOfEntriesEntered < numberOfEntriesBeingMade);
  foreach(string itemInTheodometerReadingsArray in
                                      odometerReadings)
   {
     Console.WriteLine("The item in the array is: " + itemInTheodometerReadingsArray + " ");
   } // End of foreach construct
 } // End of Main() method
Listing 11-23

Adding the foreach iteration to display the array values

  1. 17.

    Click the File menu.

     
  2. 18.

    Choose Save All.

     
  3. 19.

    Click the Debug menu.

     
  4. 20.

    Choose Start Without Debugging.

     
  5. 21.

    Type 2 for the number of entries to be made.

     
  6. 22.

    Press the Enter key.

     
  7. 23.

    Type VP000001 for the vehicle policy number.

     
  8. 24.

    Press the Enter key.

     
The console will now ask the user to input the vehicle odometer reading.
  1. 25.

    Type 10000.

     
  2. 26.

    Press the Enter key.

     
  3. 27.

    Type VP000002 for the vehicle policy number.

     
  4. 28.

    Press the Enter key.

     
  5. 29.

    Type 20000.

     
  6. 30.

    Press the Enter key.

     
Figure 11-7 shows the two iterations, and Figure 11-8 shows the array items.

A screenshot depicts a console screen with questions and inputs of 2 iterations. The questions are about vehicle policy number and odometer reading.

Figure 11-7

Both iterations completed

A screenshot depicts a console screen with 4 array items fetched from the 2 iterations.

Figure 11-8

Foreach iteration displays the array items

The array will therefore hold the string values as shown in Table 11-5.
Table 11-5

Array depiction

[0]

[1]

[2]

[3]

VP000001

10000

VP000002

20000

IndexOutOfBounds Exception

An array is of fixed size, and if we try to read or write a value that is outside the boundary of the array, we will be causing an exception. In C# the error is known as an IndexOutOfBounds exception because it happens when we have made the value of the index, the counter, larger than the size of the array. Remember that the index starts at 0, not 1.

We will now make the iteration go one more than it currently does, by adding 1 to the Boolean condition at the end of the do while construct.
  1. 31.

    Amend the code, as in Listing 11-24, to add 1 to the end of the do while.

     
  /* Increment the loop counter by 1 */
  numberOfEntriesEntered++;
} while(numberOfEntriesEntered < numberOfEntriesBeingMade + 1);
Listing 11-24

Adding +1 to the end of the do while loop

  1. 32.

    Click the File menu.

     
  2. 33.

    Choose Save All.

     
  3. 34.

    Click the Debug menu.

     
  4. 35.

    Choose Start Without Debugging.

     
  5. 36.

    Type 2 for the number of entries to be made.

     
  6. 37.

    Press the Enter key.

     
  7. 38.

    Type VP000001 for the vehicle policy number.

     
  8. 39.

    Press the Enter key.

     
The console will now ask the user to input the vehicle odometer reading.
  1. 40.

    Type 10000.

     
  2. 41.

    Press the Enter key.

     
  3. 42.

    Type VP000002 for the vehicle policy number.

     
  4. 43.

    Press the Enter key.

     
  5. 44.

    Type 20000.

     
  6. 45.

    Press the Enter key.

     
  7. 46.

    Type VP000003 for the vehicle policy number.

     
  8. 47.

    Press the Enter key.


Our array was made to have a size of

2 entries multiplied by the 2 values in each entry = 4

This means that the positions available in the array are

odometerReadings[0]

odometerReadings[1]

odometerReadings[2]

odometerReadings[3]

Our variable is 4, and we are therefore trying to write to position

odometerReadings[4]

This means our index of 4 is out of bounds, as 3 is the maximum boundary limit. Figure 11-9 shows the resulting runtime error.

A screenshot depicts a runtime error. It is about an unhandled exception as the index was out of bounds of the array.

Figure 11-9

Array out-of-bounds exception

We will now change the test back to its original value, no +, as in Listing 11-25.
    /* Increment the loop counter by 1 */
    numberOfEntriesEntered++;
  } while(numberOfEntriesEntered < numberOfEntriesBeingMade);
Listing 11-25

Removing the +1 from the end of the do while loop

  1. 48.

    Click the File menu.

     
  2. 49.

    Choose Save All.


Ranges and Indices: C# 8 and Above

Add a new class to hold the code for this example.
  1. 1.

    Right-click the project Chapter11 in the Solution Explorer panel.

     
  2. 2.

    Choose Add.

     
  3. 3.

    Choose Class.

     
  4. 4.

    Name the class IndicesAndRanges.cs.

     
  5. 5.

    Click the Add button.

     
  6. 6.

    Create a Main() method within the class, as this was not produced automatically, and delete the unwanted imports.


Remember the shortcut to create the Main() method is to type svm and then press the Tab key twice.

Now we need to set this class as the startup class.
  1. 7.

    Right-click the Chapter11 project in the Solution Explorer panel.

     
  2. 8.

    Choose Properties from the pop-up menu.

     
  3. 9.

    Choose the IndicesAndRanges.cs class in the Startup object drop-down list.

     
  4. 10.

    Close the Properties window.


C# 8 introduced the concept of ranges to collections along with two new operators. When using ranges, we now have the index and the range, which can be used to index and slice the collection. Both index and range are part of the System namespace. When we think about what we have done so far with arrays, we have worked from the start of the zero-indexed array and never really thought about starting from the end of the array, and we use the index of the element or elements when we need access to them. Now, in C# 8 we have been given an index expression that allows us to access the collection from the end. The hat operator, ^, means “index from end,” so ^2 would give us the second element from the end. The syntax is the ^ followed by an integer value or a variable that can be converted to an integer, and we should still be aware that we can still get an IndexOutOfRange exception if we use an incorrect integer value.

Also, in C# there was no easy way to access a range or a slice of the collection, but we could use commands like Skip() and Take(), which belong to the Language-Integrated Query (LINQ) library . An example of these would be
string[] policyType = { "Home", "Auto", "Life", "Boat" };
var policies = policyType.Skip(2).Take(1);
Console.WriteLine("Skip 2 and take 4 gives the values");
foreach (var category in policies)
{
  Console.WriteLine(category);
}
Running this code would mean Home and Auto are skipped and then Life is taken and it is displayed within the foreach construct. But interestingly if we are to code either of these two lines
var policies = policyType.Skip(12).Take(1);
var policies = policyType.Skip(2).Take(10);

the fact that we have tried to skip 12 on line 1 when there are only 4 items and take 12 on line 2 when there are only 2 items remaining does not cause an out-of-range exception. However, if the source was null, we would get a System.ArgumentNullException: Value cannot be null error.

C# 8 however changes things, and we are now able to use the new range operator, start..howmany, and we can leave out the start or the end. The .. syntax is called the range operator.

Let's code some C# and build our programming muscle.
  1. 11.

    Amend the code, as in Listing 11-26, to declare and initialize the array.

     
namespace Chapter11
{
  internal class IndicesAndRanges
  {
    static void Main(string[] args)
    {
     Console.WriteLine("**** C# 8 Indices and Ranges ****");
     Console.WriteLine("Ranges and indices provide a succinct ");
     Console.WriteLine("syntax for accessing single elements ");
     Console.WriteLine("or ranges in a sequence ");
     Console.WriteLine("*******************");
     /*
     Declare and initialise the array of employees
     and their salary
     */
      String[] employeeAndSalary = { "Gerry Byrne", "20000.55",
        "Peter Johnston", "30000.00", "Ryan Jones", "50000.00" };
    } // End of Main() method
  } // End of IndicesAndRanges class
} // End of Chapter11 namespace
Listing 11-26

Declare and create the array

We will amend the code to iterate the array and use the index from end within the console output . In this example we use ^(employeeAndSalary.Length (counter)), which means

  • Find the length of the array.

  • Subtract the counter value from it, for example, 6 – 0 = 6.

  • But with the ^ it becomes ^6, which means from the end take the sixth element, which we know is really the first item in the array or index zero.

  1. 12.

    Add the new code within the Main() method, as in Listing 11-27.

     
/*
 Using the index from end operator ^ indicates we wish
 to start at the end of the sequence
 Counting from the beginning means we start at 0
 Counting from the end means we start at 1
 */
  for (int counter = 0; counter < employeeAndSalary.Length;
   counter++)
  {
  Console.WriteLine($"The element positioned {counter} from the end of the array is {employeeAndSalary[^(counter+1)]}");
  }
} // End of Main() method
Listing 11-27

Iterate the array and use the hat operator , index from end

  1. 13.

    Click the File menu.

     
  2. 14.

    Choose Save All.

     
  3. 15.

    Click the Debug menu.

     
  4. 16.

    Choose Start Without Debugging.

     
Figure 11-10 shows the array has been read using the ^ operator. We see the index from end value and the value stored at that position.

A screenshot depicts a console screen with 6 values. The screen displays the names of 3 employees and their salaries based on hat operator and index from the end expression.

Figure 11-10

Using the hat operator ^, “index from end”

  1. 17.

    Press the Enter key to close the console window.

     
  2. 18.

    Amend the code, as in Listing 11-28, to use the index from end to display the second element from the end of the array.

     
      for (int counter = 0; counter < employeeAndSalary.Length;
           counter++)
      {
  Console.WriteLine($"The element positioned {counter} from the end of the array is {employeeAndSalary[^(counter+1)]}");
      }
      Console.WriteLine();
      Console.WriteLine("* ^ index from the end operator *");
      /*
      Using the index feature.
      ^ indicates we wish to start at the end
      In the first example we use the traditional position index
      In the second example we use the index from
      */
      Console.WriteLine($"Element index 2 is {employeeAndSalary[2]} and the second item from the end is {employeeAndSalary[4]}");
      Console.WriteLine($"Element index 2 is {employeeAndSalary[^4]} and the second item from the end is {employeeAndSalary[^2]}");
      Console.WriteLine();
    } // End of Main() method
  } // End of IndicesAndRanges class
} // End of Chapter11 namespace
Listing 11-28

Using the index from end, ^, to display the second element

  1. 19.

    Click the File menu.

     
  2. 20.

    Choose Save All.

     
  3. 21.

    Click the Debug menu.

     
  4. 22.

    Choose Start Without Debugging.

     
The console will show the array elements as shown in Figure 11-11. We see the output line repeated as we have used the traditional method and the equivalent ^, index from end.

A screenshot depicts a console screen with array elements based on index and hat operator. The output line is repeated twice.

Figure 11-11

Traditional index and the hat operator

  1. 23.

    Press the Enter key to close the console window.

     
  2. 24.

    Amend the code, as in Listing 11-29, to use the length and index from end to display the last element of the array.

     
      Console.WriteLine($"Element index 2 is " +
        $"{employeeAndSalary[^4]} and the second item from" +
        $" the end is {employeeAndSalary[^2]}");
      Console.WriteLine();
      Console.WriteLine("* Length and ^ index from end operator*");
      /*
      Using the index feature. ^ indicates we wish to start
      at the end. In the first example we use the length to
      help find the last item. In the second example we use the
      indices to find the last item
      */
      Console.WriteLine($"The last item of the array is {employeeAndSalary[employeeAndSalary.Length - 1]}");
      Console.WriteLine($"The last item of the array is {employeeAndSalary[^1]}");
      Console.WriteLine();
    } // End of Main() method
Listing 11-29

Using the length and index from end , ^

  1. 25.

    Click the File menu.

     
  2. 26.

    Choose Save All.

     
  3. 27.

    Click the Debug menu.

     
  4. 28.

    Choose Start Without Debugging.

     
Figure 11-12 shows the console with the last item of the array.

A screenshot depicts a console screen that displays the last item of an array using the length property and hat operator. The output line is repeated twice.

Figure 11-12

Length and the hat operator

  1. 29.

    Press the Enter key to close the console window.


Range

In this code we will look at the traditional method GetRange(), from the LINQ library, to get a sequence of values from the array. We will also use the Skip() and Take() methods, which are also from the LINQ library. We will then use the new range operator .. to locate elements.

We will amend the code to use the ToList() and GetRange() methods to display the items from the list within the given range. Read the comments to help with understanding the code.
  1. 30.

    Amend the code as in Listing 11-30.

     
      Console.WriteLine($"The last item of the array " +
        $"is {employeeAndSalary[^1]}");
      Console.WriteLine();
      /*
      Using the range feature. Range represents a sub range of
      a sequence. A range specifies the start and end of a range.
      Ranges are exclusive, meaning the end isn't included in
      the range. The range [0..^0] represents the entire range.
      Equally [0..sequence.Length] represents the entire range.
      In the first example we use the traditional method to find
      the length. In the second example we use the indices to
      find the last item
      */
      Console.WriteLine(" GetRange and ToList *");
      Console.WriteLine("Range represents a sub range of a sequence");
      var employees = employeeAndSalary.ToList().GetRange(2, 4);
      foreach (var item in employees)
      {
        Console.WriteLine($"After using GetRange() the array item is {item}");
      }
      Console.WriteLine();
    } // End of Main() method
Listing 11-30

Using the ToList() and GetRange() methods

  1. 31.

    Click the File menu.

     
  2. 32.

    Choose Save All.

     
  3. 33.

    Click the Debug menu.

     
  4. 34.

    Choose Start Without Debugging.

     
Figure 11-13 shows the console displaying the array elements starting at element 2, the third item, and taking four items, which is up to element 5, the sixth item.

A screenshot depicts a console screen that lists 4 array items from elements 2 to 6 using get range and to list functions.

Figure 11-13

GetRange() and ToList() methods start at the third item for four items

  1. 35.

    Press the Enter key to close the console window.

     
  2. 36.

    Amend the code, as in Listing 11-31, to use the Skip() and Take() methods and display the items.

     
      Console.WriteLine();
      Console.WriteLine("* Skip and Take * ");
      /*
      Using the skip and take features.
      In the first example we use the traditional method to
      find the length. In the second example we use the indices
      to find the last item
      */
      var someemployees = employeeAndSalary.Skip(2).Take(4);
      foreach (var item in someemployees)
      {
        Console.WriteLine($"After using Skip() and Take() the array item is {item}");
      }
      Console.WriteLine();
    } // End of Main() method
  } // End of IndicesAndRanges class
} // End of Chapter11 namespace
Listing 11-31

Using the Skip() and Take() methods

  1. 37.

    Click the File menu.

     
  2. 38.

    Choose Save All.

     
  3. 39.

    Click the Debug menu.

     
  4. 40.

    Choose Start Without Debugging.

     
The console, as shown in Figure 11-14, will show the array elements.

A screenshot depicts a console screen that lists 4 array items from elements 2 to 6 using skip and take functions.

Figure 11-14

Skip() and Take() methods

  1. 41.

    Amend the code to use the range operator and display the items.

     
      foreach (var item in someemployees)
      {
        Console.WriteLine($"After using Skip() and " +
          $"Take() the array item is {item}");
      }
      Console.WriteLine();
      Console.WriteLine("* Range operator *");
      /*
      Using the range operator .., specifies the start and end
      of a range as its operands. A range specifies the start
      and end of a range. Ranges are exclusive, meaning the
      end isn't included in the range.
      The range [0..^0] represents the entire range.
      In this example we use start at index 2 and
      stop at the element 2 from the end
      */
      var someemployeeswithindices = employeeAndSalary[2..^2];
      foreach (var item in someemployeeswithindices)
      {
        Console.WriteLine($"Starting at index 2 and stopping at the element before 2 from the end the array item is { item }");
      }
    } // End of Main() method
Listing 11-32

Using the range operator [2..^2]

  1. 42.

    Click the File menu.

     
  2. 43.

    Choose Save All.

     
  3. 44.

    Click the Debug menu.

     
  4. 45.

    Choose Start Without Debugging.

     
The console, as shown in Figure 11-15, shows the result from using the range operator.

A screenshot depicts a console screen that lists 2 array elements using range operator. The range starts from index 2 and stops at element 2 from the end.

Figure 11-15

Range operator [2.. ^2]

Chapter Summary

In this chapter we have learned about the particularly important programming concept called arrays. We have learned that in C#
  • Arrays are used to hold a collection of items all of the same data type.

  • An array is homogeneous.

  • Arrays are of fixed size. Once we declare the size of the array, it cannot be altered.

  • Arrays hold the data for the duration that the program runs.

  • There are single-dimensional arrays, which we have used in this chapter, but there are also multidimensional arrays.

  • Items in an array are referenced by their index, also called the subscript.

  • The indexes start at 0, not 1 – arrays are zero indexed.

  • The foreach loop is an ideal iterator to use with arrays; however, it is not suitable if we need to reference a counter since no counter exists in the foreach construct.

  • If we try to exceed the maximum index of the array, we will get an IndexOutOfBounds exception.

  • There are different ways to access the elements of the array using the range features like the hat operator, ^, which means “index from end,” and the range operator .., which effectively lets us “slice” the array.

  • We can have more than one class in a project.

We are making great progress in our programming of C# applications and we should be proud of our achievements. In finishing this chapter and increasing our knowledge, we are advancing to our target.

An illustration depicts concentric circles. Some inner circles are shaded. A label reads, Our target is getting closer.

..................Content has been hidden....................

You can't read the all page of ebook, please click here login for view all page.
Reset
3.142.252.199