File Handling
In the previous chapter, we gained knowledge of string handling and used many of the methods that belong to the String class. We saw some of the new features introduced in C# 10 that related to string handling , and now we will look at another important topic, file handling. File handling is an important skill since there are many uses for it in the commercial environment.
We learned throughout all the previous chapters about the core constructs of a C# program, and we have seen how to write data to an array . We also read that an array is used to temporarily store data in a data structure , but now we will look at how to store the data in the more permanent form of a text file. Once we have seen how to write to a text file, we should easily be capable of writing the data to a database, but for this book we will not get into the setting up of a database.
It is common for developers to interact with files within their applications. If we think about a game application , we will often see that the highest scores are stored, and the store could be a file located on the device where the game is being played. If the top ten scores are written to the file, then we can envisage that the file will have to be amended as new high scores are achieved. With a persistent store, such as a text file, the scores will be read after the device is restarted.
In the same manner when we use a web browser to visit a website, the site might store a cookie on our computer. The cookie could be a session cookie, which is stored temporarily and only exists for the duration of our browser session on this site, or it could be a persistent cookie where a small text file is saved on our computer. Text files are also widely used as log files, and a log file could consist of historical data related to things that occur. An example where we might encounter a log file could be historical data related to when we logged on to our insurance account or a bank account. The insurance company may record data related to the date and time of our log-in, the date and time when we logged out, and what parts of the account we used, for example, the payments window or the statements window. Or it might have been the documents window where we can see a PDF of our policy.
Within .NET we are provided with many “tools” to help us interact with the file system. Files provide a means by which our programs can store and access data. Within .NET the System.IO namespace offers us a collection of classes, methods, enumerations, and types to read and write data streams and files, using either a synchronous or asynchronous approach. In .NET all file handling operations require us to use the System.IO namespace.
An Overview of File Handling
- The file path , which contains
The drive the file is stored on, which could be a local drive or server
The directory the file is located in, within the drive – this may be a nested folder
In C#, when our application code is used to read in from a file or write out to a file, we will use a stream object, which can pass and receive data in the form of bytes. We can think of a stream as a series of bytes, and we will commonly use streams when we are reading or writing a large file where it is more efficient to read the file, chunk by chunk, or where we write to the file, chunk by chunk. Streams offer better performance in our application because in a write operation, the data is written to a stream first and held there until the device being written to is ready to accept the data. Equally, in a read operation, the chunks are sent to a stream as they are read from a file on the device, before they are used by the application requesting the data.
Network – A network stream will be used to read from or write to a network socket, where a socket is one of the endpoints in a two-way network communication.
Memory – A memory stream will be used to read or write bytes stored in memory.
Pipe – A pipe stream will be used to read or write bytes from or to various processes.
Buffer – A buffered stream is used to read or write bytes from or to other streams in order to enhance the performance of the operation.
Read( ) method , which allows us to read data from a stream.
Write( ) method , which allows us to write data to a stream.
Close( ) method , which frees the file for other processes to use. Not closing the stream means other programs will not have access to the stream and its data.
Seek( ) method , which allows us to change position within a stream. We can therefore use this method to read from or write to a position of our choice within the stream.
File Class
File class methods
Method | Description |
|---|---|
AppendAllLines(filename, lines) | This method will be used to append lines to a file and then close the file. Should the file not exist, then the method will create the file for us, write the required lines to the new file, and then close the newly created file. |
AppendAllText(filename, strig) | This method will be used to open a file and append the specified string to the file, closing the file when it has completed the task. Should the file not exist, then the method will create the file for us, write the required string to the new file, and then close the newly created file. |
Exists(filename) | This method checks if the specified file exists. |
ReadAllBytes(filename) | This method will be used to open a binary file and then read the contents of the file into a byte array before closing the file. |
ReadAllLines(filename) | This method will be used to open a file and then read the contents of the file line by line before closing the file. |
ReadAllText(filename) | This method will be used to open a file and then read the contents of the file as one block before closing the file. |
WriteAllBytes(filename, byte[]) | This method will be used to create a new file and then write the contents of the specified byte array to the file before closing the file. Should the file exist, then the method will overwrite it. |
WriteAllLines(filename, String[]) | This method will be used to create a new file and then write the contents of the specified String array to the file before closing the file. Should the file exist, then the method will overwrite it. |
WriteAllText(filename, string) | This method will be used to create a new file and then write the contents of the specified string to the file before closing the file. Should the file exist, then the method will overwrite it. |
In terms of the word static , we will see more about it in Chapter 13 , but for now just accept that static means belonging to this class .
Using the instance of the class, we have access to the methods and fields of the class that have the public access modifier and are not static.
Adding the full stop after the instance name means those methods and fields that are accessible will be displayed. This is called the dot notation
Well, in .NET the File class contains static methods, and this means they belong to the File class , not any instance of the File class. So, when we wish to use the static methods, we will not need to make an instance of the File class to access and use these methods. Yes, indeed, this is different from what we did in Chapter 13, but it is a perfectly acceptable practice, and there are many classes that follow this paradigm.
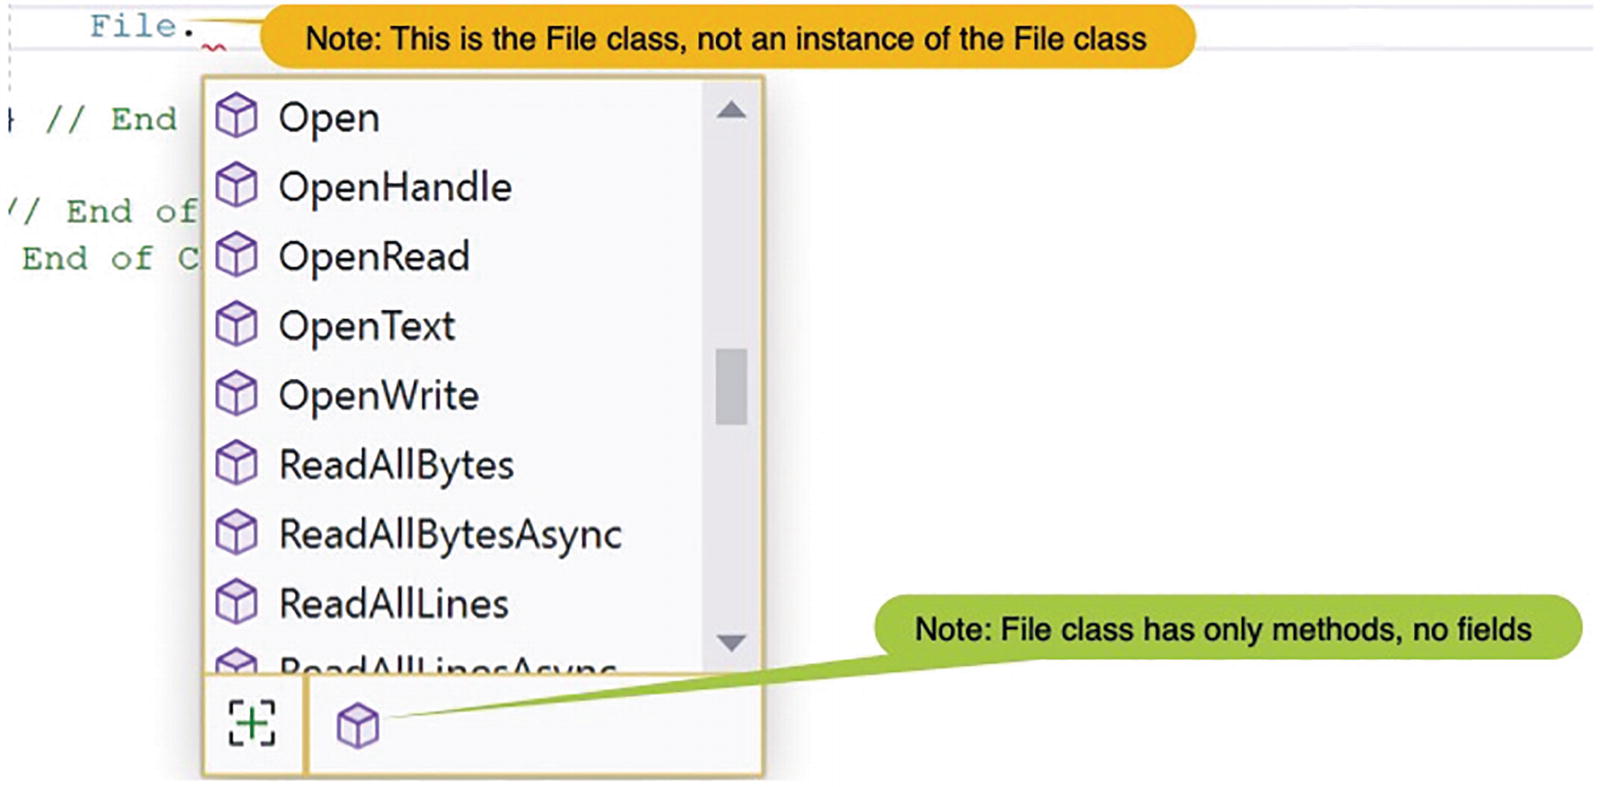
A window displays a dropdown list that contains the file class methods. The file icon is depicted in the lower part.
File class methods
Having gained some knowledge about classes and knowing that when we use the File class, we are using the class directly, we will know that we do not need to make an instance of the class. We can say this another way: we do not make an instance of the class.
Let’s code some C# and build our programming muscle.
- 1.
Right-click the solution CoreCSharp.
- 2.
Choose Add.
- 3.
Choose New Project.
- 4.
Choose Console App from the listed templates that appear.
- 5.
Click the Next button.
- 6.
Name the project Chapter16 and leave it in the same location.
- 7.
Click the Next button.
- 8.
Choose the framework to be used, which in our projects will be .NET 6.0 or higher.
- 9.
Click the Create button.
- 10.
Right-click the Chapter16 project in the Solution Explorer panel.
- 11.
Click the Set as Startup Project option.
- 12.
Right-click the Program.cs file in the Solution Explorer window.
- 13.
Choose Rename.
- 14.
Change the name to FileHandling.cs.
- 15.
Press the Enter key.
- 16.
Double-click the FileHandling.cs file to open it in the editor window.
- 17.
Amend the code as, in Listing 16-1, to have a namespace, a class, and a Main( ) method and import the System and System.IO namespaces.
Class template with the Main( ) method
- 18.
Amend the code, as in Listing 16-2, to create string variables at the class level and assign the filenames to them.
String variable assigned the filename
- 19.
Amend the code, as in Listing 16-3.
Create a method outside Main( ) and call it from inside Main( )
- 20.
Click the File menu.
- 21.
Choose Save All.
- 22.
Click the Debug menu.
- 23.
Choose Start Without Debugging.

A console window displays the message that the file does not exist. It prompts the user to press any key to close the window.
File does not exist message
- 24.
Press the Enter key to close the console window.
- 25.
Amend the code, as in Listing 16-4, to create the method for creating the file.
Create a new file using the Create( ) method
- 26.
Amend the code, as in Listing 16-5, to call the method from the Main( ) method.
Call our new method that creates the file
- 27.
Click the File menu.
- 28.
Choose Save All.
- 29.
Click the Debug menu.
- 30.
Choose Start Without Debugging.
- 31.
Press any key to close the console window that appears.
- 32.
In the Solution Explorer click the Chapter16 project.
- 33.
Click the Show All Files icon, as shown in Figure 16-3.

A Solution Explorer Window depicts several icons. The icon for Show All Files is chosen.
Show All Files
- 34.
Click the Sync with Active Document button, if the icon is displayed, as shown in Figure 16-4.
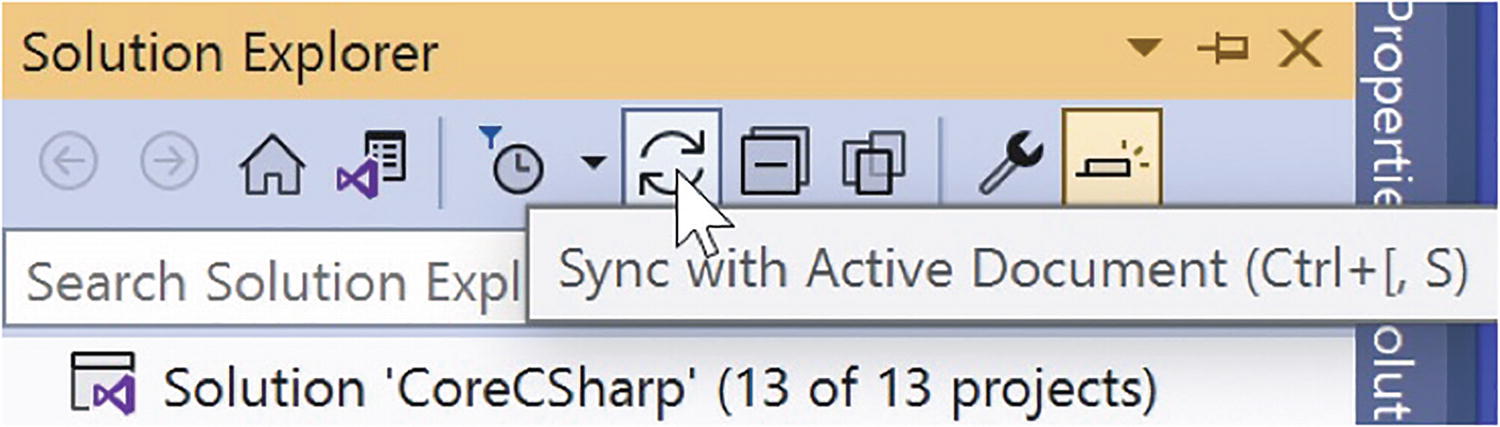
A Solution Explorer Window depicts several icons. The icon for Sync with Active Document is chosen.
Refresh the project files view
- 35.
Expand the bin, Debug, and net6.0 folders.

A folder tree for Chapter 16 exhibits three hidden folders, bin, Debug, and net 6.0. A created file is also noted with the title policy details dot t x t.
Text file has been written to its location

A file listing depicts that the policy details text file and the Chapter 16 application file are both located in the bin folder.
Location of the compiled code
Writing to a File
WriteAllText( )
- 36.
Amend the code, as in Listing 16-6, to create the new method.
Create the method that will write all text to a file
- 37.
Amend the code, as in Listing 16-7, to call the method from the Main( ) method.
Call our new method that writes text to the file
- 38.
Click the File menu.
- 39.
Choose Save All.
- 40.
Click the Debug menu.
- 41.
Choose Start Without Debugging.

A console window displays the message that the file exists. It prompts the user to press any key to close the window.
File is found and can be written to
- 42.
Press any key to close the console window that appears.
- 43.
In the Solution Explorer expand the Chapter16 project.
- 44.
Double-click the policydetails.txt file to open it in the editor window, as shown in Figure 16-8.

An editor window displays the data written to the policy details dot t x t file. The string of data reads, This file will hold details of the customer policies.
Data written to the text file
WriteAllLines( )
- 45.
Amend the code, as in Listing 16-8, to create a method.
Create the method that will write the array contents to the text file
- 46.
Amend the code, as in Listing 16-9, to call the method from the Main( ) method.
Call our new method that writes all lines to the file
- 47.
Click the File menu.
- 48.
Choose Save All.
- 49.
Click the Debug menu.
- 50.
Choose Start Without Debugging.
- 51.
Press any key to close the console window that appears.
- 52.
In the Solution Explorer click the Chapter16 project.
- 53.
Double-click the policydetails.txt file to open it in the editor window, as shown in Figure 16-9.

An editor window displays the array data written to the policy details dot t x t file. The array data consist of three lines.
Data from array written to the text file, overriding existing text
WriteAllBytes( )
We stated earlier that the WriteAllBytes method is used to create a new file or overwrite the existing file with the contents of a byte array . Now we will code another method where we will
Create a string variable and assign it a string of text.
Convert the string to bytes using the GetBytes( ) method from System.Text.Encoding.ASCII and place the bytes in a byte array.
Use the WriteAllBytes( ) method to write the bytes to a new text file.
Display the bytes by iterating the byte array and displaying each element, which will be a byte value from 0 to 255.
- 54.
Amend the code, as in Listing 16-10, to create the method to perform the steps listed previously.
Create the method to write a byte array’s contents to the text file
- 55.
Amend the code, as in Listing 16-11, to call the WriteAllBytesToTheFile( ) method from the Main( ) method.
Call our new method that writes a byte array’s contents to the text file
- 56.
Click the File menu.
- 57.
Choose Save All.
- 58.
Click the Debug menu.
- 59.
Choose Start Without Debugging.

A console window displays 12 lines of Ascii byte codes.
The bytes from the byte array are displayed
- 60.
Press any key to close the console window that appears.
- 61.
In the Solution Explorer click the Chapter16 project.
- 62.
Double-click the policydetails.txt file to open it in the editor window, as shown in Figure 16-11, and see that the data is written to the file.

An editor window displays the data from the array written to the policy details dot t x t file. The data reads, All policies.
Data from array written to the text file
WriteAllText( )
WriteAllLines( )
WriteAllBytes( )
AppendAllText( ) or AppendAllTextAsync( )
AppendAllLines( ) or AppendAllLinesAsync( )
AppendAllBytes( )
ReadAllText( )
ReadAllLines( )
ReadAllBytes( )
There are also async versions of these three methods: ReadAllTextAsync( ), ReadAllLinesAsync( ) and ReadAllBytesAsync( ).
Reading from a File
ReadAllText( )
We stated earlier that the ReadAllText( ) method is used to open a file and then read the contents of the file as one block, before closing the file. Now we will code another method to read all the text from a new file, which we will create, and then call the method from the Main( ) method.
- 1.
Right-click the policydetails.txt file in the net6.0 folder, which is inside the Debug folder, inside the bin folder, in the Solution Explorer window.
- 2.
Choose Copy.
- 3.
Right-click the net6.0 folder.
- 4.
Choose Paste.
- 5.
Right-click the newly pasted policydetails – Copy.txt file.
- 6.
Choose Rename.
- 7.
Rename the file policydetailsnew.txt.
- 8.
Double-click the policydetailsnew.txt file to open it in the editor window.
- 9.
Amend the text file by adding some additional lines of text. Listing 16-12 shows some additional lines added to the one line that previously existed.
Additional lines added to the policydetailsnew.txt file
- 10.
Amend the FileHandling.cs code, as in Listing 16-13, to create the method.
Create the method to read all contents of the text file
- 11.
Amend the code, as in Listing 16-14, to call the method from the Main( ) method.
Call our new method that reads all contents of the text file
- 12.
Click the File menu.
- 13.
Choose Save All.
- 14.
Click the Debug menu.
- 15.
Choose Start Without Debugging.

A console window displays the data read from the new file. It starts with a text that reads, The data read is, and then proceeds to list 4 policies.
Data read from the file is displayed

A console window displays the data read from the lines of the file. Instead of listing the policy number only, the text follows the format, The policy number is, then mentions the policy number.
Data read from the lines of the file is displayed
- 16.
Press any key to close the console window that appears.
ReadAllLines( )
Read all the lines from the file we have created
If it is the first line, display the text as it is.
If it is not the first line, use the Substring( ) method to read the policy number part of the line, which starts at character 7.
Display a message showing the policy number.
- 17.
Amend the code, as in Listing 16-15, to create the method.
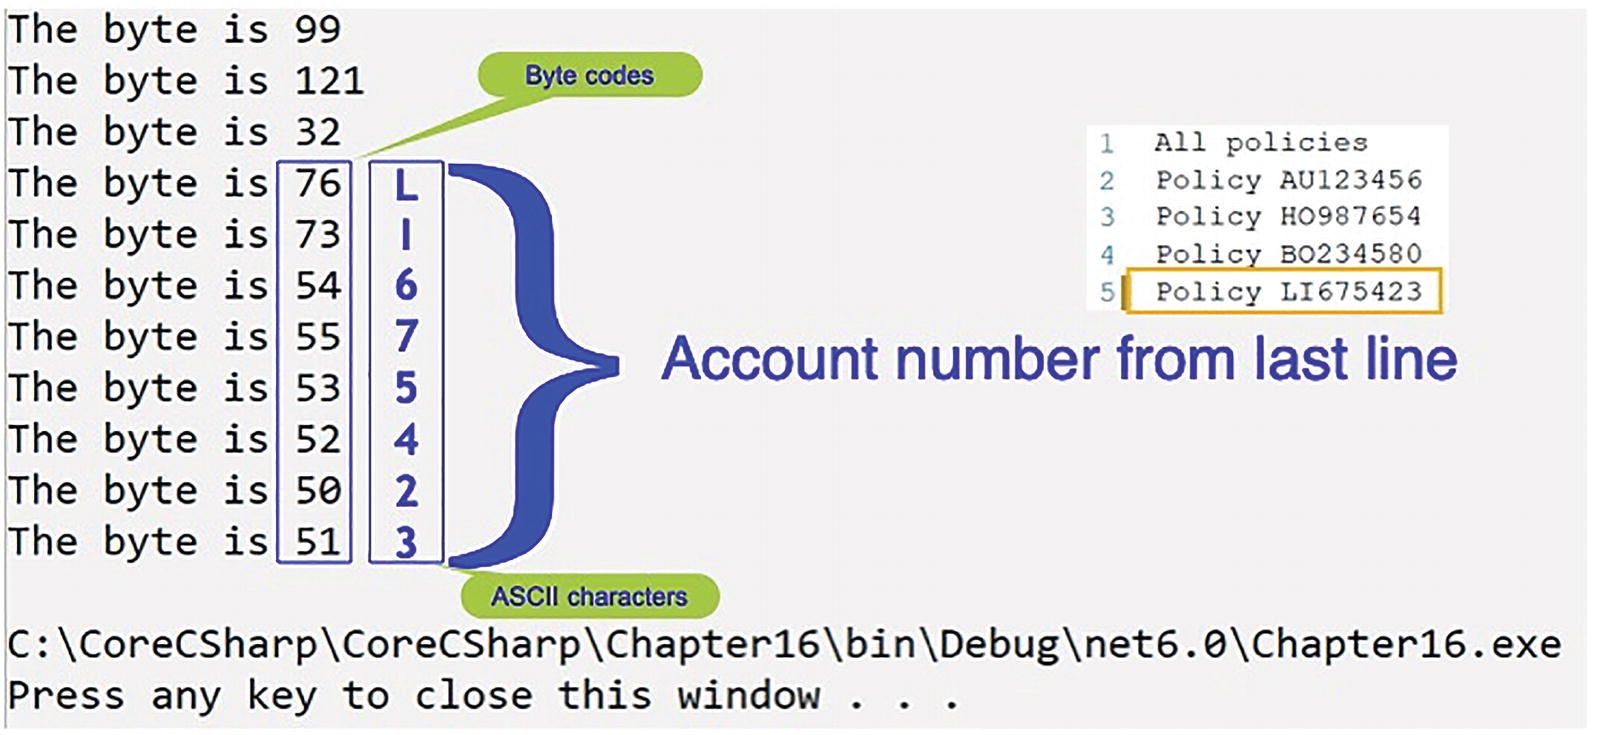
A console window displays some of the data read from the file to a byte array. The byte codes are given equivalent Ascii characters which become the basis for the account number.
Some of the data read from the file to a byte array
Create the method to read all lines of the text file
- 18.
Amend the code, as in Listing 16-16, to call the method from the Main( ) method.
Call our new method that reads all lines of the text file
- 19.
Click the File menu.
- 20.
Choose Save All.
- 21.
Click the Debug menu.
- 22.
Choose Start Without Debugging.
- 23.
Press any key to close the console window, as shown in Figure 16-13.
ReadAllBytes( )
- 24.
Amend the code, as in Listing 16-17, to create the method.
Create the method to read all bytes of the text file
- 25.
Amend the code, as in Listing 16-18, to call the method from the Main( ) method.
Call our new method that reads all bytes of the text file
- 26.
Click the File menu.
- 27.
Choose Save All.
- 28.
Click the Debug menu.
- 29.
Choose Start Without Debugging.
- 30.
Press any key to close the console window, as shown in Figure 16-14.
Copy a File
The file might not exist.
The file might be readonly when we attempt to write to it.
The file may be damaged.
We may have the filename spelled incorrectly.
C# gives us a try catch block that can help us avoid getting an exception error when we perform file handling processes . The C# try catch block uses the try and catch keywords, and the try catch block is placed around the code that we think could throw an exception. When an exception is thrown, the try catch block will handle the exception and therefore ensure that our application does not cause an unhandled exception. Since we are dealing with files and we are using the System.IO namespace , we can use the catch section to catch any IO exceptions.
Copy( )
Copy(String, String)
Copy(String, String, Boolean)
- 31.
Amend the code, as in Listing 16-19, to create a method that uses the Copy( ) method from the File class to copy the specified source file to the specified destination file.
Create the method to copy the file
- 32.
Amend the code, as in Listing 16-20, to call the method from the Main( ) method.
Call our new method that copies the file
- 33.
Click the File menu.
- 34.
Choose Save All.
- 35.
Click the Debug menu.
- 36.
Choose Start Without Debugging.

A console window displays the output and a message that the copying process was successful.
File success message
- 37.
Press any key to close the console window that appears.
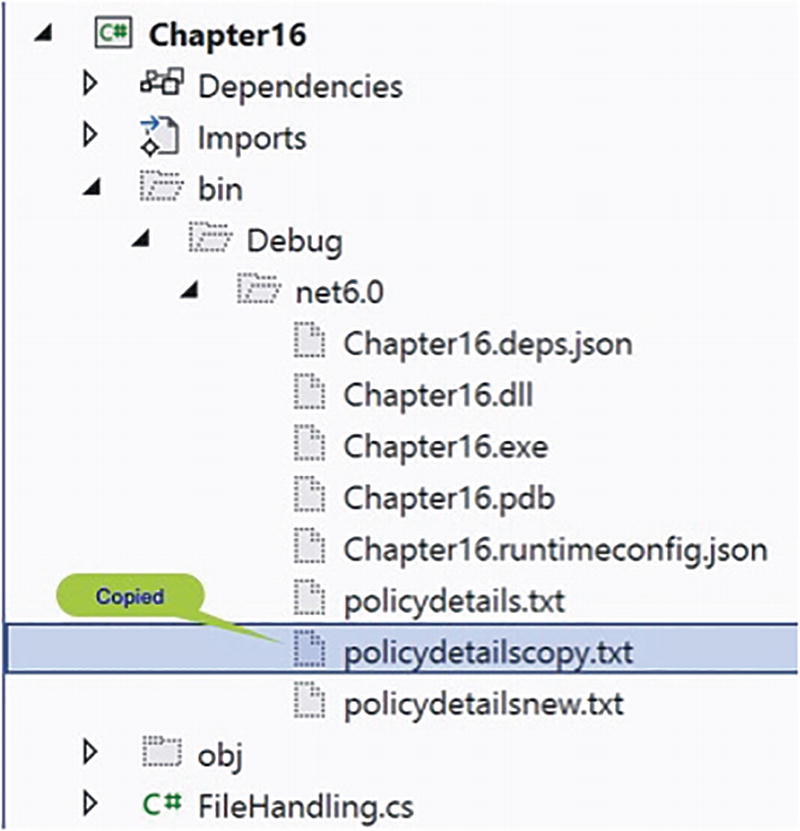
A folder tree of Chapter 16 displays the copied file on the lower part of the list. The copied file is highlighted and is named, policy details copy dot t x t.
File copied
Delete a File
In a similar manner to reading a file or writing a file where we could get an exception, when we wish to delete a file, we could get an exception, so we will use the try catch block around the process used to delete a file.
Delete( )
- 38.
Amend the code, as in Listing 16-21, to create a method that uses the Delete( ) method from the File class to delete the specified source file.
Create the method to delete the file
- 39.
Amend the code, as in Listing 16-22, to call the method from the Main( ) method.
Call our new method that deletes a file
- 40.
Click the File menu.
- 41.
Choose Save All.
- 42.
Click the Debug menu.
- 43.
Choose Start Without Debugging.

A window displays two lines of text. The second line is framed and it reads, The file deletion was successful.
Deletion successful
- 44.
Press any key to close the console window that appears.

Two folder trees of Chapter 16 are placed side by side. The one on the left contains the copied file, and the one on the right does not have it.
File deleted
StreamReader Class
The C# StreamReader class provides methods that allow us to read the characters of a file into a stream. There is also a StreamWriter class that allows us to write to a stream, and we will discuss this in the next section. StreamReader and StreamReader hide us from some of the complexities of streams, and we will look at this in the “FileStream” section.
Stream
First, we might want to think about what a stream is and why we would use one. Well, let's think about downloading a film from our favorite online store. Do we expect the whole video to be downloaded before we watch it? Well, the answer is probably not, and this is where the idea of a stream comes in. The stream will act as an intermediary, between the sender and the receiver, where the sender starts delivering the movie, chunk by chunk, and the stream accepts the chunk and starts to pass the data to the receiver. The speed at which the sender can send the movie data and the speed at which the receiving device can accept the data could well be different, so the stream holds the data and “feeds” the receiver at a speed that suits it. In the meantime, as this streaming process is taking place, we are able to start watching the movie as the first chunks have arrived, and the other chunks will be available when we need them. We should therefore think about the stream as having the objective of making for a smooth process when performing a read and write operation. Also, we should remember that it’s not just movies that the principle of streaming applies to.
Synchronous and Asynchronous
With synchronous processes, the first process or task needs to complete before the next process starts. We therefore have the first process “blocking” other processes while it completes its task fully.
With asynchronous processes, the first process or task does not need to complete before the next process starts. The processes can run in parallel. One process does not block the other processes, and we therefore will hear the term “non-blocking” in the context of asynchronous processing.
Now, if we think about synchronous and asynchronous approaches within our C# code, we might see that the synchronous approach could cause delays in the execution of a process or program. Many programmers will therefore use an asynchronous approach to overcome the delays. In programming we will hear mention of threading, the use of multiple threads where each thread will return after making a request, so that the program can get on with performing the other processes it has to perform.
Looking at another programming language called JavaScript, we will see that it is by default synchronous and single-threaded, meaning our JavaScript code could not create new threads and run in parallel. On the other hand, when Node.js was created, it introduced a non-blocking input and output (I/O) environment, and there is the concept of a callback , which is used to inform one process when its work has been completed. Think of it like the “chef” who takes the order for eggs and toast from child 1. They process the order by making the eggs and toast, and then they call the first child when their order is complete, a callback. We have probably experienced a callback or asynchronous process in our everyday life.
StreamReader Class Methods
StreamReader class methods and property
Method | Description |
|---|---|
Read( ) | This method will be used to read the next set of characters from an input stream and then move to the next. |
ReadAsync( ) | This method will be used to asynchronously read a sequence of bytes from a stream and then move to the next position in the stream to read the next sequence of bytes. |
ReadLine( ) | This method will be used to read a line of characters from a stream returning the data read as a string. |
ReadLineAsync( ) | This method will be used to read a line of characters from a stream in an asynchronous manner returning the data read as a string. |
ReadToEnd( ) | Reads all characters from the current position to the end of the stream. |
Property EndOfStream | This property of the class returns a value that indicates if we are at the end of the stream. It is a Boolean value, so it is either true or false. |
StreamWriter Class
The C# StreamWriter class provides methods that allow us to write characters to a stream with specific encoding and by default uses UTF-8 encoding. UTF-8 is used as an encoding mechanism for Unicode, and Unicode is a standard that assigns a unique number to every character. UTF is an acronym for Unicode Transformation Format.
StreamWriter class methods and property
Method | Description |
|---|---|
Write( ) | This method will be used to write a sequence of bytes to a stream and then advance to the position after this sequence of bytes. |
WriteAsync( ) | This method will be used to asynchronously write a sequence of bytes to a stream and then advance to the position in the stream after this sequence of bytes. |
WriteLine( ) | This method will be used to write a formatted string and a new line to a stream. |
WriteLineAsync( ) | This method will be used to asynchronously write a sequence of bytes to a stream followed by a line terminator. |
Property | |
EndOfStream | Gets a value that indicates if the current stream position is at the end of the stream. The return value is true if the current stream position is at the end of the stream; otherwise, it will be false. |
Reading from a Stream
- 1.
Amend the code, as in Listing 16-23.
Read( ) and Peek( ) to read file characters, close StreamReader
- 2.
Call the method from the Main( ) method, as in Listing 16-24.
Call our new method that reads the specified text
- 3.
Click the File menu.
- 4.
Choose Save All.
- 5.
Click the Debug menu.
- 6.
Choose Start Without Debugging.

A console window displays 12 byte codes corresponding to Ascii characters. The byte codes return the phrase, All policies.
Bytes read from file – these bytes represent the string All policies
- 7.
Press any key to close the console window that appears.
Writing to a Stream
Rather than using the try catch block, we will use a different approach to illustrate that a using block can be used if we wish to have garbage collection (GC) handled for us. Using is very helpful and can be used with the StreamReader and StreamWriter classes. With the using block, we wrap the StreamWriter process inside it. Using handles disposal of any objects that are not required; it is not a try catch being used to catch exceptions, but rather a way to ensure disposal of objects we are not using.
We will discuss the using statement at the end of this chapter, but for now we will use the pre–C# 8 version of the using statement, and later we will see how there is an alternative way to use the using without the curly braces.
We will now use the StreamWriter WriteLine( ) method in some code along with the using block:
We will create the using block.
Using will be given an instance of the StreamWriter class.
In creating the instance of the StreamWriter class, we will use the constructor, which will accept a true attribute, and this indicates that the content should be appended to the file, rather than overwriting the contents.
We will use the WriteLine( ) method to write some lines to the file.
We will also add an extra WriteLine( ) so our new data starts on a new line.
- 8.
Amend the code, as in Listing 16-25.
Making use of the using block
- 9.
Call the method from the Main( ) method, as in Listing 16-26.
Call our new method
- 10.
Click the File menu.
- 11.
Choose Save All.
- 12.
Click the Debug menu.
- 13.
Choose Start Without Debugging.
- 14.
Press any key to close the console window that appears.
- 15.
Double-click the policydetails.txt file to open it in the editor window.

An editor window displays the data that has been appended.
WriteLine() method inside a using block
Great, the StreamWriter class has been used with its WriteLine( ) method to write data to the file.
Async Methods and Asynchronous Programming
We must use the async keyword to convert our method into an async method, which then allows us to use the await keyword within the body of the method. We should not use async on void methods, and we should use Task as the return type for non-void methods.
The await keyword acts to put the caller on hold while the async method is performing what it needs to perform, but in the meantime our program can do other things until we get control back.
Listing 16-27 shows an example of using Task and await, while Listing 16-28 shows how we call the async method that returns a Task.
So how can using asynchronous programming help us when reading and writing files? Well, writing to a file in an asynchronous manner allows our program to continue doing other things while the file is being written to. If we are writing small files, the asynchronous approach will hardly be noticeable, but when the files become much larger, which will be the case in many business applications, it will make a big difference. The same principle applies when reading a large file in an asynchronous manner. Our program can get on with doing other things while it awaits the end of the reading process.
WriteLineAsync
We will now use the StreamWriter WriteLineAsync( ) method to write data. This is almost the same code as in Listing 16-25, but we are using a WriteLineAsync() method instead of the ordinary WriteLine( ) method, and we will still have our code in a using block. We read earlier that the WriteLineAsync( ) method is used to asynchronously write a sequence of bytes to a stream followed by a line terminator.
- 16.
Amend the code as in Listing 16-27.
Writing data asynchronously with WriteLineAsync( )
- 17.
Call the method from the Main( ) method, as in Listing 16-28.
Call our new method that writes data asynchronously
- 18.
Click the File menu.
- 19.
Choose Save All.
- 20.
Click the Debug menu.
- 21.
Choose Start Without Debugging.
- 22.
Press any key to close the console window that appears.
- 23.
Double-click the asynctextfile.txt file, in the net6.0 folder, to open it in the editor window.

An editor window displays the lines of text added using the asynchronous method.
Data written to new file in an asynchronous manner
FileStream
When looking at this section, we need to be aware that we have used the StreamReader and StreamWriter classes and they have shielded us from certain “complexities.” Now we are going to see how we can do things that the StreamReader and StreamWriter shield us from.
FileModes
The FileMode fields, which dictate the file mode
Field | Description |
|---|---|
Open | This will open the file. |
OpenOrCreate | This will open the file if it exists and creates a new file if it does not exist. |
Append | This will open the file and seeks the end of the file. If the file does not exist, it will be created. |
Create | This will create a new file, and if the file already exists, it will be overwritten. |
CreateNew | This will create a new file, and if the file already exists, an exception is thrown – more about this shortly. |
Truncate | This will open a file and truncate it so the size is zero bytes. |
Stream class methods
Method | Description |
|---|---|
Seek( ) | This method will be used to set the position within a stream. |
Read( ) | This method will be used to read a sequence of bytes from the stream and then move by the number of bytes read to the new position within the stream. |
ReadAsync( ) | This method will be used to asynchronously read a sequence of bytes from the stream and then move by the number of bytes read to the new position within the stream. |
Write( ) | This method will be used to write a sequence of bytes to the stream and then move by the number of bytes written to the new position within the stream. |
WriteAsync( ) | This method will be used to asynchronously write a sequence of bytes to the stream and then move by the number of bytes written to the new position within the stream. |
Create a byte array from a string of characters.
Display the elements of the byte array.
Create a file to hold the byte data and use an appropriate method to add the bytes to it.
Use the Seek( ) method to move to a position in the FileStream, the stream.
Read each byte from this new position to the end of the stream.
Display the data that has been read.
- 24.
Amend the code, as in Listing 16-29, to create the method.
Using the Seek() method
- 25.
Call the method from the Main( ) method, as in Listing 16-30.
Call our new FileStreamSeekReadAndWrite( ) method
- 26.
Click the File menu.
- 27.
Choose Save All.
- 28.
Click the Debug menu.
- 29.
Choose Start Without Debugging.
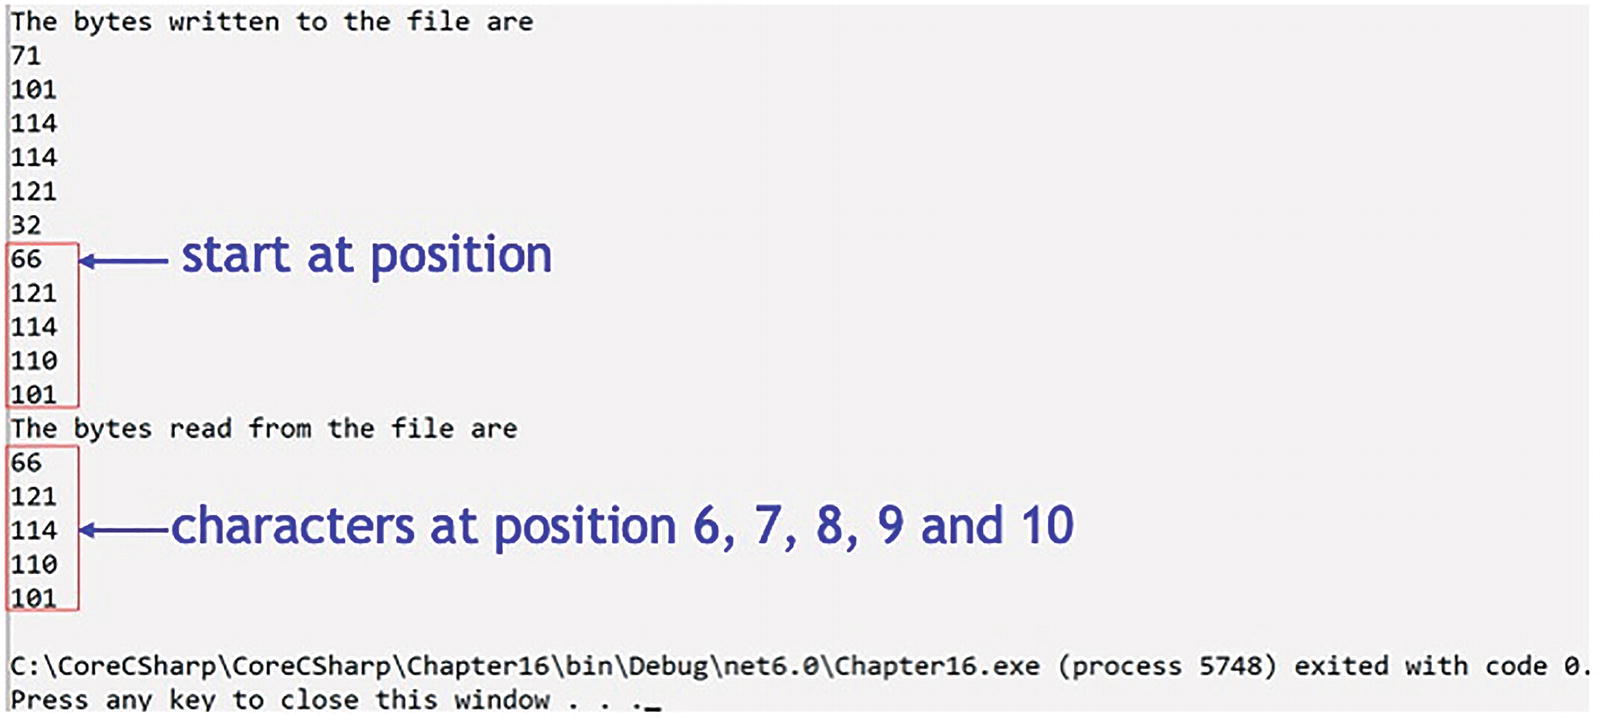
A console window displays five bytes written vertically and framed with a note, start at position. There is another set of five bytes written vertically, framed, and with a note, characters at position 6, 7, 8, 9, and 10.
Data read from file starting at index 6
- 30.
Press any key to close the console window that appears.
Chapter Summary
So, finishing this chapter on file handling, we should be aware that C# file handling is taken care of by the namespace System.IO. We have used some of the methods of the File class including Exists( ), Create( ), ReadAllText( ), WriteAllText( ), Copy( ), and Delete( ). We also looked at the StreamReader class with methods such as Read( ), ReadAsync( ), and the synchronous and asynchronous concepts in programming. Likewise, we looked at the StreamWriter class and the methods WriteLine( ) and WriteLineAsync( ). The FileStream class was then introduced when we looked at the Seek( ), ReadByte( ), and WriteByte( ) methods, but we should be aware that all stream types work in roughly the same way. We also looked at exception handling with the try catch code block and the using statement.
It is great to be able to read from and write to a text file, and we could in the future apply a similar concept to reading from and writing to a database.
We are making fantastic progress in programming our C# applications. We should be proud of our achievements. In finishing this very important chapter, we have increased our knowledge further and we are advancing to our target.

An illustration of concentric circles with a text below that reads, our target is getting closer. The circles at the center are shaded in green.