In this chapter, you will be looking at the purpose of Document Control and the application of important Document types in SAP S4HANA. What are Posting Keys, and what is the importance of different Posting Keys?
Define number ranges.
Define field status variants.
Create variants for posting periods.
Document Control
Hundreds of documents are created by companies as a result of transactions arising from business operations. To be able to manage documents storage in the SAP system, it is important that documents posted in the system are categorized and stored sequentially for easy of retrieval. Once a transaction is posted, then the system generates a document, assigns a document number to the document, and saves the generated document in the system.
Every posting in the SAP system generates a document and the document remains open in the system until the document is cleared and archived. For example, when a transaction is posted in the system, the system generates a document and assigns it a number, and it remains open in the system until cleared.
As mentioned earlier, hundreds of transactions are posted in SAP S4 HANA. Identifying a single transaction in an environment where you have hundreds of transactions stored in the same system can be very daunting. To eliminate this problem, SAP uses a document-control technique that allows the system to structure documents storage in the system in a systematic way using document numbering, company code, and fiscal year.
Document number: This is a unique number that is assigned to a document by the system automatically from the number range you have defined in the system. We will be looking at how to define number range in this chapter.
Company code: This is your company’s identification code. We looked at how to define company code in chapter 1.
Fiscal year: This is your company’s accounting year. Normally, the accounting year is a 12-month period.
Document types.
Posting key.
Document types – Document types are defined at the client level. This makes document types available to all company codes within the client. Document types are used to control different business transactions in SAP R/3.
The appropriate account type to be posted,
Document header fields, and
The number ranges for document numbers.
Document type
A List of Some of the Important Document Types in SAP S4 HANA
Document Types | |
|---|---|
KR | Vendor Invoice |
KZ | Vendor Invoice Payment |
KG | Vendor Credit Memo |
DR | Customer Invoice |
DZ | Customer Invoice Payment |
DG | Customer Credit Memo |
AB | Accounting Document |
SA | G/L Account Document |
AA | Asset Posting |
AF | Asset Depreciation |
The nature of business transactions and the account types where they are posted. The importance of this is that it is easier to display line items based on the type of business transactions involved.
Posting to account types when you assign appropriate document types to business transactions. For example, the document type DR will post to a customer account, KR will post to a vendor account, and so on. During document posting, you enter the document types in the document header field. This enables the system to differentiate between accounts where transactions are posted.
The number ranges for document numbers. The system assigns a number range to a document during posting, using the number range you created. The number range allows the system to store documents in the system based on similar number ranges. Number ranges therefore control document storage in the system.
SAP S4 HANA comes with standard document types, which you can use as your document types. Some of the document types delivered by SAP are listed in Table 3-1. It is also possible to create your own document types, but we advise that you use the document types supplied by SAP, instead of creating your own from the scratch. The reason we recommend that you use the standard document types supplied by SAP is that they meet your requirements.
Up to a future fiscal year: This is the situation where a number range is used over one fiscal year. The system uses the available number range by choosing the current number from the number range that comes up next. This method has the drawback of running out of numbers when an entire number range is used up.
Each fiscal year: At the beginning of each year, the system starts all over again by choosing the first number in the number range defined for that fiscal year. The advantage of this method is that number range is always sufficient.
Document number can be assigned to a document either internally or externally. The internal number is assigned by the system, and the external number is assigned by the user. Follow this menu path to go to the screen where you can customize your document types if you feel like doing so: IMG: Financial Accounting ➤ Financial Accounting Global Settings ➤ Document ➤ Document Types➤ Define Document Types
Posting Key
Posting Key – Used for line items.
Posting keys are defined at the client level and are available to all company codes within the client.
Controls which account is to be post to.
Controls whether the line item will be posted as a debit or credit.
Determines field statuses.

Important Posting keys
We recommend that you use the predefined posting keys supplied by SAP in the system instead of creating your own posting keys, as the supplied posting keys in the system are sufficient for your requirements. To access the screen where posting keys are defined follow this menu path: IMG: Financial Accounting ➤ Financial Accounting Global Settings ➤ Document ➤ Define Posting Keys.
Definition of Number Range Intervals
A document type in SAP S4 HANA must be assigned a number from a predefined number range you have defined. A document type is assigned to a number range. When a transaction is posted, the system will automatically assign a number to the document from the number range you have defined via the document type you assigned to the document. You can either define your own number ranges or you can copy the predefined number ranges provided by SAP in the system.
During your configuration you can define whether you want the system to assign a number from the number ranges you have defined automatically or whether you want the user to manually assign a number to a document during posting. This decision is based on your client requirements.
There are three steps to create number range intervals in SAP S4 HANA. We will be looking at each of these steps in turn in this activity.
In this activity, we will be looking at how to define your own number ranges by copying a subject from another company code.
Defining Document Number Ranges using Copy Subobject Function
The number ranges you defined in the activity will be automatically assigned by the system sequentially to documents during posting. To go to the screen where to define your own number ranges follow this menu path: Financial Accounting ➤ Financial Accounting Global Settings ➤ Document ➤ Document Number Ranges➤ Define Document Number Ranges.

Copying another company code number ranges using the Copy Subobject function

Number range interval transport message

Number range intervals you copied to your company code
Assigning years to your number ranges has a drawback. This means each year you have to define other number range intervals for the year that are missing from your number ranges. To ensure that you never run out of number ranges, you can enter 9999 in the year column. For example, instead of using years like 2018, 2019, 2020, and so on, you enter 9999 in all of the year column. This means your number ranges are valid infinitely. This will save the time of maintaining number range intervals each year.
How to Delete Number Range Intervals

How to delete number range intervals
Creating your number range intervals from scratch
This is when you decide to create your own unique number range intervals.

The screen where you start defining your document number ranges
To maintain number ranges for your company code, choose change Intervals button. That is the second button from the left with a pencil icon on the Edit Intervals: Accounting document, Object RF-BELEG screen.
The Edit Intervals: Accounting document, Object RF-BELEG screen subobject (your company code) screen is displayed, as in Figure 3-7.
Update the following fields:
No: This is the field where you will enter your number range identifier. For example – 01
Year: The years you enter here determine the validity of your number range. It is important that you include the current year in your number range.
From number: This is the lower limit for your number range intervals (i.e., the starting point of your number range).
To number: This is the upper limit for your number range intervals (i.e., where your number range ends).
Current number: No entry is needed here. This field shows the current number range that has been assigned by the system. During configuration this filed is always defaulted as 0.

The screen where you maintain your number range intervals
Enter two numeric character – 01 or alphanumeric character – A1 or alpha character – AB identifier for your number range intervals. The choice of what character to use is discretionary.
It is important to stress here that the characters used as above are only for illustration. There is no restriction to the digits you can use as your number range identifier. You can use any character as deemed fit, but it is advisable to use meaningful and sequential characters. In the following example, we used numeric characters.
Repeat the same process as above by clicking the change Intervals button and enter another number range interval for Fiscal year – 2023, 2024, and so on.
Once you have completed creating your number ranges for the desired years, save the number ranges you have defined. The Transport number range intervals screen pops up. Accept the warning by choosing the Enter button. The system will then notify you at the status bar below that your changes were saved.
Number ranges must not overlap.
Let’s look at the final step of how to define document number ranges by copying the number range intervals of another company code to your company code.
Copy Another Company Code to your Company Code

Copying document number range intervals from a source company code to a target company code
Update the following fields:
In the General selections section of the screen, enter the start number of the number range of the source company in the Number range number field and the end number range in the To field. Enter the year range you are copying in the Fiscal Year field. You can use our example, as in Figure 3-8. In the Source company code details section, enter the company code you are copying the number range intervals from in the Company code field. In the Target company code details section, enter your company code in the Company code section.
Source company code is the company code you are copying the document number ranges from. In this activity, we copied company code 0001 and the target company is your company code you are copying company code 0001 document number ranges to. In this activity, our company code is C100.
This action will allow you to copy the entire number range for company code –0001.
Finally, let’s look at how to copy document number ranges to fiscal year.
Copying Number Ranges to Fiscal Year

Copying document number range intervals from one fiscal year to another fiscal year
Update the following fields: In General selections section of the screen of the screen enter your company code in the Company code field. In the Source fiscal year details section enter the fiscal year you are copying in the To fiscal year field and in Target fiscal year details section, enter your new fiscal year in the To fiscal year field and click the Execute button at the bottom right of the screen. The Document Number Ranges: Copy to Fiscal Year screen appears displaying a list of all the intervals added to your new fiscal year.
Field Status Variants
Field Status variants are variants that comprise the Field Status group in SAP S4 HANA. A Field Status Group defines the screen layout for a general ledger account entry and also controls document creation within a company code. Based on your specification, the Field Status Group will determine which fields will accept input during documents entry, whether a field should be hidden, displayed or suppressed, required or optional.
In SAP S4 HANA, field statuses are defined at global settings and are assigned Field Status Groups. Field status variants are independent of company codes (that is they are available to all company codes in the client); hence they are created at client level. A Field Status Group is entered in the company code section of the G/L accounts master record during the creation of a G/L account.
A field status group allows you to determine which fields require entry, which fields are optional or suppressed during document entry.
We recommend that you copy the standard field status variants supplied by SAP. Defining your own field status variants will require you to update the associated tables as well, and this can be cumbersome in practice.
Define Field Status Variants
Problem: You are to copy the Company code 0001 Field Status Variants supplied by Sap in the system and modify them to meet your requirements. As part of this customizing exercise, you are to specify field status variants and assign your company code to the field status variant you have defined.

The screen where you define and maintain field status variants
Since you are going to copy an existing field status variants supplied by SAP in the system, use the Position button at the button of the screen search for the company code whose field status variants you want to copy. You can copy the field status variants of any of the sample company supplied by SAP in the system for your country.
In this activity, we will be copying the field status variants for Company code – 0001. SAP have supplied a list of field status variants you can copy from. For example, you can copy field status variants from 0001 or 1000, 2000, etc. You will get the same result.
Select the field status variant you want to copy from the list of field status variants provided by SAP in the system (see Figure 3-10 as an example), click Copy as… at the top of the screen. Change View “Field Status Variants”: Overview of Selected Set screen is displayed with details of the field status variant you have copied.
Modify the copied field status to meet your requirements by changing the exiting field status variant in the FStV (Field Status Variant) field to your company code identifier and enter a description you will remember in the Field Status Name field.
We advise that you use your company code as your field status variant and use a description you will remember for your field status variant as we did in Figure 3-11. This will make it easy for you to identify your field status variant from the list of field status variants in the system.
Once you have maintained your field status variant click the Copy button at the bottom right of the screen. Specify object to copy screen pops up with three options to choose from: copy all, only copy entry, or cancel.

Copying Field Status Variant
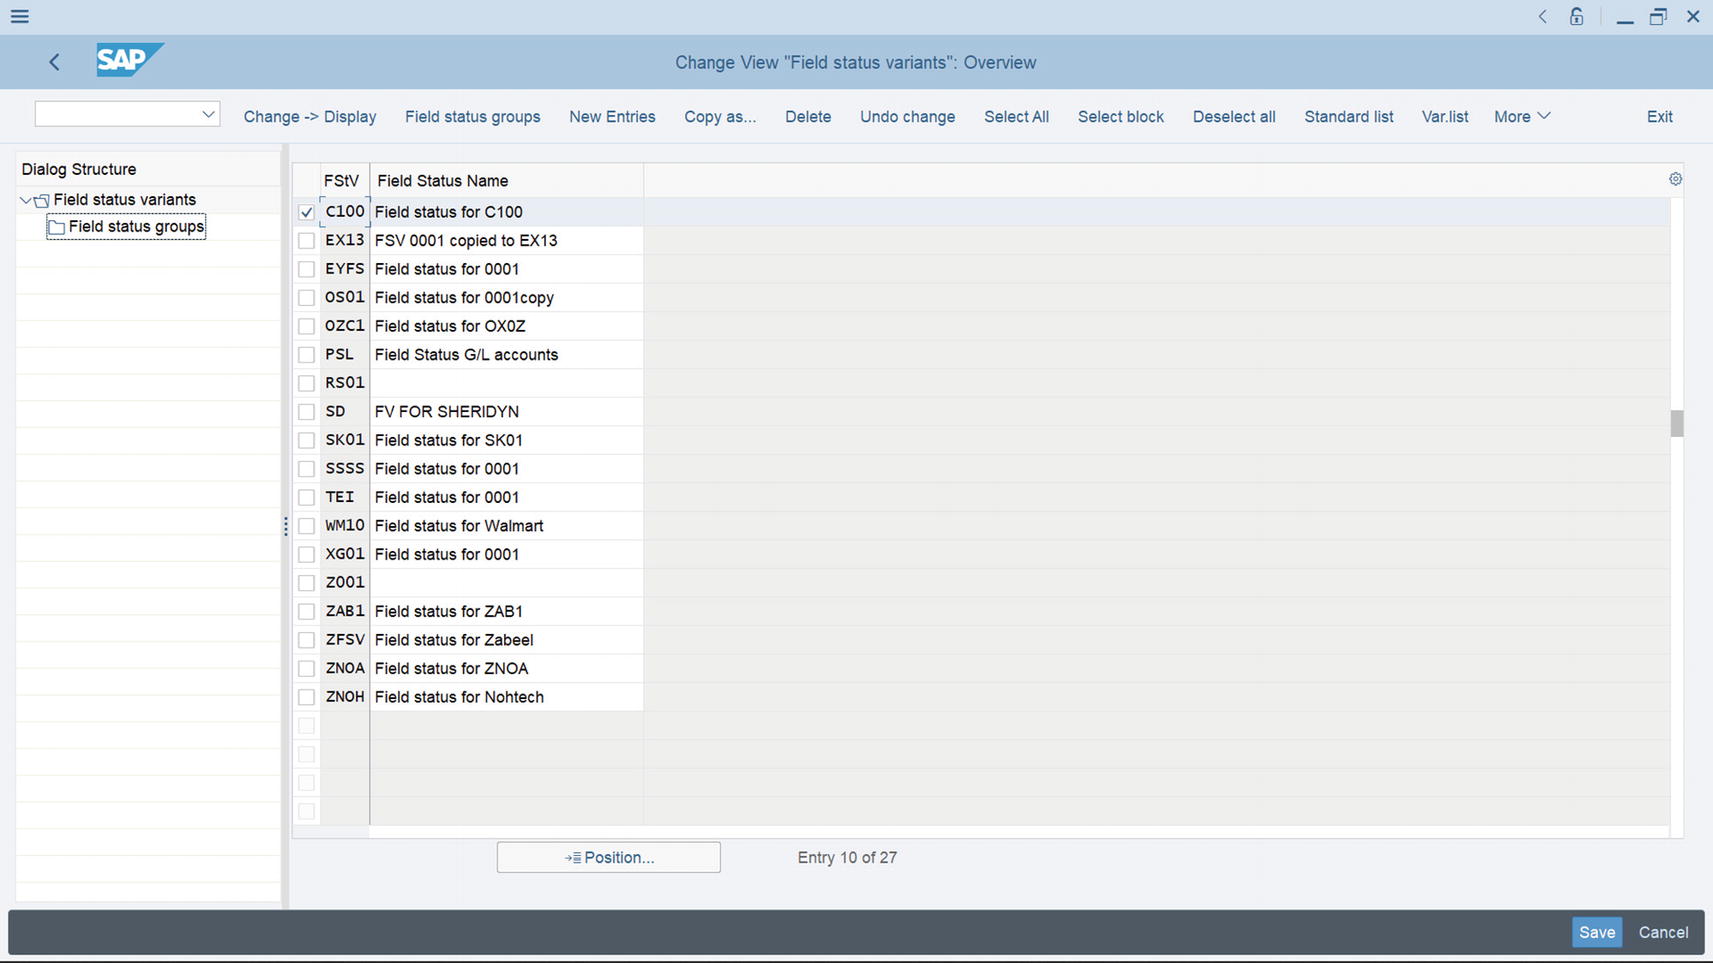
A list of field status variants, including the field status variant you defined

A view of the field status group you copied
As we mentioned earlier, the Field Status group controls the appearance of certain data entry fields in the data screen for G/L accounts. For example, you can decide which field in the G/L account should be suppressed, required entry, or optional entry. For example, let’s assume that your client wants you to make Due Date and Payment terms field a required entry fields during Receivables/Payable clearing.

The screen where you select the field status group you want to maintain

The screen where you specify document entry fields
Select Due Date and Payment terms under Req. Entry radio buttons, as in Figure 3-15, and save your customizing by clicking the Save button at the bottom right of the screen.
Assign Company Code to Field Status Variants

Assignment of Field status variant to company code
Using the Position button at the bottom of the screen, search for your company code and use the Match code function for your field status variant and assign it to your company code and save your work.
Summary
This chapter explained document control by looking at document types and posting keys and their functions in SAP S4 HANA. As part of the customizing exercise, you learned how to copy document number ranges from predefined number ranges supplied by SAP in the system, how to display the number ranges you defined, and how to delete number range lines. You learned about what field status variants are and the importance of field status variants. Finally, you learned how to create your own field status variants by copying predefined field status variants and field status variant groups and their dependent entries and how to assign a field status variant to your company code.
In the next chapter, we will be looking at how to customize tolerance groups and how to assign a user to a tolerance group.