In this chapter, we explain what accounts receivable and payable are, and also look at the steps involved in customizing accounts receivable and accounts payable.
Understand what accounts payable/receivable is.
Describe an account group and understand its importance.
Maintain the Field Status group for general data about customer account groups.
Define account groups with screen layout.
Define payment terms in SAP.
Maintain terms of payment for an installment plan.
Define document types for enjoy transactions.
Maintain settings for manual outgoing payments.
Define automatic outgoing payments.
Maintain tolerance groups for employees, customers/vendors, and G/L accounts.
Define sort methods and adjustment accounts for regrouping receivables/payables.
Specify adjustment accounts for receivables/payables by maturity.
Define adjustment posting/reversal using negative posting methods.
Understand reasons for reversal.
Accounts Payable and Accounts Receivable
Accounts Receivable and Accounts Payable simply stands for Customer and Vendor Accounts, respectively. Additionally, a customer is usually referred to as a Debtor and a vendor as a Creditor.
Customer: A business partner from whom receivables are due. In order words, these are business partners owing you money for Goods delivered or services rendered. A customer falls under the category of Sales. In the SAP S4 HANA system, a customer must have a master record. A customer master record contains information about a customer account held in the database, which is applied to accounting transactions in the system.
Vendor: Likewise, a vendor is a business partner to whom payable are due. They are those you owed money for goods and services received. Like customers, vendors come under the category of purchases and have a master record in the SAP system. Likewise, a vendor master record contains information about a vendor account held in the database, which is applied to accounting transactions in the system.
To configure Accounts receivable and Accounts Payable several steps are involved. We will be going through these steps systematically in this activity.
Customizing accounts receivable and accounts payable entails several steps and can be confusing if care is not taken. Firstly, we will start with the configuration of customer accounts and then you will also go through the configuration of vendor accounts.
There is no restriction on which to configure first. The decision to start first with the configuration of Customer Accounts instead of Vendor Accounts is purely a matter of choice.
Customer Accounts
What is Customer Account Group?
Customer Account group allows the classification of customers to a business partner function that best fits the nature of business transaction involved. The customer account groups controls the customer hierarchy containing the customer master record. When a customer account is created, you must assign it to an account group. Account group is a control mechanism that determines the relevant screens and fields to be displayed for input based on individual customer’s different business functions. Account group is maintained in IMG.
The importance of Account Group
Which fields in the customer master are Required, Optional, Display, etc.
Number Range assignment.
There is a list of account groups supplied by SAP in the system you choose from for your configuration. For example:

It is also possible to create your own account group to meet your requirements.
You can also Define Screen Layout:
Per Company code (customer).
Per Activity (customer).
This is outside the scope of this lecture. Simply because SAP standard settings are sufficient.
In this activity, you will be defining Customer Account Groups Screen Layout for Domestic and Foreign Customers, respectively.
Defining Accounts Groups with Screen Layout (Customer)
- 1.
Domestic Customer,
- 2.
Foreign Customer, and
- 3.
One-time Customer.
Your task is to maintain an account group that will reflect these partner’s functions in the system.
In this activity, you will define an account group with appropriate business partner functions and maintain the field status group for its general data. To customize the account groups for your customer based on business partner function, follow this menu path: IMG: Financial Accounting ➤ Accounts Receivable and Accounts Payable ➤ Customer Accounts ➤ Master Data ➤ Preparations for Creating Customer Master Data ➤ Define Accounts Groups with Screen Layout (Customers). The Change View Customer Account Groups Overview screen is displayed. This is where you will define the account groups for your customers. To go to the screen where you will specify your account group, choose the New Entries at the top of the screen (this is the third function from the left side of the screen). The New Entries: Details of Added Entries screen comes up (Figure 14-1).
you can create as many account groups as you need, such as Foreign Customers, Domestic Customers, One-Time Customers, and so on.
To avoid confusion we will be using DC and two digits for Domestic Customers, FC for Foreign Customer, and OT for One-time Customers in this activity.

Initial screen for account groups specification with screen layout (customer)
The section where you specify your account group ID.
General data: Allows you to enter your customer account group name.
Field status: Allows you to specify if a field should be surprised, required, optional, or display.
If you are creating a one-time customer group, remember to tick the One-time account check box in General data section in the Account group entries screen.
Update the following fields:
Account group: Enter your customer group ID in this field. In this activity, we used DC01 (Domestic Customer-01).
General data: In the Meaning field, enter a description for your customer account group.
Once you have updated the screen click the Save button at the bottom right side of the screen. Upon saving the system will notify you on the status bar at the bottom of the screen that your data was saved.
There is no hard rule for the name you use as account group. Account group name is a matter of choice. It is based on how your client wants to classify their customer groups. The Domestic Customer Account Group used in this activity is purely for illustration purposes. It is not a standard.
Foreign Customer Account Group
Account Group | Meaning |
|---|---|
FC01 | Foreign Customer – C100 |
One-time Customer Account Group
Account Group | Meaning |
|---|---|
OT01 | One-time Customer – C100 |
Maintaining the Filed Status Group for General Data of the Customer Account Group
General data.
Company code data.
Sales data.
First, let’s look at how to maintain the field status group for general data:
In the Field status section of the screen (Figure 14-1), double click General data from the list of field status. The Maintain Field Status Group: Overview screen is displayed. Select the item you want to define the field status for from the Select Group list (e.g., Address, communication, etc.), select Address from Select Group list by clicking it and click choose function at the top left side of the screen.

Maintain Field Status Group for customer address
Click save at the bottom right of the screen to save your specifications.
The items you specified as optional gives the account users the option to either enter data in the field or not, but the items you specify as required entry will force the account users to enter data in the field.
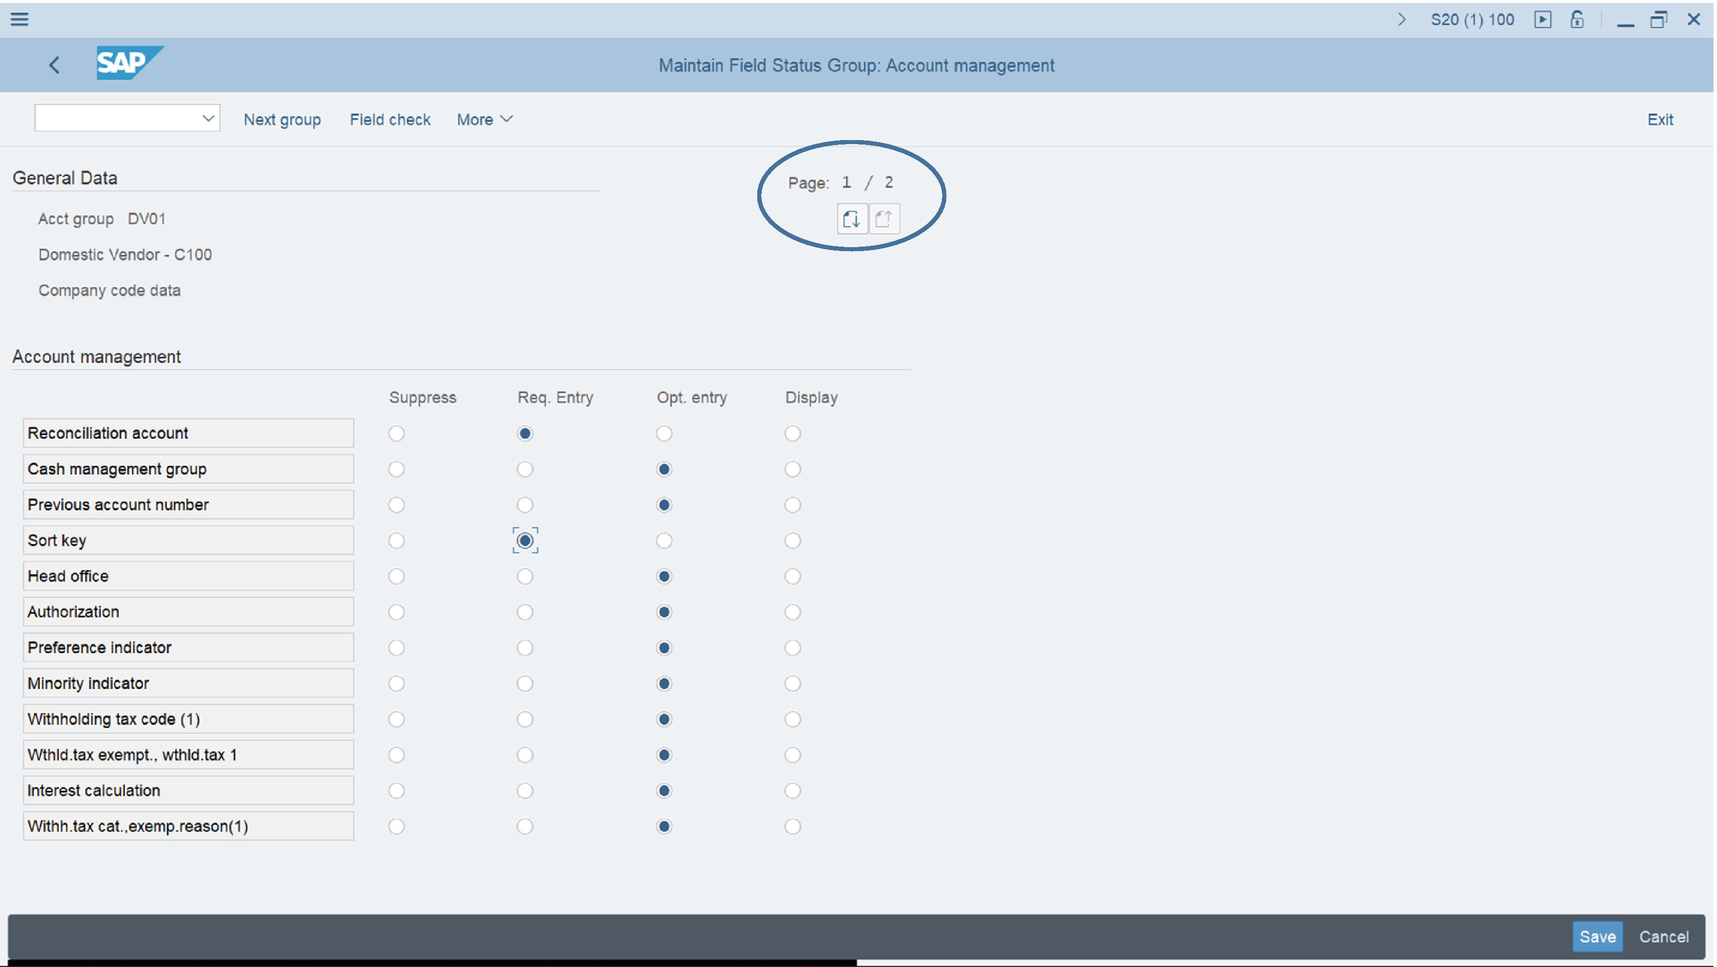
Problem: To ensure that users enter important information during document entry, you have been asked to make specifications that will make Reconciliation account field and Sort key compulsory input entry fields.
The specification of Reconciliation Account and Sort key are carried out in Company code data in the field status section of the Change View “Customer Account Group”: Details screen (Figure 14-1). This is where you will specify the field status groups for Company code data.

Maintain Field Status Group – Account Management
- 1.
Select Reconciliation account and Sort Key as Required Entry fields for Account management and set every other item on the list to optional as they are less important.
Do not save your work yet, because you will learn how to use the Next Page Button on this screen.
To go to the next page of Account management, click the Next Page button (Circled in Figure 14-3).
Save your customer account group.
Before moving on, define two more account groups for your foreign customer and one-time customer groups.
Enter Accounting Clerk Identification Code for Customers
In this activity, we will be looking at how to define the Accounting Clerk name under an Identification code (ID). This ID can be entered in the customer/master record, which the clerk is responsible for. The system will automatically print the name of the accounting clerk on all correspondence. This code can also be used for sorting dunning and payment proposal lists. The following menu path will take you to the initial screen where this customizing is carried out: IMG: Financial Accounting ➤ Accounts Receivable and Accounts Payable ➤ Customer Accounts ➤ Master Data ➤ Preparations for Creating Customer Master Data ➤ Enter Accounting Clerk Identification Code for Customer.

Initial Screen for Accounting Clerk Identification Code for Customer
The New Entries: Overview of Added Entries screen comes up. Update the following fields:
Cod: Enter your company code in this field.
Clerk: Enter two characters identifier ID for your clerk.
Name of Accounting Clerk: Enter the name of your accounting clerk in this field.
Office User: You can also enter the position of your accounting clerk in this field.
After you have updated your New Entries: Overview of Added Entries screen, save your work.
Creating Number Ranges for Customer Account Groups
Number ranges were covered in depth in Chapter 3, so we will only be looking at the basic steps involved in how to create number ranges for customer accounts in this activity. Number ranges for customer accounts are created using a two-character key.
The number interval which will be used as the account number for your customer accounts.
If number assignment is internal or external.
If you select the internal number range indicator, the system will automatically assign number range intervals to your documents during document postings.
On the other hand, if external number range indicator is selected, during document postings, the users will have to enter number intervals manually based on a predefined format during configuration.
Number range assignment can either be internal or external. For internal number range assignment, the system assigns the number assignment automatically. Whereas the external number range assignment is entered manually by the users during document entry.
You may likely encounter a number range overlap problem when creating number ranges. The SAP system does not allow number interval overlap when creating number ranges for customer accounts. So, make sure that your number interval is not overlapping. If your number interval is overlapping, the system will issue a warning “Interval already available.” Then use another number range until you can find one that is not over lapping.
It is also possible to choose from existing number range intervals in the system instead of creating your own.
Now let’s create number ranges for the Domestic and Foreign customer Account Groups you created earlier.

The Edit Intervals: Customer, Object DEBITOR initial screen
On the Edit Intervals: Customer, Object DEBITOR initial screen, click the Intervals button Circled in Figure 14-5. The Edit Intervals: Customer, Object DEBITOR second screen comes up (Figure 14-6). This is the screen where you can maintain your customer number ranges, displaying a list of number ranges already in the system. You have a number of options here. First, you can either decide to use an existing number range in the system by simplifying assigning it you’re your customer account group, or second, editing an existing number range and then assign it to your customer number range or third, you can create your own customer account group number range from scratch. The choice is entirely up to you. However, in this activity, we will be creating our own number ranges we will be assigning to our customer account group.
The system will not allow number interval overlapping (for example, the number interval 01 is already in the system; therefore, we will not be able to use this number interval again). So, we must use a number that is not already in the system.

Maintain number ranges for Customer Account group
Since 03 number interval is not in the list of number intervals displayed in the system, we decided to use 03 as our number interval, as in Figure 14-6.
Update the following fields:
Number Range No.: Enter the number such as 03 in this field. Number range sequences are maintained using two digits.
From No.: Enter a start number range such as 0100000000 in this field.
To Number: Enter the end number range such as 0199999999 in this field.
You can create as many number range intervals as desired. The number range interval you define depends on your requirements.
For more information on creating number ranges refer to Chapter 3 for a detailed explanation on how to create number ranges.
If you are having a problem making your own number range intervals because of number range overlap. Skip this section and go to the next section – Assign Number Ranges to Customer Account Groups below and assign any existing number range in the system to your customer account groups. This action will allow you to carry on with your configuration.
Save your number range intervals.
Transport number range intervals screen will pop up. Ignore the message and confirm your number range intervals by clicking the enter button below.
Transport number range interval screen pops up with a message. Ignore message and click Insert Enter button to confirm your number range intervals.
You can create as many number range intervals as desired. The number range interval you can define depends on your client’s requirements.
Assigning Number Ranges to Customer Account Groups
Finally, in this activity on customer account group, you have to assign the number ranges you have created to your customer account groups.
The system will automatically use the number range you have assigned to the customer account group when you create a customer account. The system does this by systematically selecting the next available number from the number range you have assigned. To assign a number range to a customer account group follow this menu path: IMG Financial Accounting ➤ Accounts Receivable and Accounts Payable ➤ Customer Accounts ➤ Master Data ➤ Preparations for Creating Customer Master Data ➤ Assign Number Ranges to Customer Account Groups.
The Change View “Assign Customer Acct Groups >> Number Range:” Overview screen is displayed. Search for your Customer Account Group using the Position button at the bottom of the screen. In this activity, we used customer account group – DC01-Domestic Customer key and 03 as our number range interval.

Assign number range intervals to customer account groups
Save your number range assignment.
Vendor Accounts
What is Vendor Account Group?
Vendor Account group like Customer Account Group allows the classification of vendors to a business partner function that best fits the nature of business transaction involved. The vendor account group controls the vendor hierarchy containing the vendor master record. When a vendor account is created, you must assign it to an account group. Account group is a control mechanism that determines the relevant screens and fields to be displayed for input based on individual vendor’s business functions. Account group is maintained in IMG (Implementation Guide).
The importance of Vendor Account Group
Which fields in the vendor master are Required, Optional, Display, etc.
Number Range assignment.
There is a list of account groups to choose from for your configuration supplied by SAP in the system.
It is also possible to create your own account group to meet your requirement.
you can also Define Screen Layout:
Per Company code (vendor).
Per Activity (vendor).
This is outside the scope of this book, because the standards settings supplied by SAP are sufficient.
In this activity, you will be defining Vendor Account Groups Screen Layout for Domestic and Foreign Vendors, respectively.
Defining Account Groups with Screen Layout (Vendors)
- 1.
Domestic Vendor,
- 2.
Foreign Vendor, and
- 3.
One-time Vendor.
You are to maintain an account group that will reflect these classifications in the system.
In this activity, you will define an account group with appropriate business partner functions and maintain the field status group for its general data. To customize the account groups for your supplier (Vendor) based on business partner function, follow this menu path: IMG: Financial Accounting ➤ Accounts Receivable and Accounts Payable ➤ Vendor Accounts ➤ Master Data ➤ Preparations for Creating Vendor Master Data ➤ Define Accounts Groups with Screen Layout (Vendors). The Change View Vendor Account Groups Overview screen is displayed. This is where you will define the account groups for your vendors. To go to the screen where you will specify your account group, choose the New Entries at the top of the screen (this is the third function from the left side of the screen). The New Entries: Details of Added Entries screen comes up (Figure 14-8).
You can create as many account groups as you need, such as Foreign Vendors, Domestic Vendors, One-Time Vendors, and so on.
To avoid confusion, we will be using DV and two digits for Domestic Vendors, FV for Foreign Vendors, and OV for One-time Vendors in this activity.

Initial screen for account groups specification with screen layout (vendor)
The section where you specify your account group ID.
General data: Allows you to enter your vendor account group name.
Field status: Allows you to specify if a field should be surprised, required, optional, or display.
If you are creating a one-time vendor group remember to tick the One-time account check box in the General data section in the Account group entries screen.
Update the following fields:
Account group: Enter your Vendor group ID in this field. In this activity, we used DV01 (Domestic Vendor-01).
General data: In the Meaning field, enter a description for your vendor account group.
Once you have updated the screen click the Save button at the bottom right side of the screen. Upon saving, the system will notify you on the status bar at the bottom of the screen that your data was saved.
There is no hard rule for the name you use as account group. Account group name is a matter of choice. It is based on how your client wants to classify their vendor groups. The Domestic Vendor Account Group used in this activity is purely for illustration purposes. It is not a standard.
Foreign Vendor Account Group
Account Group | Meaning |
|---|---|
FV01 | Foreign Vendor – C100 |
One-time Vendor Account Group
Account Group | Meaning |
|---|---|
OV01 | One-time Vendor – C100 |
Maintaining the Filed Status Group for General Data of the Vendor Account Group
General data.
Company code data.
Purchasing data.
First, let’s look at how to maintain the field status group for general data:
In the Field status section of the screen (Figure 14-8), double click General data from the list of field status. The Maintain Field Status Group: Overview screen is displayed. Select the item you want to define the field status for from the Select Group list (e.g., Address, communication, etc.), select Address from Select Group list by clicking it and click choose function at the top left side of the screen.

Maintain Field Status Group for vendor address
Click save at the bottom right of the screen to save your specifications.
The items you specified as optional gives the account users the option to either enter data in the field or not, but the items you specify as required entry will force the account users to enter data in the field.
Problem: To ensure that users enter important information during document entry, you have been asked to make specifications that will make the Reconciliation account field and Sort key compulsory input entry fields.
The specification of Reconciliation Account and Sort key are carried out in Company code data in the field status section of the Change View “Vendor Account Group”: Details screen (Figure 14-8). This is where you will specify the field status groups for Company code data.
Maintain Field Status Group – Account Management
- 1.
Select Reconciliation account and Sort Key as Required Entry fields for Account management and set every other item on the list to optional, as they are less important.
Do not save your work yet because you will learn how to use the Next Page Button on this screen.
To go to the next page of Account management, click the Next Page button (circled in Figure 14-10).
Save your vendor account group.
Before moving on, define two more account groups for your foreign vendor and one-time vendor groups.
Enter Accounting Clerk Identification Code for Vendors
In this activity, we will be looking at how to define the Accounting Clerk name under an Identification code (ID). This ID can be entered in the Vendor/master record, which the clerk is responsible for. The system will automatically print the name of the accounting clerk on all correspondence. This code can also be used for sorting dunning and payment proposal lists. The following menu path will take you to the initial screen where this customizing is carried out: IMG: Financial Accounting ➤ Accounts Receivable and Accounts Payable ➤ Vendor Accounts ➤ Master Data ➤ Preparations for Creating Vendor Master Data ➤ Enter Accounting Clerk Identification Code for Vendor.

Initial Screen for Accounting Clerk Identification Code for Vendor
The New Entries: Overview of Added Entries screen comes up. Update the following fields:
Cod: Enter your company code in this field.
Clerk: Enter two characters identifier ID for your clerk.
Name of Accounting Clerk: Enter the name of your accounting clerk in this field.
Office User: You can also enter the position of your accounting clerk in this field.
After you have updated your New Entries: Overview of Added Entries screen, save your work.
Creating Number Ranges for Vendor Account Groups
Number ranges were covered in depth in Chapter 3, so we will only be looking at the basic steps involved in how to create number ranges for vendor accounts in this activity. Number ranges for vendor accounts are created using a two-character key.
The number interval which will be used as the account number for your vendor accounts.
If number assignment is internal or external.
If you select the internal number range indicator, the system will automatically assign number range intervals to your documents during document postings.
On the other hand, if an external number range indicator is selected, during document postings, the users will have to enter number intervals manually based on a predefined format during configuration.
Number range assignment can either be internal or external. For internal number range assignment, the system assigns the number assignment automatically. Whereas the external number range assignment is entered manually by the users during document entry.
You may likely encounter a number range overlap problem when creating number ranges. The SAP system does not allow number interval overlap when creating number ranges for vendor accounts. So make sure that your number interval is not overlapping. If your number interval is overlapping, the system will issue a warning “Interval already available.” Then use another number range until you can find one that is not over lapping.
It is also possible to choose from existing number range intervals in the system instead of creating your own.
Now let’s create number ranges for the Domestic and Foreign vendor Account Groups you created earlier.

The Edit Intervals: Vendor, Object KREDITOR initial screen
On the Edit Intervals: Vendor, Object KREDITOR initial screen, click the Intervals button (circled in Figure 14-5). The Edit Intervals: Vendor, Object DEBITOR second screen comes up (Figure 14-12. This is the screen where you can maintain your vendor number ranges) displaying a list of number ranges already in the system. You have a number of options here. First, you can either decide to use an existing number range in the system by simplifying assigning it you’re your vendor account group, or second, editing an existing number range and then assign it to your vendor number range or third, you can create your own vendor account group number range from scratch. The choice is entirely up to you. However, in this activity, we will be creating our own number ranges we will be assigning to our vendor account group.
The system will not allow number interval overlapping (for example, the number interval 01 is already in the system; therefore, we will not be able to use this number interval again). So, we must use a number that is not already in the system.
Click Insert Line function (This is the fourth item from the left top of the screen) on the Edit Intervals: Vendor, Object KREDITOR (Figure 14-6) to create addition line(s) for your number range intervals. You will notice that a blank line will be inserted at the top of the displayed list of number intervals in the system.

Maintain number ranges for Vendor Account group
Update the following fields:
Number Range No.: Enter the number such 03 in this field. Number range sequence are maintained using two digits.
From No.: Enter a start number range such as 0200000000 in this field.
To Number: Enter the end number range such as 0299999999 in this field.
You can create as many number range intervals as desired. The number range interval you define depends on your requirements.
For more information on creating number ranges refer to Chapter 3 for a detailed explanation.
If you are having problem making your own number range intervals because of number range overlap. Skip this section and go to the next section – Assign Number Ranges to Vendor Account Groups below and assign any existing number range in the system to your vendor account groups. This action will allow you to carry on with your configuration.
Save your number range intervals.
The transport number range intervals screen will pop up. Ignore the message and confirm your number range intervals by clicking the enter button below.
You can create as many number range intervals as desired. The number range interval you can define depends on your client’s requirement.
Assigning Number Ranges to Vendor Account Groups
Finally, in this activity on vendor account groups, you have to assign the number ranges you have created to your vendor account groups.
The system will automatically use the number range you have assigned to the vendor account group when you create a vendor account. The system does this by systematically selecting the next available number from the number range you have assigned. To assign a number range to a vendor account group, follow this menu path: IMG Financial Accounting ➤ Accounts Receivable and Accounts Payable ➤ Vendor Accounts ➤ Master Data ➤ Preparations for Creating Vendor Master Data ➤ Assign Number Ranges to Vendor Account Groups.
The Change View “Assign Vendor Acct Groups >> Number Range:” Overview screen is displayed. Search for your Vendor Account Group using the Position button at the bottom of the screen. In this activity, we used vendor account group – VC01-Domestic Vendor key and 03 as our number range interval.

Assign Number Range Intervals to Vendor Account Groups
Terms of Payment
Cash Discounts
It is a normal business practice for business partners to enter into some form of payment agreement that governs their business relationship on invoice payment and cash discounts awards. This type of agreement is referred to as Terms of Payment. Terms of Payment are conditions agreed with business partners for goods sold or services offered in relation to payment of invoices. The terms of payment defines invoice due date and cash discounts offered for payment of invoice within a specified period.
The terms of payment you defined during configuration are assigned to business partners’ master record. Once terms of payment key is assigned to business partner’s master record, the system will automatically default the terms of payment during entry. Otherwise the user have to enter it manually.
The SAP system comes with pre-defined standard terms of payment that users can use, but it is also possible to create new terms of payment if necessary.

Terms of Payment flow
When customizing terms of payment, you need to define settings for the following items:
Payment Terms: This is a four-digit identifier key for payment terms. It determines the basis on which discount is granted. This includes the percentage rate used in the calculation of cash discount granted or received.
Day Limit: This is optional. The day limit is used to specify the calendar day that terms of payment are valid.
Account type: Specify whether payment terms relate to customer or vendor and allow the system to post business transactions to appropriate accounts.
Baseline Date: This covers the date for which the terms of payment applies. This is the date used by the system to determine the invoice due date. For the system to default baseline date for payment, you should specify the date to be used.
Document date.
Document posting date.
Document entry date.
On the contrary, if you want to enter the baseline date manually by yourself during document entry, set No default indicator.
Payment terms: The basis on which discount is granted. This includes the percentage rate used in the calculation of cash discount granted or received.
Let’s see how terms of payment are maintained in the system.
It is advisable to use separate terms of payment for vendor and customer. This is important because changes may occur in customer payment terms which may not necessarily be relevant to the payment agreement with vendors.
Maintaining Terms of Payment (Customer)
- 1.
5% for immediate payment.
- 2.
2% for payment made within 15 days.
- 3.
No discount for payment in 30 days.
As FI consultant, you are to specify these terms of payment in the system.
To maintain terms of payment for customers, follow this menu path: IMG: Financial Accounting (New) ➤ Account Receivable and Accounts Payable ➤ Business Transaction ➤ Outgoing Invoices/Credit Memos ➤ Maintain Terms of Payment.

Screen where terms of payment are maintained
Terms of Payment for Customers
Field Name or Data Type | Values | |
|---|---|---|
Payment type | D001 | |
Account type | ||
Customer | Select | |
Default to baseline date | ||
Posting date | Select | |
Payment terms | ||
Term | Percentage | No. of days |
1. | 5% | Blank |
2. | 2% | 10 |
3. | 30 | |
Save your terms of payment.
It is important to define separate terms of payment for Customer and Vendor because it is most unlikely that the terms of payment for customer and vendor will remain the same.
Payt Terms: This is defined using up to a maximum of four-digit key. This key is entered in the master records of customers/vendors.
Day Limit: Here you specify a given date of the month that you want the payment term to apply to a corresponding payment.
Own explanation: This is where you specify your own special description relating to your payment terms. The description you specify here will replace the system generated explanation by the system.
Account type: This will allow you to specify the account type that your payment term applies to. This could be either Customer or Vendor. It is also possible to set your payment term to both account types by selecting the checkbox for both Customer and Vendor, but we advise that you use one account type per payment term, as changes in one account type may not necessarily affect the other account type.
Default for baseline date: You have a number of options here that you can select from to use as the date applicable to the terms payment. The date you selected will be used by the system to determine permitted cash discount amount or invoice due date.
You have the choice of setting the baseline date for payment that the system will use as:
No default: You use No default if you do not want the system to default a date during document entry. This means during document entry the user has to manually specify the baseline date that is applicable to the terms of payment.
Document date: This is the date on the document or the date you entered during document entry as the document date.
Posting date: This is the date a document is posted or the date you specified as the posting date when posting a document.
Entry date: This is the date the document is entered into the system.
Payment terms: The specification done here will allow the system to award a cash discount if invoice amount is paid within specified days. For example, on immediate payment 5%, within 15 days 3% cash discount, and within 45 days due net.
When Installment payment is set. The system will automatically break the invoice amount into partial payments with different due dates specified in your customization.
Now define another terms of payment for Vendor
To maintain terms of payment for customers, follow this menu path: IMG: Financial Accounting (New) ➤ Account Receivable and Accounts Payable ➤ Business Transaction ➤ Outgoing Invoices/Credit Memos ➤ Maintain Terms of Payment.
Define Terms of Payments for Vendors
Field Name or Data Type | Values | |
|---|---|---|
Payment Type | V001 | |
Account Type | ||
Customer | Select | |
Default to baseline date | ||
Posting Date | Select | |
Payment Terms | ||
Term | Percentage | No. of days |
1. | 5% | Blank |
2. | 3% | 15 |
3. | 45 | |
Select Vendor as your Account Type.
Save your term of payment.
Installment Plan
Another important aspect of payment terms is the installment plan. This is the payment terms where business partners agree for an invoice amount payment to be spread out systematically over a specified period. The total invoice amount is divided into partial amounts and paid at different dates until the invoice amount is cleared or paid off in full. For example, your company agrees with a customer to pay 20% of an invoice amount of $4000 USD monthly over a five-month period. Thus, the installment plan will allow your company to receive $800 USD monthly for the agreed five-month period until the amount is paid in full.
The number of installments for your payment terms. This is the number of payments needed to pay off the outstanding amount.
The percentage rate that will be applied to clear the outstanding invoice amount (the percentage rate specified must be equal to 100%).
Define the terms of payment for individual instalments for each percentage rate applicable to your installment plan.
The system will automatically carry out the instalment split once instalment payment is defined in the system and assigned to the business partner’s master record. Secondly, the system will also create a line item for each instalment automatically.
Problem: You have been asked to create a terms of payment for an installment plan, where 10% of the invoice amount is paid immediately, 40% is paid within 60 days, and the balance is paid within 90 days.
Maintaining Terms of Payment for an Installment Plan
Maintaining Terms of Payment may seem to be a complicated exercise, but this is not truly so. To help you understanding how to customize terms of payment for your instalment plan, we have decided to break this activity into a sequence using steps 1–4.
To go to the screen where you will maintain your terms of payment for an installment plan, follow this menu path: IMG: Financial Accounting ➤ Account Receivable and Accounts Payable ➤ Business Transaction ➤ Incoming Invoices/Credit Memos ➤ Maintain Terms of Payment. The Change View “Rem of Payment”: Overview screen is displayed.
Choose the New Entries button; this will take you to the New Entries: Detail of Added Entries screen where you will carry out your terms of payment settings.
Define terms of payment for your instalment plan using a suitable four-character identification key.
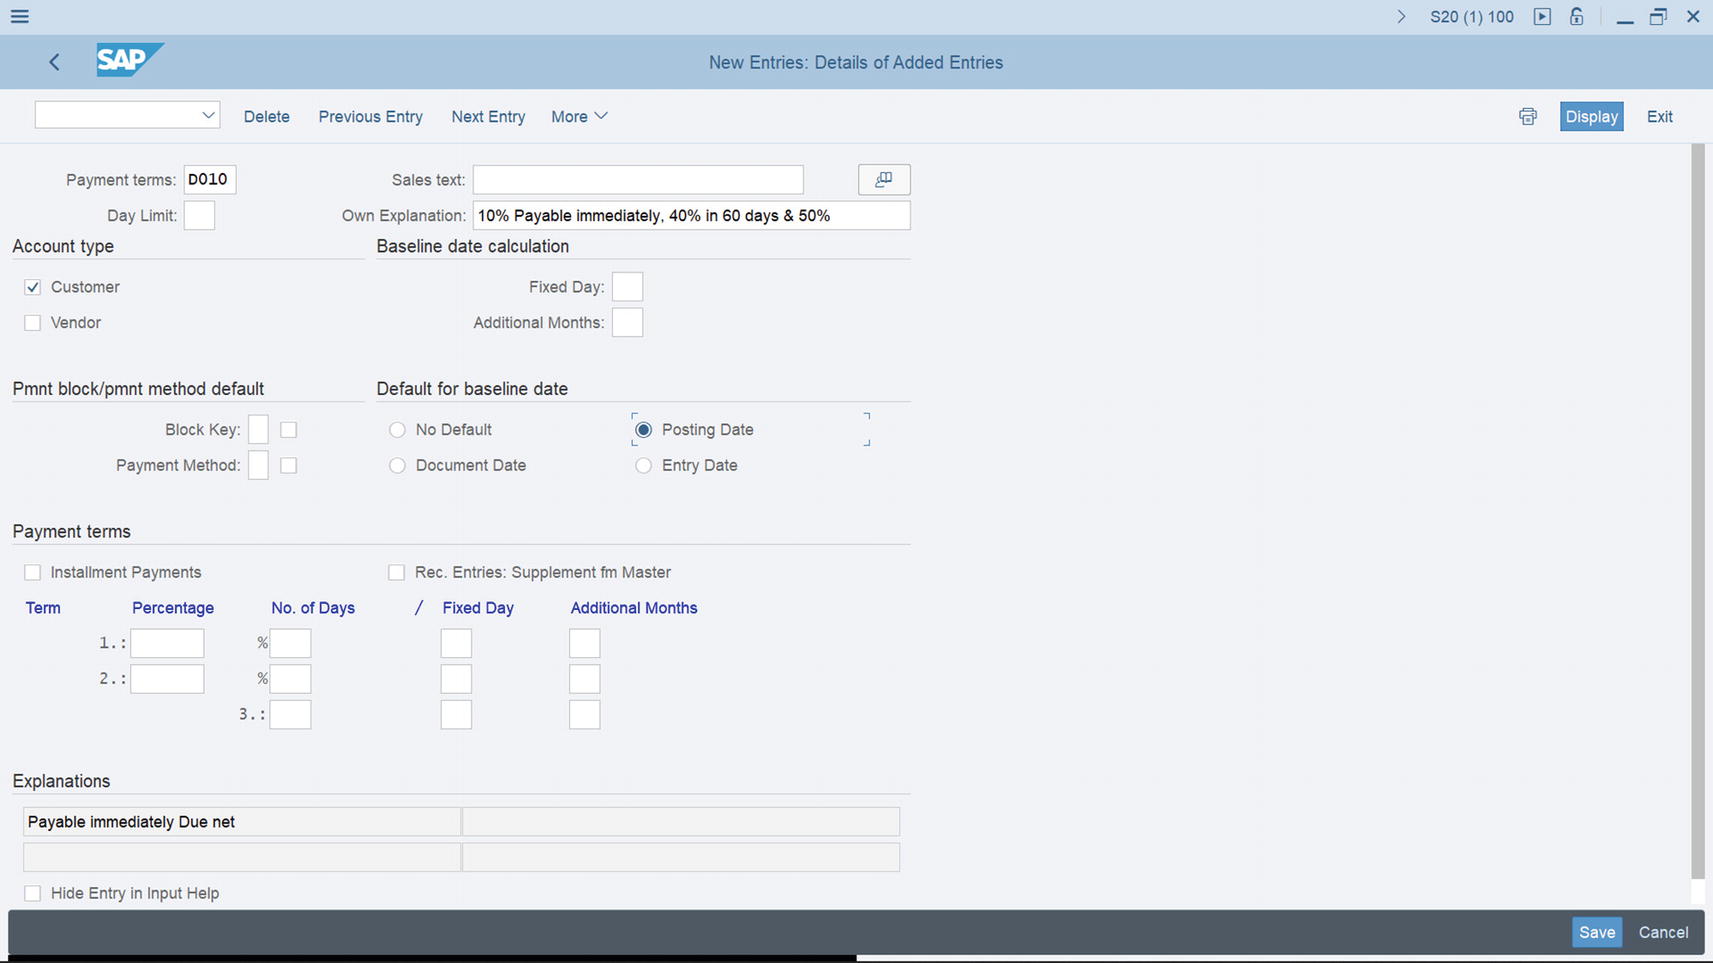
The initial where Installment plan is maintained
The Data to Update the Payment Terms
Field Name or Data Type | Values | |
|---|---|---|
Payment Terms | D010 | |
Own Explanation | 10% Payable immediately, 40% in 60 days & 50% | |
Account Type | ||
Customer | Select | |
Default to baseline date | ||
Posting Date | Select | |
Payment Terms | ||
Term | Percentage | No. of days |
1. | ||
2. | ||
3. | ||
Payment Terms: Enter four-characters. This key allows you to store payment conditions in your payment terms and identify your terms of payment when you have more than one terms of payment in the system. In this activity, we used DC01 as our payment terms (this is a freely defined key). The terms of payment you have defined here is applicable to all terms of payment. We will be looking at this in depth in the next activity when defining payment terms.
Own Explanation: Describe the payment terms for your installment plan. Enter the description in this field.
Account Type: Specify the account type you want to apply to your payment terms. Since you are maintaining payment terms for your customers, click the Customer checkbox.
Default to Baseline Date: The date you select here will determine the default baseline date. In this activity, we used the posting date as our baseline date. Activate the Posting Date checkbox.
Terms: Specify the terms, percentage rates, and number of days for your payment terms. For this activity, leave this section blank.
At this stage, save your terms of payment.
We advise that you follow the steps in this exercise carefully, without trying to jump a step, unless you are quite good in this area.
The next step in this activity is to define individual payment terms for each percentage rate you are using as a basis of instalment payment. In this exercise, you will be defining payment terms for 10%, 50%, and 40%, respectively.
Your total payment terms percentage rate must be equal to 100%.
Click Next Entry at the top of the screen to go to another blank New Entries: Details of Added Entries screen.

The Data to Update the Payment Terms – Step 1
Field Name or Data Type | Values | |
|---|---|---|
Payment Type | P010 | |
Own Explanation | 10% Payable Immediately | |
Account Type | ||
Customer | Select | |
Default to baseline date | ||
Posting Date | Select | |
Payment Terms | ||
Installment Payment | Select | |
Term | Percentage | No. of days |
1. | ||
2. | ||
3. | ||
Save your terms of payment.

Define payment terms for no. of days – 60 days.
Click Next Entry at the top of the screen to go to another blank New Entries: Details of Added Entries screen.
The Data to Update the Payment Terms – Step 2
Field Name or Data Type | Values | |
|---|---|---|
Payment Type | P040 | |
Account Type | ||
Customer | Select | |
Default to baseline date | ||
Posting Date | Select | |
Payment Terms | ||
Term | Percentage | No. of days |
1. | 60 | |
2. | ||
3. | ||
Save your terms of payment.

Define payment terms for no. of days – 90 days.
Click Next Entry at the top of the screen to go to another blank New Entries: Details of Added Entries screen.
The Data to Update the Payment Terms – Step 3
Field Name or Data Type | Values | |
|---|---|---|
Payment Type | P050 | |
Account Type | ||
Customer | Select | |
Default to baseline date | ||
Posting Date | Select | |
Payment Terms | ||
Term | Percentage | No. of days |
1. | 90 | |
2. | ||
3. | ||
Payt Terms: Enter a four-character key – P050.
Own explanation: Enter a description for your instalment plan – 50% payable in 90 days
Account type: Set customer indicator.
Default for baseline date: Set Posting date indicator.
Save your terms of payment.
Now let’s define Instalment Payments for the Terms of Payment you created above.
Defining the Payment Terms for Instalment Payments
To define the payment terms for installment payments, follow this menu path: IMG: Financial Accounting➤ Account Receivable and Accounts Payable ➤ Business Transaction ➤ Incoming Invoices/Credit Memos ➤ Define Terms of Payment for Instalment Payments.
The Change View Terms of Payment for Holdback/Retainage” Overview screen is displayed. Click the New Entries button at the top of the screen. The New Entries: Overview of Added Entries screen is displayed. Use the search function to call up the Terms of Payment list.
The Data to Update the Payment Terms
Terms of payment | Installment | Percent | Payment term |
|---|---|---|---|
D010 | 1 | 10 | P010 |
D010 | 2 | 40 | P040 |
D010 | 3 | 50 | P050 |

Setting up payment terms for Installment payments
Save your terms of payment.
Defining Cash Discount Base for Incoming Invoices
A cash discount base is calculated either as net value or gross value depending on your country’s regulation.
The specification you make in this activity per company code will determine whether tax amount is considered in the base amount calculation for cash discount by the system. To go to the screen where you will specify your cash discount base for incoming invoices, follow this menu path: IMG: Financial Accounting ➤ Account Receivable and Accounts Payable ➤ Business Transaction ➤ Incoming Invoices/Credit Memos ➤ Define Cash Discount Base for Incoming Invoices.

Cash Discount Base for Incoming Invoices
Activate The DiscBaseNt checkbox.
Save your cash discount base.
By selecting Discount Base Net checkbox, you are instructing the system to calculate your cash discount excluding taxes (net value). If the check box is left blank, the system will automatically assume that you want your cash discount amount to be based on gross value. This is part of the global parameter settings in your company code.
Incoming Invoices Credit Memos /Credit Memos – Enjoy
Enjoy Transaction
Single screen transaction (this allows you to enter, park and, hold a document on a single screen without loss of context).
User-friendly interfaces.
Defining Document Types for Enjoy Transaction
You define document types for enjoy transactions, which is defaulted by the system when entering incoming invoices and credit memos for customer and vendor. If you did not define a document type, the system will automatically propose the document type that was used in the previous document entry. You can overwrite the proposed document type. Follow this menu path to go to the screen where you will define document types for enjoy transaction: IMG: Financial Accounting➤ Account Receivable and Accounts Payable ➤ Business Transaction ➤ Incoming Invoices/Credit Memos ➤ Incoming Invoices/Credit Memos − Enjoy ➤ Define Document Types for Enjoy Transaction.

Document types for Enjoy Transaction
Update the following fields:
Company: Enter your company code (100) in this field. This will apply the
settings to your company code.
Acct Type: Enter the account type you want the system to use as the default during document entry. For example, Customers/Vendors.
Trans.: Using the pull-down arrow next to the field to display the predefined transactions list supplied by SAP, enter the transaction description that fits the account type you want to apply the default setting to.
Document: Enter the document type to use as the default. For example:
DR-Invoice (Customers)
DG-Credit Memo (Customers
KR-Invoice (Vendors)
KG-Credit Memo (Vendors)
Save your work.
Defining Tax Code per Transaction
This setting in the Define Tax Code per Transaction section allows you to select a subset from the tax codes (Tax codes where created in chapter 10). As part of this definition, you specify a tax code per transaction and per country key and then you can select a subset from the defined tax codes in the system during document entry. To define tax code per transaction, follow this menu path: IMG: Financial Accounting➤ Account Receivable and Accounts Payable ➤ Business Transaction ➤ Incoming Invoices/Credit Memos ➤ Incoming Invoices/Credit Memos – Enjoy ➤ Define Tax Code per Transaction.

Specifying tax codes per transaction
Update the following fields:
Tax Code: Enter your output tax code in the first field and input tax code in the next field.
Transaction: Enter the transaction for your tax code in this field. For example, for output tax, select Financial Accounting outgoing and for input tax, select Financial Accounting Invoice.
Save your setting for tax code per transaction.
Cash Discount
Cash Discount Granted
This is the cash discount you give to a customer for complying with an agreed terms of payment. Discount granted reduces the total invoice amount by an agreed percentage of the total invoice amount. Based on the settings you made in this activity, when clearing open items, the system will post cash discount granted to the accounts you defined for cash discount granted.
We advise that you should first create the G/L account 880000 that cash discount granted will be posted to before proceeding with this customizing. Please refer to Chapter 5 where we covered in detail how to customize G/L accounts.
Defining Accounts for Cash Discount Granted.
Cash discount granted is the cash discount you give to a customer for complying with agreed terms of payment. The cash discount granted reduces the total invoice amount by an agreed percentage. Based on the settings you make in this activity; the system will post discount granted amount to the G/L account you assigned to cash discount granted. Use this menu path to go to the screen where you will assign a G/L account for cash discount granted: IMG: Financial Accounting➤ Account Receivable and Accounts Payable ➤ Business Transaction ➤ Incoming Payments – Incoming Payments Global Settings ➤ Define Accounts for Cash Discount Granted.
The Enter Chart of Accounts dialog box pops up. Enter your Chart of Accounts – CA10 in the Chart of Accounts field and click the enter button at the bottom right of the dialog box.
The Configuration Accounting Maintain: Automatic Posts – Rules screen is displayed. Click the Save bottom at the bottom left of the screen. The Configuration Accounting Maintain: Automatic Posts – Accounts screen is displayed. Assign the GL Account for Clearing Cash discount Granted – 880000 to Automatic Posting – Accounts and Save your work.
If you have not created a G/L Account for Cash Discount Granted, the system will notify you on the status bar below that your G/L account is not created in the chart of accounts. You can force the system to accept the G/L account temporarily and you can create the G/L account later by hitting the enter key on your keyboard several times and the system will allow you to save your configuration.
Define Account for Cash Discount Taken
This is the cash discount you receive from a vendor for complying with payment conditions. Discount taken will reduce the total invoice amount by an agreed percentage of the total invoice amount. Based on the settings you made in this activity, when clearing open items, the system will post cash discount taken to the accounts you defined for cash discount taken.
Again, just like Cash Discount Granted above, create the appropriate G/L account – 276000 for cash discount taken.
Use this menu path to go to the screen where you will assign a G/L account for cash discount taken: IMG: Financial Accounting➤ Account Receivable and Accounts Payable ➤ Business Transaction ➤ Outgoing Payments ➤ Outgoing Payments Global Settings ➤ Define Accounts for Cash Discount Taken.
The Enter Chart of Accounts dialog box pops up. Enter your Chart of Accounts – CA10 in the Chart of Accounts field and click the enter button at the bottom right of the dialog box.
The Configuration Accounting Maintain: Automatic Posts – Rules screen is displayed. Click the Save bottom at the bottom left of the screen. The Configuration Accounting Maintain: Automatic Posts – Accounts screen is displayed. Assign the GL Account for Clearing Cash discount taken – 276000 to Automatic Posting – Accounts and Save your work. The system will notify you on the status bar at the bottom of the screen that changes have been made.
Defining Account for Overpayments/Underpayments
Payment difference arises as a result of either overpayment or underpayment.
It is not possible to post difference through cash discount adjustment.
The difference falls within tolerance limits for an automatic adjustment posting.
Again, just like Cash Discount Granted above, create the appropriate G/L account – 276000 for Account for overpayments/underpayments
Use this menu path to go to the screen where you will assign a G/L account for Accounts for overpayments/underpayments: IMG: Financial Accounting➤ Account Receivable and Accounts Payable ➤ Business Transaction ➤ Outgoing Payments ➤ Outgoing Payments Global Settings ➤ Define Accounts for Overpayments/Underpayments..
The Enter Chart of Accounts dialog box pops up. Enter your Chart of Accounts – CA10 in the Chart of Accounts field and click the enter button at the bottom right of the dialog box.
The Configuration Accounting Maintain: Automatic Posts – Rules screen is displayed. Click the Save bottom at the bottom left of the screen. The Configuration Accounting Maintain: Automatic Posts – Accounts screen is displayed. Assign the GL Account for Clearing overpayments/underpayments – 881000 to Automatic Posting – Accounts and Save your work. The system will notify you on the status bar at the bottom of the screen that changes have been made.
Defining Accounts for Bank Charges (Vendor)
Bank Charges are posted to an expense account. Here you define the account for bank charges and assign an expense account to it. The system will then automatically post bank charges to your expense account during posting.
Create the G/L Account for Bank Charges (vendor) before proceeding with this customizing. Otherwise, you can force the system to accept the G/L account you are using for this activity and then create it later.
Again, just like Cash Discount Granted above, create the appropriate G/L account – 276000 for Account for overpayments/underpayments.
To go to the screen where you will assign a G/L account for Accounts for Bank Charges (Vendor) follow this menu path: IMG: Financial Accounting ➤ Account Receivable and Accounts Payable ➤ Business Transaction ➤ Outgoing Payments ➤ Outgoing Payments Global Settings ➤ Define Accounts for Bank Charges (Vendor).
The Enter Chart of Accounts dialog box pops up. Enter your Chart of Accounts – CA10 in the Chart of Accounts field and click the enter button at the bottom right of the dialog box.
The Configuration Accounting Maintain: Automatic Posts – Rules screen is displayed. Click the Save bottom at the bottom left of the screen. Configuration Accounting Maintain: Automatic Posts – Accounts screen is displayed. Assign the GL Account for Clearing Bank Charges – 470100 to Automatic Posting – Accounts and save your work. The system will notify you at the status bar at the bottom of the screen that changes have been made.
Defining Payment Block Reasons
When defining reasons for blocking payments, there are a few specifications you need to consider. You can specify whether payment blocks can be changed in payment proposals or during manual payment. You can also specify whether documents defined with block keys can be cleared during manual payment processing or if changes are not allowed.
The reasons you define in this exercise allow you to differentiate why invoices are not to be paid. Standard block reasons are supplied by SAP, which you can use if you do not want to define your own.
Payment block reasons are valid for all company codes. This means all company codes within the client or in the system can use the payment block reasons in the system without having to define payment block reasons that are company code specific. When customizing payment block reasons, you need to update the following fields:
Block Ind.: This is a block indicator key that is defined with a one-digit character key. This key contains reasons for blocking payments. It’s entered in a document to block an invoice from being paid for a specified reason.
Description: Enter a short description stating why this payment is being blocked.
Change in Payment Proposal: When you want changes to be carried out during the payment proposal. It is possible to remove a payment block when processing the payment proposal, but when you set this proposal, changes cannot be made during payment proposal processing.
Manual Payment Block: If you do not want documents assigned with a block key to be cleared during manual payment clearing, then choose this option.
Not Changeable: Changes cannot be made during payment proposal processing or during manual payment.
This step allows us to define the reason for blocking invoice(s) for payment. Standard block reasons are supplied which you can use. It is also possible to define additional block reasons if there is any need for it.
Since Payment block reasons are valid for all company code, you can use block reasons already defined in the system.
Now let’s define a payment block reason. Follow this menu path to go to the screen where you will define payment block reasons: IMG: Financial Accounting ➤ Account Receivable and Accounts Payable ➤ Business Transaction ➤ Outgoing Payments ➤ Outgoing Payments Global Settings ➤ Payment Block Reasons ➤ Define Payment Block Reasons.

Defining payment block reasons
Update the following fields:
Block Ind.: Enter your payment block reason key in this field. This is usually defined using a single-digit character. In this exercise, we used K as our payment block reason key for illustration purposes. This key is a freely definable payment block reason key. You can use any key of your choice.
Description: Enter a meaningful short statement describing your payment block reason. As an example, we used Payment Block C900 as our payment block reason. You can use any meaningful description of your choice.
Change in Pmnt Prop.: When you select the change in payment proposal checkbox, the payment block cannot be removed during an automatic payment program run.
Save your block reason.
Manual Outgoing Payments
Tolerances for vendors.
Reason codes for manual outgoing payments.
Define account for payment differences.
Defining Tolerances for Vendors
Employees Tolerance Group,
GL Accounts Tolerance Group, and
Customers/Vendors Tolerance Group.
Tolerances define acceptable tolerance during posting. Tolerance provides the control mechanism that allows management to restrict the amount accounting clerks are permitted to post. It also serves as a control measure for discounts granted, payment differences, and tolerances for payment advice.
The advantage of setting tolerances is to impose restrictions to avoid major posting errors by clerks or end users.
You have already covered Employees Tolerance Groups and GL Accounts Tolerance Groups earlier in Chapter 9. Hence, you will only be looking at Customers/Vendors Tolerance groups. The settings in this activity are valid for both customers and vendors tolerance groups.
Clearing transactions.
Permitted payment differences.
Posting residual items from payment differences.
Tolerances for payment advice notes.
- 1.
Tolerance group: This is defined with a four-digit group key (group key is defined with a four-digit ID).
Blank group key is the standard tolerance group, and it is required as the minimum tolerance group.
- 2.
Once the tolerance group is defined, you then assign it to the right object. In this activity, your tolerance group will be assigned to the Vendor/Customer master record.
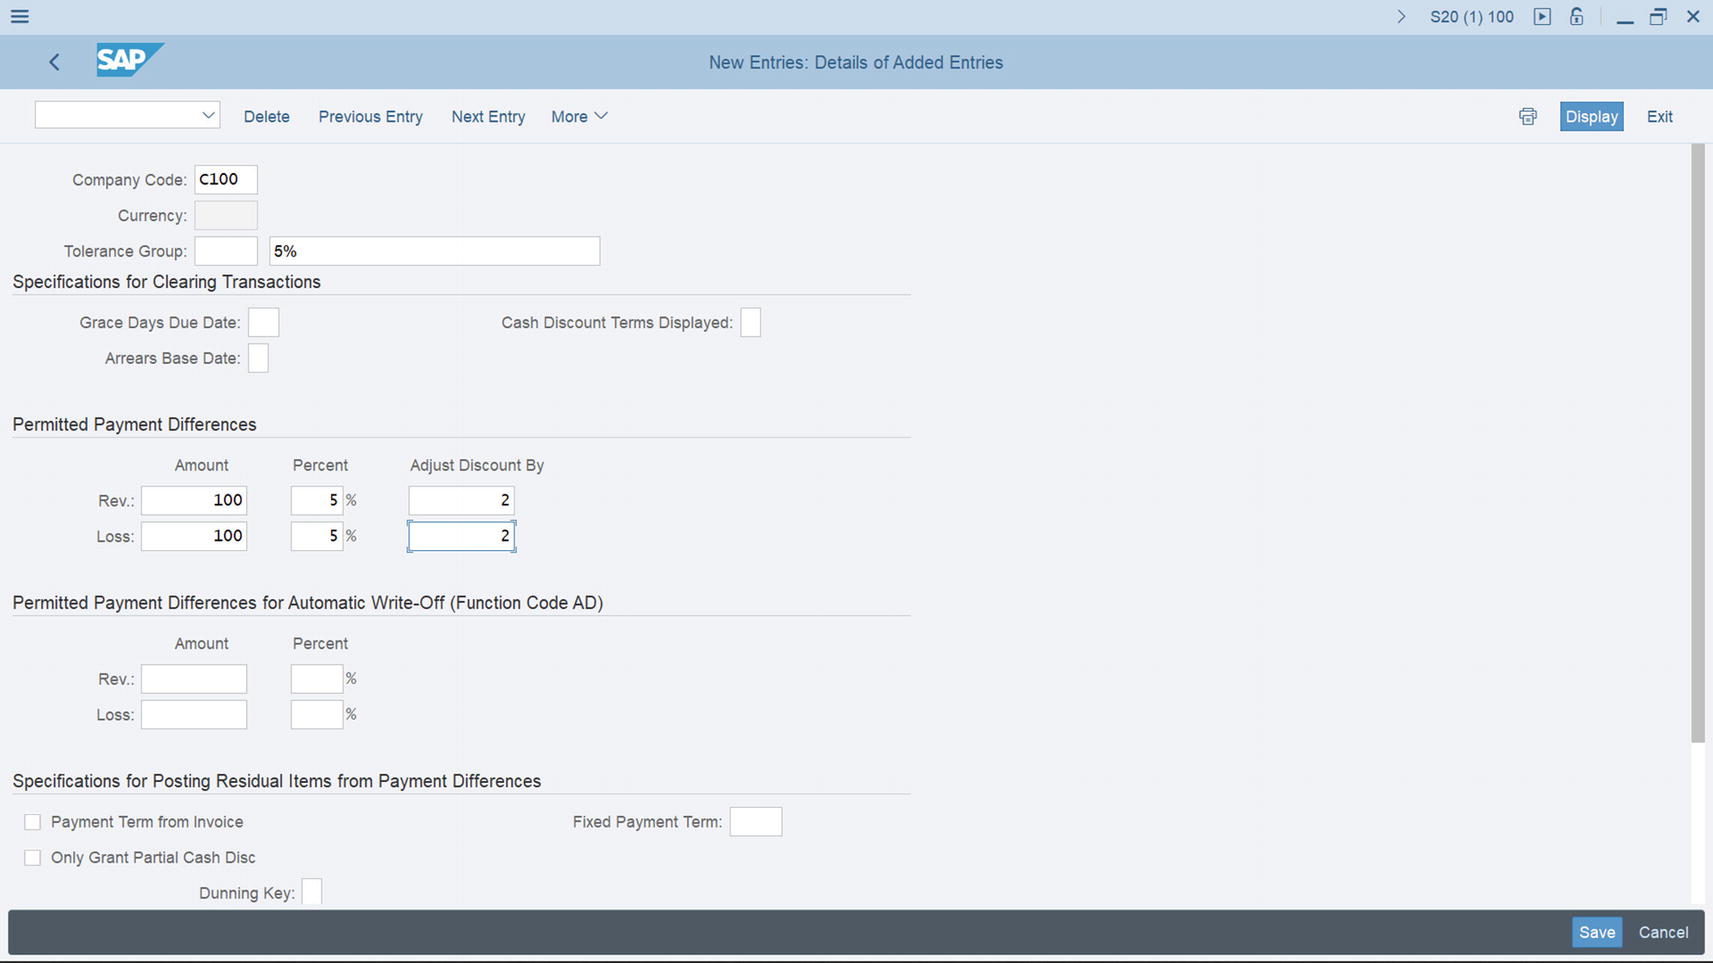
Problem: You have been asked by your team leader to create two tolerance groups – one with a group key and the second one without a group key – to satisfy the minimum tolerance group requirements
First, let’s define tolerance group with ID:
Follow this menu path: IMG: Financial Accounting➤ Account Receivable and Accounts Payable ➤ Business Transaction ➤ Outgoing Payments ➤ Manual Outgoing Payments ➤ Define Tolerances (vendors).

Defining tolerance group
Company code: Enter the four-digits of your company identification key is in this field.
Currency: This is your Company Code Currency. The system will automatically default your company code currency during document entry.
Tolerance group: This is defined with a four-digit ID as your tolerance group key. This ID will be assigned to your tolerance group relating to vendors.
In the Permitted Payment Difference section of the screen, update the following fields:
Rev/Loss: The permitted payment differences that a user is permitted to post in Amount and in percentage are entered in these fields, respectively. When posting a document, the system will check the amount and the percentage of the document amount posted and use whichever is lower. You also need to specify the Discount adjustment allowed.
Adjust Discount By: Specify the discount adjustment allowed.
Using the information in Table 14-12, update New Entries: Details of Added Entries screen:
Data to update your tolerance group with ID
Company Code | Enter our company code (C100) | ||
|---|---|---|---|
Currency | |||
Tolerance Group | CLK1 | ||
Permitted Payment Differences | Amount | Percent | Adjust Discount By |
Gain | 100 | 5 | 2 |
Loss | 100 | 5 | 2 |
Save your tolerance group.
The second step in this activity is to create another tolerance group without a tolerance group ID.
Since you have created a group key for Customer/Vendor tolerances, you also need to create a blank group key, which is for the minimum standard tolerance group.
Follow this menu path to go to the screen where you will define tolerance group without an ID for minimum standard tolerance group: IMG: Financial Accounting➤ Account Receivable and Accounts Payable ➤ Business Transaction ➤ Outgoing Payments ➤ Manual Outgoing Payments ➤ Define Tolerances (vendors).
Defining the standard minimum tolerance group (with a group ID)
Company code: Enter the four-digits of your company identification key in this field.
Currency: This is your Company Code Currency. The system will automatically default your company code currency during document entry.
Tolerance group: Leave this field blank
In the Permitted Payment Difference section of the screen, update the following fields:
Rev/Loss: The permitted payment differences that a user is permitted to post in Amount and in percentage are entered in these fields, respectively. When posting a document, the system will check the amount and the percentage of the document amount posted and use whichever is lower. You also need to specify the Discount adjustment allowed.
Adjust Discount By: Specify the discount adjustment allowed.
Using the information in Table 14-13, update the New Entries: Details of Added Entries screen:
Data to update your tolerance group without ID
Company Code | Enter our company code (C100) | ||
|---|---|---|---|
Currency | |||
Tolerance Group | Leave blank | ||
Permitted Payment Differences | Amount | Percent | Adjust Discount By |
Gain | 100 | 5 | 2 |
Save your standard minimum tolerance group
Defining Reason Codes (Manual Outgoing Payments)
Payment differences would normally arise when clearing open items against payments. The difference is compared to the tolerance limit allocated to the employee making the posting. If the difference is deemed to be immaterial, the payment is done automatically and the system will adjust the cash discount up to the amount specified in the configuration for cash discount adjustment or the system can write it off to a special account. Otherwise, the payment has to be processed manually.
Partial Payment: You enter the partial payment against the open item and assign a reason code. When a partial payment is posted, all documents remain in the account as open items.
Residual Item: You assign the residual item and assign reason code. The system will clear the original net amount and the payment, whilst the residual item remains in the account as open item.
Payment on account: All item remains as open items.
Reason Codes
There are several reasons for payment differences. It is important to specify reasons for payment differences when posting partial payments or residual items. SAP has the flexibility to assign more than one reason codes to a payment difference. To do this click on distribute difference push button option on the top right hand side of the payment screen.
Partial Payments.
Residual Posting.
Posting on account.
Charge off Difference: When this indicator is set for a reason code, the payment difference arising will be posted to a separate GL account automatically.
Disputed Item: The Disputed item indicator allows disputed items to be excluded from credit checks.
Do not copy text: When this indicator is set, you will have to enter reason code text into the segment text field of the residual item or the partial payment manually. If the indicator is not set, the system will automatically copy the reason code text you defined in your configuration into the segment text of residual item or partial payment.
Let’s go to the screen where you will customize reason codes for your manual outgoing payments. Follow this menu path: IMG: Financial Accounting ➤ Account Receivable and Accounts Payable ➤ Business Transaction ➤ Outgoing Payments ➤ Manual Outgoing Payments ➤ Overpayment/Underpayment ➤ Define Reason Codes (Manual Outgoing Payments).

Assigning reason codes to manual outgoing payments
1. Update the following fields:
RCd: Enter a three-digit character code in this field. It represents your reason code. This code will allow you to store text and the correspondence type for your reason code.
Short Text: Enter a short description of your reason code in this field. For example, in this exercise, we used Damaged Goods.
Long Text: Enter a full description of your reason code in this field. For example, we used Damaged Goods – Disputed.
CorrT: Specify the correspondence type for your reason code in this field. SAP comes with standard predefined correspondence types you can choose from.
Click the pull-down arrow next to the Correspondence Type field to display the list of correspondence types supplied by SAP. Select the correspondence type that best meets your requirement. For example, the code for payment notice with line items is SAP0l and the code for difference 050 payment notice is SAP50.
SAP01 – Payment notice with line items.
SAP50 – Difference 050 Payment notice.
You can create as many reason codes as you want. We advise that you take a look at the reason codes for company code 1000 before defining your own reason codes.
Save your reason codes.
The next step is to define accounts for Payment Differences (Manual Outgoing Payments). The settings you make will allow the system to automatically post payment differences to the accounts you specify.
Defining Accounts for Payment Differences (Manual Outgoing Payments)
Payment differences are posted to a special account in SAP S4 HANA. In this activity, you assign payment differences by reason to your G/L account. You have already created the GL account required for this configuration. Your payment difference will be assigned to unallowed customer discounts and a G/L Account.
You have already created the G/L account (Unallocated Customer Discount 881000) required for this customizing in a previous activity. So you don’t need to define it again; all you need to do is simply assign it to the payment differences.
To assign your account to payment difference, follow this menu path: IMG: Financial Accounting ➤ Account Receivable and Accounts Payable ➤ Business Transaction ➤ Outgoing Payments ➤ Manual Outgoing Payments ➤ Overpayment/Underpayment ➤ Define Accounts for Payment Differences (Manual Outgoing Payments).

Account determination for automatic posting of payment differences
Enter the appropriate GL account for payment differences in the Account field and save your work.
Automatic Outgoing Payments
Automatic Outgoing Payments is a payment management tool in the SAP S4 HANA system that manages payments of multiple open invoices, posts payment documents, and prints payment media using EDI (Electronic Data Interchange) or DME (Date Medium Exchange) simultaneously.
Payment Program can be accessed from the User Side (Easy Access) and IMG. It is recommended that you perform your configuration in IMG. It is very important that you work from top down during configuration to ensure that your settings are complete. Several levels and steps are involved when customizing a payment program in SAP S4 HANA.
Payment program configuration allows you to specify the settings for the following items for Payment Transactions:

Ok let’s begin Automatic Payment Program configuration.
All Company Codes
Specifying the company code you want to include in your automatic payment program is important when the payment process is centralized. For example, when one company code makes payments for other company codes. At this level, you make settings for all the company codes that you want to include in your payment program.
All Company Codes are the company codes you want to include in your payment transactions.
The paying company code (this is the company code responsible for processing outgoing payments). This setting is applicable where payments are made centrally by one company code for several company codes.
The Sending Company code (the company code payment is being made on its behalf to a business partner by another company code). If the sending company is not specified, the system will automatically assume that the paying company is also the sending company.
You can specify if Separate payment per business area is to be made and use payment method supplements.
If your business partner normally allows certain days of grace for invoice payment, you can enter it in Tolerance days payable field. The system will automatically delay payment of the appropriate due items until the next payment run as long as it is within the allowed days of grace in order not to lose cash discounts.
You can also specify Special GL transactions for vendors and customers settlement using the following special GL indictors from the pull-down lists supplied by SAP in the system (see List below).

To set up all company code codes for your payment transactions, follow this menu path: IMG: Financial Accounting ➤ Account Receivable and Accounts Payable ➤ Business Transaction ➤ Outgoing Payments ➤ Automatic Outgoing Payments ➤ Payment Method/Bank Selection for Payment Program ➤ Set Up All Company Codes for Payment Transactions.
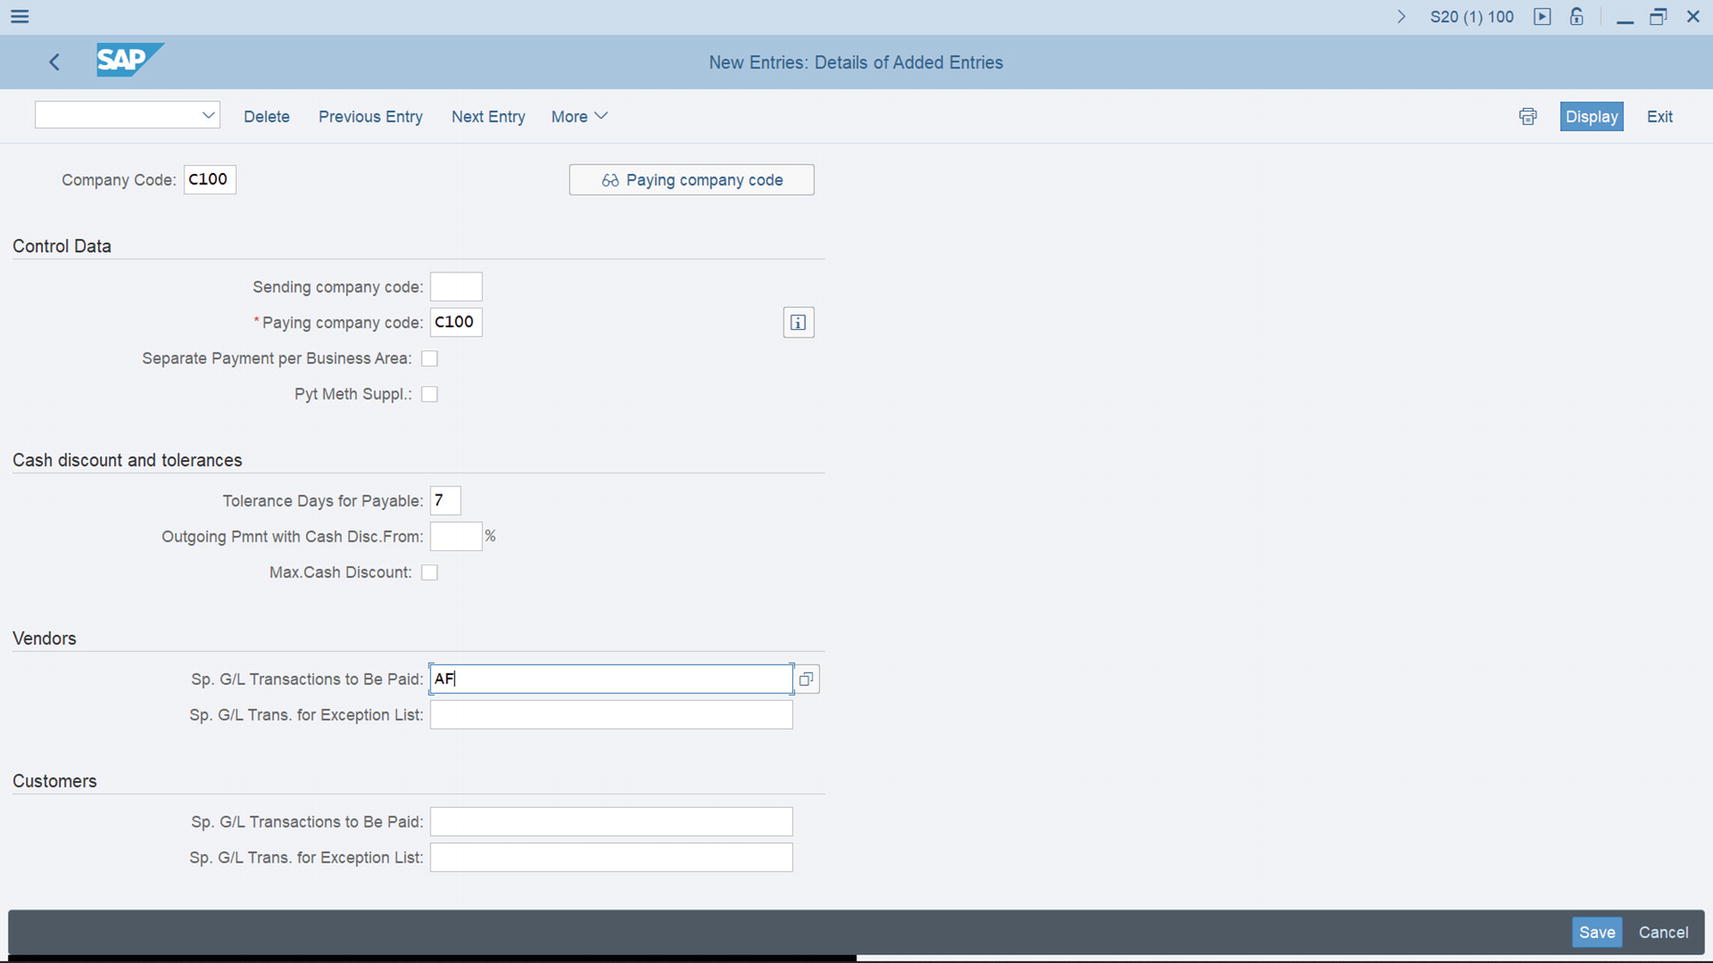
Defining payment program for all company codes
Data to update your payment program for all company codes
Fields | Values |
|---|---|
Company code | Enter our company code (C100) |
Control Data | |
Sending Company | |
Paying Company | Enter our company code (C100) |
Cash Discount and Tolerances | |
Tolerance Days for Payable | 7 |
Vendor | |
Sp. GL Transactions to be paid | AF |
Save your setting for all company codes by clicking the save button at the bottom right of the screen.
Paying Company Codes
The paying Company Code is the company that is assigned with the task of processing payment transactions on behalf of other company codes. This is the case where a centralized payment system is in place. Invoices arising from transactions by other company codes are sent to one Company code within the group company who makes payments on behalf of other company codes centrally. A good example of this is an environment where the head office makes payment for other company codes (i.e., branches). The company code making payment on behalf of other company code is referred to as the paying company code, and the company to whom payment is being made is referred to as the sending company code.
Minimum amount for incoming payment: This determines the minimum amount that will be allowed by the system to go through the automatic payment program for an incoming payment. Any amount lower than this amount will not be allowed as an automatic payment, it will have to be performed manually instead.
Minimum amount for outgoing payment: The amount specified as the minimum amount for outgoing payments relates to invoice payments. Any amount below the· minimum amount will not be included by the system in the payment run. Amounts below this have to be performed manually. For example, if the minimum amount specification for an outgoing payment is $0.50 USD, any invoice amount less than $0.50 USD on will be excluded from the payment run.
Forms: SAP comes with standard payment program forms in SAPScript. SAPScript defines the form layout that meets certain country specific and international payment methods. You can choose from several standard forms when defining your paying company code. The benefit of using the standard forms defined in SAPScript is that it saves you from using the wrong print program. There are two types of forms in this activity – forms for printing a payment advice and the EDI accompany sheet form.
Sender details: Specify the texts you want to use for your letter header, letter footer, and your company code sending address.
Now let’s look at how to setup a paying company code for payment transactions. To do this, follow this menu path: MG: Financial Accounting ➤ Account Receivable and Accounts Payable ➤ Business Transaction ➤ Outgoing Payments ➤ Automatic Outgoing Payments ➤ Payment Method/Bank Selection for Payment Program ➤ Set Up Paying Company Codes for Payment Transactions.
The Change View “Paying Company Codes”: Overview screen is displayed. Click New Entries at the top left of the screen. The New Entries: Details of Added Entries screen comes up. This is the screen where you will specify the minimum account for incoming payments and minimum amount for outgoing payment for your paying company code.
Update the following fields:
Paying company code: Enter your paying company code in this field. In this activity, we used C100 as our company code
Minimum Amount for Incoming Payment: Enter the minimum incoming payment you want to include in your payment program in this field. In this activity, we used $0.50USD.
Minimum Amount for Outgoing Payment: Enter the minimum outgoing payment you want to include in your payment program in this field. In this activity, we used $2.50USD.
The next step is to assign SAPScripts, which are country specific to your paying company code (the form for payment advice and EDI accompany sheet form).

Setting Minimum Amount for Outgoing Payments/Incoming Payments
SAP comes with several predefined payment forms you can use for your payment advice and EDI. In this activity, you will be using International Script form – F110_IN_AVIS for Payment Advice and Script form – F110_EDI_01 for EDI accompanying Sheet form. You can use any other form of your choice. In practice, you should use your country specific SAPScript or what your company recommends.

Specifying the Form for Payment Advice/EDI Accompanying Sheet Form using the search function
Click the search function button by the SAPscript circled in Figure 14-29 to display SAPscript Form Tree (Display Mode) with a list of payment advice versions for countries represented in the system that you want to use in your payment program. Under Payment Medium, choose International from the payment medium list. The Payment Medium Workbench comes up with a list of forms represented in the system. Select Payment Advice Note (international), the Form F110_IN_AVIS (AVIS (international)) screen is displayed. Click Form F110_IN_AVIS. This will copy the F110_IN_AVIS to your form for the payment advice – SAPscript, as in Figure 14-30.
The next step is to also assign EDI accompany sheet form to your EDI accompany sheet form.

Specification of Payment medium for your payment program

Specification of Sender details
Save your configuration.
In the next activity, we will be looking at how to customize payment method per company codes.
Payment Methods per Company Codes
The Payment Methods per Company Codes are obtained from Country Payment Keys defined in Payment Methods per Country. It is not compulsory that a Company Code must use the entire payment Methods per Country in the system. In practice, it is possible for a company code to use some or all available payment methods in the system. The specifications you make here will determine the payment methods the system will use in the automatic payment program for your company code when making payments.
The Paying company code (this is the company code responsible for processing outgoing payments).
The Payment method, for example check, bank transfer, etc.
Amount limits (minimum and maximum) applies to your payment method(s). Any payment amount below or above specified limits will be excluded from the payment run for your payment transaction.
- Other specifications under this activity includes:
Grouping items.
Foreign payments/foreign currency payments for foreign currency transactions:
The payment method will allow the system to process foreign currency payments and receipts. Make payments to/from business partner’s bank abroad.
Bank Selection control:
This allows the use of optimization either by bank group or by postal order. When you want the payment program to make payment from bank within the same clearing house, choose optimize by bank group indicator in your configuration. Funds are transferred more quickly and easily from your house bank within the shortest possible time to the business partner’s bank account. This is possible only if you assign your bank in the master record to the bank group that you have defined. On the other hand, if optimized by postal code is specified, the house bank selection that is closer to the business partner bank postal code is used.
Let’s look at how to set up payment method per company code. Follow this menu path to proceed to the screen where the setting is carried out: IMG: Financial Accounting ➤ Account Receivable and Accounts Payable ➤ Business Transaction ➤ Outgoing Payments ➤ Automatic Outgoing Payments ➤ Payment Method/Bank Selection for Payment Program ➤ Set Up Payment Methods per Company Code for Payment Transactions.

Maintaining paying company code data for a payment method
Update the following fields:
Paying co. code: Enter the company code that you want to use for transaction payment in your configuration for your payment run.
Payment method: Specify payment method (For example, Check – C and Bank Transfer – T).
Minimum Amount: Enter the minimum amount limit. Any amount below the minimum amount specified will be omitted from the payment run. If the field is left blank, there will be no amount limit restriction.
Maximum Amount: Enter the maximum amount limit in this field. Any amount in the payment transaction in excess of the maximum amount limit will be automatically excluded from the payment run.
Foreign business partner allowed: When indicator for foreign business partner allowed is set, the system will include foreign business partners in the payment run for a payment transaction.
Foreign Currency allowed: Specified foreign currencies are allowed in the payment run.
Cust/vendor bank abroad allowed: When the indicator for foreign business partner allowed is set, the system will allow payments from business partners’ bank accounts from abroad to be included in the payment run for a payment transaction
- 1.
Maintain paying company code Data for a Payment Method for Check payments. Using the information in Table 14-15, update the input field.
Data to Update your Paying Company Code for a Payment Method
Fields | Values |
|---|---|
Paying co. code | Enter our company code (C100) |
Pymt Method | C |
Amount Limits | |
Minimum Amount | Blank |
Maximum amount | 9.999.999.999,00 |
Foreign payments/foreign currency payments | |
Foreign business partner allowed | Select |
Foreign currency allowed | Select |
Cust/vendor bank abroad allowed/ | select |
Bank Selection control | |
No Optimize | Select |
The next step in this activity is to specify a standard payment form in SAPscript to your company code payment method using the international version and check (with check management) to your print checks. Click the Form button at the bottom left of the screen to expand the form page for further entries where you will assign SAPscript form for the paying company code.
Use International Script form for Check (with Check management) in your setting.
Click the search function button by the SAPscript circled in Figure 14-32 to display SAPscript Form Tree (Display Mode) with a list of payment advice versions for countries represented in the system that you want to use in your payment program. Under Payment Medium, choose International from the payment medium list, select Check (With Check Management) and the Form F110_Premium Medium screen pops up. Double click Language EN Activ and select F110_Premium to copy it into the Form for Payment Medium field.
The Payment Medium Workbench comes up with a list of forms represented in the system. Select Payment Advice Note (international), the Form F110_IN_AVIS (AVIS (international)) screen is displayed. Click Form F110_IN_AVIS. This will copy the F110_IN_AVIS to your form for the payment advice – SAPscript, as in Figure 14-30.
The next step is to enter senders’ details in in your payment method.
To expand sender details for Drawer on the form section, click the Sender Details button at the bottom of the screen, as in Figure 14-32.
Data to Update your Drawer Form
Fields | Values |
|---|---|
Drawer on the form | Enter your Company’s details in this field. For this activity we used Spoxio Inc. 1551 Ferry Avenue New Jersey |
Sorting of the | |
Correspondence | K2 (Name) |
Line items | E2 (Date) |
Finally, Click the Pyt adv.ctrl button to call up Payment Advice Control in order for you to specify appropriate items in the Payment advice note control section. That is vital for your payment program.
Set the following items in the Payment advice note control section. Select the as many as req. radio button and select the NoPytAdv radio button.
- 1.
The next step in this activity is to maintain paying Company Code Data for a Payment Method for Bank Transfer. Follow this menu path to go to the screen where you will specify payment method for bank transfer: IMG: Financial Accounting ➤ Account Receivable and Accounts Payable ➤ Business Transaction ➤ Outgoing Payments ➤ Automatic Outgoing Payments ➤ Payment Method/Bank Selection for Payment Program ➤ Set Up Payment Methods per Company Code for Payment Transactions.
The Change View “Maintenance of Company Code Data for a Payment Method” Overview screen is displayed. Click New Entries at the top left of the screen to go to New Entries: Details of Added Entries screen (Figure 14-25) where you will specify the maximum amount and maintain form data for payment program.
The Data to Update your Payment Program for Bank Transfer
Fields | Values |
|---|---|
Paying co. code | C900 |
Pymt Method | T |
Amount Limits | |
Maximum amount | 9.999.999.999,00 |
Foreign payments/foreign currency payments | |
Foreign business partner allowed | Select |
Foreign currency allowed | Select |
Cust/vendor bank abroad allowed/ | Select |
Bank Selection control | |
No Optimize | Select |
The next step is to update the form data.
- 1.
In the Payment advice note control section select None and save your work.

Company Code Data for Payment Method
Bank Determination for Payment Transactions
The settings you make in Bank Determination for Payment Transactions will allow the payment program to determine which bank account to make payment from based on the ranking order you defined in your configuration.
Define the following specifications in your configuration:
Ranking Order: Payments are made in order of ranking from your house bank by the payment program. The system will check the bank account with the highest priority for sufficient funds. If there are enough funds, payment will be made from the first house bank. If there are not sufficient funds in the first house bank, the system will check the second house bank for sufficient funds and make payment from that house bank, if there are sufficient funds, and so on.
Bank Accounts: The settings made here allow you to specify which bank account the payment program will use for payment.
Available Amounts: For each of the house banks included in your payment program, you should specify the amount available for incoming and outgoing payments. This specification also helps the system to determine which bank accounts to include when making payments.
Payment Method.
House Bank.
Account.
Amount Limit.
Currency.
Days.
Expenses/Charges: These include Fees/Charges.
Before configuring Bank Determination for Payment Transactions, you should ensure that the House Banks you are applying to your payment transaction have been defined. See how to define House Bank in Chapter 9.
To start with the customizing of Bank Determination for payment transactions, follow this menu path: MG: Financial Accounting ➤ Account Receivable and Accounts Payable ➤ Business Transaction ➤ Outgoing Payments ➤ Automatic Outgoing Payments ➤ Payment Method/Bank Selection for Payment Program ➤ Set Up Bank Determination for Payment Transactions.
The Display View “Bank Selection”: Overview screen comes up. Make sure the Bank selection folder on the Dialog Structure is open. Work through the folders under the Bank selection folder from top down systematically to ensure that there is nothing missing from your configuration.
Ranking Order
Payments are made in order of ranking from the house bank by the payment program. This system will check for the bank account with the highest priority for sufficient funds. If there are enough funds, payment will be from the first bank in order of ranking. If there are insufficient funds in the first house bank, the system will check the second house bank for sufficient funds and make payment from the house bank, if it has sufficient funds.
Using the Position button at the bottom of the screen, look for your company code from the Bank Selection list.
First, select your company from the Bank selection list and then Double click on the Ranking Order fold on the left side of the screen in the Dialog Structure. The Change View Ranking Order Overview screen is displayed; click New Entries at the top left of the screen and define the Ranking Order for your payment in the New Entries: Overview of Added Entries screen.
Update the flowing fields:
Payment Method: Enter the payment method you want to use in your payment transaction and in the appropriate order. (For example, you want payment to be made by check or bank transfer, enter C for cheek payment and T for bank transfer in the payment method field). During payment run, the system will automatically apply the payment method that you entered in the payment method to your payment transaction.
Currency: Enter the currency key that you want to apply to payment transaction. If this field is blank, this will allow the payment program to carry out payment in any currency. If currency is specified, only the currency that you specified will be used by the payment program.
Ranking order: Enter the ranking order that you want the system to make payment from your house bank. For example, ranking order 1, 2, etc.
House Bank: Enter the house banks you want to use for your payment transaction in ranking order in this field.
Specification of Ranking Order for your Payment Program
Payment Method (PM) | Currency (Crcy) | Bank Ranking | House Bank |
|---|---|---|---|
C | Leave blank | 1 | Bank of America |
T | Leave blank | 1 | Bank of America |
C | Leave blank | 2 | HSBC |
T | Leave blank | 2 | HSBC |
Save your payment program ranking order.
Leave currency blank. This will allow the payment program to carry out payment in any currency. If a currency is specified, only the currency that you specified will be used by the payment program.
Assuming you have more than one House Bank, since Barclays Bank is ranked 1, the second bank will be ranked 2, the third bank will be ranked 3, and so on. Ranking is based on priority.
Bank Accounts
Bank accounts allow you to specify which house bank the payment program can make payment from and where outgoing payments are posted during a payment run. Payments are posted to subaccounts based on payment method. For example, an outgoing payment made with a check is posted to the subaccount for checks. Likewise, payments made with bank transfer are posted to the subaccount for bank transfer.
You have already created the bank accounts needed for your configuration in Chapter 9 in House Bank configuration. Make sure that you have created the appropriate GL account for your bank account. Otherwise, you have to create them by referring to Appendix – A, Chapter 9.
- 1.
Update the flowing fields:
House Bank: Enter the house banks you want to use for your Bank account in this field in payment ranking order. (For example, you want payment to be made first from your Barclays Bank Account. However, if there are not sufficient funds in Barclays Bank Account, then use HSBC Bank Account, and so on).
Payment Method: Enter the payment method you want to use in your payment transaction and in the appropriate order. (For example, you want payment to be made by check or bank transfer, enter C for check payment and T for bank transfer in the payment method field). During payment run, the system will systematically apply the payment method that you entered in the payment method to the represented Bank Subaccounts, respectively.
Currency: Enter the currency key that you want to apply to payment transaction. If this field is blank, this will allow the payment program to carry out payment in any currency. If currency is specified, only the currency that you specified will be applicable to Bank Subaccount in your payment program.
Account ID: Enter your Bank Account ID in this field. This Account ID was created earlier during House Bank configuration in Chapter 9.
Bank Subaccount: Enter the GL account you created earlier for Check Account and Bank Transfer Account in Chapter 9.
Data for Specifying the Bank Accounts for Paying Company Code
House Bank | Payment Method (PM) | Currency (Crcy) | Account ID | Bank subaccount |
|---|---|---|---|---|
BARC1 | C | Leave blank | BARC | 111412 |
BARC1 | T | Leave blank | BARC | 111414 |
HSBC1 | C | Leave blank | HSBC | 113155 |
HSBC1 | T | Leave blank | HSBC | 113158 |
Save bank account setting.
GL account 111412 – Bank of America - Check issued out (the account check payments are posted for Bank of America).
GL account 111414 – Bank of America - Outgoing transfer (the account bank transfers are posted for Bank of America).
GL account 113155 – HSBC Bank - Check issued out (the account check payments are posted for HSBC).
GL account 113158 – HSBC Bank - Outgoing transfer (the account bank transfers payments are posted for HSBC).
The final step in your customizing is to specify the available amount that can be paid out of a bank account.
Available Amounts
The available amounts field holds the funds available in your selected bank accounts. You specify the amount available for incoming and outgoing payments. During payment run, the payment program will check the selected banks based on ranking order to find out whether there are enough funds for payment. If the available amount is insufficient in the first bank, the payment program will automatically check the next bank account for available funds and so on, until it finds a bank account with sufficient funds for payment.
The Payment program does not conduct amount splits, but the system does have the flexibility to check your bank account based on ranking order to find out which bank account has sufficient funds for payment. If none of the bank account assigned to payment have sufficient funds, payment will not be carried out.
It is important that before running the payment program, you ensure that available amounts in the bank accounts assigned to your payment program are up to date.
Double click Available Amounts folder in the Dialog Structure. The Change View “Amount Available”: Overview screen is displayed. When you click the New Entries at the top left of the screen, the New Entries: Overview of Added Entries screen comes up.
Update the following fields:
House Bank: Enter your House Bank Identifier key for the bank accounts assigned to your payment program.
Account ID: Enter your Bank Account ID in this field. This Account ID was created earlier during House Bank configuration in Chapter 9.
Days: This facility is only needed if you want to post payments by bill of exchange before due date. Otherwise, enter 999 in this field.
Data to specify the amount available for outgoing payments for each bank account for the paying company code
House Bank | Account ID | Days | Currency | Amount available for outgoing payment |
|---|---|---|---|---|
Bank of America | BAME | 999 | GBP | 9.999.999.999.999.00 |
HSBC | HSBB | 999 | GBP | 9.999.999.999.999.00 |
Use dot (.) to separate the amount in units down to hundreds and comma (,) to separate the amount in unit of tens. For example the unit amount of 1000 will be represented in the system as 1.000,00
Save your specification.
This brings us to the end of the automatic payment program.
The next Activity is to look at how to customize sort methods and adjustment accounts for regrouping receivables/payables.
Sort Methods and Adjustment Accounts for Regrouping Receivables/Payables
Accounting standards define how companies classify and disclose receivables and payables according to their remaining life. SAP provides the facilities to perform this function in the sort methods and adjustment accounts for regrouping receivables/payable. The remaining life of AR and AP is defined in the sort method. For example, AR remaining life is classified as less than one year or more than one year. Payables’ remaining life is classified as less than one year, 1–5 years, and more than five years.
The settings you define here allow you to classify receivables and payables into periods or years. For example, receivables/payables due within a year are classified as receivables/payables due within one year. Likewise, the receivables/payables due after one year, but within five years, are classified as receivables/payables due between one to five years. Other items due outside these periods are classified as receivables/ payables due after five years. It is important to classify transactions arising from receivables and payables in the G/L account based on periods to allow proper disclosure in the financial report.
In this activity, you will define settings that allow you to sort receivables and payables items into periods.
Problem: Spoxio Inc. accounting staff wants to be able to classify receivables and payables in the G/L Accounts in periods for proper disclosure in the financial statement. Your task as FI consultant is to define sort methods and adjustment accounts for regrouping receivables and payables for receivables/payables due within one year and receivables/payables due after one year
Define Sort Methods
To define sort methods for receivables, follow this menu path: MG: Financial Accounting➤ General Ledger Accounting ➤ Periodic Processing ➤ Reclassify ➤ Transfer and Sort Receivables and Payables ➤ Define Sort Method and Adjustment Accts for Regrouping Receivables and Payables.

The initial periodic intervals screen for receivables
Double click the Receivable folder in the Dialog Structure on the left side of the screen and update the following fields:
Interval: Enter a four-digit ID in this field. We recommend that you use your company code for ease of identification as especially in an environment where you have more than one company code. We used C100 as our interval ID in this activity.
Description: Enter a short description for your sort method.
Save your customizing.
Period Interval for Receivables

Specifying periodic intervals for receivables
Update the following fields:
From: Enter 0 for receivables due within one year and 1 for receivables due after one year.
Time Unit: You have three options to choose from: Day, Month, and Year. Using the drop-down arrow, select Year for each field. This will classify the receivables on a yearly basis.
Description: Enter the descriptions for each interval: “Receivables due within 1 year” and “Receivables due after 1 year.”
Cust.Pstg: When you click the Customer Posting checkbox, the system will classify receivables based on your interval specifications.
Vend.Pstg: When you click the Vendor Posting checkbox, the system will classify payables based on your interval specifications.
G/L Posting: When you click the G/L posting checkbox, the system will classify postings to the G/L account based on your interval specifications.
Save your work.
Periodic Intervals for Payables

Specifying periodic intervals for payables
Save your work.
Define Adjustment Accounts for Receivables/Payables by Maturity
In this activity, you define adjustment accounts for receivables and payables by maturity. The system will automatically post to the accounts you have assigned for each period interval based on your specifications.
Before defining adjustment accounts for receivables and payables by maturity, we advise that you first create the G/L accounts you will need in your customizing. How to create G/L accounts is covered in Chapter 5).
In this activity, we only covered adjustment accounts for receivables/payables by maturity for foreign receivables/payables. The same procedure is applicable when you create domestic and onetime receivables/payables. We advise that you create accounts for domestic and one-time payables/receivables on your own.
Receivable Due Within One-Year
To maintain automatic posting procedures for adjustment accounts for receivables/payables by maturity accounts due within one year, follow this menu path: MG: Financial Accounting➤ General Ledger Accounting ➤ Periodic Processing ➤ Reclassify ➤ Transfer and Sort Receivables and Payables ➤ Adjustment Accounts for Receivables/Payables by Maturity.

Assignment of G/L accounts to periodic intervals for automatic posting of payables due within 1 year
The Accounts for Posting Receivables Due Within 1 Year
Reconciliation | Adjustment | Targ. Acct. |
|---|---|---|
213000 – Trade creditors – foreign | 213099 – Trade payable – foreign adjustment | 119300 – Vendor with a debit balance |
Save your work.
Receivables Due After One Year
To maintain automatic posting procedures for adjustment accounts for receivables/payables by maturity due after one year, follow this menu path: MG: Financial Accounting➤ General Ledger Accounting ➤ Periodic Processing ➤ Reclassify ➤ Transfer and Sort Receivables and Payables ➤ Adjustment Accounts for Receivables/Payables by Maturity.
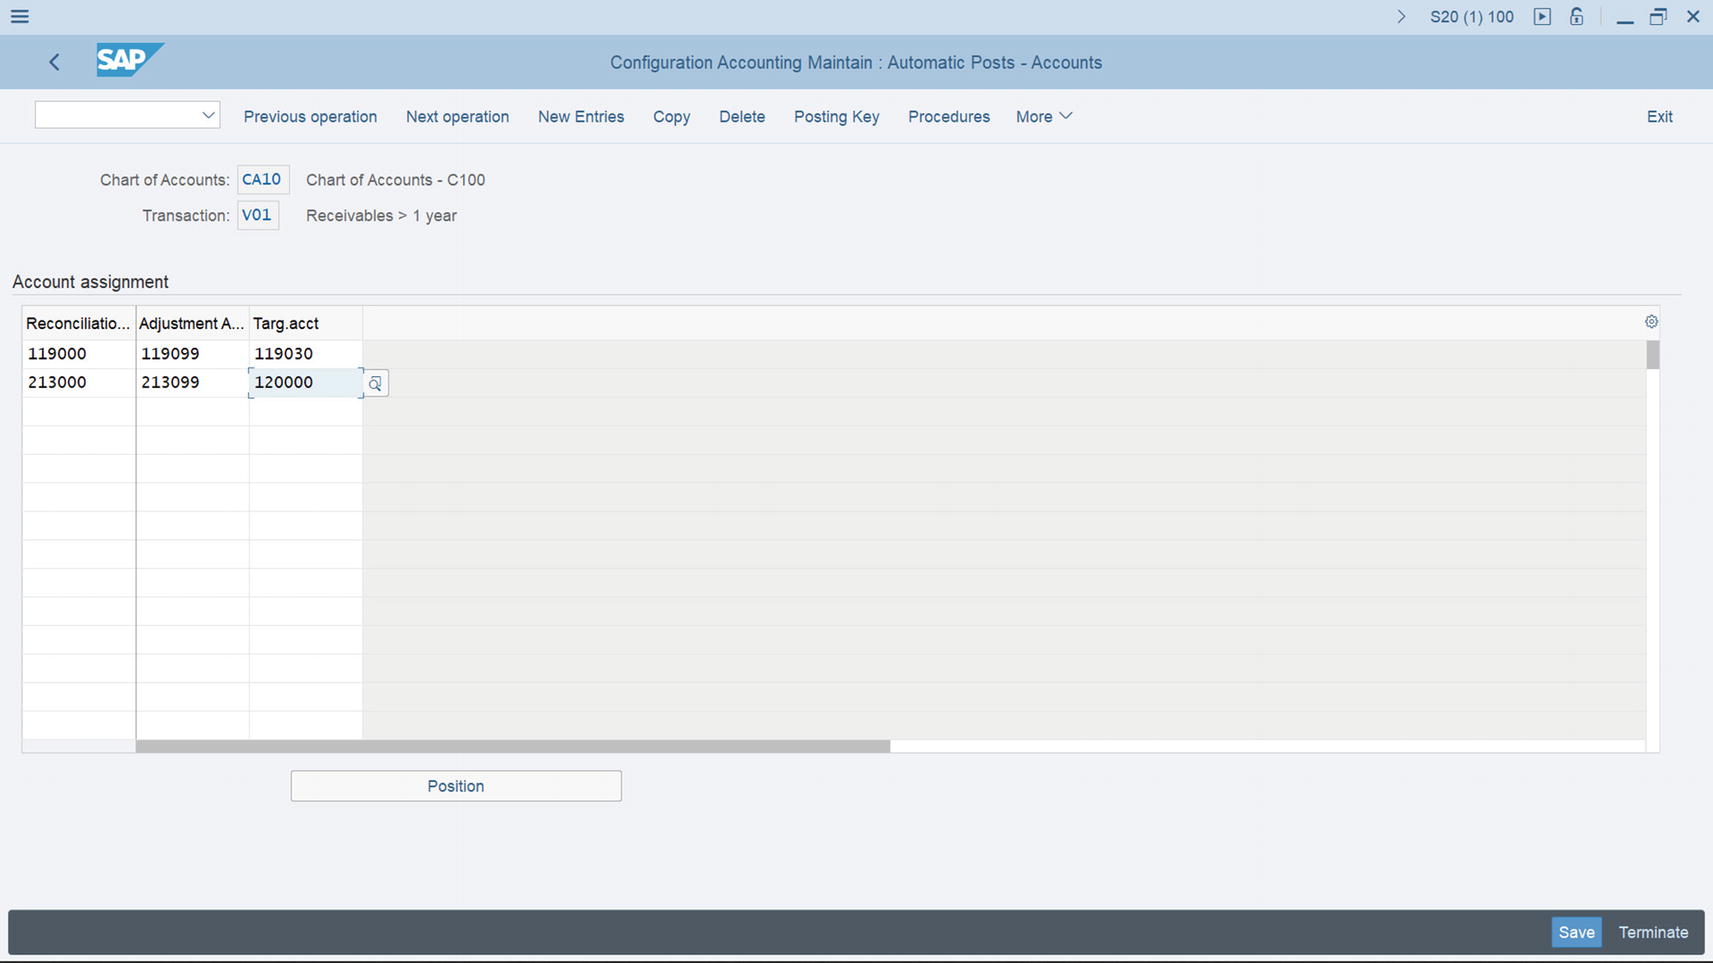
Assignment of G/L accounts to periodic intervals for automatic posting of payables after 1 year
The Accounts for Posting Receivables Due After 1 Year
Reconciliation | Adjustment | Targ. Acct. |
|---|---|---|
119000 – Trade debtors foreign | 119099 – Trade receivables foreign adjustment | 119030 – Trade receivables foreign due > 1 yr. |
213000 – Trade creditors foreign | 213099 – Trade payables foreign adjustment | 120000 – other debtors due > 1 yr. |
Save your work.
The same procedure is applicable when defining adjustment accounts for receivables/payables by maturity.
Adjustment Posting/Reversal
It is inevitable that during document posting, some incorrect document might be mistakenly entered in the system. An incorrect document entered in the SAP system cannot be deleted; instead it must be reversed. Documents can be reversed in the system using either the normal posting reversal or the negative reversal method.
With normal posting reversal, the debit and credit sides of the total transaction are increased with the adjustment figure. With negative reversal, the adjustment figure is subtracted from the total transaction figure in the account. In other words, the total transaction figure will not be increased with the transaction figures. The transaction figures in the system remain as the original figures before posting. This systematic style of reduction is referred to as negative posting. When you permit negative posting, negative postings will be permitted for your company code. This will allow the system to reduce transaction figures in G/L and in your customer and vendor accounts without actually increasing the total transaction figures.
Permit Negative Postings
Problem: The accounting team in the C900 Pie Company heard that transactions posted to the system can be systematically reversed without having to increase total transaction figures. The team is interested in knowing how this can benefit them. Consequently, your colleagues have asked you to customize the system to allow negative postings for Spoxio Inc.
In this exercise, you will specify a negative posting for your company code. This specification will allow you to carry out negative postings. To activate Negative Postings, follow this menu path: IMG: Financial Accounting ➤ Accounts Receivable and Accounts Payable ➤ Business Transactions ➤ Adjustment Postings/Reversal ➤ Permit Negative Postings.

Maintaining negative postings by company code
Search for your company code from the list of company codes displayed on the screen using the Position button at the bottom of the screen. Then click tick the check box for Negative Postings and save your settings.
Define Reasons for Reversal
It is mandatory to state the reason for reversing a document in SAP ERP during document reversal. Hence it is important to define reasons for reversing documents. When you’re posting document reversal, the reason for the reversal will be copied to the document that is reversed.
You can use standard reversal reasons supplied by SAP or you can define your own reversal reasons.
To define reasons for reversal that will be applied to negative postings, follow this menu path: IMG: Financial Accounting ➤ Accounts Receivable and Accounts Payable ➤ Business Transactions ➤ Adjustment Postings/Reversal ➤ Define Reasons for Reversal.
The Change View “Reason for Reversal Posting” Overview screen is displayed. This screen contains reasons for reversal. For example:
01 – Reversal in current period.
02 – Reversal in closed period.

Specifying the reasons for posting reversal
Update the following fields:
Reason: Enter up to two characters of your choice in this field. This is a freely definable code. For example, we used ER (Error) as our reason code for this activity. This code serves as the identifier code of your defined reason for reversal.
Text: Enter a short text that best describes the reason for reversal in this field, such as Posting Error.
Neg. Posting: When you click the Negative Posting checkbox, you can create negative posting for this reason code.
Alt.Pos.Dt: This checkbox allows alternative posting dates for this reason code.
Summary
This chapter covered account payables and account receivables and explained what a customer account is. It also explained the steps involved in defining account groups with screen layout for customers. You learned how to maintain the field status group for general data for a customer account group. You also learned how to enter an accounting clerk identification code for customers and create number ranges and assign them to your account groups. You learned what a vendor account is and how to customize vendor accounts. You learned how to define account groups with screen layout for vendors, maintain the field status group for general data for a vendor account group, define accounting and clerk identification codes for vendors, maintain number ranges for your vendor accounts, and assign number ranges to end or account groups.
The next exercise you learned about in this chapter was terms of payment. You learned how to maintain terms of payment for customers and how to maintain terms of payment and an installation plan. You then learned how to define a cash discount base for an incoming invoice, define incoming invoices credit memos/credit memos, define document types for enjoy transactions, define tax code per transaction, and define accounts for net procedures.
You also learned about manual outgoing payments. You learned how to define tolerances for outgoing payments. You also learned how to define reason codes and how to define accounts for payment differences.
Apart from learning what an automatic outgoing payment is, you went through the steps involved when defining automatic outgoing payments. You looked at the specifications involved when defining and paying company codes, payment methods per country, and payment methods per company codes.
You learned how to define sort methods and adjust accounts for regrouping receivables/payable. You learned how to define sort methods for accounts receivables and payables by defining periodic intervals for receivables and payables. The next exercise explained how to define adjustment accounts for receivables/payables by maturity based on periods receivable and payables due to enabling automatic postings to the GIL accounts. In so doing, you learned how to define accounts for receivables/payables due in one year, receivables due after one year, payables due between one and five years, and payables due after five years.
Finally, you looked at the difference between the normal reversal and negative reversal posting methods. You learned how to activate the indicator for permitted negative postings and how to define a reason code for negative posting.
In the next chapter, you will learn how to define correspondence in SAP. In doing this, you will define correspondence types, assign programs for correspondence type, define sender details for correspondence form, determine call-up functions, define dunning procedures, specify the special G/L transactions that allow the system to dun special GIL transactions, and learn about the various levels involved when defining dunning.