
In this chapter, we explore how to customize the house bank in FI.
What a house bank is.
Identify the components of a master record in a house bank.
Define a house bank.
Use a house bank ID and an account ID.
Identify bank statements supported by SAP S4 HANA.
Assign global settings for an electronic bank statement.
Configure a manual bank statement.
Define posting keys and posting rules for check deposit.
Define variants for check deposits.
Introduction
The banks that hold your company code bank account are referred to as house bank in SAP ERP (for example, City Bank. Bank of America, etc.). A company code can have more than one house bank assigned to it.
Bank Account Data (Bank Account Number, Currency, Bank Key, GL Account…).
House Bank Data (Bank Country and Bank Key, Bank Name).
Communication Data (Telephone, Contact Person, Address, EDI Partner Profile and Data Medium Exchange).
Control (SWIFT Code, Bank Number…).
The first 4 characters contains the bank code (alphabets only).
The next 2 characters contain the ISO (this is numeric digit) and 2 alpha digits as the country code.
Bank details are required for printing payment forms.
A combination of House Bank ID & Account ID makes up the bank account in the SAP R/3 system. You enter the Hose Bank ID and Account ID in the GL account so that the system can recognize the appropriate GL account during bank transactions.
The bank group is used for classifying banks. The key is freely assignable. The aim of the classification is to group banks together in such a way that payment transactions within a group can be carried out as fast as possible (this is referred to as payment optimization).
When customer/vendor has more than one bank account, the bank type in the customer master record is used to distinguish between different banks. During invoice processing, the user can decide which bank to use by using the match-code in the partner bank field.
Likewise, the House Bank ID and the Account ID is used by the payment program to determine the banks to use during invoice payment.
Now, configure House Banks for Barclays bank and HSBC Bank.
Defining House Bank
Banks used by company codes in SAP_ERP system are called House Banks. A combination of both House Bank ID & Account ID makes up the bank account in the SAP R/3 system.
The House Bank ID and the Account ID are used by the payment program to determine the banks to use during invoice payment.
The SAP system comes with examples of standard House Banks. It is advisable to take a look at them as a guide if you are not confident with House Bank configuration.
Problem: Company C900 plc has two bank accounts (Barclays Bank and HSBC Bank). You are to define the House Banks for both Bank Accounts.
To define house bank, follow this menu path: IMG: Financial Accounting ➤ Financial Accounting Global IMG: Financial Accounting ➤ Bank Accounting ➤ Bank Accounts ➤ Define House Bank.

The Display View “Company Codes”: Overview screen

New Entries: Details of Added Entries screen
Update the following fields
Company Code: Your Company Code will be automatically defaulted by the system.
House Bank: In this field, you can enter up to five digit characters as your house bank key. Enter your House Bank ID in this field. This ID will enable you to identify this bank account, especially in an environment where you have multiple House Banks. Secondly, the House Bank ID is also entered in the Bank Account GL account master data and Customer/Vendor master record for automatic payment program.
House Bank Data Section
Bank Country: Enter your country ID (for example, for the United States of America enter – US) in this field. This will allow you to identify your House bank country. Another important factor of Country ID is that it forms part of IBAN and SWIFT for international payments.
Bank Key: Enter your Bank Sort Code. This helps identify your bank and the branch. This key is very important as it forms part of IBAN & SWIFT used for international payments.
Communications Data Section
Telephone: This is usually your bank telephone number.
Contact person: This is your account manager or someone that is designated by the bank to your account.
After updating the screen in Figure 9-2, click the Create button at the right side of the screen. This will call up the Bank Data form, where you can enter further bank information about your house bank. For example, you can enter your bank name, address, region, and so on. Once you have added your entries, click Continue at the bottom of the screen to confirm your entries and save your house bank by clicking the Save button at the bottom right of the screen.
The next step is to define Bank Account for your house bank.
Define Bank Account for your House Bank
To define bank accounts for your house bank, follow this menu path: IMG: Financial Accounting ➤ Financial Accounting Global IMG: Financial Accounting ➤ Bank Accounting ➤ Bank Accounts ➤ Define House Bank.
Unfortunately, bank accounts and accounts assignments can no longer be maintained in SAP S4 HANA as earlier SAP versions. Bank statements now have to be maintained in SAP NetWeaver Business Client, and this is outside the scope of this book.
Data to Define a House Bank for HSBC Bank Account
Field Name | Bank Data |
|---|---|
Company Code | Enter your company code in this field |
House Bank | Enter a house bank data in this field, such as HSBC |
Bank Country | Enter your country code in this field such US or GB or DE and so on |
Bank Key | Enter your bank unique sort code in this field |
Address | Enter your company address in this field |
Account ID | Enter a unique account Id in this field – such as HSBC |
Description | Enter a short text that best describes your House Bank, Such as HSBC Bank |
The next step in this activity is to look at how to maintain a bank statement in SAP S4 HANA.
Bank Statement
A bank statement is a summary of financial transactions, such as incoming and outgoing payments that took place during a given period on an account. This is the state of your cash position. SAP ERP supports two types of bank statements: electronic bank statements and manual bank statements.
Before you create your electronic and manual bank statements, it is recommended that you first create the following clearing accounts (refer to Chapter 9 on how to create G/L accounts), which your bank transactions will be posted to:
Main Balnc Account: As the name suggests, this is the general bank account entered in the house bank master data. This account serves as a reconciliation account that holds the bank account balance.
Checks Received: The checks you received for invoice amounts from your customers or business partners for supplying them goods or for providing services are posted to this account.
Other Interim Posting: Reconciliation items are posted to this account.
Check Issued out: Check payments made by your company to its creditors or business partners for goods/services received are posted to this account.
Outgoing Wire Transfer: This is an electronic method of funds transfer from your company to a business partner to mitigate due invoice(s). This is a very fast way of transferring money from one person to another or from one company to another.
Incoming Cash: Cash received by your company from business partners for a business transaction are posted to this account.
Outgoing Cash: Cash payments made by your company relating to business transactions to business partners are posted to this account.
We have provided information in “Appendix A, Chapter 9 Bank Statement” that will enable you to create the Gil account that you will need to customize your bank statement. We recommend that you first create the necessary Gil account before creating your bank statement.
The next section defines an electronic bank statement and explains how to set up an electronic bank statement (EBS) framework. Later in this chapter, you will define manual bank statements.
SAP R/3 supports two types of bank statements, namely Electronic Bank Statement and Manual Bank Statements.
Check Received.
Other Interim Posting.
Check Issued Out.
Outgoing Wire Transfer.
Incoming Cash.
Outgoing Cash.
Go to Appendix 1– Chapter 9 Bank Statement below to create the necessary G/L Account for your configuration.
Electronic Bank Statement
Clears all bank clearing accounts in the system to the bank main account (this is the general bank account entered in the house bank master data).
Uses the bank statement to perform automatic bank reconciliations in the system.
Multicash: Invented by Omikron a German Company, Multicash is an electronic bank statement format that allows the SAP ERP system to communicate with the bank system. The format is split into two file formats. AUSZUG.TXT holds the bank statement header information and UMSATZ.TXT contains the bank account transactions information.
SWIFT (Society for World-Wide Interbank Financial Telecommunication): This is a computer-based switching system used by banks for making payments related to international transactions.
BAI (Bank Administration Institute): This is a standardized electronic file format used for cash management between the bank and the account holder. The bank transmits BAI file formats to the account holder who in turns downloads or inputs the file into the system, generates a bank statement, and performs bank reconciliation.
BA12: This is the latest release of a cash management balance report. It is very similar to BAI in functionality. The only difference is that BAI2 contains more detailed information.
Now let’s define Electronic Bank Statement and setup Electronic Bank Statement (EBS) framework.
Electronic Bank Statement
Clears various bank clearing accounts to the main account and
Perform automatic bank reconciliations.
SAP S4 supports various electronic bank statement formats like Multicash, BAI, BAI2, SWIFT, etc.
Defining Global Settings for Electronic Bank Statement
In this activity, you will need to make seven global settings. These seven global settings are listed on the Dialog structure on the left pane of the Account symbols overview screen.
Create Account Symbols:
The accounts symbols you created as part of your electronic bank customizing will specify the G/L accounts and subledgers that the bank statement transaction are posted to.
Assign Accounts to Account Symbol: This will allow you to assign or map account symbols to appropriate GL accounts and subledgers.
Create Keys for Posting Rules: Posting key decides the posting rules applicable to general ledger and subledger.
Define Posting Rules: Posting rules represents business transactions in the bank statement by using appropriate posting keys, document types, and posting. For example incoming check, check out, Bank Transfer, Bank Charges, etc.
To ensure that your configuration is complete, we advise that you work from top to bottom. Using this technique will ensure that all the required aspects of the required configurations are covered.
Problem:
Spoxio Inc.’s accounting team wants to be able to upload their bank statement electronically using defined bank communication standards. SAP supports various electronic bank statement formats like Multicash, BAI, BAI2, SWIFT, etc.
As a part of your task, it is your responsibility to define appropriate settings needed to allow the accounting team to be able to upload bank statements electronically to the SAP system from the bank to be able to clear several bank clearing accounts and also be able to carry out automatic bank reconciliation.
To define global settings for electronic bank statement, follow this menu path: IMG: Financial Accounting ➤ Bank Accounting ➤ Business Transactions ➤ Payment Transactions ➤ Electronic Bank Statement ➤ Make Global Settings for Electronic Bank Statement.
The Determine Work Area: Entry dialog box pops up, enter your company chart of accounts key in the Chart of Accounts field and click Enter at the bottom of the dialog box. A Warning screen comes up saying that “All fields which define the area have initial values.” Ignore the warning and click the Continue button.

Global Setting for Electronic Bank Statement – Specify Account Symbols
Create Account Symbols.
Assign Accounts to Account Symbol.
Create Keys for Posting Rules.
Define Posting Rules.
Create Transaction Type.
Assign External Transaction Types to Posting Rules.
Assign Bank Accounts to Transaction Types.
To ensure that your configuration is complete work through the folders on the Dialog Structure on the left-hand side of the screen systematically in steps from top down.

Creating Account symbols
You will notice that the Create Account Symbol folder on the Dialog Structure is open.
Choose New Entries at the top left of the screen. The New Entries: Overview of Added Entries screen is displayed. This screen will allow you to create your own account symbols.
Account | Text |
|---|---|
C900-BANK | Main Bank Account |
C900-BANKCHGS | Bank Charges |
C900-CHECK-IN | Incoming Checks |
C900-CHECK-OUT | Outgoing Checks |
C900-BANKTRANS | Bank Transfers |
C900-INTERPOST | Reconciliation Items |
There is no hard rule to creating Account Symbols. You don’t necessarily have to use the account symbols used in this activity; it is only for illustration. You can formulate your own account symbols.
Once an account symbol has been used by someone else, the system will not allow you to use the same account symbol again. So, use your own initiative when creating your account symbols by trying other symbols – be creative.

Specification of account symbols for your electronic bank statement

Assigning Accounts to account symbols
By assigning accounts to accounts symbol during configuration, the system automatically specifies the G/L accounts that transactions are posted when users retrieve bank statements electronically. For example, Checks received are posted to Incoming Checks account, charges are posted to Bank Charges account, and so on.
In Figure 9-4, double click the Assign Accounts to Account Symbol folder on the Dialog structure on the top left hand corner. The Change View “Assign Accounts to Account Symbol”: Overview screen is displayed. To Assign Accounts to Account Symbol, choose New Entries at the top left of the screen. This will display the New Entries: Overview of Added Entries screen, where you will assign the symbols you have created above to your account.
Update the following fields for each Account Symbol:
Act. Symbol: Enter each of your Account Symbols in this field by using the Search function.
Acct Mod: Enter account modifier “+.”
Currency: Enter “+.”
G/L acct: Enter the account by entering series of “+” signs as part of your GL account.
It is also possible to use the search function to look for the Account Symbols that you created in Figure 9-4.

Assignment of accounts to account symbols
Account symbols can be assigned in two ways: either by entering the full GL account number or replacing your GL account or most of the first parts of your GL account with series of “+” signs.
For example, your Bank Account could be replaced with “++++++++++” (this is up to 10 symbols). What happens is that the system will automatically replace these signs with the GL account assigned to House Bank during house bank configuration.
On the other hand, for example, when part of your Check Received GL account is replaced with “+++++++++1,” the system will automatically replace the GL account you created for Incoming Checks.
Always use the last G/L account number. The system automatically recognizes the other ten characters.
Hit Enter on your keyboard and save your work.
By appending “+” signs to your GL account you don’t have to keep defining a symbol for every house bank when a new GL is maintained. Instead use symbol “++++++++++.” The system will automatically recognize the GL account for your house bank. Likewise, to avoid input error when maintaining GL accounts for other items, use “++++++++n” and enter the last GL account number at the end for each signs (item). For example, the GL Account for Check Received with Account Symbol CHECKOUT is 111412, then our GL Account should look like this +++++++++2. Hence your symbol for CHECKOUT GL Account is +++++++++2 as above.
Only your Main Bank Account should be masked without a number at the end. The bank charges should contain all the GL code.
The next step in this activity is to create keys for posting rules for each of the account symbols you created in step 1.

Creating Keys for Posting Rules
To create keys for posting rules, double click the Create Keys for Posting Rules folder in the Dialog structure on the top left hand pane of the screen to create the keys for posting rules. The Change View “Define Posting Rules”: Overview screen is displayed. Choose New Entries at the top left of the screen to go to the New Entries: Details of Added Entries screen where your will create the posting rules for your electronic bank statement.
Update the following items by creating posting rules for each of your account symbols. In this activity, you should create six keys for posting rules and we describe the keys for posting rules in the next section.
You can use the Posting Keys supplied by SAP or you can create your own posting keys from scratch. In this activity, we recommend that you create your own posting keys.
The system allows a maximum of four characters for a posting rule key.
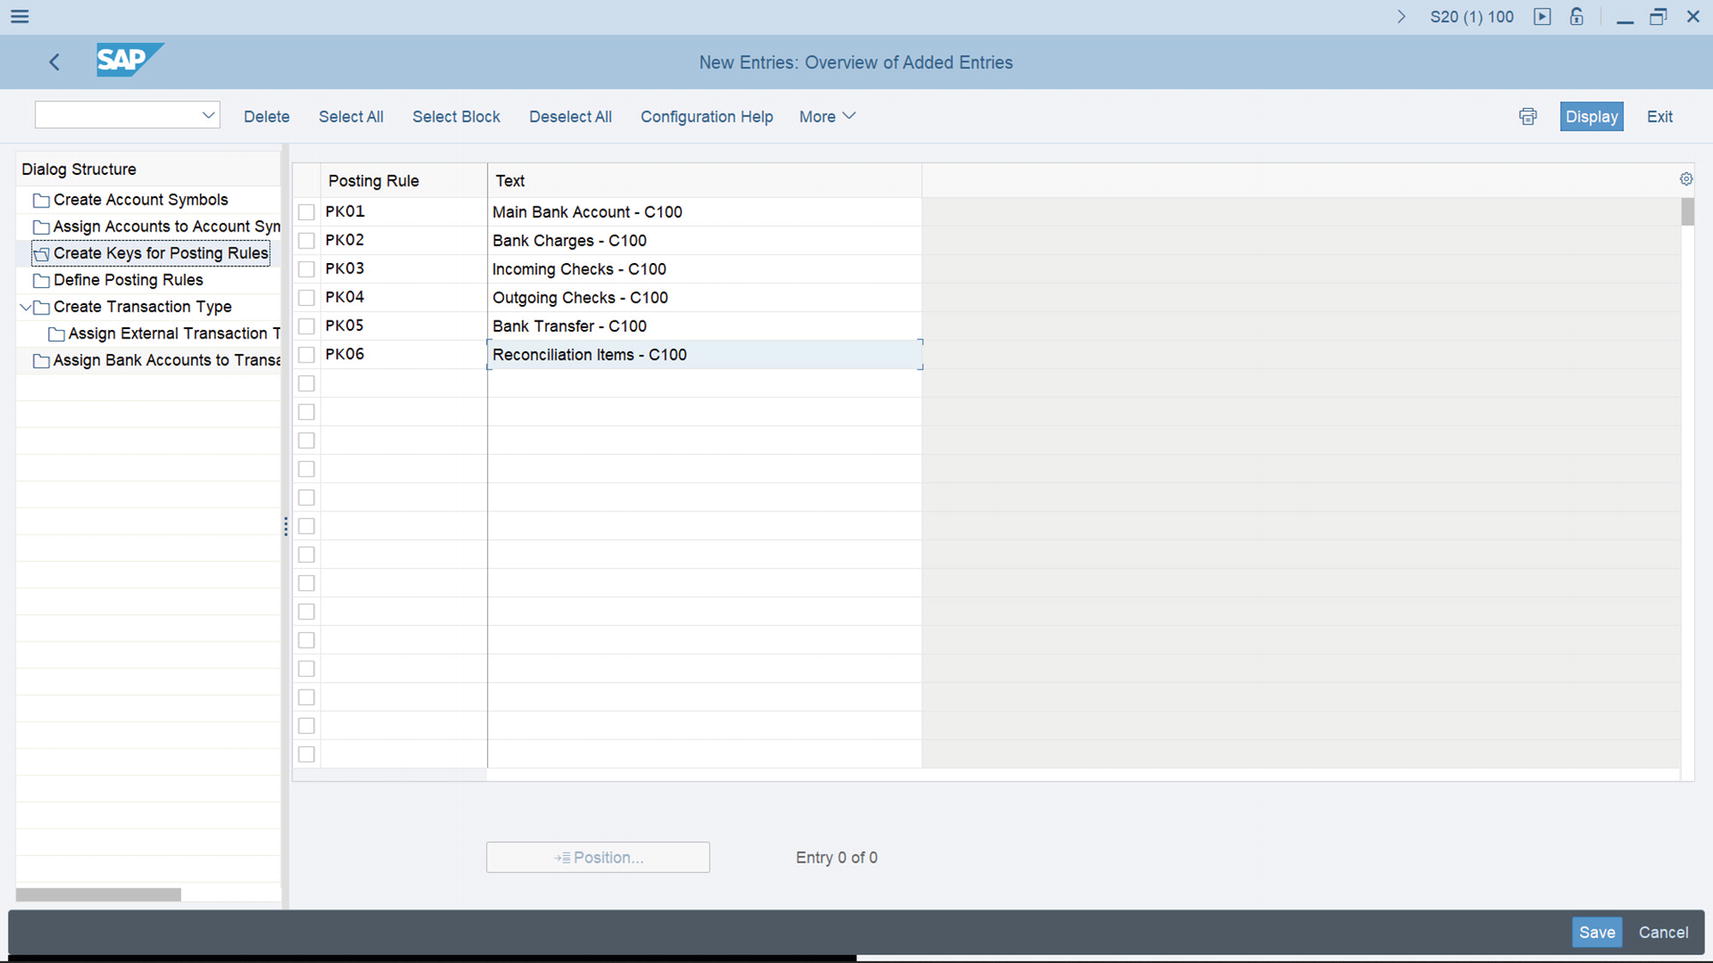
Customizing keys for posting rules
Save the keys for your posting rules.
The posting keys we used in this activity are only for illustration. You can use any posting key and description of your choice in this activity.

Defining Posting Rules

Defining posting rules for check received
Update the following fields:
Posting Rule: Enter the Keys for Posting Rules that you defined above in the Posting Rule fields. Posting Rules are used by the system to determine which GL accounts and subledgers to post transactions to.
Posting Area: The SAP ERP System comes with two standard values for posting area (1 – Bank Accounting and 2 – Subledger Accounting). Posting Area will allow the system to post to either of the specified areas.
Posting Key: Enter the appropriate posting key in this field. Posting key allows the system to determine whether a line item should be treated as debit or credit and the account type to post a transaction to. It also controls the field status for document entry.
Acct Symbol: You have already defined a number of account symbols above. Enter the appropriate account symbol in this field. The account symbol you entered here will allow the system to determine to which account the related transaction is posted when users retrieve bank statements electronically.
Document Type: Allows you to differentiate between transactions and also allows the system to determine which business transactions to post.
Data to Define Posting Rules for CHECK-IN (This is for checks received from customers)
Posting Rule | S003 |
|---|---|
Posting Area | 1 |
Debit | |
Posting Key | 40 |
Acct Symbol | C900-BANK |
Credit | |
Acct Symbol | C900-CHECK-IN |
Document Type | SA |
Posting Type | 5 |
This configuration is for incoming checks. The accounting entries for check receipt is to debit your bank account using debit posting key – 40, since money is coming in. Likewise, credited a corresponding Incoming Check clearing account.
Similarly, the configuration for outgoing checks is the reverse. Credit your Bank Account using Posting Key – 50 and Debit the corresponding Outgoing Check Clearing account.
Save your posting rules for check received.
Data to Define Posting Rules for CHECK-OUT (This is for checks paid out to vendors)
Posting Rule | PK04 |
|---|---|
Posting Area | 1 |
Debit | |
Acct Symbol | C100-CHECK-OUT |
Credit | |
Posting Key | 50 |
Acct Symbol | C100-BANK |
Document Type | SA |
Posting Type | 4 |
Data to Define Posting Rules for BANKTRANS (This is for bank transfers from the bank)
Posting Rule | PK05 |
|---|---|
Posting Area | 1 |
Debit | |
Acct Symbol | C100-BANKTRANS |
Credit | |
Posting Key | 50 |
Acct Symbol | C100-BANK |
Document Type | SA |
Posting Type | 4 |
INTERPOST (this is for other Interim Posts)
Posting Rule | PK06 |
|---|---|
Posting Area | 1 |
Debit | |
Posting Key | 40 |
Acct Symbol | C100-INTERPOST |
Credit | |
Posting Key | 50 |
Acct Symbol | C100-BANK |
Document Type | SA |
Posting Type | 1 |
Data to Define Posting Rules for BANKCHGS (This is for bank charges)
Posting Rule | PK02 |
|---|---|
Posting Area | 1 |
Debit | |
Posting Key | 40 |
Acct Symbol | C100-BANKCHGS |
Credit | |
Posting Key | 50 |
Acct Symbol | C100-BANK |
Document Type | SA |
Posting Type | 1 |
Once you have completed your posting rules customizing using the data in Tables 9-2 to 9-6, save your posting rules.

Create Transaction Type
Transaction type allows you to assign the appropriate external transactions to posting rules.
Before you assign external transaction type to posting rules, first you have to define transaction type.

The screen where you create transaction type for your electronic bank statement
Update the following fields:
Trans. Type: Enter your transaction type in this field. Transaction type can be up to a maximum of eight characters (in this activity, we used C100 as our transaction type).
Name: The name-field will allow you to describe your Transaction type – Electronic Bank Statement – C100.
Press Enter on your keyboard and Save your transaction type.

Assign External Transaction Types to Posting Rules

Assignment of External Transaction Types to Posting Rules
Update the following fields:
External Transaction: Enter your external transaction codes which could be up to a maximum of four characters for each transaction type for the system posting rule.
+/− Sign: this field allows you to specify further transaction differentiation for external transaction. The ‘+’ sign in the front of external transaction code indicates receipt and ‘−’ sign indicates payment.
Posting Rule: Enter posting rules already defined above.
The data to update the assignment of external transaction types to posting rules
External Trans | +/- | Posting |
|---|---|---|
TT02 | - | PK02 |
TT03 | + | PK03 |
TT03 | - | PK04 |
TT05 | - | PK05 |
TT06 | - | PK06 |
Hit Enter on your keyboard and Save your transaction types.

Assign Bank Accounts to Transaction types
It is not uncommon in an environment where there is more than one bank account for each bank to use its own individual transaction type to differentiate business types. If this is the case, each bank must be assigned its own transaction type. In this activity only one transaction type is created. You can define more than one transaction type. It all depends on your requirement.
On the Dialog Structure pane, double click the Assign Bank Account to Transaction Types folder to call-up the Assign Bank Account to Transaction Types Overview screen. When you select the New Entries button, this will allow you to assign transaction types to your bank account.

Assignment of your bank account to transaction types
Bank Key: This is your bank key or sort code that you created during House Bank customization.
Bank Account: Your House Bank Account number. This is normally your company’s bank account number.
Transaction Type: Enter the transaction type you created in step 5.
Although you created two house banks, in this activity, you will only be assigning one house bank (Barclays Bank) to your transaction type, this is only for illustration purposes. There is no restriction to the number of banks you can assign to transaction type.
The Bank Key and the Bank Account used here are obtained from the House Bank you created above.
Save your work.
Manual Bank Statement
Most of the configurations carried out in Electronic Bank Statement are also applicable to Manual Bank Statement configuration. Hence only minimum configuration is required in Manual Bank Statement.
Create and Assign Bank Transaction.
Define Variants for Manual Bank Statement.
Create and Assign Business Transactions
Bank Charges.
Bank Transfer.
Incoming Check.
Outgoing Check.
Reconciliation Items.
You don’t need to create new posting rules, you can use the posting rules you created for electronic bank statement for your manual bank statement.
Follow this menu path to the screen where you will create and assign business transactions for your manual bank statement customizing: IMG: Financial Accounting ➤ Bank Accounting ➤ Business Transaction ➤ Payment Transactions ➤ Manual Bank Statement ➤ Create and Assign Business Transaction.
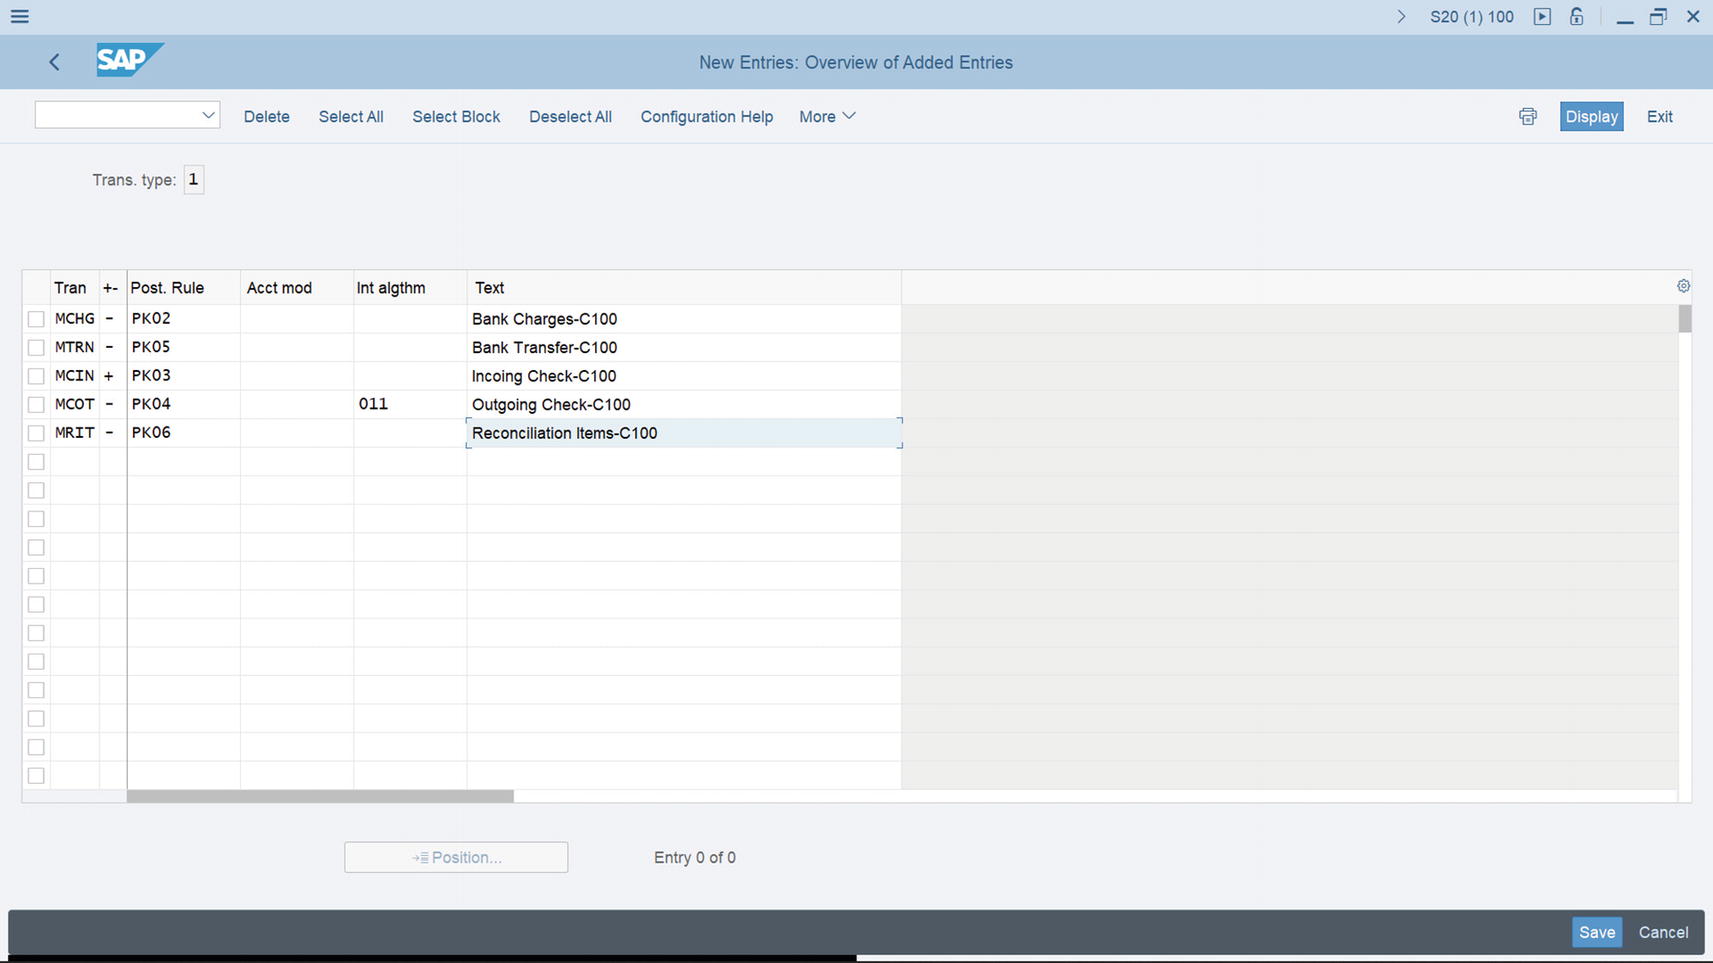
The screen where you create and assign business transactions for your manual bank statement
Update the following items:
Transaction: Enter your transaction codes in this field. This could be up to a maximum of four characters for each transaction type for the system posting rule.
+/− Sign: This field will allow you to specify further transaction differentiation for your business transaction. The “+” sign in the front of business transaction code indicates receipt and “−“ sign indicates payment.
Posting Rule: Enter posting rules that you defined during automatic bank statement configuration.
The Data to Update the Screen for Creating and Assigning Business Transactions for Manual Bank Statement
Trans | +/− | Post Rule | Acct mod | Int algth | Text |
|---|---|---|---|---|---|
MCHG | − | PK02 | Bank Charges-C100 | ||
MTRN | − | PK05 | Bank Transfer-C100 | ||
MCIN | + | PK03 | Incoming Check-C100 | ||
MCOT | − | PK04 | 011 | Outgoing Checks-C100 | |
MRIT | − | PK06 | Reconciliation Items-C100 |
011 - Outgoing check. Check No. different from Pymt. Used in Int algth field will allow outgoing check to be referenced.
Save your work.
You don’t need to define other posting keys and rules for manual bank statements; you can use the posting keys you defined for electronic bank statement
Finally, you will now have to define Variants for Manual Bank Statement.
Define Variants for Manual Bank Statement
SAP supplied a standard variant – SAP01 as a default. Only minimum modification is allowed for this standard variant. You can use this standard variant for your manual bank statement. It is advisable to copy the standard variant – SAP01 and modify it to meet your company’s specific requirements.
If you choose not to use the standard variant – SAP01 supplied by the system, instead you decide to create your own your variant. First you have to deactivate the standard variant SAP01 and then activate your variant.
To go the screen where you define variants for manual bank statement, follow this menu path: Financial Accounting ➤ Bank Accounting ➤ Business Transaction ➤ Payment Transactions ➤ Manual Bank Statement ➤ Define Variants for Manual Bank Statement.
The Maintain Screen Variant: List screen is displayed.

The copy variant dialog box
Maintaining variants for manual bank statement with all properties copied
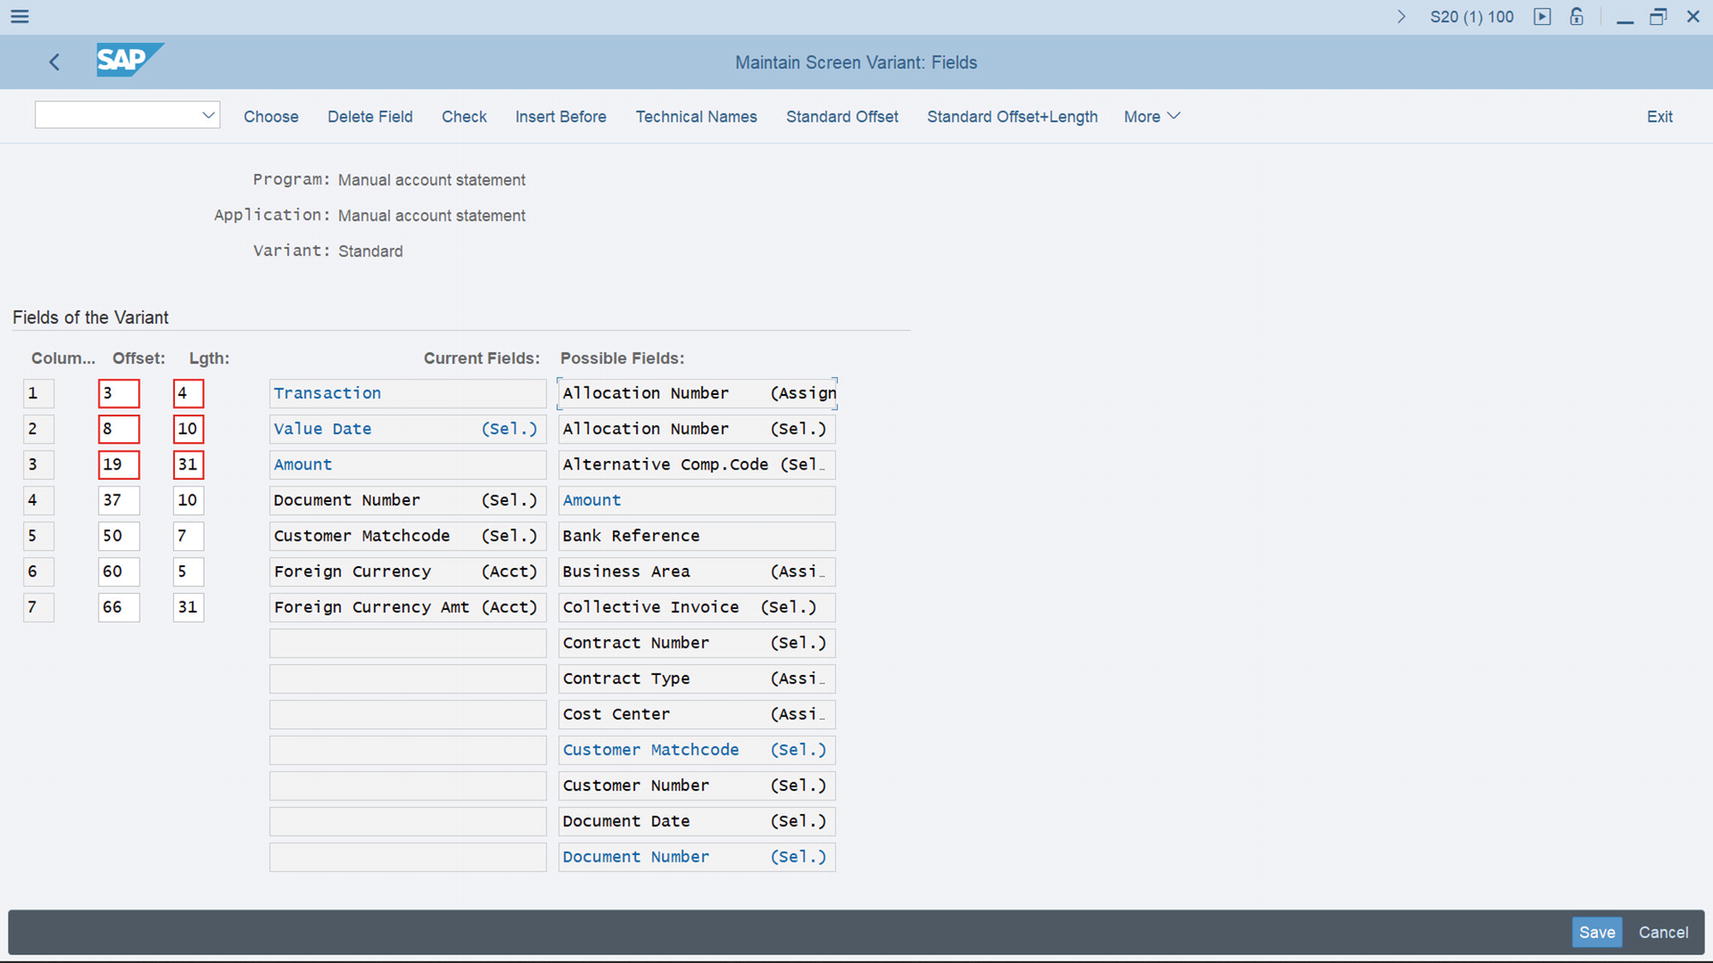
The Maintain Screen Variant Fields screen is displayed for your Variant – C100 (Figure 9-13) inheriting the properties of the standard variant SAP01 that you copied. Modify the item on this screen to meet your requirement.
Document number.
Customer matchcode.
Foreign Currency.
Foreign Currency amt.

Deleting a field from your variant for manual bank statement

Maintain variant for manual bank statement after the deletion of unwanted items
The maximum length of Amount must not exceed 15. Please make sure that the maximum length is at least 15.
Next, you need to move Allocation Number and Bank Reference from the Possible Fields list to the Current Field list. The Allocation Number field will record incoming check numbers and the Bank Reference field will record outgoing checks.

Output length of allocation number
You can replace the defaulted output length with your desired output length. Click Continue at the bottom right of the screen to confirm your entry. The Allocation Number (Ass) you have added to the Current Field will now appear in the Current Fields list under AMOUNT as in Figure 9-16.
The next step is to include the Bank Reference to the Current Fields list. Double click Bank reference in the Possible Fields list, the Specify output length screen pops up with a default output length. You can replace the defaulted output length with your desired output length. Click Continue at the bottom right of the screen to confirm your entry. The Bank reference you have added to the Current Field will now appear in the Current Fields List under Allocation number.
Save your variant.
The next step is to change the variant name to your own. Click the Back button at the top left of the screen to return to the previous screen, the Maintain Screen variant: List. Search for your variant (C100) among the variant list and change the copied variant name (Standard) to your own. In this activity, we used Manual Bank Statement – C100 as our variant name, and Save your modification.
Finally, select your variant from the variant list by clicking on it and click Activate at the top of the screen. The system will notify you on the status bar at the bottom of the screen that your variant was activated.
You must activate the variant for your manual bank statement for the manual bank statement settings to work effectively.
Save your variant.
Check Deposit
Check deposit customization is useful in an environment where large volumes of checks are processed simultaneously in the system. The settings carried out here will allow checks received to be entered into the system.
- 1.
Create and Assign Business Transactions.
- 2.
Define Posting Keys and Posting Rules for Check Deposit.
- 3.
Define Variants for Check Deposit
We recommend that you Define Posting Keys and Posting Rules for Check Deposit first before you Create and Assign Business Transactions to Posting Rules. The reason for this is that the Accounting Symbols needed for Business Transactions during customizing are first defined during customizing of Posting Keys and Posting Rules for check deposit.
Define Posting Keys and Posting Rules for Check Deposit
Create Account Symbols.
Assign Accounts to Account Symbol.
Create Keys for Posting Rules.
Define Posting Rules.
To Define Check Deposit, follow this menu path: IMG: Financial Accounting ➤ Bank Accounting ➤ Business Transactions ➤ Check Deposit ➤ Define Posting Keys and Posting Rules for Check Deposit.
The Determine Work Area: Entry dialog box pops up, enter your company chart of accounts key in the Chart of Accounts field and click Enter at the bottom of the dialog box.

Creating Account Symbols for check deposit
Create Account Symbols,
Assign Accounts to Account Symbol,
Create Keys for Posting Rules,
Define Posting Rules,
To ensure that your configuration is complete, work through the folders on the Dialog Structure on the left-hand side of the screen systematically in steps from top down.
The first step in this activity is to create account symbols for your check deposit.

Creating Account symbols for Check Deposit
You will notice that the Create Account Symbol folder on the Dialog Structure is open.
Choose New Entries at the top left of the screen. The New Entries: Overview of Added Entries screen is displayed. This screen will allow you to create your own account symbols
Update the following fields:
Account Symbol: Enter a symbol of your choice in this field. In this activity, we used CHKDEPOSIT as our account symbol.
Description: Enter a short description in this field, such as Check Deposit.
There is no hard rule to creating Account Symbols. You don’t necessarily have to use the account symbols used in this activity; it is only for illustration. You can formulate your own account symbols.
Once an account symbol has been used by someone else, the system will not allow you to use the same account symbol again. So, use your own initiative when creating your account symbols by trying other symbols – be creative.
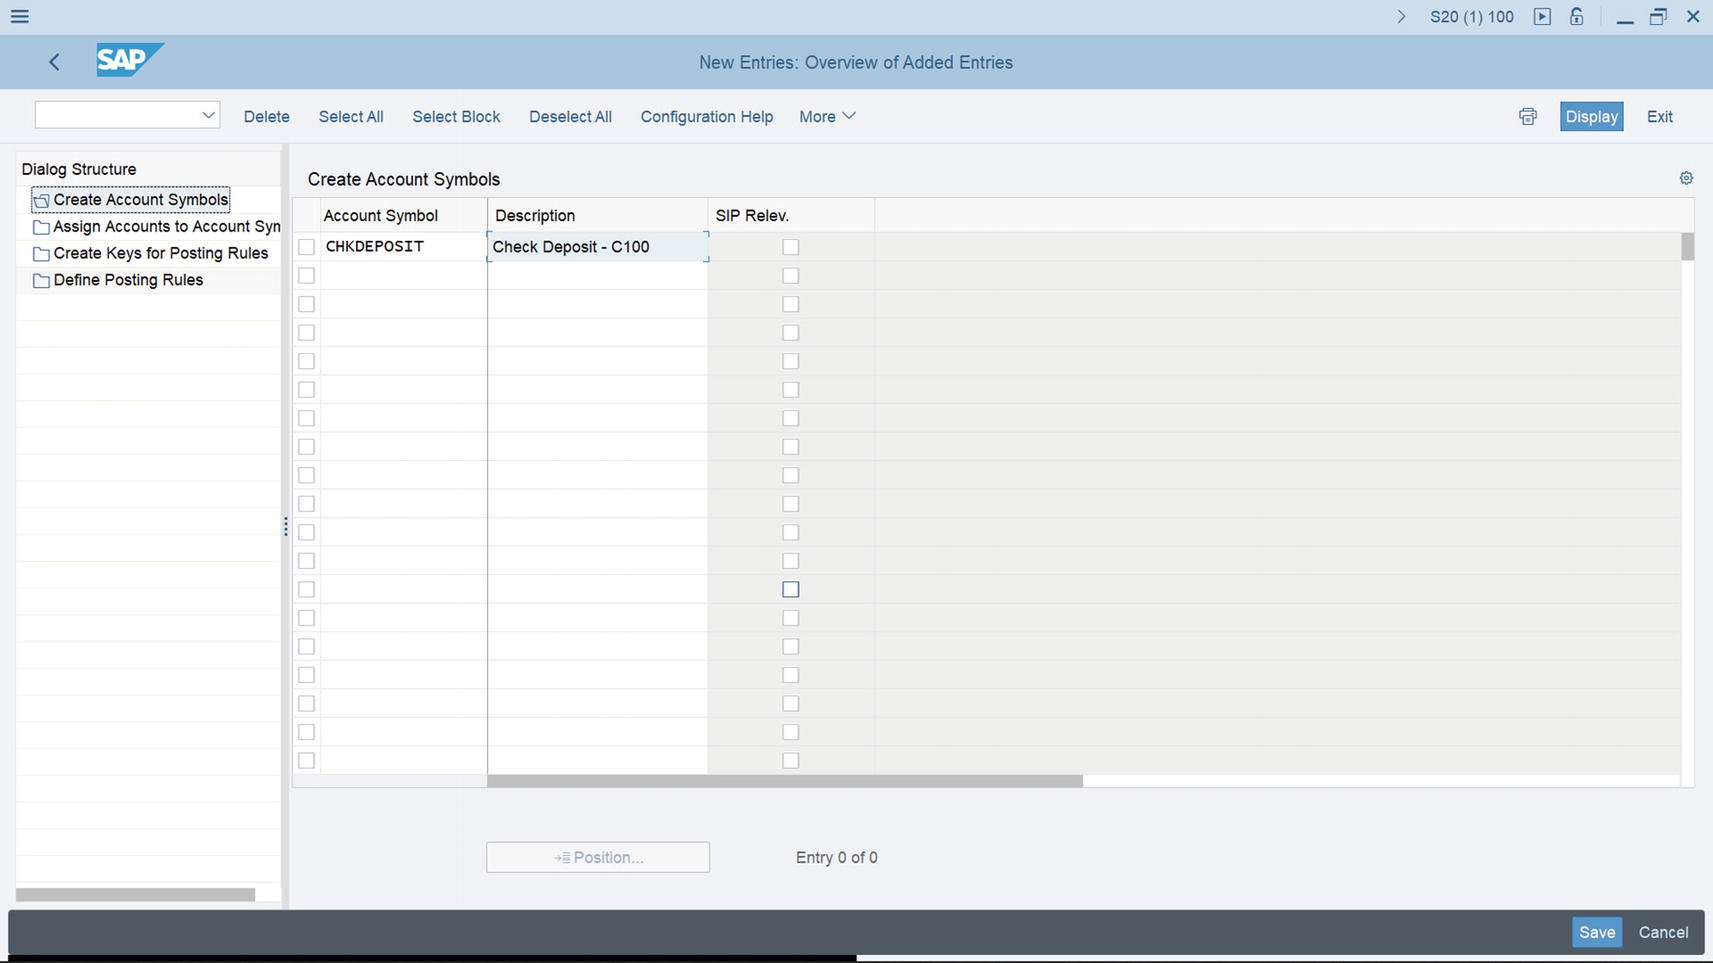
Specification of account symbols for your check deposit
Once you have specified your account symbol (as in Figure 9-18), hit the Enter key on your keyboard and save your Account Symbols.

Assigning Accounts to account symbols
By assigning accounts to accounts symbol during configuration, the system automatically specifies the G/L accounts that transactions are posted to when check deposit transactions are carried out.

Previously assigned accounts to an account symbol

Creating Keys for Posting Rules
To create keys for posting rules, double click the Create Keys for Posting Rules folder in the Dialog structure on the top left hand pane of the screen to create the keys for posting rules. The Change View “Define Posting Rules”: Overview screen is displayed. Choose New Entries at the top left of the screen to go to the New Entries: Details of Added Entries screen where your will create the posting rules for your check deposit.
You can use the Posting Keys supplied by SAP or you can create your own posting keys from scratch. In this activity, we recommend that you create your own posting key.
The system allows a maximum of four characters as a posting rule key.

Customizing keys for posting rules for check deposit
Save the keys for your posting rules.
The posting keys we used in this activity are only for illustration. You can use any posting key and description of your choice in this activity.

Defining Posting Rules

Defining posting rules for check deposit
Update the following fields:
Posting Rule: Enter the Keys for Posting Rules that you defined above in the Posting Rule fields. Posting Rules are used by the system to determine which GL accounts and subledgers to post transactions to.
Posting Area: The SAP ERP System comes with two standard values for posting area (1 – Bank Accounting and 2 – Subledger Accounting). Posting Area will allow the system to post to either of the specified areas.
Posting Key: Enter the appropriate posting key in this field. Posting key allows the system to determine whether a line item should be treated as debit or credit and the account type to post transaction to. It also controls the field status for document entry.
Acct Symbol: You have already defined a number of accounts symbols above. Enter the appropriate account symbol in this field. The Account symbol you entered here will allow the system to determine which account the related transaction is posted to when users retrieve bank statement electronically.
Document Type: Allows you to differentiate between transactions and also allows the system to determine which business transactions to post.

A list of standard posting types supplied by SAP
Data to Define Posting Rules for Check Deposit
Posting Rule | CHKD |
Posting Area | 2 |
Dedit | |
Posting Key | 40 |
Acct Symbol | CHKDEPOSIT |
Document Type | DZ |
Posting Type | 8 |
SAP supplied standard Posting Rules. You can copy the standard posting rules supplied by SAP and modify them to meet your requirements or you can create your own Posting Rules.
- 1.
Hit the Enter
 button to confirm your entries.
 - 2.
Save
 your Posting Rules.
It is easier for you to search for the Posting Rule and the Account Symbol you created above and use them.

Create and Assign Business Transactions
- 1.
The Change View “Check Deposit Transactions”: Overview screen is displayed. Choose New Entries at the top left of the screen and the New Entries: Overview of Added Entries comes up.

Creating and assigning business transactions for check deposit transaction
Define your transaction indicator. This is a maximum of four characters.
Assign your predefined posting rule to your transaction indicator.
Specify which business transaction is a positive value or negative value using sign +/−.
Trans | + − | Post. rule | Acct mod | |
|---|---|---|---|---|
CHKD | + | CHKD | Check Received & deposited – C100 |
The final step in Banking is to define the Variant for Check Deposit.
Define Variants for Check Deposit
In this activity, you will define variants for check deposit by copying the standard variant supplied by SAP, simply because it is a lot easier to copy standard variants and modify to meet your requirement instead of creating your own from scratch.
if you are defining your own variant, make sure that you activate your own variant and deactivate the standard variant.
To define a variant for check deposit, follow this menu path: IMG: Financial Accounting ➤ Bank Accounting ➤ Business Transactions ➤ Check Deposit ➤ Define Variants for Check Deposit.
The Maintain Screen Variant: List screen is displayed. Since you are copying the standard variant – SAP01 in this activity, select SAP01-Standard from the list of variants displayed and click Copy… at the top of the screen. The Copy variant dialog box pops up. Enter the variant you want to copy – SAP01 in the From Variant field and also enter your own variant identifier key in the To Variant field – C100 and click Continue at the bottom right of the dialog box to copy variant – SAP01. The Information dialog box with a warning that “Field FEBMKA-MEHRW is missing on reference screen” will pop up. Ignore the information and click Continue at the bottom right of the screen. Once copy is confirmed, the system will automatically copy the standard variant – SAP01 to your variant – C100.
- 1.As part of your modification process, delete the items you do not need. In this activity, delete the following items not needed in the Current fields section of the screen:
3-digit check number.
8-digit bank key.
Document number.
To do this, click the item you want to delete to mark it for deletion and click Delete Field at the top left of the screen.

Maintain Variant for Check Deposit
The next step is to include some items in the Possible Fields section to the Current Fields. These items will appear as input fields when entering documents into the system.
As part of your customizing exercise, you will need to include the Check Number field in Possible Fields list to your Current Fields list.
Make sure that the Maximum Length for Amount did not exceed 14. Otherwise, you will not be able to carry on with your customizing. Check the defaulted output length and change it from 30 to 14.
Make sure that the Maximum Length for Invoice Amount did not exceed 15. Otherwise, you will not be able to carry on with your customizing. Check the defaulted output length and change it from 31 to 15.
To add an item to your Current Fields list, double click the item 10-Digit Check number in the Possible Fields list. The Specify output length dialog box pops up with a defaulted output length. Enter your desired field length in the Output length field and click the Continue at the button at the right of the screen. The 10-digit check number will now appear in the Current Fields List under customer number. Save your variant.
The final step is to Change the standard variant description you copied to your own variant name. Search for your variant among the displayed variants list. Change the defaulted Standard variant name to your own variant name – Check Deposit-C100. Save your changes and activate your variant by clicking Activate at the top of the screen. The system will notify you on the status bar at the bottom of the screen that your variant was activated.
You must activate the variant for your manual bank statement for the manual bank statement settings to work effectively.
Save your variant.
Summary
This chapter explained what a house bank is and demonstrated how house banks are maintained in SAP ERP. You learned about each specification when configuring your house bank and learned what each does. As part of customizing the house bank, you defined a bank ID and an account ID, which are the key aspects of your house bank configuration and learned how to apply them to the G/L account where your bank account transactions are posted.
You went on to learn about various house banks represented in SAP S4 HANA. You defined the accounts that bank statement transactions are posted to and learned how to customize electronic and manual bank statements. You went through the stages involved in customizing global settings for electronic and manual bank statements. In doing so, you created account symbols that the system uses to determine the G/L accounts and created subledgers, where the bank statement transactions are posted. You then looked at how to assign accounts to account symbols and how to create keys for posting rules. You learned how to define posting rules that are assigned to appropriated transactions (for example, for checks in, checks out, bank transfers, and bank charges). You then learned how to define variants to meet your company code-specific account requirements.
You learned how to customize settings for check deposits. You also learned how to create account symbols, create keys for posting rules for check deposits, and assign accounts to the account symbols you created.
Chapter 10 looks at how to define taxes on sales and purchases in SAP ERP. As part of those exercises, you will look at the basic settings, learn the calculation procedures, and define tax codes for sales and purchases.