This chapter explains what dunning is and covers basic settings involved in customizing the dunning procedure.
Define a dunning procedure.
Defining dunning levels.
Specify G/L transactions that allow the system to dun special G/L transactions.
Assign a dunning procedure to customer master data.
Dunning
It is a normal business practice for business partners to sometimes fall behind in invoice payments. Hence a form of reminder mechanism needs to be in place that will remind business partners of overdue invoices.
Dunning is an automatic process of sending reminder notices to customers demanding payment of overdue invoices. This program ensures that the mechanism for sending reminder letters for due invoice payments is in place.
Dunning procedure
The dunning procedure defines how the dunning is carried out. More than one dunning procedure can be defined. There is no restriction to the number of procedures you can define. The account that you want to include in your dunning process must have a dunning procedure assigned to it.
A dunning procedure is applicable to both normal and special GL transactions in the SAP system.
SAP comes with standard dunning procedures. These procedures can be adapted and modified to meet your company code specific settings.
Basic Settings for Dunning
Dunning Areas: A dunning area could be defined as a department or a unit within a company code which you may want to use for processing dunning.
Dunning Keys: Are company code independent. The advantage of a dunning key is that it allows you to specify item display separate with dunning key and print dunning key text in the dunning notice.
Dunning Block Reasons: Allow you to exclude an item or account being dun during dunning run. To do this, a block key is entered in the dunning block field in the master record.
If you are defining your own dunning, we recommend that you use the Basic settings supplied by the system. Hence there is no need to carry out any settings here.
Define Dunning Procedures
Problem: Spoxio Inc. wants to have four dunning levels as part of their credit control that will systematically generate reminder letters to customers for overdue invoices. The first letter is to be a courteous reminder, and thereafter subsequent reminders will be a little bit firmer, and so on.
Your task is to define four dunning levels for Spoxio Inc.
When maintaining the Dunning Procedure, you can defined the specifications for the following items:

Dunning Levels.
Charges.
Minimum Amounts.
Dunning Texts.
Special GL Indicator.
To define the dunning procedure for your dunning program, follow this menu path: IMG: Financial Accounting ➤ Account Receivable and Accounts Payable ➤ Business Transaction ➤ Dunning ➤ Dunning Procedure ➤ Define Dunning Procedures.

The screen for maintaining a dunning procedure
Dun procedure: This represents the key for the dunning procedure to be used. The key is company code independent.
Dunning Interval in Days: This specification defines the intervals in days to ensure that the accounts in this procedure are dunned at given intervals. The system checks at every dunning run to see if the number of days specified is greater than the last run day. If this is the case, a new dunning note is issued; otherwise, a new dunning note will not be issued.
No of Dunning Levels: This specification represents the number of dunning levels that are permitted in this procedure. Usually, the system allows up to a maximum of 9 levels.
Min. days in arrears (acct): This is the minimum days an item in the account must have for the account to be dunned. Otherwise, a dunning notice will not be created.
Line item grace period: Is the number of days allowed above an item due day. If the days in arrears is less than or equal to the days of grace, the account will not be considered for dunning during a dunning run.
Interest Indicator: When this indicator is selected, interest will be calculated.
Fields | Values | Description |
|---|---|---|
Dun. Procedure | C900 | Enter your Company Code in this field. |
Name | Four-level Dunning, every two weeks | Enter a short description for your dunning procedure in this field. |
General Data | ||
Dunning Interval in Days | 14 | The dunning interval entered here will allow the system to checks at every dunning run to see if the number of days specified is greater than the last run day. If this is the case a new dunning note is issued. |
No. of dunning levels | 4 | Enter the number of dunning levels that is permitted in this procedure in this field. |
Total due items from dunning level | Leave Bank | |
Min. days in arrears (acct) | 5 | This allows the system to determine the minimum days an item in the account must have for the account to be dunned. |
Line item grace period | 2 | The entry here specify the number of days allowed above an item due day. |
Interest indicator | 01 | When you select this indicate, interest will be calculated on due amount. |
Reference data | ||
Ref. Dunning Procedure for Texts | C100 | This serves as reference for dunning text for your dunning procedure. |
If you try to save your dunning procedure at this level, the system will notify you on the status bar at the bottom of your screen that “reference dunning procedure has 0 dunning levels.” So, we advise you not to save your work yet.
The next step in this activity is to define the dunning levels for your dunning procedure.
Defining Dunning Levels
Dunning level allows you to determine the dunning letter to assign to your dunning notice. As a part of the credit control procedure, several letters are sent out systematically to remind business partners of open items in their account. These letters are categorized into various levels (SAP allows up to nine dunning levels that can be assigned to the dunning procedure). The first dunning level could be a very friendly reminder; the second obviously becomes a lot firmer, and so.
Days in arrears.
Interest calculation applicable to your dunning level.
Print parameter.
Legal dunning procedure.

Maintaining dunning levels for dunning procedure
Update the screen by specifying the following items:
Days in Arrears: The number of days an invoice is in arrears determines the dunning notice level that is created for it. For example, if an overdue item is in arrears for two days, the payment program will create a dunning notice at dunning level 1. Likewise, if an overdue item is in arrears for 16 days, the payment program will create a dunning notice at level 2, and so on.
Calculate Interest: The system calculates interest on the set dunning levels. For example, interests should be calculated on dunning levels 3 and 4.
Always Dun: This allows the dunning program to always dun the overdue item at the last dunning level so that no item is skipped at this level.
Print All Items: This allows you to print an overview of the customer/vendor account balance at the specified level.
Payment Deadline: This determines the new payment deadline printed on the dunning notice. It is best to use a basic 12-month calendar to avoid the payment deadline falling on a weekend.
Always Dun in Legal Dunning Proc.: Selecting this option allows you to print dunning notices using a legal dunning procedure, regardless of whether any changes have taken place in the account or not.
Maintaining Charges
Sometimes a small amount of fee may be charged at certain dunning levels in the dunning procedure. Dunning charges are displayed only in the Dunning letter; no other entry will take place in the system. Dunning charges are entered in the customer account manually.
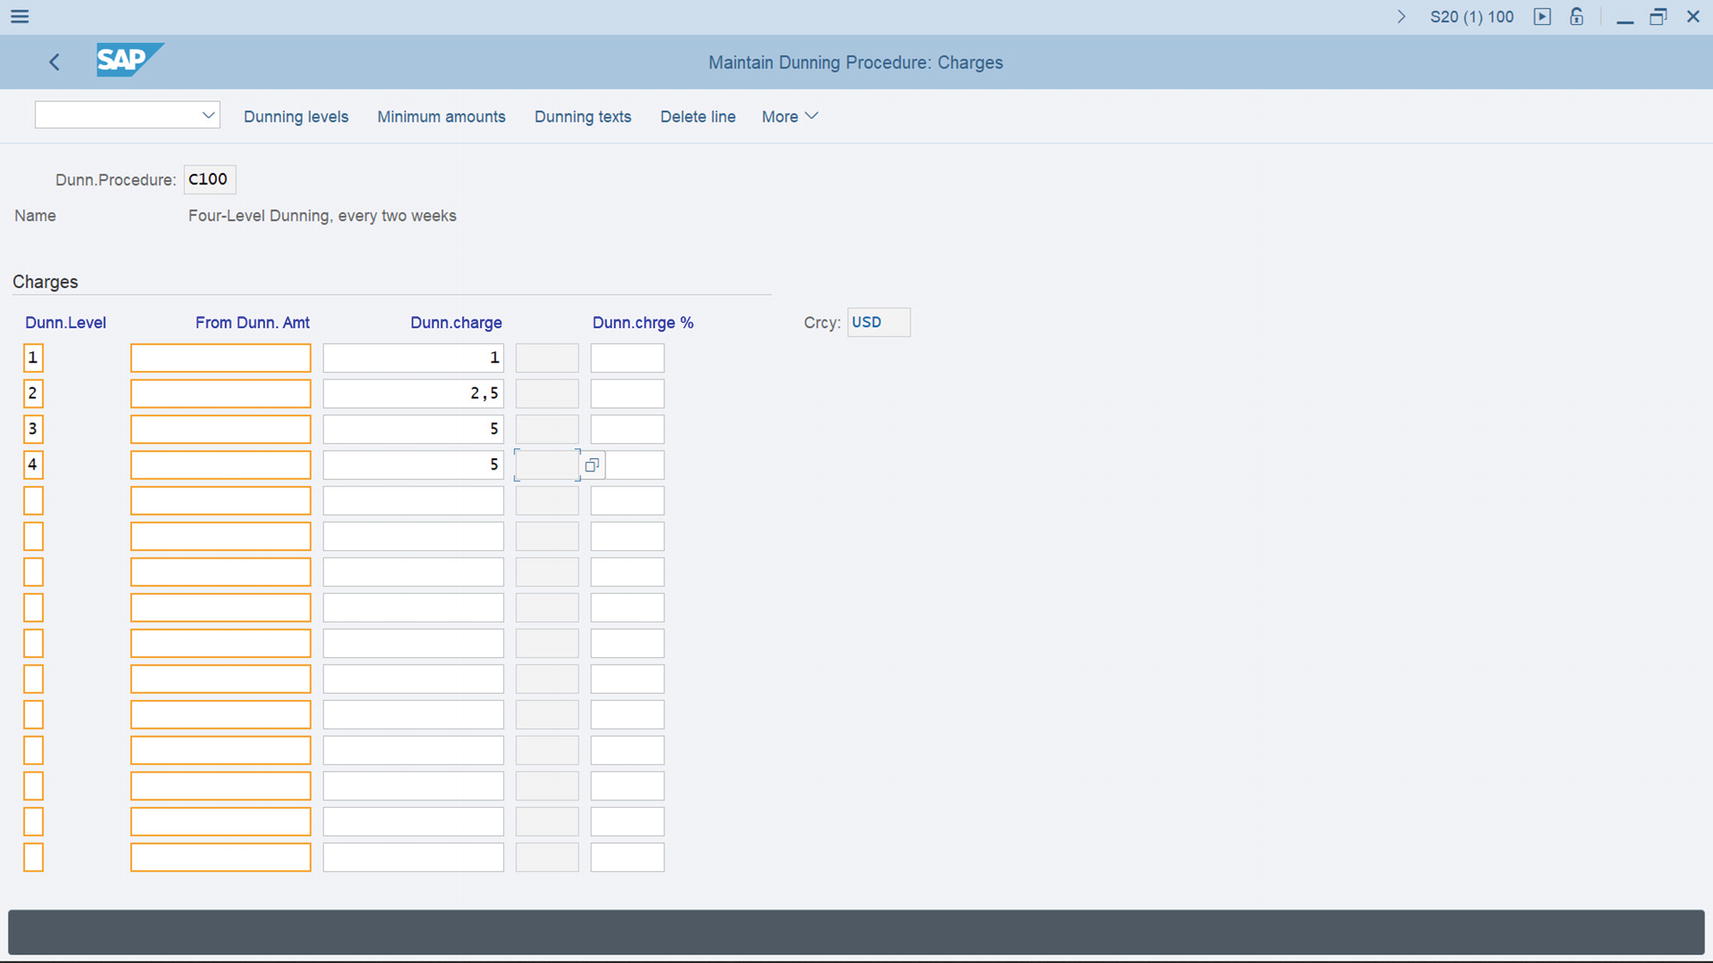
Maintaining charges for you dunning procedure
Specify the dunning levels and charges you want to apply to each dunning level.
The next step is to specify the minimum amount you want to apply to your dunning levels.
Maintaining Minimum Amounts
You set minimum dunning amounts per dunning level to stop the system from triggering high dunning levels for insignificant amounts. You can do this by specifying a minimum amount or minimum percentage rates for each dunning level. The dunning program will check the open item to see if it is to be dunned. If the amount due on the open item is less than the minimum amount, the dunning program will exclude it from the dunning. But if the open item exceeds the minimum amount or the minimum percentage rate, the system will dun the open item. The system will also check your specifications to determine the minimum amount on which interest is applied.
When you set a minimum as the dunning amount per level for which to charge interest, any amount below the minimum amount you set will not attract charges.
On the Maintain Dunning Procedure: Charges screen, click Minimum amounts on the top of the screen to go to the screen where you will maintain the minimum amount charged at each dunning level. The Minimum Amounts dialog box comes up. Enter your company code country currency key in the Currency field and click Continue at the bottom of the dialog box. The Maintain Dunning Procedure: Minimum amounts screen appears. This is the screen where you will specify the minimum amount that should attract charges.

Specifying of minimum amount and minimum amount for interest for each dunning level
When the minimum amount or percentage is reached or exceeded in respect of all open items, the system will trigger the next upper dunning level. If the specified minimum amount or minimum percentage is not reached, the system will automatically assign the items to the next level and carry out another check.
You can specify either a minimum amount or percentage to your dunning procedure. You cannot use both at the same time.
The next step is to specify the dunning texts you want to use for each dunning level.
Dunning texts
SAP comes with standard forms in SAPscript, which you can use for your dunning procedure. You can maintain the name of the form that you want to use per dunning level. SAPscript defines the layout of the form represented in the system. The dunning program generates payment advice notes, dunning notices, and payment terms.

Maintaining company code data in your dunning program
At this level, save your dunning program customizing.
The next thing you need to do is to assign SAPscript forms to each dunning level. Click the Back Arrow bottom at the top left of the screen to return to the previous screen, the Maintain Dunning Procedure: Minimum Amounts screen. The Maintain company code screen pops up with the question “Do you want to save the data?” choose the yes button at the bottom left of the screen to save your configuration.

The list of SAPscript forms provided by SAP in the system

The screen where you specify the appropriate SAPscript form for each dunning level
SAPscript forms contain the reminder letters you apply to each dunning level. SAP provided dunning forms that you can assign to each dunning level. For Example, F150_DUNN_01, F150_DUNN_02, and F150_DUNN_03. We recommend that you use the SAPscript form F150_DUNN_01 for dunning levels 1 & 2 and F150_DUNN_02 for levels 3 & 4. The SAPscript F150_DUNN_01 content is more cautious than the remaining SAPscript forms.
You can change the content of the form to meet your requirements.
The final step in customizing the dunning procedure is to specify special G/L indicators for customers and vendors.
Special GL Indicator
This specification will allow special GL transactions to be dunned. You can also include special GL transactions to your dunning by setting the appropriate indicators. For example, if you want Down payment request to be dunned, you must set the special GL indicator in the dunning procedure. This will automatically allow the system to search for due down payment requests and include them in your dunning.

Special G/L indicators specification
Click the Back arrow at the top left of the screen to return to the previous screen, the Maintain Dunning Procedure: Overview screen, and save your dunning procedure.
You have just completed the configuration for automatic dunning. The next activity in this chapter is to look at how to configure correspondence in SAP S4 HANA.
Assigning Dunning Procedure to Customer Master Data
As we mentioned earlier, dunning is an automatic process of sending reminder notices to customers demanding payment of overdue invoices. This program ensures that the mechanism for sending reminder letters for due invoice payments is in place.
To assign a dunning procedure to customer master data follow this menu path: Easy Access: Financial Accounting ➤ General Ledger ➤ Master Data ➤ Change. The Customer Change: Initial screen pops up, search for the customer you want to assign dunning. The Customer’s details will be displayed, click Correspondence at the top right of the screen and assign dunning.
Summary
This chapter explained what dunning is and talked a bit about how to define a dunning area. You learned how to define a dunning procedure. You also learned how to specify dunning levels, charges, and minimum amounts for your dunning procedures. You learned how to assign text to the dunnings and how to specify the G/L indicators for each dunning procedure.
The next chapter looks at configuring special G/L transactions. As part of this customizing activity, you will learn how to define various types of down payments, define tax clearing accounts, and use various special G/L transactions, including guarantees (automatic offsetting entry (statistical), down payments (free offsetting entry), and bills of exchange (noted items).